The Odoo Inventory module helps businesses streamline stock management by supporting key warehouse operations like receiving, delivering, and transferring products. It provides real-time inventory visibility, accurate stock tracking, and tools like stock adjustments and the Inventory Overview dashboard, enabling efficient order fulfillment, timely invoicing, and reliable financial data. Operation types standardize and automate inventory workflows, helping businesses manage stock consistently, reduce manual tasks, and improve overall warehouse efficiency.
Operations Menu
The Odoo Inventory module's Operations menu offers crucial resources for efficiently managing warehouse operations and stock movements. As seen in the screenshot below, it enables companies to manage Receipts, Deliveries, Internal, Manufacturing, Dropships, Batch Transfers, Wave Transfers, Physical Inventory, Scrap, Landed Costs, Replenishment, Master Production Schedule, References, and Procurement Run Scheduler to guarantee efficient logistics and maintain stock accuracy.
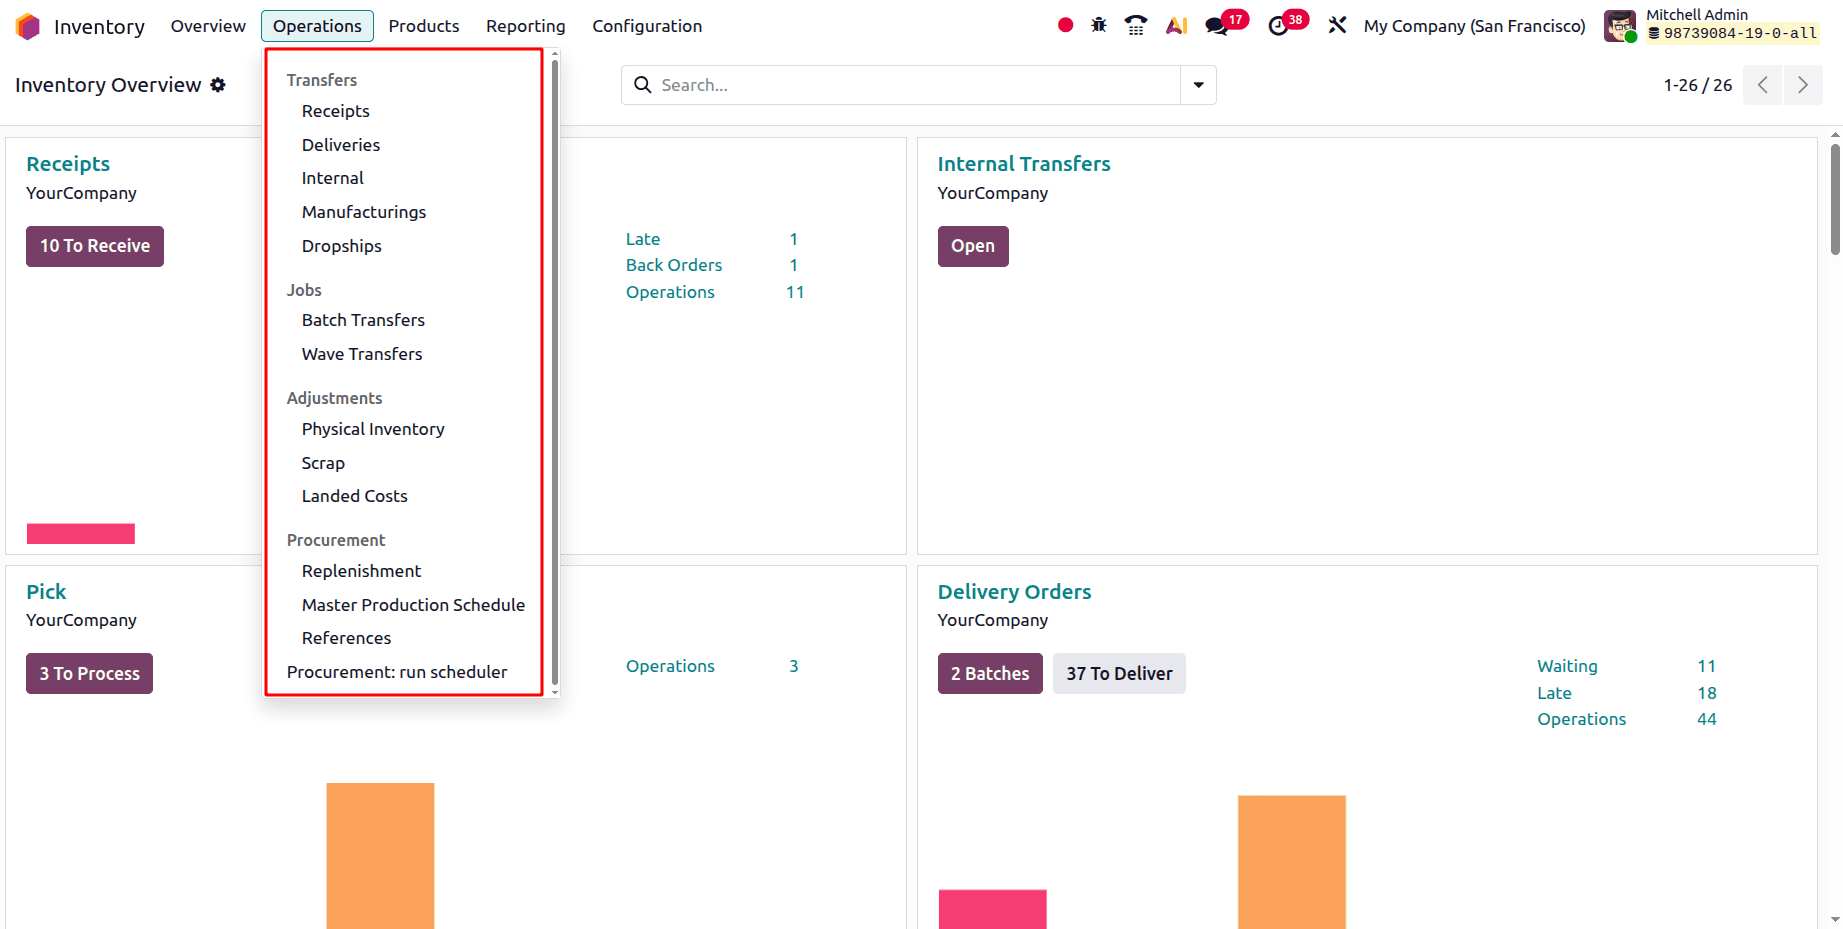
Businesses can streamline replenishment processes, monitor inventory in real time, and optimize warehouse workflows by leveraging these features. These features greatly improve operational effectiveness and lower the possibility of stock management mistakes. We can now go into more depth about them.
1. Receipts
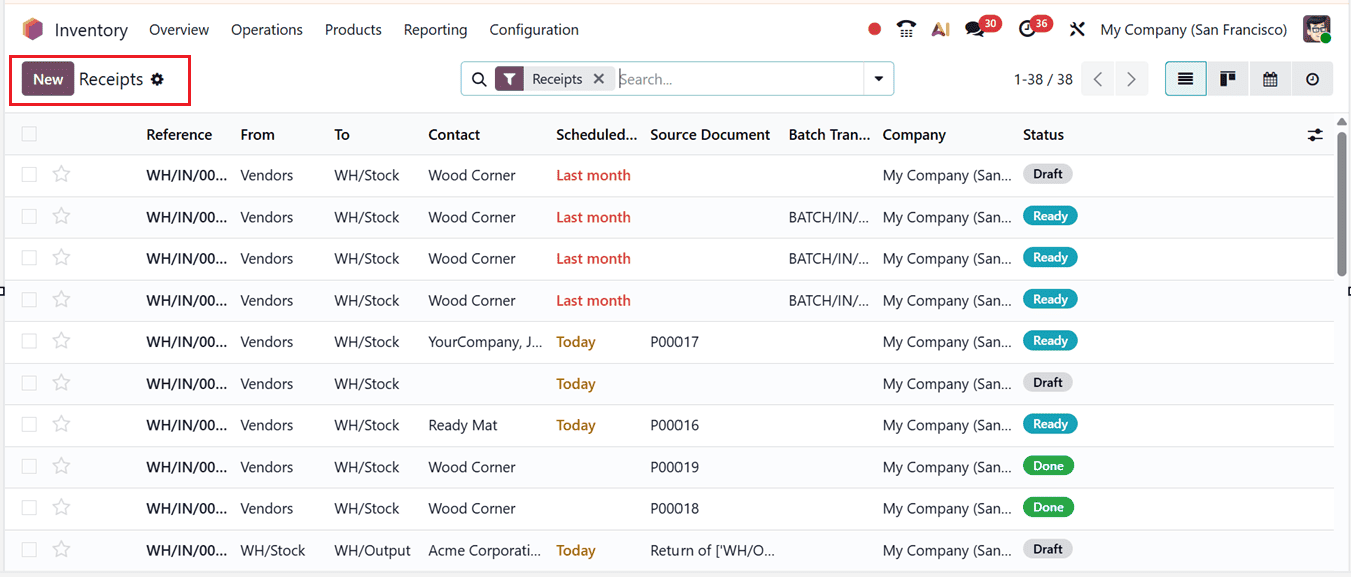
In the ‘Receipts’ window, you can access detailed information for preconfigured transfers, including Reference, From, To, Contact, Scheduled Date, Source Document, Batch Transfer, Company, and Status, as illustrated in the screenshot below.
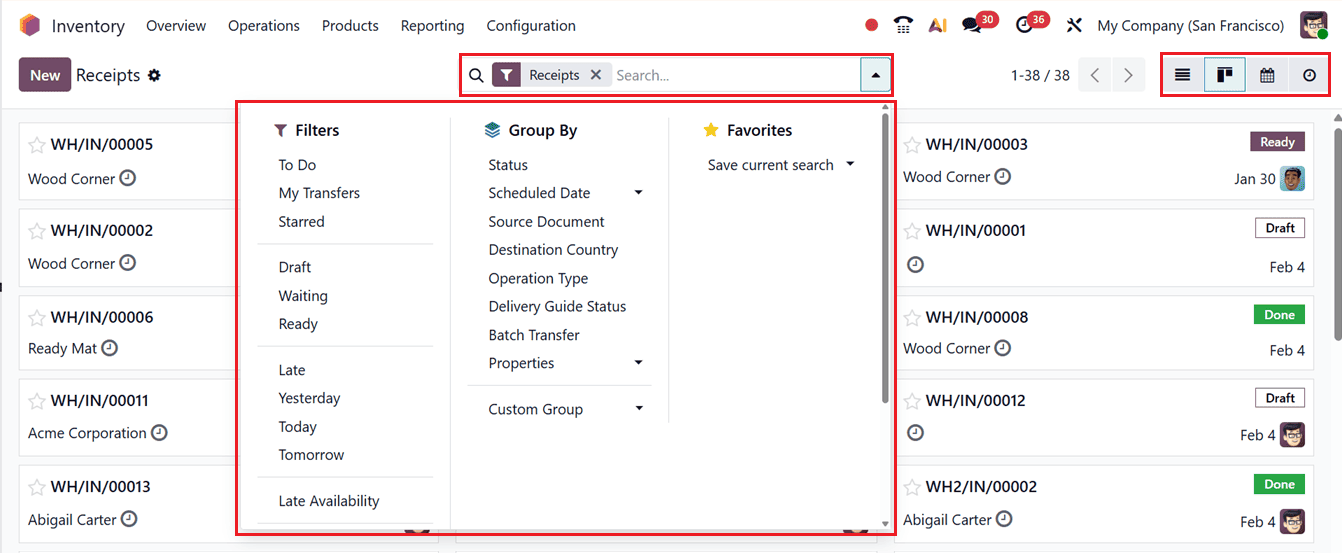
The interface also provides Kanban, Calendar, and Activity views. Sorting activities can be completed easily using the Group By and Filters tools provided in the advanced search bar area. The ‘Favorites’ feature will help you to save recent searches using filter options.
You can also create customized groups and filters using the ‘Custom Group’ and ‘Custom Filter’ options from the relevant sections, as shown in the screenshot below.
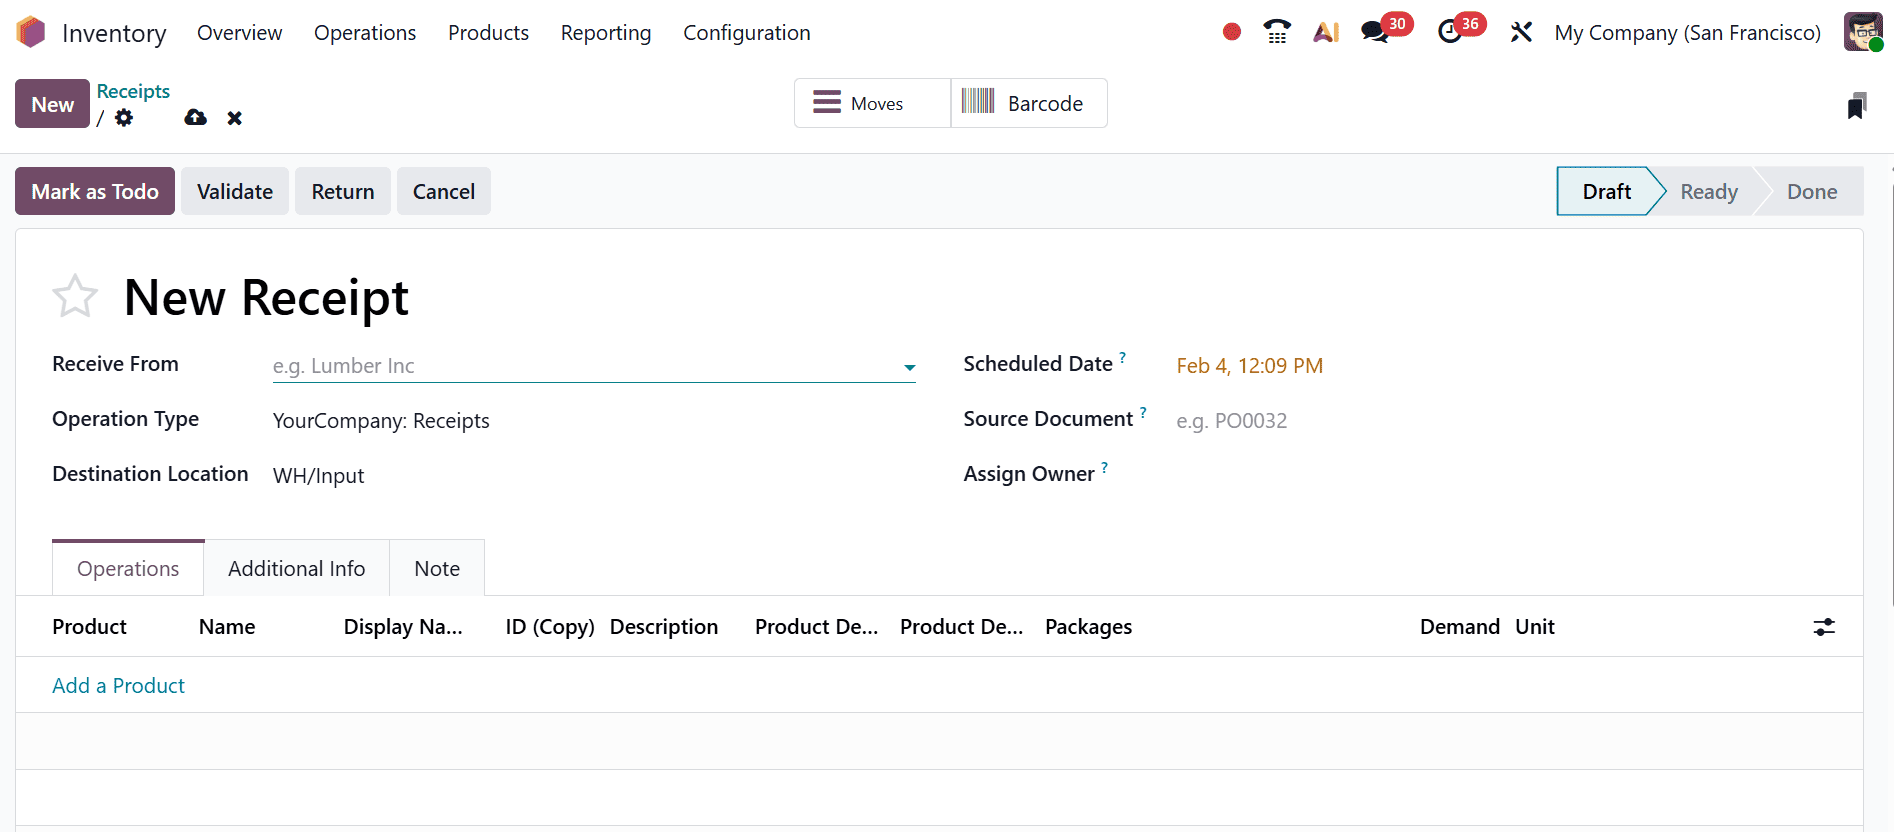
To create a new transfer between two locations, click on the New button. This will open a new receipt transfer configuration form. The displayed Receipts transfer form contains several key fields that define how stock moves between locations.
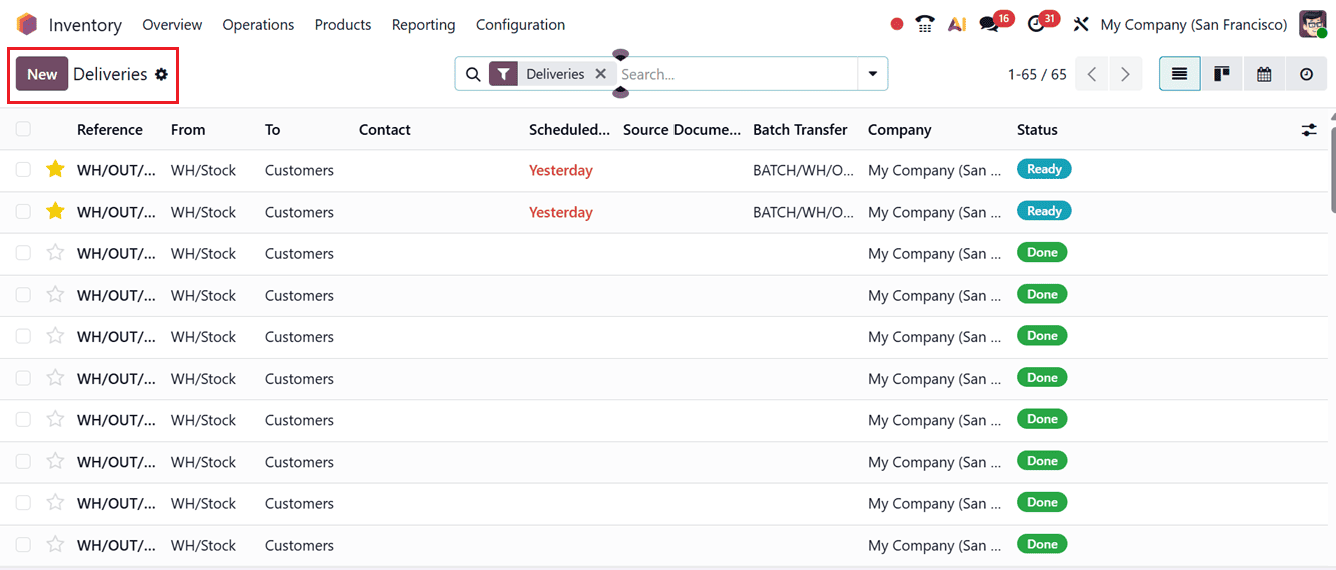
2. Deliveries
This function moves stock from the warehouse to customers or other designated locations. It is typically used during sales operations. The ‘Deliveries’ dashboard window is similar to the ‘Receipt' window with similar dashboard titles and options, as shown in the screenshot below.
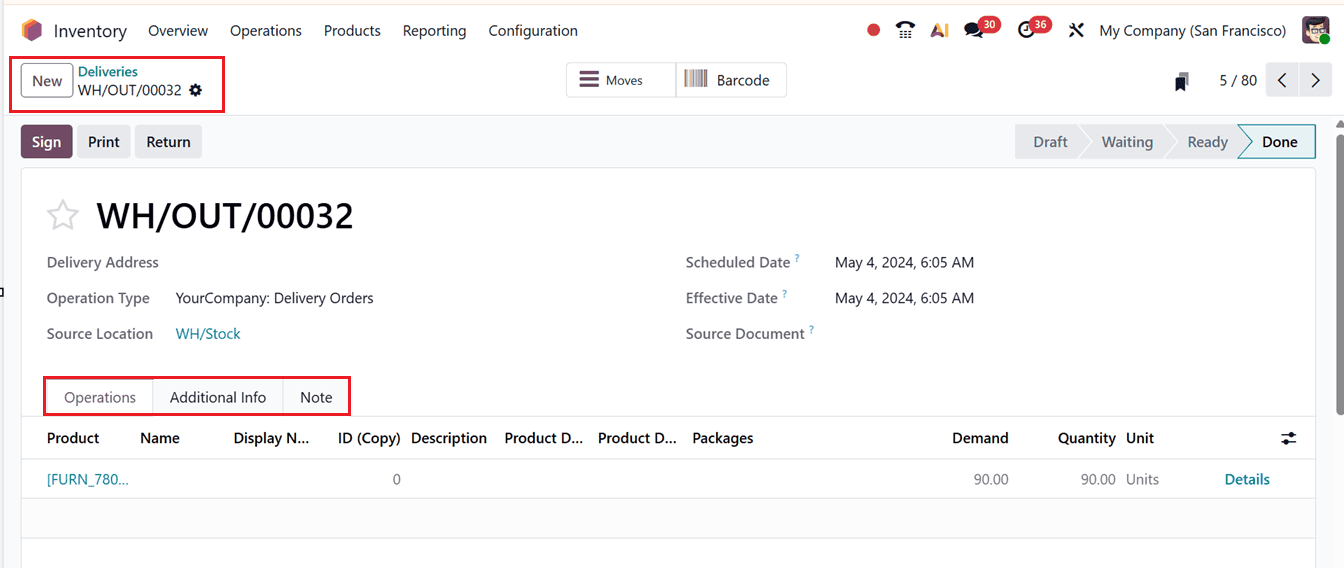
From the dashboard, you can create a Delivery operation by clicking the New button, which opens the delivery transfer configuration form. The form fields and processes are almost similar to those discussed earlier, as shown in the screenshot below.
3. Internal
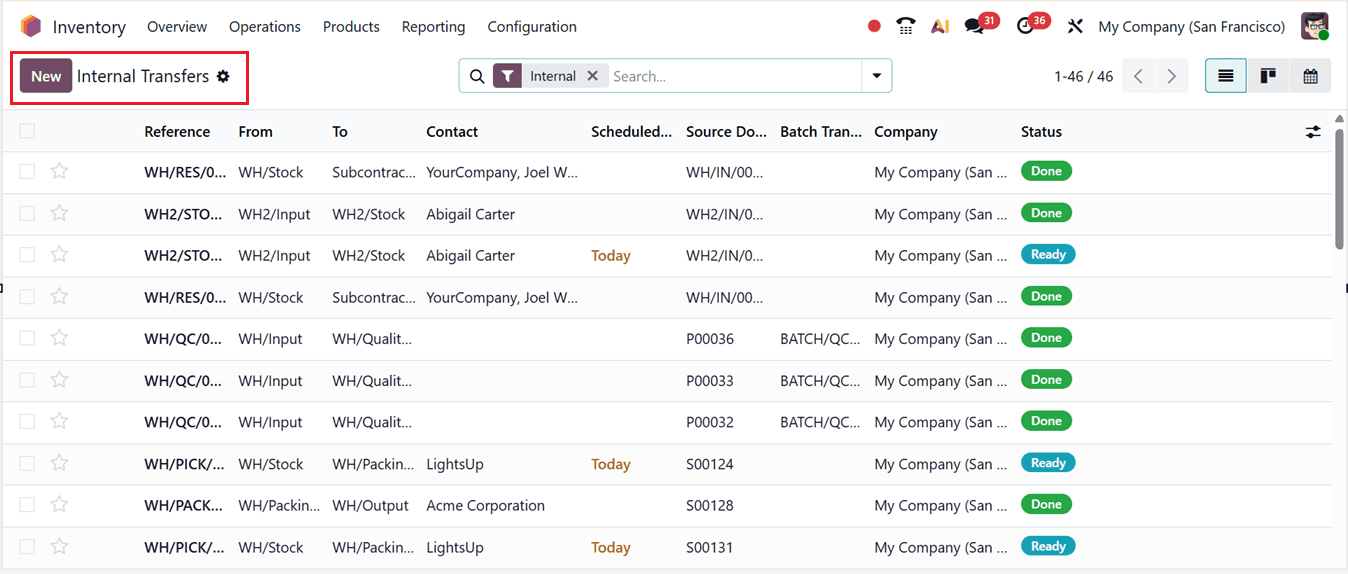
This process transfers inventory between areas within the same company, allowing the relocation of goods between warehouses or internal storage zones. External entities are not involved in this operation.
You can see the ‘Internal Transfers’ dashboard with their Reference ID, From, To, Contact, Scheduled Date and other details, as shown in the screenshot below.
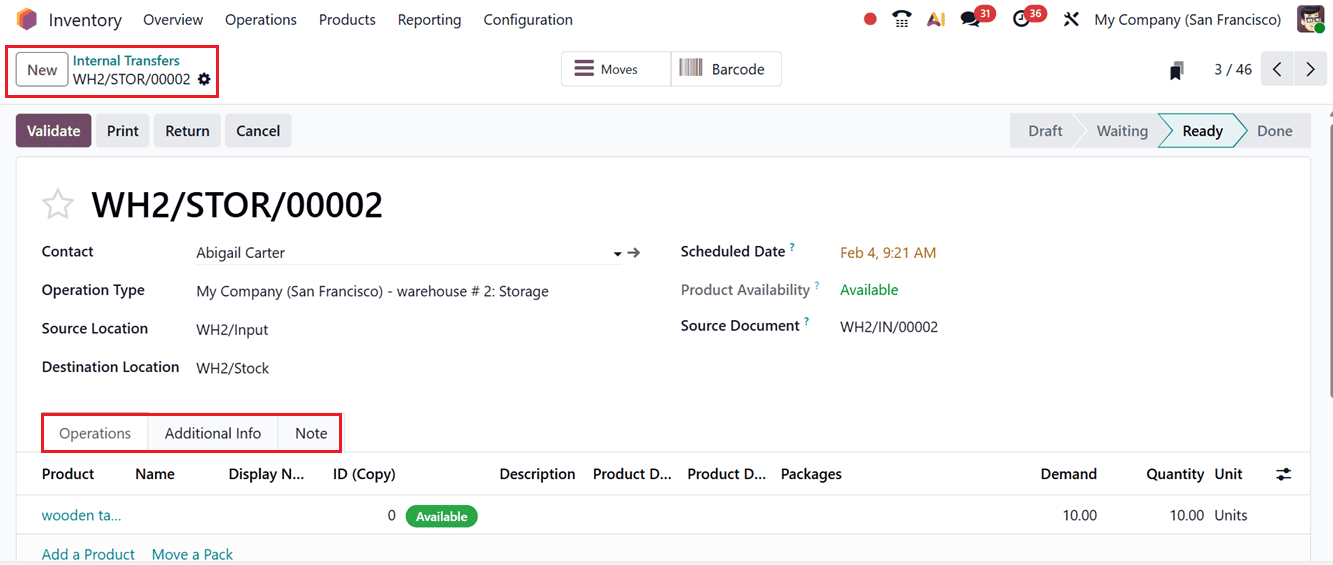
The creation of a new Internal Transfer is similar to the Receipt Transfer operations, but some form fields may vary, as depicted in the screenshot below.
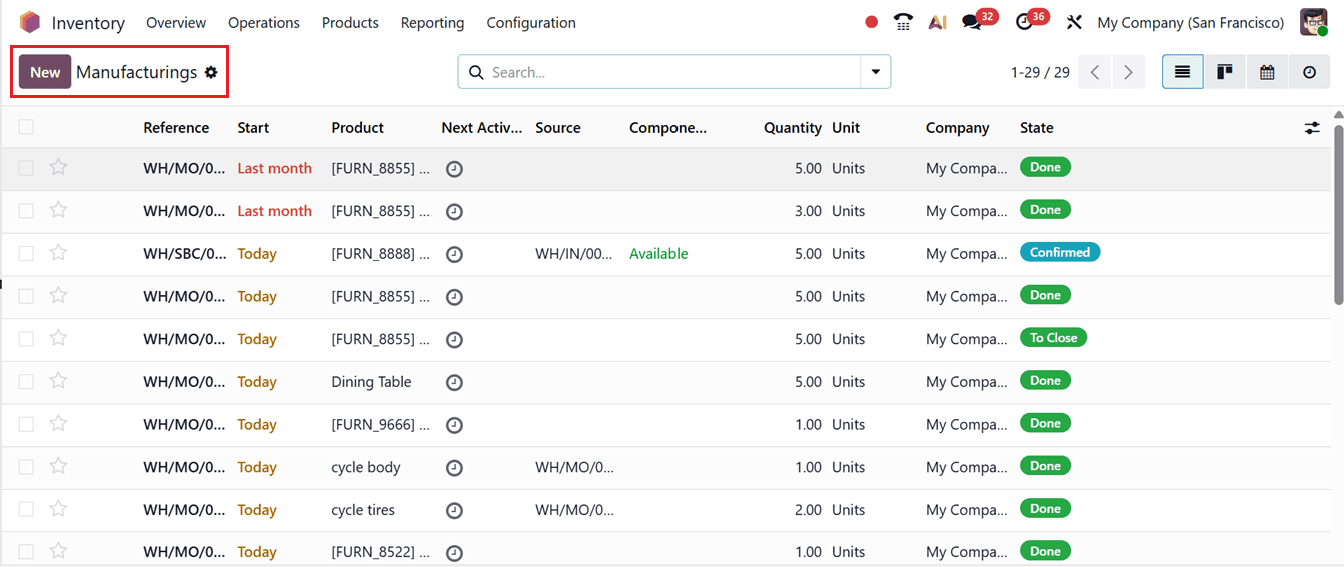
4. Manufacturing
The 'Manufacturings' window of the ‘Operations’ menu manages the transfer of raw materials into production areas and moves finished goods back into inventory upon completion.
The dashboard list view will show the details of the Reference number, Start date, Next activity, Source, Components, Quantity, Unit, Company and current State, as shown in the screenshot below.
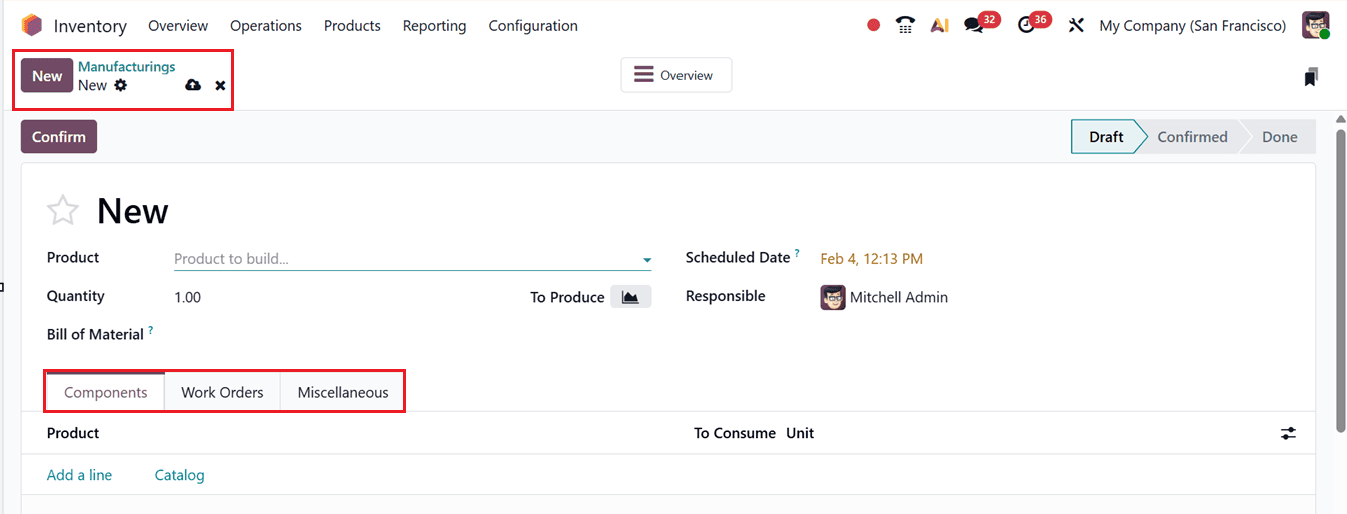
In the new Manufacturing Operation creation form, you can edit the product to be manufactured in the Product field and the total quantity to be generated in the Quantity field, as shown in the screenshot below.
5. Dropship
The ‘Dropshipping’ feature enables direct delivery of goods from the supplier to the customer without storing them in the company’s warehouse, meaning the stock is not affected. Before creating any Dropshipping operations, you have to enable the ‘Dropshipping’ feature from the ‘Logistics’ tab of the Settings window, as shown in the screenshot below.

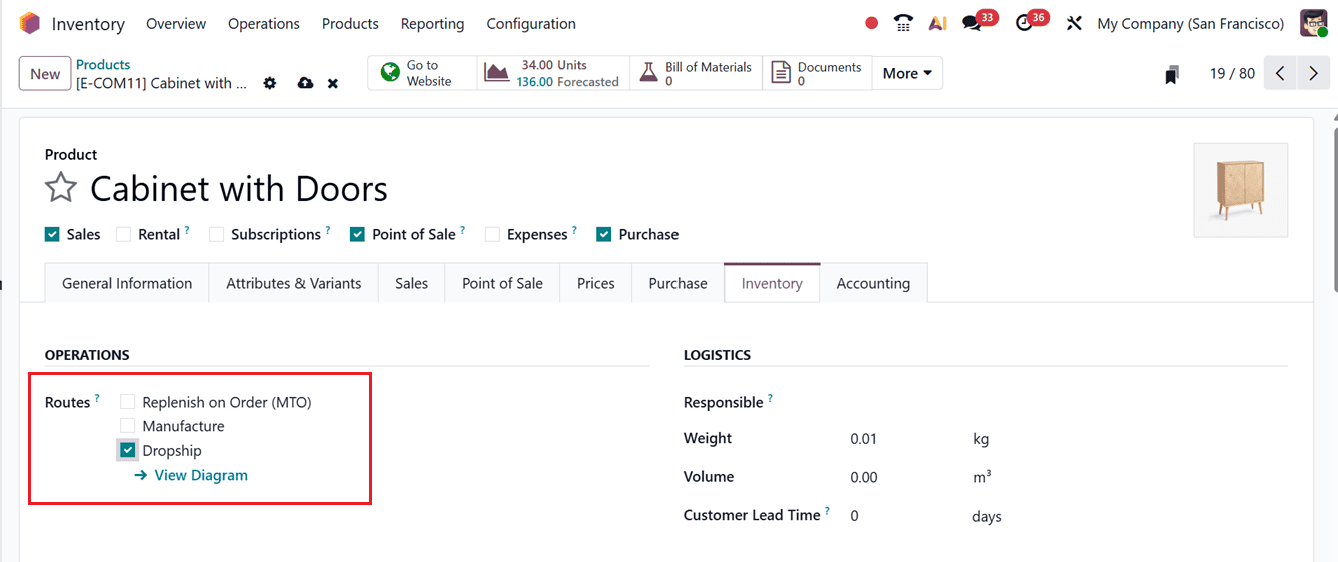
Once the Dropshipping feature is enabled in the settings, an additional ‘Dropship’ option will be displayed in the Inventory Routes tab of the product configuration page, as shown below.
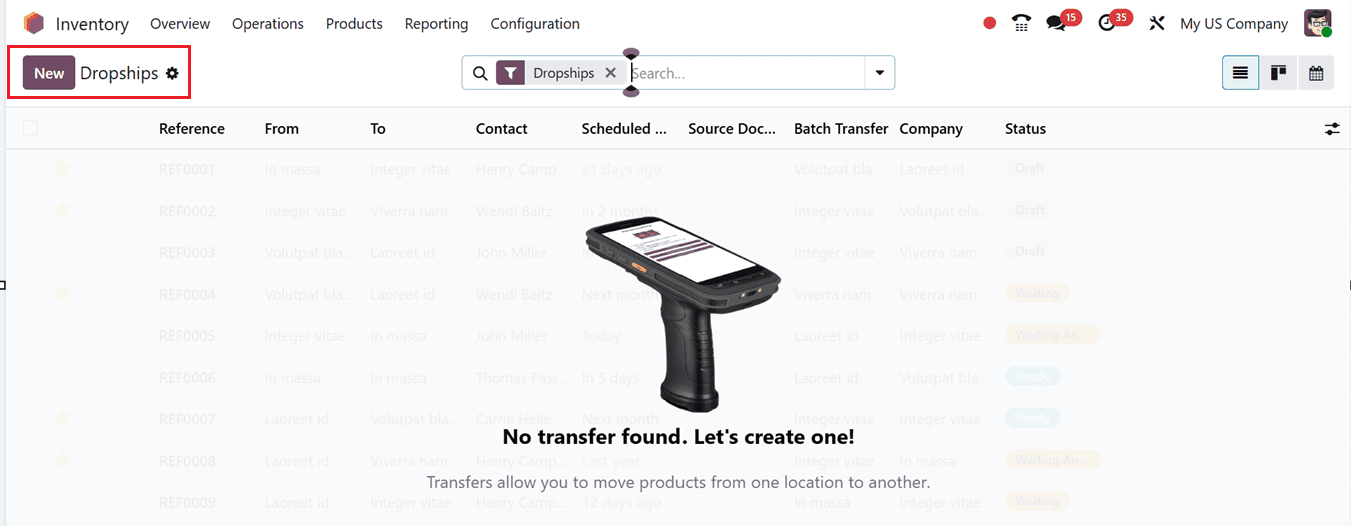
Then, you can create new Dropship orders from the Dropships window from the Operations menu, as shown below.
Then, you can create a new dropship order using the New button and edit the details including the Contact name. Here, Odoo will automatically consider the Operation Type as Dropship. Then, the Source Location and Destination Location will be assigned to Vendors and Customers. Also, you can edit the Scheduled Date for this transfer and add a Source Document regarding the transfer or products, as shown in the screenshot below.

6. Batch Transfers
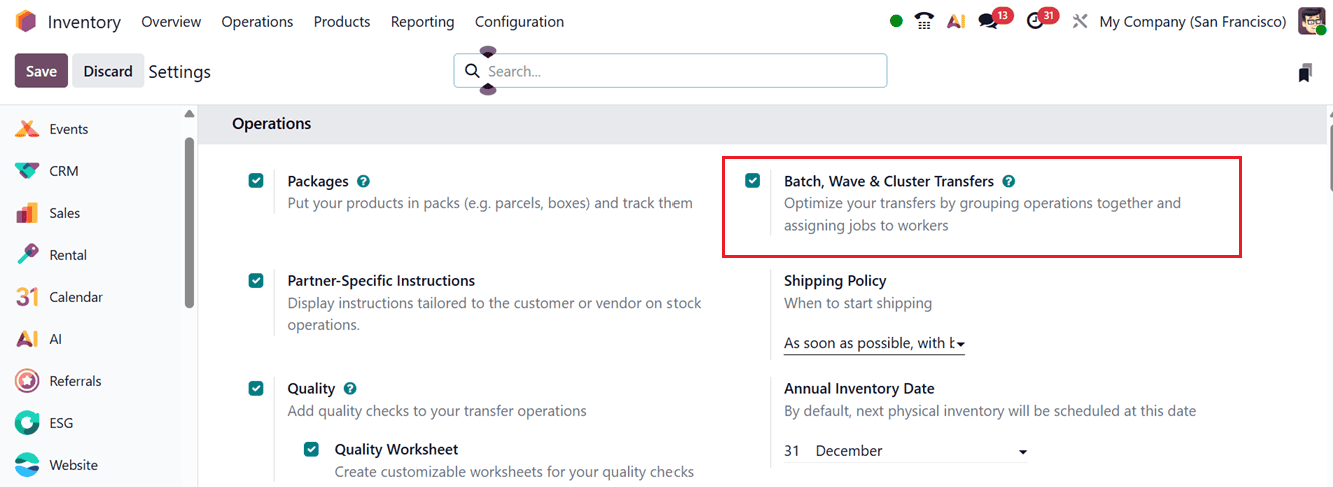
The Batch Transfer feature in Odoo 19 enables users to process several transfers simultaneously, saving both time and effort. All included transfers within a batch are executed together, which reduces complexities when handling large-scale movements. To activate the feature, you can enable the ‘Batch, Wave & Cluster Transfers’ option from the ‘Operations’ tab of the Settings menu in the Inventory module, as shown in the screenshot below. Once activated, click on the Save button to apply changes.
You can then manage Batch Transfers via the Operations menu. This page lists existing batch transfers with fields for Batch Transfer, Description, Scheduled Date, Responsible, Operation Type and Status.
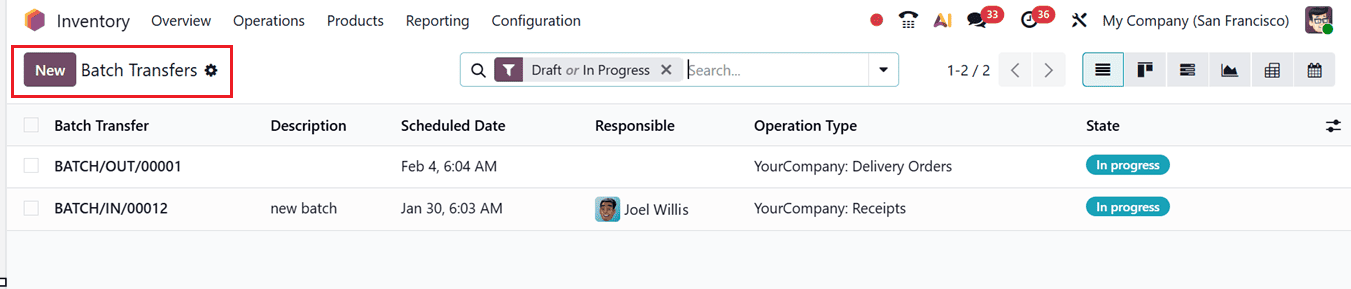
The view can also be switched to Kanban, Gantt, Graph, Pivot and Calendar views. To create a new batch, click on the New button. Assign an employee in the Responsible field, fill in the Operation Type and manually set the Scheduled Date if required. If not manually set, Odoo 19 automatically selects the earliest date from the included transfers. Then, you can add any notes regarding the batch transfers in the ‘Descriptions’ field, as shown in the screenshot below.
When the Dispatch Management System is enabled, you can also specify the Third party provider in the Vehicle, and Vehicle Category fields.
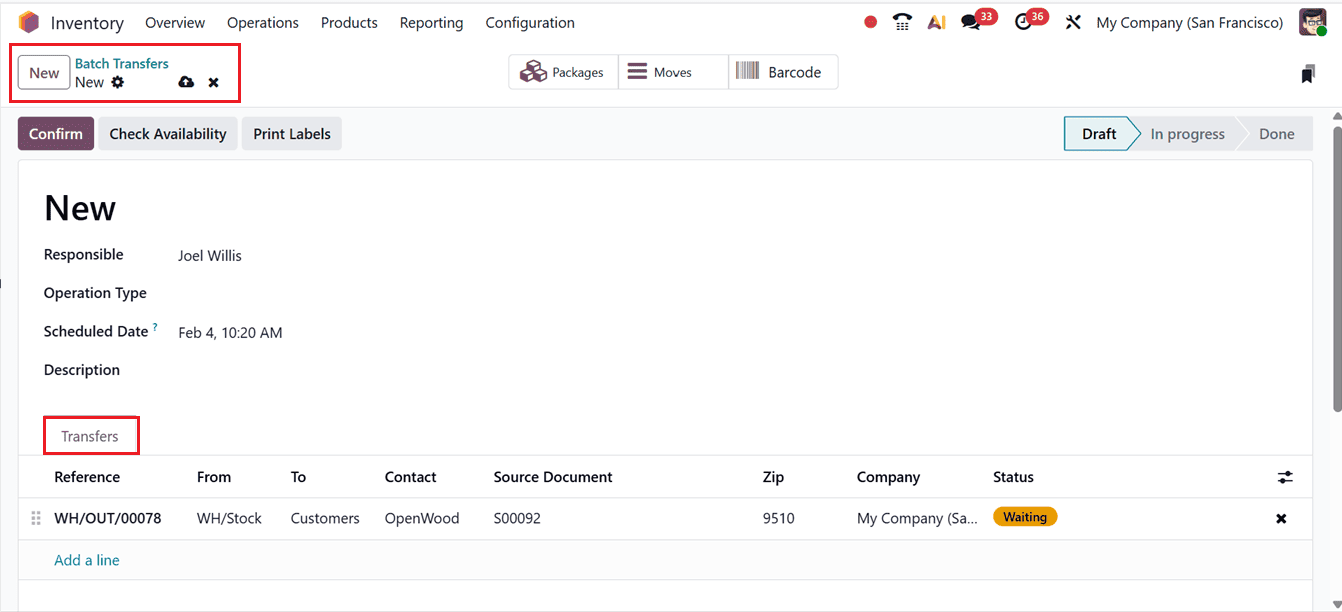
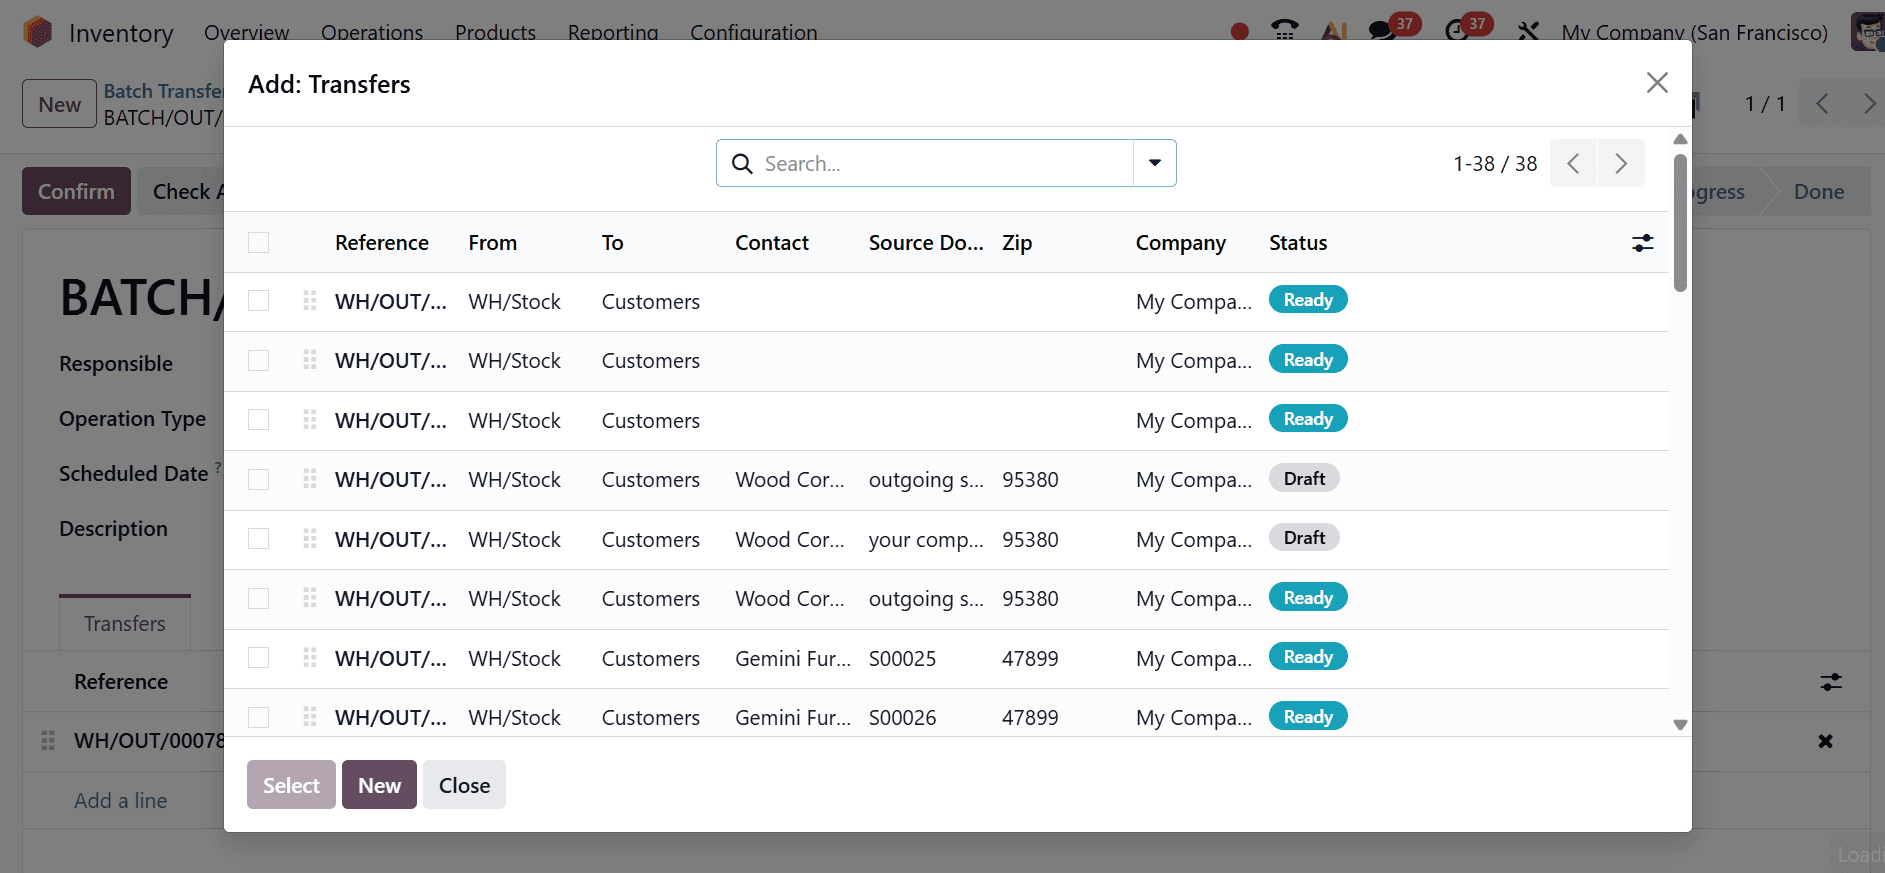
Then, add transfers to the batch one by one using Add a line link provided under the Transfers tab. This will cause a pop-up window to appear, showing eligible transfers of the chosen operation type. Then, select required transfers that share the same Status (Waiting or Ready) by clicking on the Select button to add them to the batch.
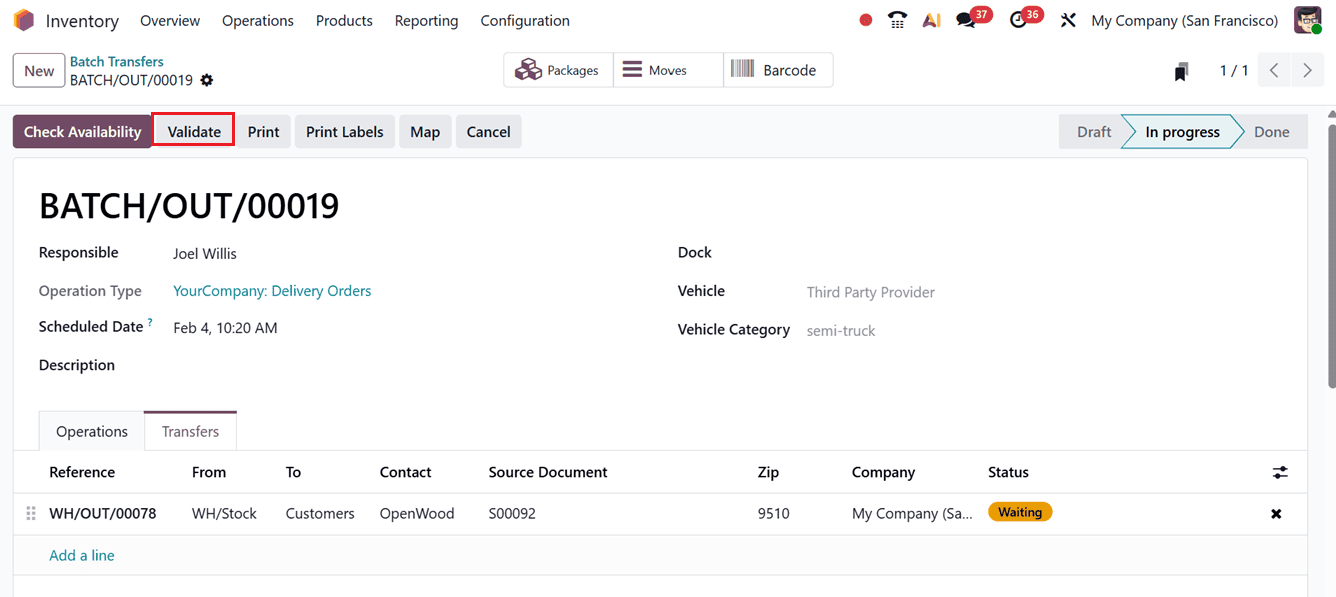
You can also create new batches using the ‘Create New’ button. All the selected transfers will appear in the batch list in the ‘Transfers’ tab. Once availability is verified, click on the Confirm button and then Validate the transfer to finalize the batch transfer.
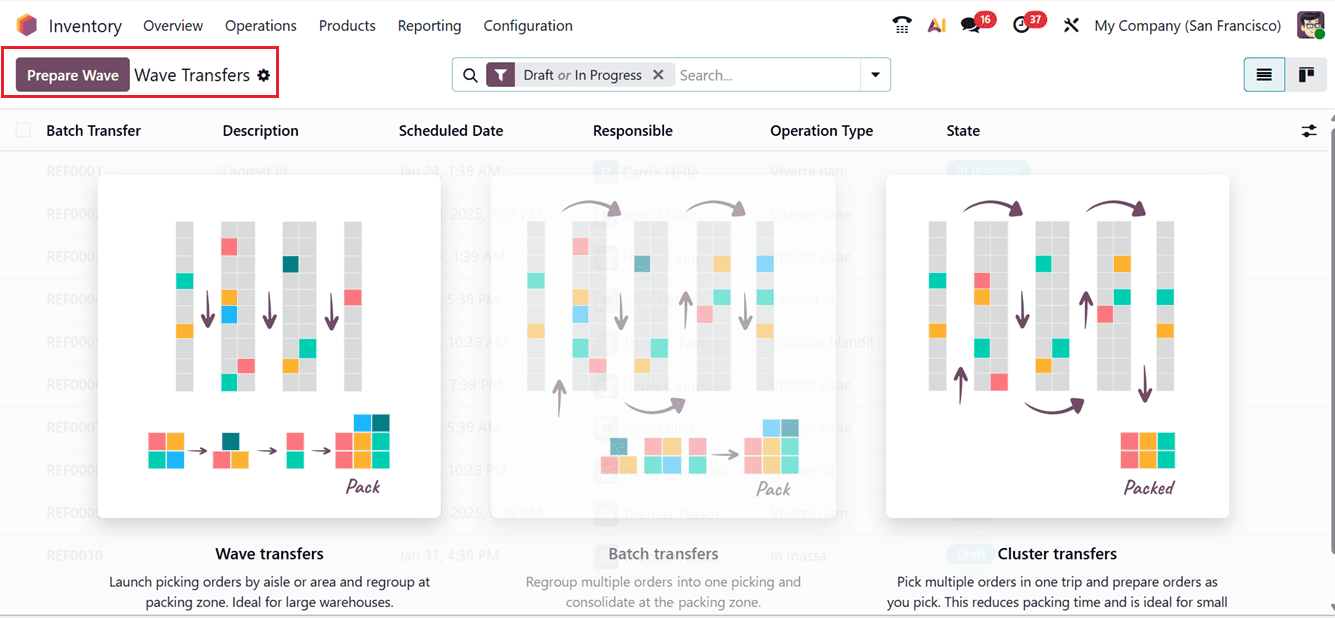
7. Wave Transfers
The Wave Transfer feature functions similarly to batch transfers but is more advanced. It enables bulk transfer of multiple products at once, though transfers cannot be removed once added. Ensure that this ‘Batch, Wave & Cluster Transfers’ feature is activated in the Settings menu to use it within the Odoo 19 Inventory module.

Inside the Wave Transfers window, you can see previously configured wave transfers in a dashboard along with their Batch Transfer , Description, Scheduled Date, Responsible person, Operation Type and State, as shown in the screenshot below.
The Prepare Wave button in Odoo 19 enables wave picking by grouping multiple pickings into a single wave, allowing warehouse staff to collect items for several orders in one optimized trip. Odoo organizes the wave by product, location, and quantity, creating a wave transfer that can be assigned to a picker or team, reducing walking time, improving efficiency, and minimizing errors. After clicking Prepare Wave, a transfers dashboard appears where users can select and combine the required transfers to create the wave.
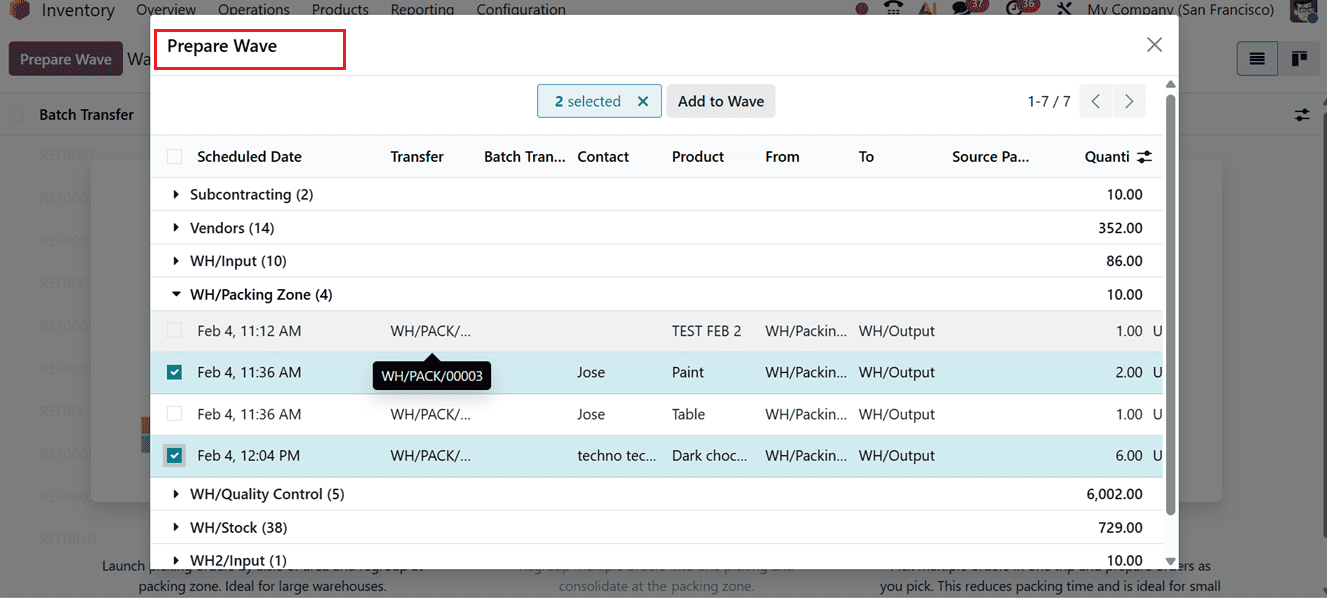
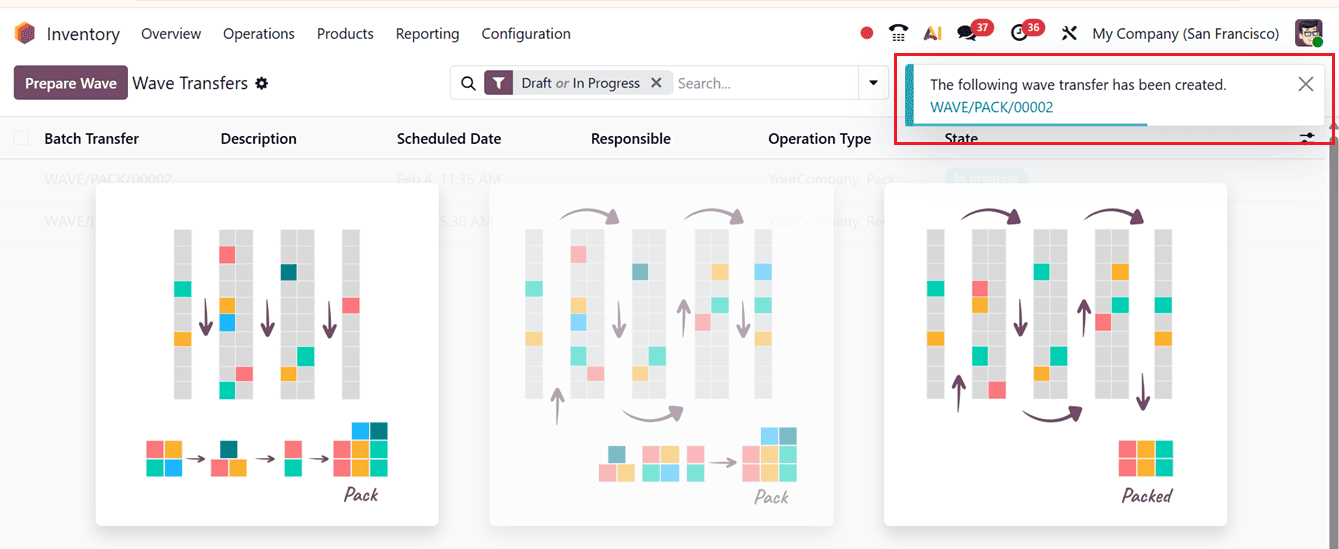
After choosing the transfer lines, click on the Add to Wave button. This action will create a new wave transfer and you can see the notification, as shown in the screenshot below.
8. Physical Inventory
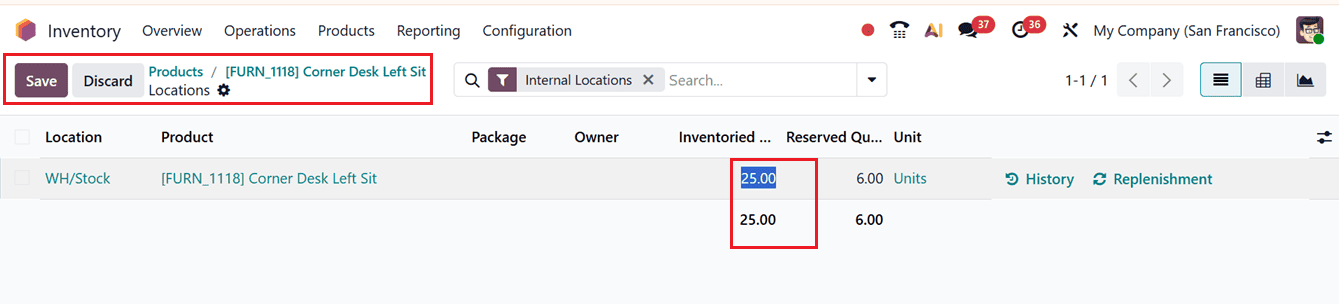
Inventory adjustments may be needed when physical stock levels differ from system records, and in Odoo 19 these updates are handled through the Physical Adjustment process. Stock quantities can be updated directly from the Product configuration window using the Quantity On Hand option in the General Information tab. Detailed on-hand quantities are displayed only for tracked products with lot or serial numbers, while untracked products show a single total available quantity without individual breakdowns.
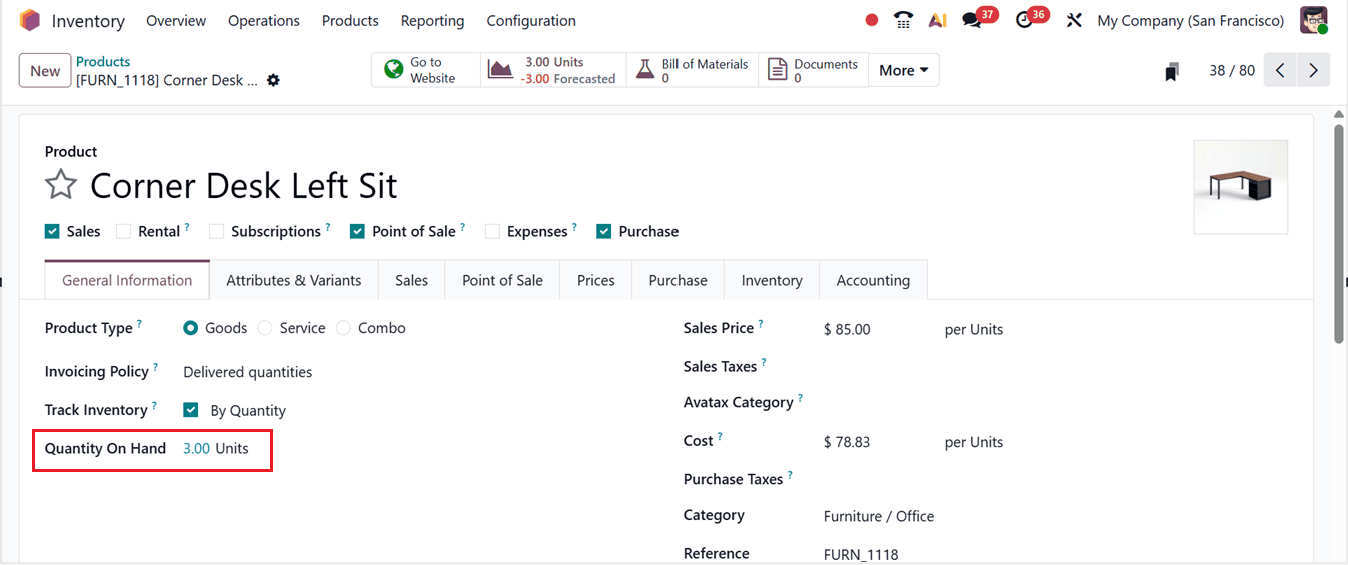
Then, click on the highlighted field to view Inventoried Quantity details. Then click on the ‘New’ button to adjust or add new stock levels and quantities.
9. Scrap
Scrap inventory consists of damaged, expired, or unusable products that cannot be sold and must be removed from stock, though some materials may be reused or recycled. An effective scrap management process helps reduce waste, control costs, and support sustainability.
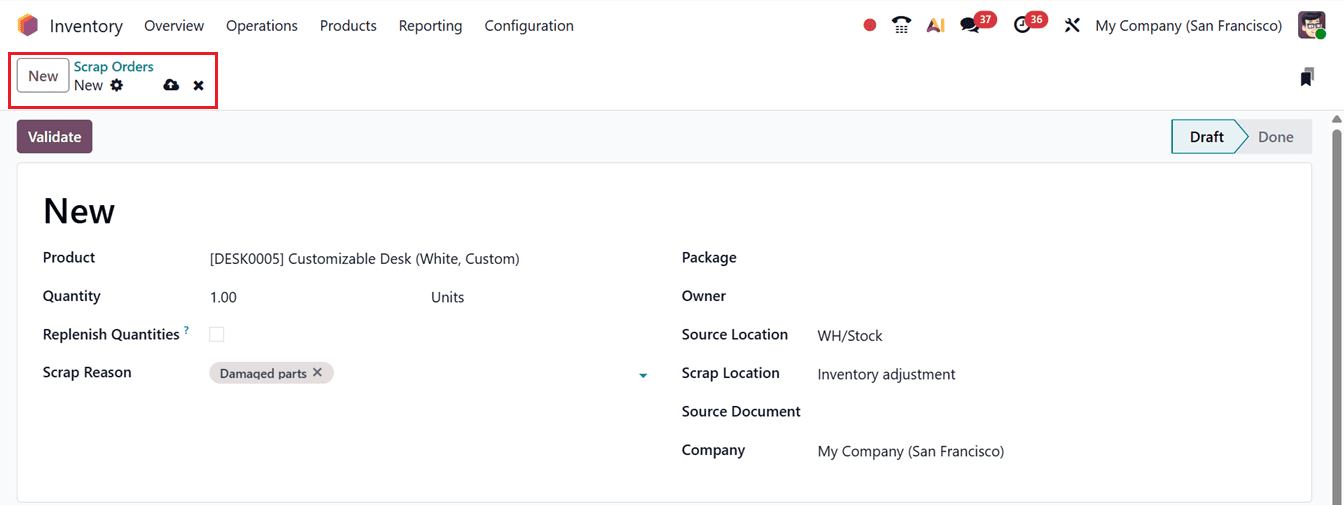
You can manage and replenish the scrap products or orders using the ‘Scrap’ window provided under the ‘Operations’ menu. This will show the dashboard of all the available Scrap Orders with their Reference, Date, Product, Quantity, Unit, Source Location, Scrap Location, Company and Status, as shown in the screenshot below.

Then, you can manually add a new scrap order using the ‘New’ button and editing the Scrap Product, Quantity, Scrap Reason along with the relevant details, as shown in the screenshot below.
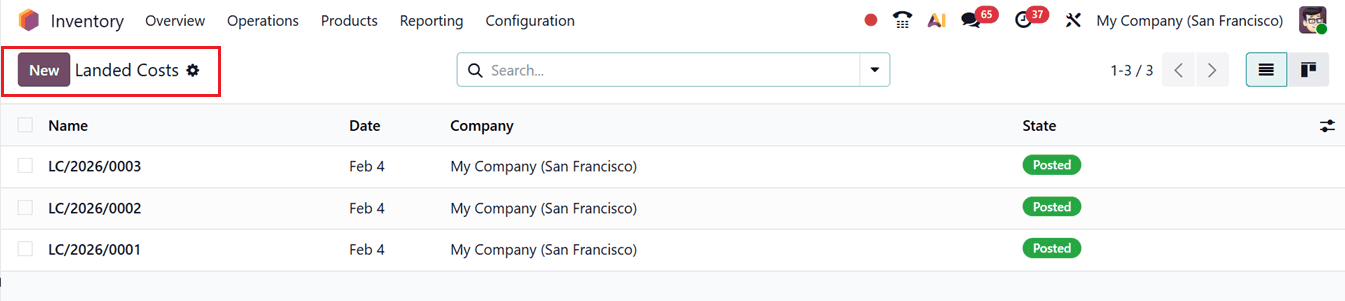
10. Landed Costs
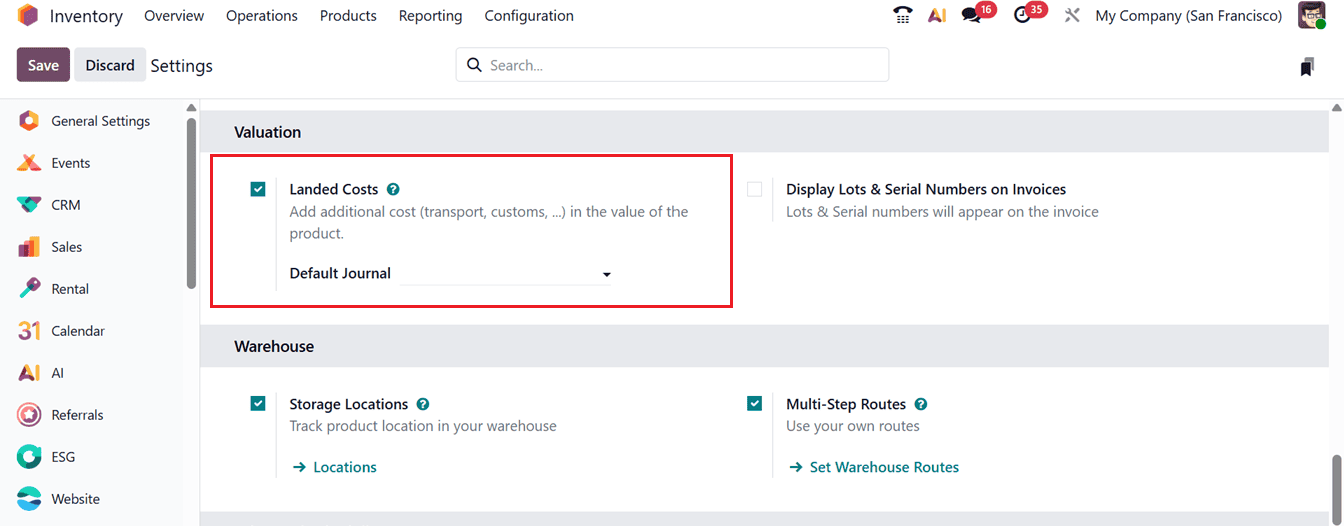
Landed cost refers to the total additional expenses incurred when purchasing a product, including transportation, handling charges, customs duties, taxes, and other incidental costs, added to the base purchase price. In Odoo 19 Inventory, businesses can calculate and allocate these costs proportionally across product quantities, allowing them to determine accurate product costs and adjust selling prices according to their accounting policies.
To activate the Landed Costs feature, navigate to the Settings menu and activate the option form the ‘Valuation’ tab, as shown in the screenshot below.
By enabling this feature, users can append custom-defined landed costs to their items. Begin by generating a purchase order that includes products within the same category, then mark the order to observe how the landed cost process functions.
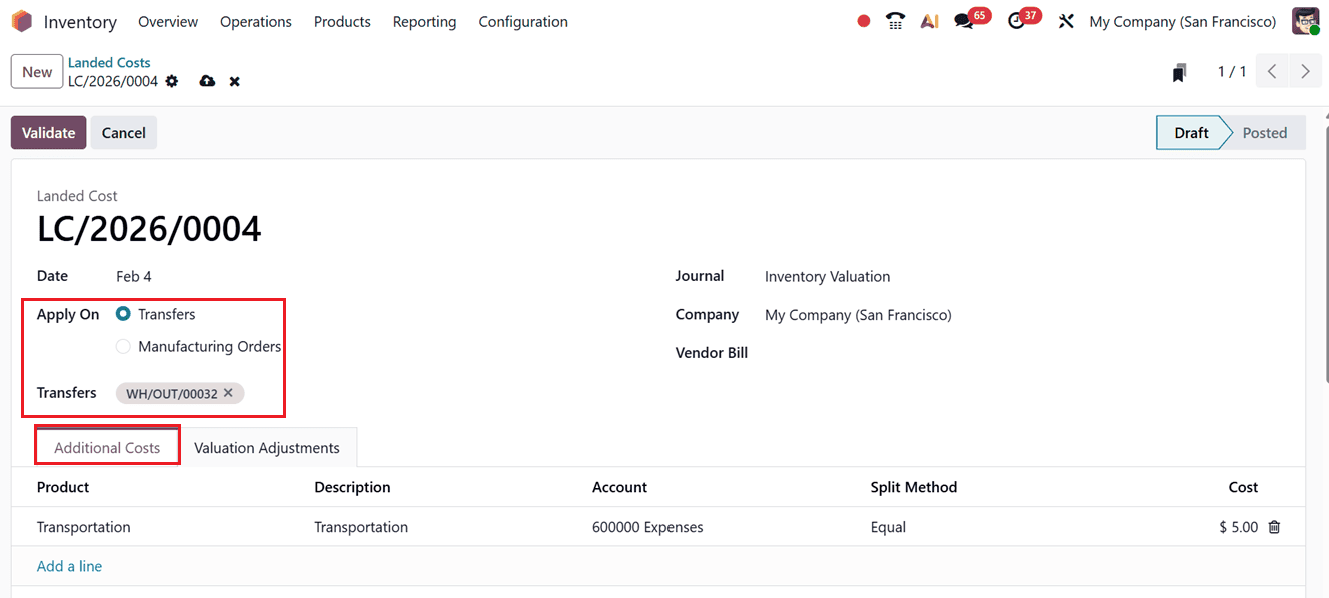
From this interface, you can view the list of previously defined landed costs or charges. To add a new one, simply click the New button and enter the creation date in the appropriate field.
You can apply the landed cost either to Transfers or Manufacturing Orders in the ‘Apply On’ field. Then, mention the relevant reference number of the transfer or manufacturing order inside the ‘Transfer’ field, as shown in the screenshot below.
11. Replenishment
Replenishment is a core inventory process that ensures optimal stock levels by restocking products based on demand and supply needs, helping prevent both stockouts and overstocking. Odoo 19 provides powerful tools to manage replenishment either through the Product Management window or the Replenishment feature within the Inventory module. Accessible from the Operations menu, the Replenishment interface presents a consolidated view of all configured replenishment orders, enabling businesses to monitor and manage restocking efficiently, as shown in the screenshot below.
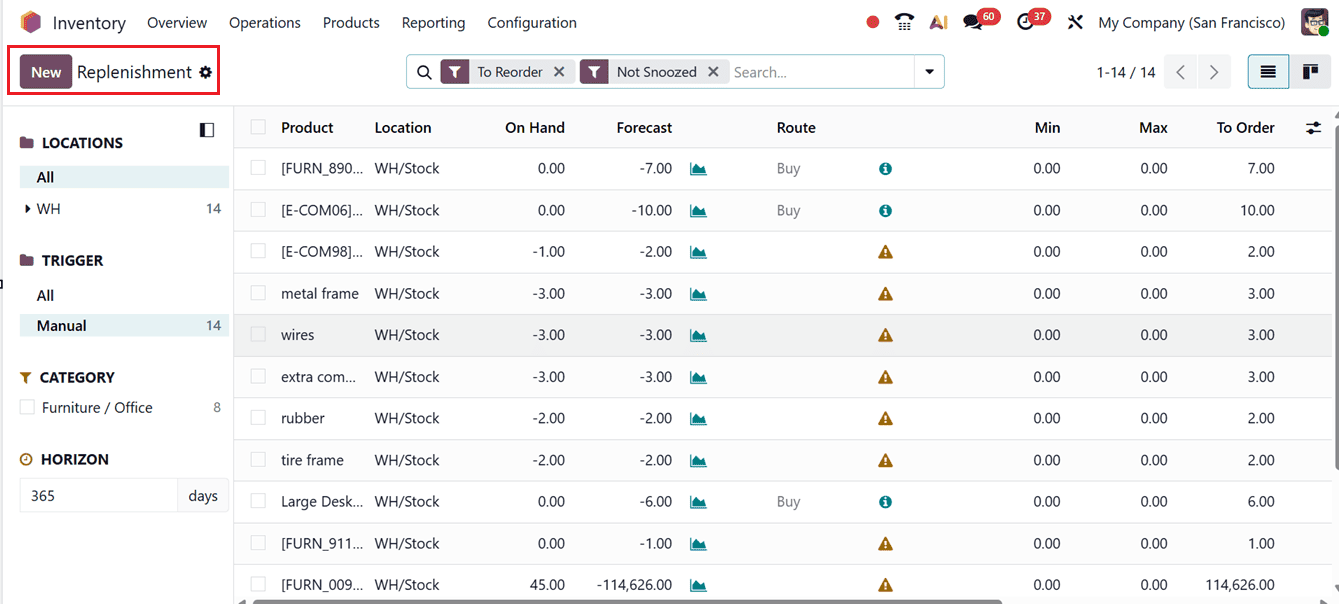
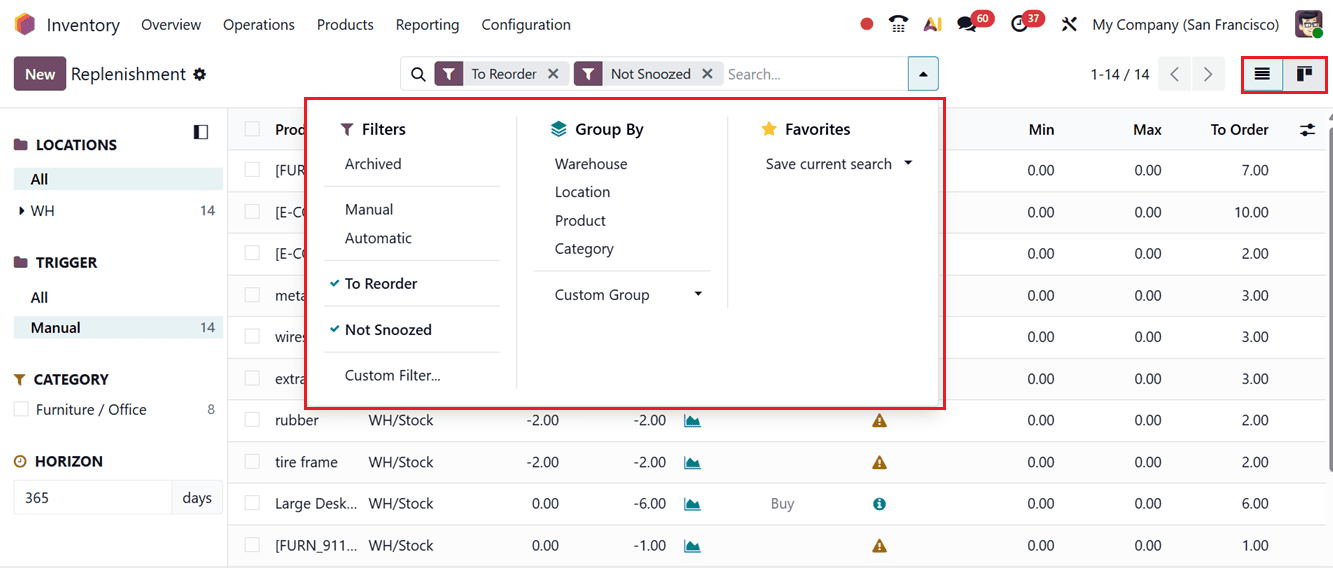
An advanced search box is provided at the top of the interface, enabling users to locate specific replenishment orders quickly. Various Filters and Group By options further simplify the process of organizing and retrieving information. These allow sorting of orders based on parameters such as Archived, Manual, Automatic, To Order, Not Snoozed, Location, Product, and Category. On the left-hand panel, users can also find a Custom Filter and a Custom Group feature that enables sorting data by warehouse locations or other desired criteria.
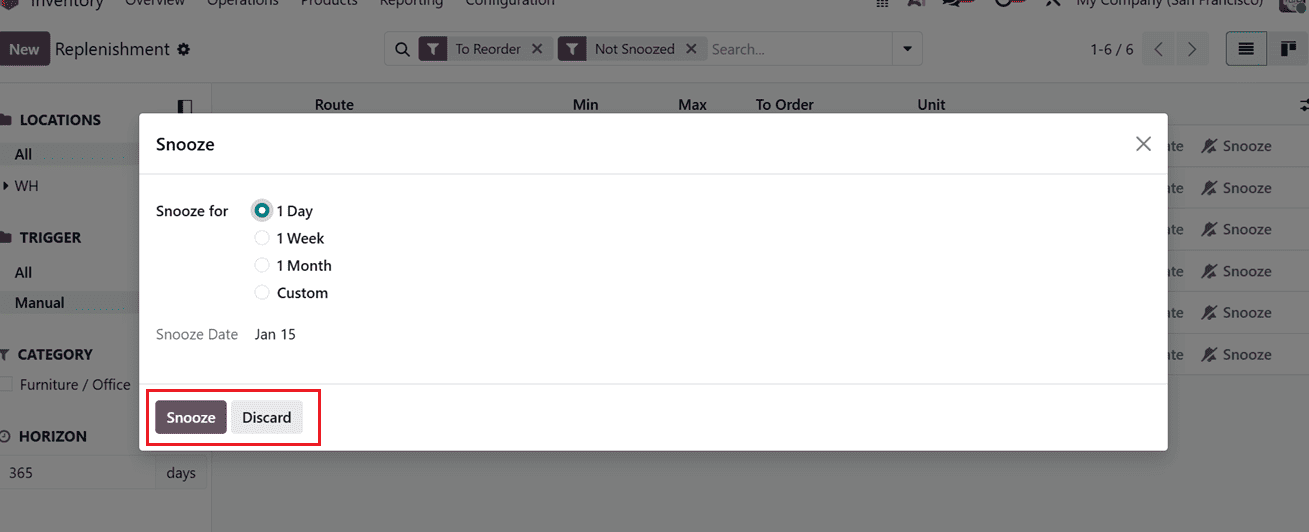
The Trigger option in the left panel helps users differentiate between system-generated and manually created replenishment requests, while replenishment records can be viewed in either List or Kanban view using the view switcher. In the List view, each record displays key information such as product, location, on-hand quantity, forecast, route, minimum and maximum levels, quantity to order, and unit. Users can click Order to generate a one-time RFQ, select Automate to enable automatic replenishment when stock falls below the minimum level, or use the Snooze feature to temporarily delay replenishment for a set period ranging from one day to a custom date after which the process resumes automatically.
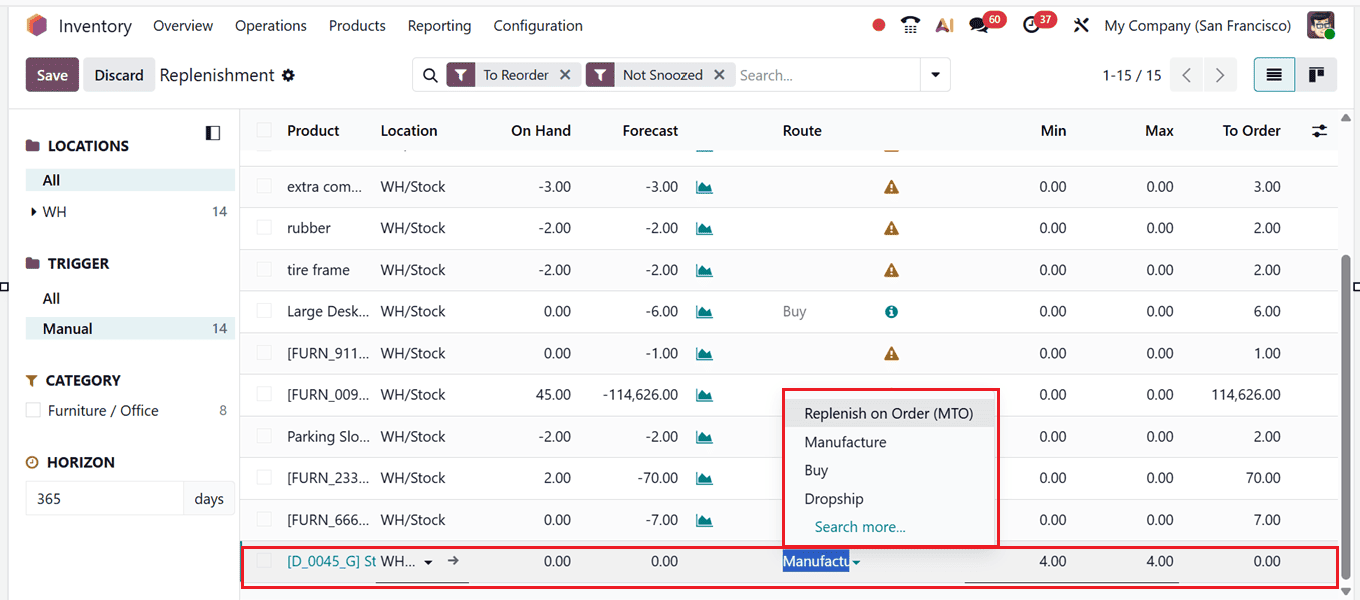
To manually create a replenishment in Odoo, click on the New in the Replenishment window and enter the required details. After selecting a product, Odoo automatically fills in fields such as location, on-hand quantity, and forecasted quantity, while allowing you to choose a procurement route like Buy, Manufacture, Dropship, or transfer from another warehouse.
You then define the minimum and maximum stock levels and the quantity to order, and select either Order Once or Automatic Orders, enabling businesses to control restocking efficiently while maintaining optimal inventory levels and minimizing holding costs, as shown in the screenshot below.
12. Master Production Schedule
The Master Production Schedule (MPS) in Odoo 19 supports long-term production and inventory planning by forecasting demand and suggesting replenishment quantities based on current stock, safety levels, bills of materials, and existing orders. Accessible from the Operations menu, the MPS dashboard displays all products with planning data across defined time periods, including forecasted demand, indirect demand, suggested replenishment, and projected stock levels. This structured view helps businesses plan manufacturing or purchasing activities in advance while maintaining control over inventory and aligning production with future demand, as shown in the screenshot below.
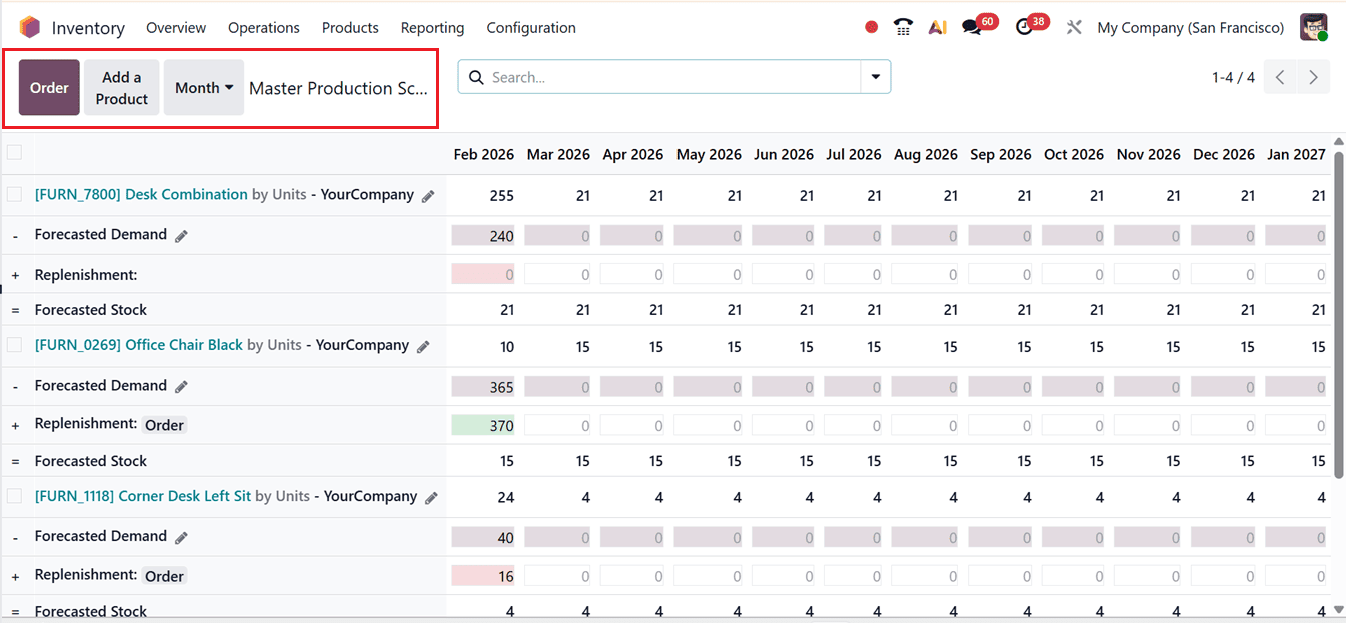
The MPS view in Odoo 19 can be customized using filters and custom search options to display additional planning data such as actual demand, indirect demand, available-to-promise quantities, previous year demand, or actual replenishment, enabling more accurate and data-driven production planning.
The dashboard presents products across configurable time periods (daily, weekly, or monthly), with the current period shown first and color-coded replenishment indicators such as, Green for required orders, Gray for existing orders, Yellow for insufficient orders, and Red for excess stock to help prioritize actions.
Replenishment orders can be created directly from the MPS dashboard for single or multiple products, or for all items below safety stock. New products can be added using the Add a Product button. In summary, the Master Production Schedule enables users to set key planning parameters and manage replenishment and demand forecasts from a centralized dashboard, supporting efficient inventory, production, and purchasing planning.
13. References
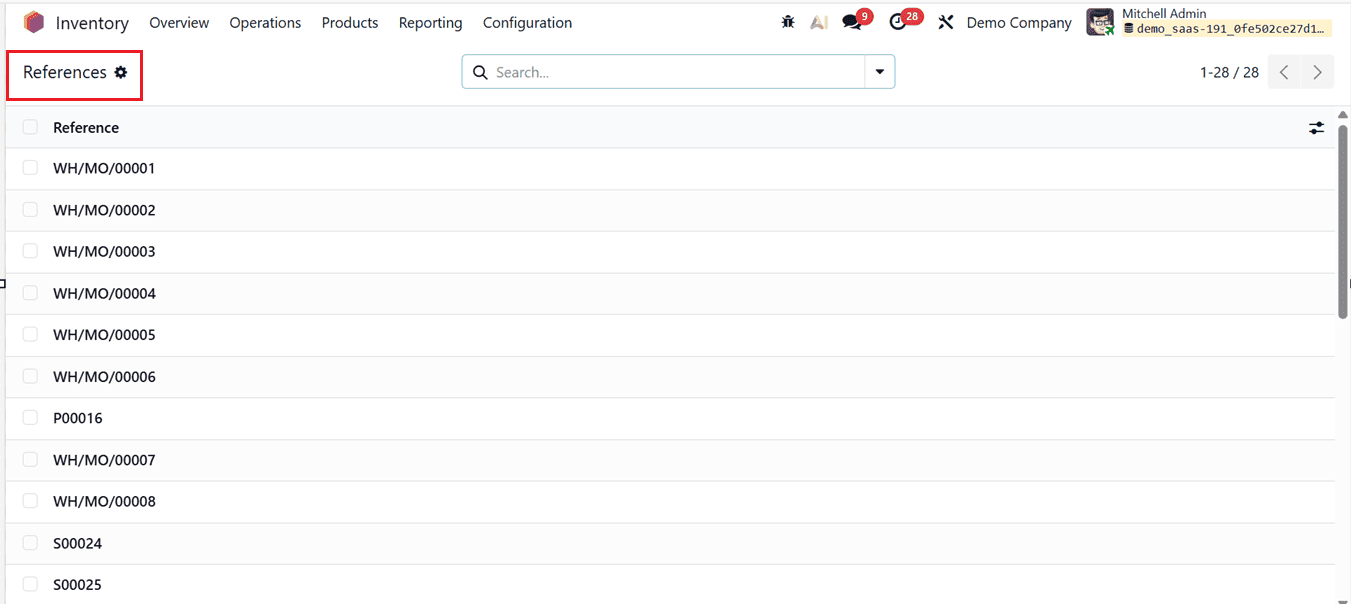
In Odoo 19 Inventory, a Reference is a system-generated unique identifier used for inventory operations such as receipts, deliveries, internal transfers, replenishments, adjustments, and scrap moves. Generated through predefined sequences (for example, WH/MO/000021 or WH/OUT/00032), these references enable accurate tracking across Inventory, Sales, Purchase, and Accounting modules and are vital for reporting and auditing. Since they are sequence-based, references should not be edited manually and can be viewed from the References option under the Operations menu.
14. Procurement: run Scheduler
The Run Scheduler feature in Odoo Inventory triggers the replenishment engine to immediately evaluate stock levels and apply reordering rules, routes, lead times, and forecasted quantities. Based on this analysis, Odoo automatically generates the required documents, such as RFQs or Purchase Orders, Manufacturing Orders, and Internal Transfers.
In summary, operation types in Odoo 19 are essential for efficient and accurate inventory management. These features enable businesses to standardize workflows, automate routine tasks, and maintain real-time stock visibility. The Operations menu acts as a central hub for managing all warehouse processes, ensuring stock accuracy, improving order fulfillment, and supporting dependable financial reporting. Altogether, these capabilities help organizations streamline logistics, minimize manual work, and boost overall warehouse efficiency. You can explore the detailed functionality of each of these operation types in our upcoming blogs.
To read more about What Are the Different Operation Types in Odoo 18 Inventory, refer to our blog What Are the Different Operation Types in Odoo 18 Inventory.