Odoo's web framework provides a powerful and flexible way to customize field widgets, allowing developers to enhance the user experience beyond the default behavior. One of the most commonly used field types in Odoo is the Many2One field, which represents a relationship between models — for example, the Vendor field on a Purchase Order.
By default, the Many2One field provides a dropdown selection with search capabilities. But what if you want to show additional information about the selected record without navigating away from the form? In this blog post, we'll walk through building a custom Many2One widget for Odoo 19 that displays a popover with partner details (name, email, phone) when an info button is clicked.
What's New in Odoo 19 for Many2One Widgets: Odoo 19 introduced two important breaking changes in the Many2One component:
- Template split: The rendering is now divided across two components — web.Many2OneField (outer wrapper) and web.Many2One (actual DOM structure). Always inherit web.Many2One for template customizations.
- props.value is now an object: Previously in Odoo 18, props.value was an array [id, display_name], so you accessed the ID with this.props.value?.[0]. In Odoo 19 it is now a plain object { id, display_name }, so the correct way is this.props.value?.id.
Module Structure
many2one_info_widget/
+-- __manifest__.py
+-- __init__.py
+-- models/
¦   +-- __init__.py
¦   +-- res_partner.py
+-- views/
¦   +-- purchase_order_view.xml
+-- static/src/
    +-- js/many2one_info_widget.js
    +-- xml/many2one_info_widget.xml
Create the Module Files
__manifest__.py
# -*- coding: utf-8 -*-
{
    'name': 'Many2One Info Widget',
    'version': '19.0.1.0.0',
    'category': 'Technical',
    'summary': 'Custom Many2One widget that displays partner info popover on click',
    'depends': ['base', 'purchase', 'web'],
    'data': [
        'views/purchase_order_view.xml',
    ],
    'assets': {
        'web.assets_backend': [
            'many2one_info_widget/static/src/xml/many2one_info_widget.xml',
            'many2one_info_widget/static/src/js/many2one_info_widget.js',
        ],
    },
    'license': 'LGPL-3',
    'installable': True,
}
__init__.py
from . import models
models/__init__.py
from . import res_partner
Add the Python Method
We extend res.partner to expose a method the widget will call via RPC to fetch partner details.
models/res_partner.py
# -*- coding: utf-8 -*-
from odoo import api, models

class ResPartner(models.Model):
    _inherit = 'res.partner'
    @api.model
    def get_partner_info(self, partner_id):
        partner = self.browse(int(partner_id))
        if not partner.exists():
            return []
        return [{
            'name': partner.name or '',
            'email': partner.email or '',
            'phone': partner.phone or partner.mobile or '',
            'street': partner.street or '',
            'city': partner.city or '',
            'country': partner.country_id.name if partner.country_id else '',
        }]
Create the JavaScript Component
This is where the core logic lives. There are two important Odoo 19 concepts to understand here:
Why extend Many2One and not Many2OneField?
In Odoo 19, the rendering is split across two components:
- Many2OneField — the outer field wrapper, just renders
- Many2One — the actual DOM structure with the input, buttons, and extra lines
Why this.props.value?.id and not this.props.value?.[0]?
In Odoo 18, props.value was an array [id, display_name]. In Odoo 19 it changed to an object { id, display_name }. So the correct way to get the partner ID in Odoo 19 is this.props.value?.id.
We extend Many2One because that's where the real template lives. Then we swap it into Many2OneField via static components.
static/src/js/many2one_info_widget.js
/** @odoo-module **/
import { registry } from '@web/core/registry';
import { Many2OneField } from '@web/views/fields/many2one/many2one_field';
import { Many2One } from '@web/views/fields/many2one/many2one';
import { useService } from '@web/core/utils/hooks';
import { useState, useRef } from "@odoo/owl";
export class Many2OneInfoWidget extends Many2One {
    static template = "many2one_info_widget.Many2OneInfoWidget";
    setup() {
        super.setup();
        this.orm = useService("orm");
        this.detailPop = useRef("detail_pop");
        this.infoState = useState({ data: [] });
    }
    async showPopup(ev) {
        ev.stopPropagation();
        const popEl = this.detailPop.el;
        if (!popEl) return;
        if (popEl.classList.contains("d-none")) {
            const partnerId = this.props.value?.id;
            if (!partnerId) return;
            try {
                const result = await this.orm.call(
                    'res.partner',
                    'get_partner_info',
                    [partnerId]
                );
                this.infoState.data = result || [];
            } catch (err) {
                console.error("m2o_info: failed to fetch partner info", err);
                this.infoState.data = [];
            }
            popEl.classList.remove("d-none");
        } else {
            popEl.classList.add("d-none");
            this.infoState.data = [];
        }
    }
}
export class Many2OneInfoField extends Many2OneField {
    static components = {
        ...Many2OneField.components,
        Many2One: Many2OneInfoWidget,
    };
}
const baseDescriptor = registry.category("fields").get("many2one", {});
registry.category("fields").add("m2o_info", {
    ...baseDescriptor,
    component: Many2OneInfoField,
    fieldDependencies: baseDescriptor.fieldDependencies || [],
Create the QWeb Template
Two important decisions in the template:
Why inject the button in two places?
The web.Many2One template has two separate branches — one for readonly mode and one for edit mode. If you only inject into the edit branch, the button disappears when the record is saved and the form switches to readonly. We inject into both so the button is always visible.
Why anchor the popover to o_many2one and not o_field_many2one_extra?
o_field_many2one_extra is only rendered when there are extra display lines configured on the field. Most of the time it doesn't exist in the DOM, so t-ref="detail_pop" would return null. The o_many2one root div is always rendered unconditionally, making it the safe anchor point.
static/src/xml/many2one_info_widget.xml
<?xml version="1.0" encoding="UTF-8" ?>
<templates xml:space="preserve">
    <t t-name="many2one_info_widget.Many2OneInfoWidget"
       t-inherit="web.Many2One"
       t-inherit-mode="primary">
        <!-- Button in EDIT mode: after the autocomplete input -->
        <xpath expr="//Many2XAutocomplete" position="after">
            <button class="m2o-info-icon btn btn-sm btn-outline-primary ms-1"
                    t-on-click.stop="showPopup"
                    type="button">
                i
            </button>
        </xpath>
        <!-- Button in READONLY mode: after the display text -->
        <xpath expr="//t[@t-if='props.readonly']" position="inside">
            <button t-if="props.value"
                    class="m2o-info-icon btn btn-sm btn-outline-primary ms-1"
                    t-on-click.stop="showPopup"
                    type="button">
                i
            </button>
        </xpath>
        <!-- Popover anchored to root div - always in the DOM, ref never null -->
        <xpath expr="//div[hasclass('o_many2one')]" position="inside">
            <div class="popover d-none"
                 style="max-width: none"
                 t-ref="detail_pop">
                <t t-if="infoState.data.length">
                    <t t-foreach="infoState.data" t-as="item" t-key="item_index">
                        <b>Name</b>: <t t-esc="item.name"/><br/>
                        <b>Email</b>: <t t-esc="item.email"/><br/>
                        <b>Phone</b>: <t t-esc="item.phone"/><br/>
                    </t>
                </t>
            </div>
        </xpath>
    </t>
</templates>
Apply the Widget to a View
Finally, apply the custom widget to the partner_id field on the Purchase Order form.
views/purchase_order_view.xml
<?xml version="1.0" encoding="UTF-8" ?>
<odoo>
    <record id="purchase_order_form_m2o_info" model="ir.ui.view">
        <field name="name">purchase.order.form.m2o.info</field>
        <field name="model">purchase.order</field>
        <field name="inherit_id" ref="purchase.purchase_order_form"/>
        <field name="arch" type="xml">
            <xpath expr="//field[@name='partner_id']" position="attributes">
                <attribute name="widget">m2o_info</attribute>
            </xpath>
        </field>
    </record>
</odoo>
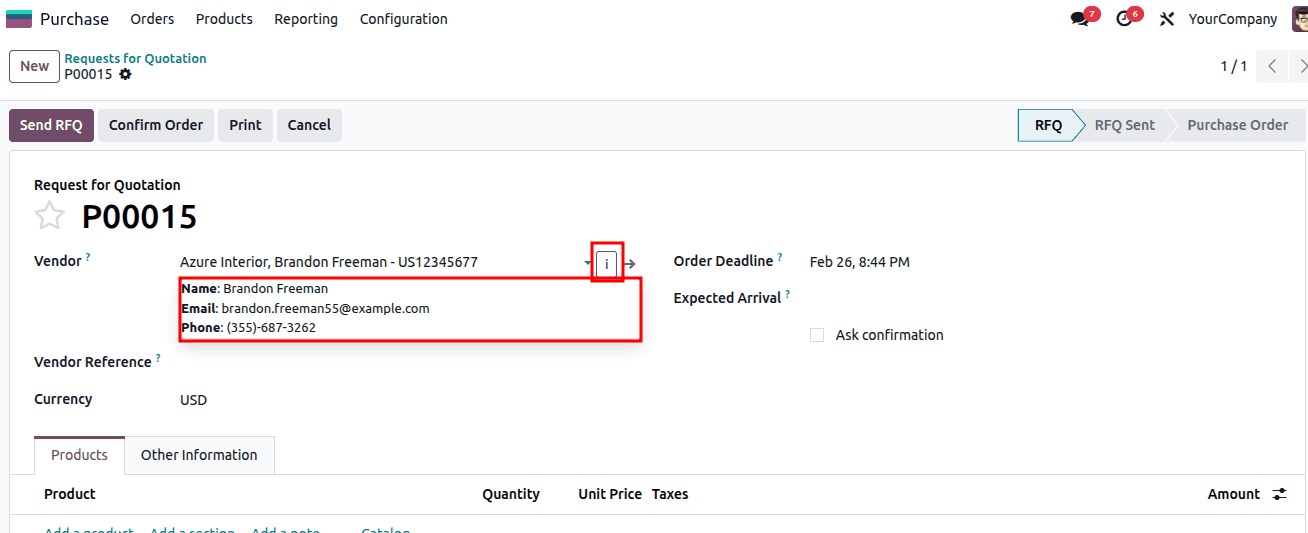
After Installation open any Purchase Order, the i button will appear next to the Vendor field in both edit and readonly modes.
In this blog post, we built a fully functional custom Many2One widget for Odoo 19 that adds an interactive info button to the Vendor field on the Purchase Order form. Clicking the button fetches and displays partner details in a popover without navigating away from the form.
The key takeaway for Odoo 19 development is understanding the two-component architecture of the Many2One field. Always extend Many2One for template customizations and swap it into Many2OneField via static components. This pattern is clean, maintainable, and avoids the fragile xpath inheritance problems that plagued earlier approaches.
The same technique can be applied to any Many2One field across any model in Odoo 19; simply change the view XML to target the field you need and update the Python method to return whatever data is relevant for your use case.
To read more about How to Create a Many2One Widget in Odoo 18, refer to our blog How to Create a Many2One Widget in Odoo 18.