The quality of Odoo lays in is its uncompromising features that meet any business needs. Whether it is small service sector firm or a large scale manufacturing industry, Odoo can full fill any type of requirement arising from there. Odoo Repair Management is such a versatile module which facilitate repairs/renovation works of broken or damaged products/Asset. The module takes the details of the damaged product and tracks it through ought the repair stages. I this blog I will be giving an overall understanding about Odoo repair management Module
Features:-
- Add/remove products in the reparation
- Impact for stocks
- Invoicing (products and/or services)
- Warranty concept
- Repair quotation report
- Notes for the technician and for the final customer
Activating Repair Management module in Odoo
Go to Odoo Apps and search ‘Repairs Management’ and Install the module (see fig). The module is integrated with other modules like Sales, Inventory, and Accounting.

After the installation, a new menu -‘Repairs’ will appear in Odoo.
Click the menu to see the repair management option. Here you can click on ‘Create’ button to create a new reparation order. In a Repair order, you can fill the components you wish to remove, add, replace etc. The Repair order automatically checks the warranty date on the serial number of the product. And decides whether the repair should be in invoiced to the customer or not.
When you click on the ‘Create’ button you will get a form as follow.
Here Repair Reference will be automatically filled by Odoo. Then you can choose the product in the field ‘Product to Repair’. You can also mention the quantity of the product which you want to repair. Partner field is a mandatory field, so you must select the partner too.
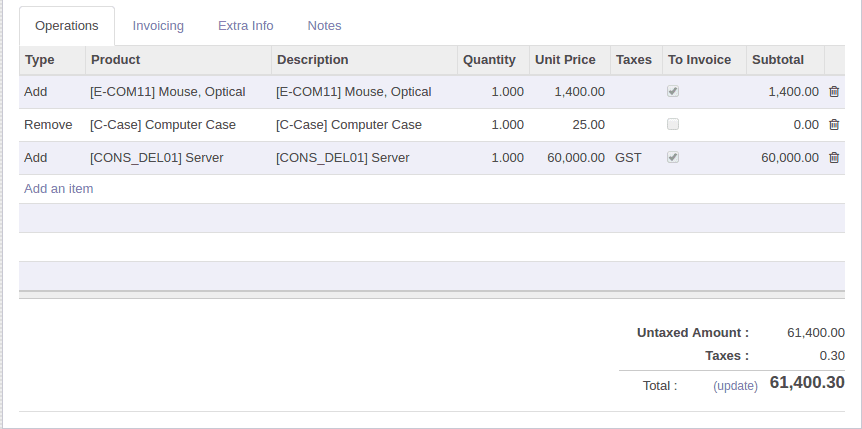
Then you can add operations for this repair order. You can specify the warranty expiration date too. In operation tab, you can mention the products which you want to remove or add to the order.

Here I just describe the fields in order line.
Type: - Here you can specify the type of operation as Add or Remove.
Product: - The product name which you want to add/remove.
Description: - Description of the selected operation
Quantity: - Quantity of the selected product.
Taxes: - Here you can be included taxes for this operation.
To Invoice:- This field is a Boolean field. Here you can specify this operation is to be invoiced or not. If you tick this field the amount will consider the billing.
Subtotal: - This field shows the total amount of the operation.
Note that the Subtotal only shows the sum of Invoiced amounts.
At bottom of the operation table, you can see Untaxed Amount, Taxes and Total fields. Here Untaxed Amount field shows the total amount excluding taxes. Taxes field shows the total taxes for all operations. And finally, the Total amount is displayed in the Total field.

Repair Form Field description- Invoicing Tab
This is ‘Invoicing’ tab. Here you can mention the invoice method. We have 3 invoice methods.
1. No Invoice: - Select this option for free service or warrantied service.
2. Before Repair: - Select this option when we need to create the invoice for the Repair process. If you select this method you can see a button ‘Create Invoice’ to create invoice when you confirm the repair order.
3. After Repair: - Select this option when we need to create the invoice only after the Repair process. If you select this invoice method you can see a button ‘Create Invoice’ to create invoice when you finish the repair order process
Here you also have an option to add fees for the repair order. Invoice field represents the corresponding invoice reference for this repair order.
Other Tabs

In ‘Extra Info’ tab, you can see the corresponding movement reference in ‘Move’ field. you can commence the work by clicking ‘Start Repair’ button and end the process by clicking End Repair’ button. The time ‘Repaired’ will be filled automatically while you click End Repair
When you create the invoice for this repair order then the field ‘Invoiced’ field will be filled automatically with True value.
You can take print out of invoice from Print -> Quotation/Order.