Reports are essential for tracking data, analyzing trends, and
supporting decision-making within a business. Odoo uses QWeb, a
powerful templating engine, to generate customizable and
professional-looking PDF reports.
Let’s walk through how to create a custom QWeb report in Odoo 18—from
XML configuration to Python logic—along with the new multi-print
functionality introduced in recent versions.
What is QWeb?
QWeb is Odoo’s templating engine based on XML. It’s used to render
HTML (which is then converted into PDF using wkhtmltopdf). This
allows you to style, loop through records, and dynamically display
data in your reports.
Step 1: Define the Report Action (XML)
Every QWeb PDF report starts with an action that tells Odoo when and
how to generate the report.
<record id="action_report_student_detail" model="ir.actions.report">
    <field name="name">Student Detail</field>
    <field name="model">student.detail</field>
    <field name="report_type">qweb-pdf</field>
    <field name="report_name">student_registration.report_student_detail</field>
    <field name="report_file">student_registration.report_student_detail</field>
    <field name="print_report_name">'Student Report - %s' % (object.name)</field>
    <field name="binding_model_id" ref="model_student_detail"/>
    <field name="binding_type">report</field>
</record>
- report_type: Use qweb-pdf to generate a PDF report.
- report_name & report_file: Reference your QWeb template.
- print_report_name: Dynamically names the report (e.g., Student
Report - John).
- binding_model_id: Ties the report to a specific model so it's
available from form views.
- binding_type: Use report to attach the action directly to the
print button.
Step 2: Create the QWeb Report Template
This is the core HTML structure for your report. Define it inside
your module’s /report directory.
<template id="report_student_detail">
<t t-call="web.html_container">
<t t-call="web.internal_layout">
<t t-foreach="docs" t-as="rec">
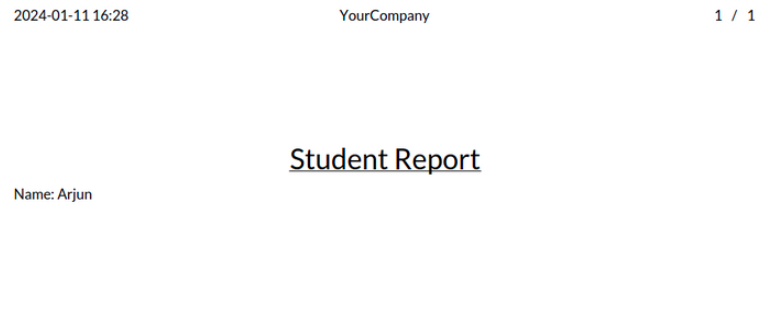
<div class="text-center">
<h2><u>Student Report</u></h2>
</div>
<p><strong>Name:</strong> <t t-esc="rec.name"/></p>
</t>
</t>
</t>
</template>
- t-call="web.html_container" wraps the layout in standard HTML.
- t-call="web.internal_layout" uses the default Odoo style.
- docs is the variable representing the record(s).
Step 3: Add Python Logic for the Print Button
Add a function in your model to trigger the report programmatically.
def action_print(self):
    return self.env.ref('student_registration.action_report_student_detail').report_action(self)
Calling this method will generate and download the PDF for the
current record.

Multi-Print in Odoo 18: Printing Multiple Reports Together
Odoo 18 introduced multi-report printing using a JavaScript client
action called do_multi_print. This allows users to print several
reports at once—great for bulk actions or summary reporting.
JavaScript Code: do_multi_print:
/** @odoo-module **/

import { _t } from "@web/core/l10n/translation";
import { registry } from "@web/core/registry";
import { sprintf } from "@web/core/utils/strings";

async function doMultiPrint(env, action) {
   for (const report of action.params.reports) {
       if (report.type !== "ir.actions.report") {
           env.services.notification.add(_t("Incorrect type of action submitted as a report, skipping action"), {
               title: _t("Report Printing Error"),
           });
           continue;
       }
       if (report.report_type === "qweb-html") {
           env.services.notification.add(sprintf(_t("HTML reports cannot be auto-printed, skipping report: %s"), report.name), {
               title: _t("Report Printing Error"),
           });
           continue;
       }
       await env.services.action.doAction({ type: "ir.actions.report", ...report });
   }

   if (action.params.anotherAction) {
       return env.services.action.doAction(action.params.anotherAction);
   } else if (action.params.onClose) {
       action.params.onClose();
   } else {
       return env.services.action.doAction("reload_context");
   }
}

registry.category("actions").add("do_multi_print", doMultiPrint);
The provided JavaScript code defines an Odoo module that facilitates
the printing of multiple reports. The doMultiPrint function, marked
with the Odoo module comment, is asynchronous and takes two
parameters: env and action. The function iterates through the
specified reports, checks their types and report formats, and
triggers the printing using Odoo's env.services.action.doAction
method. The module registers the doMultiPrint function under the
"actions" category in the Odoo registry, making it available for use
as an action in the Odoo system.
The Python function for performing multi-printing is exemplified
below.
def action_print(self):
    return {
        'type': 'ir.actions.client',
        'tag': 'do_multi_print',
        'context': {},
        'params': {
            'reports': [
                self.env.ref('student_registration.action_report_student_detail').report_action(self),
                self.env.ref('student_registration.action_report_student_attendance').report_action(self),
            ]
        }
    }
- 'type': 'ir.actions.client': Specifies the type of action as a
client action in Odoo.
- 'tag': 'do_multi_print': Associates this action with the
previously defined client action named do_multi_print.
- 'context': {}: Provides an empty context for the action.
- 'params': Contains a dictionary with a key 'reports', which
holds a list of reports to be printed.
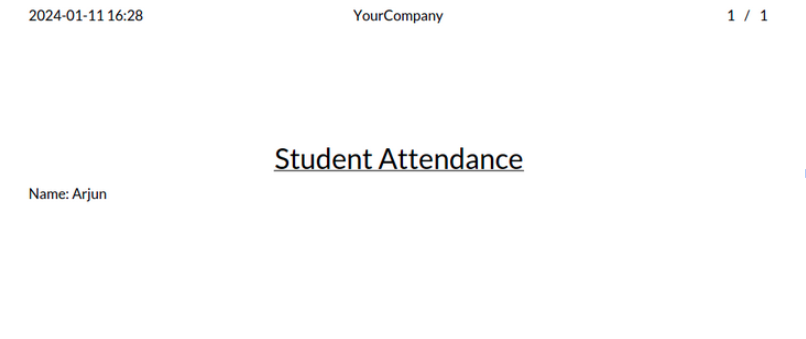
The list includes two reports, presumably related to student details
and student attendance.