In recent years, Next.js has emerged as one of the most powerful frameworks for building modern web applications. Built on top of React, it offers a developer-friendly environment, flexible rendering options, and performance optimizations right out of the box.
Whether you’re building a personal portfolio, an e-commerce store, or a large-scale application, Next.js provides the structure and tools to help you move faster without sacrificing quality.
In this guide, we’ll explore what makes Next.js special, walk through its core concepts, and build a simple application to get you started.
Why Next.js?
Next.js builds upon React by adding features that make your app faster, more maintainable, and easier to scale:
- File-based routing – No manual route configuration needed.
- Flexible rendering – Use static generation, server rendering, or client rendering as needed.
- Built-in layouts and nesting – Organize pages with shared UI components like headers and sidebars.
- Seamless data fetching – Fetch data directly inside your components.
- Automatic optimization – Image optimization, code splitting, and caching work out of the box.
Getting Started
- Install Node.js
First, check that Node.js is installed:
node -v
If you don’t have it, download the LTS version from nodejs.org.
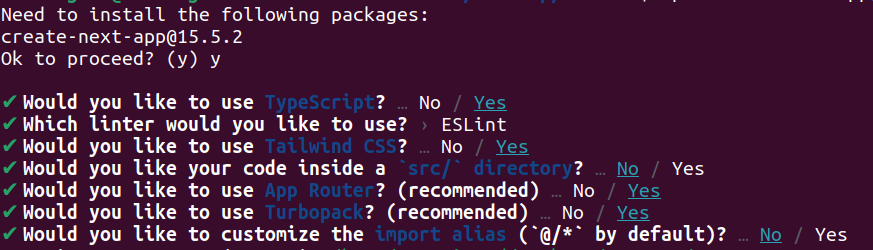
- Create a New Next.js Project
In your terminal:
npx create-next-app@latest my-app
You’ll be prompted to choose settings like TypeScript, ESLint, and styling options.
Once done:
cd my-appnpm run dev
Open http://localhost:3000 to see your app.
Understanding the Project Structure
A fresh Next.js project includes an app/ directory where routes are defined. The folder structure might look like this:
app/ layout.tsx ? Shared layout for your application page.tsx ? Home page (/) about/ page.tsx ? About page (/about) blog/ [id]/ page.tsx ? Dynamic blog page (/blog/1)public/ ? Static files (images, icons, etc.)styles/ ? CSS and global styles
Core Files
- page.tsx – Defines the UI for a route.
- layout.tsx – Wraps routes with shared elements like headers or footers.
- loading.tsx – Displays a loading state while fetching data.
- error.tsx – Handles errors for a route.
Creating Pages and Layouts
A page is simply a component in a page.tsx file:
// app/about/page.tsxexport default function AboutPage() { return <h1>About Us</h1>;}A layout wraps one or more pages with a shared structure:
// app/layout.tsxexport default function RootLayout({ children }: { children: React.ReactNode }) { return ( <html lang="en"> <body> <header>My Website</header> <main>{children}</main> <footer>(c) 2025 My Website</footer> </body> </html> );}Fetching Data
Next.js allows you to fetch data directly inside your components without special functions. You can use fetch() in server components to load data before rendering:
// app/blog/page.tsxasync function getPosts() { const res = await fetch('https://jsonplaceholder.typicode.com/posts'); return res.json();}export default async function BlogPage() { const posts = await getPosts(); return ( <div> <h1>Blog</h1> {posts.map((post: any) => ( <p key={post.id}>{post.title}</p> ))} </div> );}Visiting /blog will display all the posts.
Dynamic Routes
Dynamic routes are created by naming a folder with square brackets:
// app/blog/[id]/page.tsxinterface Props { params: { id: string };}async function getPost(id: string) { const res = await fetch(`https://jsonplaceholder.typicode.com/posts/${id}`); return res.json();}export default async function PostPage({ params }: Props) { const post = await getPost(params.id); return <h1>{post.title}</h1>;}Visiting /blog/3 will display the post with id=3.
Deployment
The easiest way to deploy your Next.js app is on Vercel:
- Push your code to GitHub.
- Go to vercel.com and import your repository.
- Click deploy—Vercel handles the rest
Tips for Beginners
- Keep components small – Easier to reuse and maintain.
- Use layouts for shared UI – Avoid duplicating code.
- Start with static rendering – Add server rendering only where needed.
- Organize routes logically – Keep related files in the same folder.
- Leverage built-in optimizations – Avoid manually configuring things like image optimization unless necessary.
Conclusion
Next.js gives you the power to build fast, SEO-friendly, and scalable web applications without wrestling with complex configurations.
Its routing system, data-fetching capabilities, and performance optimizations make it an excellent choice for beginners and professionals alike.
With just a few commands, you can set up a project, create pages, fetch data, and deploy to production—making the leap from idea to live website faster than ever.
To read more about How to Load JS Function in Menu Item Click in Odoo 18, refer to our blog How to Load JS Function in Menu Item Click in Odoo 18