We are no more new to barcodes now. Even though they seem mere black and white stripes of varying widths for us, they contain much more information in those strips. The information from barcodes is decoded either via scanning them using a laser or via camera-based systems. They serve an important role and save time compared to the manual entering of the information.
Why use Barcodes :
1. Using barcodes is a viable and valuable choice for companies that look forward to improving efficiency.
2. Barcodes are both cost-effective and reliable; also it is a method for saving time.
3. Manual tracking leads to many human errors, barcodes eliminate the possibility of human errors to an extent.
4. They are inexpensive, both in the case of design and printing.
EAN-13 and UPC-A Barcodes:
The most widely used and oldest GS1 barcode standard is the EAN/UPC family.
GS1 is a global, non-profit organization that maintains the standards for barcodes.

EAN stands for European Article Numbers also called International Article Numbers.
UPC is a Universal Product Code. EAN-13 is a 13 digit long code, whereas UPC-A is 12 digits long.
When looking at the above figure, the only difference is the placement of numbers below, other than that they work in a similar fashion. EAN-13 is actually a superset of UPC. The leading zero in UPC indicates the USA as a country of origin. Nowadays both barcode formats are accepted around the world. Traditionally, UPC-A barcodes have been in use in the USA and EAN-13 in the rest of the world.
What is Barcode Nomenclature in Odoo?
Odoo supports barcode nomenclatures. There is a module called barcode in Odoo, which enables the end-user to scan the barcodes and get the details. Mainly barcodes are used in POS, stock in inventory, and in events. The interface of the barcode module is given below.
One can set the barcode nomenclature from the inventory module. Activate debug mode, from the configuration menu, there you can find the barcode nomenclatures. Or one can find them from the POS module, within the settings of point of sale.
Barcode nomenclatures are the rules that are used to create a barcode. Let’s take a look at the default nomenclature. There, one can give a name to the rule, also an option for UPC/EAN conversion. We have already discussed these barcode formats.
Here, one can choose the conversion type according to our needs.
From the above figure, a clear-cut idea of how the rules are made is given.
It explains how the number’s digits and floats are encoded. The number’s digits are represented by ‘N’ and the floats are supported with the decimals indicated with D’s. The dots represent the positions of the barcode. This will be explained in the following examples.
We can see some rules and their types, encoding method also the barcode pattern of that rule. Let’s take a look at how a rule is created. Edit the nomenclature and add a line for the new rule. It will lead to a new wizard.
Rule name: One can give a name for the rule.
Sequence: Sequence number of the rule.
Encoding: Here we can choose the specified encoding type.
Barcode pattern: This indicates the matched barcode pattern.
Type: One can choose the area to which the barcode is applied to.
1. Priced product: barcode pattern for the priced product is 23.....{NNNDD} By default. Set a product with barcode 231234500000. In POS, when we scan this barcode, the corresponding product will be added. If we want a particular price say 666.44. Then scan 231234566644. Here as the default pattern for the priced product, the 666 represent ‘NNN’ and 44 represent ‘DD’. 12345 represents the five positions after 23 which is indicated as dots in default pattern format.
2. Discounted product: From the default nomenclature defined we know that the barcode pattern for the discounted product is 22{NN}. Barcode matching this pattern will add a discount of NN in the POS.
Eg: if the barcode pattern is starting with 2250, then 50% discount will be added. Here NN is 50.
3. Weighted product: Let’s set the barcode format weighted product as 21.....{NNDD}. Now, create a product with a barcode 211234500000.
If we want 66.44 units of the product, scan the barcode 211234566440.
So 66.44 units will be added.
4. Alias: alias option is used to scan the same product with multiple barcodes. Create a product with barcode 435123456789. Now create a rule with type ‘alias’
Here the barcode pattern is set as 435123456{NNN}. So whatever the last three digits, the barcode will be aliased to the product with barcode 435123456789, which is given in the alias field.
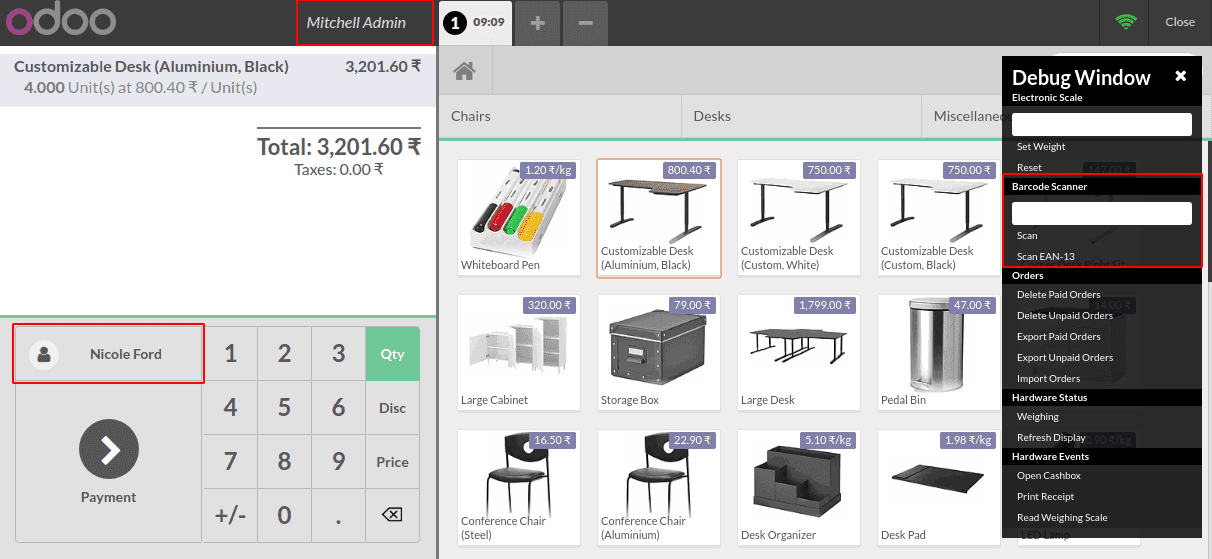
5. Client and cashier: If the barcode match with the prefix of the rule set for the customer, POS detects the customer and the customer name in the customer section. The same is the case of the cashier. The cashier name will get changed at the top menu of the POS screen if the barcode detects a cashier barcode pattern.
6. Unit product: this rule is for general product scanning.
Important segments of the barcode in Odoo
In point of sale:
Using the barcode in POS makes the process faster. If we activate debug mode, a debug window will appear on the POS interface. There, one can manually enter the barcode.
This is shown in the figure. Check rules created for POS in the debug window.

In inventory:
One can set the barcode scanner in the inventory module, from
Going to Inventory -> configuration -> settings -> operations -> Barcode Scanner
Usage of barcodes in inventory is of great help. The operations which are used to manage stock in the warehouse can be simplified and can be made faster with the help of barcodes.
Here comes the help of the barcode module. One can scan the operation barcode to the barcode module. When one scans an operation type, the module will ask for scanning the source location.
It further proceeds to scan the products, in case if the product has a package, it scans the barcode.
One can increase the count of the product via scanning the product barcode again.

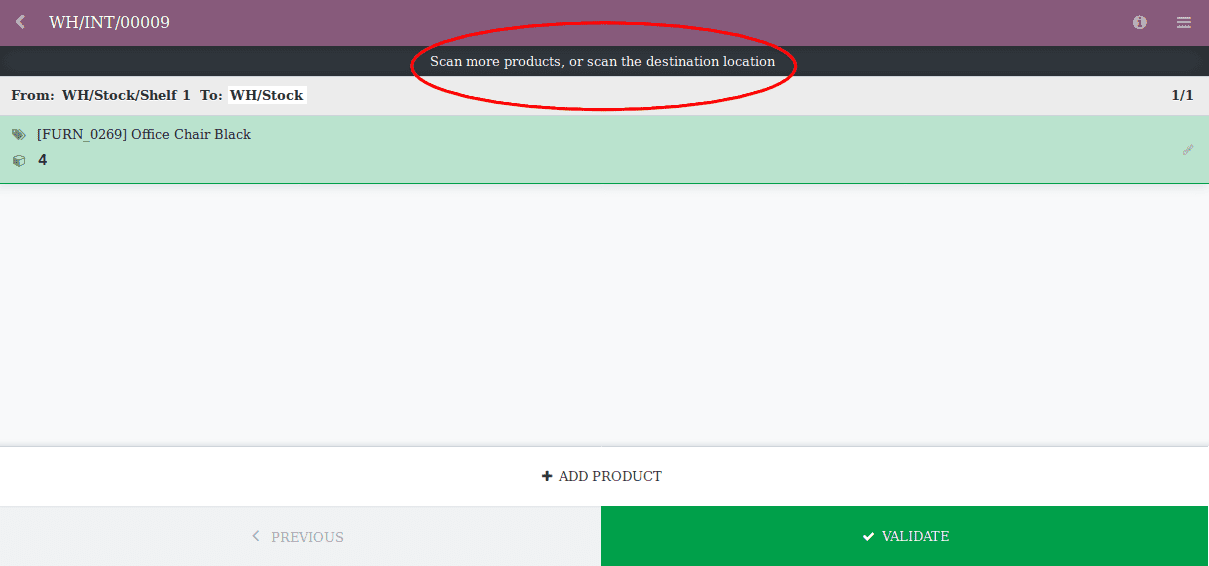
One gets the notification of which barcode is to be scanned next at the top of the barcode module. Consider, we have scanned the barcode of the internal transfer. Hence the barcode window will be like:
So, here we have to scan the source location. Keep in mind that we are doing an internal transfer. Here I am scanning the barcode of WH/Stock/Shelf 1.
Then we have to scan the products. Scanning the product barcode many times will increase the quantity of that product.

Next, we have to choose the destination location. Here I am going to scan the barcode of WH/Stock/Shelf 2.
Later we can validate that transfer. It will lead to a transfer validation success message. This is in the case of the internal transfer operation. You can check other operations too.
In events:
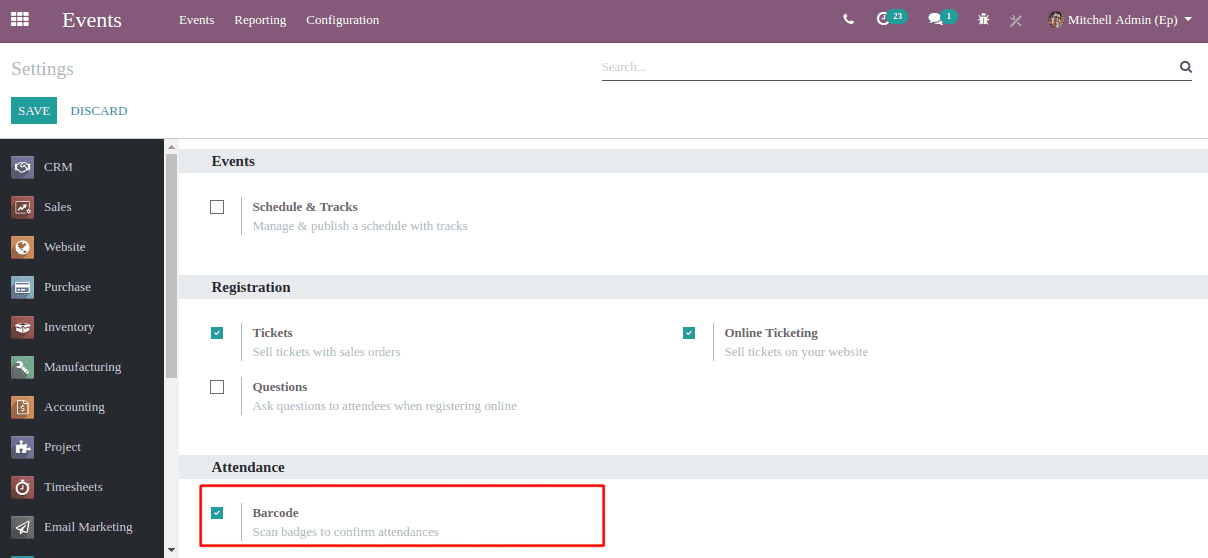
One can set the barcode at the events in the settings from the configuration menu.

If a person is registering for an event, an email with a barcode is sent to the email address of that person. This barcode can be used as an entry ticket for the event.
One can find the barcode interface for an event in the above figure.
This is the barcode interface of the event. Here one can find the details about the event too.
These are the segments in Odoo where barcodes are used. The application of barcodes in Odoo is interesting. Isn’t it?
You can also have look on Odoo 13 POS