The SSL stands for Secure Sockets Layer is a cryptographic protocol that is used to provide communication security between web clients and web servers over an insecure network.
Self-signed certificates are security certificates that are not signed by a security authority-which encrypts the communication between server and clients.
This blog explains how to configure self-signed SSL certificates for Nginx.
As these self-signed certificates are not signed by any trusted authority we cannot use the self-signed certificate for validating the identity of our server automatically.
Prerequisite to be satisfied before you start
1.Non-root user with sudo privilege
2.Nginx web server installed
Refer blog How to Configure Odoo with Nginx as Reverse Proxy ? for Nginx.
Now follow the instructions below to configure the self-signed SSL certificates.
1.Creating the certificate using OpenSSL
The first step is to create an SSL certificate.
Follow the below-mentioned steps for creating a certificate and self-signed key pair
sudo openssl req -x509 -nodes -days 365 -newkey rsa: 2048 -keyout /etc/ssl/private/nginx-selfsigned.key -out /etc/ssl/certs/nginx-selfsigned.crt
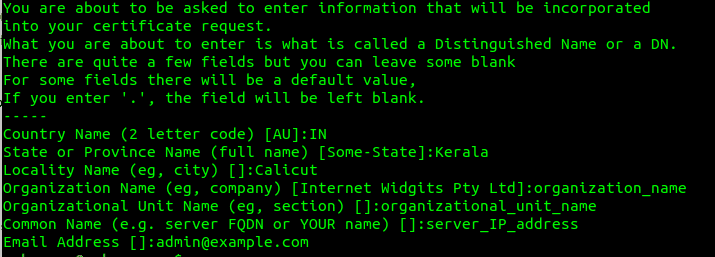
Once we have created the key file and the certificate, next we will follow up with some questions related to our server where we have to give the correct information in order to embed those details properly in the certificate.
You have to provide your correct country name, state, locality, organization name, organizational unit name, common name, and then the email address.
The line which asks for Common Name (eg server FQDN or YOUR name) [], is the one that is most important in this, where you have to specify the domain name or the public IP address of your server
We also need to create a strong Diffie-Hellman group as we are using OpenSSL- use the following command for this
sudo openssl dhparam -out /etc/nginx/dhparam.pem 4096
2. Configuring Nginx to use SSL
Now let's configure the Nginx configuration file as follows
1. Configuration Snippet for SSL Key and Certificate
Now we have to create a new Nginx configuration snippet /etc/nginx/snippets/self-signed.conf using the command below
sudo nano /etc/nginx/snippets/self-signed.conf
Add the ssl_certificate and the ssl_certificate_key in the configuration file as given below.

2. Creating a Configuration Snippet with Strong Encryption Settings
The next step is to create another snippet to define some SSL settings in order to keep our server secure.
sudo nano /etc/nginx/snippets/ssl-params.conf
Use the following commands in this SSL-params.conf
ssl_protocols TLSv1.2;
ssl_prefer_server_ciphers on;
ssl_dhparam /etc/nginx/dhparam.pem;
ssl_ciphers ECDHE-RSA-AES256-GCM-SHA512: DHE-RSA-AES256-GCM-SHA512: ECDHE-RSA-AES256-GCM-SHA384: DHE-RSA-AES256-GCM-SHA384: ECDHE-RSA-A38256;
ssl_ecdh_curve secp384r1; # Requires nginx> = 1.1.0
ssl_session_timeout 10m;
ssl_session_cache shared: SSL: 10m;
ssl_session_tickets off; # Requires nginx> = 1.5.9
ssl_stapling on; # Requires nginx> = 1.3.7
ssl_stapling_verify on; # Requires nginx => 1.3.7
resolver 8.8.8.8 8.8.4.4 valid = 300s;
resolver_timeout 5s;
# Disable strict transport security for now. You can uncomment the following
# line if you understand the implications.
# add_header Strict-Transport-Security "max-age = 63072000; includeSubDomains; preload";
add_header X-Frame-Options DENY;
add_header X-Content-Type-Options nosniff;
add_header X-XSS-Protection "1; mode = block";
3.Adjusting the Nginx Configuration to Use SSL
Now we can adjust the Nginx configuration to enable SSL.
Assume we are using the server block configuration in the directory /etc/nginx/sites-available/example.com
Take the backup of our current configuration file as follows:
sudo cp /etc/nginx/sites-available/example.com /etc/nginx/sites-available/example.com.bak
Now open the configuration file
sudo nano /etc/nginx/sites-available/example.com
And make the following adjustments.
server {
listen 80;
listen [::]: 80;
server_name example.com www.example.com;
root /var/www/example.com/html;
index index.html index.htm index.nginx-debian.html;
. . .
}
In this, we just need to change the listen to directives and add the SSL snippets, so even if the format and order of the file are different from the above it's ok. Now you can change the existing server block to port 443 for serving SSL traffic and also create a new server block for responding to port 80. So that it will be redirected automatically to port 443
Now in the existing configuration file update the listen to statements to use the port 443 and SSL and include the two snippets files that we have created in the previous steps.
server {
listen 443 ssl;
listen [::]: 443 ssl;
include snippets / self-signed.conf;
include snippets / ssl-params.conf;
server_name example.com www.example.com;
root /var/www/example.com/html;
index index.html index.htm index.nginx-debian.html;
. . .
}
Paste the next server block after the first one
3.Enable the Nginx Changes
Now we can restart the Nginx to implement the new changes that we have made.
Make sure that there are no syntax errors in the files, for that use the command
sudo nginx -t
If everything is error-free you can get a result like this.
nginx: [warn] "ssl_stapling" ignored, issuer certificate not found
nginx: the configuration file /etc/nginx/nginx.conf syntax is ok
nginx: configuration file /etc/nginx/nginx.conf test is successful
Now we can restart the Nginx
sudo systemctl restart nginx
4.Testing
Now that we can test your SSL server.
In your browser type https: // server_domain_or_IP
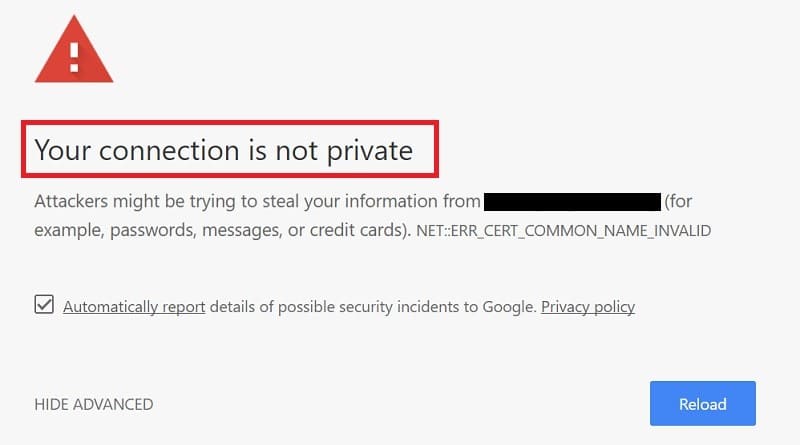
If the certificate that we have created is not signed by any of the trusted certificates authority you will be getting a warning message like this.
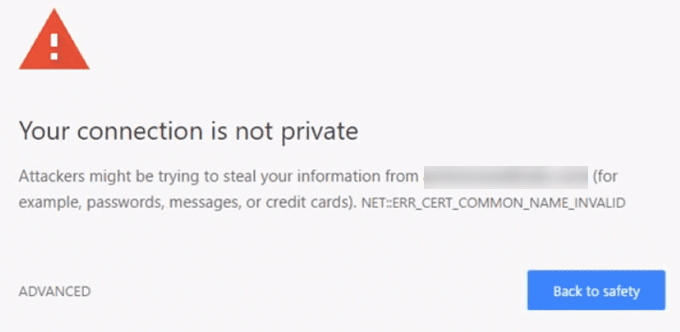
As we just need the encryption aspect of our certificate click on the "ADVANCED" and then proceed.
You will be taken to your site now. In the address bar of your browser if you see a lock symbol with a 'x' over it, which means it's still encrypting your connection.
5.Changing to a Permanent Redirect
The Ngnix configuration need to be updated as given for allowing only the encrypted traffic
In your configuration file change the return 302 to return 301
sudo nano /etc/nginx/sites-available/example.com
return 301 https: // $ server_name $ request_uri;
Now again check for syntax errors and then restart your Nginx
sudo nginx -t
sudo systemctl restart nginx
This is how we configure the Nginx server to use strong encryption for client connection