The Odoo log-in screen is very simplistic; it includes only a username and password. This works great for most implementations, but many companies want more security checks in place before allowing a user to enter their account, which would involve sending an OTP to the user’s email address.
In this post, we’ll demonstrate how to create a custom Odoo 19 module where the OTP field will be displayed directly on the Odoo login screen. We will implement all the necessary functionality required to generate and send the code via email and validate it before opening the user's session.
At the end of the process, we will get the following sequence of operations during the authentication procedure:
- User enters his username and password.
- Odoo validates the user's credentials.
- When the user's credentials are valid, the system displays the OTP field on the current page, and the user receives a 6-digit code via email.
- The user inputs the code and logs in.
Why Bother With an OTP Field?
A password is only one level of protection. If it becomes compromised - via a phishing website, a reused password, or a breach on another service - this ends the story there. The OTP feature makes it so that, in addition to compromising the password, the attacker will also have to get hold of the user's email account.
At the same time, it highlights how versatile Odoo’s login page can be. After learning how such a field is implemented in Odoo, any other elements can be added to the page following the same principle - from the company selector to a checkbox for remembering the device and a captcha.
What Are We Building?
This module covers four categories in Odoo:
- res.users model – for saving the generated OTP and the expiration time.
- Controller – for verifying the credentials, generating OTP, sending the OTP, and verifying the OTP.
- Login QWeb template – for adding the OTP field on the page.
- Little bit of JavaScript code – for controlling the user interface with the help of Odoo’s public widgets.
Now we’ll see the detailed explanation for all of these.
Module Structure
This is how the completed module is organized on disk. Remembering this will help you to understand what we do as we develop each component:
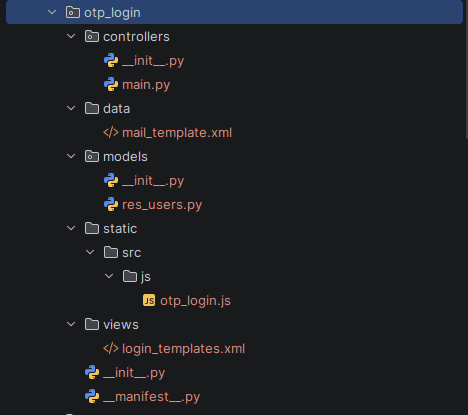

- __manifest__.py - module metadata: name, dependencies (web, mail), and the assets/data files to load.
- controllers/main.py - the send_otp and verify_otp routes.
- models/res_users.py - the otp and otp_expiry fields, plus the helper methods.
- views/login_templates.xml - inherits web.login to add the OTP input field.
- data/mail_template.xml - the mail.template record used to email the OTP.
- static/src/js/otp_login.js - the public widget controlling the login page's behavior.
Step 1: Add OTP Fields to res.users
First, we will add two fields to the res.users model: one that will store the OTP value, and another will store the expiration date of the OTP. It may seem like a small thing to set the expiration date for the OTP, but it’s important because otherwise, an old OTP will remain valid indefinitely.
# -*- coding: utf-8 -*-
import random
from odoo import models, fields

class ResUsers(models.Model):
   _inherit = 'res.users'
   otp = fields.Char(
       string='OTP Code',
       copy=False,
       help="One-Time Password used for login authentication.",
   )
   otp_expiry = fields.Datetime(
       string='OTP Expiry',
       copy=False,
       help="Date/time after which the current OTP is no longer valid.",
   )
   def _generate_otp(self):
       """Generate a secure 6-digit numeric OTP and store it (with expiry) on the user."""
       self.ensure_one()
       digits = "0123456789"
       otp_code = ''.join(random.choice(digits) for _ in range(6))
       print('otp_code',otp_code)
       expiry = fields.Datetime.add(fields.Datetime.now(), minutes=10)
       self.sudo().write({'otp': otp_code, 'otp_expiry': expiry})
       return otp_code
   def _verify_otp(self, otp_input):
       """Check the submitted OTP against the stored one and its expiry."""
       self.ensure_one()
       if not self.otp or not otp_input:
           return False
       if self.otp_expiry and fields.Datetime.now() > self.otp_expiry:
           return False
       print('test',self.otp == otp_input)
       return self.otp == otp_input
   def _clear_otp(self):
       self.sudo().write({'otp': False, 'otp_expiry': False})
Absolutely nothing fancy about it – a mere 6-digit random code, a 10-minute validity period, and some supporting methods so that our controller won’t need to handle the logic.
Step 2: Build the Controller
Here is where the authentication process will take place. We will extend the Odoo Home controller, which currently handles /web/login, and introduce two more routes:
- /login/send_otp - verifies username/password combination, and if it is correct, sends an OTP to the user’s email address.
- /web/login/verify_otp - verifies the OTP entered by the user.
File: controllers/main.py
# -*- coding: utf-8 -*-
from odoo import http
from odoo.http import request
from odoo.exceptions import AccessDenied
from odoo.addons.web.controllers.home import Home

class OTPLoginController(Home):
   @http.route('/web/login/send_otp', type='jsonrpc', auth='public', csrf=False)
   def send_otp(self, login, password, **kwargs):
       """Validate the credentials and send an OTP via email.
       Deliberately does NOT call request.session.authenticate()/logout().
       Those rotate the session (and its CSRF secret), which invalidates the
       csrf_token hidden field already rendered in the login page HTML and
       causes "Session expired (invalid CSRF token)" on the final native
       form submit. Instead we check the credentials directly against
       res.users without touching the session at all; the real session is
       only created later, by the standard /web/login POST once the OTP is
       verified.
       """
       credential = {'login': login, 'password': password, 'type': 'password'}
       try:
           auth_info = request.env['res.users'].sudo().authenticate(
               credential, {'interactive': True}
           )
           uid = auth_info['uid']
       except AccessDenied:
           return {'success': False, 'error': 'Invalid login or password.'}
       user = request.env['res.users'].sudo().browse(uid)
       if not user.email:
           return {
               'success': False,
               'error': 'No email address is configured for this user; '
                        'the OTP cannot be sent.',
           }
       # Generate and store a fresh OTP for the user.
       otp_code = user._generate_otp()
       # Render and send the OTP email using the module's mail template.
       template = request.env.ref('otp_login.otp_email_template', raise_if_not_found=False)
       if template:
           template.sudo().with_context(otp_code=otp_code).send_mail(
               user.id, force_send=True
           )
       return {'success': True}
   @http.route('/web/login/verify_otp', type='jsonrpc', auth='public', csrf=False)
   def verify_otp(self, login, otp, **kwargs):
       """Verify the submitted OTP against the one stored for the user."""
       user = request.env['res.users'].sudo().search([('login', '=', login)], limit=1)
       if not user:
           return {'success': False, 'error': 'Invalid OTP.'}
       if user._verify_otp(otp):
           user._clear_otp()
           return {'success': True}
       return {'success': False, 'error': 'Invalid or expired OTP. Please try again.'}
And there is one aspect that should be highlighted: both of these ways do not involve any calls to Odoo’s session. The authentication process is being done using res.users, without any use of session.authenticate(). This means that the CSRF token on the page will remain untouched till the last moment: until the standard Odoo login form is submitted.
And one more thing: the type of route here is jsonrpc. Since Odoo 19, this kind of route has been renamed from type="json" to type="jsonrpc".
Step 3: Extend the Login Template
Now, we put the real input field on our login page by inheriting web.login.
File: views/login_templates.xml
<?xml version="1.0" encoding="UTF-8" ?>
<odoo>
   <template id="login_page_inherit" inherit_id="web.login">
       <xpath expr="//div[hasclass('oe_login_buttons')]" position="before">
           <div class="form-group d-none" id="otp_field_container">
               <label for="otp">OTP</label>
               <input type="text" name="otp" id="otp" class="form-control"
                      placeholder="Enter the OTP sent to your email"
                      autocomplete="one-time-code"/>
           </div>
       </xpath>
   </template>
</odoo>
The div is initially in d-none mode until the username and password have been authenticated. This is done by the JavaScript that follows.
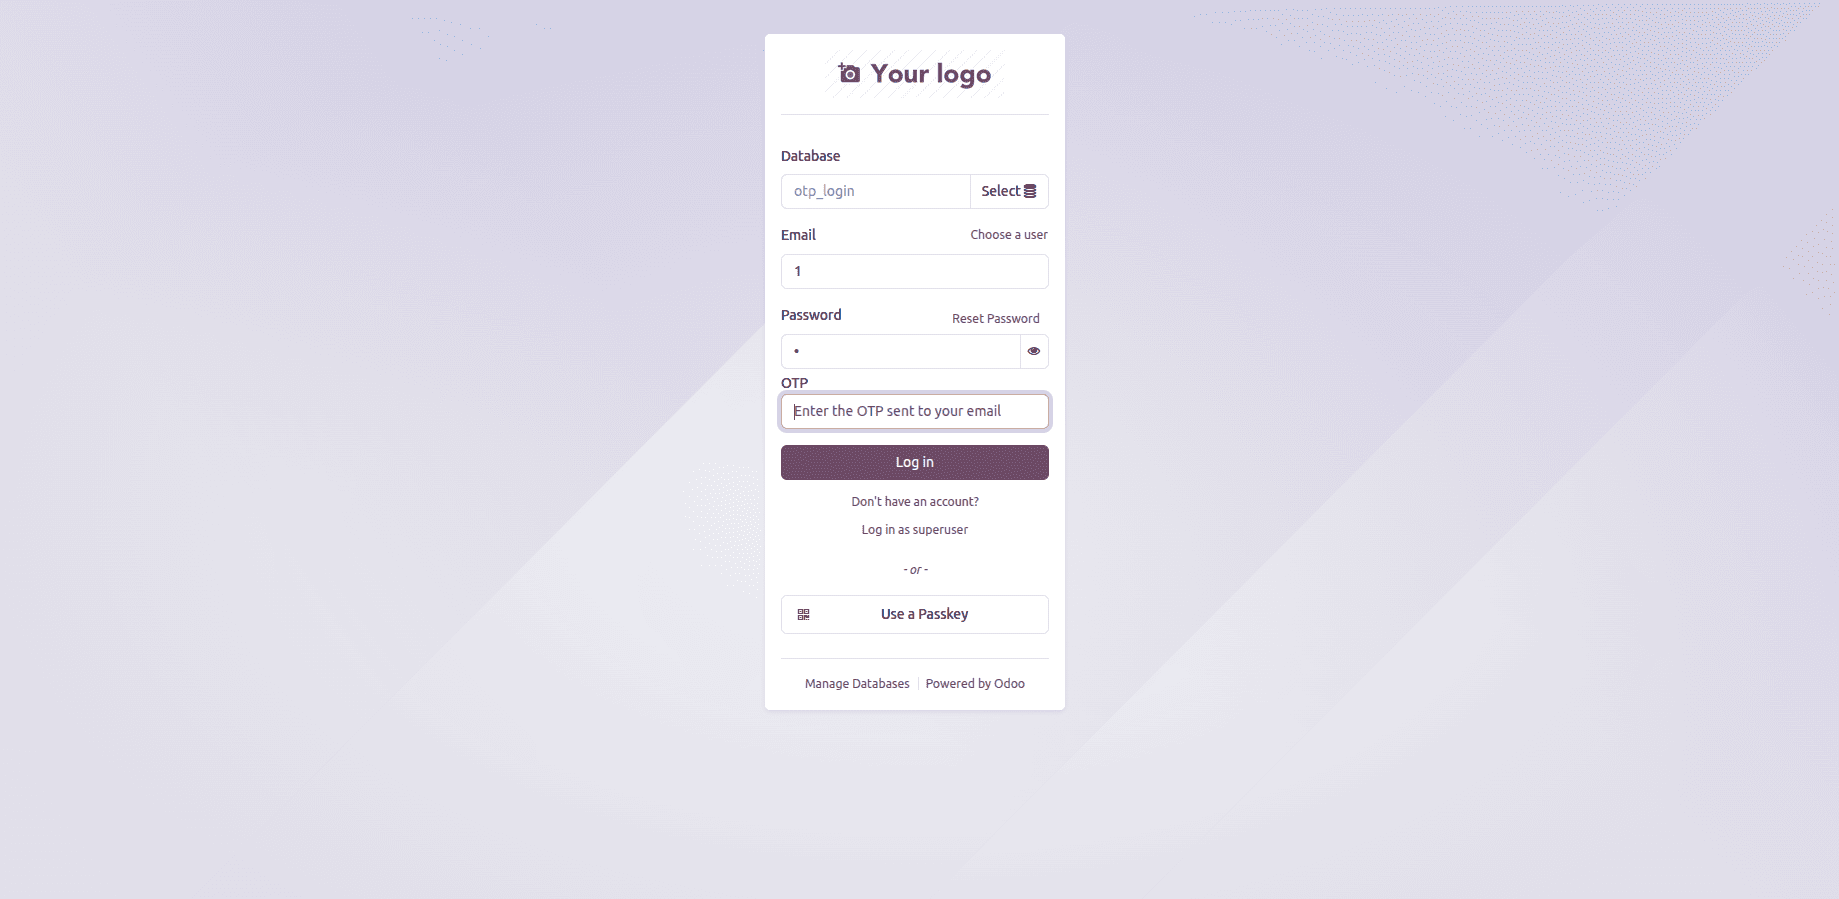
Step 4: Add the JavaScript (Public Widget)
The script that knits the whole thing together from the front-end side. The script extends Odoo’s publicWidget, connects with the login form’s submit button, and handles what to do when clicked:
File: static/src/js/otp_login.js
/** @odoo-module **/
import publicWidget from '@web/legacy/js/public/public_widget';
import { rpc } from '@web/core/network/rpc';
publicWidget.registry.OTPLogin = publicWidget.Widget.extend({
   selector: '.oe_login_form',
   events: {
       'click button[type="submit"]': '_onLoginSubmit',
   },
   /**
    * @override
    */
   start: function () {
       this._otpVerified = false;
       return this._super.apply(this, arguments);
   },
   _onLoginSubmit: function (ev) {
       const $form = this.$el;
       const $otpContainer = $form.find('#otp_field_container');
       // Once the OTP has already been verified, let the form submit natively.
       if (this._otpVerified) {
           return;
       }
       ev.preventDefault();
       ev.stopPropagation();
       const login = $form.find('input[name="login"]').val();
       const password = $form.find('input[name="password"]').val();
       const otp = $form.find('#otp').val();
       // If the OTP field is already visible, we are in the verification step.
       if (!$otpContainer.hasClass('d-none')) {
           this._verifyOTP(login, otp, $form);
           return;
       }
       // Otherwise, validate username/password first and trigger the OTP email.
       this._sendOTP(login, password, $form);
   },
   _setLoading: function ($form, isLoading) {
       const $button = $form.find('button[type="submit"]');
       $button.prop('disabled', isLoading);
   },
   _sendOTP: function (login, password, $form) {
       const self = this;
       this._setLoading($form, true);
       rpc('/web/login/send_otp', { login: login, password: password })
           .then(function (result) {
               self._setLoading($form, false);
               if (result.success) {
                   // Reveal the OTP field and focus it.
                   $form.find('#otp_field_container').removeClass('d-none');
                   $form.find('#otp').focus();
                   // Password is no longer required for the next (verify) step,
                   // but we keep it in the form since /web/login still needs it
                   // once the OTP is confirmed.
                   self._clearError();
               } else {
                   self._showError(result.error || 'Authentication failed. Please try again.');
               }
           })
           .catch(function () {
               self._setLoading($form, false);
               self._showError('An error occurred while sending the OTP.');
           });
   },
   _verifyOTP: function (login, otp, $form) {
       const self = this;
       this._setLoading($form, true);
       rpc('/web/login/verify_otp', { login: login, otp: otp })
           .then(function (result) {
               self._setLoading($form, false);
               if (result.success) {
                   // OTP confirmed: let the standard login form submission
                   // proceed natively (server-side /web/login handles it).
                   self._otpVerified = true;
                   self._clearError();
                   $form.find('button[type="submit"]').trigger('click');
               } else {
                   self._showError(result.error || 'Invalid OTP. Please try again.');
                   $form.find('#otp').val('').focus();
               }
           })
           .catch(function () {
               self._setLoading($form, false);
               self._showError('An error occurred during OTP verification.');
           });
   },
   _showError: function (message) {
       this._clearError();
       this.$el.prepend(
           `<div class="alert alert-danger" role="alert">${message}</div>`
       );
   },
   _clearError: function () {
       this.$el.find('.alert-danger').remove();
   },
});
export default publicWidget.registry.OTPLogin;
The interception of the button click happens once (for credentials checking and OTP sending), but then the second click will go through normally after _otpVerified becomes true because the button click will simply submit the form at that point, and Odoo's regular login functionality will take over.
Also, notice the import statement as well: @web/core/network/rpc, which is the current method for making an RPC call from a public widget in Odoo 19.
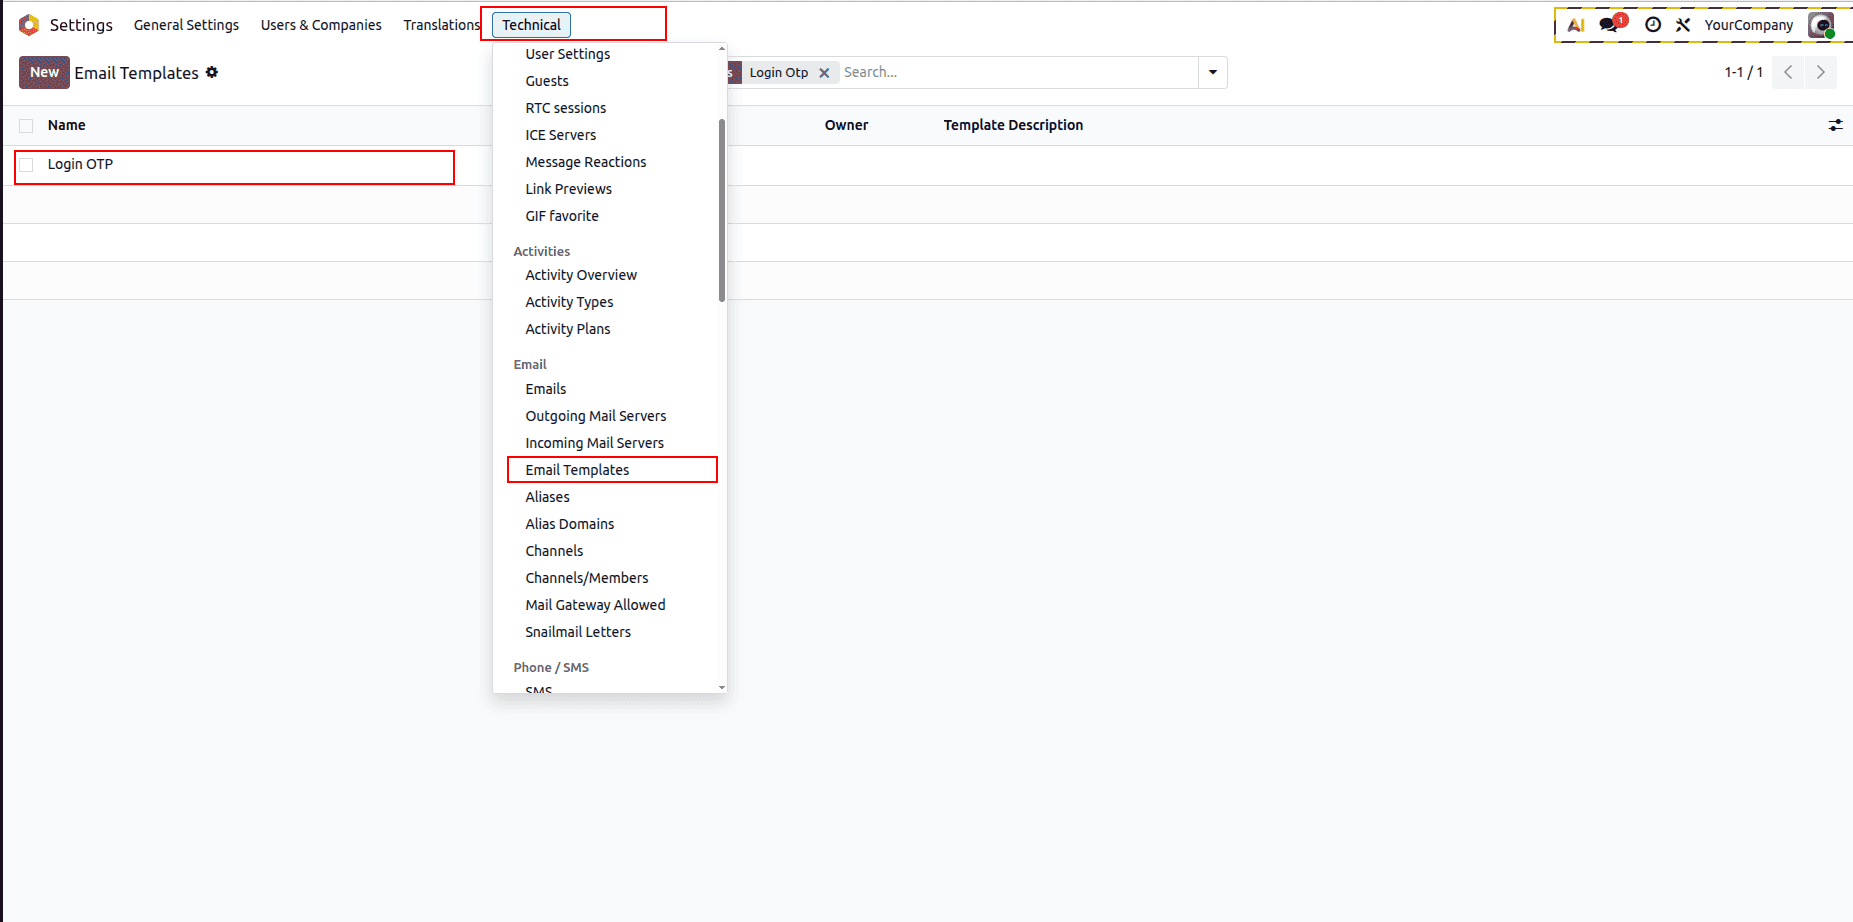
Step 5: Create the OTP Email Template
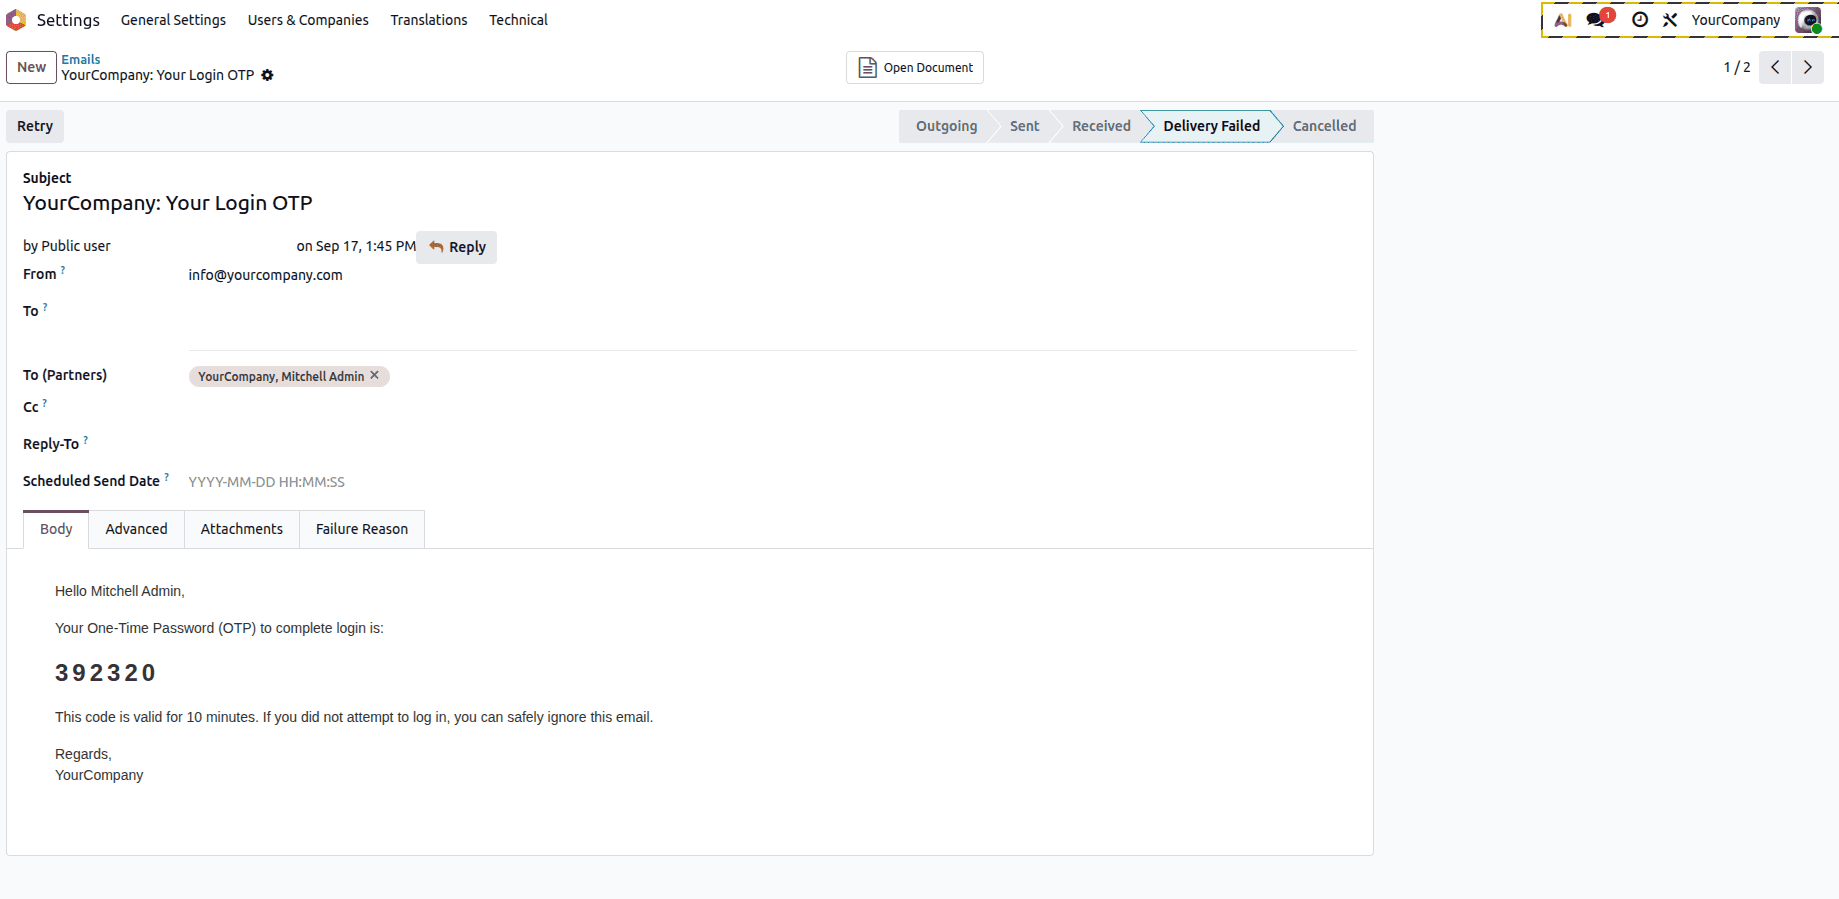
Lastly, we will require some content for mailing. This can be provided by using a mail.template object – either through Settings > Technical > Email > Templates or shipped as an XML file in the module:
<?xml version="1.0" encoding="UTF-8" ?>
<odoo>
   <data noupdate="1">
       <record id="otp_email_template" model="mail.template">
           <field name="name">Login OTP</field>
           <field name="model_id" ref="base.model_res_users"/>
           <field name="subject">{{ object.company_id.name }}: Your Login OTP</field>
           <field name="email_from">{{ object.company_id.email or user.email_formatted }}</field>
           <field name="email_to">{{ object.email }}</field>
           <field name="auto_delete" eval="True"/>
           <field name="body_html" type="html">
               <div style="font-family: Arial, Helvetica, sans-serif; font-size: 14px; color: #333;">
                   <p>Hello <t t-out="object.name"/>,</p>
                   <p>Your One-Time Password (OTP) to complete login is:</p>
                   <p style="font-size: 24px; font-weight: bold; letter-spacing: 4px;">
                       <t t-out="ctx.get('otp_code')"/>
                   </p>
                   <p>This code is valid for 10 minutes. If you did not attempt to log in, you
                       can safely ignore this email.</p>
                   <p>Regards,<br/>
                       <t t-out="object.company_id.name"/>
                   </p>
               </div>
           </field>
       </record>
   </data>
</odoo>
Putting It All Together
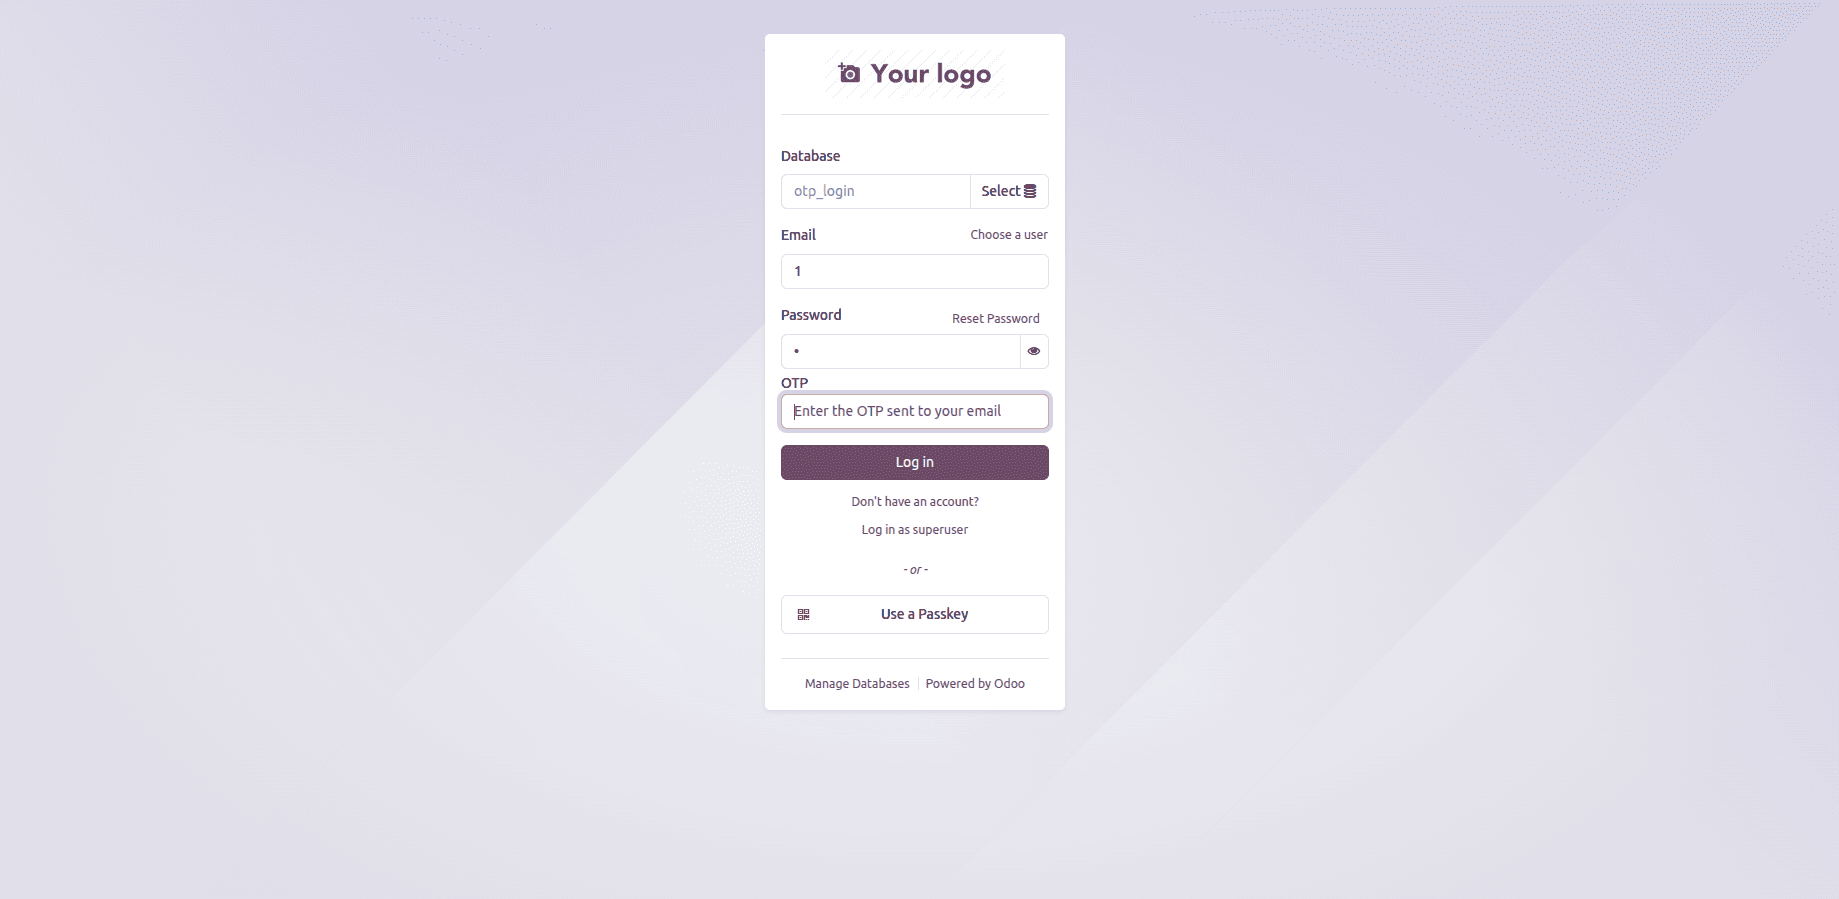
After installing the module, here’s how the login process works from a user perspective:
- Go to the login page – it all seems very familiar.
- Input your username and password, and click Login.
- Instead of logging in right away, an OTP box will show up, and a code will be sent to your email address within seconds.
- Enter the code, click Login – and you’re in.
Before testing the OTP login, please verify the outgoing mail server. If the mail server is not set up properly, then the OTP will not be sent to the email. The OTP will expire after 10 minutes. It is mentioned in the `_generate_otp()` function, and you can change it as per your requirements. The credentials will be validated prior to the OTP validation process to avoid any session expiration problems while submitting the OTP.
To read more about How to Add a Field to the User Login Page in Odoo 18, refer to our blog How to Add a Field to the User Login Page in Odoo 18.