In this blog let us discuss how to add chatter in the form view. For those, who are unaware of the chatter, see the below image,
This is the chatter and we have already seen this in many forms. So let us look at how we can add the same in our student form that we already have created in the previous blog: How to Create Module in Odoo 12 - Defining the Views
So we already have a form view,
<record id="student_free_view" model="ir.ui.view">
        	<field name="name">Student Form</field>
        	<field name="model">student.student</field>
        	<field name="arch" type="xml">
            	<form string="Student">
                	<sheet>
                    	<field name="photo" widget="image" class="oe_left oe_avatar" />
                    	<div class="oe_title">
                        	<h3>
                            	<field name="name"/>
                        	</h3>
                    	</div>
                    	<group>
                        	<group>
                            	<field name="age"/>
                            	<field name="gender"/>
                        	</group>
                        	<group>
                            	<field name="student_dob"/>
                            	<field name="student_blood_group"/>
                            	<field name="nationality"/>
                        	</group>
                    	</group>
                	</sheet>
            	</form>
        	</field>
</record>
This is the current form we have, where there is no chatter
So now we can have a look at how to add the chatter to this, for this what we have to do is that first of all in the python file, in the model student.student (the model we are using, one can do accordingly to their model),
Code:
class StudentStudent(models.Model):
	_name = 'student.student'
	_inherit = 'mail.thread'
	_description = 'Student Record'
Inherit the model mail.thread to student.student as shown in the above image. This is only what we have to do in the python file, the rest of the coding is the views, so let us look at what changes has to be done in the views.
A four line of XML code has to be added to the view, as shown above, image.
<div class="oe_chatter">
         <field name="message_follower_ids" widget="mail_followers"/>
         <field name="message_ids" widget="mail_thread"/>
</div>
Once we add this code in the form view and upgrade the module, we can see that the chatter got added in the form view. As we have made the changes in the python file, don't forget to restart the service before upgrading.
This is the form we see now; one can see that the chatter got added at the bottom of the screen. Using the option, one can message to the followers or to the channels as well as in the Log Note tab. We can log some notes to see later.
Logging Note:
Sending Message:
All the logs and messages will get recorded in the bottom view.
So this is how one can add the chatter to the form.
Before winding up this, let us see what is the track_visibilty in Odoo is. Have you heard about it?
Track Visibility
Track visibility is used to track the changes made to the fields, as our system is a multi-user system and the different person can access the same record. There might be cases where we have to keep track of who changed the field values. In these cases, we can use track_visibilty.
So let us look at how we can do it in our model.
In the above image, you can see that I have added track_visibility for the fields name and age.
Just upgrade the module and to see the changes, just open the student record and change the value of the age, I have opened my record and changed the age to 25 from 24.
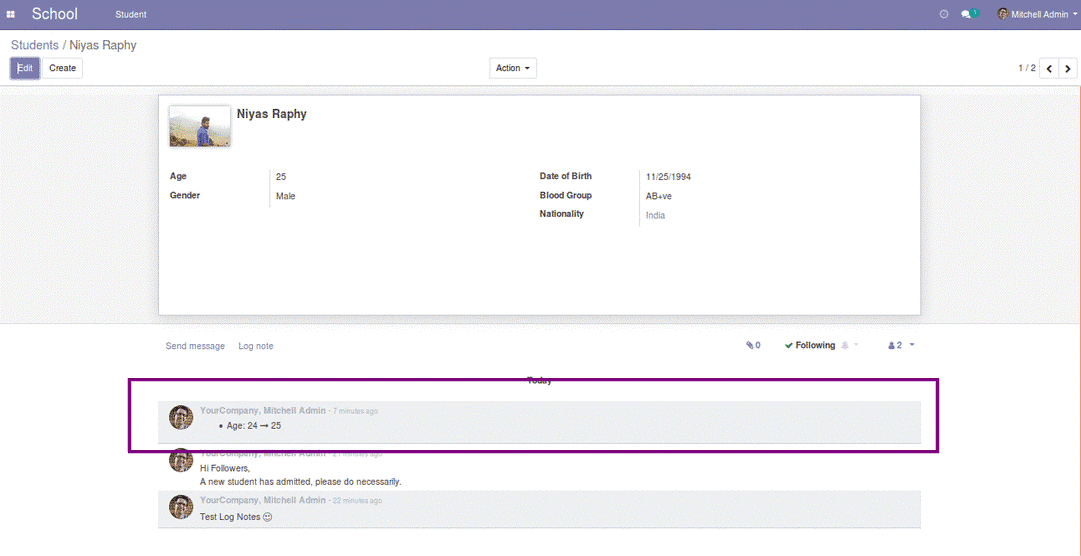
Once the age is changed, we can see that the change has been recorded. If you check the above image, you can see the old value and new value. This will give us an idea about who changed the value and history of that field values.
In the above example, I have added the track_visibility always for the field name, but it is not getting updated in the logger, will check the case and update it. So let us see the difference between the track visibility onchange and always.
Track Visibility: onchange (if it should be displayed in the notification only if the field changed) or always (if the value should always be displayed in change notifications even if this particular field did not change - useful to make notification more explanatory by always adding the name field).
So this is all about how to add the chatter and the track_visibility.