In Odoo, the Website module includes a powerful Customer Portal where users can conveniently access documents like Quotations, Sales Orders, Invoices, and more directly from the website. However, when a portal contains a large volume of records, navigating through all of them can become tedious without proper navigation tools.
A simple yet effective improvement is to introduce filters to custom portal menu items. Filters allow users to narrow down the displayed records, making it easier to locate specific information. In this blog, we’ll explore how to add filtering functionality to a custom portal section. In this case, “My Time Off” in Odoo 19.
Step 1: Add a Custom Menu to the Portal
Start by creating a new menu entry inside the Customer Portal. The following XML example shows how to introduce a new navigation item called “My Time Off”:
<!--    Template for breadcrumbs-->
   <template id="portal_my_time_off_menu" name="my_timeoff"
             inherit_id="portal.portal_breadcrumbs" priority="30">
       <xpath expr="//ol[hasclass('o_portal_submenu')]" position="inside">
           <li t-if="page_name == 'my_timeoff'"
               t-attf-class="breadcrumb-item #{'active ' if my_timeoff else ''}">
               <a t-if="my_timeoff"
                  t-attf-href="/my_timeoff?{{ keep_query() }}">My Time Off
               </a>
               <t t-else="">My Time Off</t>
           </li>
       </xpath>
   </template>
<!--    Template for adding card in portal dashboard-->
   <template id="portal_my_home_menu_my_timeoff" name="My Timeoff"
             inherit_id="portal.portal_my_home"
             customize_show="True" priority="30">
       <xpath expr="//div[hasclass('o_portal_docs')]" position="before">
           <t t-set="portal_client_category_enable" t-value="True"/>
       </xpath>
       <div id="portal_client_category" position="inside">
           <t t-call="portal.portal_docs_entry">
               <t t-set="icon"
                  t-value="'/portal_filter/static/src/img/timeoff.png'"/>
               <t t-set="title">My Time off</t>
               <t t-set="url" t-value="'/my_timeoff'"/>
               <t t-set="text">Follow, View your Time off</t>
               <t t-set="placeholder_count" t-value="'timeoff_count'"/>
           </t>
       </div>
   </template>
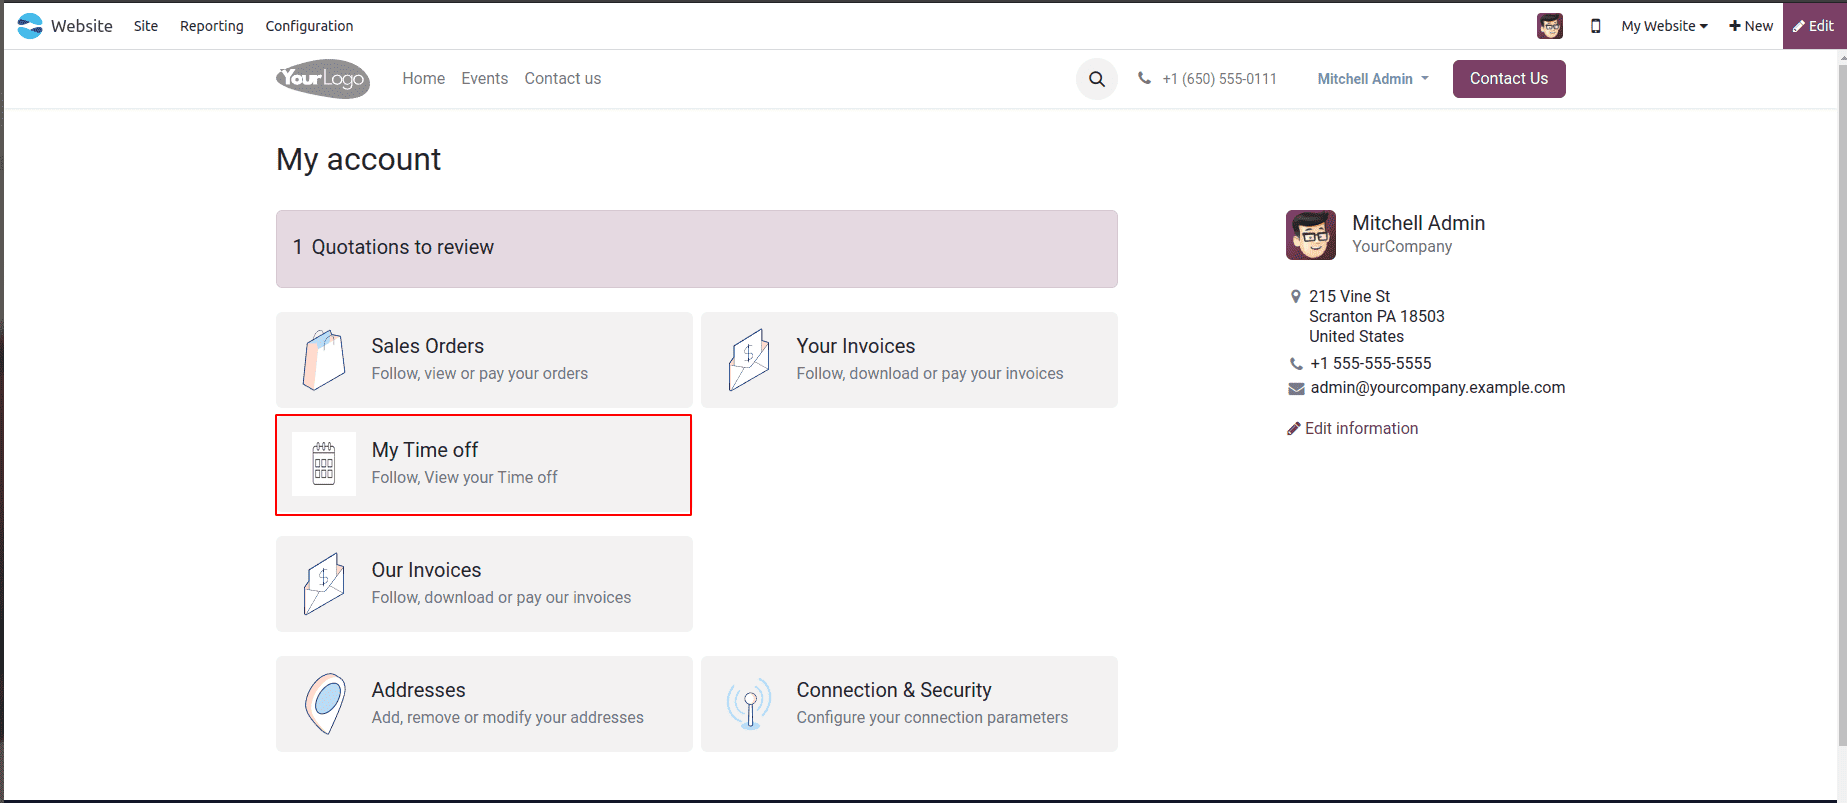
- This template introduces a breadcrumb item labeled "My Time Off" within the portal navigation.
- It verifies whether the user is currently on the my_timeoff page and marks the breadcrumb as active when appropriate.
- The keep_query() function ensures that existing query parameters, such as filters or page numbers will remain intact during navigation.
- The XML snippet also injects the "My Time Off" section into the portal dashboard.
- By clicking this menu entry, users are taken directly to their time-off overview page.
- A placeholder is defined to later display the number of time-off records dynamically.
Step 2: Add a Portal Counter in Python
To display the number of records next to the custom portal menu item, we extend the controller and override the _prepare_home_portal_values() method. This allows us to compute and inject the time-off count into the portal dashboard so it can be shown alongside the menu entry.
# -*- coding: utf-8 -*-
from odoo import http
from odoo.http import request
from collections import OrderedDict
from odoo.addons.portal.controllers.portal import CustomerPortal, pager as portal_pager
class PortalMyTimeoff(CustomerPortal):
   """To get the my time off in the website portal"""
   def _prepare_home_portal_values(self, counters):
       """To get the count of my time off in portal"""
       values = super()._prepare_home_portal_values(counters)
       if 'timeoff_count' in counters:
           values['timeoff_count'] = request.env[
               'hr.leave'].sudo().search_count(
               [('employee_id.user_id', '=', request.env.user.id)])
       return values
Make sure to add the file in __init__.py file.
Step 3: Build the Portal Controller with Filter Support
Next, we’ll create the main portal controller responsible for rendering the time-off records and managing the filtering options.
@http.route(['/my_timeoff', '/my_timeoff/page/<int:page>'], type='http', auth="user",
           website=True)
def my_timeoff_portal(self, filterby=None):
   """To add filter for records in the website portal"""
   employee_id = request.env[
       'hr.employee'].sudo().search(
       [('user_id', '=', request.env.user.id)])
   domain = [('employee_id', '=', employee_id.id)]
   searchbar_filters = {
       'all': {'label': 'All', 'domain': []},
       'to_approval': {
           'label': 'To Approve',
           'domain': [('state', '=', 'confirm')]},
       'second_approval': {
           'label': 'Second Approval',
           'domain': [('state', '=', 'validate1')]},
       'approved_timeoff': {
           'label': 'Approved',
           'domain': [('state', '=', 'validate')]},
       'refused_timeoff': {
           'label': 'Refused',
           'domain': [('state', '=', 'refuse')]},
   }
   my_time_off = request.env['hr.leave'].search(domain)
   if not filterby:
       filterby = 'all'
   domain += searchbar_filters[filterby]['domain']
   filtered_time_off = my_time_off.search(domain)
   total_time_off = my_time_off.search_count(domain)
   page_detail = portal_pager(url='/my_timeoff',
                              total=total_time_off,
                              url_args={'filterby': filterby})
   return request.render(
       "your_module_name.portal_my_home_menu_my_timeoff_views",
       {
           'my_time_off': filtered_time_off,
           'page_name': 'my_timeoff',
           'pager': page_detail,
           'default_url': '/my_timeoff',
           'searchbar_filters': OrderedDict(
               sorted(searchbar_filters.items())),
           'filterby': filterby,
       })
- This controller method provides the /my_timeoff route and displays the user’s records based on the selected filters.
- searchbar_filters lists the filtering options and their corresponding domains.
The chosen filter updates the domain criteria before fetching the records.
- portal_pager manages pagination for large result sets.
All prepared values are sent to the template for display.
Step 4: Define the Portal View with Filters
Next, we’ll create the portal template responsible for displaying the time-off records along with the filtering options.
<!--    Template for time off table -->
   <template id="portal_my_home_menu_my_timeoff_views" name="My Time Off">
       <t t-call="portal.portal_layout">
           <t t-set="breadcrumbs_searchbar" t-value="True"/>
           <t t-call="portal.portal_searchbar">
               <t t-set="title">My Time Off</t>
           </t>
           <t t-call="portal.portal_table">
               <thead>
                   <tr class="active">
                       <th class="text-left">Time off Type</th>
                       <th class="text-center">Start Date</th>
                       <th class="text-end">End Date</th>
                       <th class="text-end">Status</th>
                   </tr>
               </thead>
               <t t-foreach="my_time_off" t-as="time_off">
                   <tr>
                       <td class='text-left'>
                           <span t-field="time_off.holiday_status_id.name"/>
                       </td>
                       <td class='text-center'>
                           <span t-field="time_off.date_from"/>
                       </td>
                       <td class='text-end'>
                           <span t-field="time_off.date_to"/>
                       </td>
                       <td class='text-end'>
                           <span t-field="time_off.state"/>
                       </td>
                   </tr>
               </t>
           </t>
       </t>
   </template>
Make sure to add the file to the __manifest__.py.
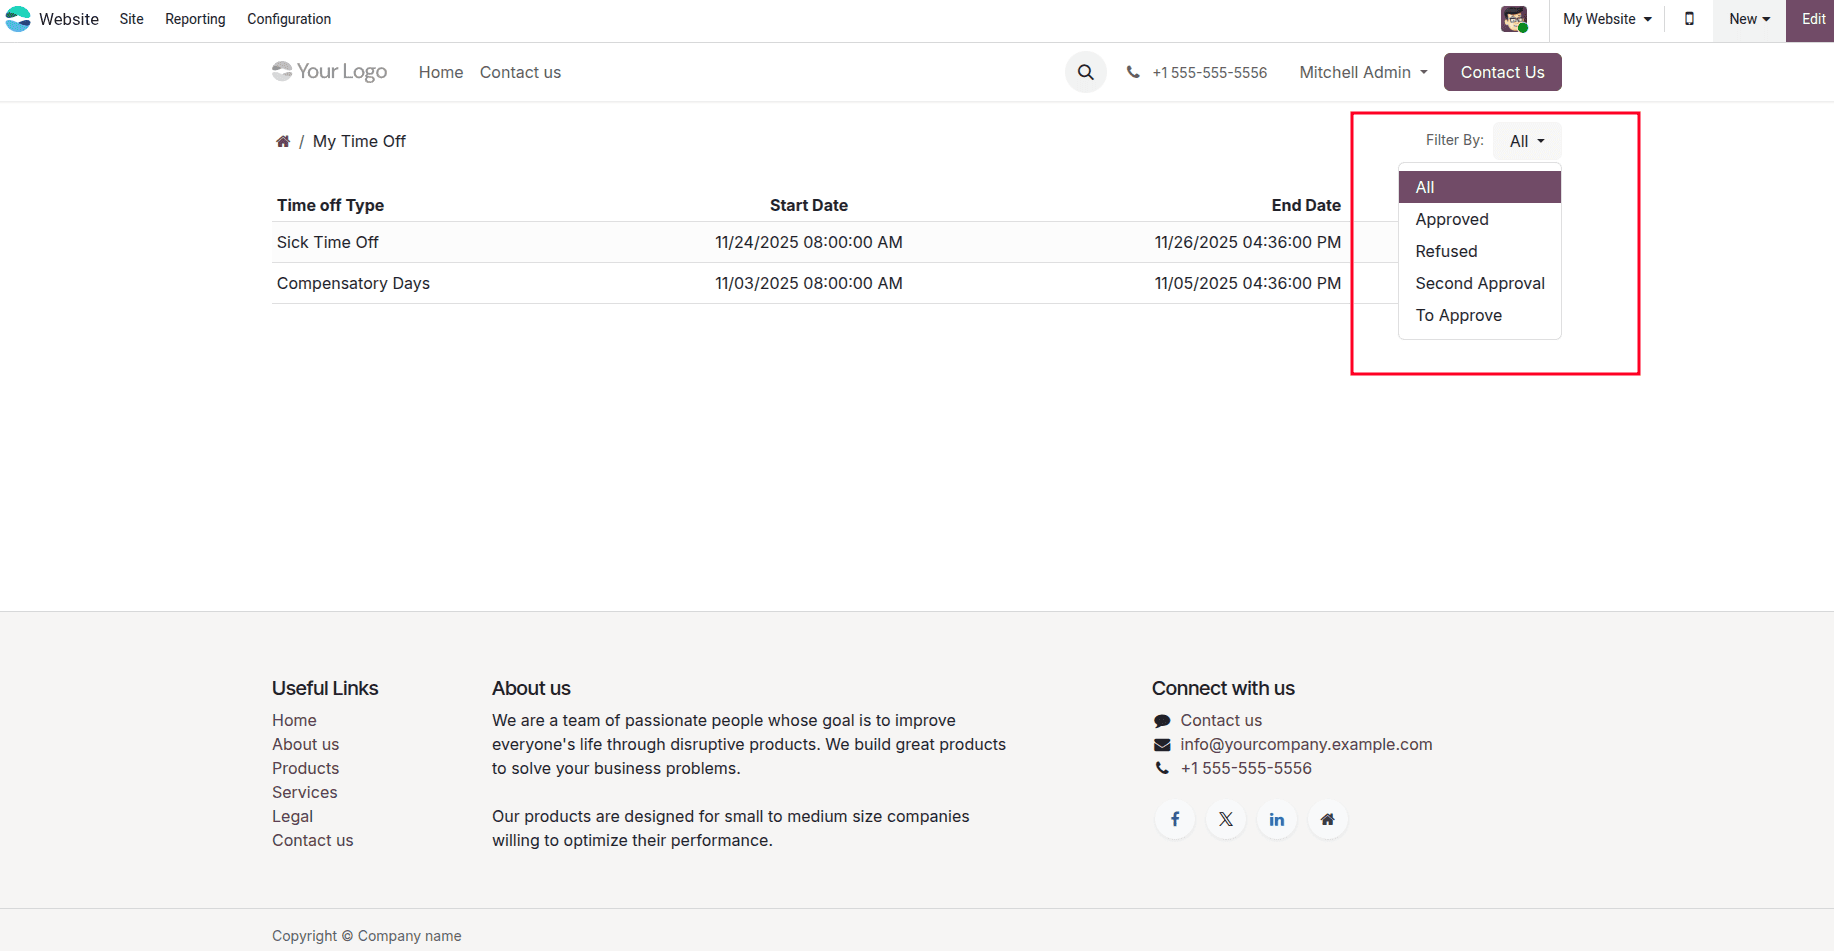
- This template displays a responsive table listing all the user’s time off entries.
- It leverages Odoo’s built-in portal_table and portal_searchbar components to keep the layout consistent with the rest of the portal.
- Each row presents key information such as leave type, the start and end dates, and the current approval status.
- The available filters are shown in the upper-right section through the portal’s search bar, allowing users to refine the list easily.
Finally, with all components implemented, users accessing the “My Time Off” section in the portal will now have access to a filter dropdown in the top-right corner. By choosing options such as To Approve, Approved, or Refused, they can quickly refine the list of displayed time off requests to match their needs.
This improvement makes the portal more user-friendly and significantly enhances the overall browsing experience within the Odoo 18 website portal.
Conclusion
Enhancing portal pages in Odoo 19 with custom filters gives users far better control over how they view and interact with their data. By implementing the steps outlined above, you can create a flexible and intuitive portal experience tailored to your business workflows. This approach not only improves navigation but also strengthens the overall usability of the customer portal.
To read more about How to Add a Filter Option in Odoo 18 Website Portal, refer to our blog, How to Add a Filter Option in Odoo 18 Website Portal.