Odoo 18 is a powerful business management platform that integrates a wide range of applications, including Sales, CRM, Inventory, Accounting, and more. Built for scalability and flexibility, it supports businesses aiming to streamline operations and boost productivity. One of its standout user-focused features is the Customer Portal, which provides external users such as clients and vendors with a secure environment to access important documents and engage directly with the business.
This blog focuses on the customization of the Customer Portal in Odoo 18, particularly how developers and functional users can tailor its default menus and views. From renaming menu items to adding new sections like purchase orders or delivery slips, and adjusting tree or form views to display business-specific data, explore the possibilities to align the portal more closely with an organization’s needs and identity.
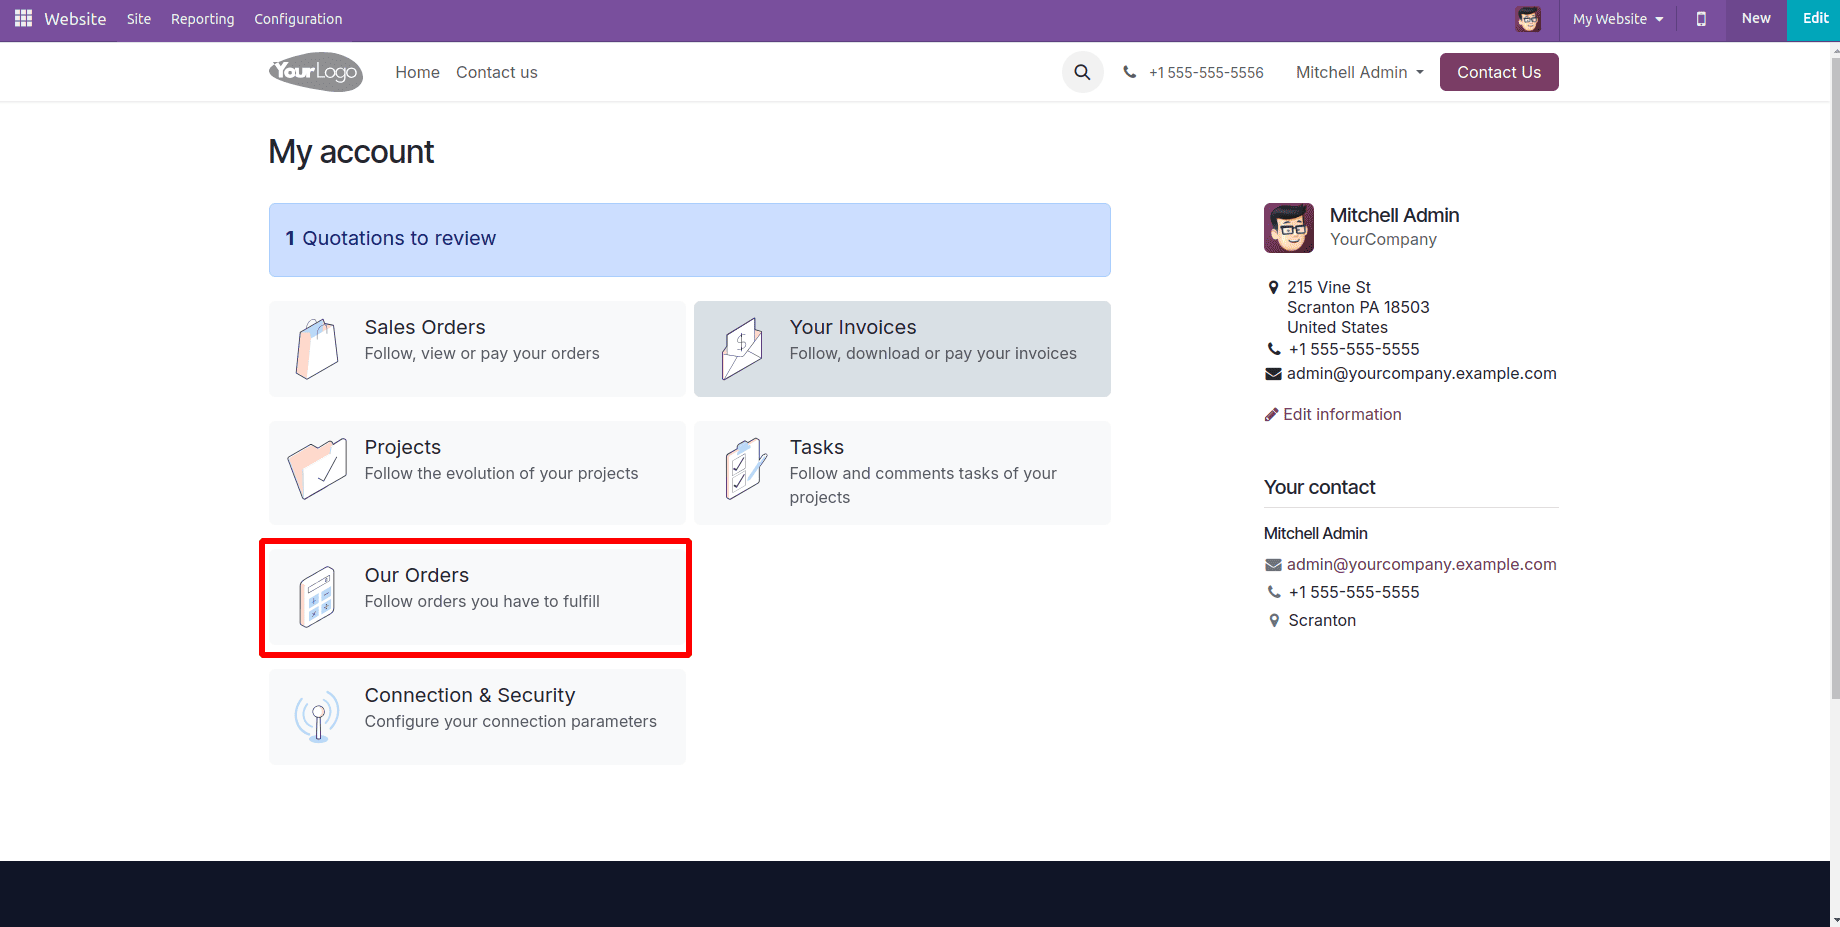
The Customer Portal in Odoo 18 provides a user-friendly dashboard where external users, such as clients or vendors, can track documents like quotations and purchase orders. The default view includes sections like Requests for Quotation and Our Orders, as shown in the figure below. The Our Orders block corresponds to purchase orders and can be customized to better fit business needs.
Menu Updation:
To update the menu label in the portal, the default QWeb template can be inherited and modified. Below is an example where the "Our Orders" block is renamed to “Purchase Orders”, also changing the menu text.
<?xml version="1.0" encoding="utf-8"?>
<odoo>

    <template id="portal_my_home_purchase_update_title" inherit_id="purchase.portal_my_home_purchase"
              name="Update Our Orders Title to Purchase Orders" priority="30">
        <xpath expr="//div[@id='portal_vendor_category']" position="replace">
            <div id="portal_vendor_category">
                <t t-call="portal.portal_docs_entry">
                    <t t-set="icon" t-value="'/web/static/img/rfq.svg'"/>
                    <t t-set="text">Follow your Requests for Quotation</t>
                    <t t-set="title">Requests for Quotation</t>
                    <t t-set="url" t-value="'/my/rfq'"/>
                    <t t-set="placeholder_count" t-value="'rfq_count'"/>
                </t>
                <t t-call="portal.portal_docs_entry">
                    <t t-set="icon" t-value="'/purchase/static/src/img/calculator.svg'"/>
                    <t t-set="text">Follow your Purchase Orders</t>
                    <t t-set="title">Purchase Orders</t>
                    <t t-set="url" t-value="'/my/purchase'"/>
                    <t t-set="placeholder_count" t-value="'purchase_count'"/>
                </t>
            </div>
        </xpath>
    </template>

</odoo>
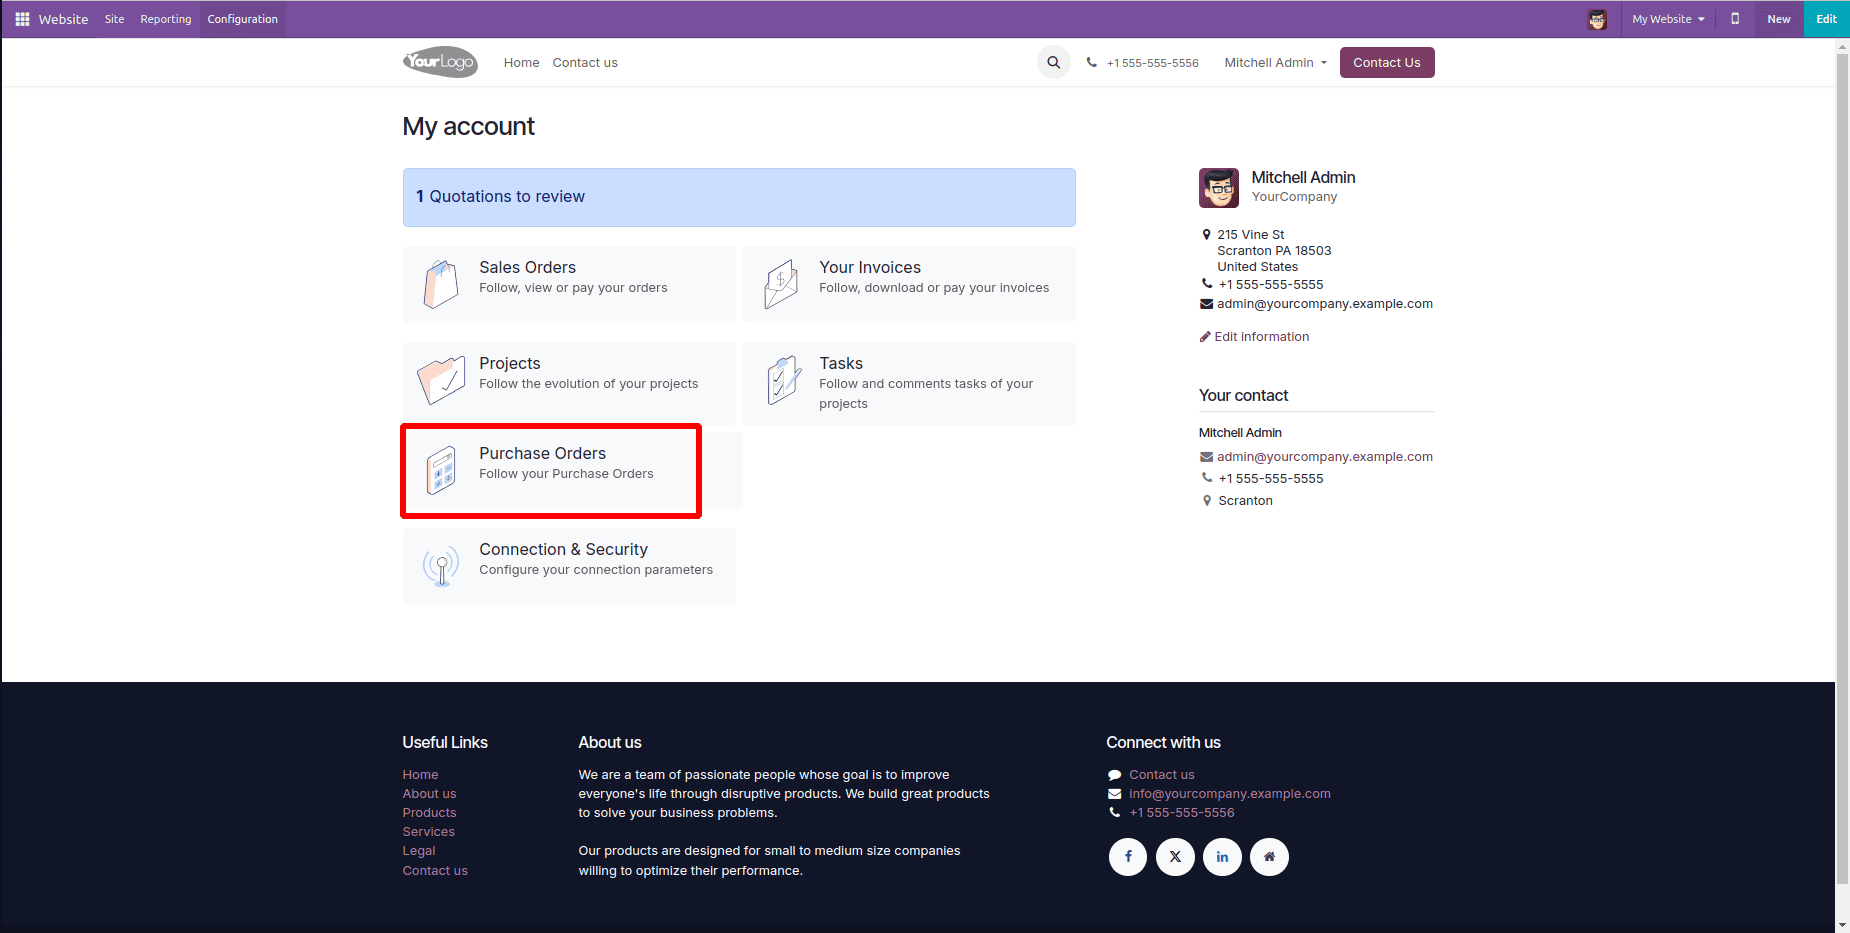
This code snippet demonstrates inheriting and customizing an existing QWeb template in Odoo 18. It inherits the original purchase.portal_my_home_purchase template and replaces the block with the ID portal_vendor_category. Inside this block, the two portal menu entries are redefined. The first entry remains unchanged for "Requests for Quotation," while the second entry updates the menu label and description from "Our Orders" to "Purchase Orders." This approach modifies the displayed text and titles without altering the original template structure, ensuring a clean and upgrade-safe customization. The following image displays the portal layout view after applying this customization.
List View Updation: Adding Order Date to Purchase Orders
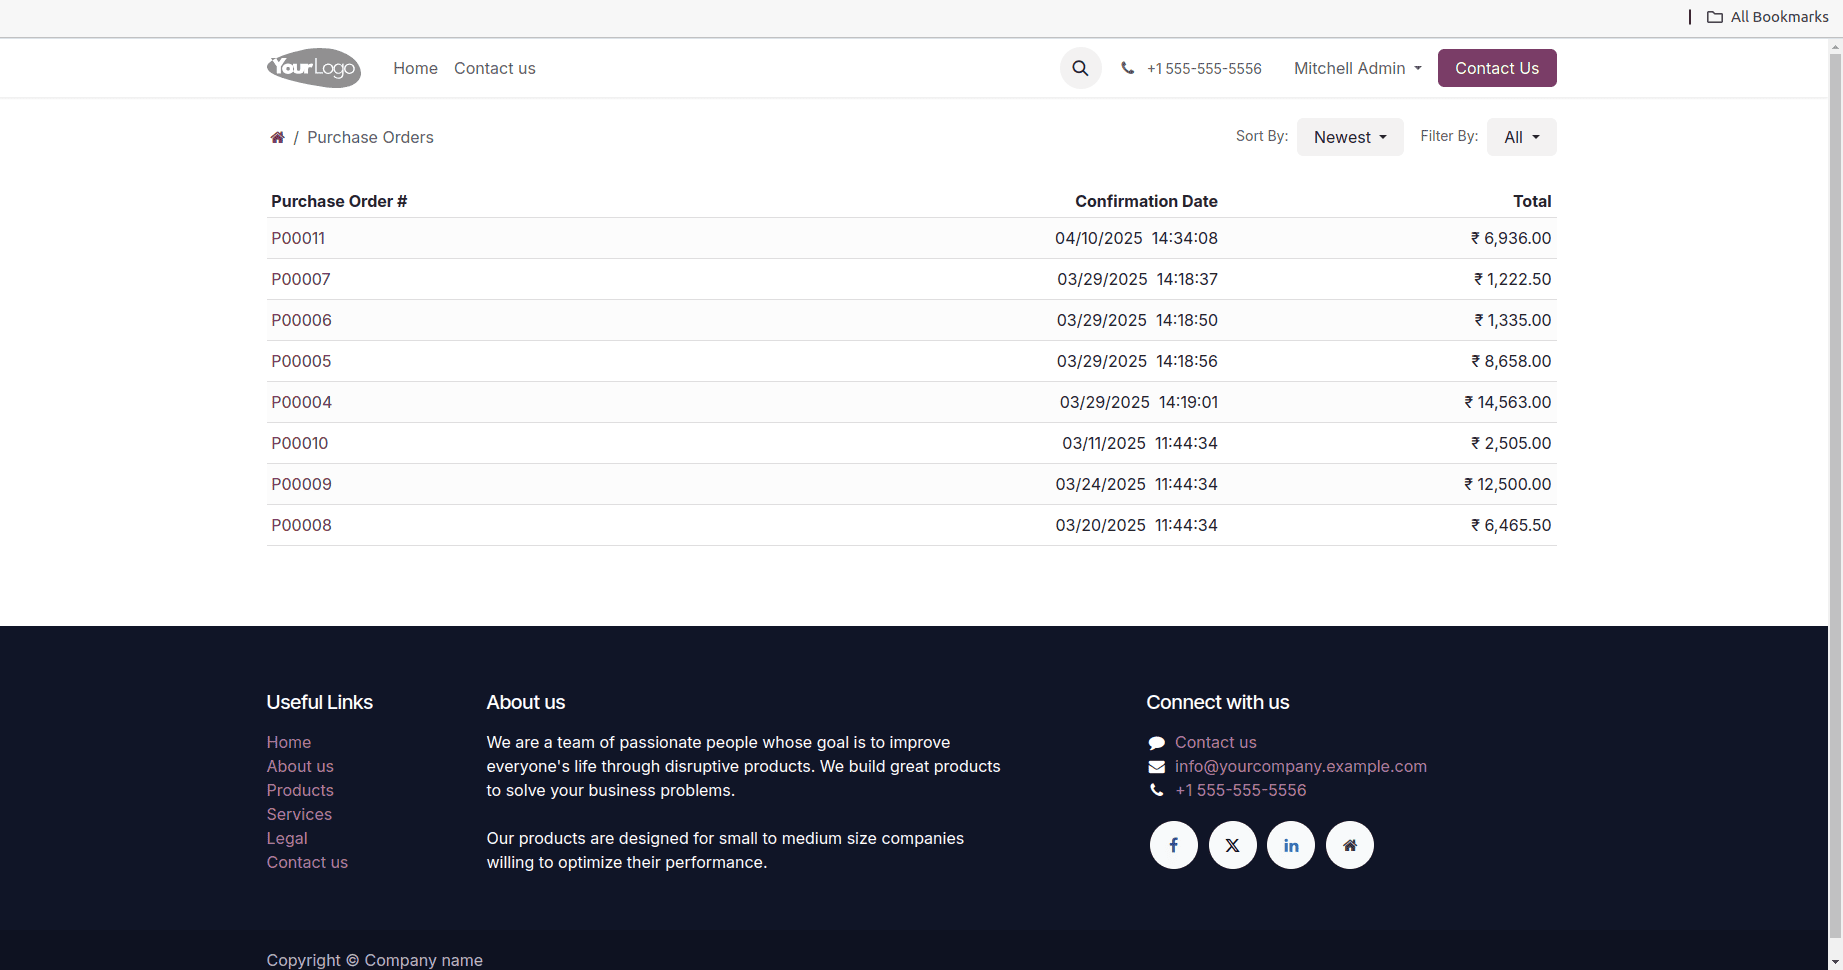
The figure below shows the default layout of the Purchase Orders list view in the customer portal, before applying any customizations.
To customize the layout of portal views, the original QWeb template can be inherited and extended. Below is an example where the Purchase Orders list view in the customer portal is modified to include a new Order Date column in the table, making it more informative for users.
<?xml version="1.0" encoding="utf-8"?>
<odoo>
<template id="portal_my_purchase_orders_add_order_date"
inherit_id="purchase.portal_my_purchase_orders"
name="Add Order Date Column in Purchase Orders Portal View">
<!-- Add Order Date Header before Confirmation Date -->
<xpath expr="//thead/tr/th[2]" position="before">
<th class="text-end">
<span class="d-none d-md-inline">Order Date</span>
<span class="d-block d-md-none">Order</span>
</th>
</xpath>
<!-- Add Order Date Value before Confirmation Date Value in row -->
<xpath expr="//t[@t-foreach='orders']/tr/td[2]" position="before">
<td class="text-end">
<span t-field="order.date_order" t-options="{'widget': 'date'}"/> 
<span class="d-none d-md-inline" t-field="order.date_order" t-options="{'time_only': True}"/>
</td>
</xpath>
</template>
</odoo>
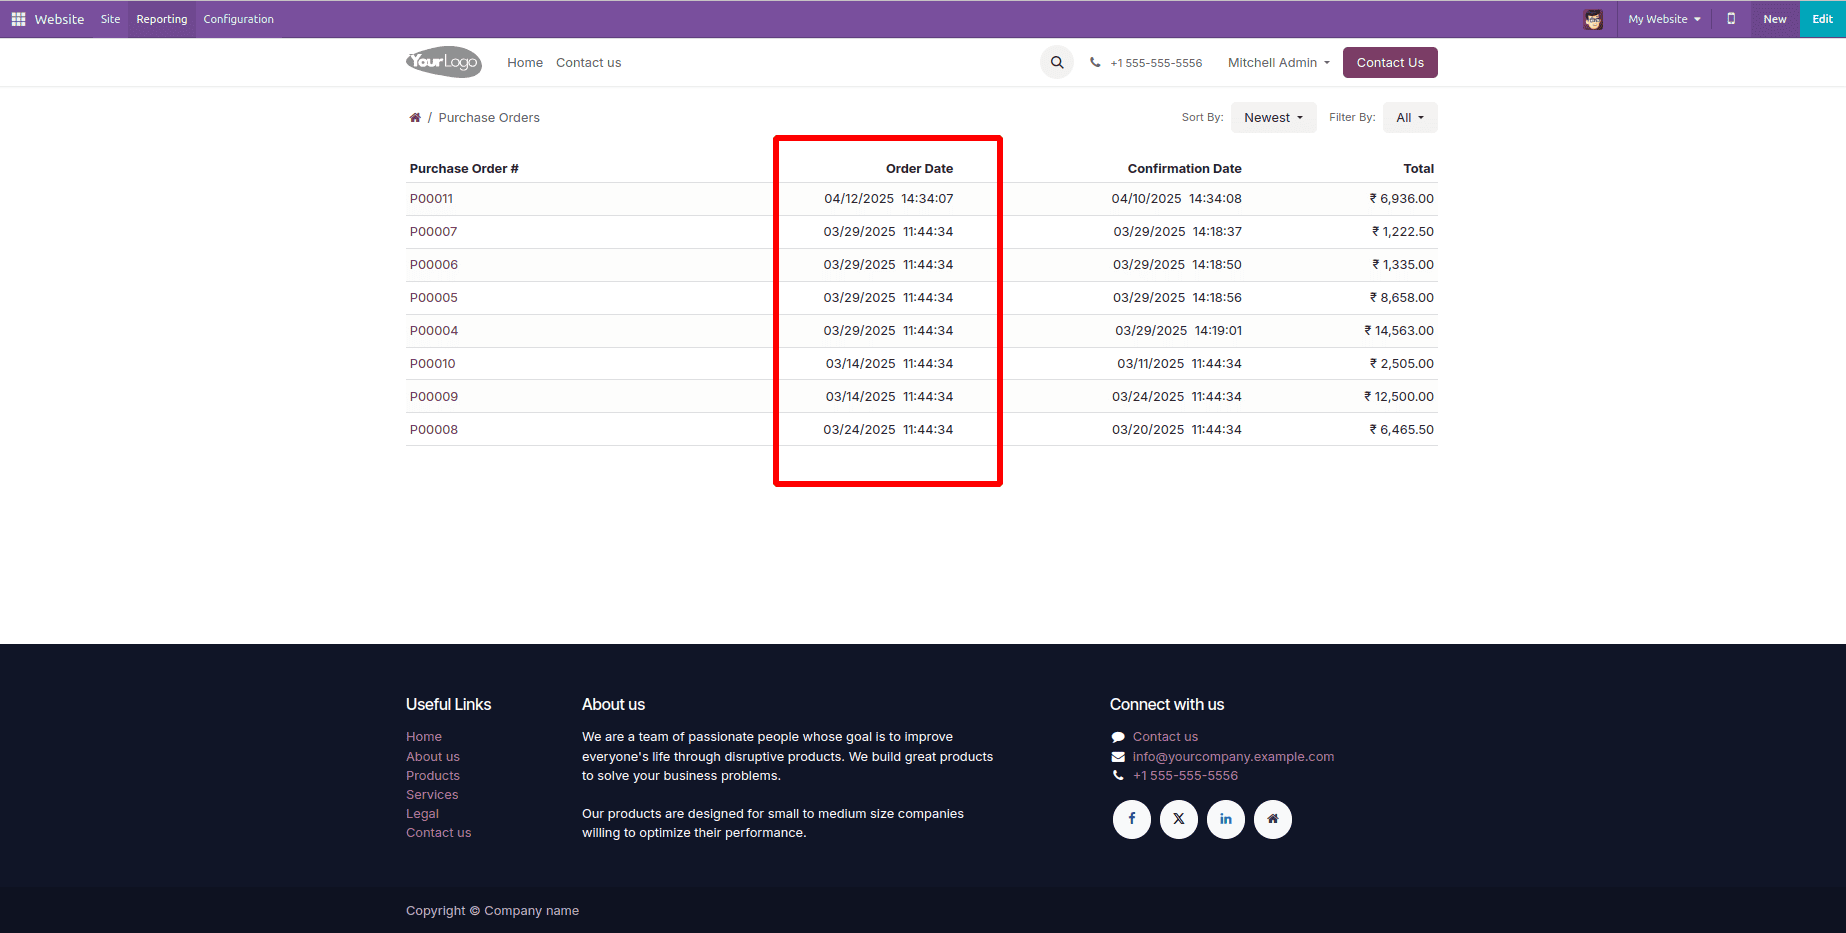
This code adds a new "Order Date" column to the Purchase Orders list view in the customer portal by inheriting the original QWeb template. It inserts the "Order Date" header before the existing "Confirmation Date" header and displays the corresponding order date for each record in the same position. This enhances the list view by providing users with additional order-related information without altering the original structure. The following image displays the customized Purchase Orders list view in the portal layout.
To add a download button in the portal list view, refer to this blog for a detailed guide How to Add a PDF Report Download Button to the Odoo 18 Customer Portal.
Form View Update:
Adding Vendor Reference to Purchase Order Portal View:
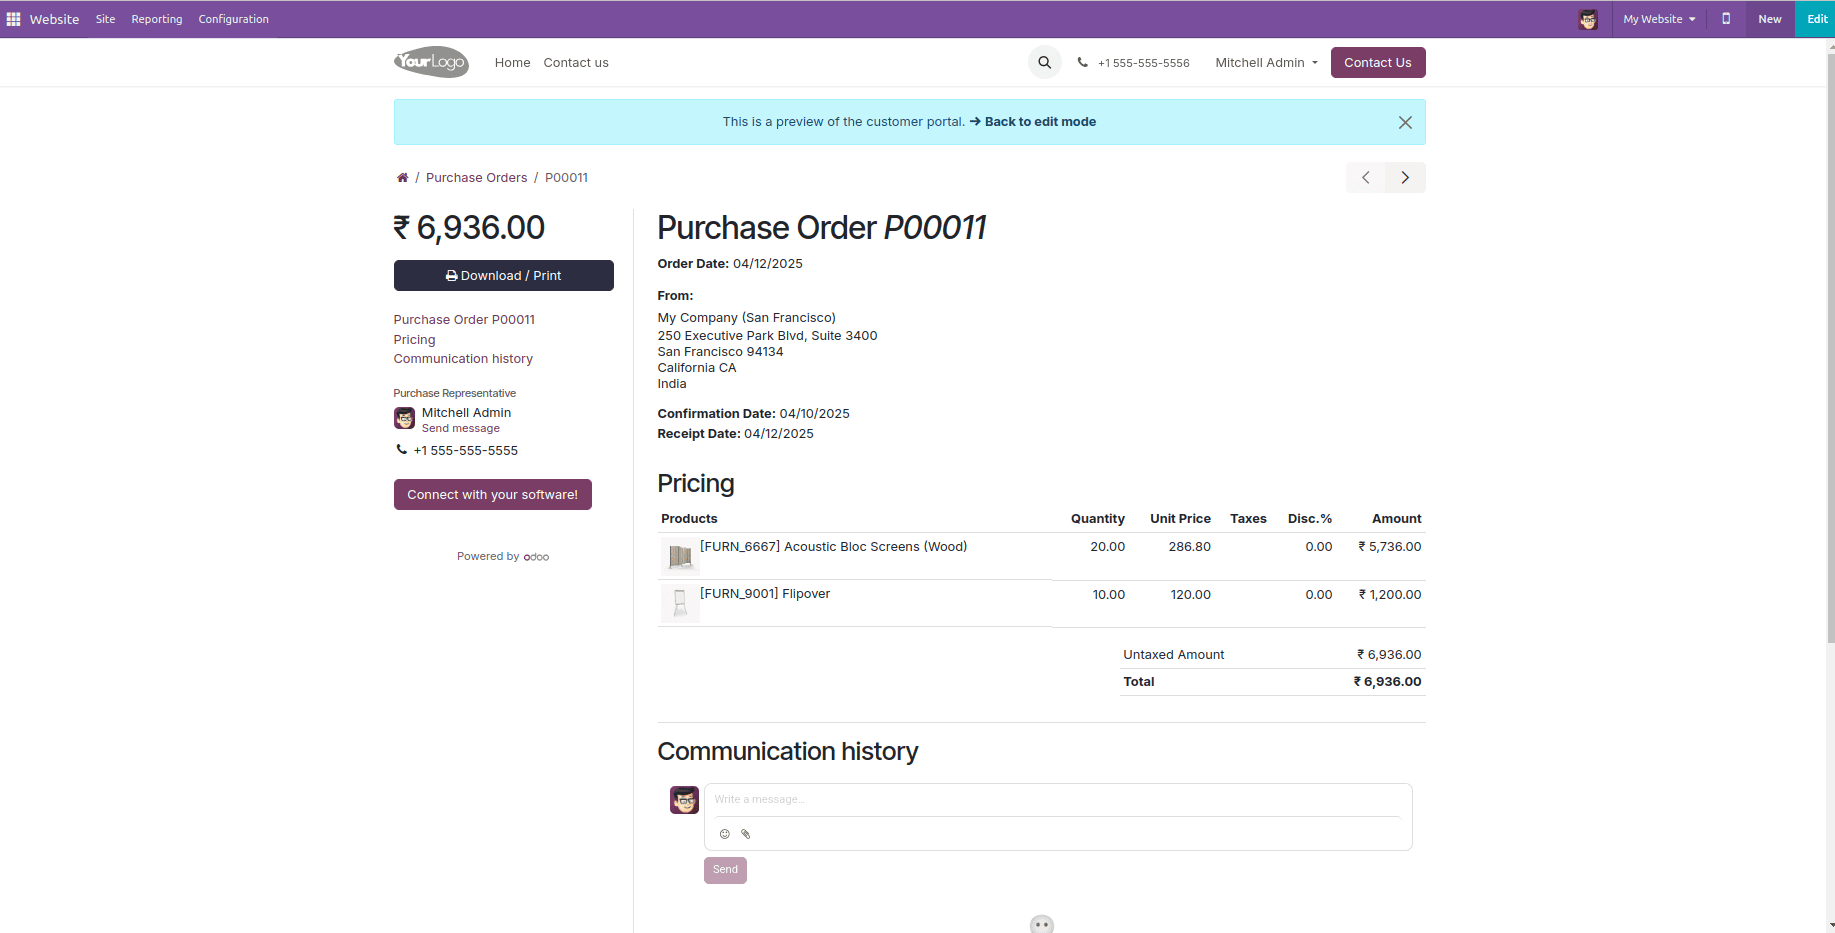
Shown below is the original layout of the Purchase Order form view as seen in the customer portal, without any enhancements.

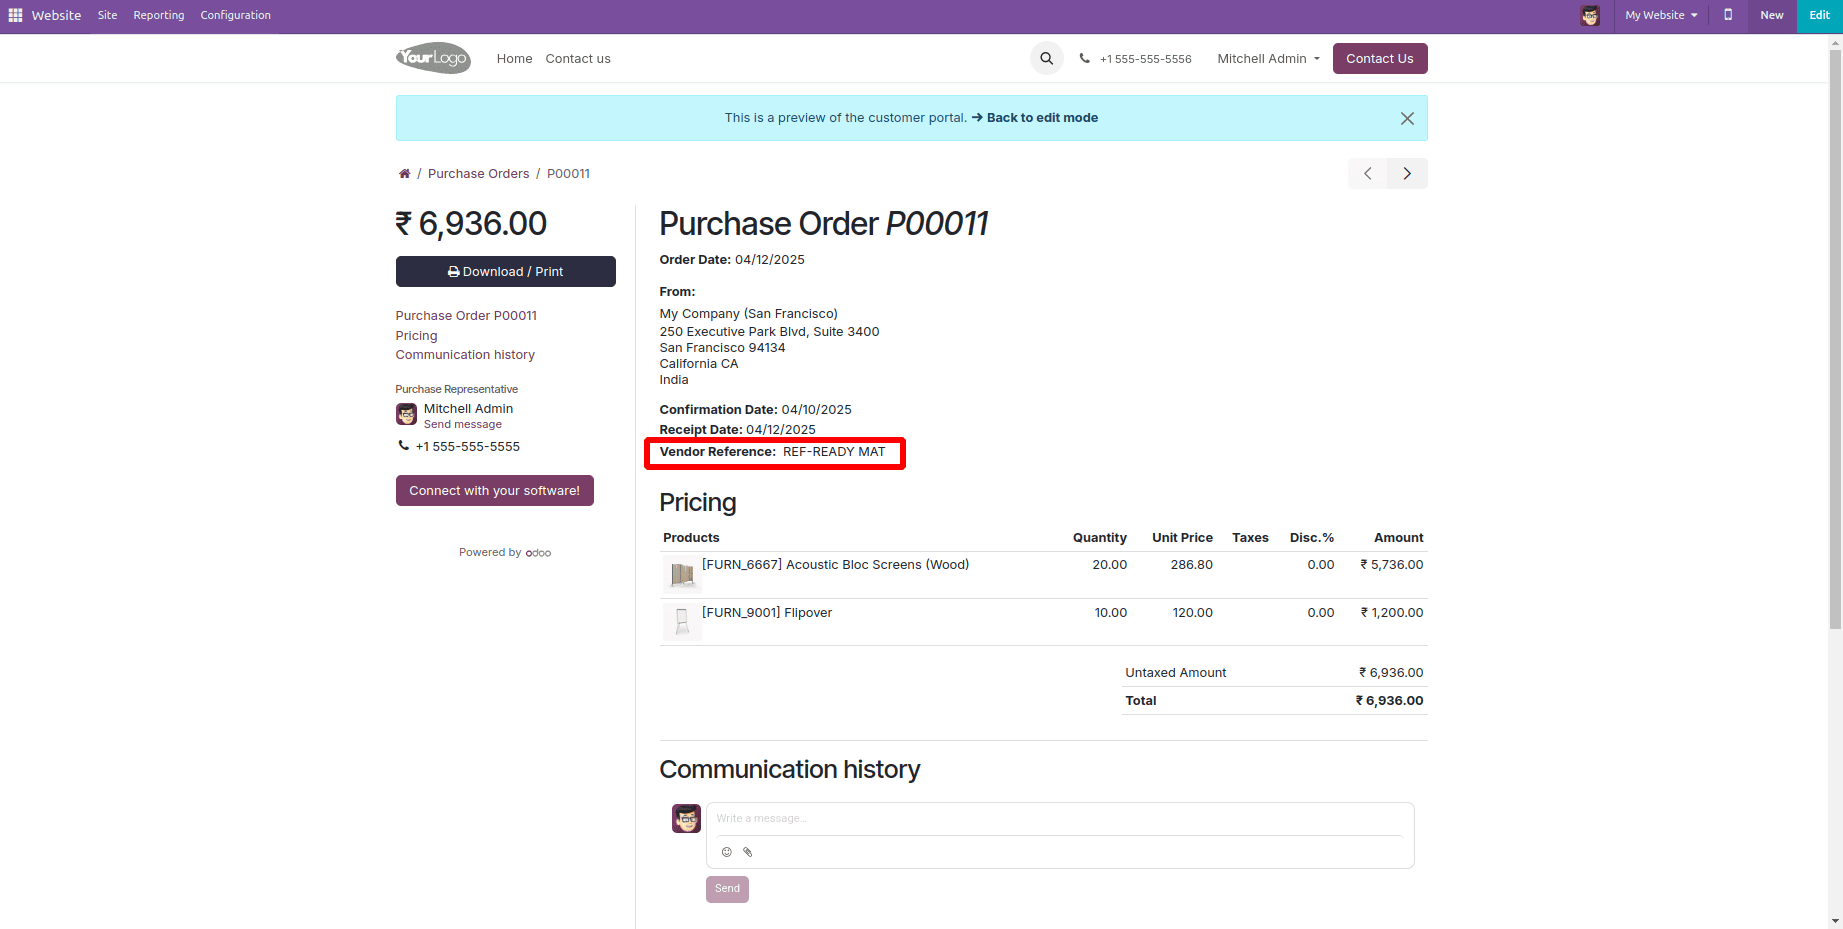
The following customization enhances the purchase order form view in the customer portal by displaying the Vendor Reference field just below the Receipt Date. This is achieved by inheriting the original QWeb template and inserting the field using XPath, ensuring better clarity and reference for users when reviewing purchase orders.
<?xml version="1.0" encoding="utf-8"?>
<odoo>
    <template id="purchase_order_portal_add_vendor_ref"
              inherit_id="purchase.purchase_order_portal_content"
              name="Add Vendor Reference to Purchase Order Portal">
        <!-- Insert Vendor Reference after Receipt Date -->
        <xpath expr="//strong[contains(text(), 'Receipt Date:')]/parent::div" position="after">
            <div t-if="order.partner_ref" class="mt-1">
                <strong>Vendor Reference:</strong>
                <span class="ms-1" t-esc="order.partner_ref"/>
            </div>
        </xpath>
    </template>
</odoo>
After applying the view customization, the Purchase Order form in the customer portal will appear as shown in the figure below.
Remove 'Order Date' from Purchase Order Form:
For another example, To remove the "Order Date:" section from the Purchase Order view in the customer portal, we can use an XPath expression in a custom inherited QWeb template. This approach targets the div element containing the "Order Date" using its unique id attribute and removes it entirely from the view.
<?xml version="1.0" encoding="utf-8"?>
<odoo>
    <template id="remove_po_order_date_from_portal"
          inherit_id="purchase.purchase_order_portal_content"
          name="Remove Order Date from Purchase Order Portal">
    <!-- Remove the Order Date / RFQ Date block -->
    <xpath expr="//div[@id='po_date']" position="replace">
        <!-- Empty replacement to remove the block -->
    </xpath>
</template>
</odoo>
Once the view customization is applied, the Purchase Order form in the customer portal will be displayed as shown in the following figure without the order date.
Customizing the customer portal in Odoo 18- whether it's the default menus, list views, or form views- provides a powerful way to improve the user experience for your customers. By using XML inheritance and XPatha techniques, you can easily adjust portal elements to display only relevant information, simplify navigation, and align the portal's look and feel with your business requirements. These customizations not only enhance usability but also ensure that the portal reflects your brand and supports efficient customer interaction. With Odoo’s flexible architecture, tailoring the portal to your exact needs becomes both manageable and impactful. To apply these changes, you simply need to locate and inherit the relevant portal templates in your custom module and update the structure using xpath as needed.
To read more about How to Use OWL Components on the Website Odoo 18, refer to our blog How to Use OWL Components on the Website Odoo 18.