Odoo 18, the latest iteration of the powerful open-source business management suite, introduces a range of enhancements across its modules, with a strong focus on usability, performance, and customization. One of the standout features in Odoo 18 is its enhanced reporting framework, designed to help businesses gain deeper insights and present information more effectively.
Reports play a crucial role in facilitating data-driven decision-making and ensuring the smooth exchange of information within an organization. In Odoo, a wide variety of report types —such as purchase orders, sales reports, and customer invoices — are readily available to support different business functions. To accommodate diverse presentation needs, Odoo 18 continues to offer predefined report layouts, such as "external_layout_standard", "external_layout_striped", and "external_layout_bold", all built using the flexible QWeb templating engine.
Users can further tailor their reports by customizing header and footer sections, either by developing entirely new layouts or by inheriting and modifying existing ones. This customization capability enables businesses to tailor their reports to specific branding, formatting, and informational requirements, making reporting in Odoo 18 both powerful and adaptable.
Steps to Customize Report Layouts in Odoo 18:
a) Enable Developer Mode: Start by activating debug (developer) mode in your Odoo 18 environment to access advanced customization options.
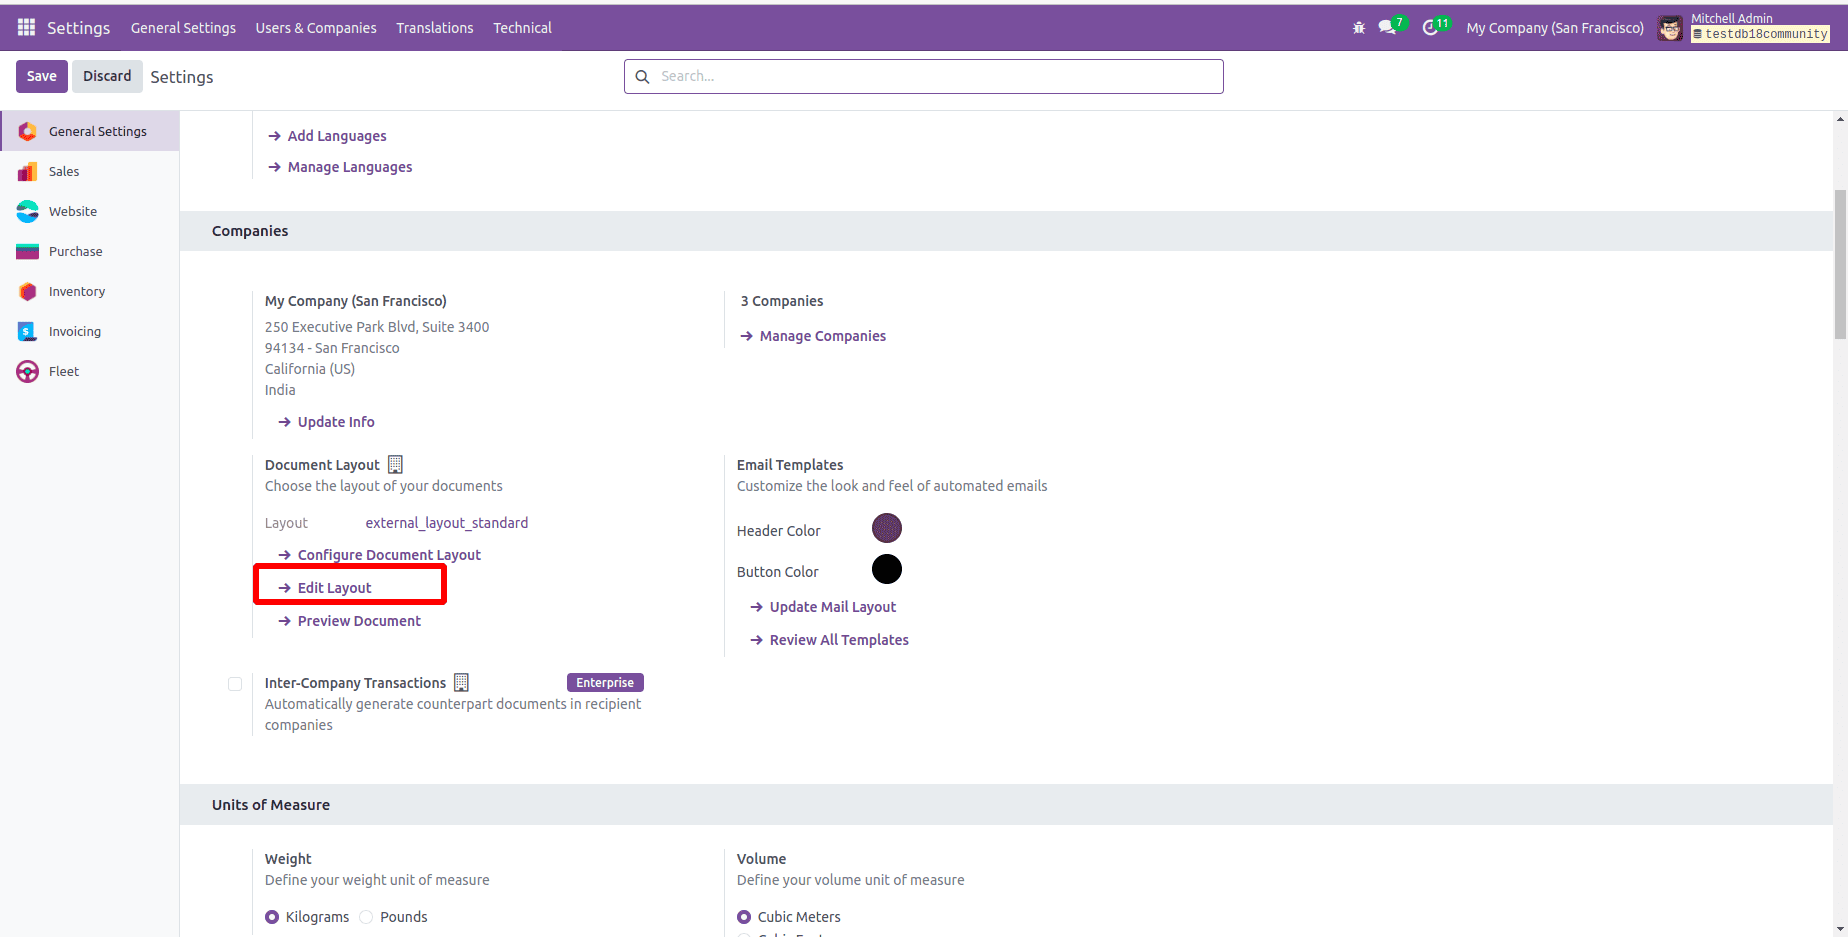
b) Access Layout Settings: Go to the Document Layout section under configuration settings (Edit Layout), as shown in the figure below, and select your preferred report layout, such as "external_layout_standard".
c) Edit the Layout: Click on the "Edit Layout" button to open the base template of the selected report layout.
d) Create an Inherited View: Use the "Inherit View" functionality to generate a new view that extends the chosen layout template. This approach ensures your changes are clean and upgrade-safe.
e) Customize Header and Footer: Modify the header and footer sections as needed; this could include adding your company logo, address, contact details, or other branding elements.
f) Save and Apply: Once you've made the necessary adjustments, save your inherited view and apply it to your reports.
By leveraging the inheritance system, you can adapt existing report layouts to better reflect your company's identity and reporting needs, all while keeping the original templates intact.
To customize a report in Odoo, you need to inherit the external_layout_standard template by using the inherit_id in your new template like this:
       <template inherit_id="module_name.layout_name" id="your_custom_layout_id">
            <!-- Add your changes here -->
        </template>
After inheriting the template, apply the following modifications.
<?xml version="1.0" encoding="UTF-8"?>
<odoo>
    <!-- Custom Header & Footer: Inherited from the standard external layout -->
    <template id="custom_standard_layout" inherit_id="web.external_layout_standard">
        <!-- Customise the Header -->
        <xpath expr="//div[contains(@t-attf-class, 'header o_company_')]" position="replace">
            <div t-attf-class="header o_company_#{company.id}_layout">
                <div class="d-flex justify-content-between align-items-center mb-2">
                    <!-- Company Logo -->
                    <img t-if="company.logo" class="o_company_logo_small" t-att-src="image_data_uri(company.logo)"
                         alt="Logo"/>
                </div>
                <!-- Company Details Section -->
                <div class="company-details text-center mt-4">
                    <!-- Display Company Name -->
                    <t t-if="company.name">
                        <h2 class="company-name" style="font-weight: bold; color: #4A90E2;">
                            <t t-esc="company.name"/>
                        </h2>
                    </t>
                    <!-- Display Company Address -->
                    <t t-if="company.street or company.city or company.zip">
                        <p>
                            <strong>Address:</strong>
                            <span t-esc="company.street"/>
                            <t t-if="company.city">,
                                <t t-esc="company.city"/>
                            </t>
                            <t t-if="company.zip">,
                                <t t-esc="company.zip"/>
                            </t>
                        </p>
                    </t>
                    <!-- Display Company Contact Information -->
                    <t t-if="company.phone or company.email or company.website">
                        <p>
                            <strong>Contact:</strong>
                            <t t-if="company.phone">Phone:
                                <t t-esc="company.phone"/>
                            </t>
                            <t t-if="company.email">Email:
                                <t t-esc="company.email"/>
                            </t>
                            <t t-if="company.website">Website:
                                <t t-esc="company.website"/>
                            </t>
                        </p>
                    </t>
                </div>
                <!-- Add a Divider Below Company Details -->
                <div class="row mt-3">
                    <div class="col-12">
                        <div style="border-bottom: 1px solid #ddd;"/>
                    </div>
                </div>
            </div>
        </xpath>
        <!-- Customise the Footer  -->
        <xpath expr="//div[contains(@class, 'o_footer')]" position="replace">
            <div class="custom_footer text-center" style="border-top: 1px solid black; padding-top: 10px;">
                <!-- Company Name and Page Number -->
                <div class="row">
                    <div class="col-12">
                        <strong>
                            <t t-esc="company.name"/>
                        </strong>
                        <p>Page:
                            <span class="page"/>
                            /
                            <span class="topage"/>
                        </p>
                    </div>
                </div>
                <!-- Company Address -->
                <div class="row">
                    <div class="col-12">
                        <p t-field="company.partner_id.street"/>
                        <p t-field="company.partner_id.city"/>
                        <p t-field="company.partner_id.country_id.name"/>
                    </div>
                </div>
            </div>
        </xpath>
    </template>
</odoo>
Once the template is inherited, the report header and footer can be customized by writing XML code and applying XPath expressions. Based on specific customization needs, positional attributes such as 'replace', 'after', or 'before' can be used.
In this example, the web.external_layout_standard template is inherited to modify the report's header and footer. XPath expressions are used to locate the specific sections that require changes. The header section is targeted using the expression:
<xpath expr="//div[contains(@t-attf-class, 'header o_company_')]" position="replace">
And the footer section is identified using:
<xpath expr="//div[contains(@class, 'o_footer')]" position="replace">
By applying position="replace", the existing content is fully replaced with custom layouts. The customized header displays the company logo, name, address, and contact details in a structured and professional format. The customized footer includes the company name, page numbers, and address information, ensuring a consistent and branded look across all reports. This method preserves the core template structure while allowing flexible personalization.
To retrieve data from the corresponding model, you can use variables like o or docs, and access related models through dotted paths such as o.partner_id.name to fetch specific values. These values can then be displayed within <span> elements using attributes like t-field or t-esc.
<span t-esc="o.partner_id.name"/>
To avoid repeating the same design structure, the t-call directive is used to include other layouts within your inherited layout:
<t-call="module_name.layout_name"/>
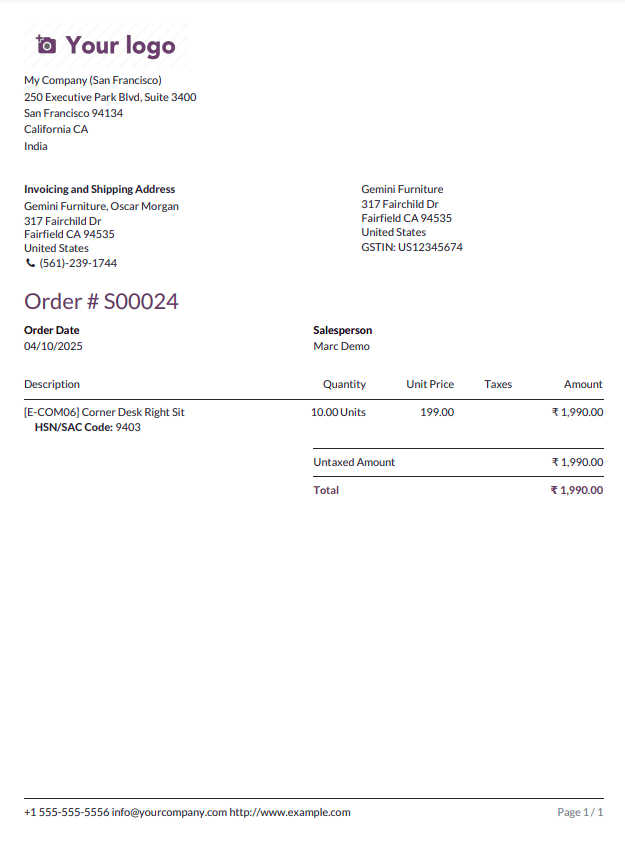
The default header and footer of the Sales Order report are shown below, without any customizations.
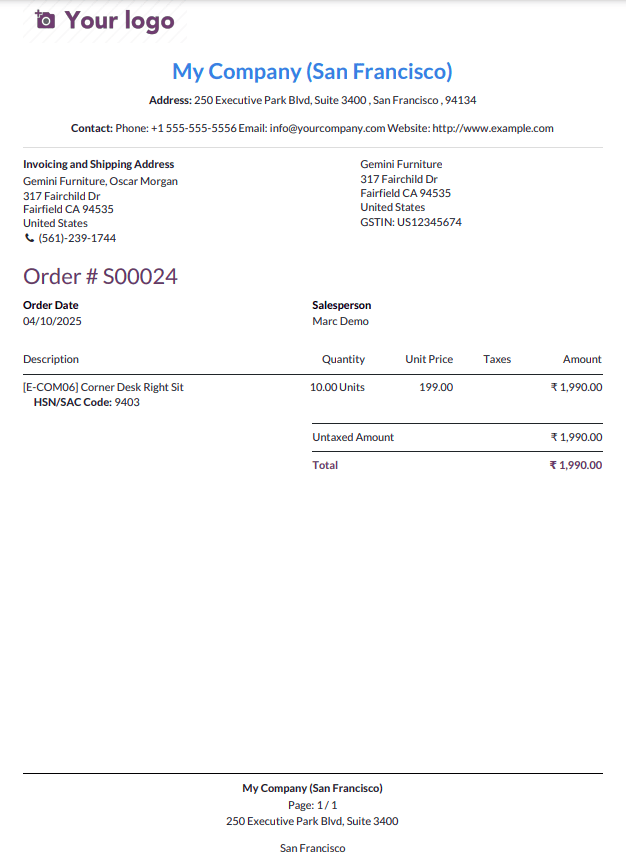
The customized Sales Order report, featuring the updated header and footer, is displayed below.
In summary, customizing the header and footer for reports in Odoo 18 can be achieved by extending the default layout template and using XPath expressions to target and modify the relevant sections. This method provides the flexibility to personalize reports while maintaining a consistent and professional design across all documents. By replacing the standard header and footer with custom elements, businesses can enhance the appearance and branding of their reports.
To read more about How to Customize Header/Footer for All Reports in Odoo 17 ERP, refer to our blog How to Customize Header/Footer for All Reports in Odoo 17 ERP.