One of the most practical tools Odoo provides to simplify item selection within business workflows is the product catalog. In Odoo 19, this is going to be much more subtle, faster, and flexible, which permits users to get products more easily, filter them by attributes, and include them in the form-this may be Sales Orders, Requests, or any other custom model.
Adding the product catalog feature in Odoo 19 means giving users a faster and more visual way to select products inside documents. Instead of choosing items from long dropdown lists, users can open a dedicated catalog view where products are displayed as cards, complete with images, prices, and quick quantity controls. This feature is already available in standard apps like Sales, and Odoo 19 allows developers to reuse the same experience in custom modules.
To understand how the catalog works, let’s first look at a familiar example from the Sales Order screen.
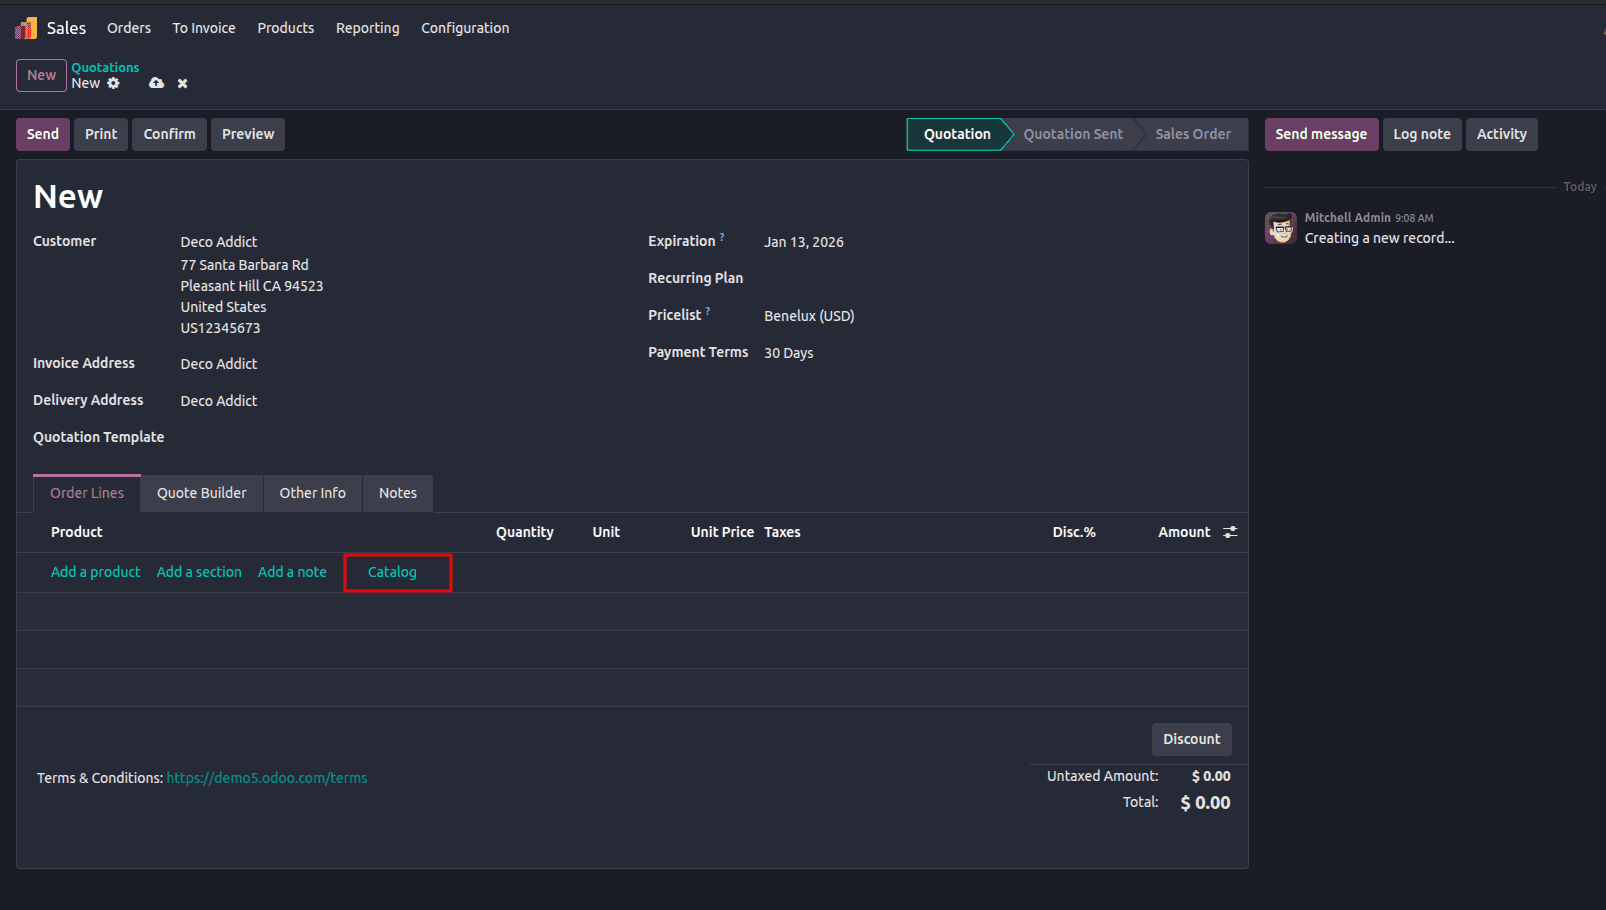
In a Sales Order, clicking Catalog opens a product grid in Kanban view. From here, users can:
- Browse products visually
- Search by name or internal reference
- Increase or decrease quantities instantly
- Add or remove items without closing the catalog
A “Back to Quotation” button allows users to return to the Sales Order form once selection is complete. Products added from the catalog immediately appear in the order lines with the selected quantities.
This same catalog behavior can be implemented in any custom model in Odoo 19 by using the appropriate mixins and methods, which we’ll walk through next.
Step 1: Enable Catalog Support Using product.catalog.mixin
To bring catalog functionality into a custom model, the model must inherit product.catalog.mixin.
This mixin provides all the backend logic needed for catalog operations, such as opening the catalog view, processing selected products, and syncing quantities.
from odoo import models, fields, api
class WarrantyRequest(models.Model):
   _name = 'warranty.request'
   _description = 'Warranty Request Model'
   _inherit = ['mail.thread', 'mail.activity.mixin', 'product.catalog.mixin']
Once this mixin is added, the model becomes compatible with Odoo’s catalog interface.
Step 2: Add the Catalog Button in the XML View
Users need a visible action to open the catalog. This is done by placing a Catalog button inside the <control> section of a one2many list view. Positioning the button here ensures it appears alongside standard line actions. When clicked, it opens the catalog view and passes the active record’s ID through the context, allowing Odoo to correctly link selected products to the document.
<button name="action_add_from_catalog" type="object"
       string="Catalog" class="px-4 btn-link"
       context="{'order_id': parent.id}"/>
The final XML code is like as follows,
<notebook>
  <page id="product" name="Product">
      <field name="warranty_line_ids" mode="list"
             widget="section_and_note_one2many"
             context="{'default_display_type': False}">
          <list editable='bottom'>
              <control>
                  <create name="add_product_control" string="Add a product"/>
                  <create name="add_section_control"
                          string="Add a section"
                          context="{'default_display_type': 'line_section'}"/>
                  <create name="add_note_control"
                          string="Add a note"
                          context="{'default_display_type': 'line_note'}"/>
                  <button name="action_add_from_catalog" type="object"
                          string="Catalog" class="px-4 btn-link"
                          context="{'order_id': parent.id}"/>
              </control>
              <field name="product_id" required="not display_type"/>
              <field name="name"/>
              <field name="display_type" column_invisible="1"/>
              <field name="quantity" required="not display_type"/>
              <field name="uom_id"/>
              <field name="lst_price"/>
              <field name="warranty_charge" sum="Warranty Charge"/>
          </list>
      </field>
  </page>
</notebook>
Step 3: Route the Catalog Action from the Child Model
The catalog action is executed at the parent level, so the child model must forward the request properly.In the warranty.request.line model, define the action_add_from_catalog method. This method retrieves the parent warranty.request record using the order_id value from the context and then triggers the catalog action from the parent model.from there.
def action_add_from_catalog(self):
   """Trigger catalog action from child model."""
   warranty_request = self.env['warranty.request'].browse(
       self.env.context.get('order_id')
   )
   return warranty_request.action_add_from_catalog()
This ensures the catalog always interacts with the correct record, even when accessed from a one2many line.
Step 4: Add the _get_product_catalog_order_data Method in the Parent Model
In the warranty.request model, define the _get_product_catalog_order_data method. This method prepares the product information that will be displayed inside the catalog view.
def _get_product_catalog_order_data(self, products, **kwargs):
   """Retrieve product details for the catalog."""
   res = super()._get_product_catalog_order_data(products, **kwargs)
   for product in products:
       res[product.id] |= {
           'price': product.standard_price,
       }
   return res
By extending the base implementation and calling super(), the default catalog behavior is preserved while allowing additional product details, such as pricing, to be included in the catalog display.
Step 5: Display Already Added Products in the Catalog View
To reflect products that are already added to the document, methods must be implemented in both the parent and child models.
a) Group existing lines in the parent model
In the warranty.request model, define the _get_product_catalog_record_lines method. This method groups existing warranty request lines by product, ensuring that products already present in the one2many field are recognized by the catalog. It returns a dictionary grouping the records by product ID.
def _get_product_catalog_record_lines(self, product_ids, child_field=False, **kwargs):
   """Group warranty request lines by product for catalog view."""
   grouped_lines = defaultdict(lambda: self.env['warranty.request.line'])
   for line in self.warranty_line_ids:
       if line.product_id.id not in product_ids:
           continue
       grouped_lines[line.product_id] |= line
   return grouped_lines
b) Provide line details in the child model
In the warranty.request.line model, define the _get_product_catalog_lines_data method. This method supplies quantity and pricing information for each product line. If a product has not been added yet, the quantity defaults to zero.
def _get_product_catalog_lines_data(self, **kwargs):
   """Provide details for warranty request lines in catalog view."""
   self.ensure_one()
   return {
       'quantity': self.quantity or 0,
       'price': self.product_id.standard_price,
       'uomDisplayName': self.uom_id.name if self.uom_id else '',
       'readOnly': False,
   }
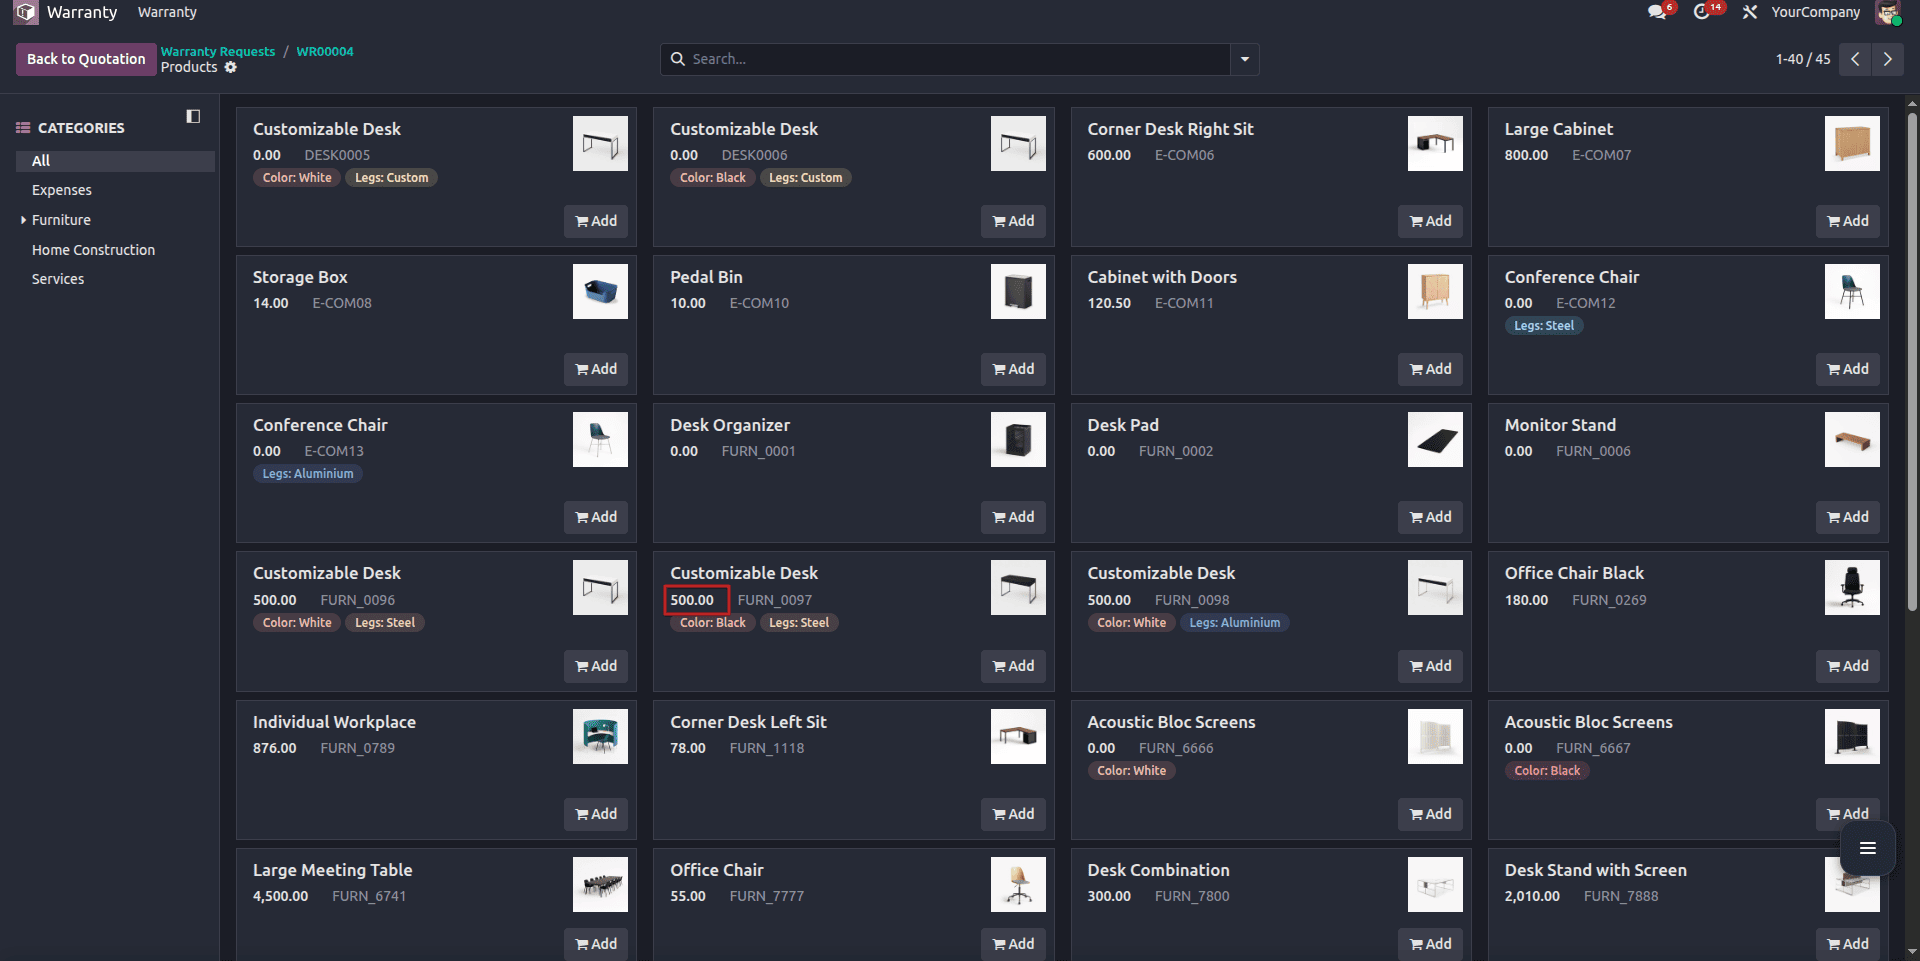
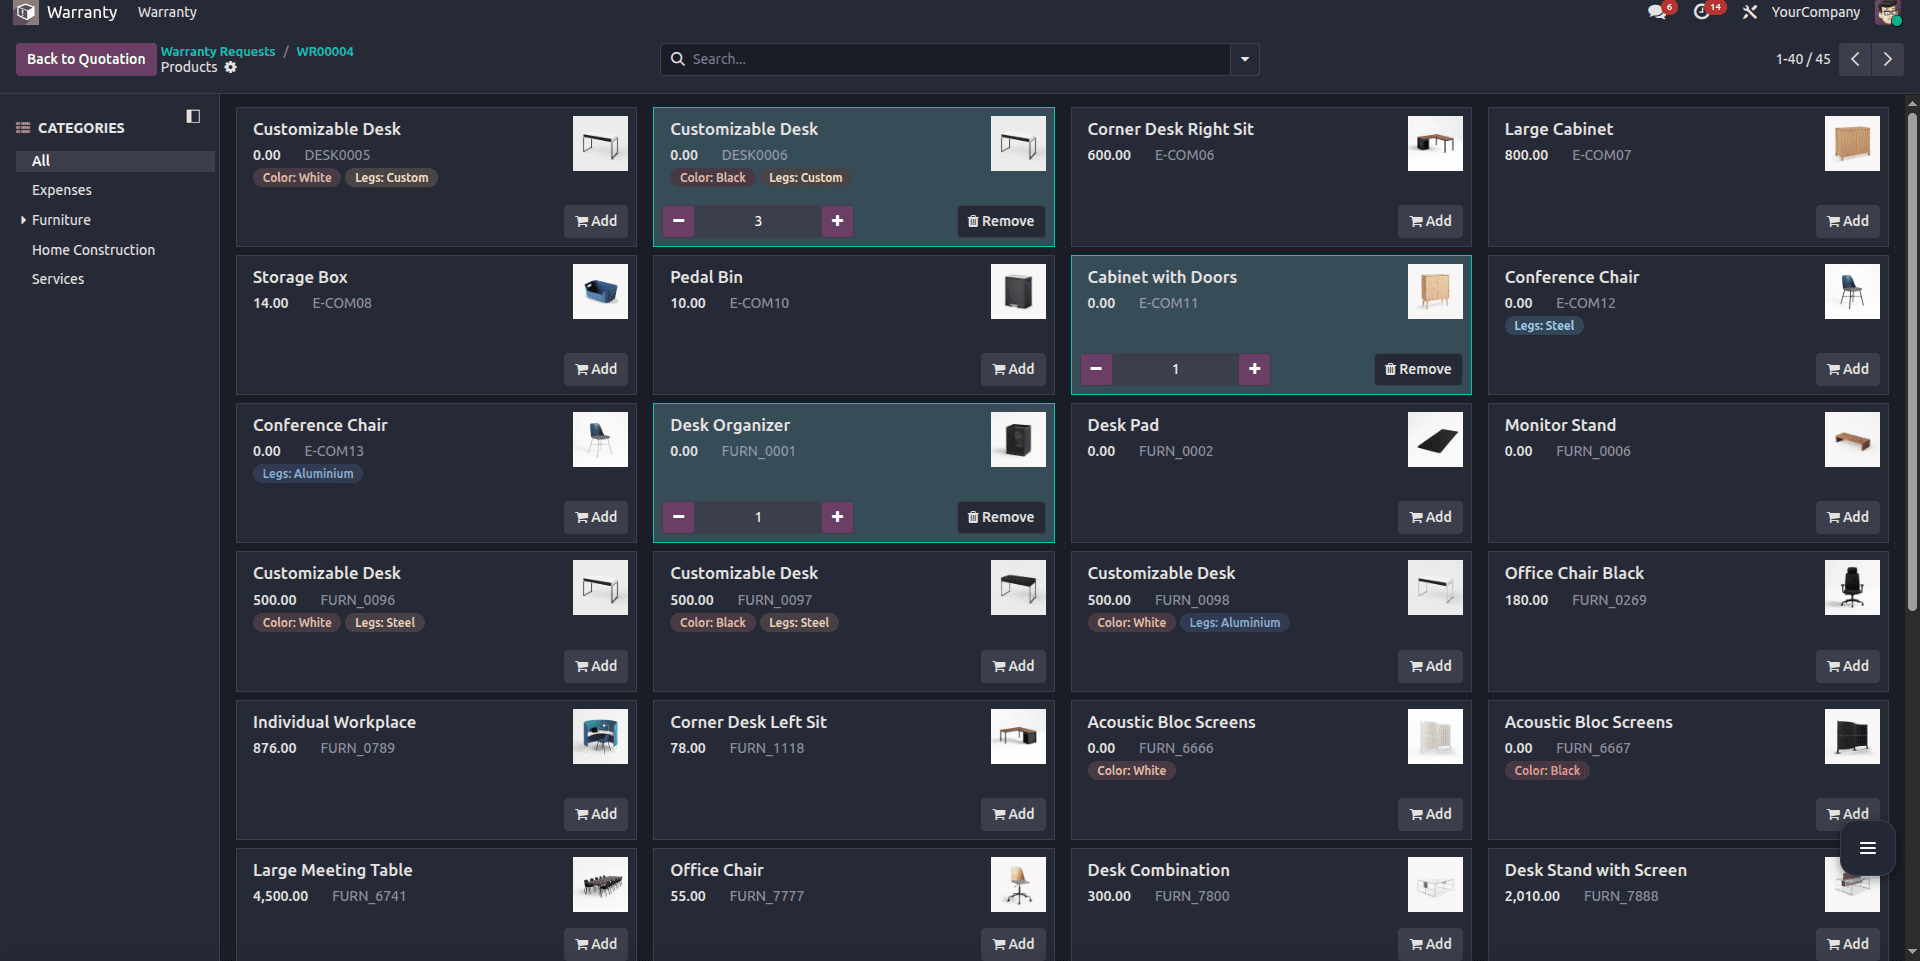
The catalog view will now show products already added to the warranty request line. Users can remove or add products directly from the catalog view itself.
Step 6: Update Warranty Lines from the Catalog View
In the warranty.request model, define the _update_order_line_info method. This method handles updates coming from the catalog view whenever a user adds a product, changes its quantity, or removes it by setting the quantity to zero.
def _update_order_line_info(self, product_id, quantity, **kwargs):
   """
   Update warranty request line information for a given product.
   :param int product_id: The product ID (`product.product`).
   :param float quantity: The quantity to update.
   :return: The updated warranty request line or None if removed.
   """
   self.ensure_one()
   warranty_line = self.warranty_line_ids.filtered(
       lambda line: line.product_id.id == product_id
   )
   if warranty_line:
       if quantity != 0:
           warranty_line.quantity = quantity
       else:
           warranty_line.unlink()
   elif quantity > 0:
       product = self.env['product.product'].browse(product_id)
       warranty_line = self.env['warranty.request.line'].create({
           'warranty_id': self.id,
           'product_id': product_id,
           'name': product.display_name,
           'quantity': quantity,
       })
   return warranty_line
The method ensures that the one2many lines are updated, created, or removed accordingly, keeping the catalog and form view fully synchronized.
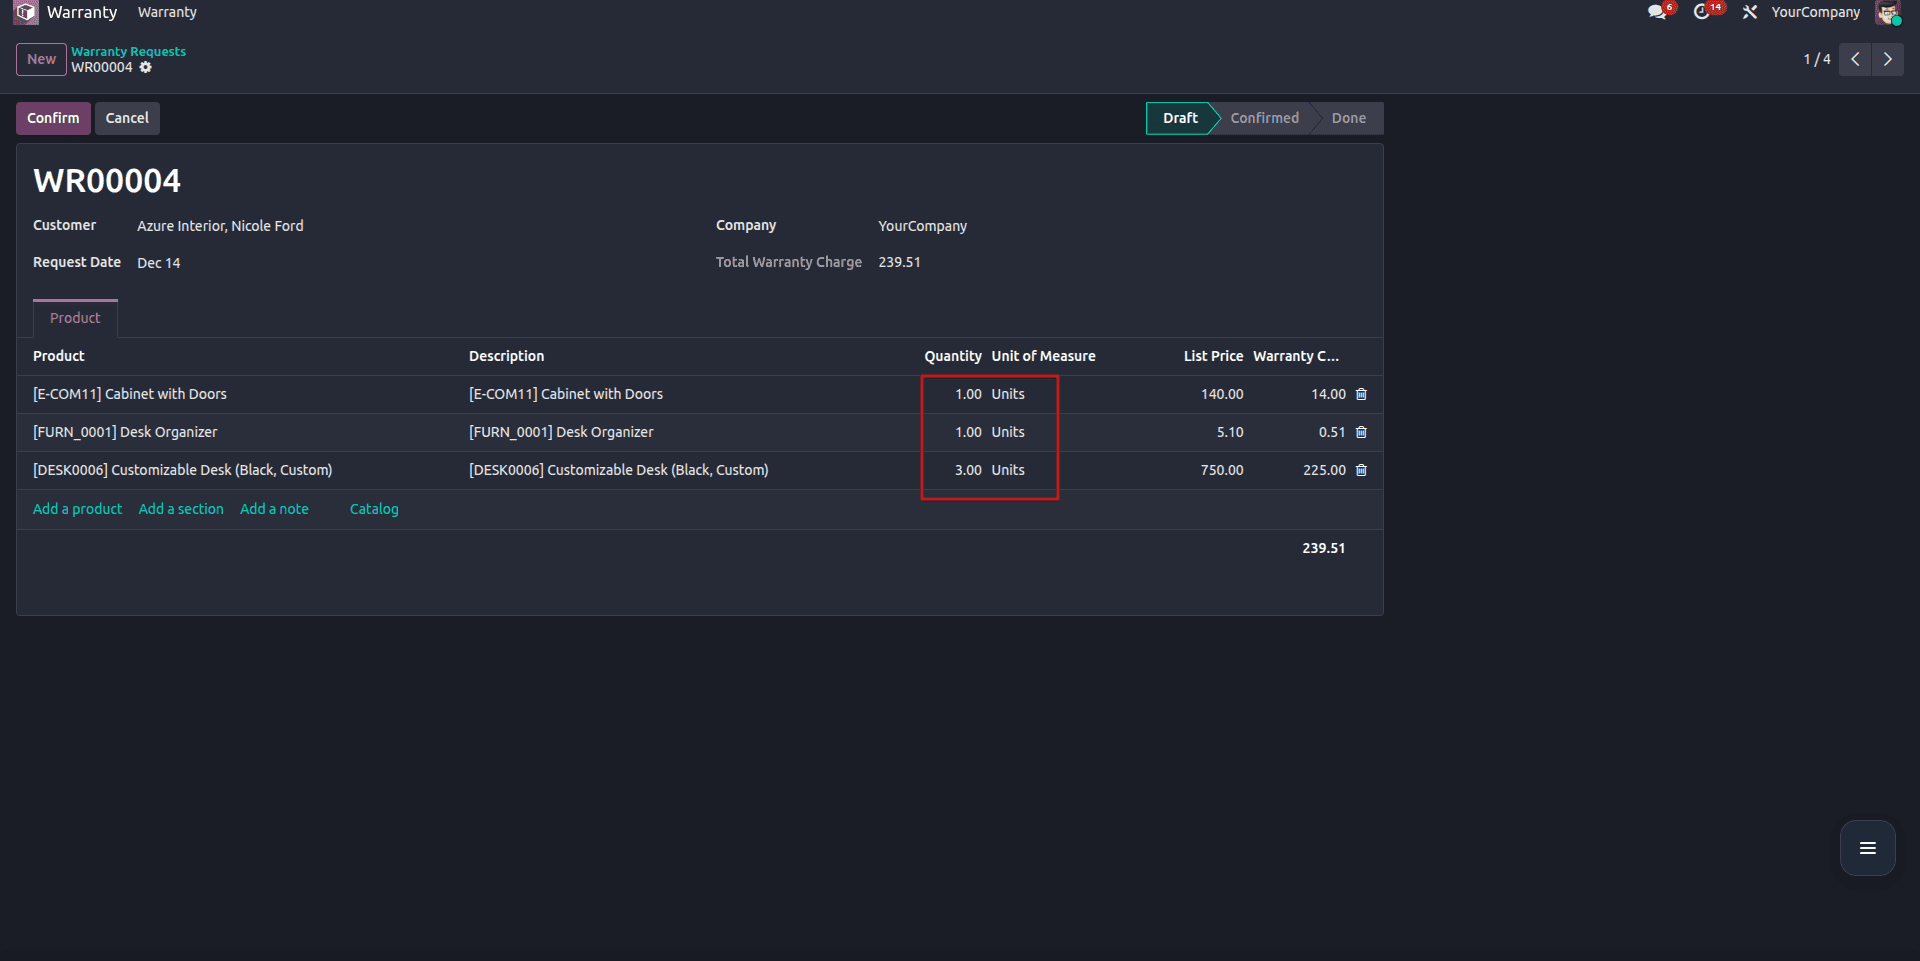
As you can see from the example above, the products chosen from the catalog appear in the warranty lines, with their quantity; it syncs correctly, and if the user sets the quantity to 0, the product will be removed from the warranty lines.
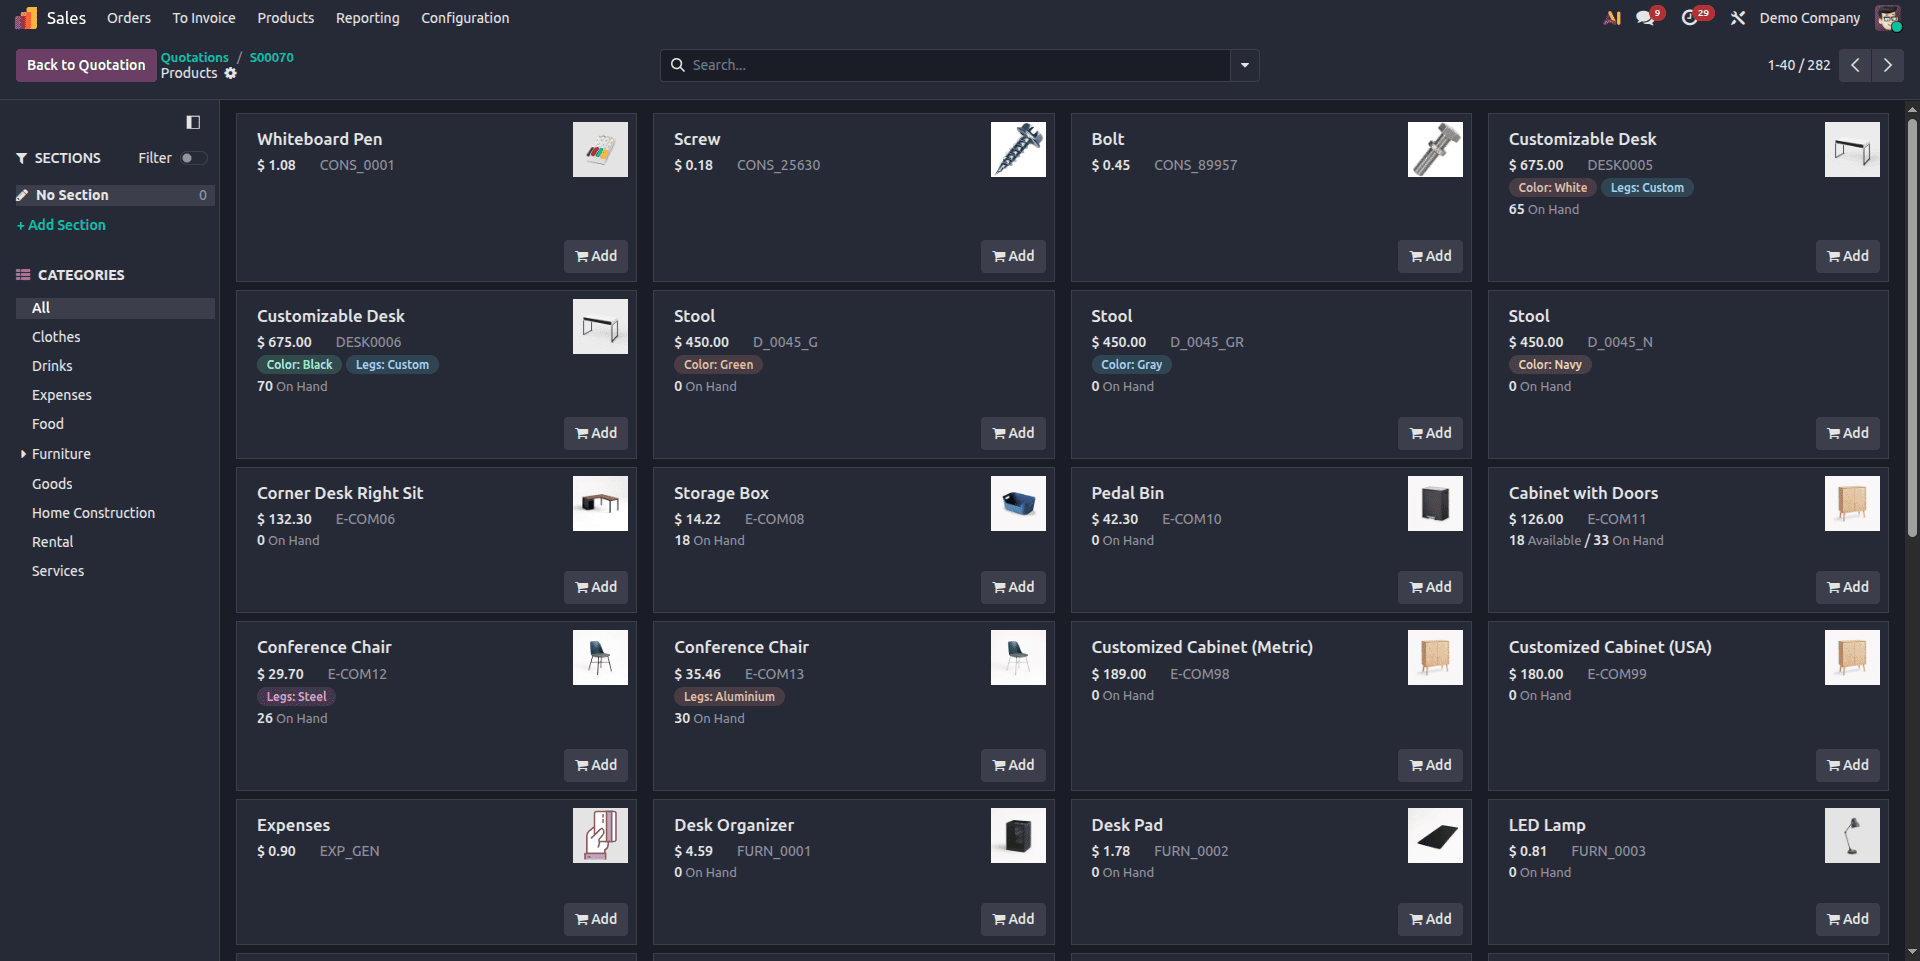
Step 7: Filter Products Displayed in the Catalog
In the warranty.request model, define the _get_product_catalog_domain method. This method restricts which products appear in the catalog based on specific conditions, such as sale_ok products or company.
def _get_product_catalog_domain(self):
   """Define the product filter for the catalog."""
   return [
       ('company_id', 'in', [self.company_id.id, False]),
       ('sale_ok', '=', True),  # Show products that can be sold
   ]
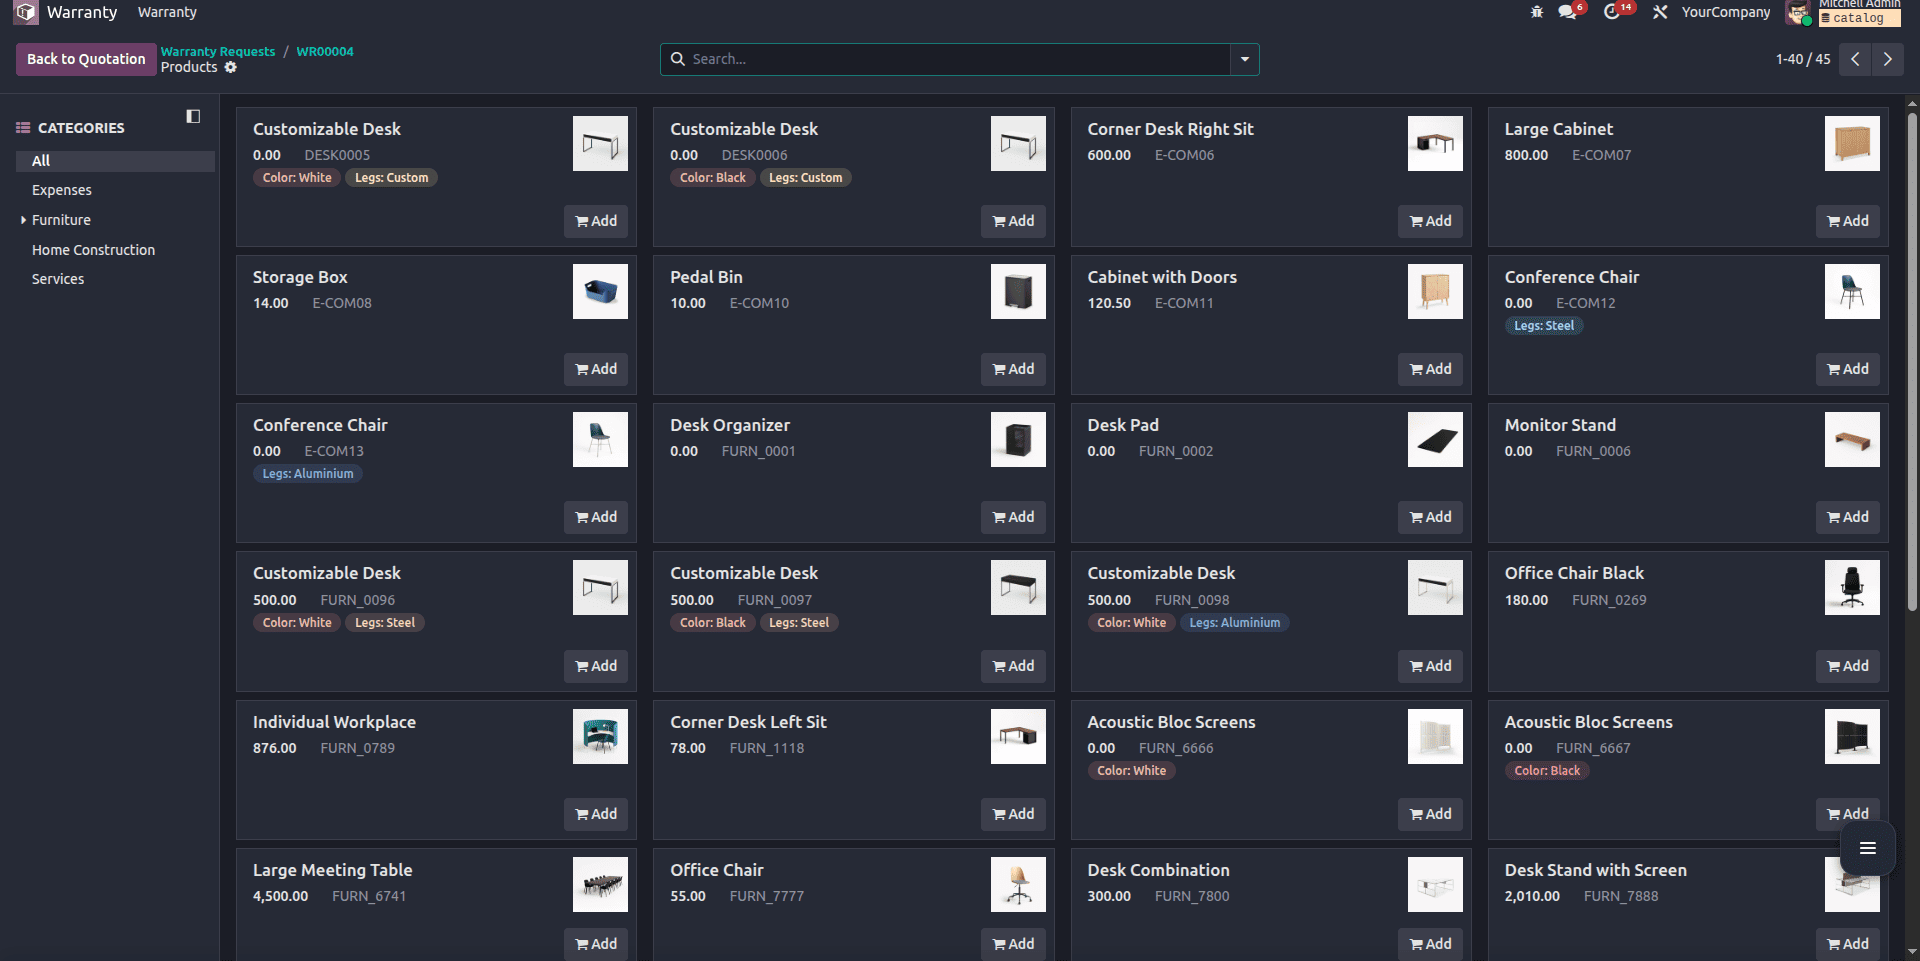
As you can see in the example below, all the products listed here are the products with sale_ok enabled.
The product catalog feature in Odoo 19 provides a clean and efficient way to manage product selection in custom modules. By inheriting the appropriate mixin and implementing a few supporting methods in the correct models, developers can recreate the same catalog experience found in standard Sales Orders.
This approach improves usability, reduces manual errors, and delivers a smoother workflow for end users. With proper customization, the catalog feature can be adapted to suit a wide range of business processes in Odoo 19.
To read more about how to add the Catalog Feature in Odoo 18refer to our blog How to Add the Catalog Feature in Odoo 18.