Every business runs dextrously due to its practical and smoothly planning. If planning is not maintained, then the industry is collapsed tremendously. For an active streamlined business to get imparted, you need to concentrate on the cornerstone of your business, with impressive planning. By implying dedicated and sophisticated planning to your business operations manually may be fixed with errors if the business multiplies and a chain of resources have launched, so by reducing these errors and getting the updated reports of your business, the Odoo ERP plays a critical role to perform. By implementing the Odoo 15 Planning module, you can just schedule your planning for different employees, change the shifts, organize the duties, and set your goals to fulfill by the end of the financial year.
As planning stands as the pillar of a business, the role of who is responsible for and managing the company needs to sort out different ideas that are planned with potential conclusions. If the process is done in a coordinated and hardcore determination and focusing on the future outcomes, you follow the business without any hesitation. By overseeing and foreseeing your business’s development and future, you can easily debug unnecessary situations with your strategic planning.
Odoo 15’s Planning module, which was recently separated as a separate module due to its importance in business management, can automate your business activities in a very productive and profitable manner. The Odoo ERP deliberately schedules your work by different criteria without overlapping and making your tasks timely done. The Odoo aligns with a standard work mode by scheduling the works and implies a structure.
This blog gives you a detailed overview of automating your business operations discreetly with the features of Odoo Planning in the Odoo 15 Planning module.
Features of Planning Module with Odoo 15
In the Planning module, the Odoo ERP serves the role of human resources, which plays a significant part in business management. Planning is categorized with Odoo in three ways Planning, Portal, and Analytics. Let’s discuss the Odoo 15 Planning module and understand how it is worked with various features.
The main features of the Planning Module with Odoo 15 can be given below:-
Planning
Personalize your shift planning in any form such as in calendar, Gantt chart, list view, and group them accordingly.
Open your shifts with unassigned and assigned using drag and drop functions.
Organize shift templates and locate them near the new shifts.
With the help of scheduling, separate all shifts by role, by employee, by project, and so on. And also, with the default Gantt chart, you can get an overview of your plan works and what is left to plan.
It can avoid conflicts by getting a warning if multiple shifts are processed to the same employee simultaneously.
You can monitor the employees' shifts by the terms of the day, week, monthly, and year with the help of Gantt view and calendar view.
You can easily manage and create the shifts and highlight them with colors for easy access.
Portal
Send the scheduled shifts to the respective employees to manage and view the shifts in their personal portal.
Employees can mark their own unavailability and unassign themselves in the portal.
Employees can assign their own shifts and mark them as open shifts in the portal or the app.
Analytics
Can create reports of all kinds based on the filters and measures, and time ranges you need to possess with the help of tasks analysis.
With the help of pivot analysis, you can create reports in spreadsheets and export the data with the XLS to open in different software.
With the help of line charts, bar diagram, and pie charts, you can view the reports in graphical representation for easy analysis.
Planning Module
To get access to the Odoo Planning module, you need to go to the Odoo Apps store, and under human resources, you get the Planning module and install it.

By clicking on the Planning module, you will be redirected to another window shown below in the screenshot.
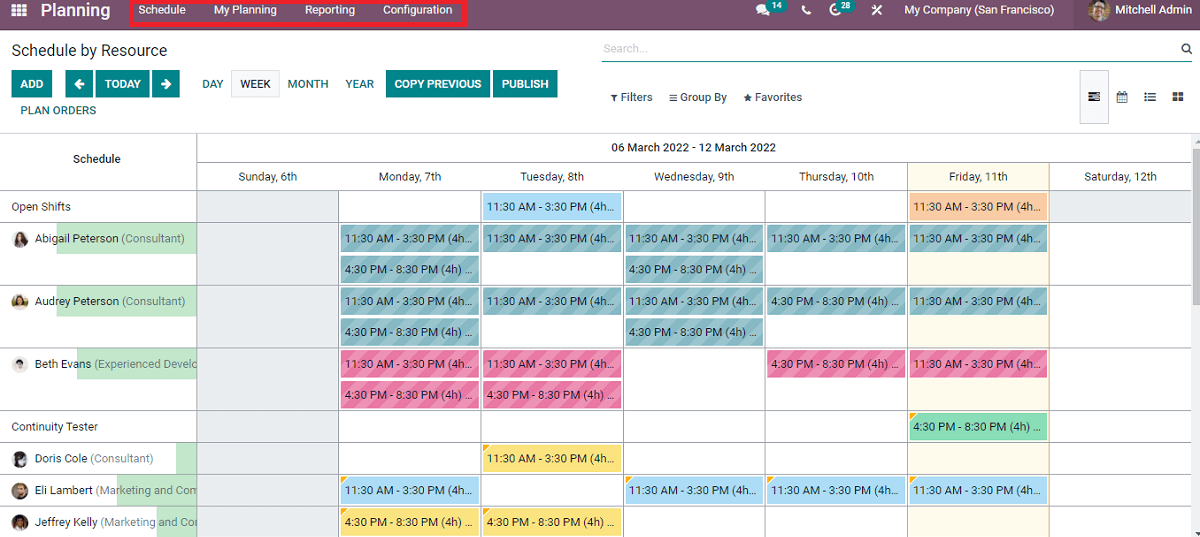
From the above screenshot, you get the different tabs, such as Schedule, My Planning, Reporting, and Configuration are separated. In that, you get detailed information about Schedule by Resource. Here you can see the list of Open Shifts scheduled for employees. In this list, you get the scheduled open shifts of different employees in week form. The WEEK is highlighted, and the window gives the open shifts from March 6, 2022, till March 12, 2022.
Now by clicking on each TODAY, DAY, WEEK, MONTH, and YEAR, you get the information per your requirements. Now you see the details of the week in the Gantt chart form, which is the default view. You can also see the window in different views such as Calendar, List, and Kanban. By adding the Filters, Group By, and Favorites options, you get the information as per the priority. In this, if you want to make a recurring strategic schedule for all the employees as you have mentioned in one week or day or year, then you can click on the COPY PREVIOUS button, and if you have done with it, you can click on the PUBLISH button to where you have to proceed with your plan. And if you want to add a new shift for an employee, you can click on the ADD button, and then you will be redirected to a window as shown below in the screenshot.
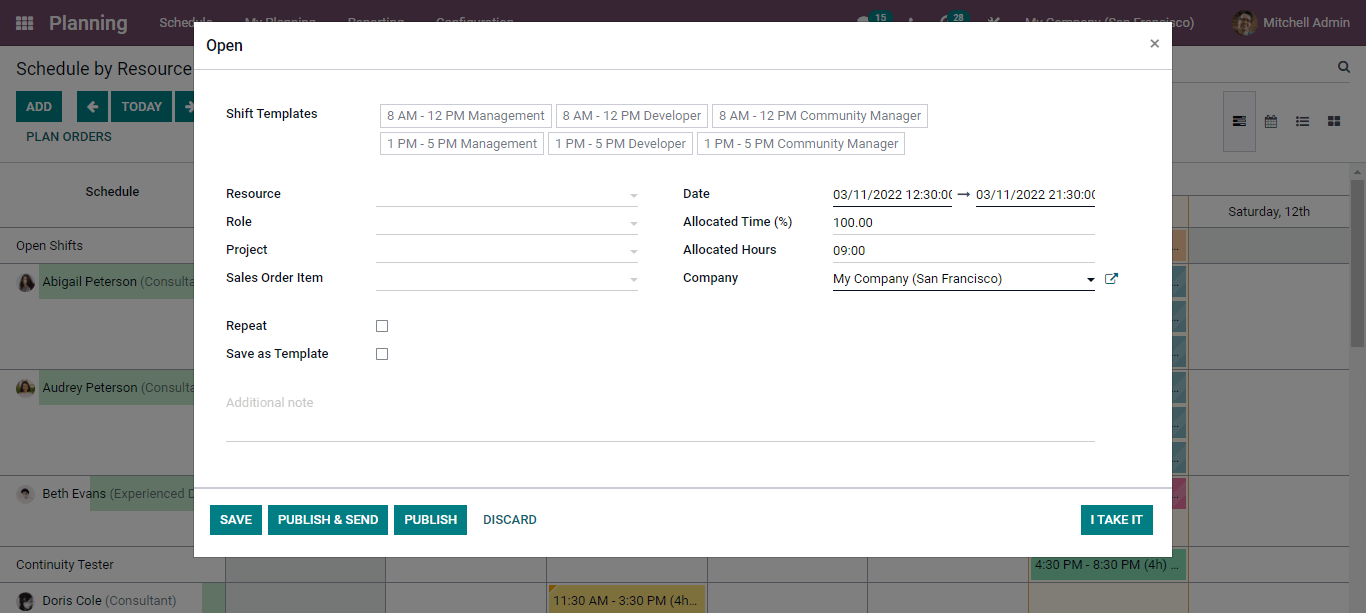
Here in the above screenshot, you can see the Shift Templates are auto-allocated as what you have done already with the Employees in your company. If you need the same schedule, click on the I TAKE IT button. And if you need to change the shifts, you can add accordingly on the Shift Templates part and follow. By adding the Resource, Role, Project, Sales Order Item, Date comes as when you are creating for, Allocated Time, Allocated Hours, Company you can mention all these in this section and click on the SAVE button. Also, if you repeat the schedule and you can mark the Repeat option. And if you want to save the template, you can mark the Save as Template option. And if you need to publish and send to the responsive team member, you can click on the PUBLISH & SEND button. If you need to publish the template, click on the PUBLISH button.
Apart from clicking on the ADD button, you can schedule the plan and shifts of your team by going through an easy click option. From the below screenshot you will get the method of scheduling.
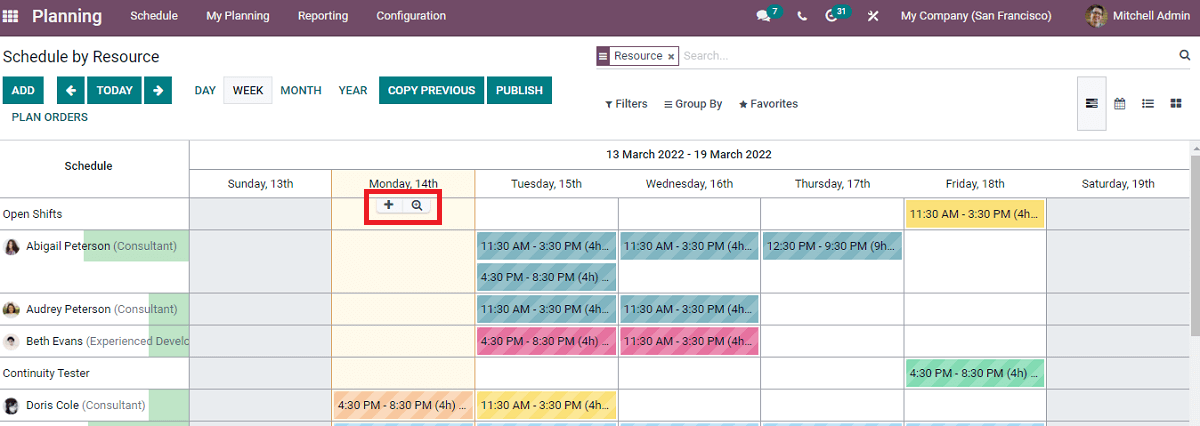
Now by seeing the above screenshot, the highlighted portion in which you found a symbol (+) denotes to create an open shift by clicking on it, the same window as to where you click on the ADD button appears. You can click this symbol near each employee working in your company and follow it. Let us see now how to schedule new shifts without a template. The following steps you need to follow:-
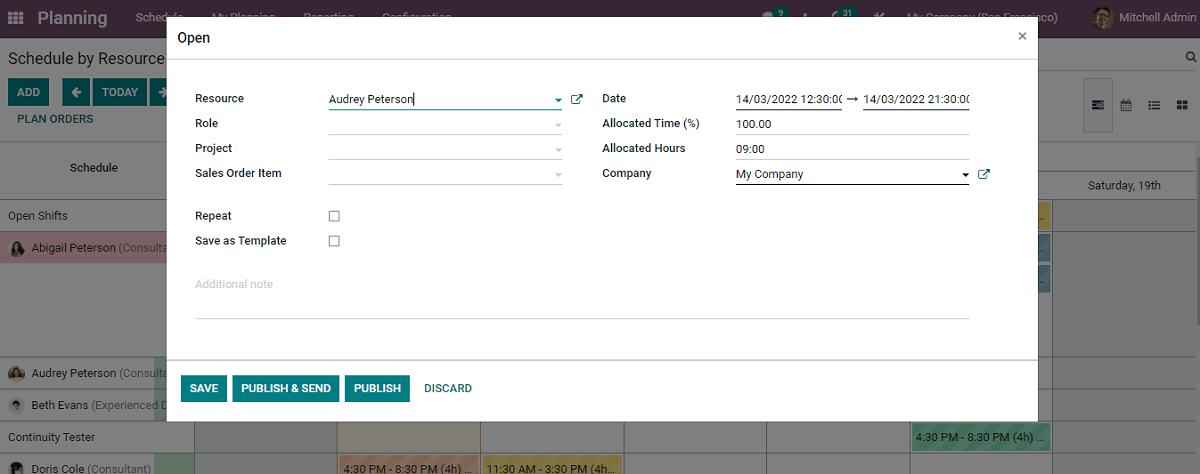
By clicking on the (+) symbol, you will get a pop-up window as shown in the above screenshot. The steps you need to follow are as shown below:-
Resource:- Select the resource from the drop-down menu if you have already created the name list of the employees working as a database.
Role:- Choose the role from the drop-down list as per the resource selected.
Project:- Choose the project as suitable for the chosen resource.
Sales Order Item:- From the drop-down menu, select the appropriate sales order item.
Date:- It will be automatically allocated, or else you can mention from the starting date and ending date of your schedule to be held.
Allocated Time %:- Here you can mention the time in percentage the shift will have lasted.
Allocated hours:- Here you need to enter the working hours of the particular shift you need to work.
Company:- The company name you can automatically adjust as per the company working from the drop-down menu.
Repeat:- This option you can enable either if you need to repeat the shift at some intervals, after enabling the option you need to mention the weeks where you need to repeat or you can mark forever where the shift has to repeat.
Save as Template: In this option, you can use the created schedule details for another template by enabling the option.
Additional Notes:- Here, you can add any notes in the required space.
After mentioning all the details, as said earlier, you can save the template by clicking on the SAVE button, or if you need to publish, you can click on the PUBLISH button. If you send simultaneously to the responsive person, you can click on the PUBLISH & SEND button.
Similarly, this same method is followed to schedule any shift for Role, Project, and Sales Order.
With this blog, you are able to manage the first process by scheduling the shifts to each employee as per your every assignment and detailed discussion with your co-members. And it is the primary function to maintain your tasks with proper time management that helps to proper planning. Thus scheduling shifts to each employee as per their role and expertise targets a company to fix with the proper foundation. The Odoo 15 Planning helps to build your foundation with any risk-free management.