For manufacturing businesses, effective production planning and scheduling are critical. Odoo 18's Master Production Schedule (MPS) assists companies in forecasting demand, planning production, and efficiently managing resources. By considering production capacity and lead times, the MPS helps businesses align their operations with actual market demand, optimizing resource allocation and minimizing potential bottlenecks.
The benefits are clear: increased production efficiency, reduced stockouts and overproduction, and stronger decision-making capabilities. With MPS, manufacturers can streamline workflows, optimize inventory, and ensure timely deliveries—ultimately driving both efficiency and customer satisfaction.
The MPS is a manual planning tool that suggests replenishment quantities but does not automatically generate manufacturing or purchase orders. As such, it's crucial to avoid using it in conjunction with automated reordering rules. Combining these approaches can lead to conflicts, inaccurate forecasts, and the creation of duplicate orders. To ensure accurate and efficient planning, choose either the MPS for manual control or automated reordering rules, but avoid using both simultaneously.
Configuring Master Production Scheduler In Odoo
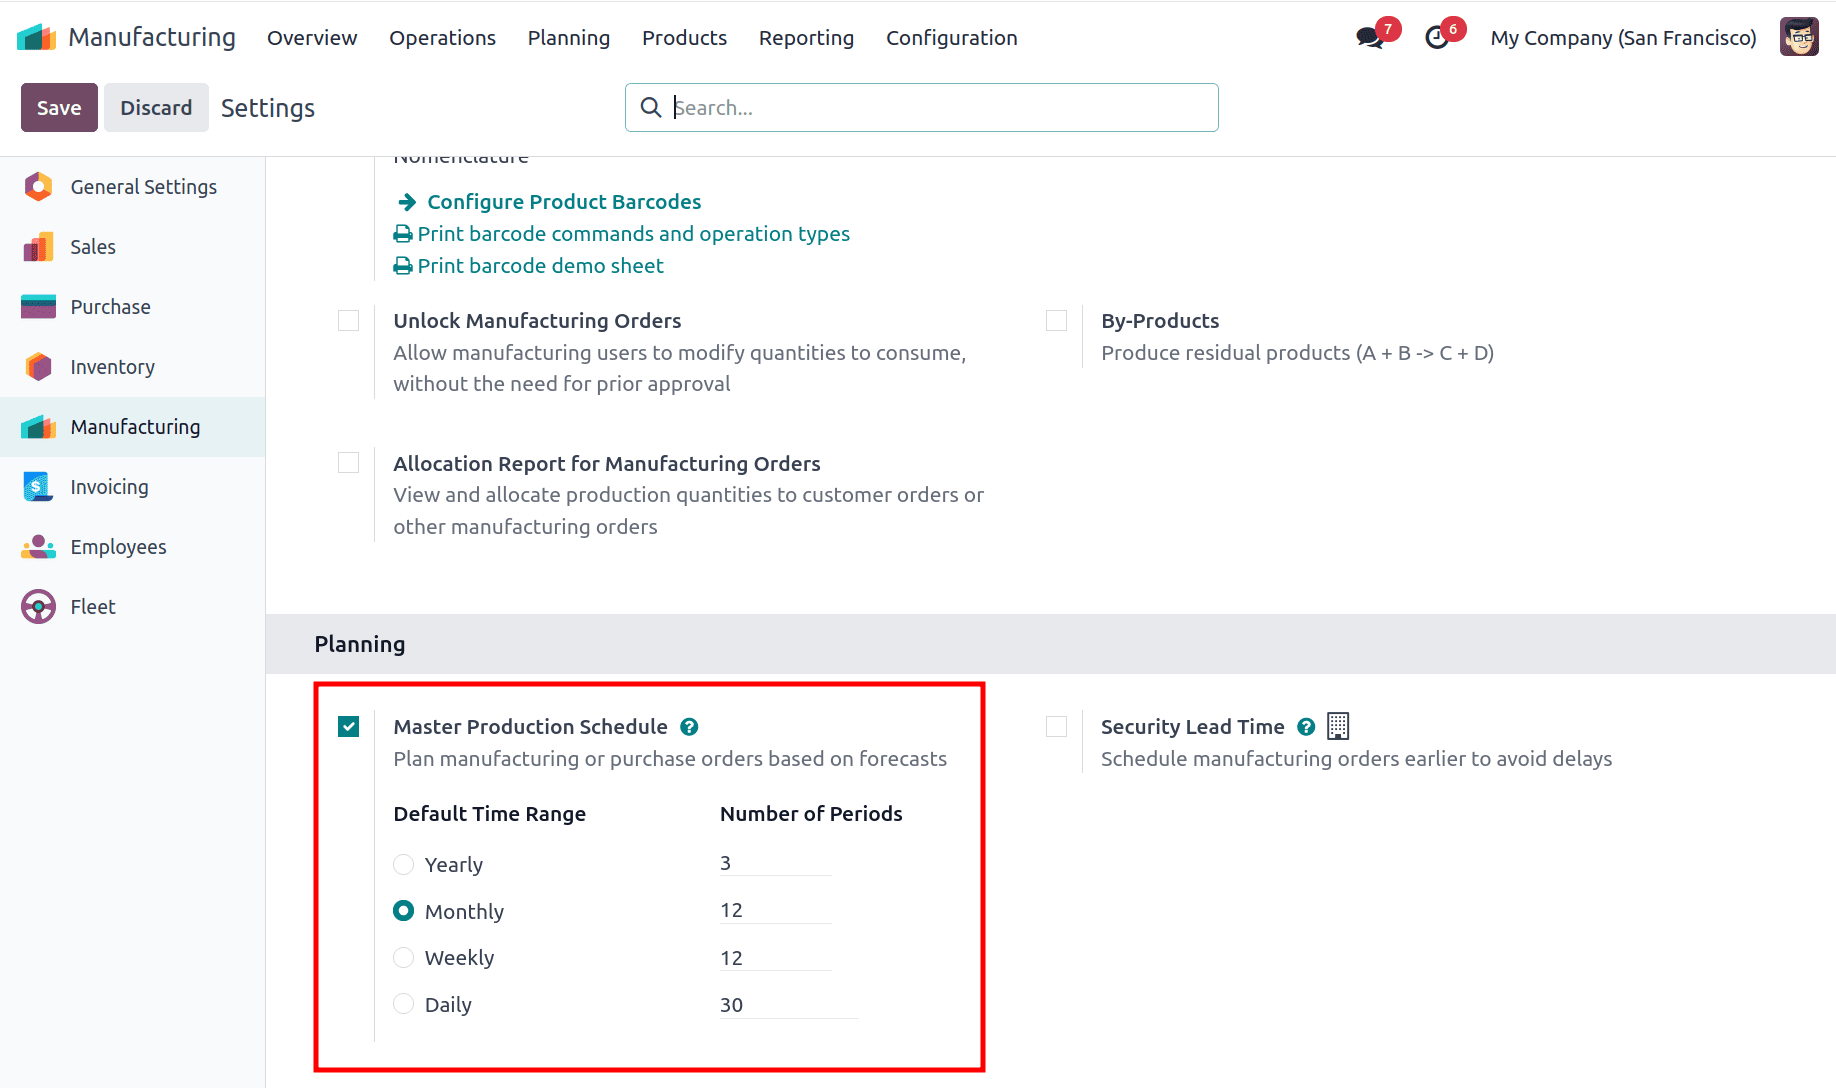
To configure the MPS in Odoo, go to Manufacturing > Configuration > Settings and, under the Planning section, enable the Master Production Schedule option. Once enabled, you can define the Default Time Range (Daily, Weekly, or Monthly) and set the Number of Periods to be displayed in the schedule.
Setting Up a Product and Accessing the MPS Dashboard in Odoo 18
Once the MPS is enabled, the core of planning happens on the MPS dashboard. You start by adding the products you need to plan for.
- Go to Manufacturing > Planning > Master Production Schedule. Click the Add a Product button.
This opens a configuration pop-up where you define the planning strategy for the product.
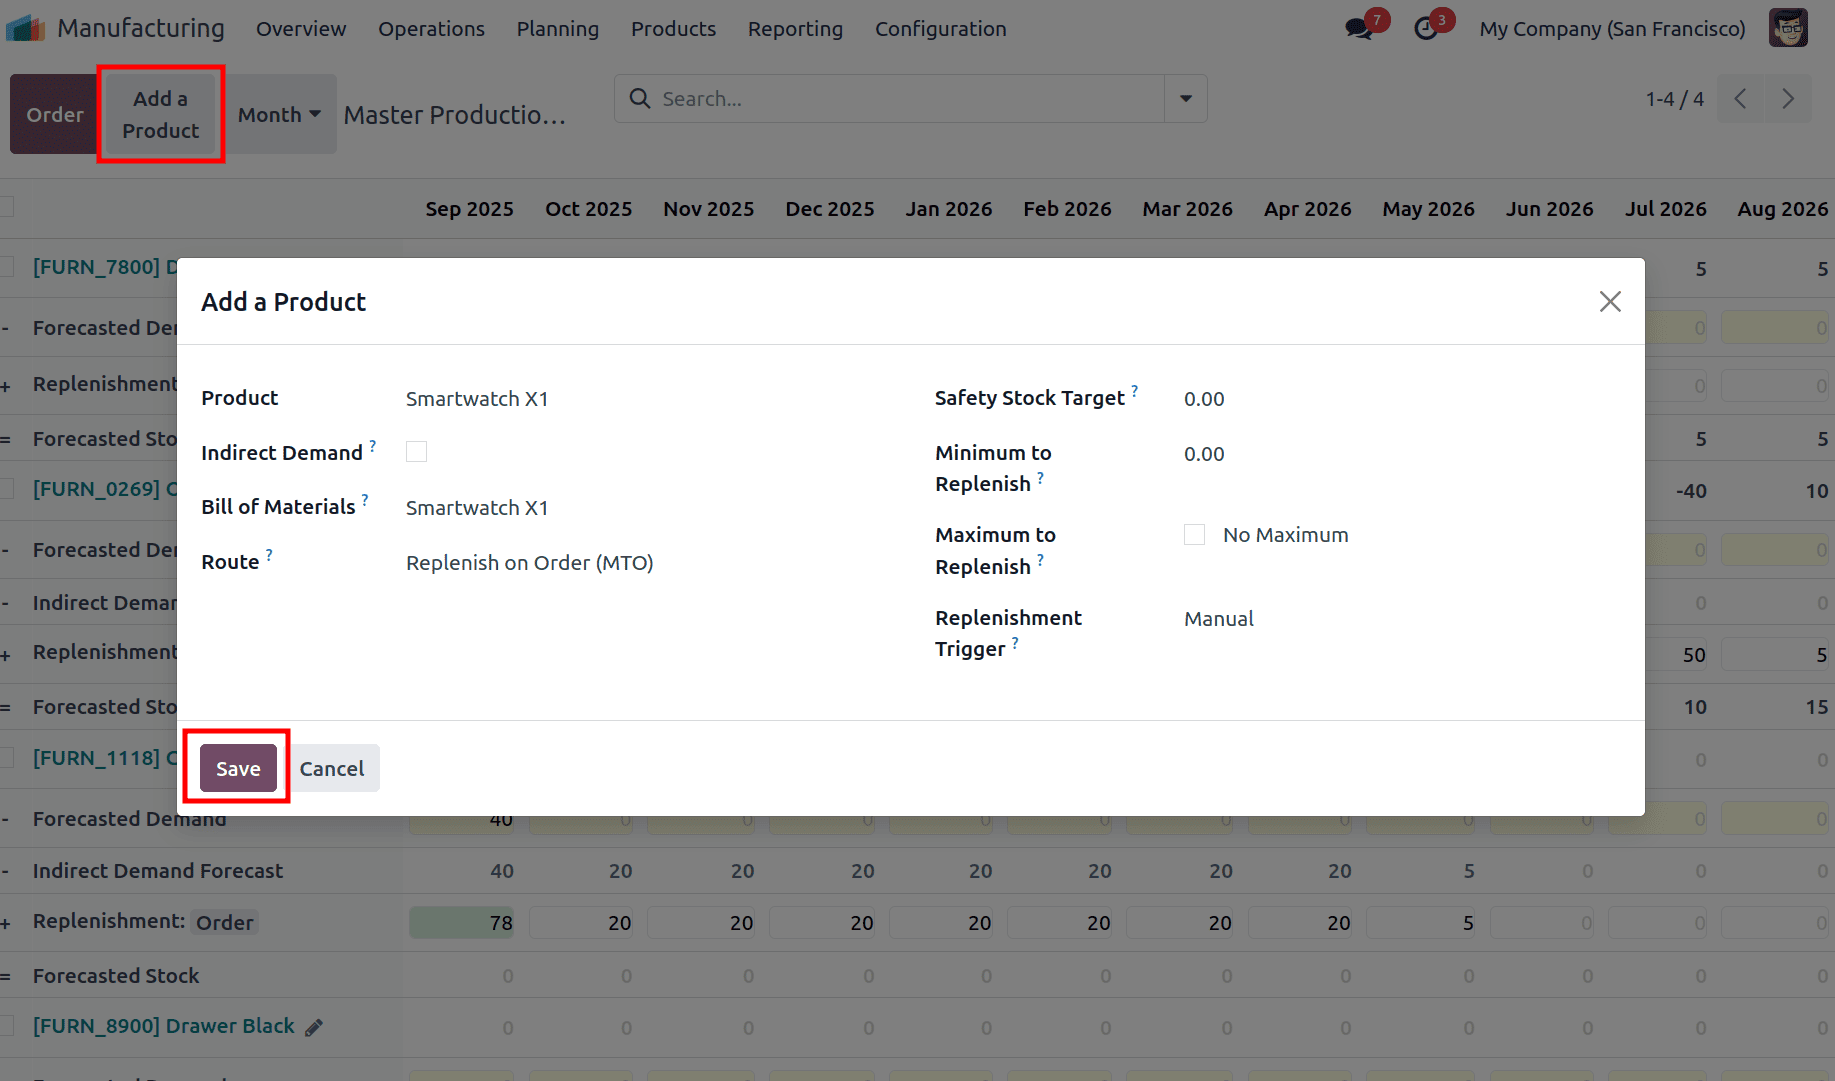
Let's use our example product, "Smartwatch X1," to explain each field:
- Product: This is where you select your finished product (e.g., Smartwatch X1). The MPS will forecast demand and plan production for this item.
- Indirect Demand: If enabled, this product will not appear in the ‘To Forecast’ filter.
- Bill of Materials: If your product is manufactured, link its BoM here. This feature automatically expands the schedule by adding all components when you select the BoM, giving a complete top-down view. For example, demand for Smartwatch X1 generates corresponding demand for its components, such as Circuit Board (to be manufactured) and LCD Screen (to be purchased).
- oute: This field is automatically filled based on the product's configuration. It shows the primary method for replenishing the product, which is crucial for the MPS's logic.
- In our example, "Smartwatch X1" has the Manufacture and MTO route, while its component "LCD Screen" has the Buy and MTO route, and component “Circuit Board” has the Manufacture and MTO route.
- Safety Stock Target: The minimum quantity you want to always have on hand to avoid stockouts. For example, setting this to 10 means the MPS will always recommend production if the forecasted available quantity drops below 10 units.
- Minimum to Replenish: The smallest batch size for production or purchasing. If set to 12, the MPS will always suggest making or buying in multiples of 12.
- Maximum to Replenish: The absolute upper limit for a single order. Setting this to 200 prevents the system from suggesting an order larger than that, helping you control capital tied up in inventory.
- Replenishment Trigger: If set to ‘Manual’, the product is replenished manually from MPS. If set to ‘Automatic’, replenishment occurs automatically via a scheduled action. If set to ‘Never’, the product is not replenished from MPS.
After clicking Save, your product (and its components, if a BoM was linked) appears in the MPS dashboard, ready for you to plan based on the forecast and the rules you just defined.
Understanding the MPS Dashboard
The left side of the screen is dedicated to your products. Each product section is then broken down into multiple rows. Each row corresponds to a product and its planning data across all periods.
By default, rows displayed for each product are:
- [Product Name]: This row shows the product name along with its Internal Reference.
- - Forecasted Demand: This row displays the estimated future demand you have manually entered for the product for each time period. This is your sales forecast.
- + Replenishment: The quantity to replenish through purchase orders or manufacturing orders.
- = Forecasted Stock: This row is the result of the planning equation. It shows the projected quantity of the product you will have in stock at the end of each period, assuming all suggested replenishments are fulfilled. This value automatically becomes the starting inventory for the next period.
In essence, these default rows form a clear planning equation for each product:
Forecasted Demand + Replenishment = Forecasted Stock
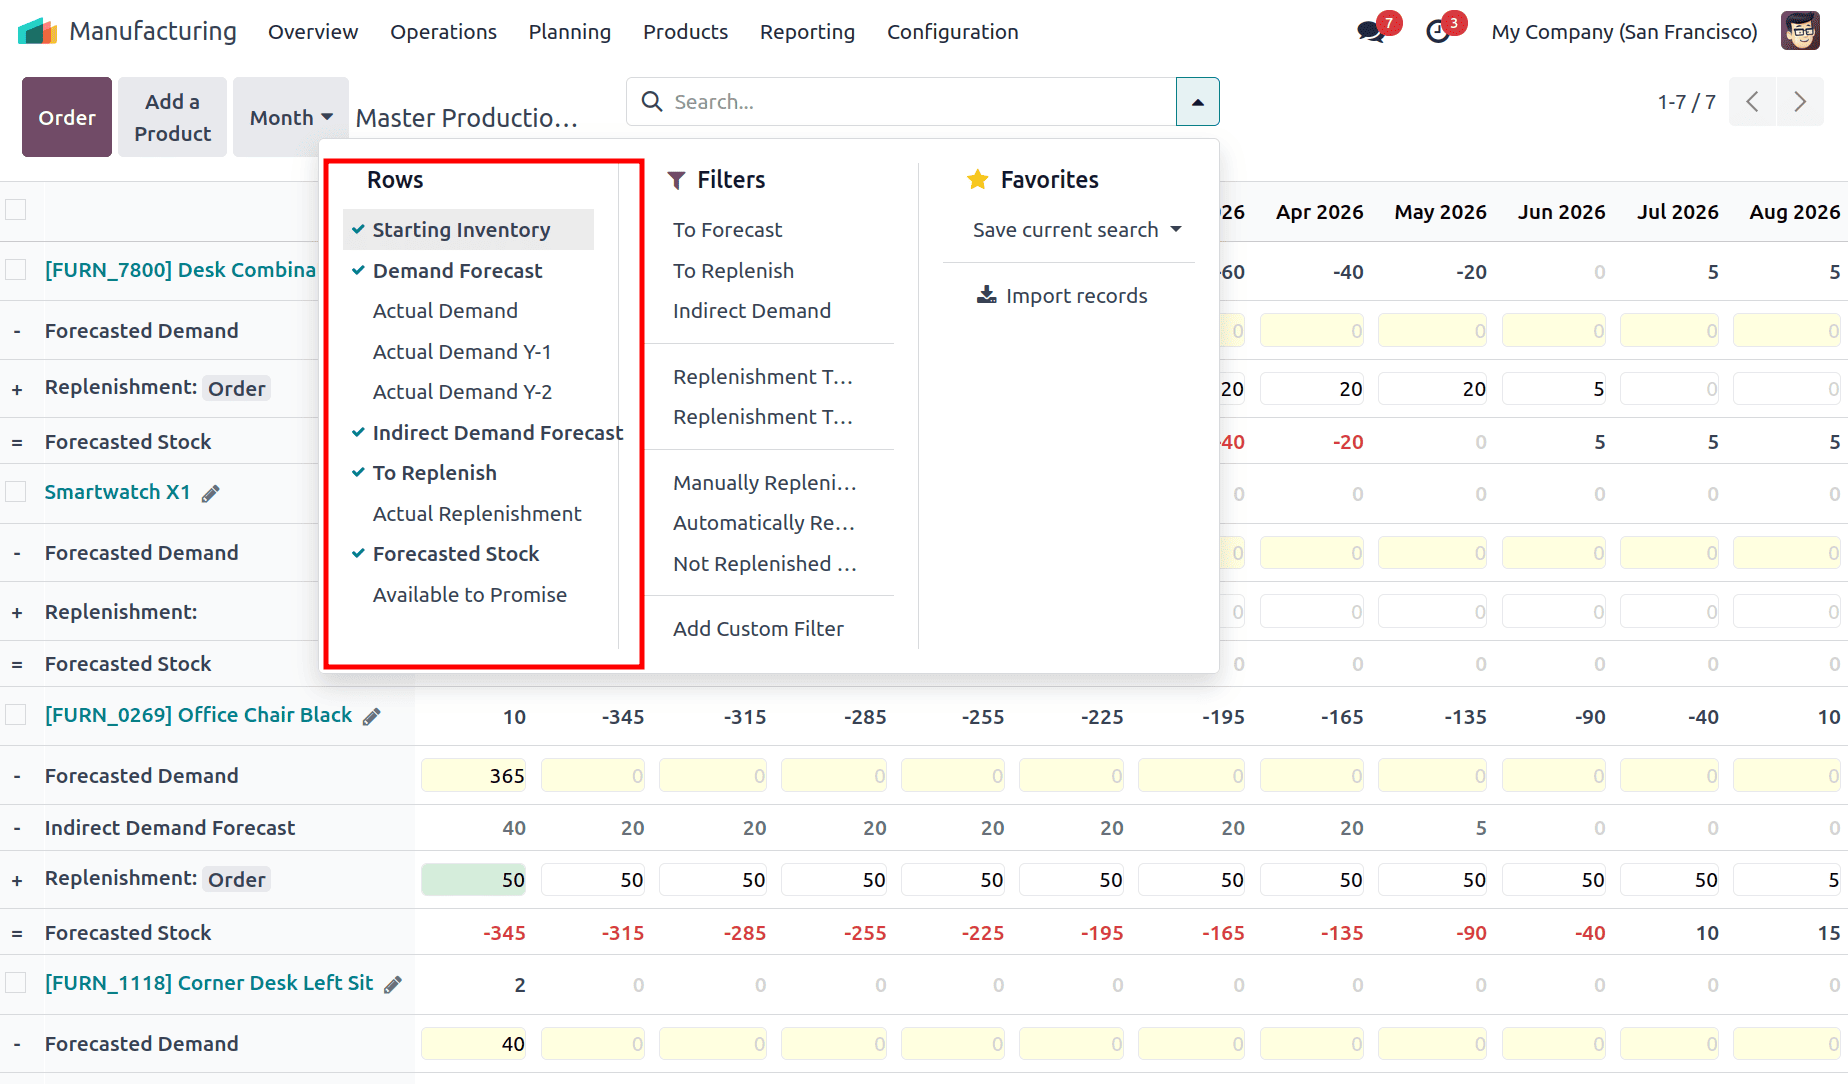
You can customize this view by selecting other rows from the menu, they are dynamically controlled by the filters you apply from the Search… bar drop-down menu at the top of the page. such as Actual Demand (from confirmed sales orders) or Available to Promise (Quantity available to sell at the end of the period after fulfilling all confirmed sales orders), to get an even more detailed picture. This flexibility allows you to incorporate concrete data like Actual Demand Y-1 (Actual demand for the same period last year, for seasonal comparisons) and Actual Replenishment (Based on confirmed RFQs and Manufacturing Orders) to create a plan.
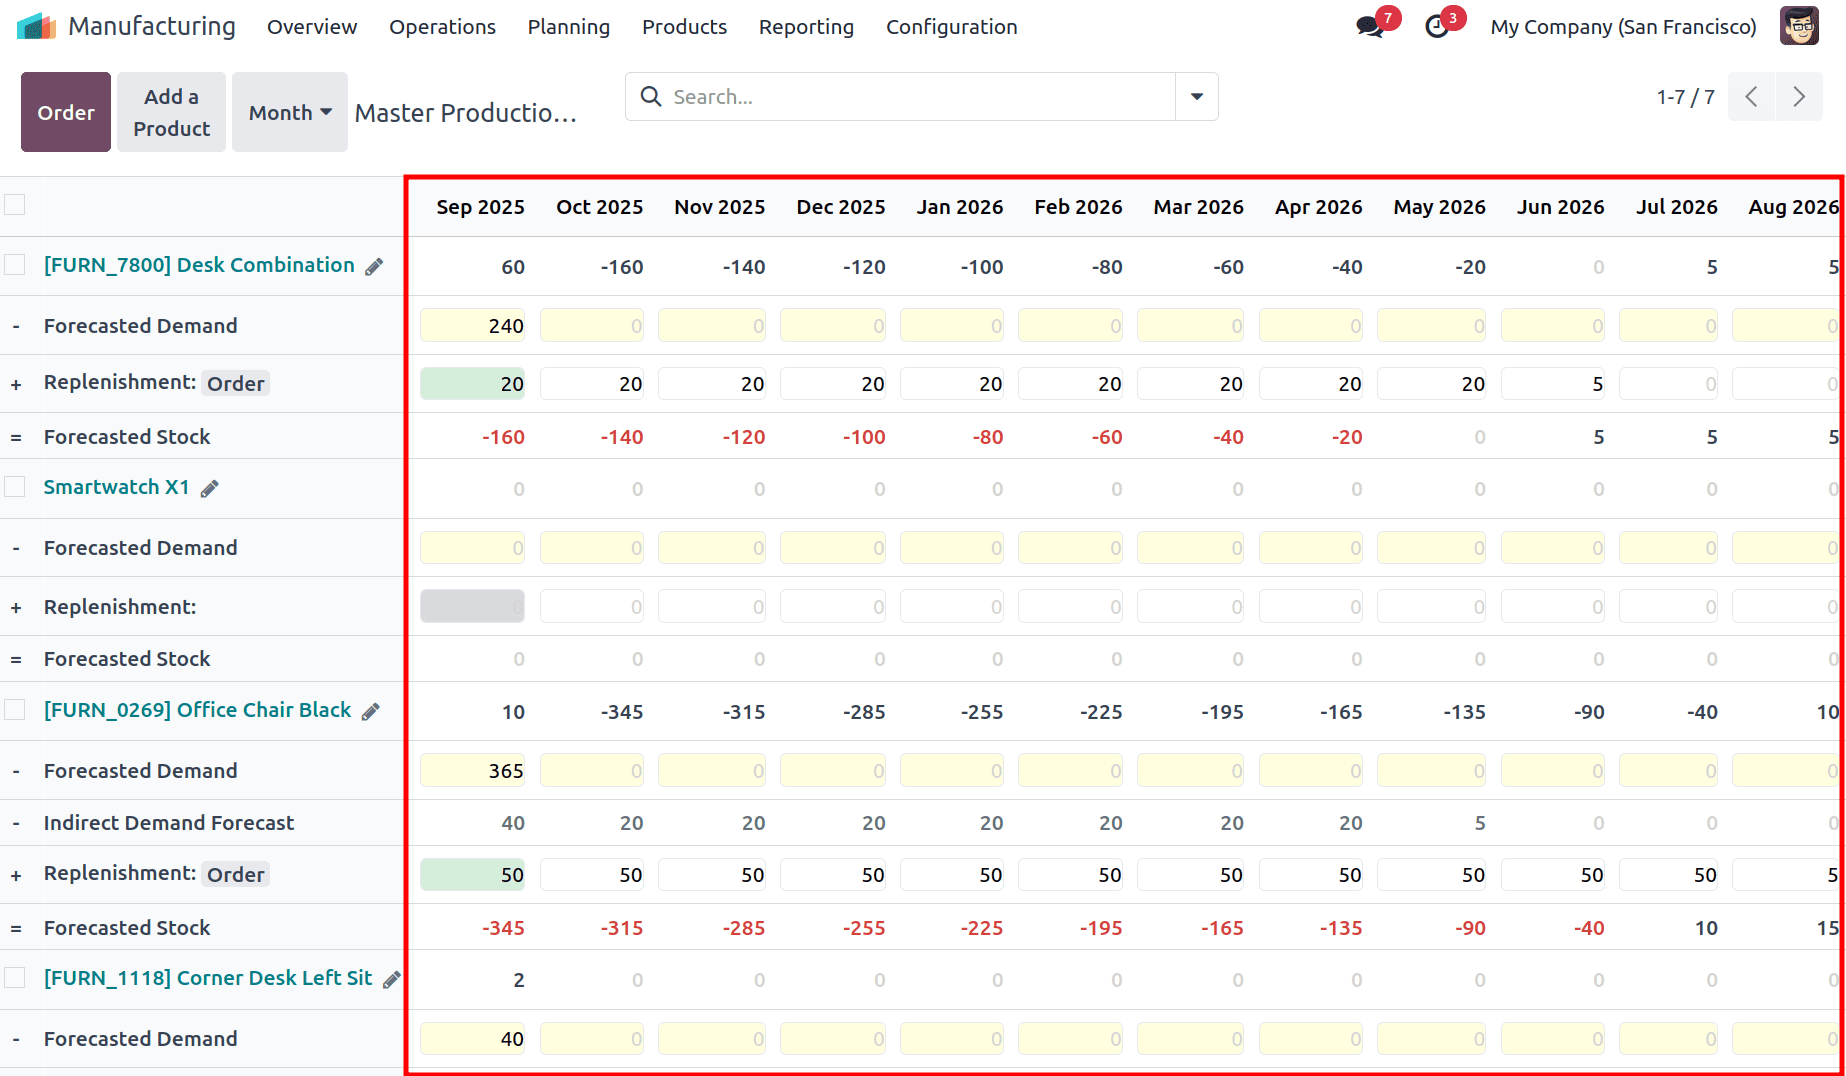
To the right of the product column, the MPS dashboard displays a series of columns, each representing one unit of the time period you defined in the Time Range field (Daily, Weekly, or Monthly) of configuration settings. The total number of these columns is determined by the value you set in the Number of Periods field in the settings.
The first column always represents the current, immediate time period. For instance, if your view is set to monthly periods, the first column is the current month.
A key feature of the MPS is its visual, color-coded alert system for the Replenishment value in this first column. This instant visual cue helps planners prioritize actions:
- Green: This color indicates that a new replenishment order must be created. The system is suggesting an order to prevent stock from falling below your Safety Stock Target. This is your cue to click the Order button.
- Gray: This signifies that a replenishment order has already been generated for the suggested quantity. No further action is needed for this period, as the system has already accounted for the demand.
- Yellow: This is a warning. It means that while a replenishment order exists, its confirmed quantity is insufficient to meet the forecasted demand and maintain your desired safety stock. You may need to create an additional order or increase the quantity of the existing one.
- Red: This alert indicates that an existing replenishment order is excessive. The confirmed order quantity is more than what is needed to meet demand and reach the safety stock target, potentially leading to overstock. You might need to adjust the order quantity down.
Generating Replenishment Orders
Odoo 18's MPS provides multiple intuitive ways to generate orders directly from the dashboard, offering flexibility and control over your supply chain execution.
You can create replenishment orders in three primary ways:
- For a Single Product:
The most common method is to generate an order for a specific product. Locate and click the Order button on the right side of the + Replenishment row for the desired product.
- For Multiple Selected Products:
To process orders in bulk, tick the checkboxes next to multiple product names. Then, click the Actions button at the top of the screen and select Order from the drop-down menu. This generates a replenishment order for each selected product with an active suggestion.
- Global Replenishment:
Clicking the global Order button at the top of the screen will automatically generate replenishment orders for every product in the current view that is below its Safety Stock Target for the immediate period.
Let's walk through the process using our "Smartwatch X1" example, where the MPS suggests a replenishment of 1000 units for the current month.
- Setting the Demand: The process begins by defining the Actual / Forecasted Demand for the main product. For instance, inputting a demand of 1000 units for Smartwatch X1 triggers the replenishment calculation.
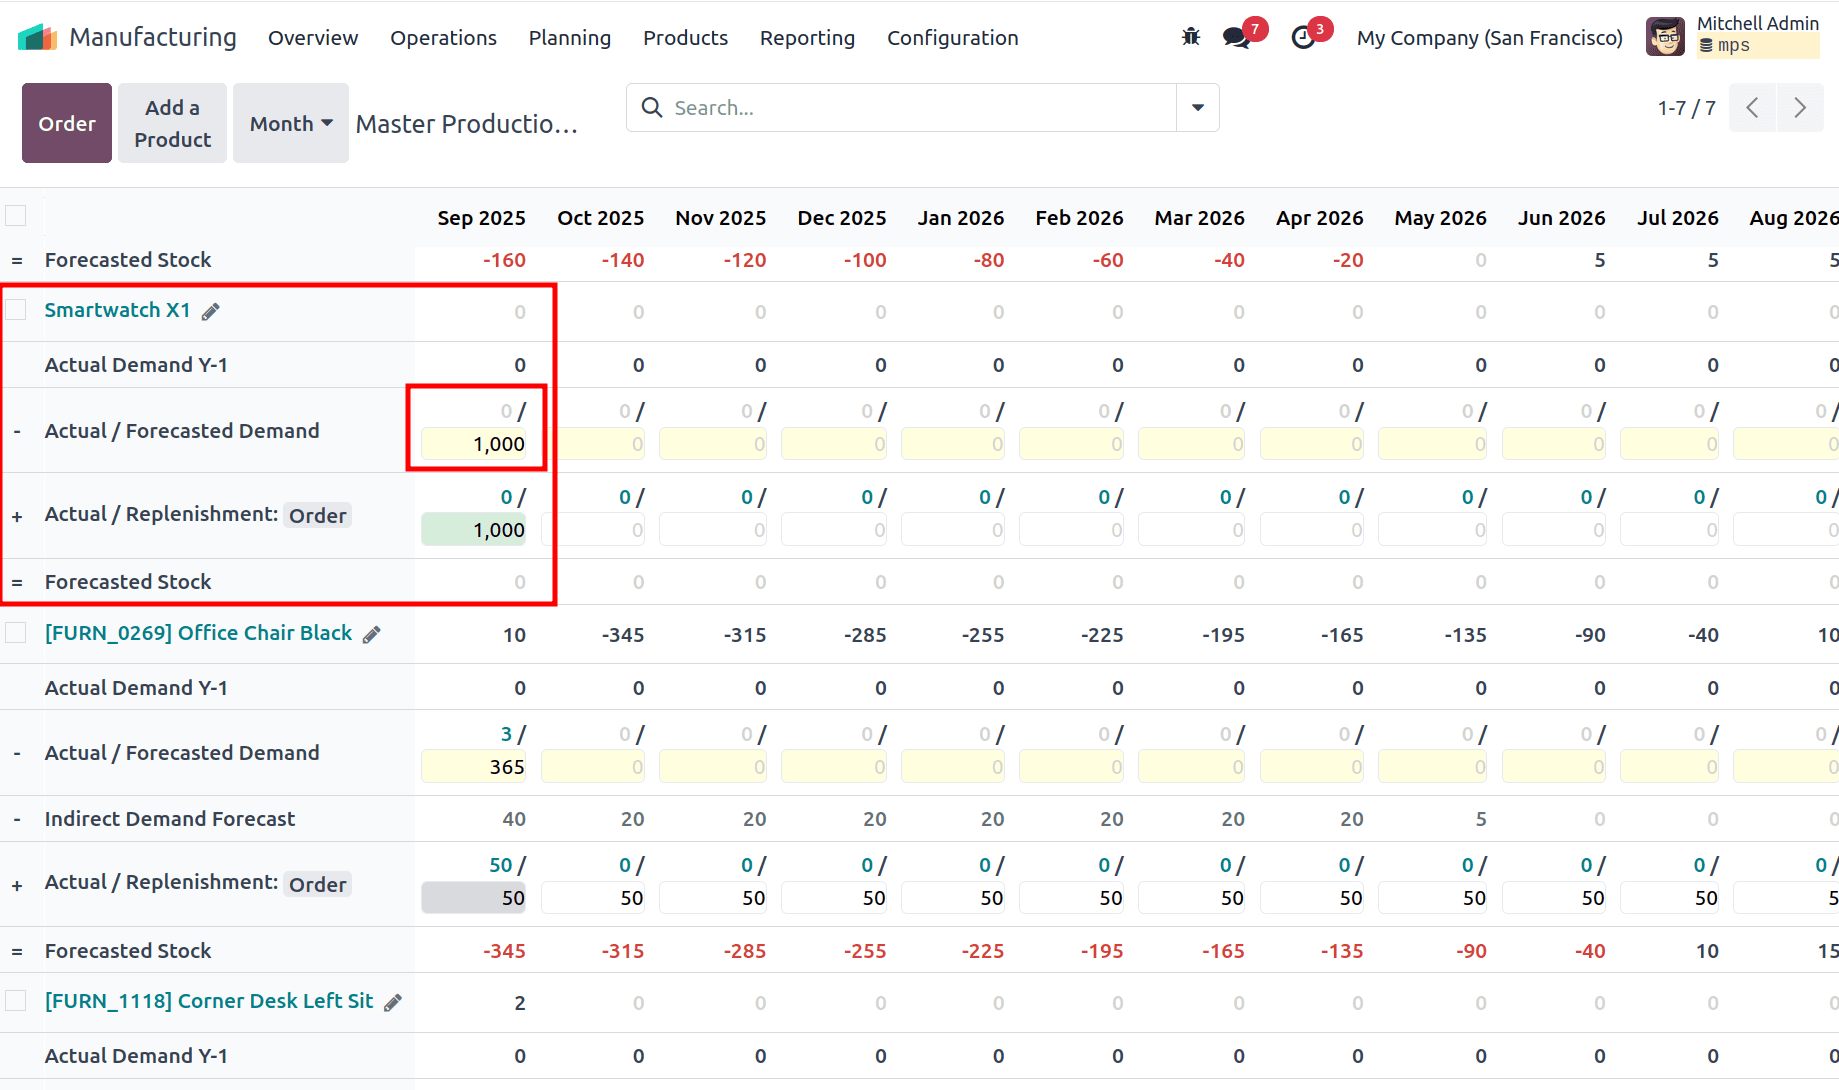
- Replenishment Calculation: The MPS automatically calculates the required replenishment for the finished product and all its components by exploding the Bill of Materials (BoM).
- The Actual / Replenishment value for Smartwatch X1 is set to 1000.
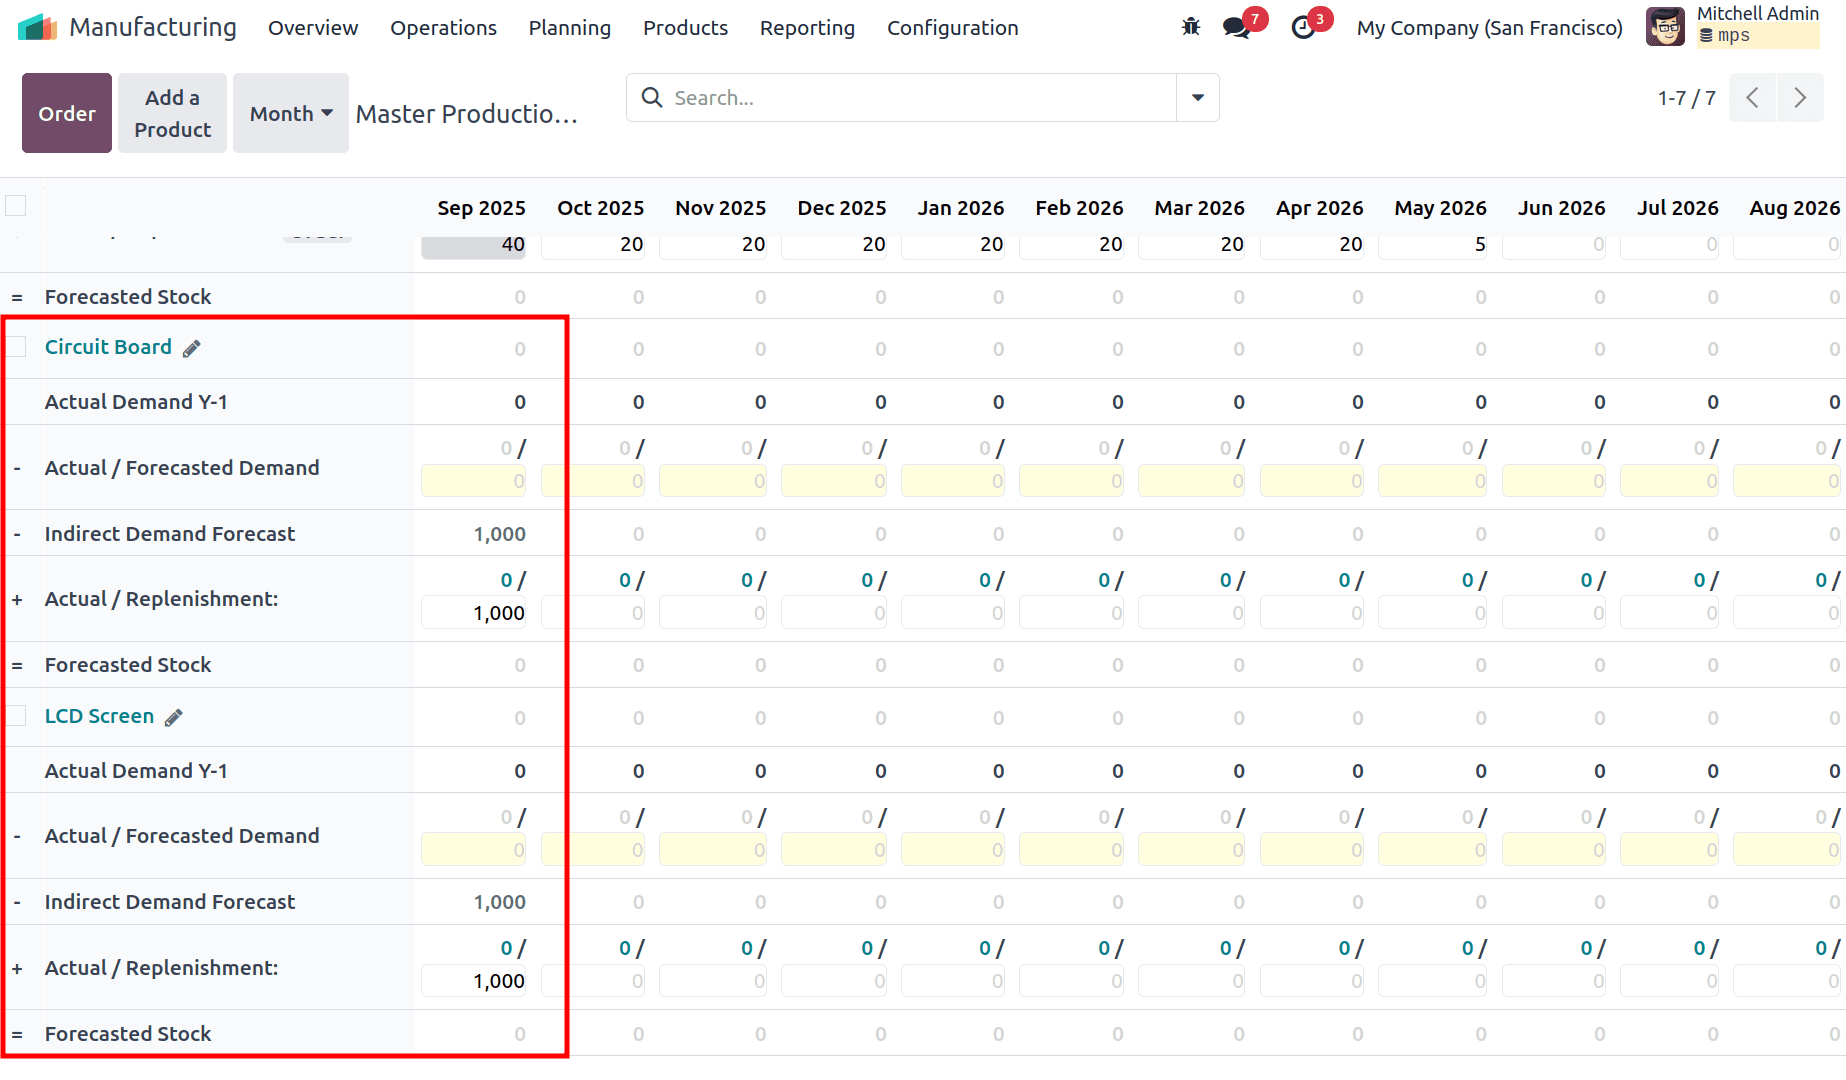
- The Actual / Replenishment value for Circuit Boards and LCD Screens is also set to 1000(based on the BoM).
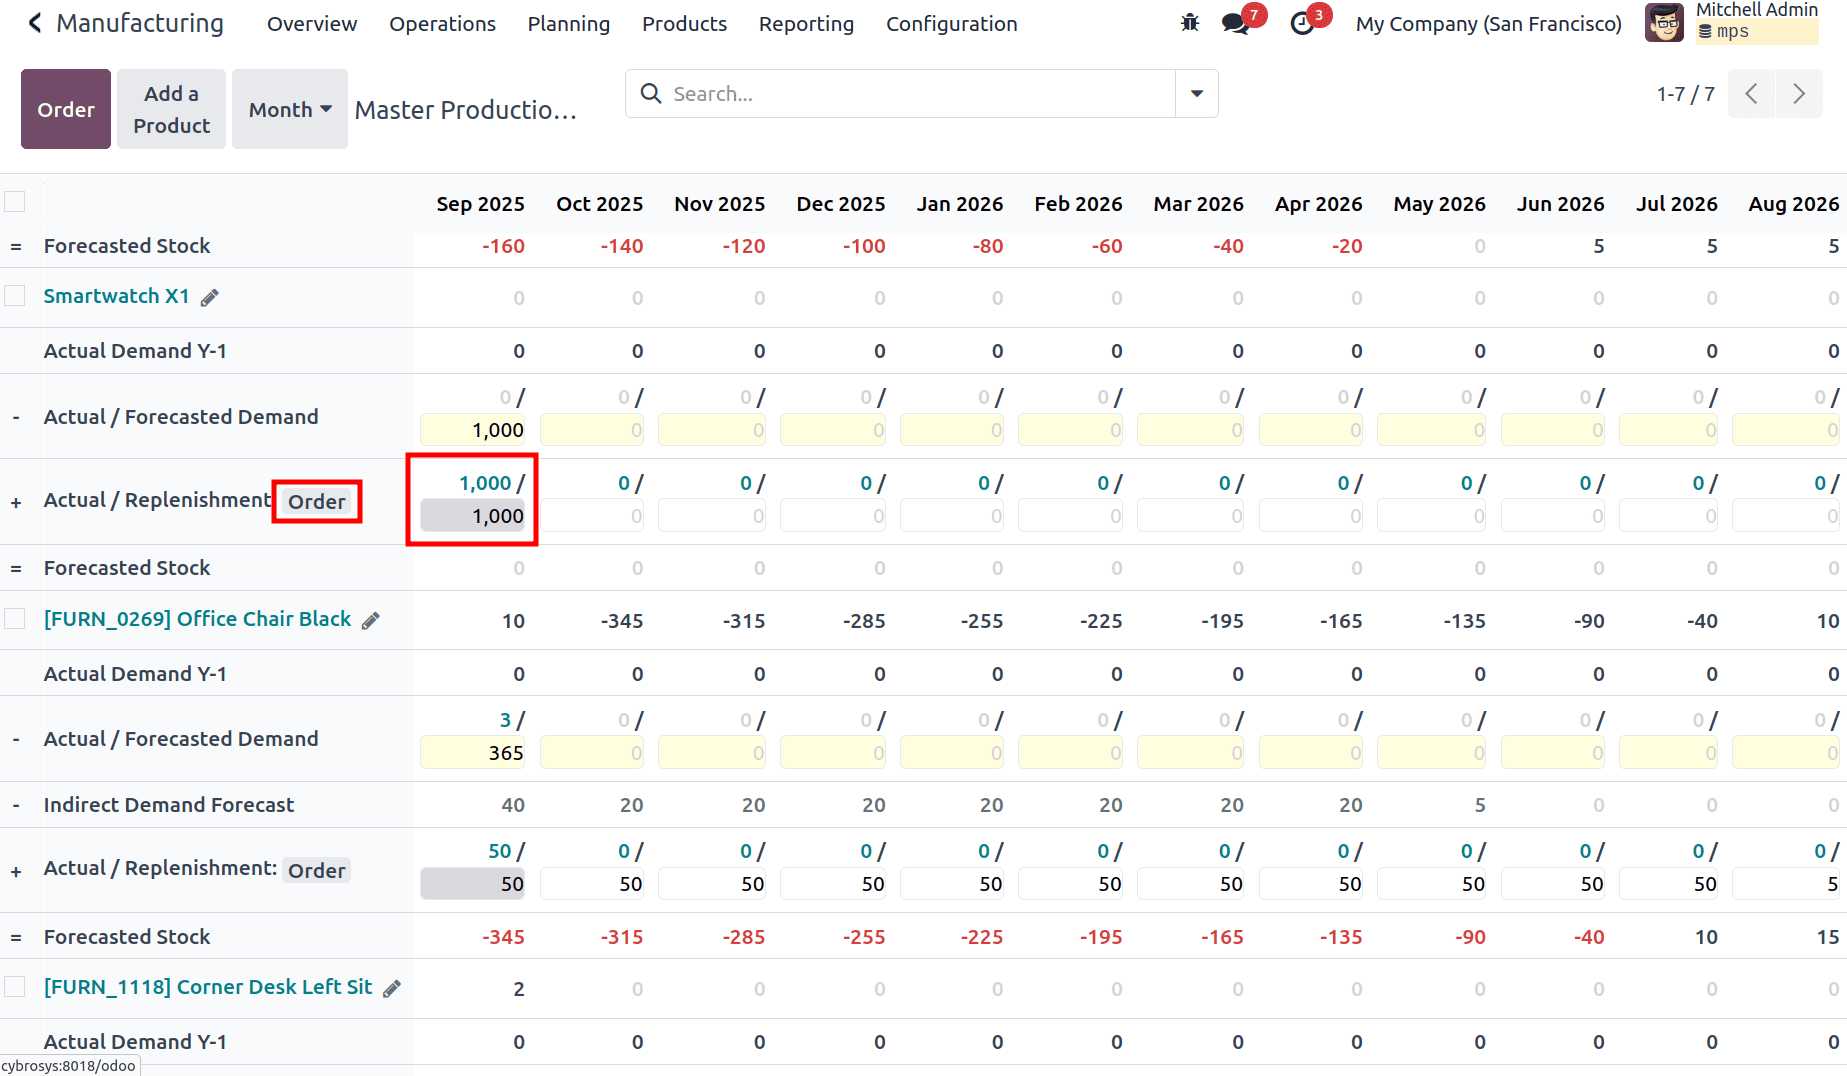
- Order Generation: Clicking the Order button for Smartwatch X1 triggers the creation of all necessary orders. The Actual / Replenishment field updates to reflect this, for example, changing from 0/1000 (suggested) to 1000/1000 (ordered). The numerator (e.g., 1000) represents the confirmed order quantity and is a clickable link.
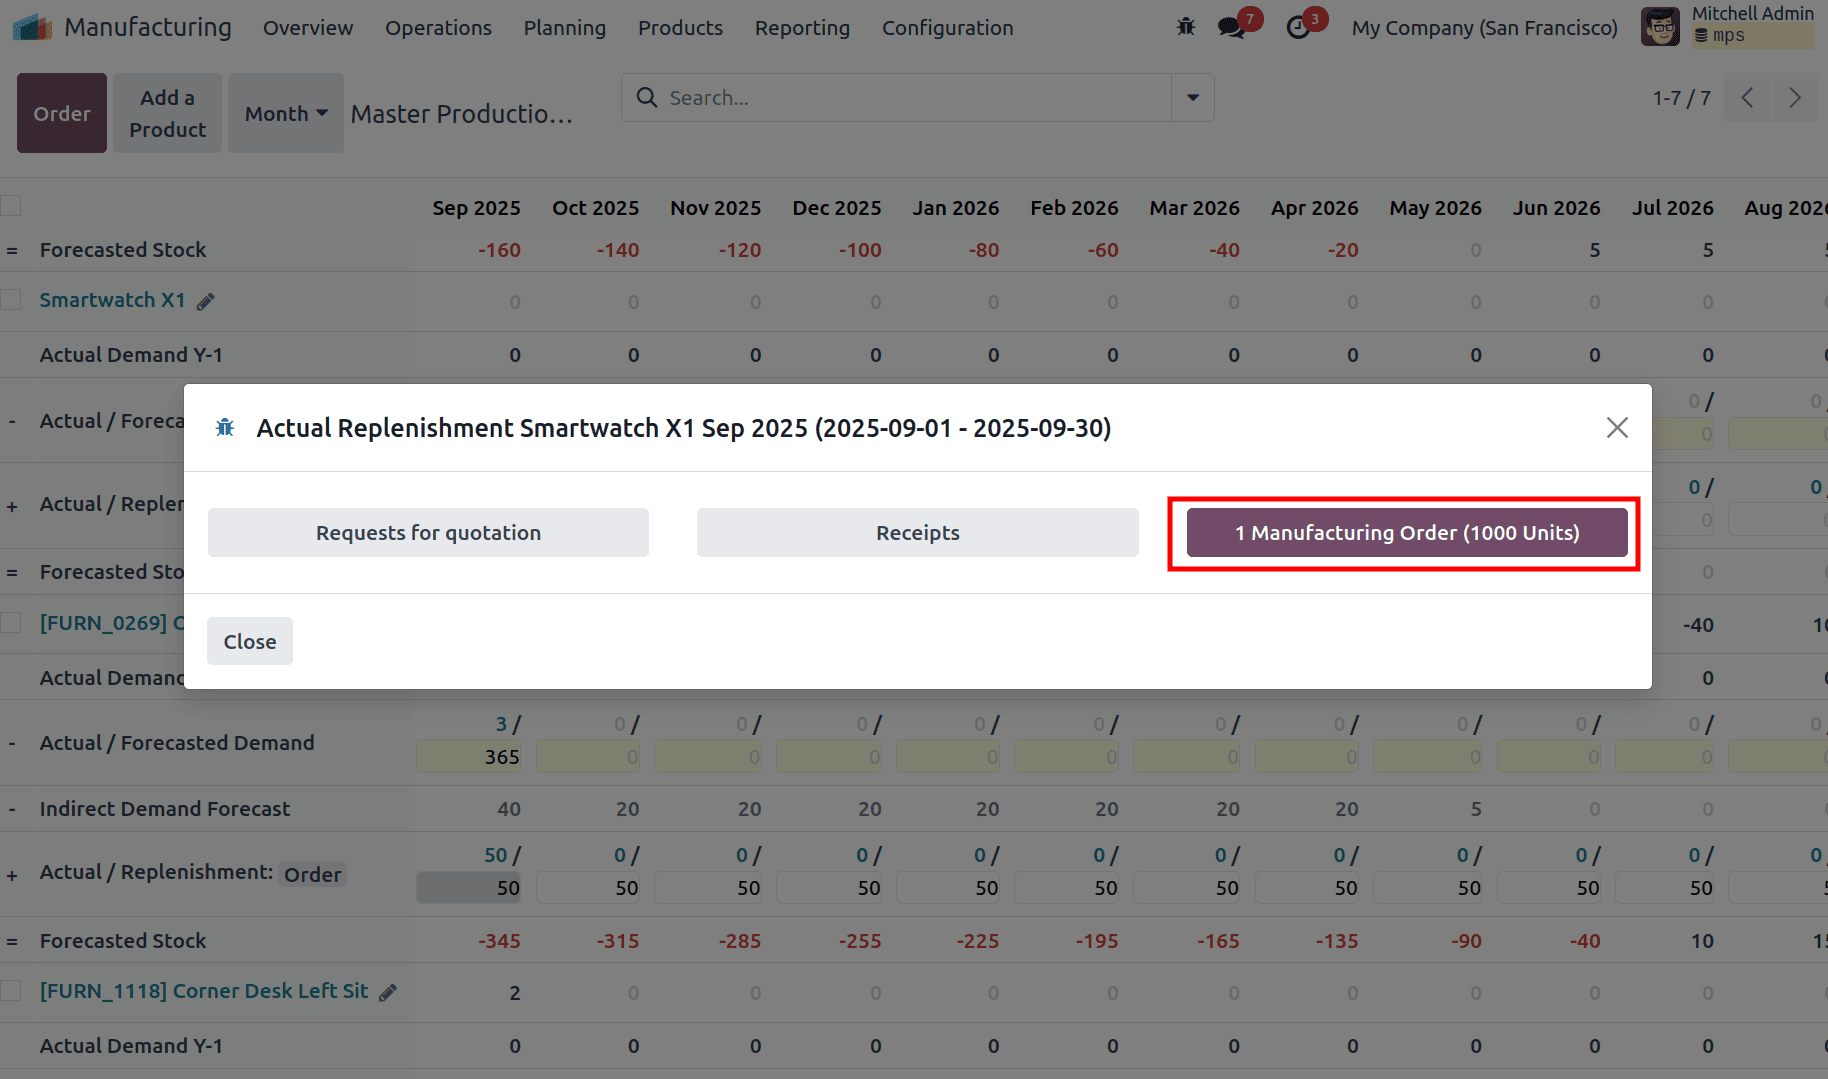
- Order Management: Clicking the updated quantity (e.g., 1000) opens a detailed view of the orders directly linked to this product.
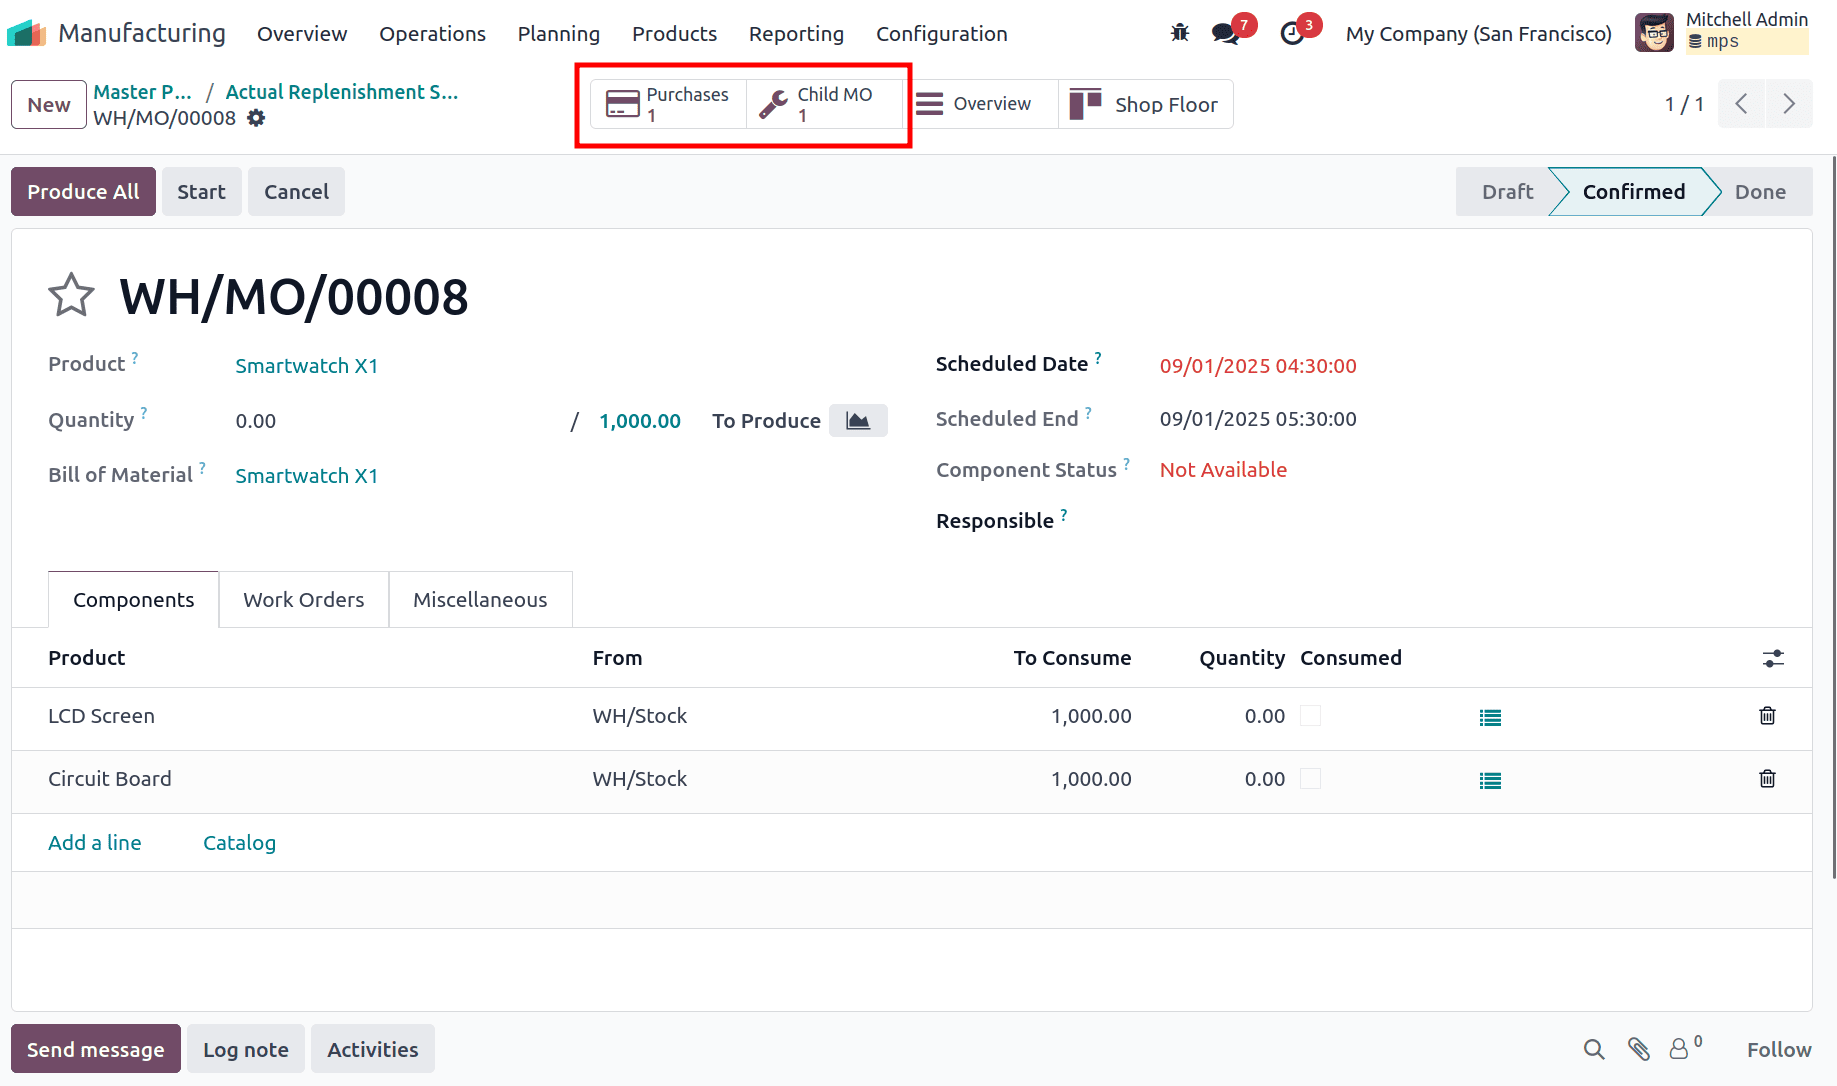
In this example, for Smartwatch X1 (which has the Manufacture route), this view will show the Manufacturing Order created for the finished product itself.
The system also automatically generates orders for components (like a Purchase Order for the LCD Screen or a Manufacturing Order for the Circuit Board) based on their individual routes. You can view and open the main Manufacturing Order for the 1000 units from this hub. From within that dedicated order, you can then track the progress and manage the downstream component orders needed to complete the production.
In conclusion, the Master Production Schedule (MPS) in Odoo 18 is a powerful, manual planning tool that provides manufacturers with a clear, top-down view of their entire supply chain. By integrating forecasted and actual demand with replenishment suggestions, it enables businesses to proactively plan production, prevent stockouts, avoid overproduction, and optimize inventory levels.
To read more about An Overview of Master Production Scheduler in Odoo 17 Manufacturing, refer to our blog An Overview of Master Production Scheduler in Odoo 17 Manufacturing.