One of the smallest UI frameworks on the basis of the Odoo web client is the Odoo web library. It uses components as building blocks.
This blog helps to add a custom pop-up in POS. First, we have to build a custom module. The custom module structure is provided below.
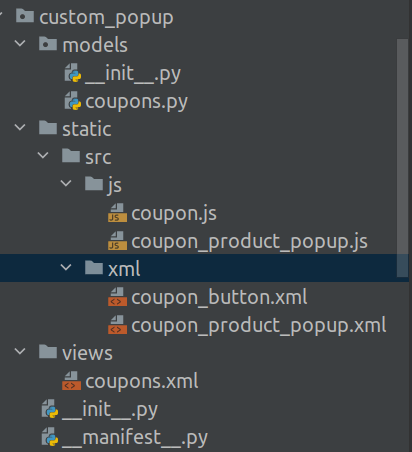
Here under static, create an src folder. That contains the js and XML folder. The js files are included in the js folder, and their views are included in the XML folder.
Python File:Coupons.py
First, we have to create a boolean and Many2one field in POS settings. We can choose the coupon products by enabling the boolean field. Using this python file, the fields are added in pos settings. Here we created two fields coupon_category of type Boolean and category_id of type Many2One. Categoery_id is only visible when we enable the boolean field coupon_category.
from odoo import models, fields
class PosCoupons(models.Model):
   _inherit = 'pos.config'
   _description = 'Pos Coupons'
   coupon_category = fields.Boolean(string="Coupon Category", default=False)
   category_id = fields.Many2one('pos.category', string="Category")
XML File: Coupons.xml
The given XML file is used to show these fields in POS settings.
<odoo>
   <record id="pos_coupons_config_view_form" model="ir.ui.view">
       <field name="name">pos.config.coupons.form.view</field>
       <field name="model">pos.config</field>
       <field name="inherit_id" ref="point_of_sale.pos_config_view_form"/>
       <field name="arch" type="xml">
           <!-- Add boolean and many2one field in pos settings-->
           <xpath expr="//div[@id='category_reference']" position="after">
               <div class="col-12 col-lg-6 o_setting_box">
                   <div class="o_setting_left_pane">
                       <field name="coupon_category"/>
                   </div>
                   <div class="o_setting_right_pane">
                       <label for="coupon_category"/>
                       <div class="text-muted">
                           Coupon Category
                       </div>
                       <div class="content-group mt16" attrs="{'invisible': [('coupon_category', '=', False)]}">
                           <field name="category_id"/>
                       </div>
                   </div>
               </div>
           </xpath>
       </field>
   </record>
</odoo>
In order to create a button, we need python, XML, and js codes. The fields are created in the python file, and the view of the button is specified in the XML file. We can set the visibility of the button in POS using the js file.
XML File: coupon_button.xml
This specifies where we added this button. Here we create an on_click event. When we click the button, it will execute the function ‘display_popup_products’.
<?xml version="1.0" encoding="UTF-8"?>
<templates id="template" xml:space="preserve">
   <!-- Coupon button-->
    <t t-name="CouponButton" owl="1">
        <button class="control-button" t-on-click="display_popup_products">
            <i class="fa fa-tag"/>
            <span>Coupon
        </span>
        </button>
    </t>
</templates>
JS File:coupons.js
The class CouponButton can be added by extending the POS component for our newly created button in pos and for popup generation. Here we define the function display_popup_products. It is used to generate a popup.
/** @odoo-module **/
    import rpc from 'web.rpc';
    import { Gui } from 'point_of_sale.Gui';
    import PosComponent from 'point_of_sale.PosComponent';
    import AbstractAwaitablePopup from 'point_of_sale.AbstractAwaitablePopup';
    import Registries from 'point_of_sale.Registries';
    import ProductItem from 'point_of_sale.ProductItem';
    import ProductScreen from 'point_of_sale.ProductScreen';
class CouponButton extends PosComponent{
      //Generate popup
      display_popup_products() {
      var core = require('web.core');
      var _t = core._t;
       Gui.showPopup("CouponProductsPopup", {
       title : _t("Coupon Products"),
       confirmText: _t("Exit")
          });
      }
  }
  //Add coupon button and set visibility
      ProductScreen.addControlButton({
      component: CouponButton,
      condition: function() {
          return this.env.pos.config.coupon_category;
      },
  });
  Registries.Component.add(CouponButton);
  export default CouponButton;
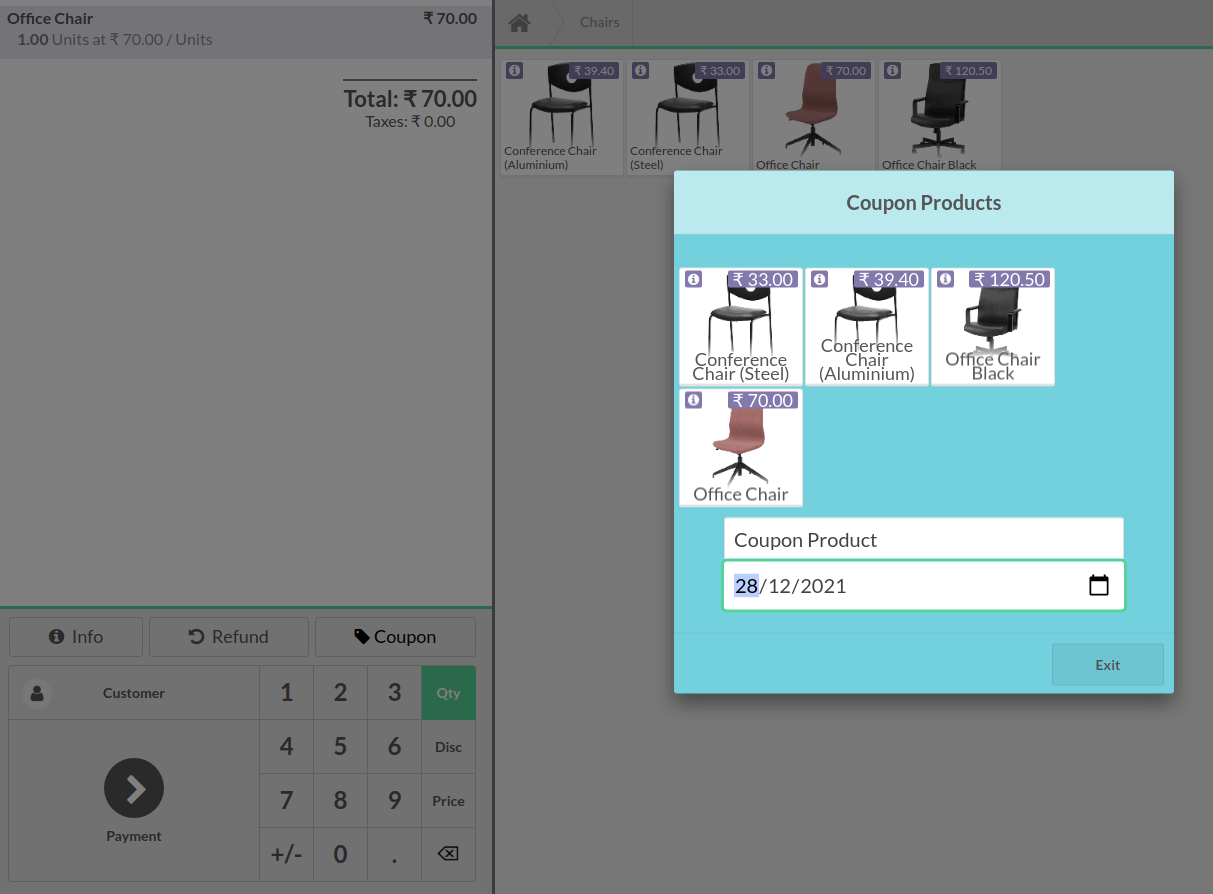
Custom Popup comprises a js and XML file. Here in the below js file, the class CouponProductsPopup extends AbstractAwaitablePopup, which is the inherit popup in odoo 15 POS. Under the static folder of the Point of Sale module, we can find more default pop-ups. In Odoo15 POS, we can also extend the existing popups to create new ones.
Qweb File: coupon_product_popup.xml
This is used to generate a popup displaying the coupon category product in it and also displaying a text field and a date field in it. If we want to add more fields, we can add them like this.
<?xml version="1.0" encoding="UTF-8"?>
<templates id="template" xml:space="preserve">
   <t t-name="CouponProductsPopup" owl="1">
       <div role="dialog" class="modal-dialog">
           <div class="popup popup-couponproducts" style="background-color: #7bcedb">
               <p class="title">
                   <t t-esc="props.title" />
               </p>
               <span class="body">
                   <!-- Display coupon category products in popup -->
                      <ProductList products="productsToDisplay" />
                   <!-- Adding text field-->
                   <div>
                        <input type="text" />
                   </div>
                     <!-- Adding date field-->
                   <div>
                        <input type="date" />
                   </div>
               </span>
               <div class="footer">
                   <div class="button cancel" t-on-click="confirm">
                       <t t-esc="props.confirmText" />
                   </div>
               </div>
           </div>
       </div>
   </t>
</templates>
JS File: coupon_product_popup.js
A product popup is created by using the below code. Products are added to the order lines by the click on the same. The function display_popup_products in the file coupon.js is used for generating popup.Gui.showPopup is used for this.
/** @odoo-module **/
   import AbstractAwaitablePopup from 'point_of_sale.AbstractAwaitablePopup';
   import Registries from 'point_of_sale.Registries';
   import PosComponent from 'point_of_sale.PosComponent';
   import ControlButtonsMixin from 'point_of_sale.ControlButtonsMixin';
   import NumberBuffer from 'point_of_sale.NumberBuffer';
   import { useListener } from 'web.custom_hooks';
   import { onChangeOrder, useBarcodeReader } from 'point_of_sale.custom_hooks';
   const { useState } = owl.hooks;
   class CouponProductsPopup extends AbstractAwaitablePopup {
    constructor() {
    super(...arguments);
    useListener('click-product', this._clickProduct);
    }
   //To get coupon products category
    get productsToDisplay() {
    return this.env.pos.db.get_product_by_category(this.env.pos.config.category_id[0]);
    }
     get currentOrder() {
           return this.env.pos.get_order();
       }
//      get products details in orderlines when clicking on popup product
     async _clickProduct(event) {
           if (!this.currentOrder) {
               this.env.pos.add_new_order();
           }

           const product = event.detail;
           let price_extra = 0.0;
           let description, packLotLinesToEdit;
           // Add the product after having the extra information.
           this.currentOrder.add_product(product, {
               description: description,
           });
       }
    }
    //Create products popup
   CouponProductsPopup.template = 'CouponProductsPopup';
   CouponProductsPopup.defaultProps = {
       confirmText: 'Ok',
       cancelText: 'Cancel',
       title: 'Coupon Products',
       body: '',
   };
   Registries.Component.add(CouponProductsPopup);
//   return CouponProductsPopup;
   export default  CouponProductsPopup;
These js files are added to the manifest in the assets section.

This is our custom pop-up. This will display the products based on the coupon category we choose in pos settings with text and date fields. In this way, we can customize the popup.
In this way, we can add a custom popup in ClientListScreen as given below.
JS file: custom_button.js
Here we extend the class ClientListScreen and add a button to it.
/** @odoo-module **/
   import { Gui } from 'point_of_sale.Gui';
   import PosComponent from 'point_of_sale.PosComponent';
   import { posbus } from 'point_of_sale.utils';
   import ProductScreen from 'point_of_sale.ProductScreen';
   import { useListener } from 'web.custom_hooks';
   import Registries from 'point_of_sale.Registries';
   import PaymentScreen from 'point_of_sale.PaymentScreen';
   import ClientListScreen from 'point_of_sale.ClientListScreen';
   const CustomButtonPaymentScreen = (ClientListScreen) =>
   	class extends ClientListScreen {
       	constructor() {
           	super(...arguments);
       	}
       	IsCustomButton() {
            	var core = require('web.core');
            	console.log(core);
            	var _t = core._t;
            	Gui.showPopup("CouponProductsPopup", {
            	title : _t("Coupon Products"),
            	confirmText: _t("Exit")
      	});
       	}
   	};
   Registries.Component.extend(ClientListScreen, CustomButtonPaymentScreen);
   export default CustomButtonPaymentScreen;
JS file: custom.js
Here we create a custom popup, ‘CouponProductsPopup’.
/** @odoo-module **/
   import AbstractAwaitablePopup from 'point_of_sale.AbstractAwaitablePopup';
   import Registries from 'point_of_sale.Registries';
   import PosComponent from 'point_of_sale.PosComponent';
   import ControlButtonsMixin from 'point_of_sale.ControlButtonsMixin';
   import NumberBuffer from 'point_of_sale.NumberBuffer';
   import { useListener } from 'web.custom_hooks';
   import { onChangeOrder, useBarcodeReader } from 'point_of_sale.custom_hooks';
   const { useState } = owl.hooks;
   class CouponProductsPopup extends AbstractAwaitablePopup {
	constructor() {
	super(...arguments);
	}
	}
	//Create products popup
   CouponProductsPopup.template = 'CouponProductsPopup';
   CouponProductsPopup.defaultProps = {
   	confirmText: 'Ok',
   	cancelText: 'Cancel',
   	title: 'Coupon Products',
   	body: '',
   };
   Registries.Component.add(CouponProductsPopup);
   export default CouponProductsPopup;
XML file: client_screen_button.xml
In this XML file, we specify where the button is added.
<?xml version="1.0" encoding="UTF-8"?>
<templates id="template" xml:space="preserve">
	<t t-inherit="point_of_sale.ClientListScreen" t-inherit-mode="extension">
       	<xpath expr="//div[hasclass('searchbox-client')]" position="after">
           	<div>
               	<div id="my_button" class="button js_invoice"
                   	t-on-click="IsCustomButton">
                   	<i class="fa fa-spinner fa-spin" /> My Button
               	</div>
           	</div>
       	</xpath>
	</t>
</templates>
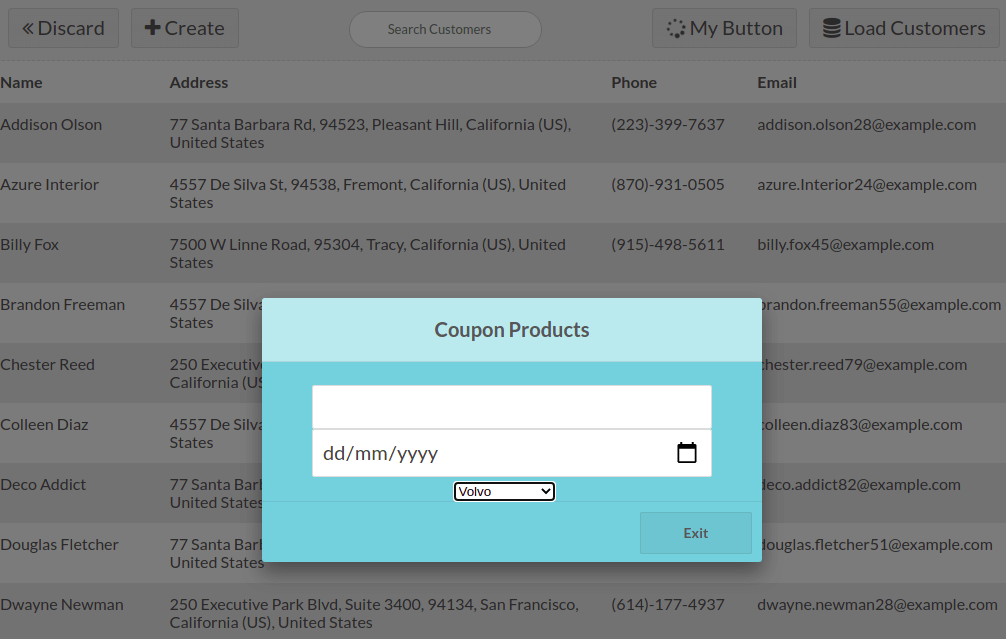
XML file: popup.xml
Here we specify what we want to show inside the popup.
<?xml version="1.0" encoding="UTF-8"?>
<templates id="template" xml:space="preserve">
    <t t-name="CouponProductsPopup" owl="1">
        <div role="dialog" class="modal-dialog">
            <div class="popup popup-couponproducts" style="background-color: #7bcedb">
                <p class="title">
                    <t t-esc="props.title" />
                </p>
                <span class="body">
                    <!-- Adding text field-->
                    <div>
                        <input type="text" />
                    </div>
                    <!-- Adding date field-->
                    <input type="date" />
                    <!-- Adding selection field-->
                    <select name="cars" id="cars">
                        <option value="volvo">Volvo</option>
                        <option value="saab">Range Rover</option>
                        <option value="mercedes">Mercedes</option>
                        <option value="audi">Audi</option>
                    </select>
                </span>
                <div class="footer">
                    <div class="button cancel" t-on-click="confirm">
                        <t t-esc="props.confirmText" />
                    </div>
                </div>
            </div>
        </div>
    </t>
</templates>
This is our custom popup in ClientListScreen