Every business entrepreneur flourishes their business by appointing dynamic and talented individuals in their field. Maintaining and having a progressive approach by the employees to their industries and management is always promoted if they are considered and paid with appropriate remuneration and benefits by the business entrepreneurs and management. To fix a good figure and manage their duties, every company must possess a well-built HR management system that controls Employee management, Attendance, Time-Off, and Payroll management. By implementing an extrusive advanced ERP software management system, you can find the best solution for the earlier statement. The Odoo open source ERP, the most advanced and upgraded one, tackles a better solution to fix an outstanding payroll system in your company with its integrated modules.
Odoo ERP is best suited for small, medium, and large enterprises; with its advanced functionalities and specific defined tools, you can set the rules, customize them, and work for an effective payroll management system. The Odoo ERP with its advanced version Odoo 15 implies more flexibility and simplifies your tasks with its positive experience. If a company is managed with multiple employees, each country depends on a structure for the payroll management with consideration factors. Thus the Odoo 15 can control the payroll in a standardized way. With all aspects of concern, the Odoo 15 manages the payroll with all the rules and regulations implied depending on the countries and the policies of each kind of enterprise. Every enterprise manages the payroll with the factors and regulations, and rules indicated on the contract formed during the recruitment time.
With the implementation of Odoo 15, a company can facilitate expeditious business-like payroll management with the help of the Payroll module. Every company requires a well-managed robust financial management system with an authoritative, conclusive calculation that builds to pay attention to the actual payroll for the employees. The Odoo 15, with its payroll module, can develop and set salary structure and advance salary rules and generate the payslip in an evident and simplified manner.
This blog gives a detailed understanding of managing the advanced salary rules and payslip generation with the Odoo 15 ERP in its Payroll module.
Before the payslip is generated, the company must focus on configuring an employment contract with employees. During the development of an employment contract, the company must implement a salary structure as per the employee's job position. The salary structure is organized with the Payroll module in Odoo 15. An employee's salary is maintained and encompasses many factors, such as basic salary, allowances, benefits, deductions, bonuses, etc.
Let us discuss how to create a salary rule in Odoo 15.
Salary Rules
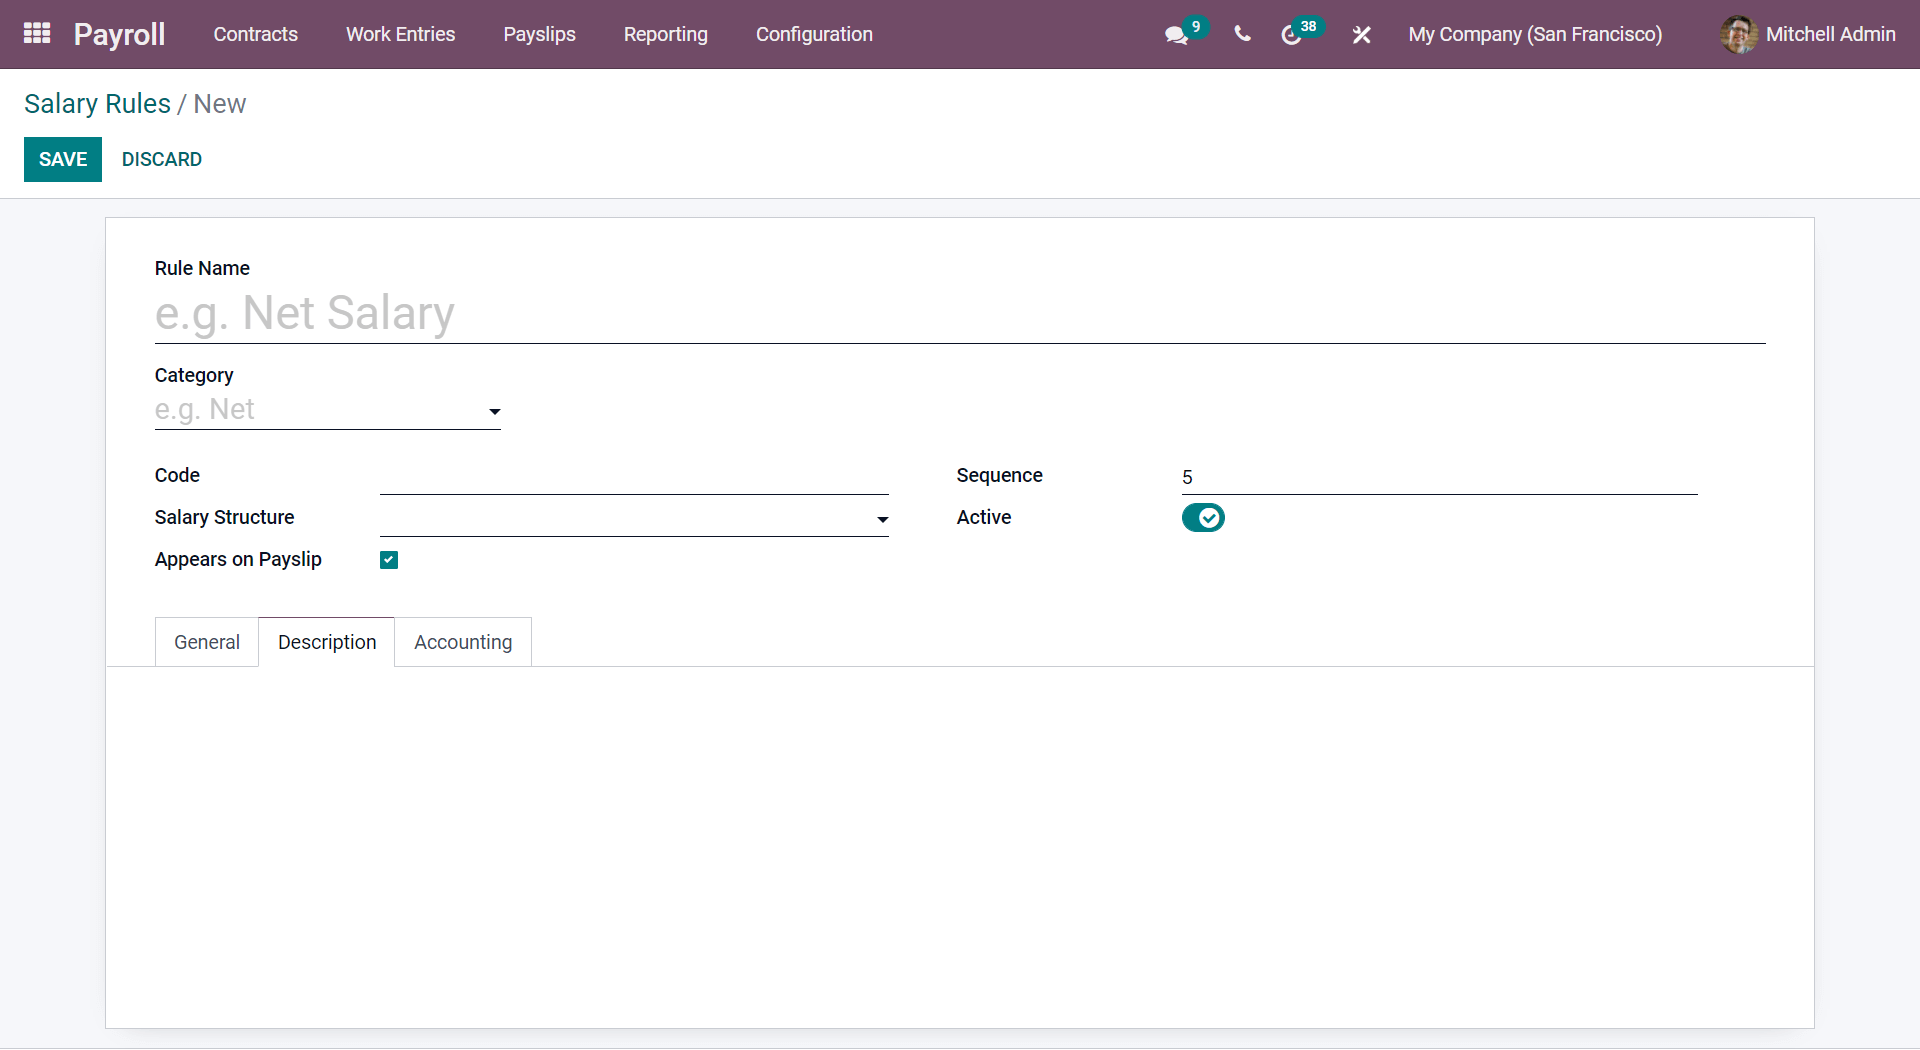
With the Payroll module, you can set advanced salary rules or add salary rules for an employee recruited into your management with precise calculations. Setting a salary rule for an organization is a heavy task. It leads to many aspects like planning, allowing a salary value with conditions and other elements, and fixing a reliable salary for an employee can be handled easily with Odoo Payroll Management. The rules can help you to improve further calculations with different categories. You can access the salary rules from the Configurations tab in Odoo 15 Payroll Management.
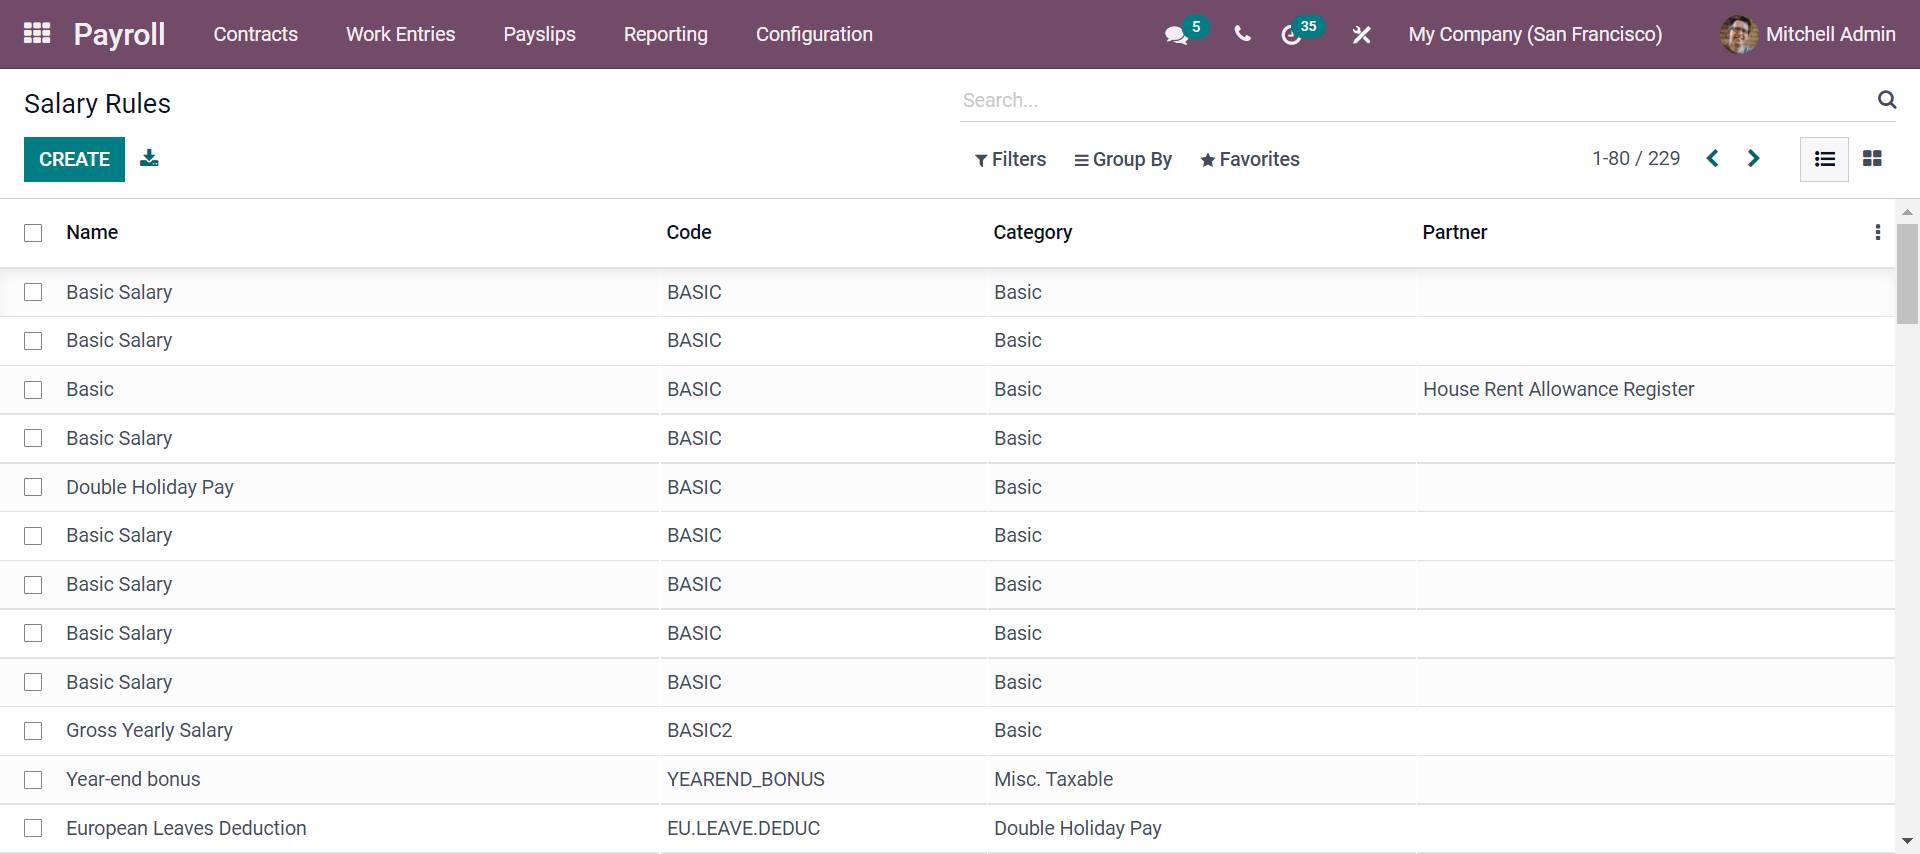
As seen in the screenshot, the feature seen above enables you to add a sequence with the rule displaying salary in the payslip and also has a unique code that formulates for the further calculations of the wage. You can also get the view in kanban format, and now depicted is the list view.
If you need to add or apply any custom or default filters based on the company requirements, you can use them with the filter options. Also, suppose you want to view the salary structure with the salary rules applied by the company. In that case, you can get it under the Group By option, which can be categorized, and if you need, you can add a custom category from the options given.
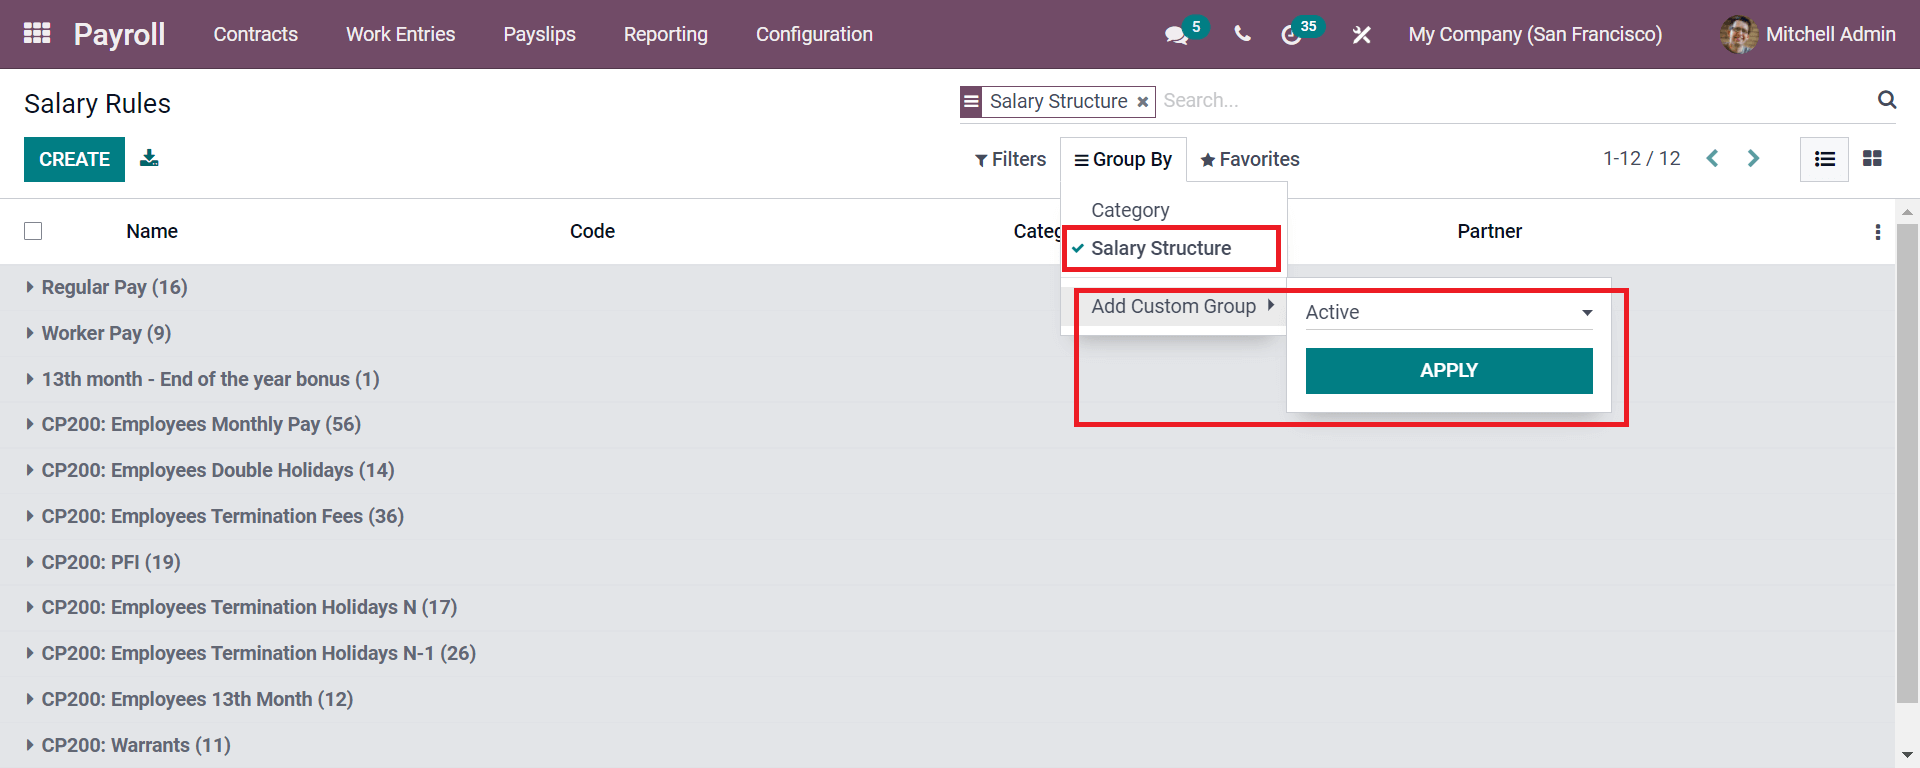
If you need to define or group the salary structure, you can click on the categorized section. Let us see how we can create a new salary emerge rule. We need to click the CREATE button, as seen in the above screenshot. A window will click on the Create button.
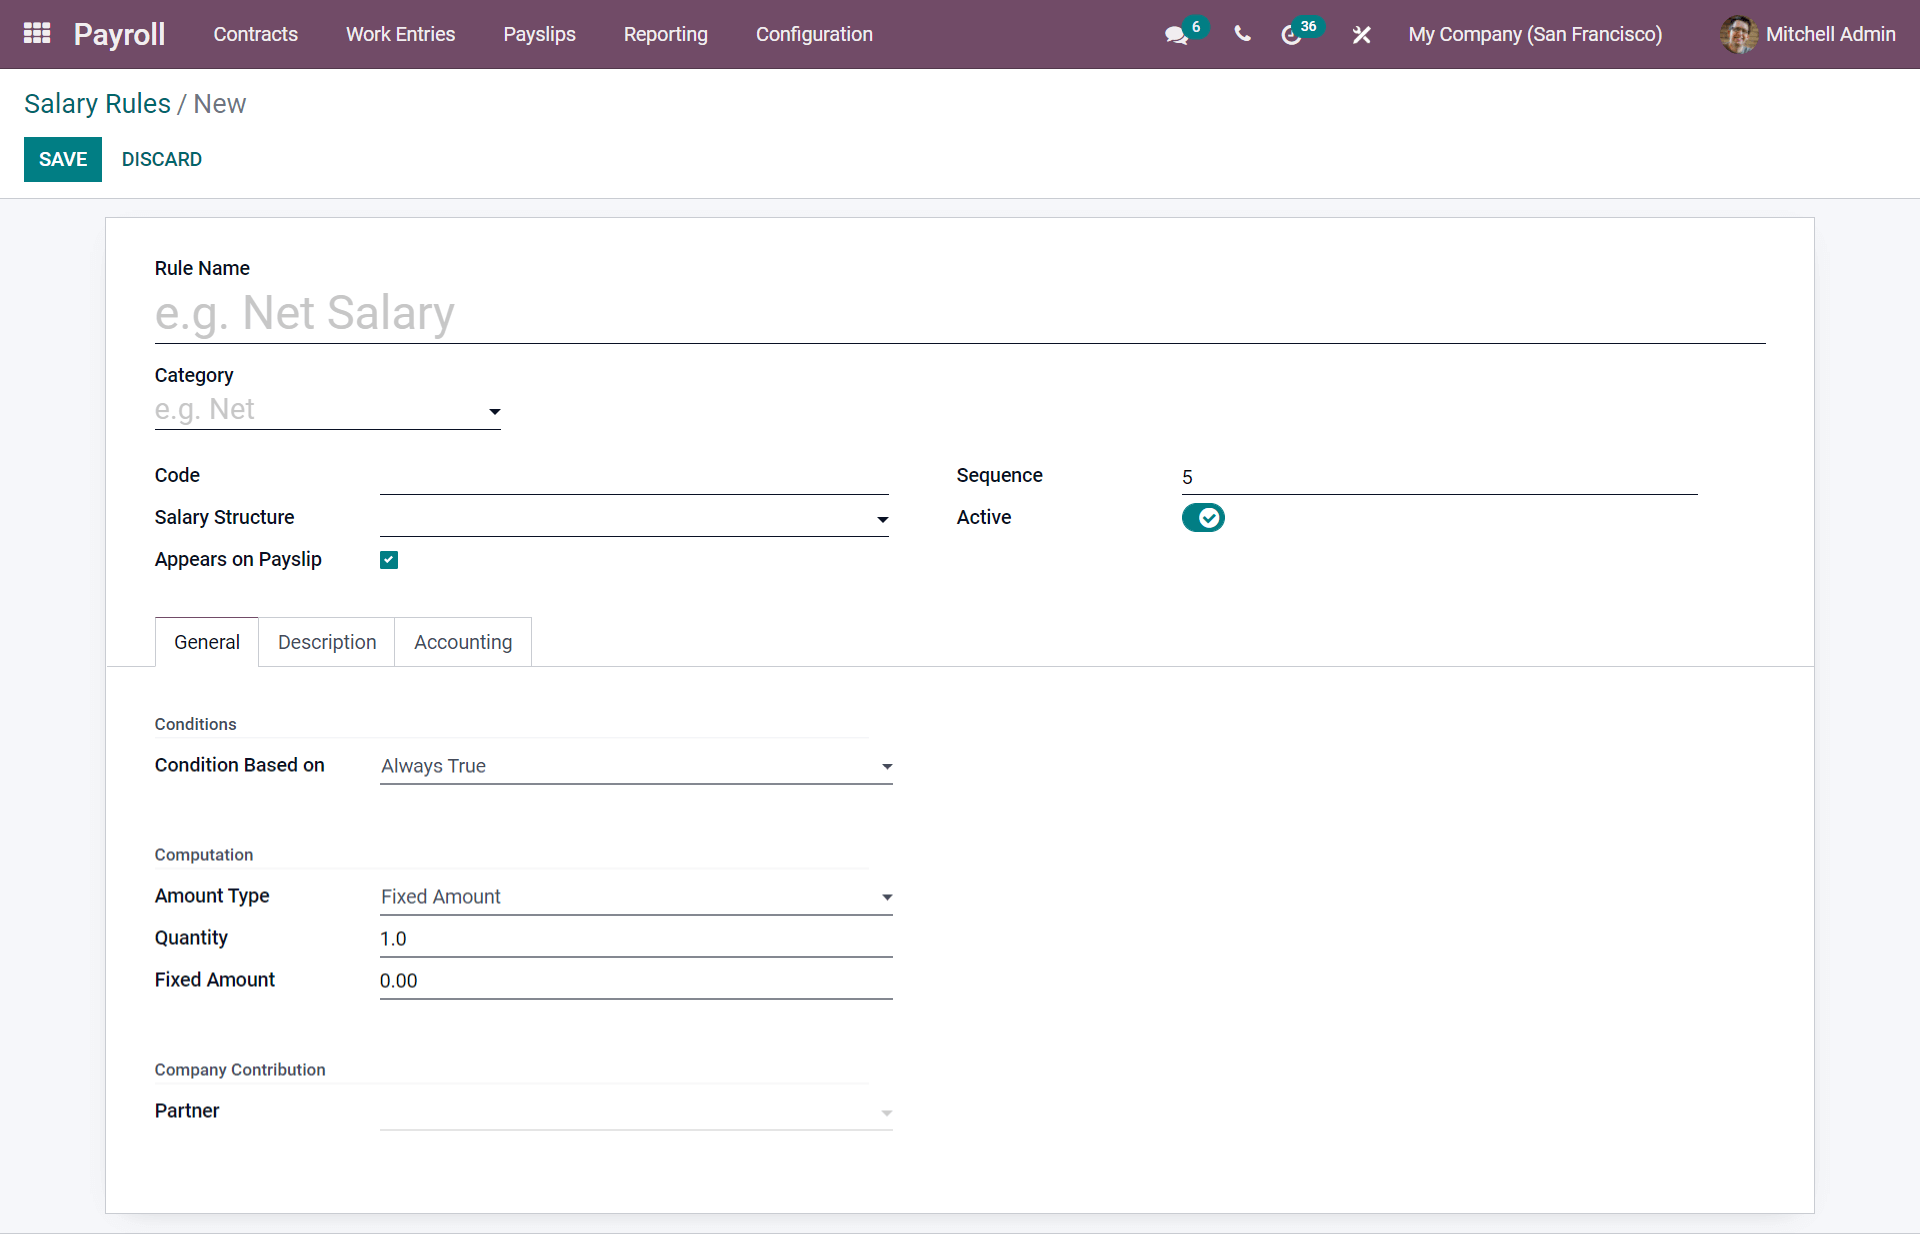
Here in the screenshot, as illustrated above, you will get the creation window with different properties as; first, you can give a salary rule name and add the category based on the rule you add. For example, Basic, Gross, Net, Gratuity, and many others. Again by moving to the following field, the code where you can easily apply the code for further computation for your salary if you apply a code. And you need to add the salary structure, which is mandatory and is given in Odoo, which is predefined as you need to select from the drop-down menu. Next is marking the enabling function where you can enable or disable whether this field must include in the salary slip. Additionally, you will get a sequence number, and you can arrange it during the time of computation. Ultimately, it is the Active field where you can either denote it as false or hide the salary rule by not removing it with this option.
Now let us see how we can compute as per the salary rule in Odoo 15.
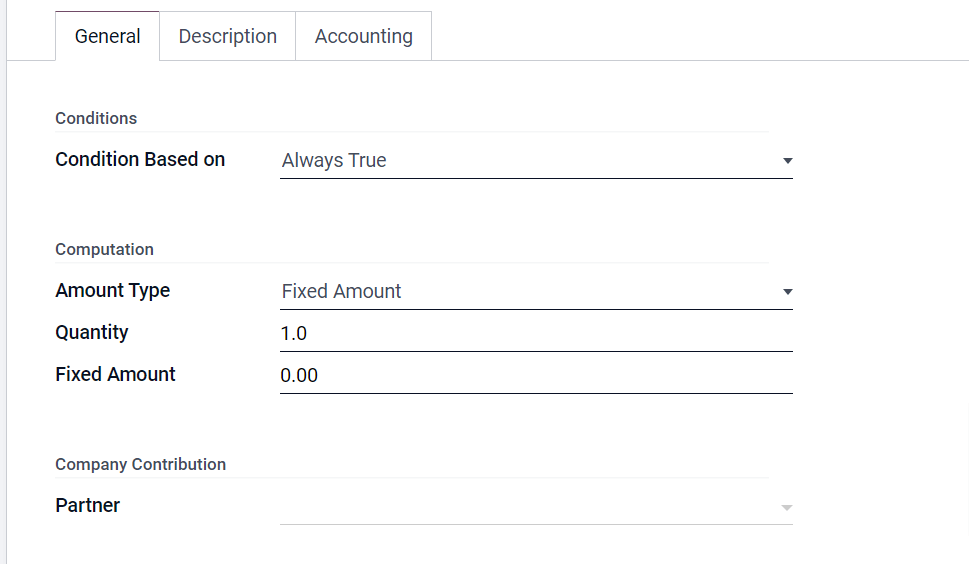
As seen in the above screenshot, under the General tab from the salary rule, you need to set the rules for computation in this part. Then Odoo automatically starts computing each employee's salary in your company based on the rules assigned. First is the condition based on where you need to select from the drop-down menu that appears in the Odoo. Here in the drop-down menu, you will get three options, namely.
Always True: It can be used when the company has set a salary rule for all the further calculations for the employees.
Range: It is used if the company has adjusted with specific ranges like minimum range, maximum range, and based on the range. The employee's employment contract always denotes the range during the recruitment.
Python expression: As seen in the below screenshot, if you use the third option from the drop-down menu, the Odoo 15 develops with a Python code as default, and you can apply it for the computation.
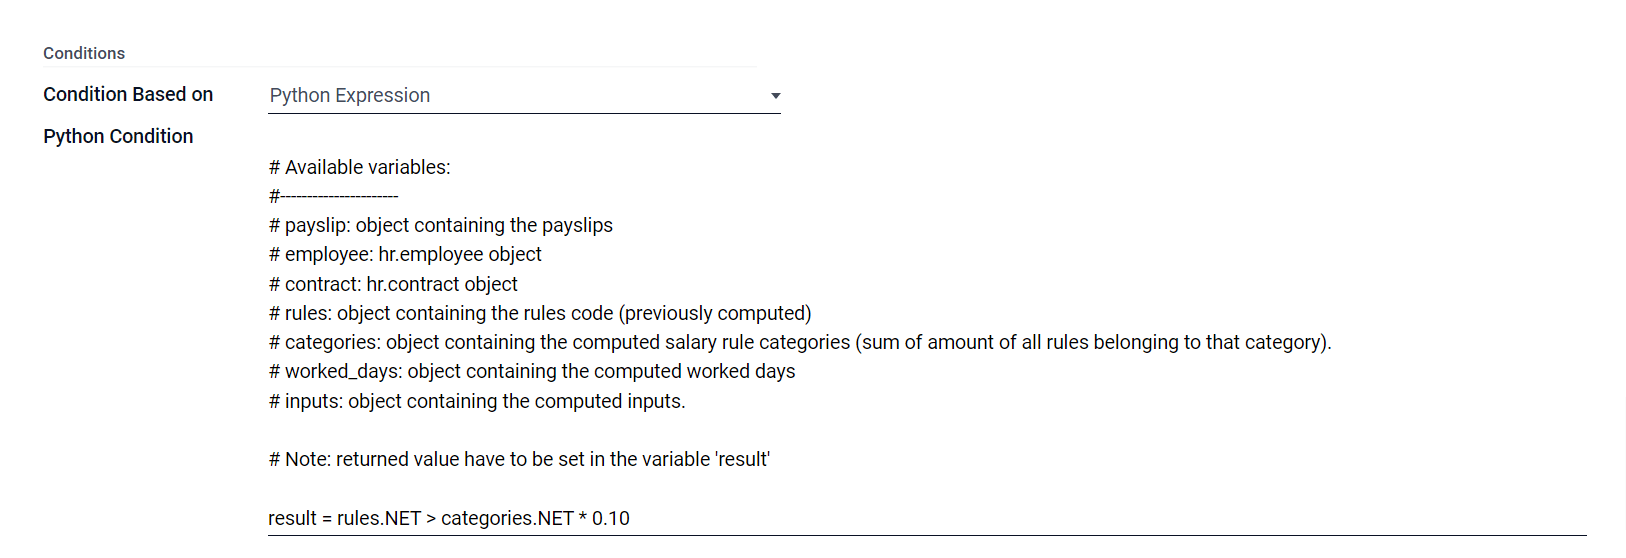
Applying or selecting the conditions lets us see how the computation is done with each condition.
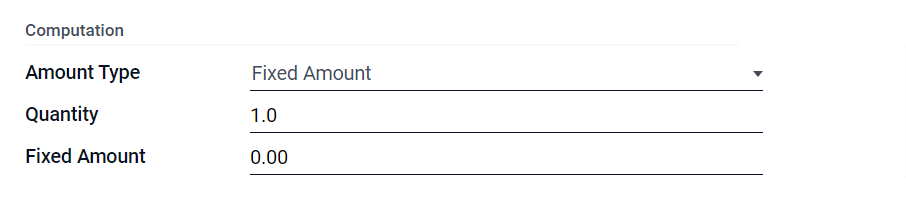
You have to select the Amount Type from the drop-down menu in the computation field, which is predefined with the Odoo 15.
Fixed Amount: In this, the company can allow a fixed amount to the employee.
Percentage (%): Here, the salary is calculated based on the company's variable with a certain percentage.
Python Code: As seen in the below screenshot, the python code opts with python variables which are allocated with the Odoo, and the calculation is done with the python variables quickly.
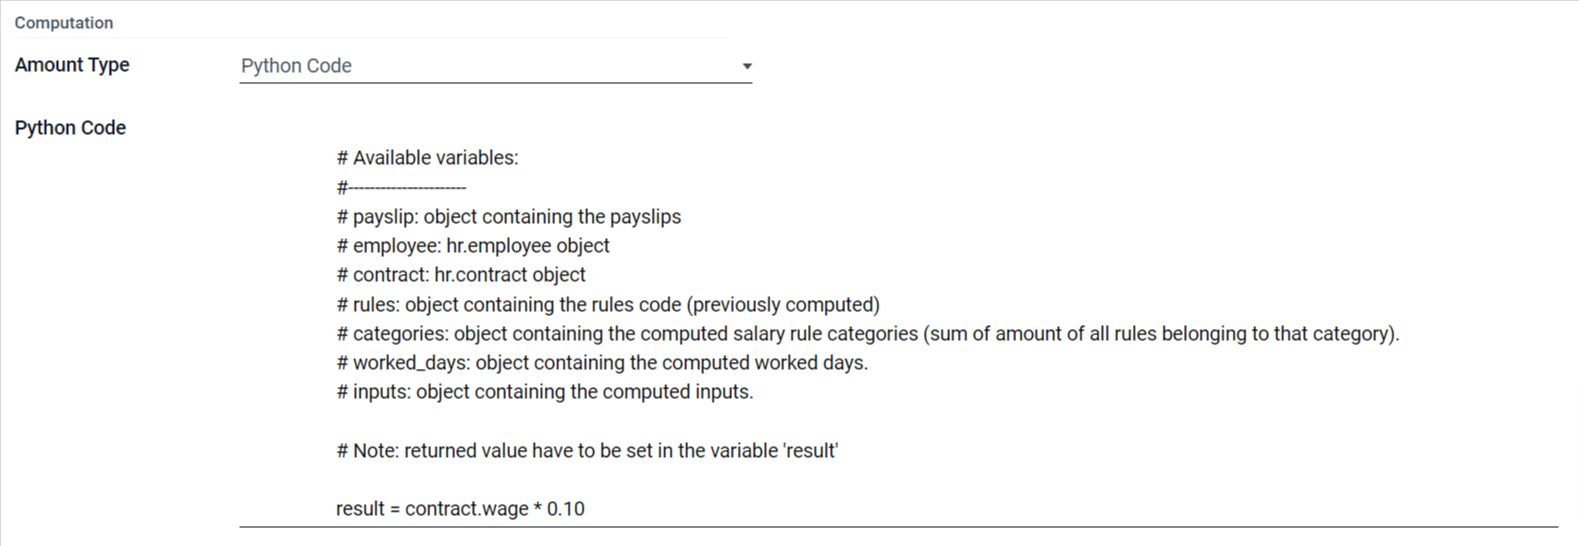
Using these python variables, the user can allocate the salaries for the employees in their company. Lastly, in the General tab, you can add the partner where the contribution of your salary is acquired from the drop-down menu. You can either add or, after adding, you can add the partner.
And now comes the Description tab, where you can add any notes if required, as seen in the below screenshot.
Now let us see how the Accounting is performed with the Odoo 15 based on the salary rules applied.
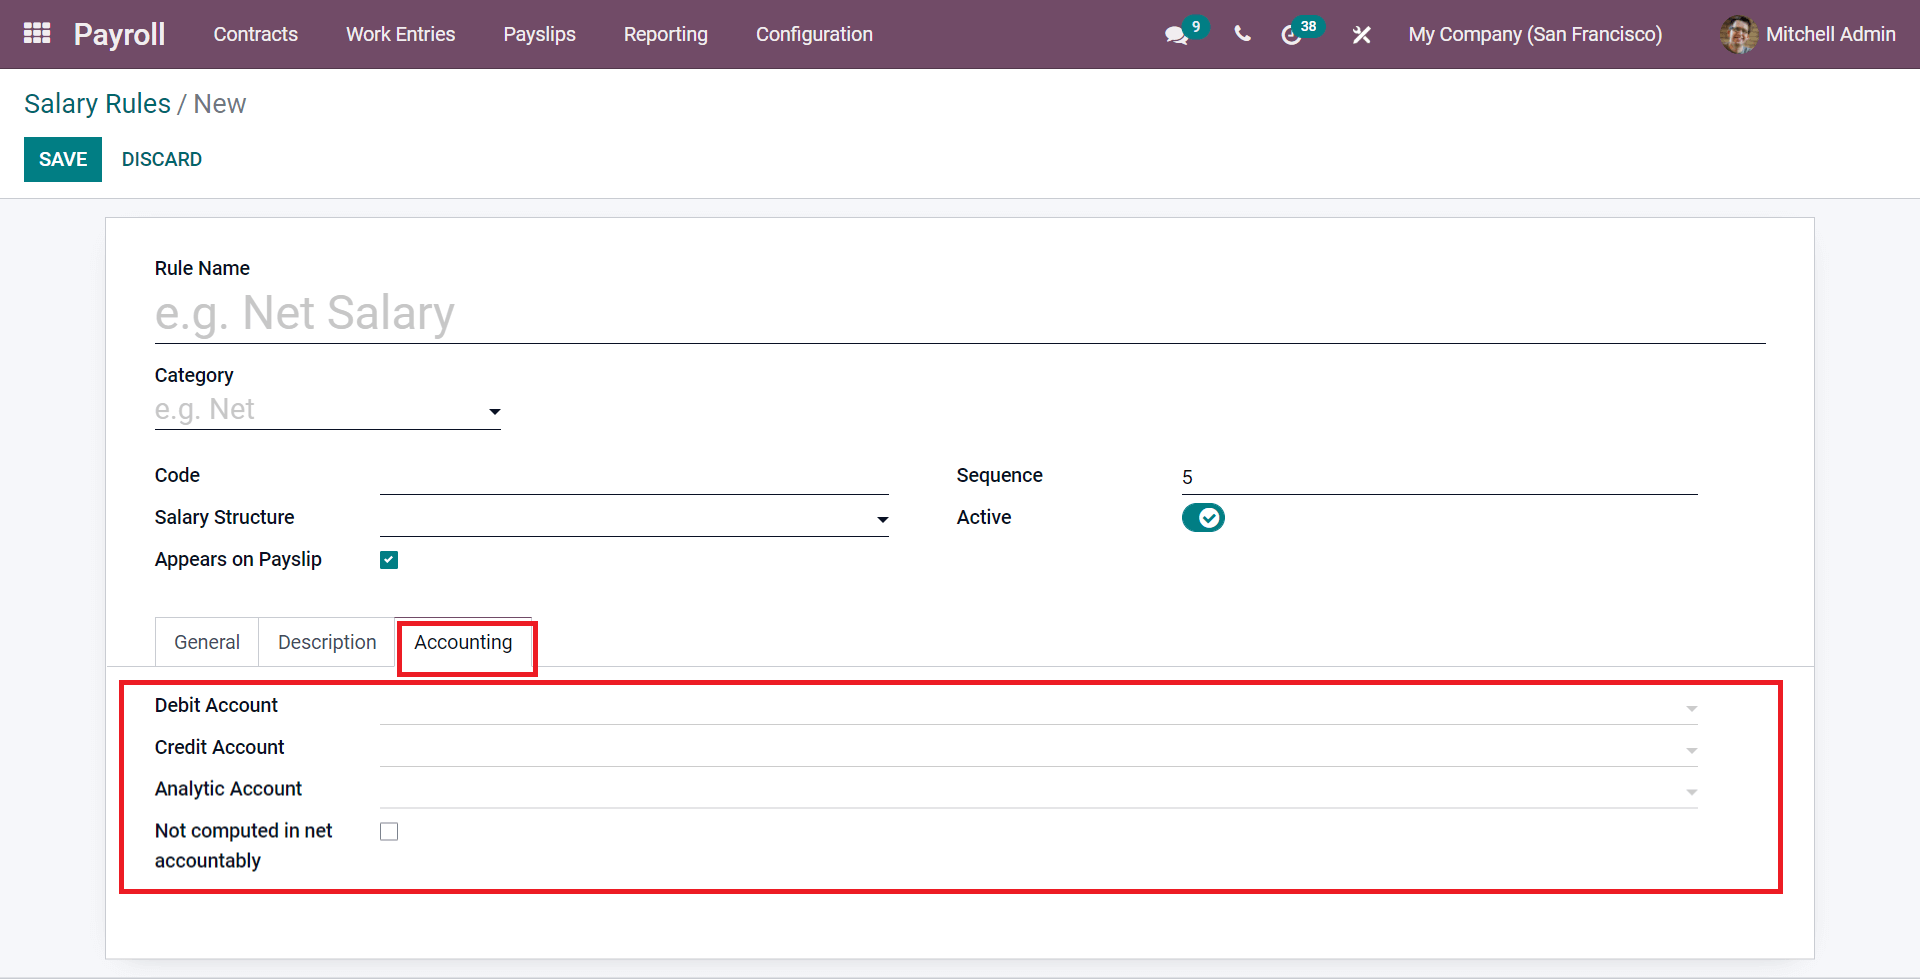
Under the Accounting sub-tab, in the Salary Rules, you can see a highlighted portion denoting different Account Areas which are required for the new salary rules. These different Accounts areas are required salary computation. Lastly, you have a section to enable or disable, which is the Not computed in net accountably used for knowing the computation of each part in payslip in detail. If it is not enabled, you cannot see the calculation. For the other three parts, by selecting each part from the drop-down menu, you can move to an icon near it to see each field's computation separately.
With the help of these salary rules, you can create advanced salary rules on basic pay and allowances like accommodation, food, medical insurance, gross salary, deductions, PF, bonuses, etc.
Let us see how to generate a payslip with Odoo 15.
Payslip Generation in Odoo 15
In Odoo 15, you can generate the payslip in a separate section, and you can send in a PDF, and the employee can quickly confirm and approve it easily.
TO PAY
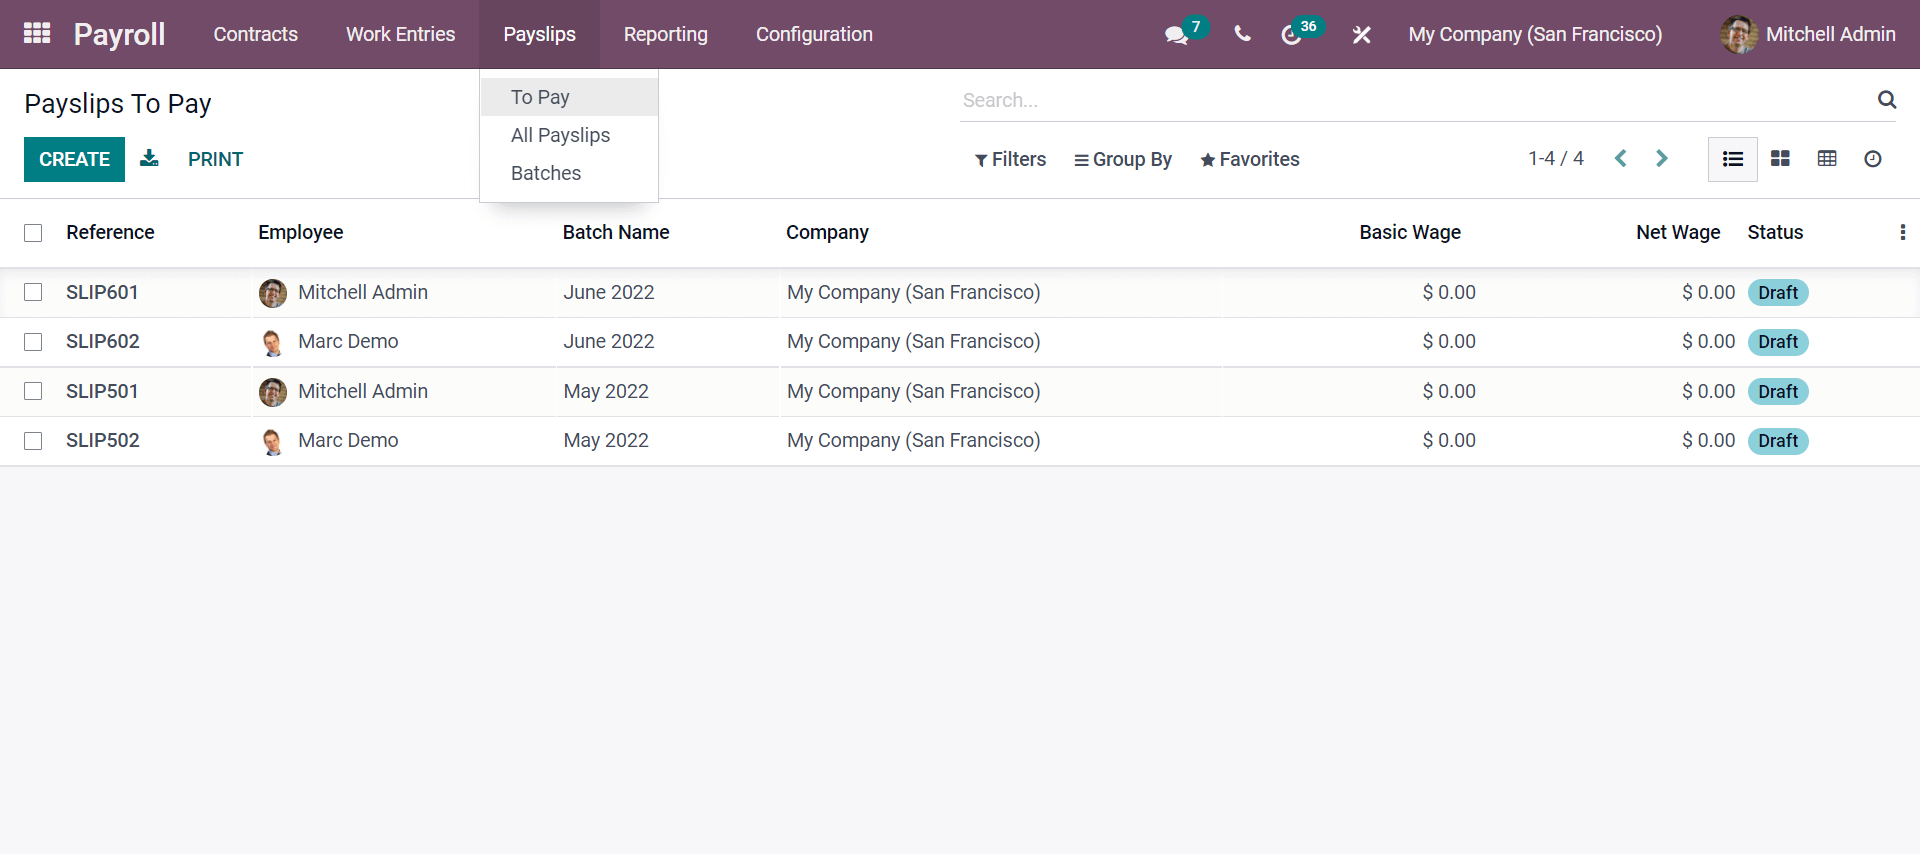
The screenshot shows that the Payslips tab includes many submenus with To Pay, All Payslips, and Batches. Each section makes you understand each submenu. As seen in the screenshot, Payslips To Pay is the part where you get the payslips of the employees that you need to pay. You can click and form a new payslip from the Create button, as seen in the below screenshot.
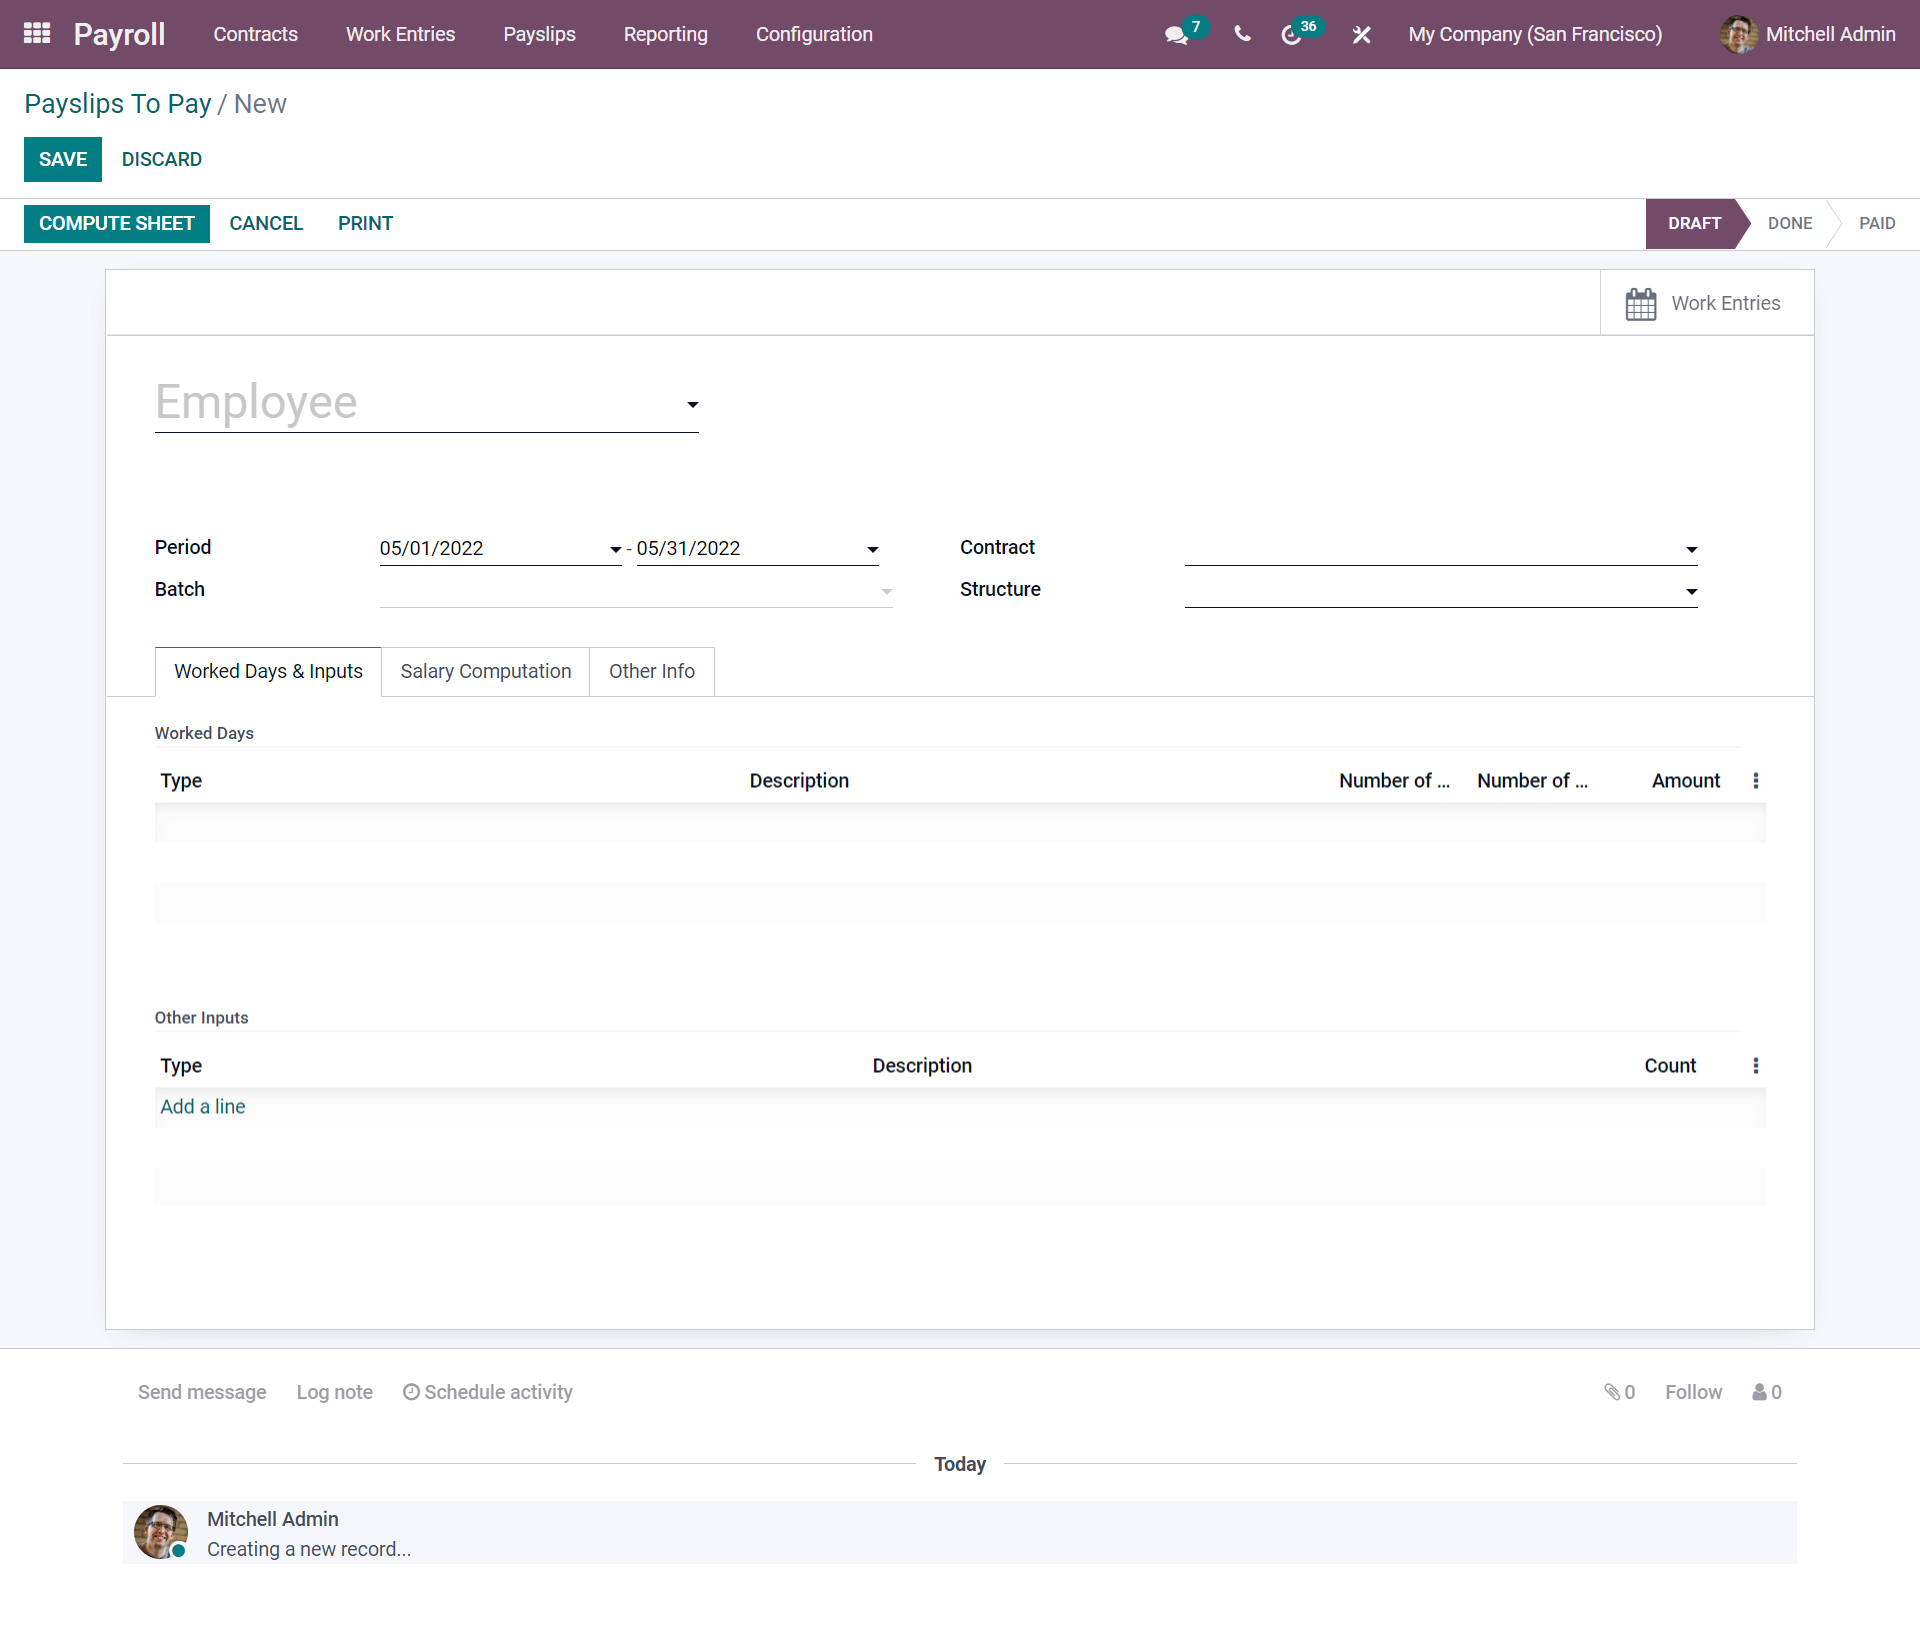
As illustrated in the screenshot, you have to enter all the necessary details. The payslip is generated under three stages, as seen in the pipeline Draft, Done, and Paid. If you have created with essential details and need to do the computing part as left, you can save the payslip made in Draft, and if you have completed all the sections clearly and if the payslip is waiting for approval, you change the stage into Done. And if it is completed with the payment of the month, then you can change the stage into Paid. By entering the crucial parts of the salary, you can see some sub-tabs additionally under Work Days & Inputs, Salary Computation, and Other Info.
Now, as seen in the below screenshot, you will be able to understand the sub-tab Work Days & Inputs.
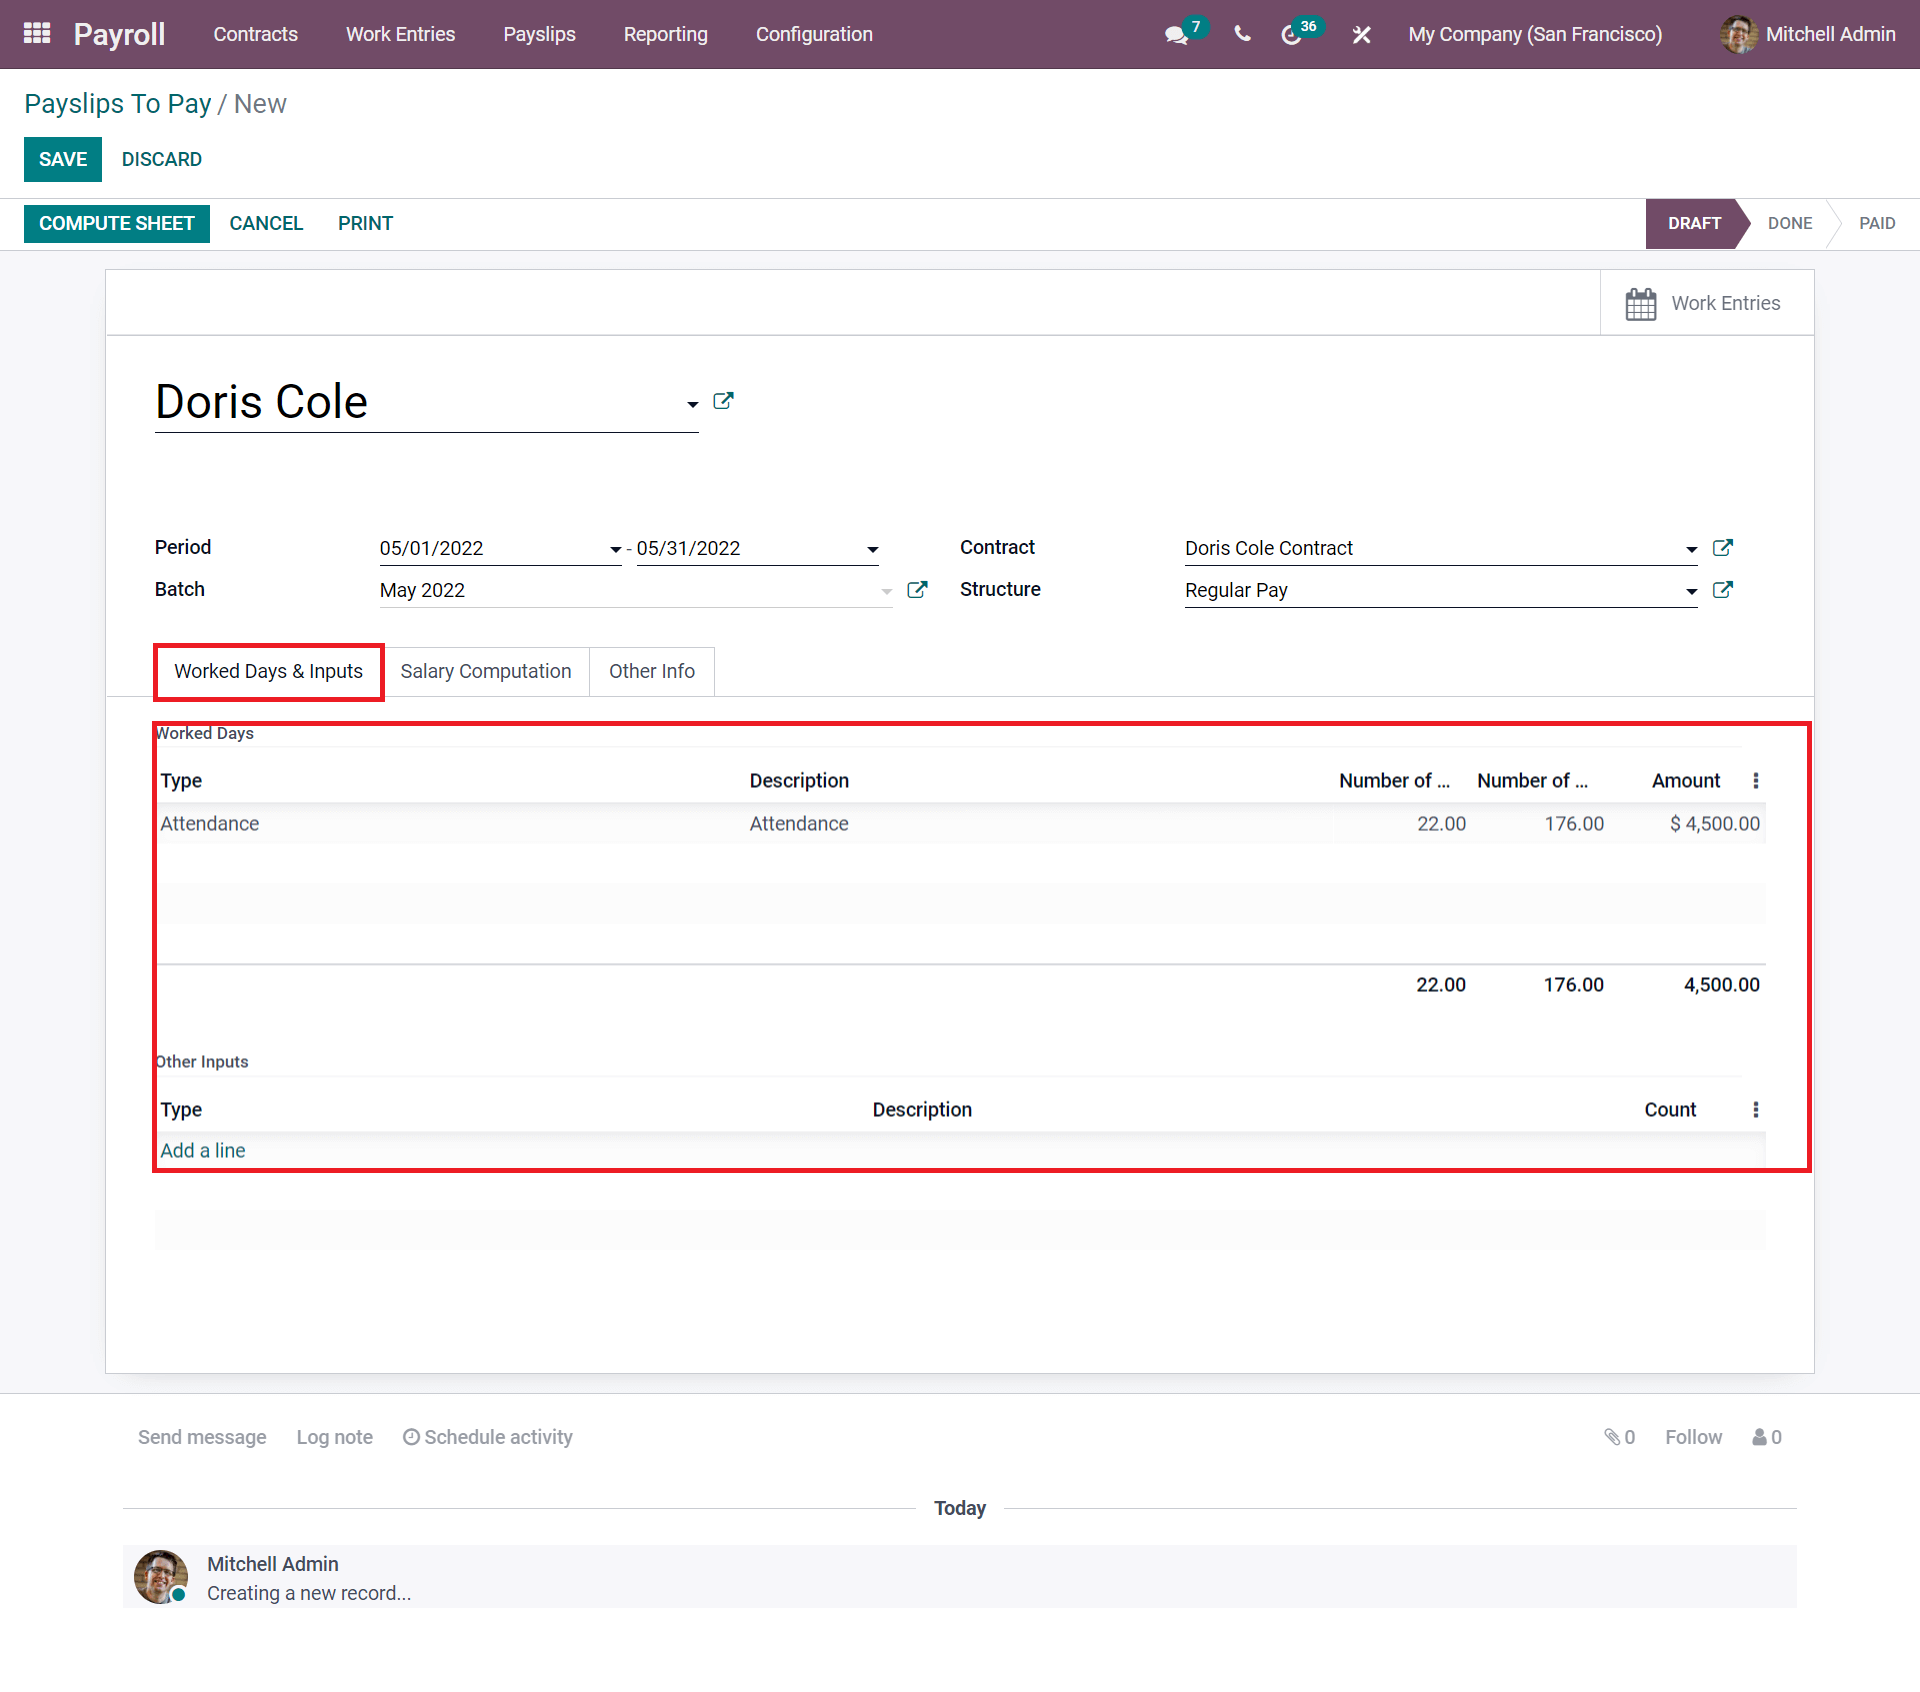
By entering the crucial details in the Sub-tab Workdays & Inputs, you will automatically count the number of days worked and the number of hours worked. As per the salary contract, your salary is calculated. The highlighted portion gives you a clear understanding. Under the Workdays & Inputs, you will get another tab with Other Inputs where you can demonstrate the Type, Description, and Count.
The next sub-tab is the Salary Computation. Here we will see that the salary is computed based on the employment contract, which has been configured with the salary rules to add.
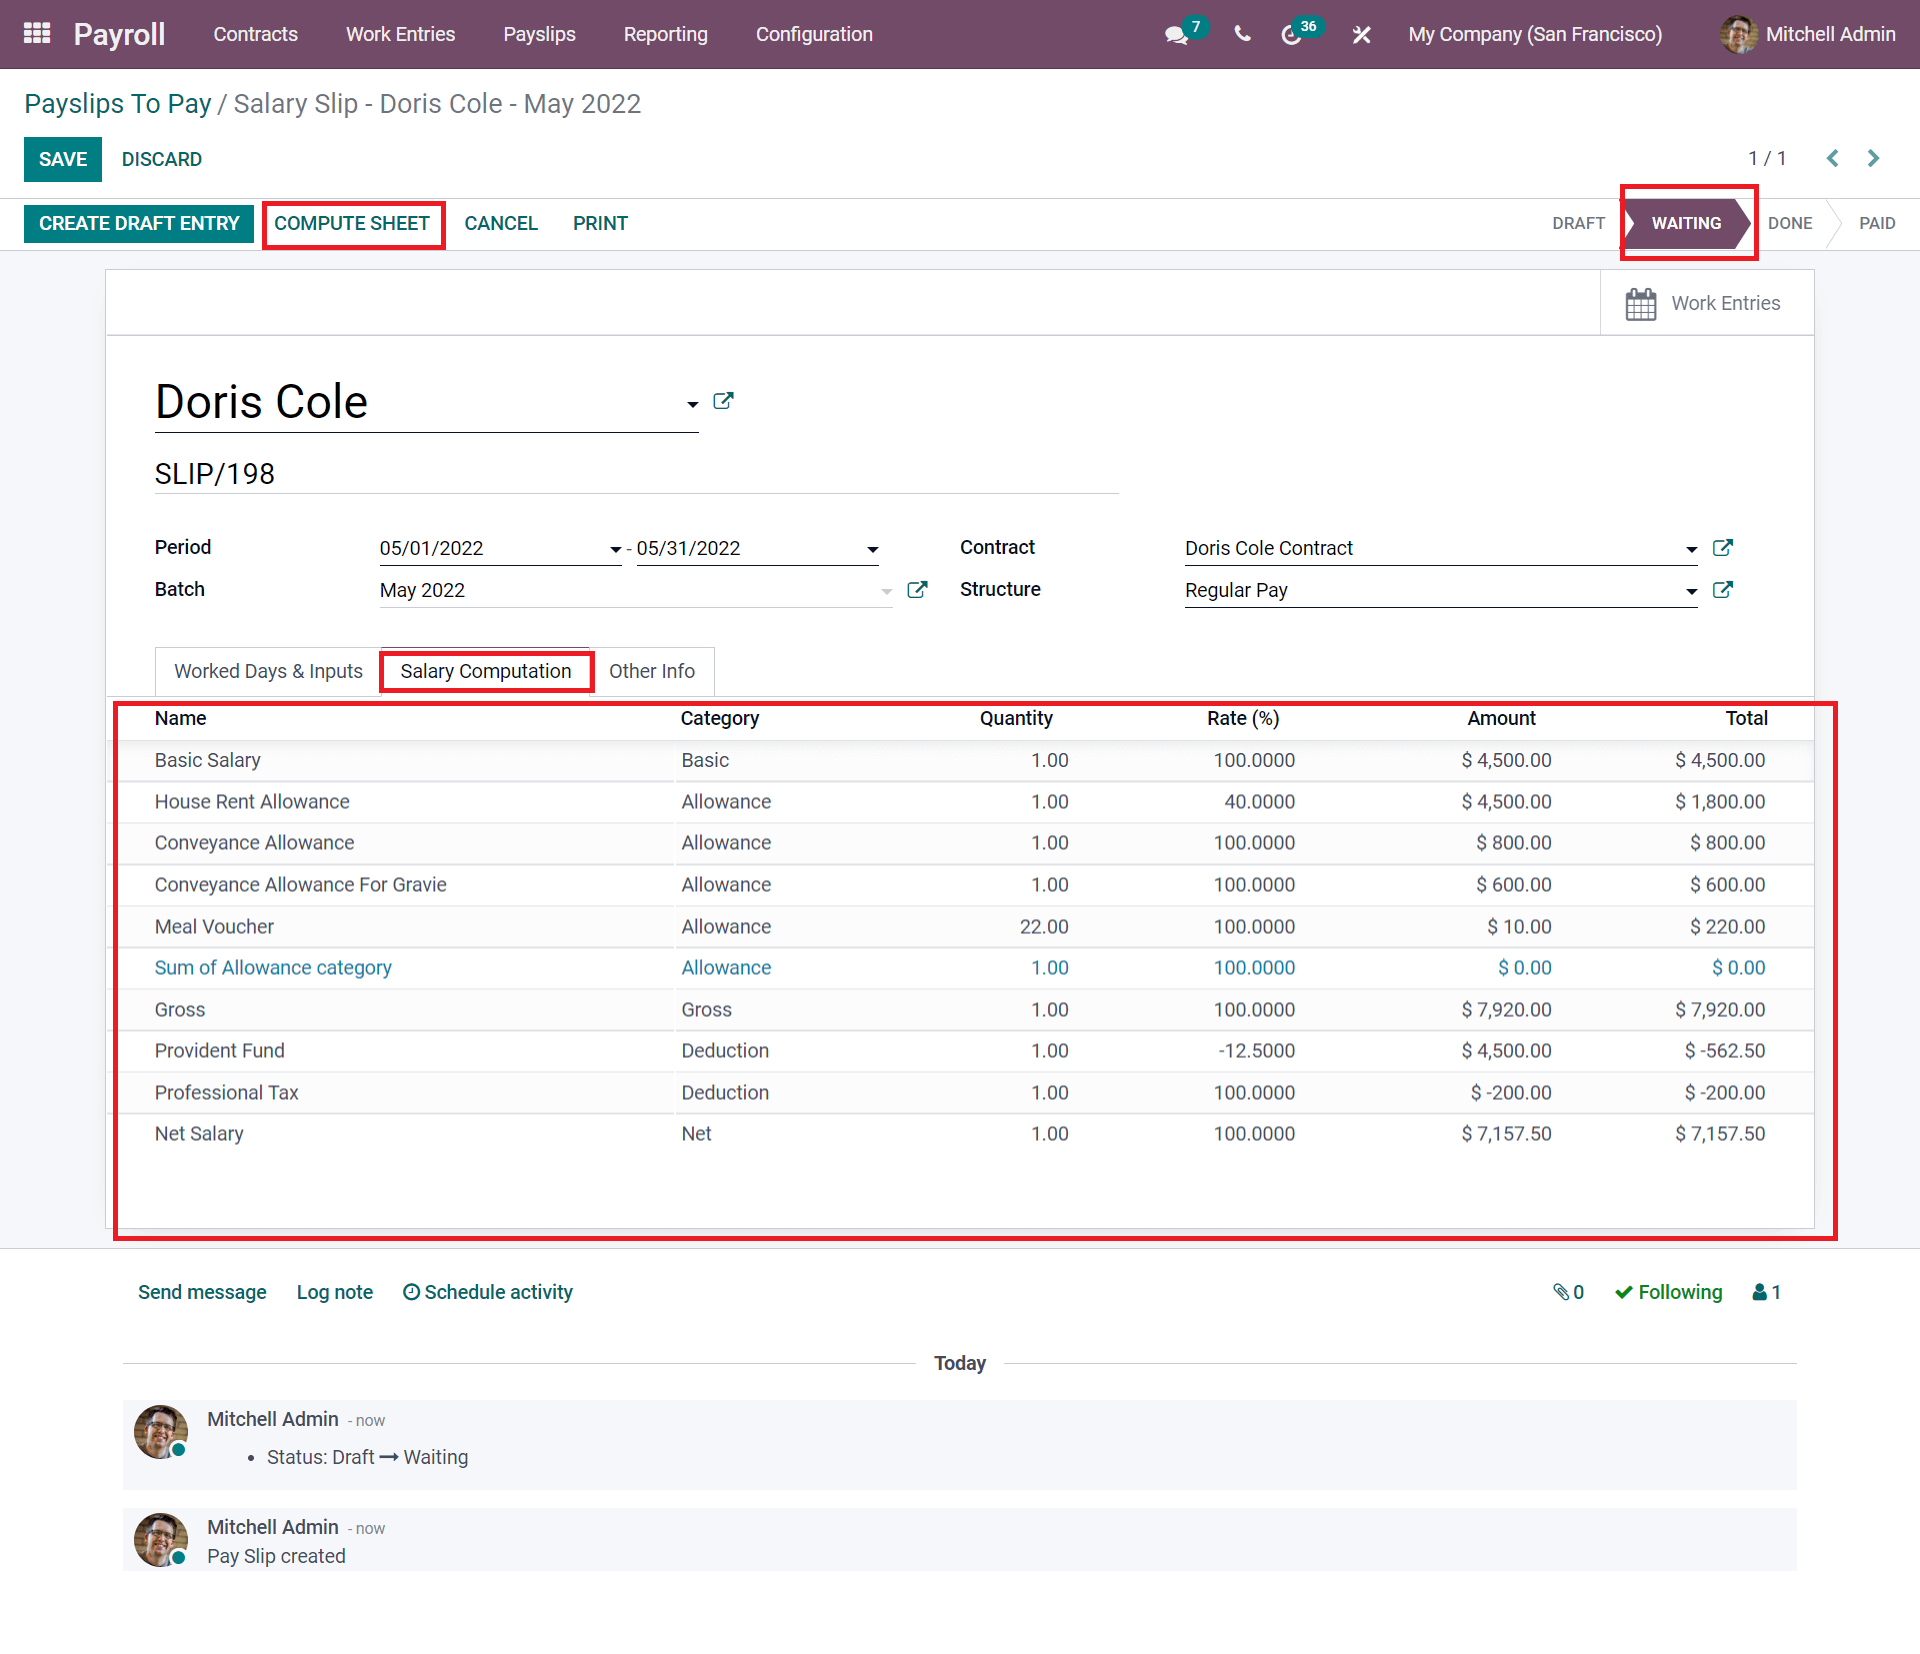
As seen in the above screenshot, by entering all the crucial details like the name of the employer, period of the calculation done, Batch, Contract, and the Structure as per said in the Contract, and by mentioning all these factors, you can click on the COMPUTE SHEET for getting the accurate salary computation. Here in the Salary Computation, you can see the salary is computed with the Name of the factors as per the Salary rules and the Category of each particular, with the Quantity, Rate in (%), Amount, and Total being described. And now, the salary is computed based on the salary rules and employee contract the payslip is changed into the WAITING stage.
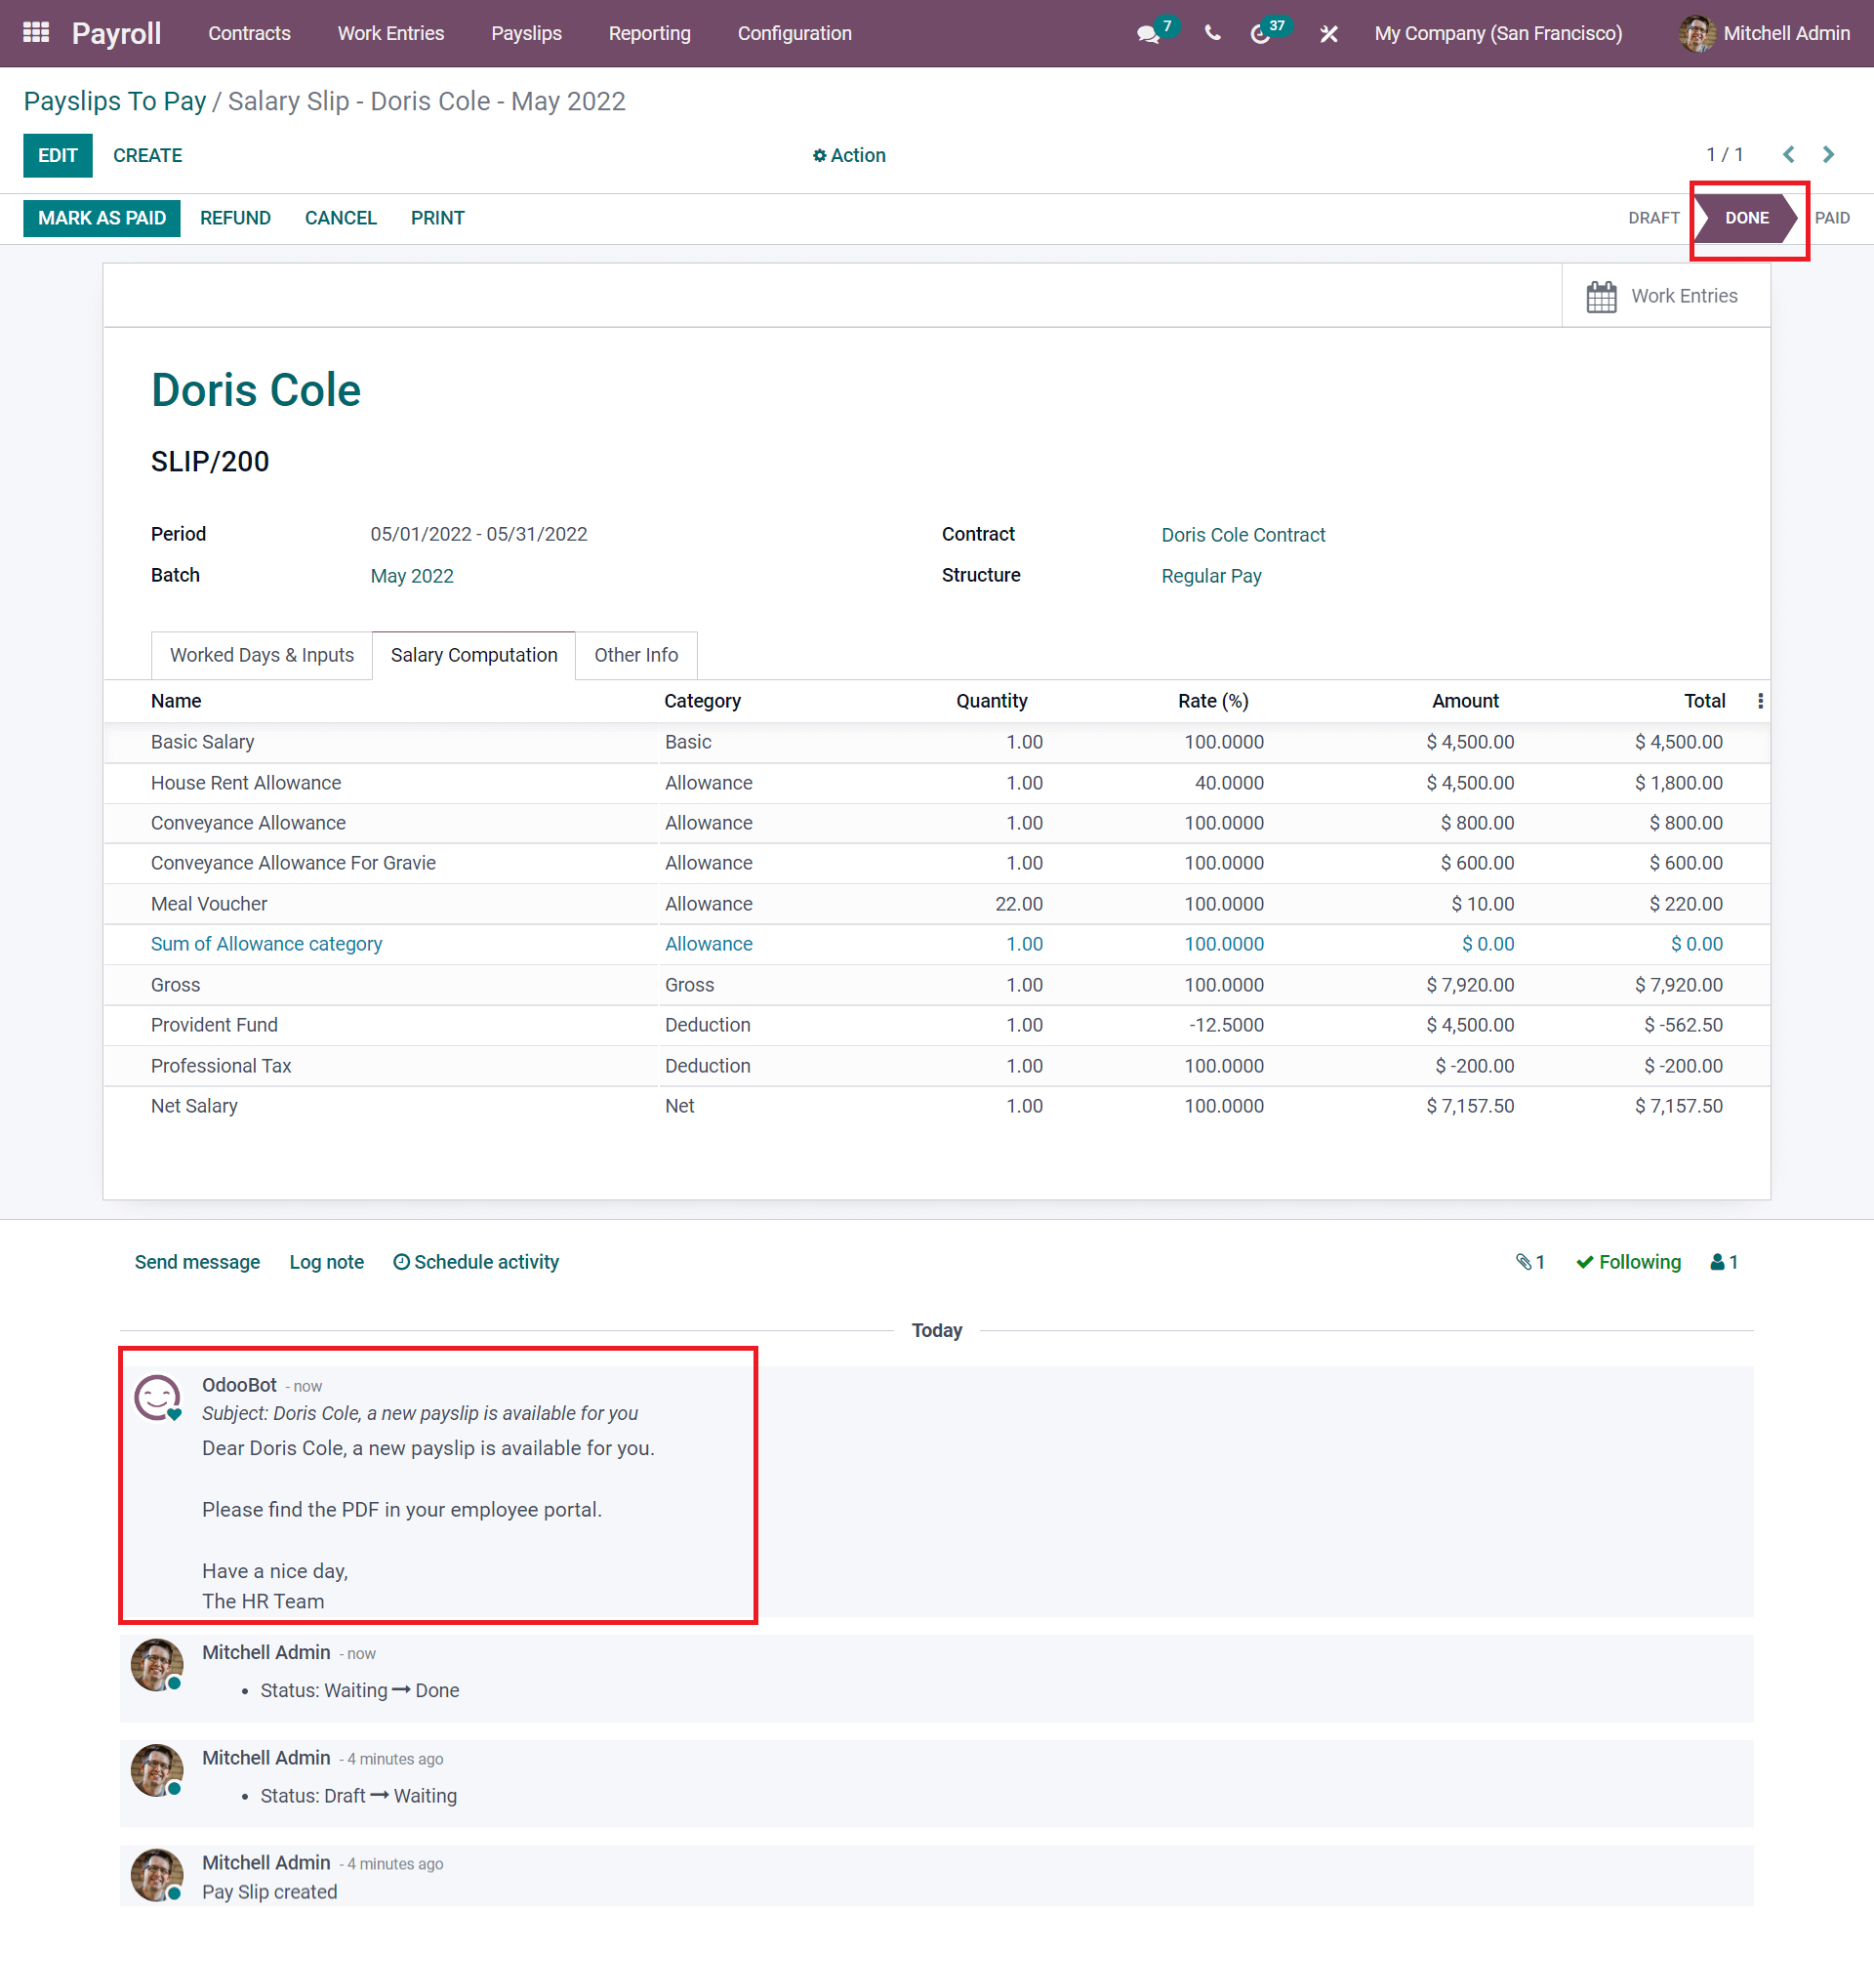
Now the WAITING stage is changed; only if the Head approves the calculation and all other entered factors are correct will they click the CREATE DRAFT ENTRY option where the stage is approved to send the employer. And as seen in the below screenshot, after clicking the SAVE button, Odoo automatically sends the email to the particular employee that the payslip is ready for the month.
As seen in the above screenshot, you can click on the MARK AS PAID button if you have paid the amount displayed, and then the stage changes into PAID in Odoo.
The third sub-tab is the Other Info. Let us see the details in it from the below screenshot.
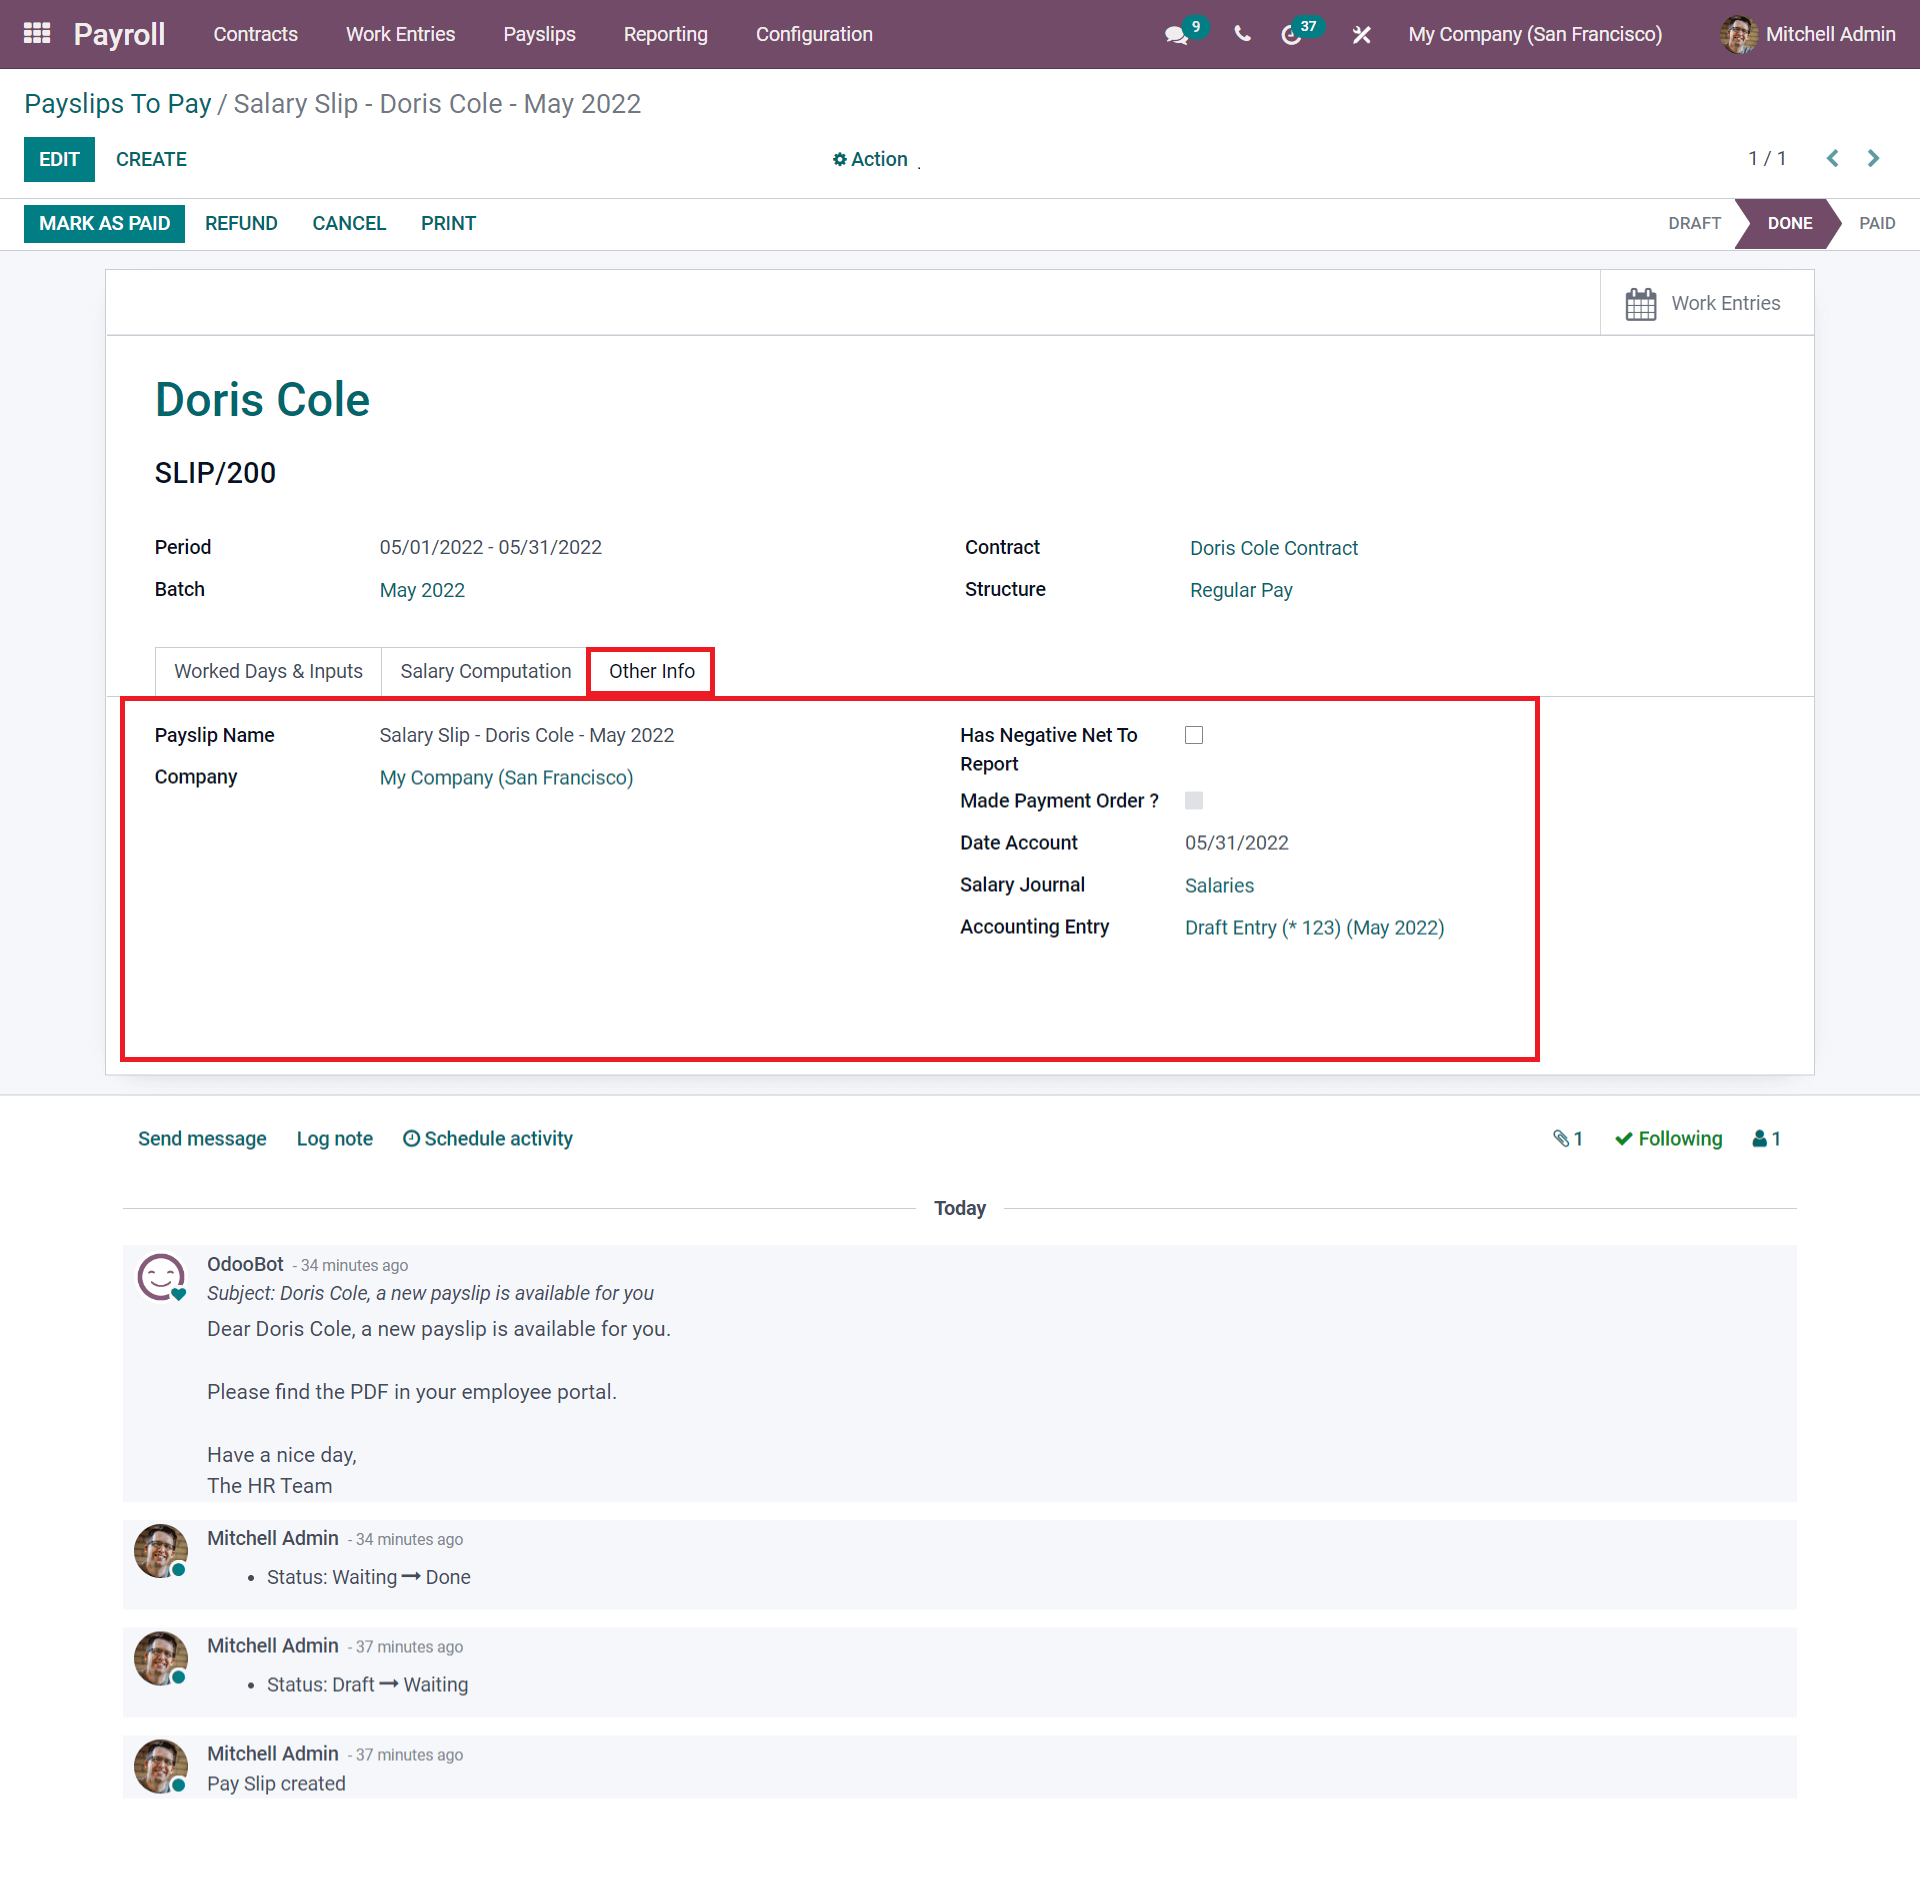
Here in the screenshot, under the Other Info, you will get the other details regarding the Payslip. The Odoo specifies further details like payslip name, Company name, Mode of a payment order, Salary journal, etc.
ALL PAYSLIPS
In the Employee Payslip field, you will get the details of all employers in the company where the payslip has been generated.
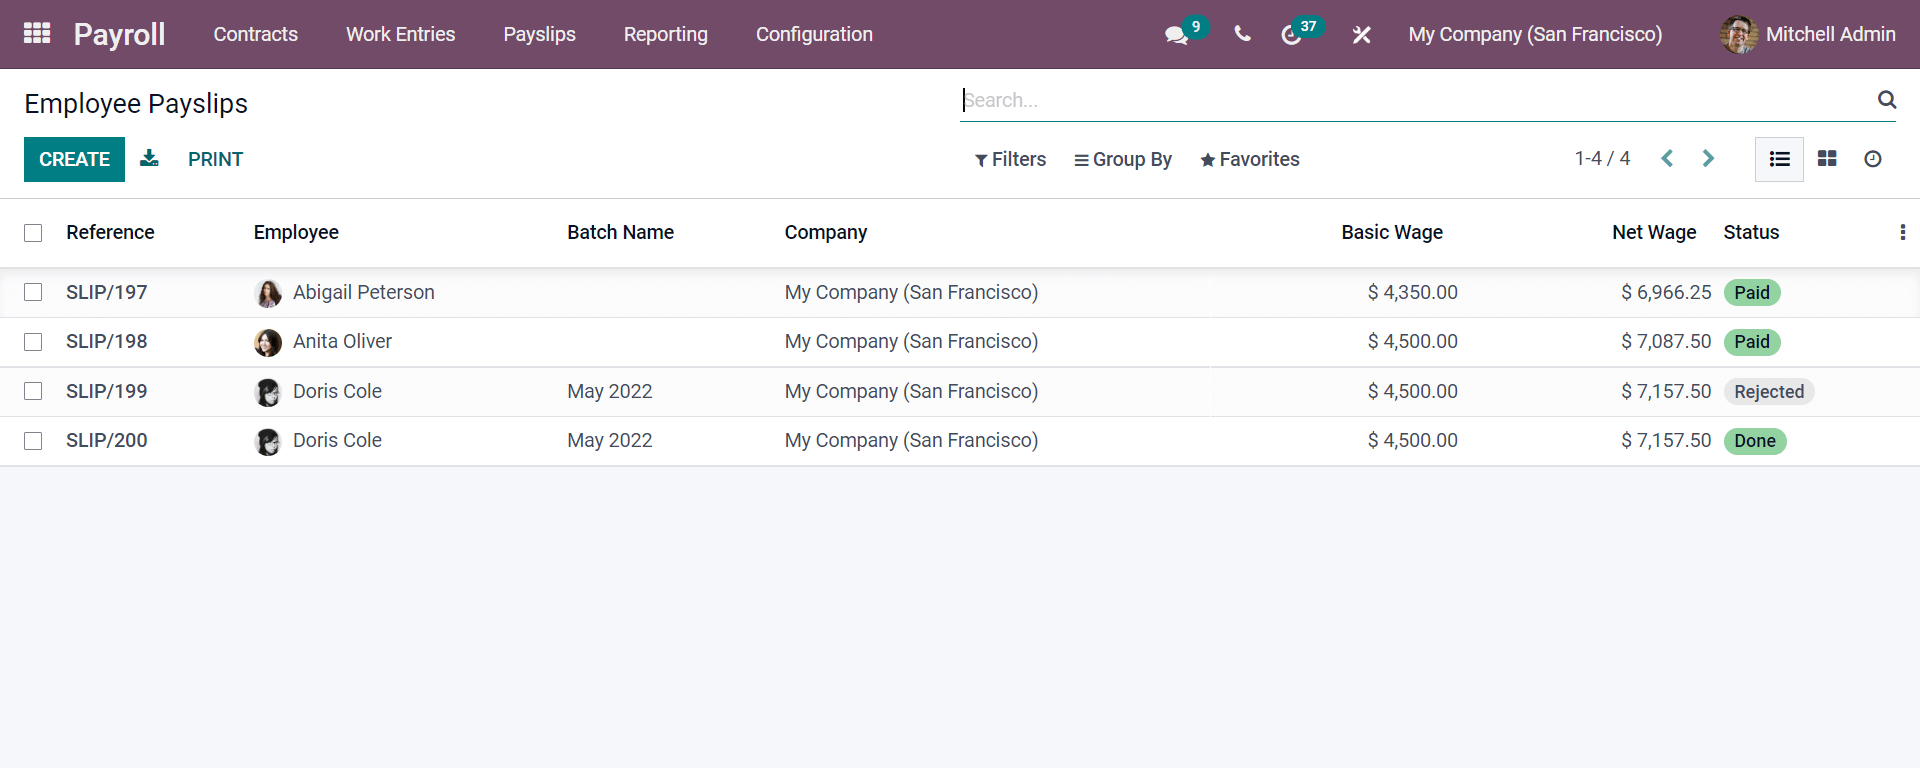
As seen in the screenshot, you will get all the details with Reference, Employee, Batch Name, Company, Basic Wage, Net Wage, and the Status of the payslip.
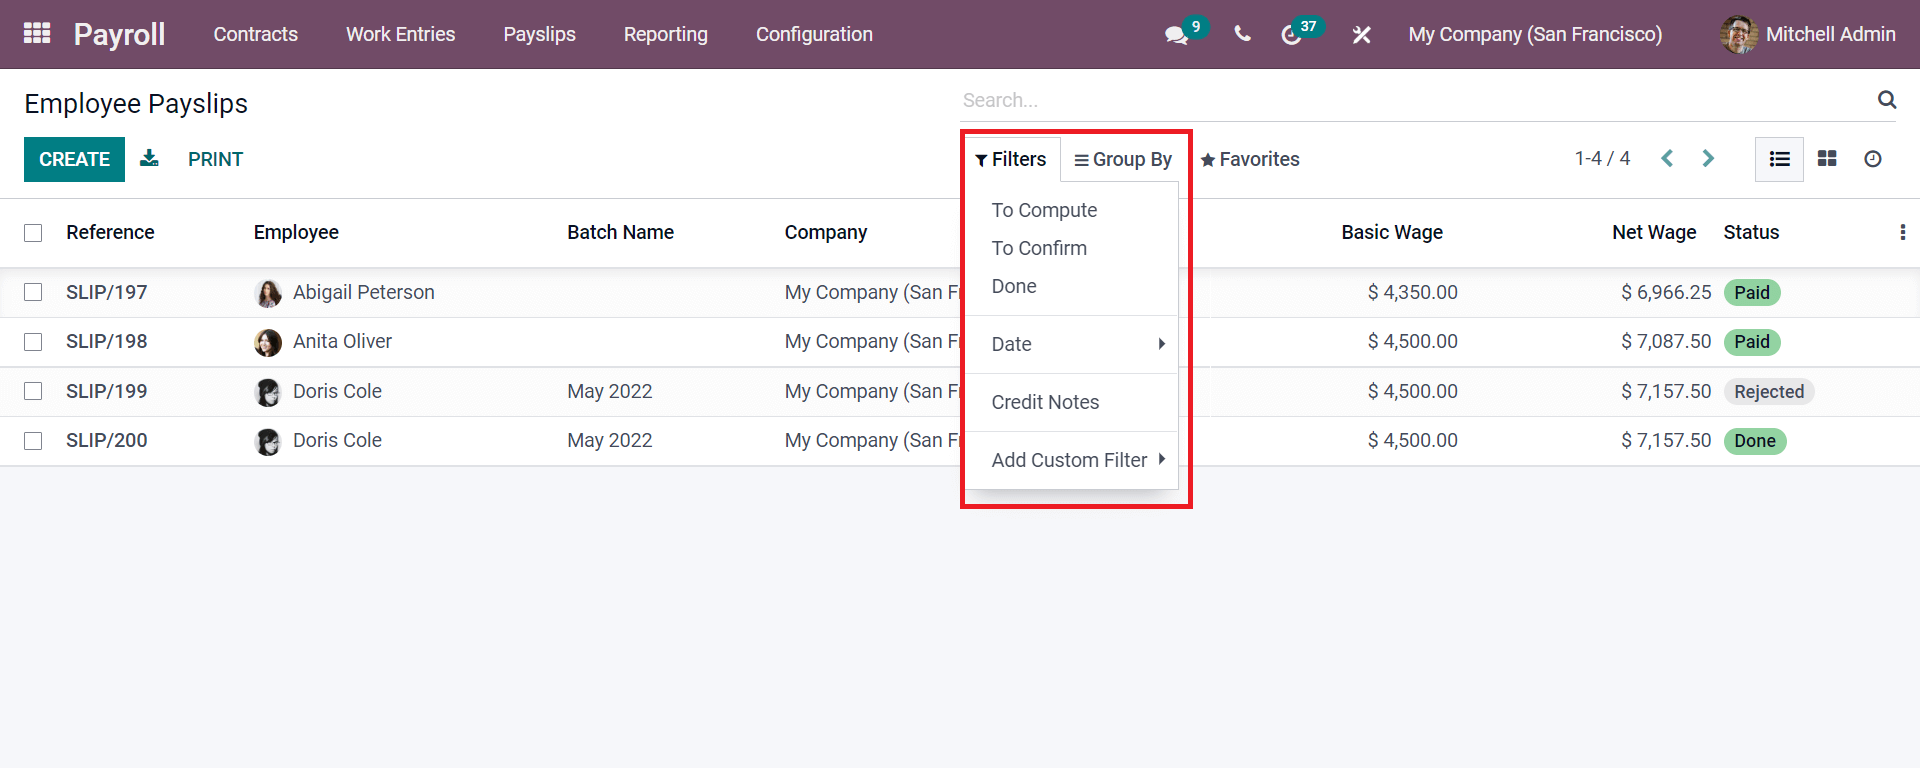
As seen in the screenshot, you can apply the default filters and get the result of the used feature with the Filters. Similarly, in the Group By options, you can select the default features and apply them accordingly. Also, in Favorites, you can add features. Now the Payslips are seen in the list view. Similarly, you can see the details in Kanban and Activity views.
Here you can even go for creating a payslip as discussed later in the To Pay option.
Payslip Batches
The submenu in Odoo Payroll in Odoo 15 gives you an excellent feature in that it creates the payslip for a batch of employees in a company.

With the details under payslips batches, you will be getting the details with the List view and Kanban view. If you click on the CREATE button, you can create employees' payslips under batch in one quick process. Let us see how the payslip is generated for employees in a batch.
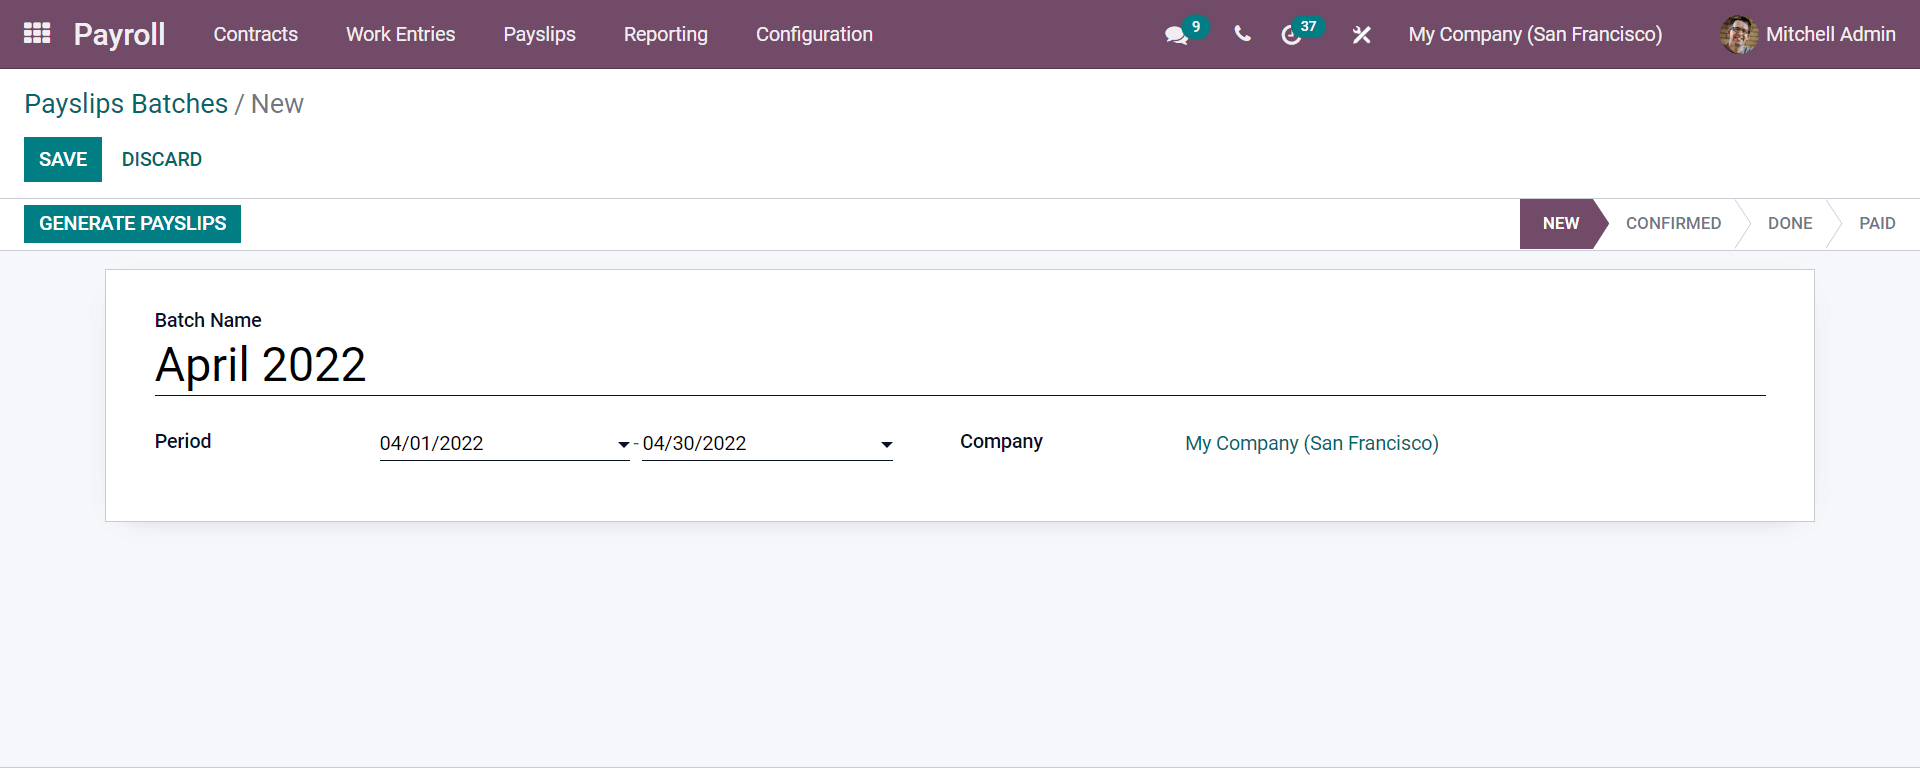
By adding all the details given and clicking on the GENERATE PAYSLIPS, you will be redirected to another window.

Here in this screenshot, you have seen a window that emerged showing the employees who worked in that period as listed in the Batch. As seen in this window, you can have the salary computed as per the specific department-wise. You can click on the department, and a dropdown menu will appear, and you can select the department you require and click on the Generate button. In the Salary Structure part, you can specify the employee who has completed the contract and give any bonus or gratuity. You can add the field with that employee's name so that Odoo will compute automatically. Lastly, you need to click the Generate button.
Conclusion:
With this, we can conclude the blog, and from this, we can understand that the Odoo 15 makes your salary computation easier and saves your time efficaciously. The Odoo 15, within a few clicks, makes your bulk salary computation within a fraction of a second accurately. Thus Odoo 15 is the best Payroll management software that handles all your payroll operations in a simplified manner without any errors.