In this section, we are going to create a field widget and display it inside the form view. Here we are adding a color picker widget and saving the values of the picked color in an integer field. Next, we can go through the steps needed to add a new OWL field component to the form view.
First adding an integer field inside the res.partner,
from odoo import fields, models
class ResPartner(models.Model):
_inherit = 'res.partner'
color = fields.Integer()
Then add the color field to the form view,
<field name="color" widget="int_color"/>
Next, we define the Qweb Template for the field widget,
<?xml version="1.0" encoding="UTF-8" ?>
<templates>
<t t-name="OWLColorPill" owl="1">
<span t-attf-class="o_color_pill o_color_{{props.pill_no}}
{{props.active and 'active' or ''}}"
t-att-data-val="props.pill_no" t-on-click="pillClicked"
t-attf-title="This color is used in {{props.book_count or 0 }} partners."/>
</t>
<span t-name="OWLFieldColorPills" owl="1" class="o_int_colorpicker" t-on-color-updated="colorUpdated">
<t t-foreach="totalColors" t-as='pill_no'>
<ColorPill t-if="mode === 'edit' or value == pill_no" pill_no='pill_no' active='value == pill_no'
book_count="colorGroupData[pill_no]"/>
</t>
</span>
</templates>
Loading the Qweb template to the manifest,
'assets': {
'web.assets_backend': [
'/owl_test/static/src/js/owl_test.js',
],
'web.assets_qweb': [
'/owl_test/static/src/xml/owl_test.xml',
],
},
In next step we are going to add some css style for the field widget,
.o_int_colorpicker {
.o_color_pill {
display: inline-block;
height: 25px;
width: 25px;
margin: 4px;
border-radius: 25px;
position: relative;
@for $size from 1 through length($o-colors) {
&.o_color_#{$size - 1} {
background-color: nth($o-colors, $size);
&:not(.readonly):hover {
transform: scale(1.2);
transition: 0.3s;
cursor: pointer;
}
&.active:after{
content: "\f00c";
display: inline-block;
font: normal normal normal 14px/1 FontAwesome;
font-size: inherit;
color: #fff;
position: absolute;
padding: 4px;
font-size: 16px;
}
}
}
}
}
Adding the scss file to the backend,
'assets': {
'web.assets_backend': [
'/owl_test/static/src/js/owl_test.js',
'/owl_test/static/src/scss/style.scss'
],
'web.assets_qweb': [
'/owl_test/static/src/xml/owl_test.xml',
],
},
Defining the widget component,
odoo.define('owl_test.owl_test', function (require) {
"use strict";

const { Component } = owl;
const AbstractField = require('web.AbstractFieldOwl');
const fieldRegistry = require('web.field_registry_owl');
class ColorPill extends Component {
static template = 'OWLColorPill';
pillClicked() {
this.trigger('color-updated', {val: this.props.pill_no});
}
}
});
Extend the Abstract field,
class FieldColor extends AbstractField {
static supportedFieldTypes = ['integer'];
static template = 'OWLFieldColorPills';
static components = { ColorPill };
}
Add the methods of the component, then the whole js is as follows:-
odoo.define('owl_test.owl_test', function (require) {
"use strict";
const { Component } = owl;
const AbstractField = require('web.AbstractFieldOwl');
const fieldRegistry = require('web.field_registry_owl');
class ColorPill extends Component {
static template = 'OWLColorPill';
pillClicked() {
this.trigger('color-updated', {val: this.props.pill_no});
}
}
class FieldColor extends AbstractField {
static supportedFieldTypes = ['integer'];
static template = 'OWLFieldColorPills';
static components = { ColorPill };
constructor(...args) {
super(...args);
this.totalColors = Array.from({length: 10}, (_, i) => (i + 1).toString());
}
async willStart() {
this.colorGroupData = {};
var colorData = await this.rpc({
model: this.model, method: 'read_group',
domain: [], fields: ['color'],
groupBy: ['color'],
});
colorData.forEach(res => {
this.colorGroupData[res.color] = res.color_count;
});
}
colorUpdated(ev) {
this._setValue(ev.detail.val);
}
}
fieldRegistry.add('int_color', FieldColor);
return {
FieldColor: FieldColor,
};
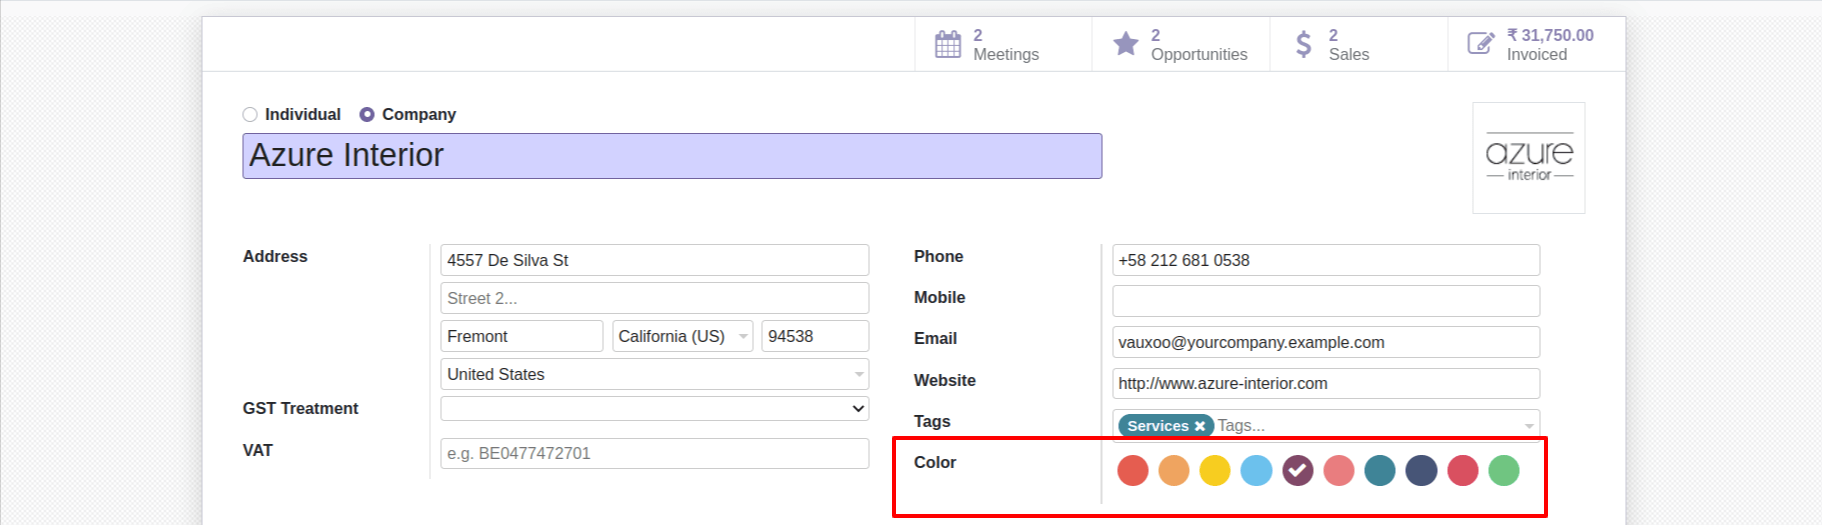
}); In the template, we need to add owl=”1” while defining the template. Here we are using the idea of subcomponents too. We added two templates, one for the field and another for the color pill. The <ColorPill> is used to instantiate the subcomponent. When calling the <ColorPill> tag, we are passing two attributes named active and pill_no. Those will be the props in the template of the subcomponent. The t-on-color-updated is used to listen to the custom event triggered from the subcomponent. Then we added the JS file for the field component. Defining the OWL utility, and also importing the AbstractField and fieldRegistry.AbstrctField is the abstract OWL component for the fields, fieldRegistery is used to list the OWL component as a field component. Then we define the field component named ColorPill. The static variable template will be the template defined for the component. There is a method pillCilcked inside the ColorPill component that is called when the user clicks on the color pill. Inside the method we have triggered the color-updated event, which is captured by the FieldColor component, the FieldColor component is the parent component. The captured event will be used t-on-color-updated on the FieldColor component. By extending the AbstractField, we created the FieldColor component. Because it will have all the utilities required to create a field widget. Then we need to list the components via the static components variable when we use the subcomponents. There is a method colorUpdated, which will be called when a user clicks on the color pill. The setValue method is called at the moment for setting the field values, which will be stored in the database. The data triggered will be available at the details attribute of the event parameter. At last, we registered our widget in the fieldRegistery. The output will be as follows:-In the above-given example, first, we have added an integer field to the res.partner model and then added the field to the form view. Next, we define the Qweb template for the field widget. When defining an OWL Qweb
This is how we can Create a widget in OWL. To know more about the related topics, you can visit our Odoo blogs.