Odoo 15 Accounting module is a complete package that helps you to manage all the accounting-related activities. The operations related to the financial management of the company can be tricky, but with proper recording and a systematic way of managing the burden can be lessened. Odoo 15 provides a reliable and efficient accounting management system.
The Accounting module of Odoo 15 is integrated with other major modules of the system. This helps in uninterrupted workflow and the operations can be executed easily. The major aspect of the Accounting module is its reliability and real-time operations. From managing the customers, creating invoices, and sending them, the Odoo Accounting module helps you to efficiently manage the customers. Vendor bills, payments, refunds, and much more can also be operated and managed using the Accounting module.
Another main feature of the Odoo 15 Accounting module is its follow-up operations on the payments made. You can monitor the financial status of the company easily through the module. General and analytic accounting is used to make sure of proper budget management.
Here, in this blog let us look at how to create customer invoices using Odoo 15 Accounting module.
Customer Invoices
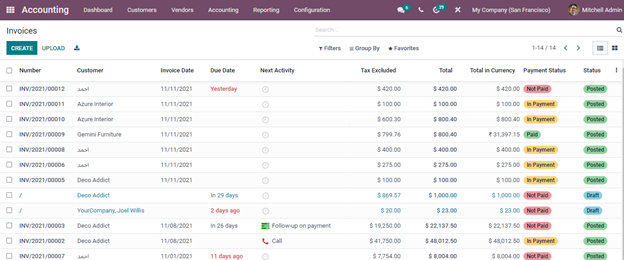
You can view the existing customer invoices by selecting the Invoices option from the Customers tab. The list of the invoices along with their details such as Number, name of the Customer, Invoice Date, Due Date, Tax Number, Next Activity scheduled, Tax Excluded amount, Total amount, Total in Currency, Payment Status, and Invoice Status. The total of the Tax Excluded amount and Total amount is displayed at the bottom. Using different Filters such as My Invoices, Draft, Posted, Cancelled, To Check, SDD Mandate, Unpaid, Paid, Overdue, Invoice Date, and Due Date you can display particular invoices. You can also display invoices based on different groups such as Salesperson, Status, Sales Team. Electronic Invoicing State, Preferred Payment Method, Invoice Date, and Due Date. You can upload invoices straight from the system by clicking on the UPLOAD button.
Creating Customer Invoices
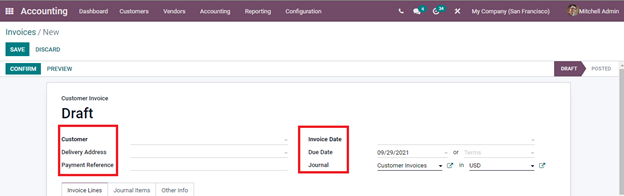
In order to create new customer invoices, select the CREATE button. A new Invoices window will appear on the screen. Here, you will have to enter the details of the new invoice. The information that has to add is:
Customer: Insert the name of the customer to whom the invoice will be sent at this provided field.
Delivery Address: Here you can enter the delivery address for the current invoice.
Payment Reference: You can enter the payment reference to set on the journal items.
Invoice Date: Insert the invoice date in this provided field.
Due Date: Enter the due date when the invoice must be paid or the Terms at which the invoice must be paid. You can also ask for immediate payment, by selecting the option from Terms.
Journal: At the space provided, enter the journal entry label under which the invoice will be added. Along with the journal enter the currency that is being used for the transaction.
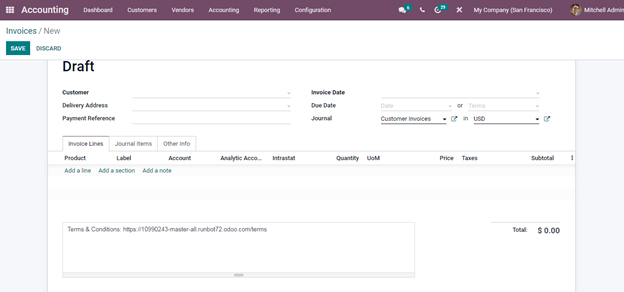
Invoice Lines: At the Invoice Lines menu enter the details of the products such as the name of the Product, Label, Account, Analytic Account, Intrastat, Quantity of the product, Unit of Measure, Price of the product, Tax imposed on the product, Product Country and Subtotal amount. You can add multiple products by clicking on the Add a Line option. The total Untaxed Amount, Tax amount, and Total amount including the tax is displayed at the bottom. The Terms and Conditions of the company can be added at the space provided.
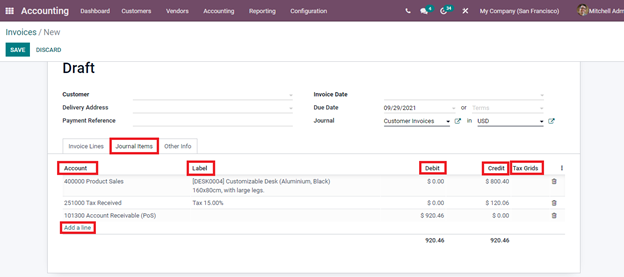
Journal Items: At the Journal Items menu, you can add details regarding the journal entry of the invoice. These details include the name of the Account, Label, Debit amount, Credit amount, and Tax Grids. The fields will be automatically filled according to the product details added to the Invoice Lines menu. You can configure and alter the entry simply by clicking on them. To add a new entry, click on the Add a Line option. You can view the total debit and credit amount at the bottom.
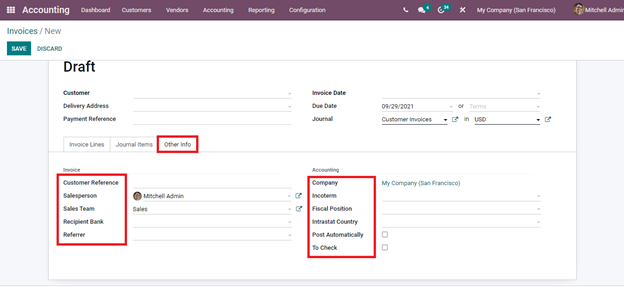
Other Info: Here, at the Other Info menu, you can include other details of the Invoice and Accounting. This information includes Customer Reference, name of the Sales Person, name of the Sales team, bank account number to which the invoice will be paid at Recipient Bank field, Referrer, name of the Company, Incoterm in case of international transaction, Fiscal Position, name of the arrival country at the Intrastat Country field, whether the entry should be automatically posted at its the date and whether the details should be rechecked
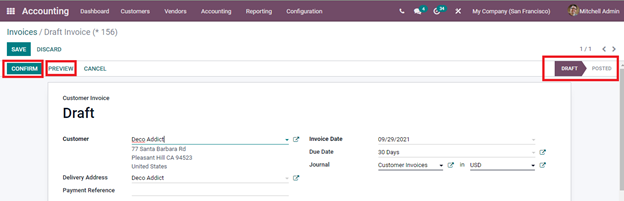
You can view the preview of the invoice created by clicking on the Preview button. By default the created invoice will be at Draft stage. After selecting the Confirm button, the stage will be changed to Posted.
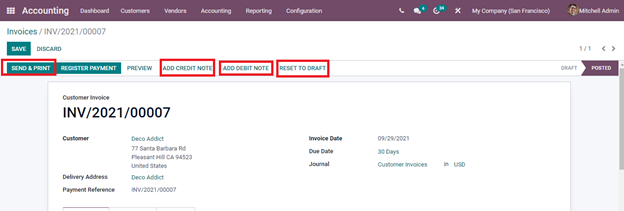
After confirming the invoice you can send the invoice to the customer by clicking on the SENT & PRINT button. To add credit note and debit note to the invoice click on the ADD CREDIT NOTE and ADD DEBIT NOTE options respectively. You can also change the stage of the invoice back to Draft by clicking on the RESET TO DRAFT option.
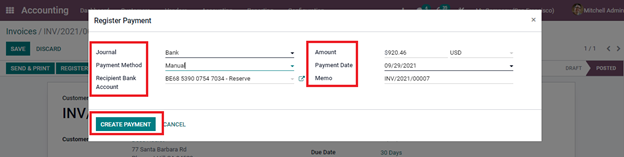
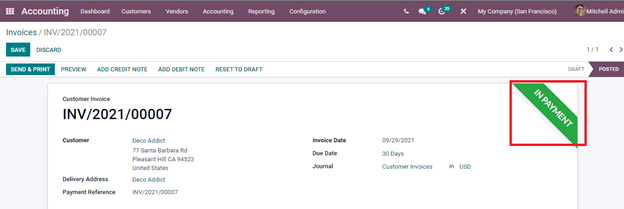
To record the payment click on the REGISTER PAYMENT button. Register Payment window will appear where you will have to enter the information such as the name of the Journal, Payment Method (whether Manual, Batch Deposit or SEPA Direct Debit), Recipient Bank Account, Amount, Currency used, Payment Date and Memo. After entering all this information you can press the CREATE PAYMENT button to make the payment.
After registering the payment, the invoice will be awarded with an IN PAYMENT banner denoting the payment register.
By following these simple steps you can create and make payments of customer invoices using the Odoo 15 Accounting module. The systematic method of creating invoices and user-friendly interface makes Odoo Accounting much easier to operate. Businesses of any size, may it be small, medium, or large, can benefit from using Odoo 15 Accounting module. In short, the complex operation of the business, accounting, can be efficiently managed with Odoo ERP.