Kubernetes is an open source developed by Google for managing containerized applications. For deploying Odoo in Kubernetes, in local, we have to configure minikube and kubectl in our local.
To deploy Odoo in Kubernetes, we must deploy Odoo and Postgres in our cluster. Officially there is an Odoo image and a Postgres image in the docker hub. We have to set up a docker for Postgres and Odoo.
Ve to
First, we have to start our minikube
minikube start
Then, we have to create a ‘yaml’ file for deploying Postgres.
Apply ConfigMap
It is an API Object that is used to store configuration for other objects. ConfigMap has two fields, data, and binaryData, where data is designed to contain UTF-8 strings, and binaryData is designed to contain base64-encoded strings.
apiVersion: v1
kind: ConfigMap
metadata:
  name: postgres-config
  labels:
    app: postgres
data:
  POSTGRES_DB: postgresdb
  POSTGRES_USER: admin
  POSTGRES_PASSWORD: root
ConfigMap is used to store Postgres information. The POSTGRES_DB, POSTGRES_USER, POSTGRES_PASSWORD in the ConfigMap are used by the Postgres pod.
Then we apply this file
kubectl apply -f postgres-config.yml
configmap/postgres-config created
It will give an output of configmap/postgres-config created.
cybrosys@cybrosys-shamsad:~$ kubectl get configmap
NAME               DATA   AGE
kube-root-ca.crt   1      4d20h
postgres-config    3      1m
In order to get the details of configmap, we can run the command kubectl get configmap. It will give the information of the configmaps.
Apply Persistent Storage Volume, and Persistent Volume Claim
A persistent volume is a segment of storage in a cluster. It provides storage for our application. A Persistent volume claim is a request for storage resources. The main advantage of PVC is that developers can dynamically request storage resources.
apiVersion: v1
kind: PersistentVolume # Create a PV
metadata:
  name: postgresql-data # Sets PV's name
  labels:
    type: local # Sets PV's type to local
spec:
  storageClassName: manual
  capacity:
    storage: 10Gi # Sets PV Volume
  accessModes:
    - ReadWriteMany
  hostPath:
    path: "/data/volume" # Sets the volume's path
Create a file for persistent volume in which the kind is PersistentVolume. We can set the storage capacity in the field storage. Here it is 10GB. There are three types of accessModes:
1) ReadWriteOnce - It implies that volume can be read and write by one node
2) ReadOnlyMany - It implies that volume can be read by many node
3) ReadWriteMany - It implies that volume can be read and write by many nodes
Then we can apply this persistent volume by the following command:
Kubectl apply -f postgres-pv.yaml
persistentvolume/postgresql-data created
Kubectl get pv
NAME              CAPACITY   ACCESS MODES   RECLAIM POLICY   STATUS   CLAIM                           STORAGECLASS   REASON   AGE
postgresql-data   10Gi       RWX            Retain           Bound    default/postgresql-data-claim   manual                  1m
Thus we can apply the persistent volume and can check the persistent volume bt command kubectl get pv
apiVersion: v1
kind: PersistentVolumeClaim # Create PVC
metadata:
  name: postgresql-data-claim # Sets name of PV
spec:
  storageClassName: manual
  accessModes:
    - ReadWriteMany # Sets read and write access
  resources:
    requests:
      storage: 10Gi # Sets volume size
Create a Persistent volume claim file with the kind as PersistentVolumeClaim. Then apply this file.
kubectl apply -f postgres-pvc.yaml
persistentvolumeclaim/postgresql-data-claim created
Kubectl get pvc
NAME                    STATUS   VOLUME            CAPACITY   ACCESS MODES   STORAGECLASS   AGE
postgresql-data-claim   Bound    postgresql-data   10Gi       RWX            manual         1m
Apply Postgresql deployment
apiVersion: apps/v1
kind: Deployment
metadata:
  name: postgres  # Sets Deployment name
spec:
  replicas: 1
  selector:
    matchLabels:
      app: postgres
  template:
    metadata:
      labels:
        app: postgres
    spec:
      containers:
        - name: postgres
          image: postgres:10.1 # Sets Image
          ports:
            - containerPort: 5432  # Exposes container port
          envFrom:
            - configMapRef:
                name: postgres-config
          volumeMounts:
            - mountPath: /var/lib/postgresql/data
              name: postgredb
      volumes:
        - name: postgredb
          persistentVolumeClaim:
            claimName: postgresql-data-claim
Deployment defines how to create the instance of the pod. Here we set replicas as one, So there will be one pod with one Postgres. If we want to create multiple, then set replicas as we wish. In the image, we set the image of the container, then expose the post of the container. Here we set it as 5432. Then we add the name of the PVC we created in the field claimName in persistent volume claim. We can also set the user and password by setting the name of the configMapRef in the envFrom same as the name of the configMap we have created.
Then we apply this file.
Kubectl apply -f postgres-pv.yaml persistentvolume/postgresql-data createdKubectl get pvNAME CAPACITY ACCESS MODES RECLAIM POLICY STATUS CLAIM STORAGECLASS REASON AGEpostgresql-data 10Gi RWX Retain Bound
Apply Postgresql service
apiVersion: v1
kind: Service
metadata:
  name: postgres # Sets service name
  labels:
    app: postgres # Labels and Selectors
spec:
  type: NodePort # Sets service type
  ports:
    - port: 5432 # Sets port to run the postgres application
  selector:
    app: postgres
Create a file for service for Postgres. For that kind must be service. The selector label and value should be the same as in the deployment manifest. There are three types of type:
1) ClusterIP - Expose the service cluster ip
2) NodePort - Expose the service node ip
3) LoadBalancer - Expose the service on cloud provider’s load balancer
Then apply the service file
kubectl apply -f postgre-service.yaml
service/postgres unchanged
kubectl get service
NAME           TYPE        CLUSTER-IP      EXTERNAL-IP   PORT(S)          AGE
postgres       NodePort    10.109.85.146   <none>        5432:32303/TCP   1m
Deploy Odoo In Kubernetes
apiVersion: apps/v1
kind: Deployment
metadata:
  name: odoo-deployment
  labels:
    app: odoo
spec:
  replicas: 1
  selector:
    matchLabels:
      app: odoo
  template:
    metadata:
      labels:
        app: odoo
    spec:
      containers:
      - name: odoo
        image: testmailqwer/odo:14
        ports:
        - containerPort: 8069
        env:
        - name: HOST
          value: postgres
        - name: USER
          value: admin
        - name: PASSWORD
          value: root
---
apiVersion: v1
kind: Service
metadata:
  name: odoo-service
spec:
  type: NodePort
  selector:
    app: odoo
  ports:
    - protocol: TCP
      port: 8069
      targetPort: 8069
      nodePort: 30300
Here we have created deployment and service for the Odoo. Here I have already created an image in which I first created a docker container of Odoo, then converted it into an image.
Here in the service manifest file, the nodePort should be a value between 30000-32767.
Kubectl apply -f odoo-deploy-service.yaml
deployment.apps/odoo-deployment unchanged
service/odoo-service unchanged
Kubectl get pod
NAME                               READY   STATUS    RESTARTS        AGE
odoo-deployment-59fcff88f5-hcsnp   1/1     Running      0
1h
postgres-cbb58f495-xzxkx           1/1     Running      0
1m
To get our service in the browser we have to find the IP of our node.
minikube ip
192.168.49.2
Then we have to enter 192.168.49.2:30300 (IP + : + Nodeport). Then our Instance will be accessible through the website.
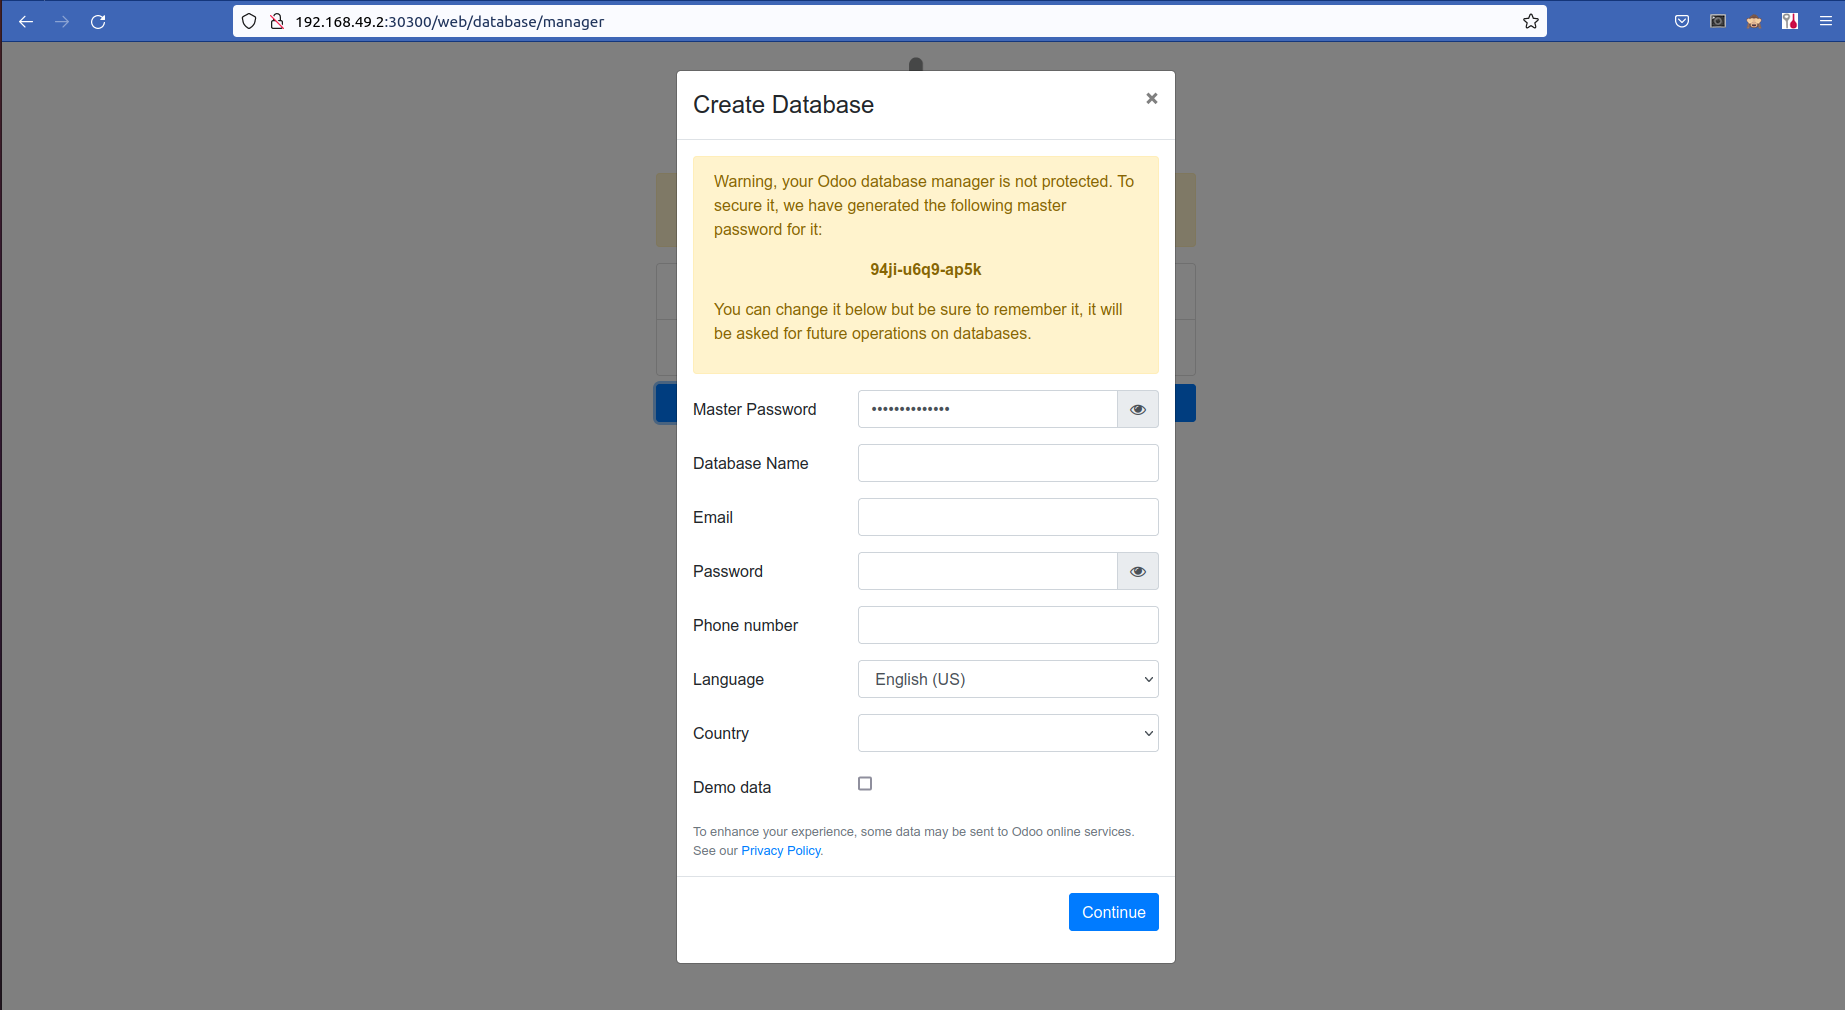
Thus our Odoo instance is running and can be accessible from the browser. Thus we can implement Odoo and Postgres in Kubernetes.