In Odoo 19, the front-end framework OWL (Odoo Web Library) is used to build modern, dynamic, and reactive user interfaces. OWL replaces the older QWeb-based frameworks, offering a more component-driven approach for designing UI elements that interact seamlessly with the backend. With each new version of Odoo, OWL continues to become the standard for front-end development.
One of the key features of OWL in Odoo is the Notification Service, which provides a consistent way to display messages to users. Using this service, developers can generate customized, user-friendly notifications such as success messages, warnings, error alerts, and general information.
In this blog, we will explore how to implement OWL notifications in Odoo 19. The first step is to create an XML template that triggers a corresponding method defined in JavaScript. This method will handle displaying the notification to the user.
To implement the notification service effectively, the XML template defines the action that triggers the notification. For example, you can add a simple ‘bell’ icon in the systray on the Odoo backend UI. The systray icon serves as a quick-access feature, allowing users to interact with specific functionality without navigating through the main interface or menus. This makes it easy to provide instant feedback and improve the user experience within the Odoo system.
<?xml version="1.0" encoding="UTF-8" ?>
<templates xml:space="preserve">
 <t t-name="systray_icon" owl="1">
         <t t-set-slot="default">
             <button>
                 <div t-on-click="_notify">
                     <i id='notify_msg'
                        class="fa fa-bell fa-1.5x"
                        role="img"/>
                 </div>
             </button>
         </t>
 </t>
</templates>
Here, the bell icon is assigned the t-on-click attribute with the _notify method. When the user clicks the bell icon, it triggers the _notify() function defined in the JavaScript component. This icon serves as the primary point for users to interact with notifications.
The icon appears in the systray section as shown below.

Next, it’s time to integrate the JavaScript component for handling the click action. To achieve this, we define the setup() and notify() methods within the SystrayIcon class, which extends the OWL Component. The JavaScript code for this implementation is as follows:
/** @odoo-module **/
import { registry } from "@web/core/registry";
import { useService } from "@web/core/utils/hooks";
import { Component } from "@odoo/owl";
import { _t } from "@web/core/l10n/translation";
class SystrayIcon extends Component {
setup() {
super.setup(...arguments);
this.notificationService = useService("notification");
}
_notify() {
{
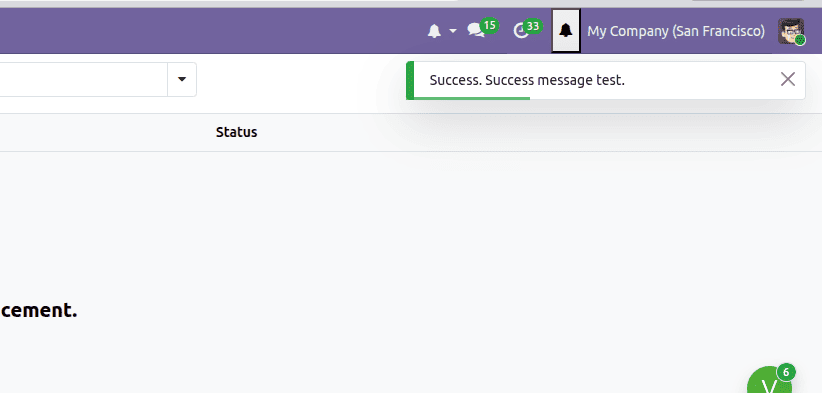
this.notificationService.add(_t("Success message test."), {
title: "Success",
type: "success"
});
}
}
}
SystrayIcon.template = "systray_icon";
export const systrayItem = { Component: SystrayIcon,};
registry.category("systray").add("SystrayIcon", systrayItem, { sequence: 1 });
The first step is to add the line /** @odoo-module **/ and import the necessary modules: registry, useService, the OWL Component, and _t for string translations.
Next, the SystrayIcon class is created by extending the Component class from the OWL library.
Within this class, the setup() method is called with super() to initialize the notification service. The content and behavior of the notification are then defined inside the _notify() method, as shown below:
_notify() {
          {
      this.notificationService.add(_t("Success message test."), {
          title: "Success",
          type: "success"
      });
  }
         }
}
To define a notification service in OWL, the following keywords are commonly used:
- add: Used with the dot (.) operator to display a notification message. The content of the notification is provided as a string, and the following attributes can be configured:
- title: The main message or content to display.
- type: Specifies the type of message; it can be "success", "info", "warning", or "danger".
- button: Adds a custom button with attributes such as name, onClick(), primary, etc.
- sticky: Determines whether the notification remains visible until manually closed (true or false).
- duration: Sets how long (in milliseconds) the notification stays on the screen.
- remove: The opposite of add, this is used to remove a specific notification.
- clear: Clears all notifications from the view.
When the user clicks the bell icon in the systray, the notification defined using the above JavaScript code is displayed as shown below:
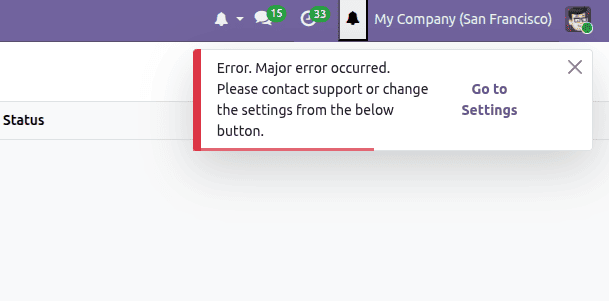
Let’s look at an example of displaying a different type of notification. We can modify the _notify() function as follows:
_notify() {
this.notificationService.add(_t("Major error occurred. Please contact support or change the settings from the below button."), {
       title: "Error",
       type: "danger",
       buttons: [{
                   onClick: () => {
                       this.actionService.doAction(
                     "base_setup.action_general_configuration");
                 closeFn();
                   },
                   primary: true,
                   name: "Go to Settings",
               },],
   });    }
After designing the required notifications, both the .xml and .js files must be included in the module’s manifest under the assets section, specifically inside the 'web.assets_backend' bundle.
In our example, since the module name is systray_icon, the assets section of the manifest is defined as follows:
'assets': {
  'web.assets_backend': [
       'systray_icon/static/src/**/*',
       'systray_icon/static/src/**/*',
          ],
},
In conclusion, OWL Notification Services can be implemented by combining XML templates with JavaScript logic, allowing developers to display a wide range of customized, user-friendly messages. These notifications are useful for handling errors, confirming successful actions such as form submissions, and responding to various system events based on the workflow. Overall, this enhances the user experience by providing clear and timely feedback in Odoo 19.
If you’re interested in earlier implementations, you can also refer to our previous blog on OWL Notification Service in Odoo 19.
To read more about How to Implement OWL Notification Service in Odoo 18, refer to our blog How to Implement OWL Notification Service in Odoo 18.