Odoo 18’s Point of Sale (PoS) makes it easy to handle customers, whether they’re individuals or companies. You can add new customers directly from the PoS screen, and all the information will automatically be saved and synced with the backend.
Customers configuration
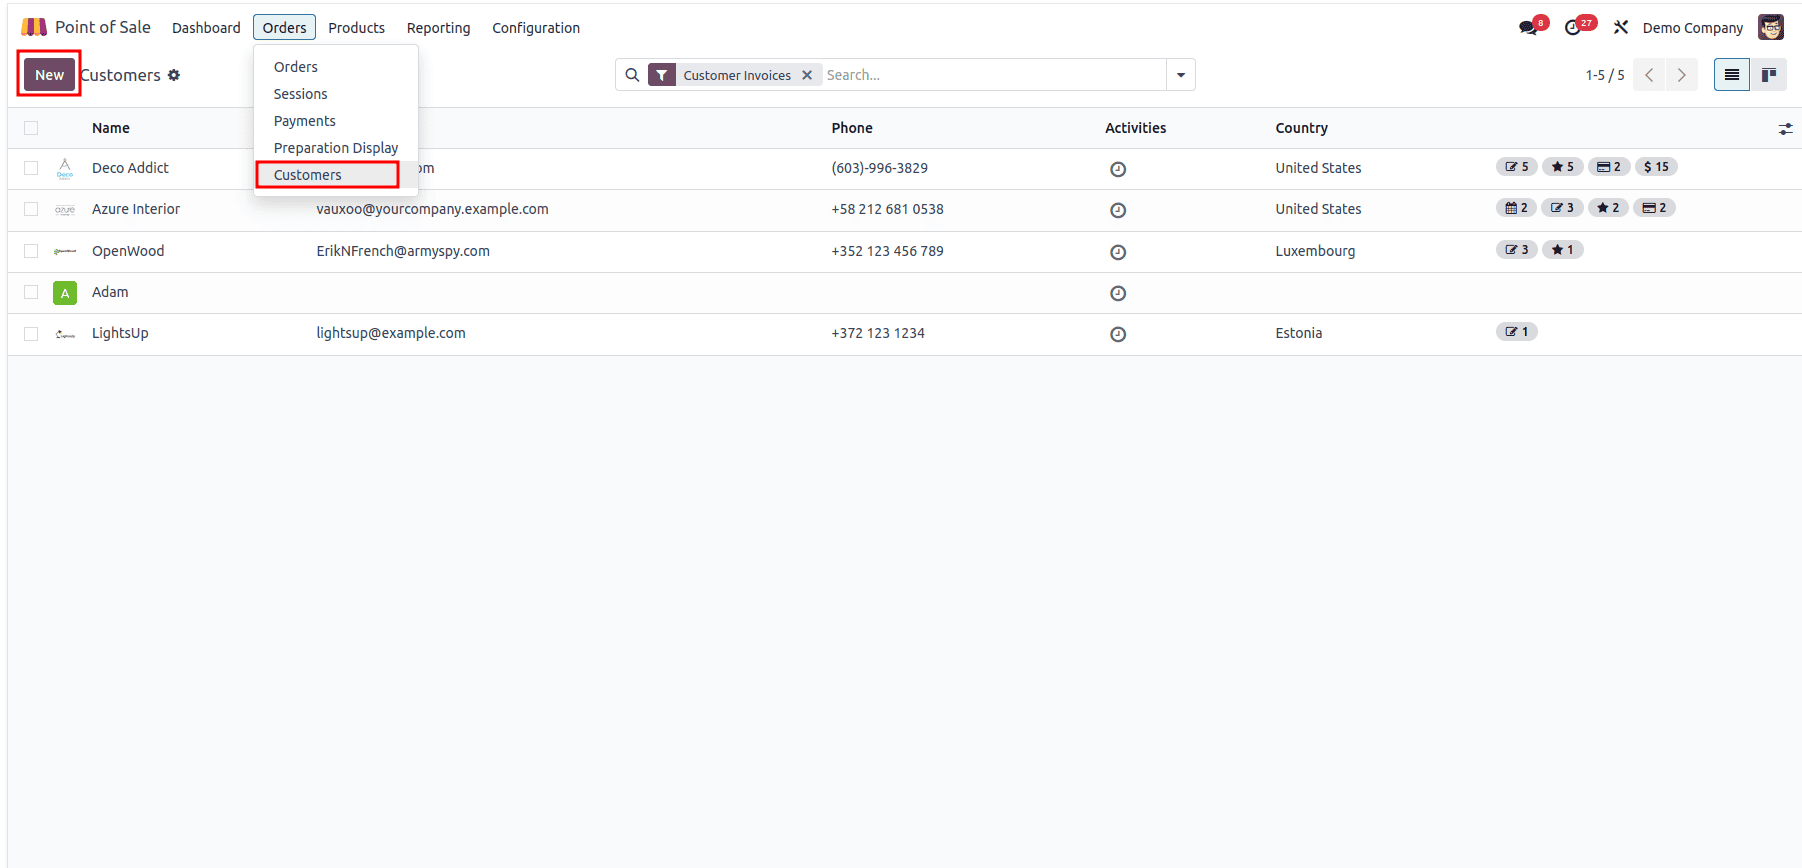
To add or manage customer information in your Odoo Point of Sale database, navigate to the Customers section under the Orders menu. This area presents a Kanban-style dashboard displaying customer profiles, including details such as their name, address, company affiliation, email, phone number, and other relevant information.
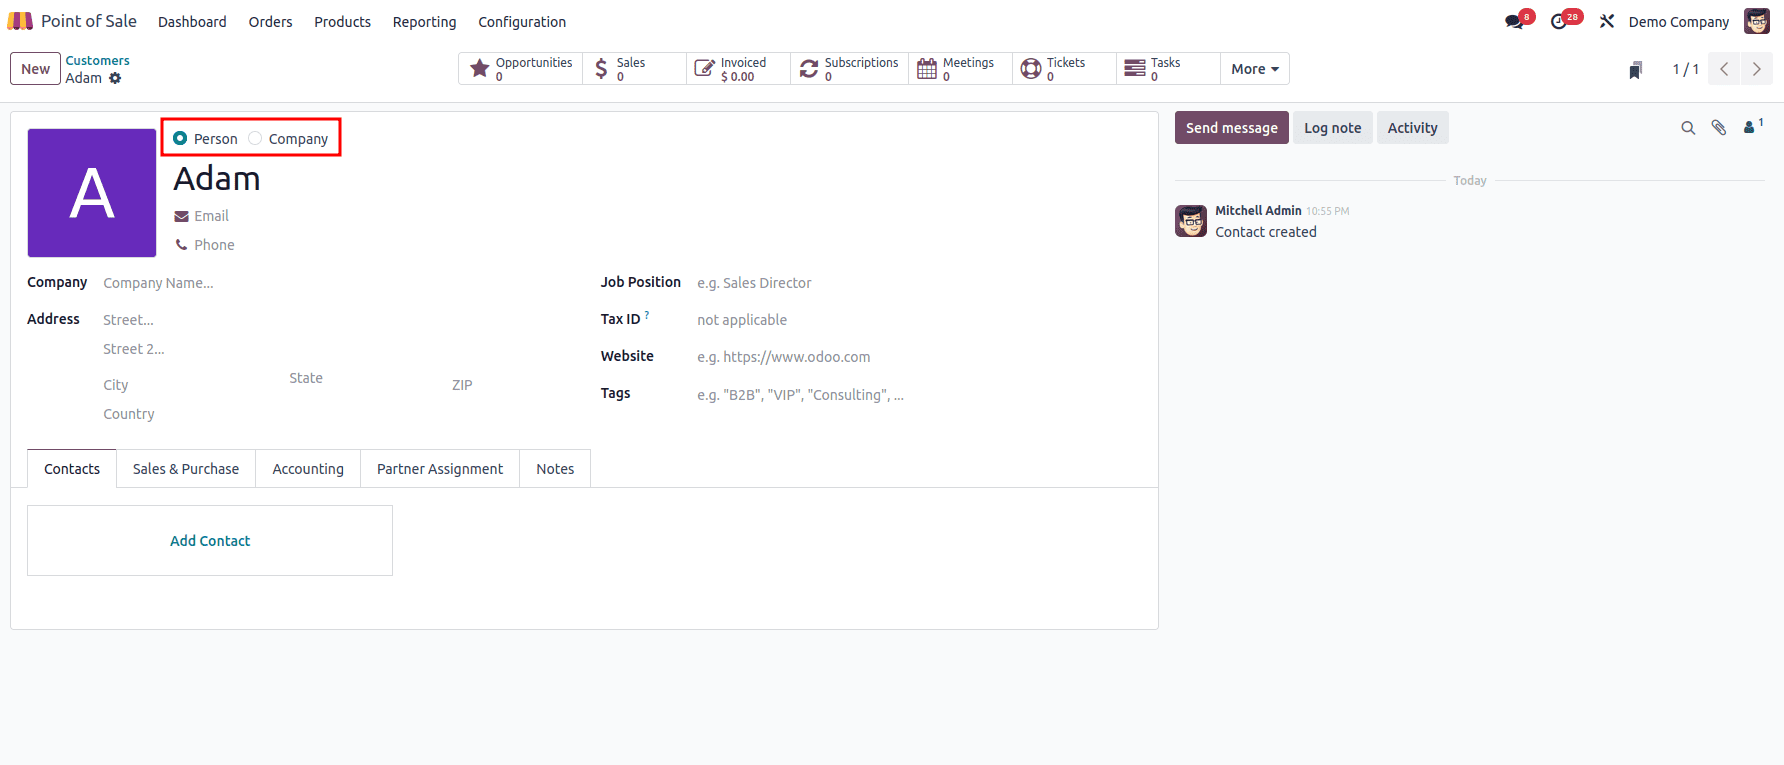
Start by selecting the type of customer, either a Person or a Company, and proceed to enter relevant customer details such as Name, Company Name, Contact Information, Job Position, Email Address, Website, along with any applicable Tags. For this example, we’ll create a new customer record for “Adam” and input the required information. If you're dealing with an existing customer, their address details will automatically populate for ease of use.
Once the basic information is entered, continue by filling out the remaining details across the available tabs.
Contacts & Addresses
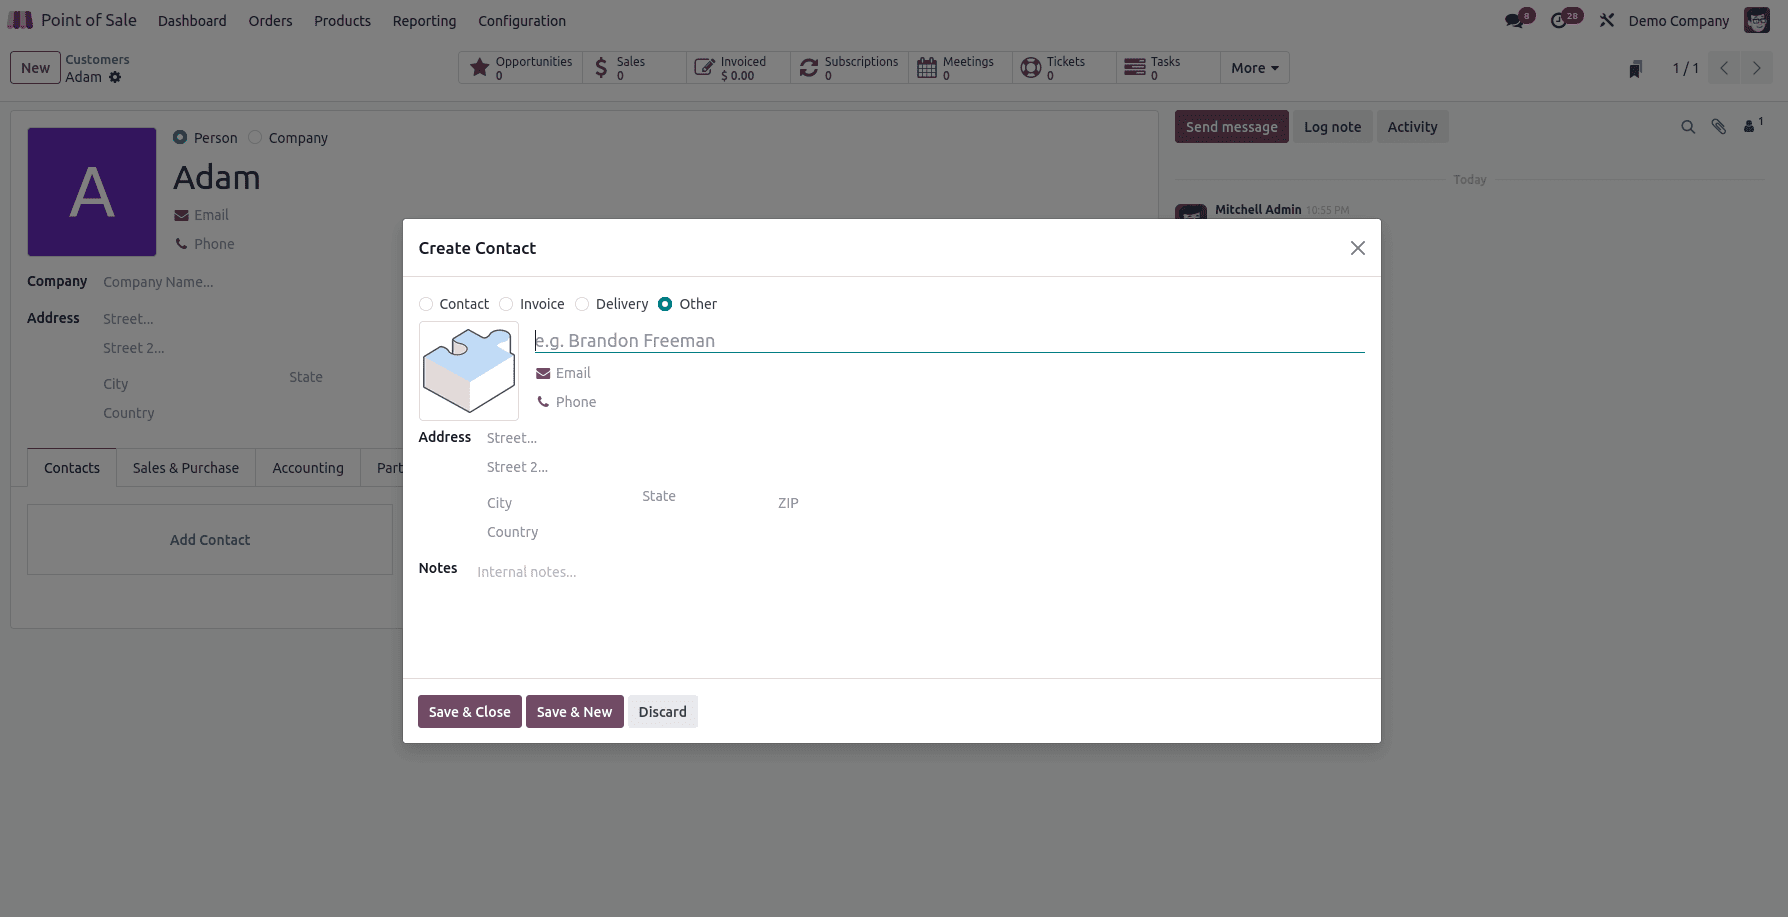
Sometimes, a customer may require more than one address, for instance, separate locations for billing and delivery, or for home and office use. These additional addresses can be added in the “Contacts & Addresses” section of the customer form, allowing you to associate multiple addresses with a single customer profile based on their specific needs.
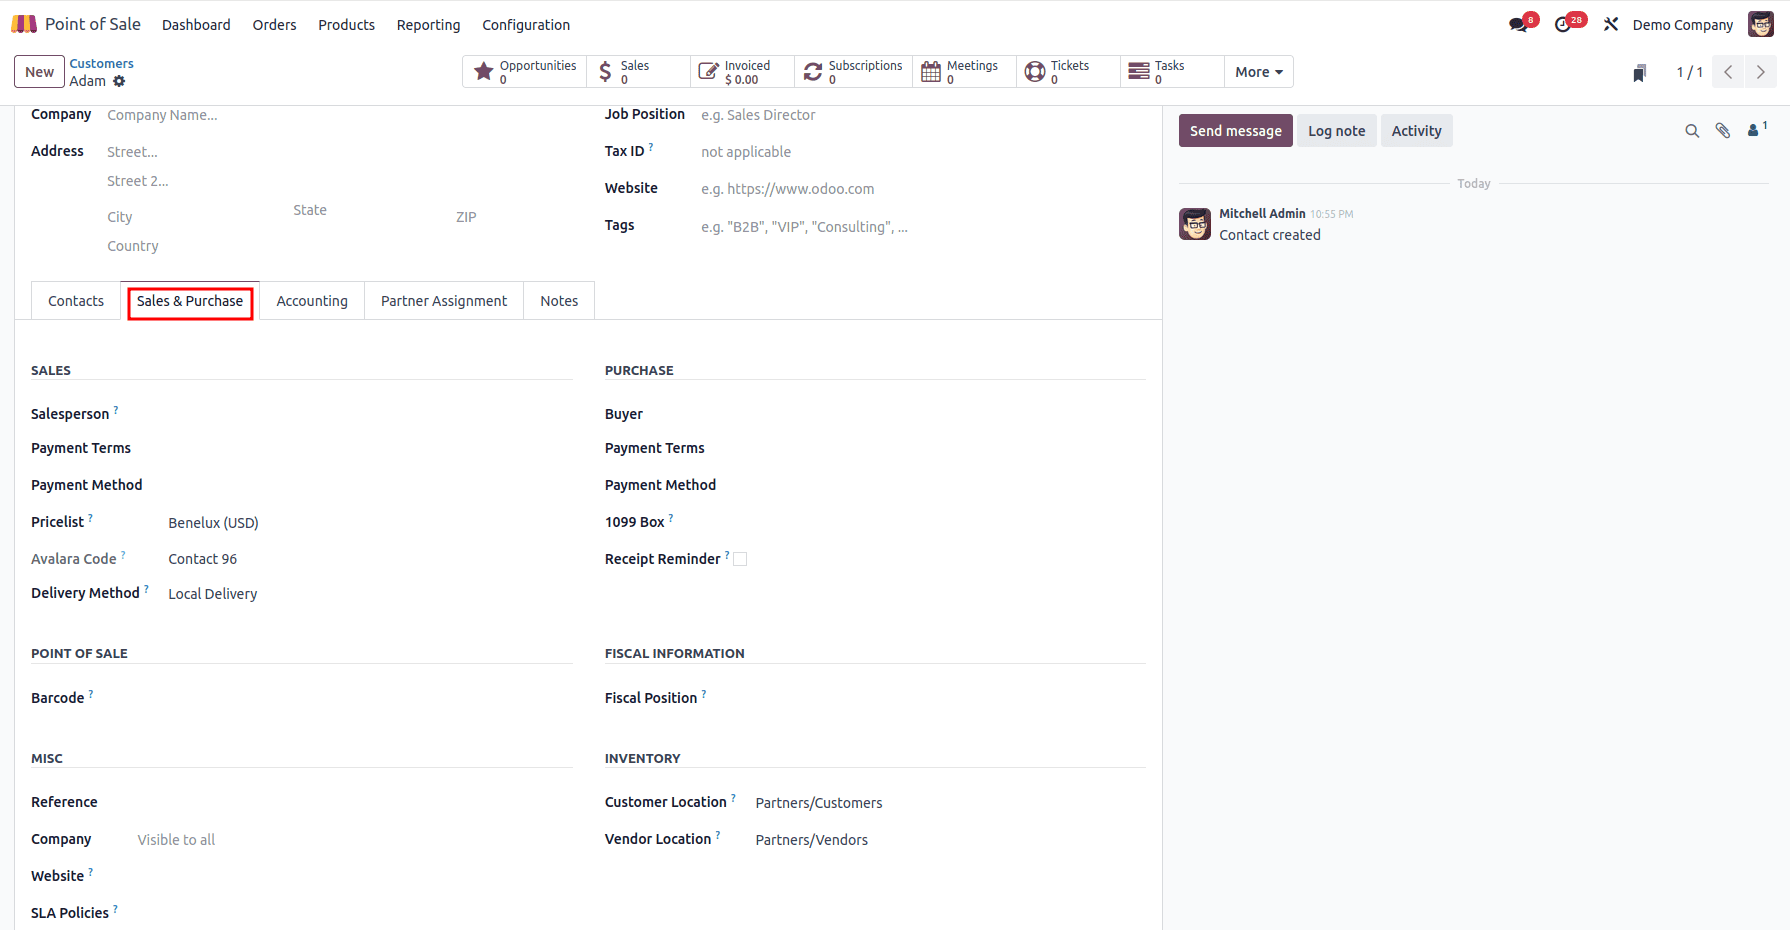
Sales & Purchase Tab
This tab allows you to enter key transactional and logistical preferences for a customer, including payment options, delivery methods, PoS identifiers, and tax configurations. The tab is divided into several sections:
- Sales: Here, you can configure the sales-related settings for the customer. Assign a Salesperson, set Payment Terms, select an applicable Pricelist, define the Avalara Tax Code, and choose the preferred Delivery Method for sales orders.
- Purchase: This section enables configuration for purchases from the customer, particularly in a B2B context. Specify a Buyer, set Payment Terms, define the Payment Method, and enable Receipt Reminders.
- Point of Sale: You can associate a Barcode with the customer to streamline identification in Point of Sale transactions.
- Fiscal Information: Assign the customer’s Fiscal Position, which helps apply the correct tax mapping rules based on their region or tax structure.
- Miscellaneous: Use this section to input additional business identifiers and references such as Company ID, Citizen ID, Reference, Website, or any other useful internal or external data points.
- Inventory: Use this section to add stock locations used as destination and source locations when sending or receiving goods to the contact.
Accounting Tab
The Accounting tab in the contact form of Odoo 18 is where you configure financial and invoicing settings specific to a customer or vendor. These settings impact how the system handles transactions, accounting entries, and invoice follow-ups for the selected contact.
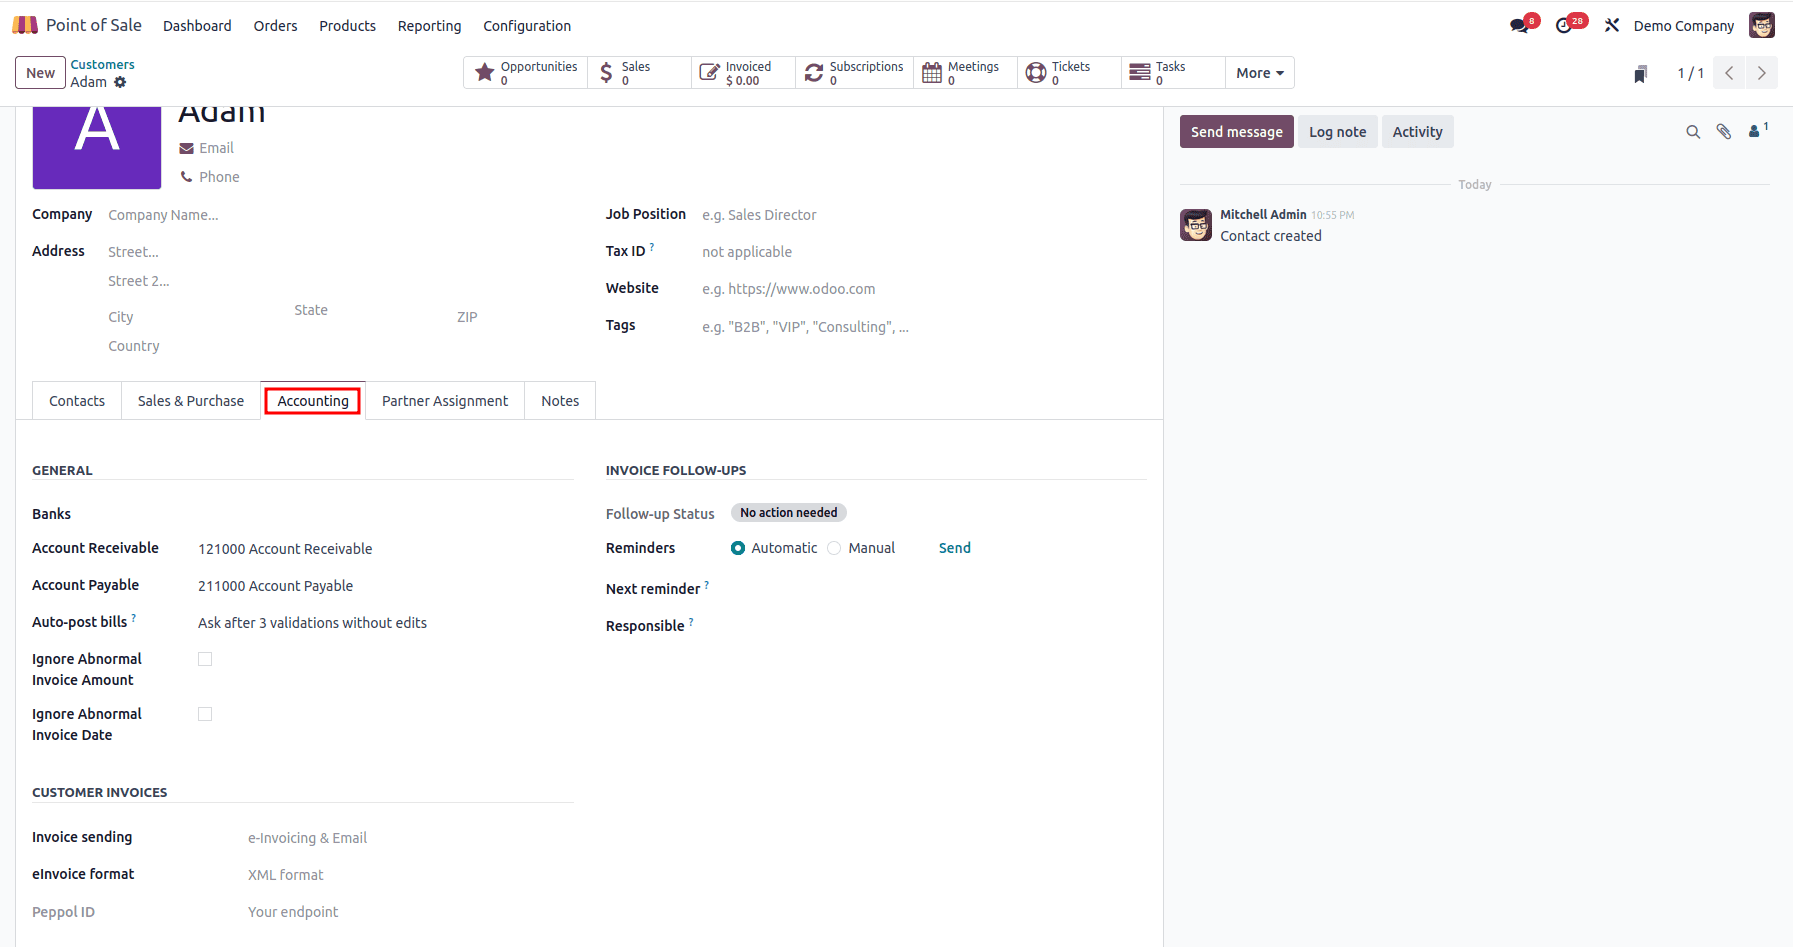
- Banks: Allows you to link one or more bank accounts to the customer for payment processing or wire transfers.
- Account Receivable: Specifies the account used to track receivables (money owed by the customer).
- Account Payable: Defines the account used for payables if this contact is also a supplier (money you owe them).
- Auto-post bills: Determines whether vendor bills from this contact should be auto-posted.
- Ignore Abnormal Invoice Amount: A checkbox to ignore automatic checks for invoice amounts that significantly deviate from expected values.
- Ignore Abnormal Invoice Date: Skips warnings for invoices with dates that differ from expected timelines (e.g., a backdated invoice).
Customer Invoices Section
This area focuses on how the customer receives invoices, especially relevant for companies using electronic invoicing systems.
- Invoice Sending: Indicates the method of delivery (e.g., e-Invoicing & Email). Combines traditional and electronic methods.
- eInvoice Format: Specifies the format used for sending e-invoices (e.g., XML format), depending on the regional or national standards (like PEPPOL, Factur-X, etc.).
- Peppol ID: Used when sending invoices through the PEPPOL network, this field stores the endpoint identifier of the customer. This ensures compliance with e-invoicing regulations in many countries.
Invoice Follow-Ups Section
This section is key to managing overdue payments and keeping your receivables healthy.
- Follow-up Status: Shows the current dunning status of the customer
- Reminders: Allows you to choose between Automatic or Manual reminders for unpaid invoices. When set to automatic, Odoo will follow a pre-configured reminder schedule.
- Send: A button to immediately send a follow-up reminder to the customer if necessary.
- Next Reminder: Displays the date on which the next reminder will be sent, based on the payment follow-up rules.
- Responsible: Assigns an internal user (e.g., an accountant or sales rep) who is accountable for tracking and managing this customer’s overdue invoices.
Creating Order from POS
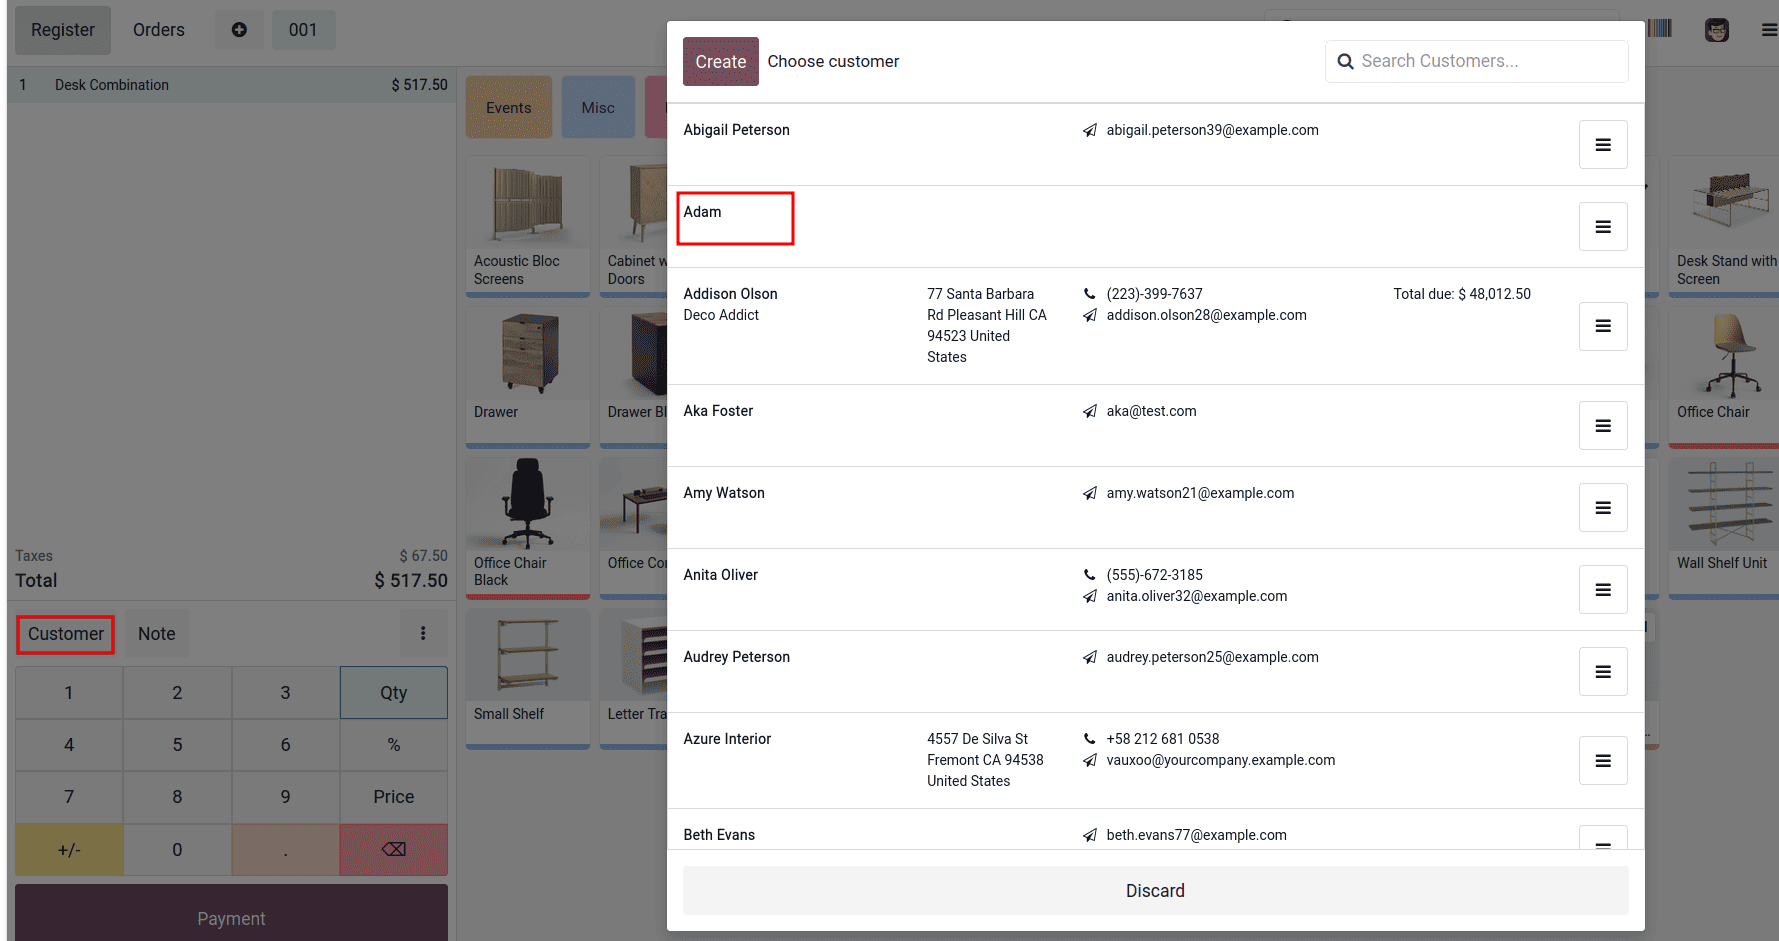
When initiating an order from the POS terminal, you can select the appropriate customer by clicking the ‘Customer’ button. This opens a popup displaying a list of existing customers. From here, you can either select a customer from the list or create a new one by clicking the ‘Create’ button.
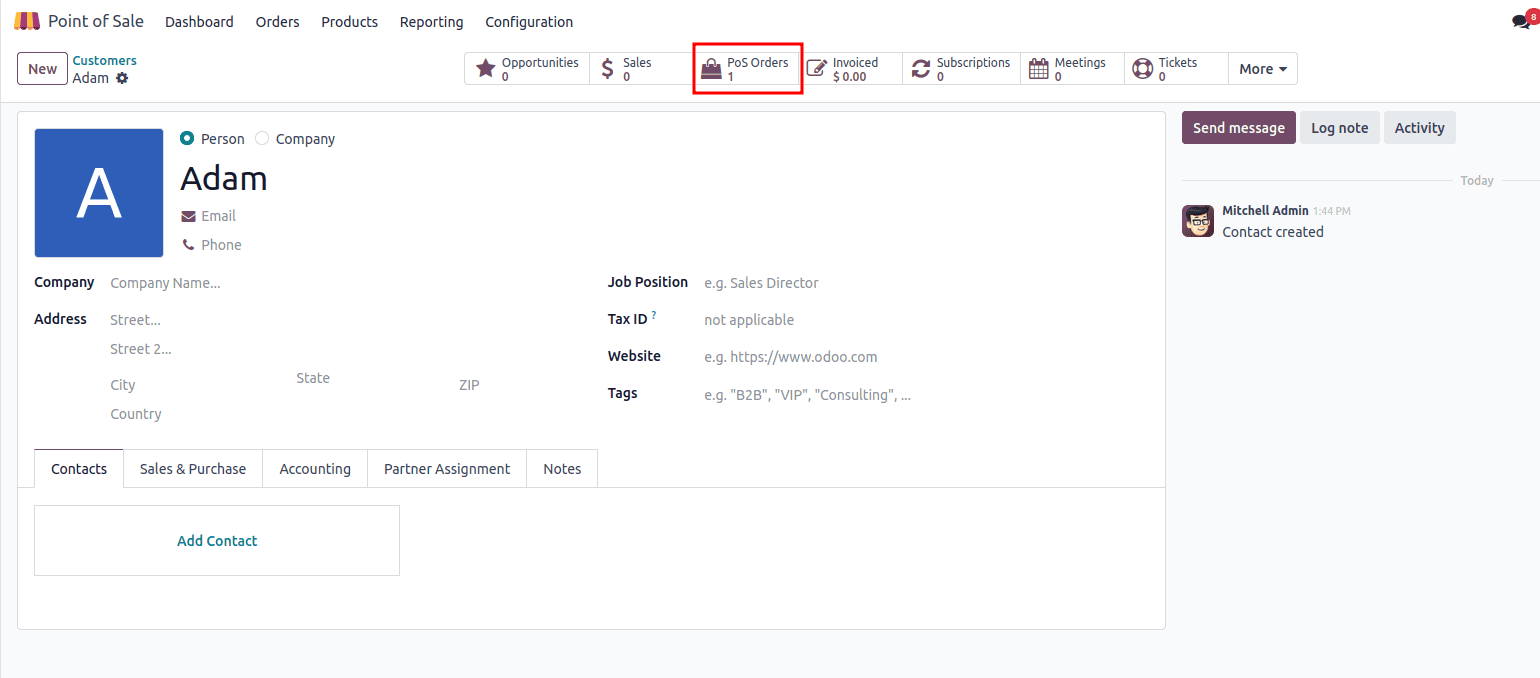
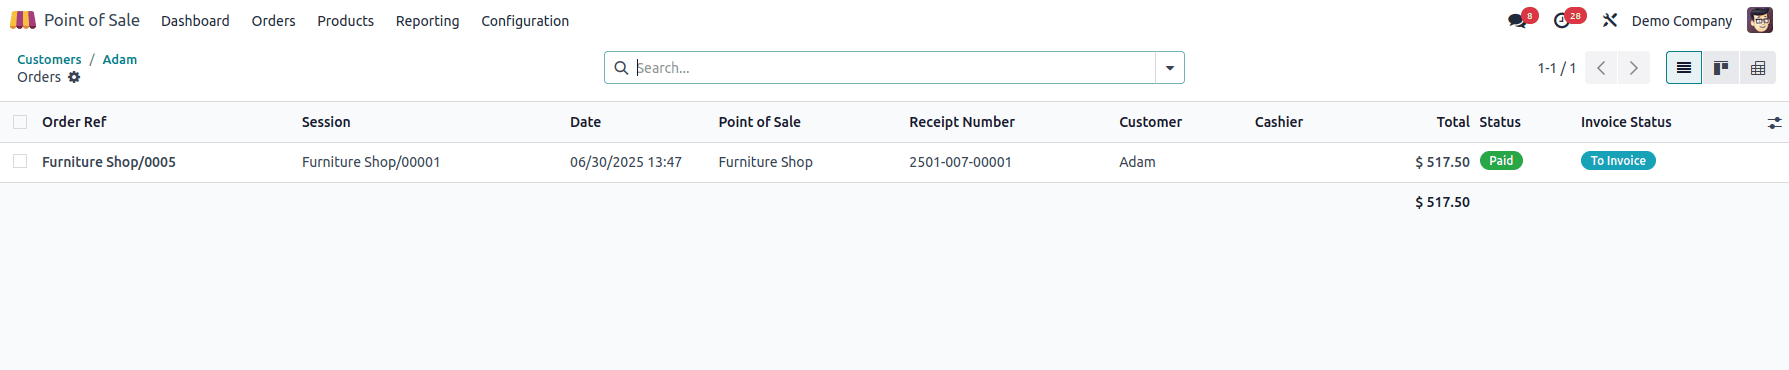
Once selected, the customer will be linked to the POS order. Later, you can easily track all orders associated with that customer by navigating to their contact profile, where you'll find a smart tab labeled ‘POS Orders’ displaying their complete transaction history.
In short, Odoo 18’s Point of Sale makes it easy to manage customers by keeping all their details, from contact information to sales, payment, and invoicing preferences, in one place. You can add new customers directly from the POS, link them to orders, set up multiple addresses, and track their full transaction history. This seamless link between the POS and backend helps businesses work faster, stay organized, and provide better, more personalized service to their customers.
To read more about How to Manage Customers with Odoo 17 POS, refer to our blog How to Manage Customers with Odoo 17 POS.