The Shop Floor module in Odoo 18 Manufacturing offers a cutting-edge, tablet-friendly interface for real-time production management and monitoring. From the shop floor, it enables operators to view work orders, initiate and terminate operations, and report production activity. By recording real-time data at the workstation, including time spent, materials consumed, and quality checks, this module increases accuracy. Supervisors can also use it to monitor each work center's progress and promptly spot any delays or bottlenecks. Throughout the production process, materials availability and adherence to requirements are guaranteed by integration with inventory and quality modules. All things considered, the Shop Floor module improves manufacturing process visibility, efficiency, and control.
The Shop Floor module in Odoo 18 Manufacturing gives operators a clear, real-time perspective of the tasks they are assigned, which aids in the efficient completion of work orders. It guarantees precise time monitoring and status updates by enabling employees to begin, halt, and complete work orders straight from the interface. To maintain production standards, the system also makes it easier to consume materials and do quality checks while the operation is underway. The Shop Floor module guarantees the timely and accurate completion of work orders by simplifying communication and lowering manual errors.
In this blog, we'll explore how the Shop Floor module in Odoo 18 can help you efficiently manage manufacturing work orders. Operators can initiate, monitor, and complete work orders in real-time using the module's user-friendly interface. Through operational simplification, error reduction, and improved shop floor visibility, production efficiency is increased.
To do this, the user should first enable the Shop Floor option from the settings. Go to the Configuration menu and select Settings. Under the Operations section, enable the Shop Floor, then save.

Let's create a new bill of materials for our new manufacturing process. Choose the bill of materials from the products menu. Then a list of bills of materials will be listed there. Either choose one or click on the New button to add a fresh one.
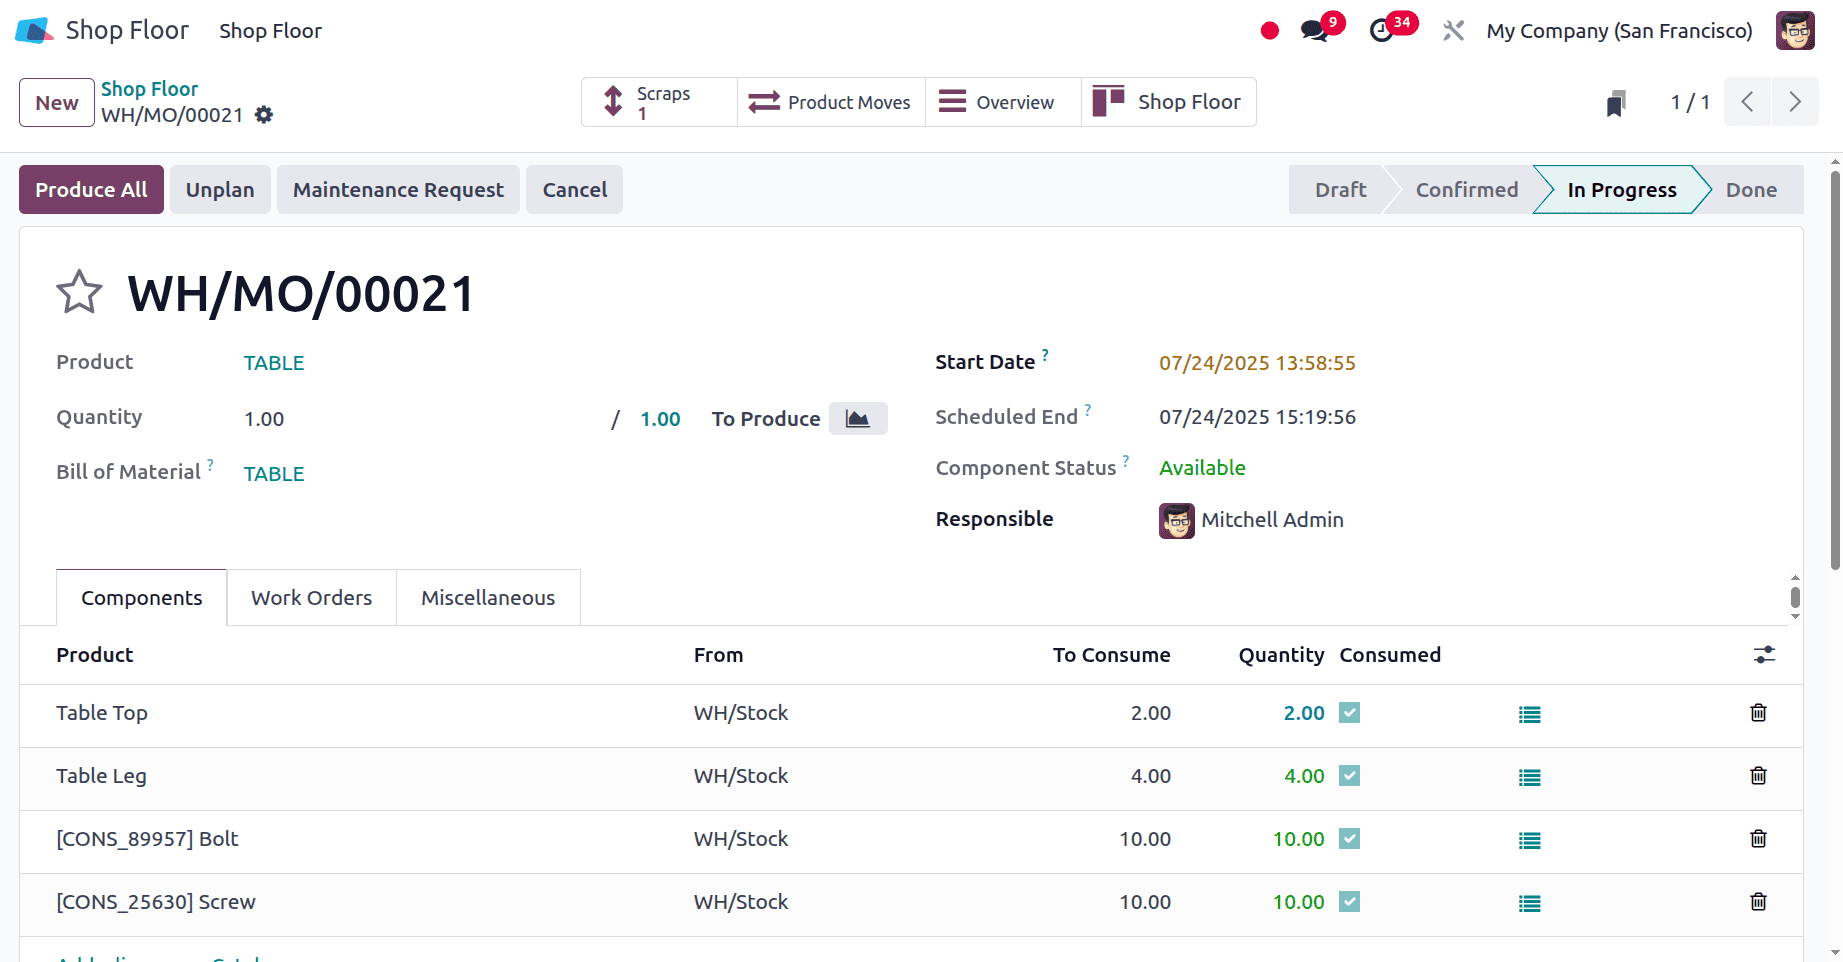
The screenshot below shows a bill of materials created for the Manufacturing Table. The components listed are Table Top, Table Leg, Bolt, and Screw.
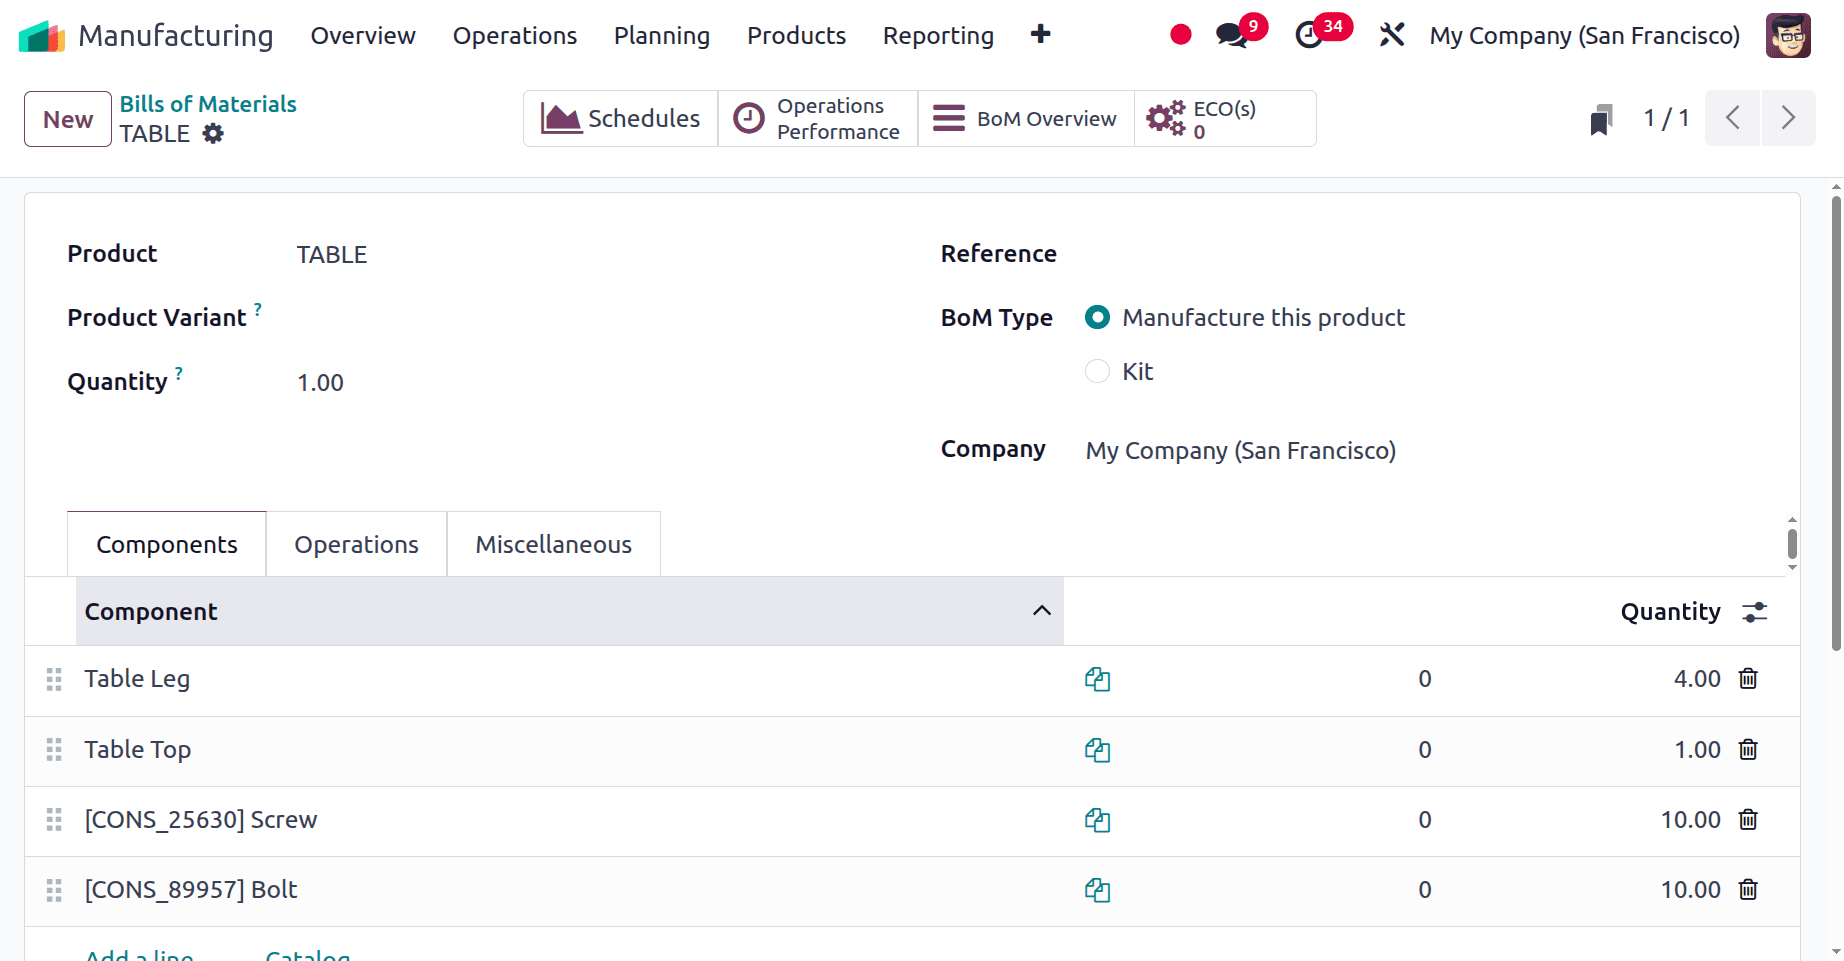
The next tab, named Operations, contains a list of work orders performed during the production of the Table.
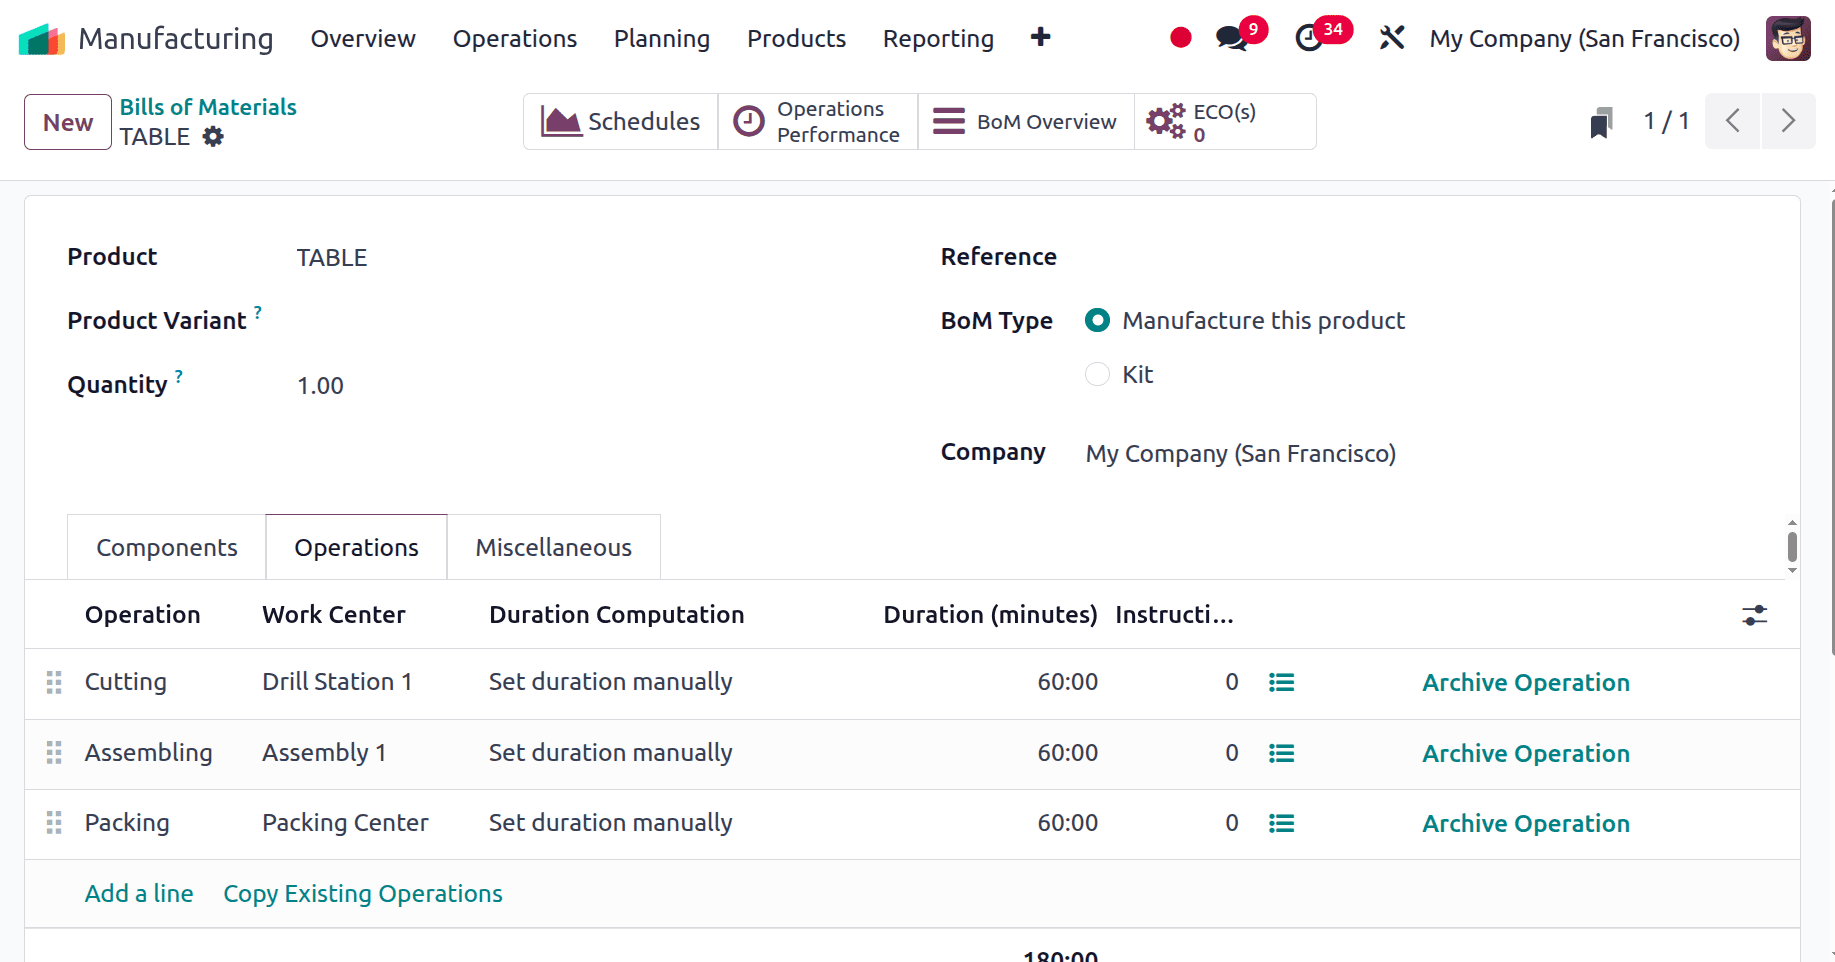
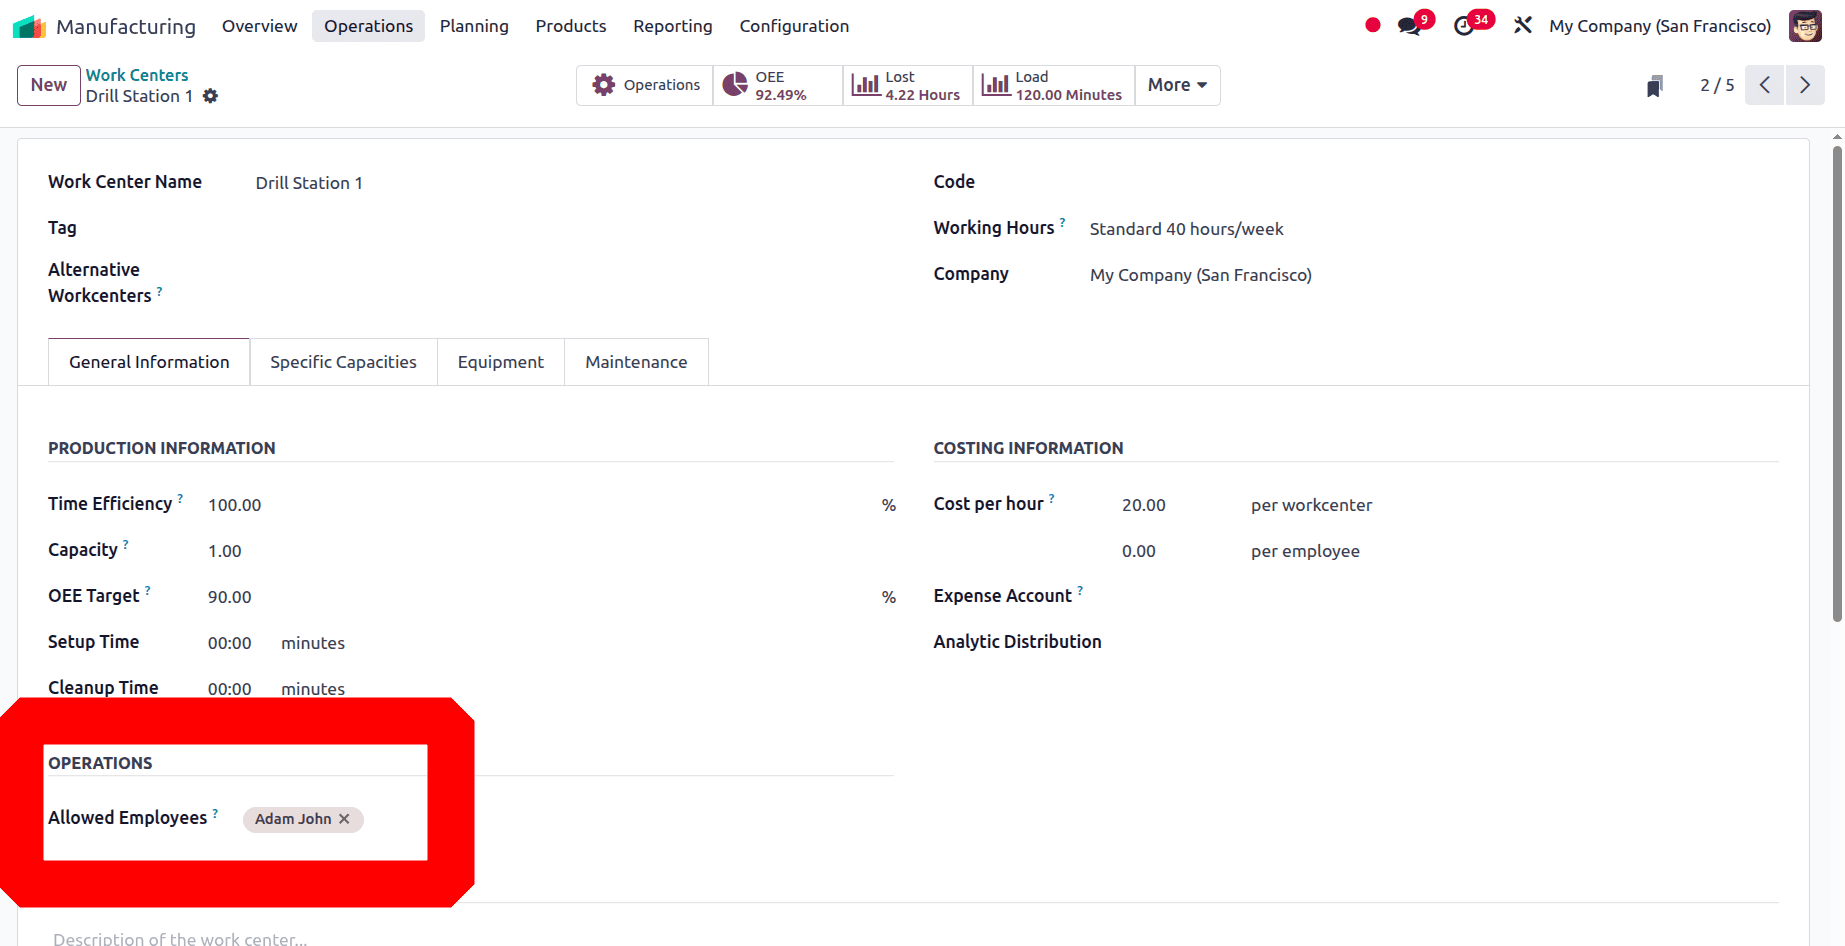
Here, the first operation is Cutting, which is performed inside the workcenter named Drill Station 1. The screenshot below shows the configuration of the workcenter.
Here, the workcenter is named Drill Station 1. Here, the operator of this workcenter is Adam John. This employee will handle all operations performed inside this work center.
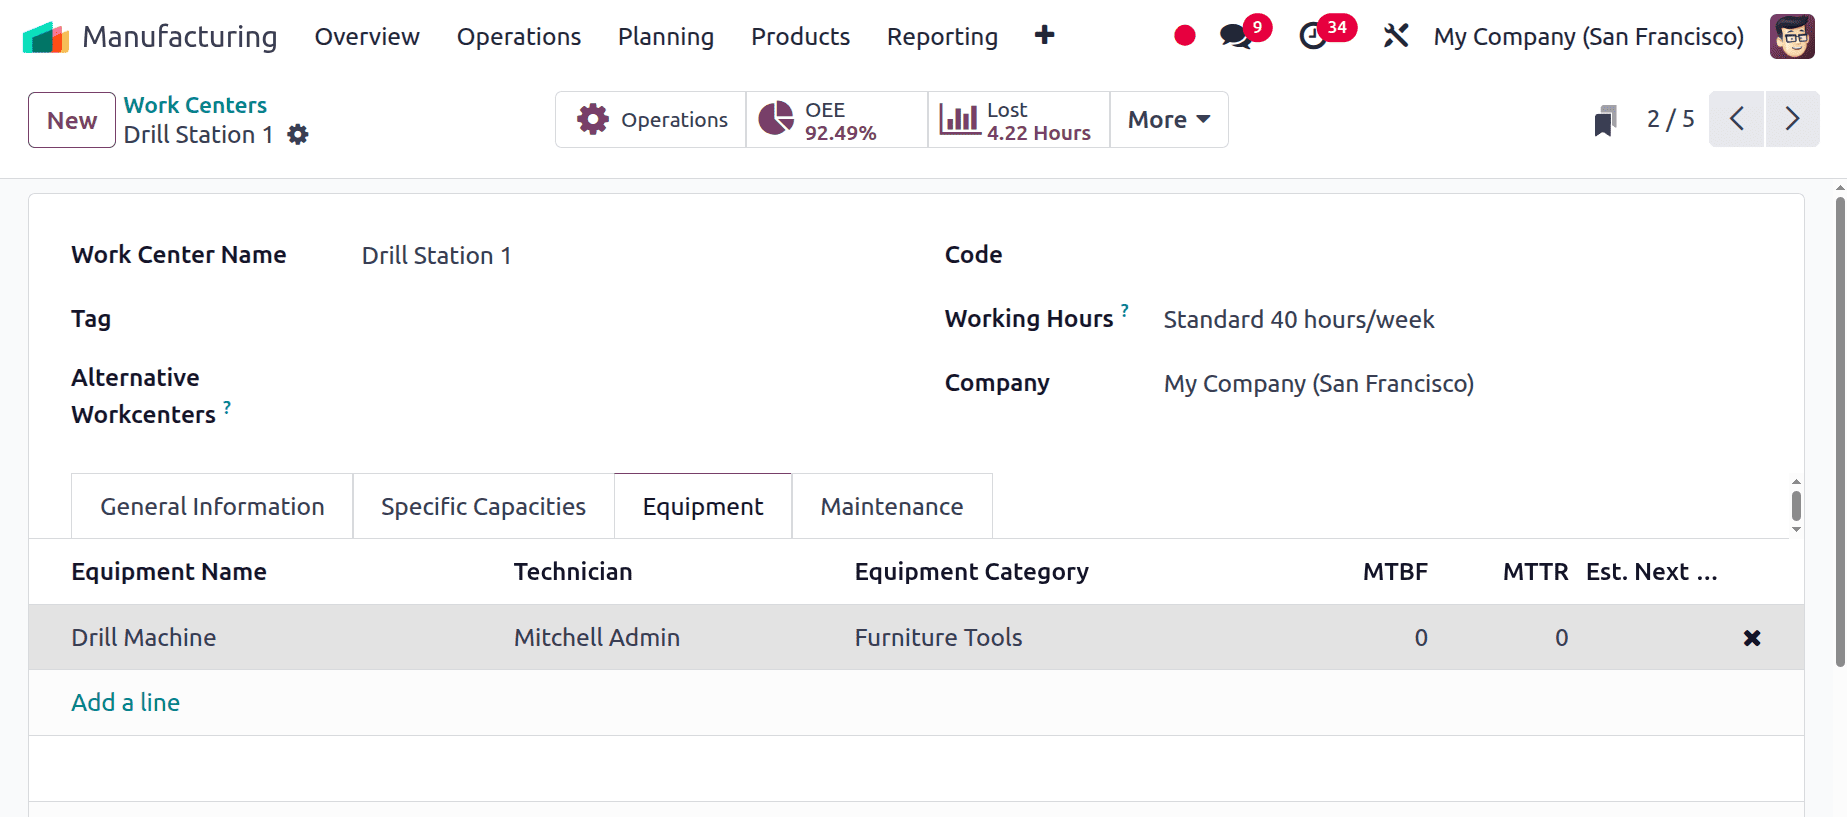
For completing the cutting operations, equipment is used. So the equipment can be added inside the Equipment tab of the Work Center as shown below.
The second operation is assembling, which will be performed inside the work center, Assembly 1. The operator of the work center is Mitchell Admin.

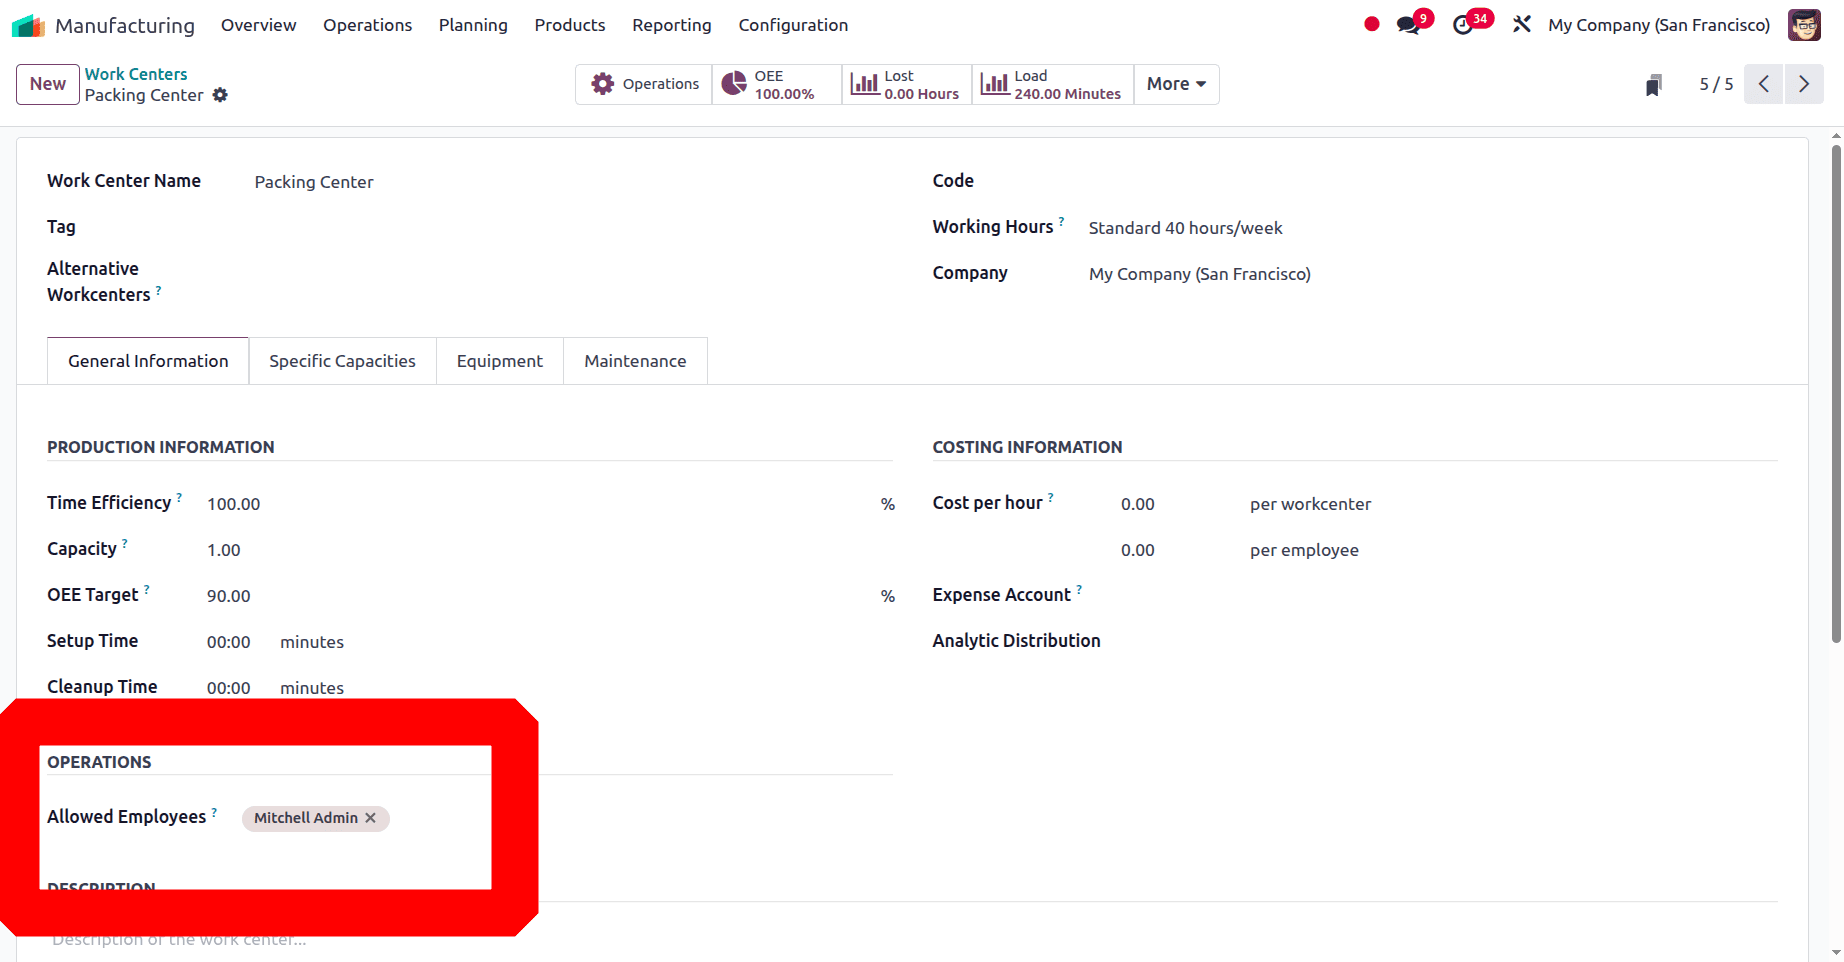
The final operation is packing, which the Packaging Center handles. The operator of the work center is Mitchell Admin.
Configuring Manufacturing Order
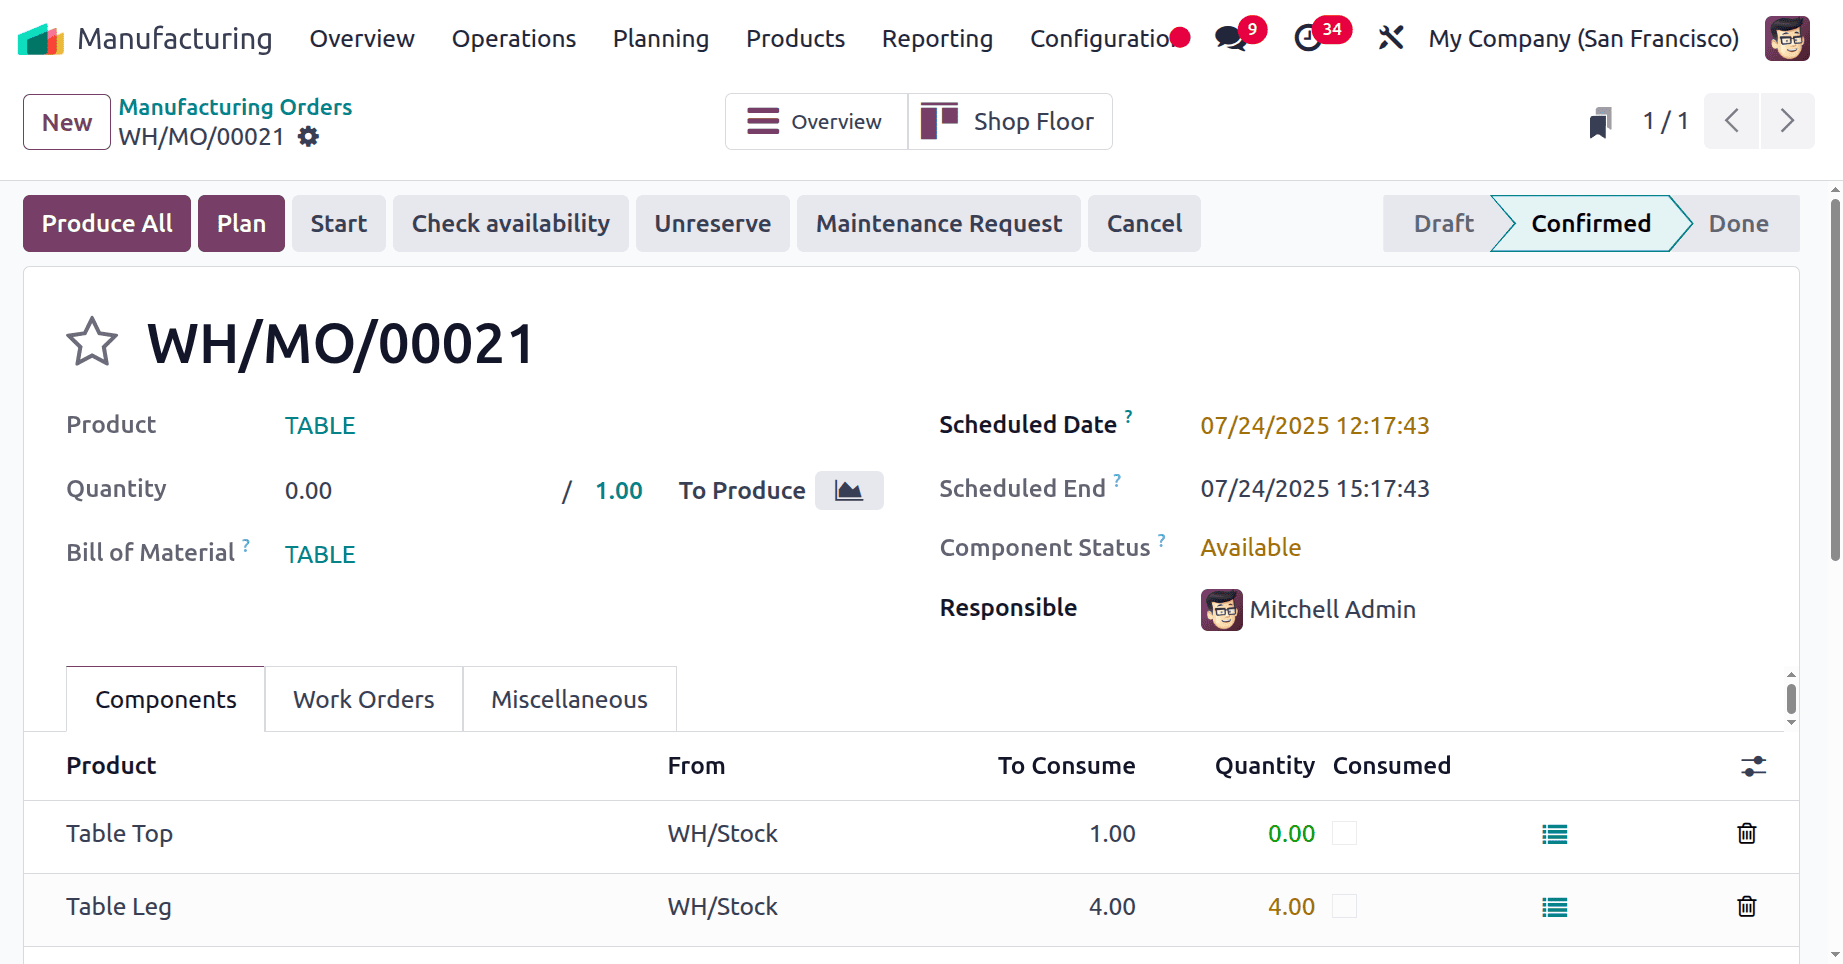
To create a manufacturing order, click on the Operations menu and choose Manufacturing Order. Then a list of manufacturing Orders is listed. Click on the New button to create a new production order.
Add the product and choose the bill of materials. Next, confirm the order and then click the Plan button to plan the work orders.
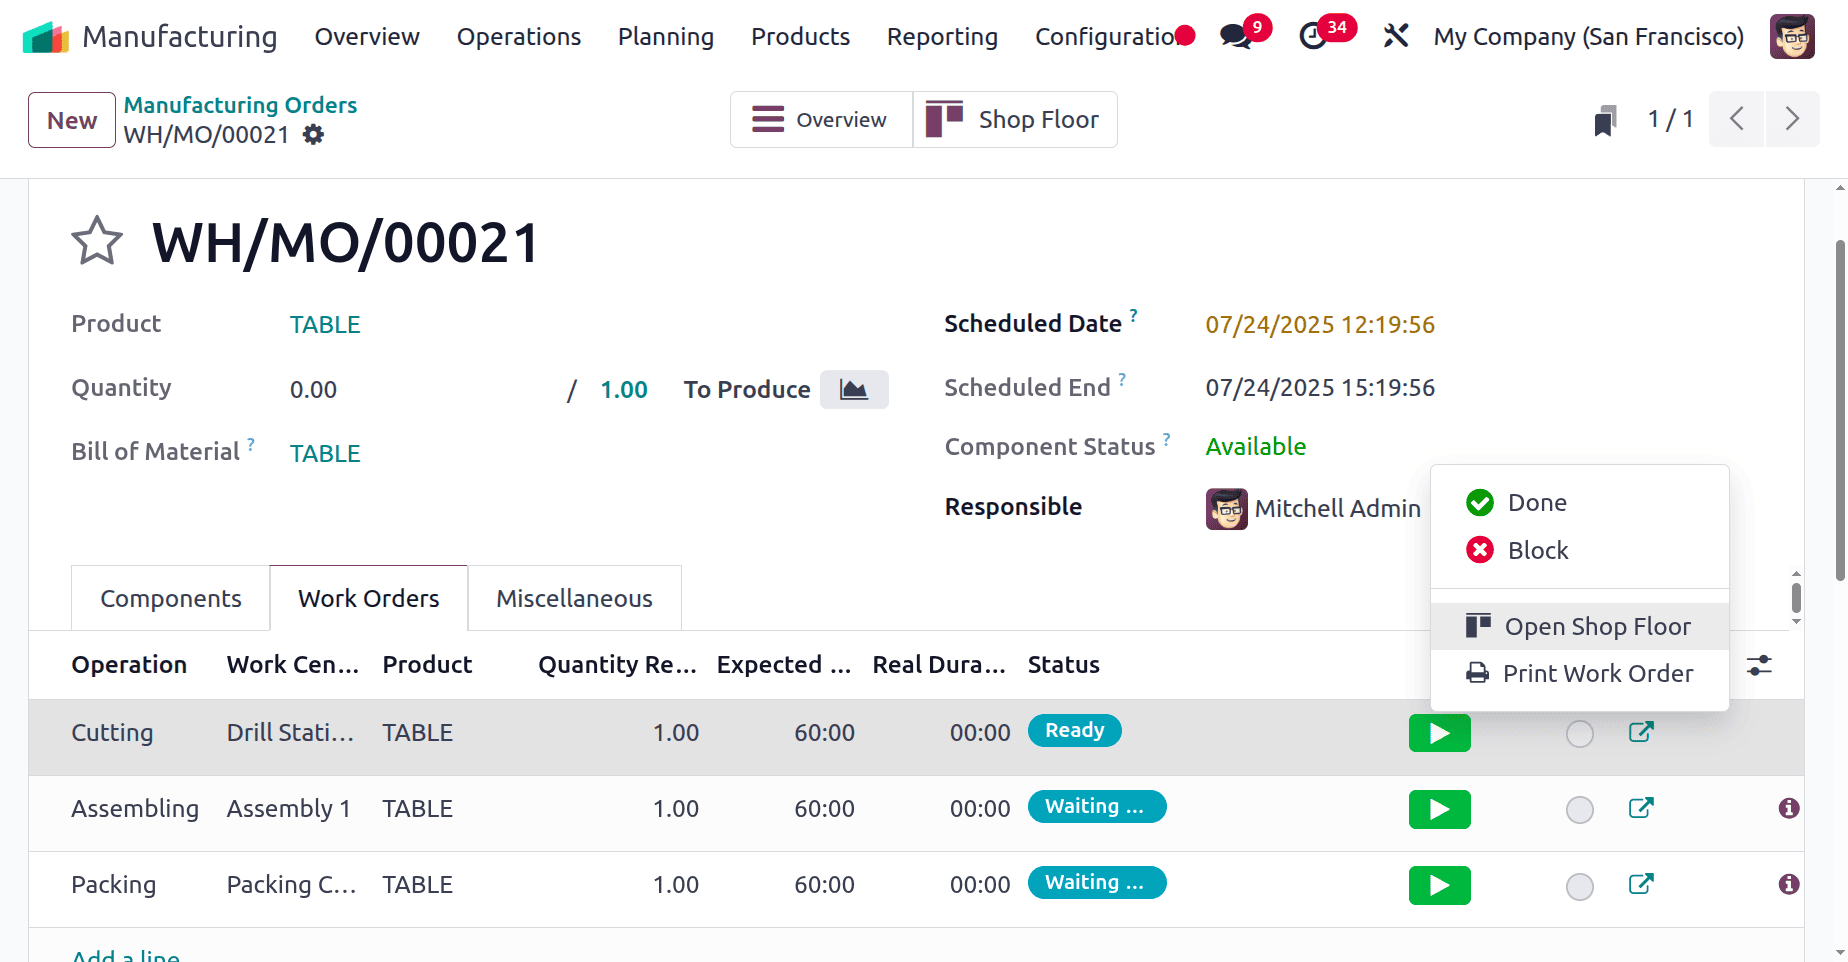
After clicking the Plan button, the first work order status changes to Ready, while the others remain Waiting for another work order. To open the Shop Floor, click on the Open Shop Floor, as shown in the screenshot below.
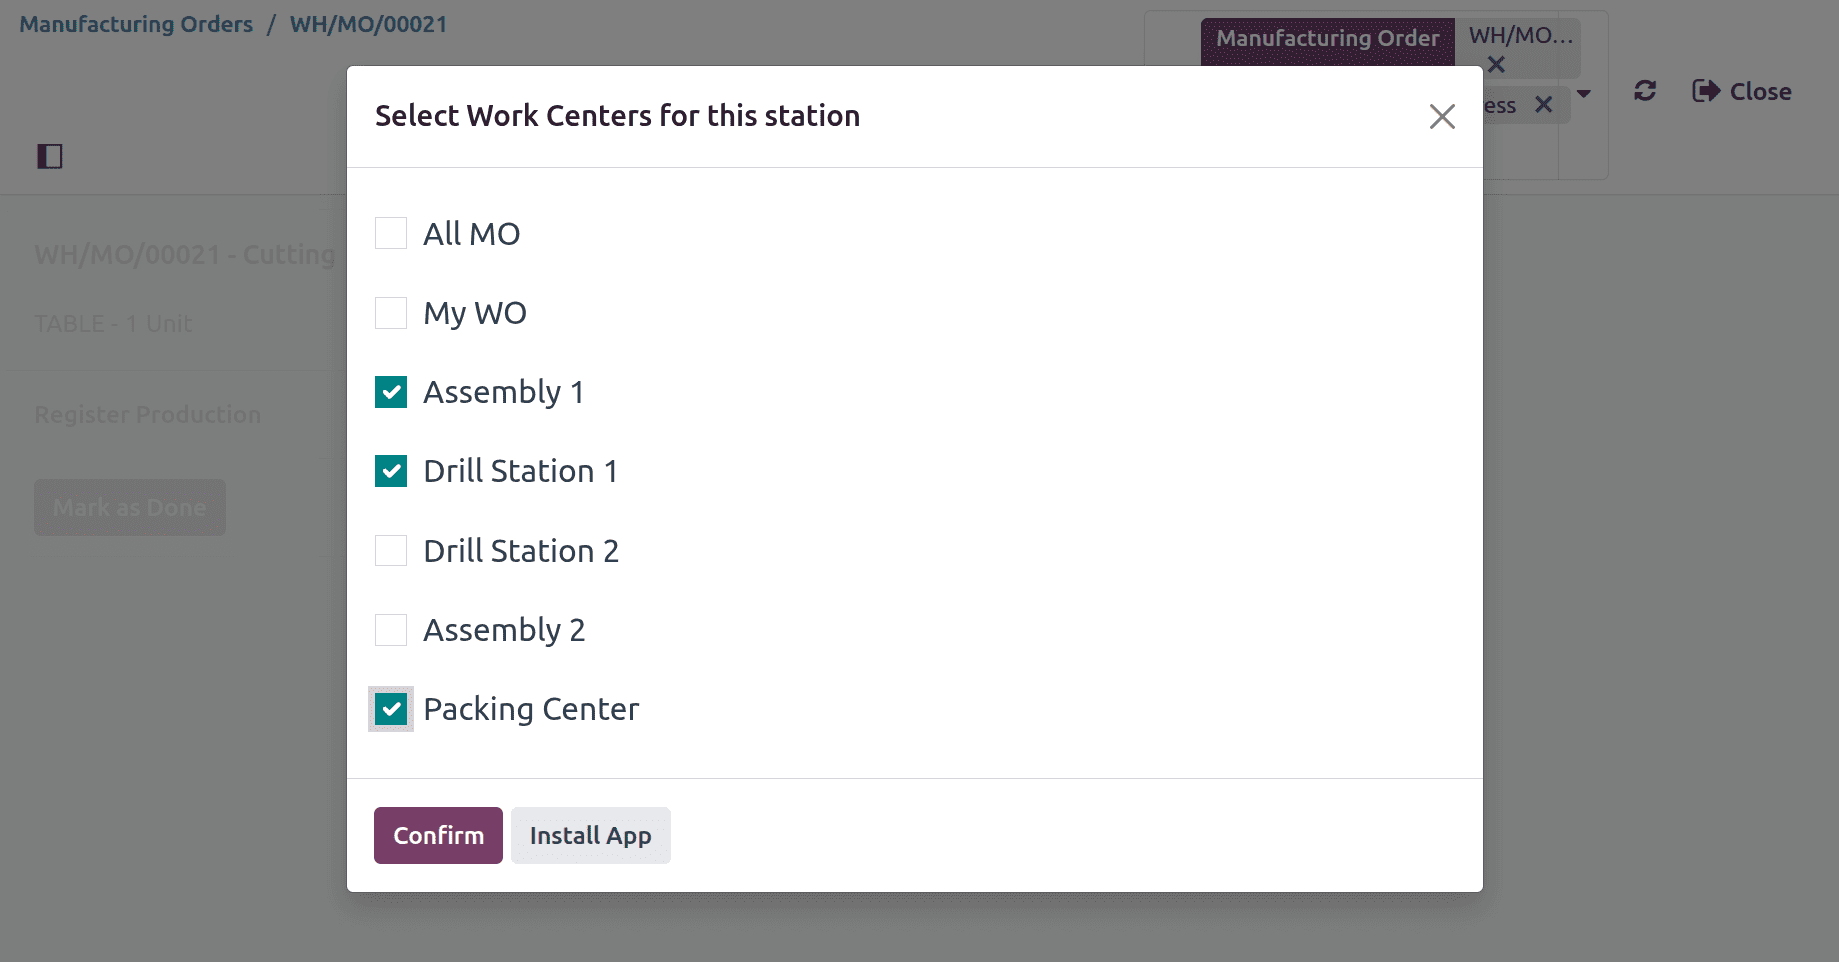
Then, a list of work centers appears; select the necessary ones. Here to complete the production process of the Table, the user needs three work centers: Drill Station 1, Assembly 1, and Packing Center. Select the three work centers and click on the Confirm button.
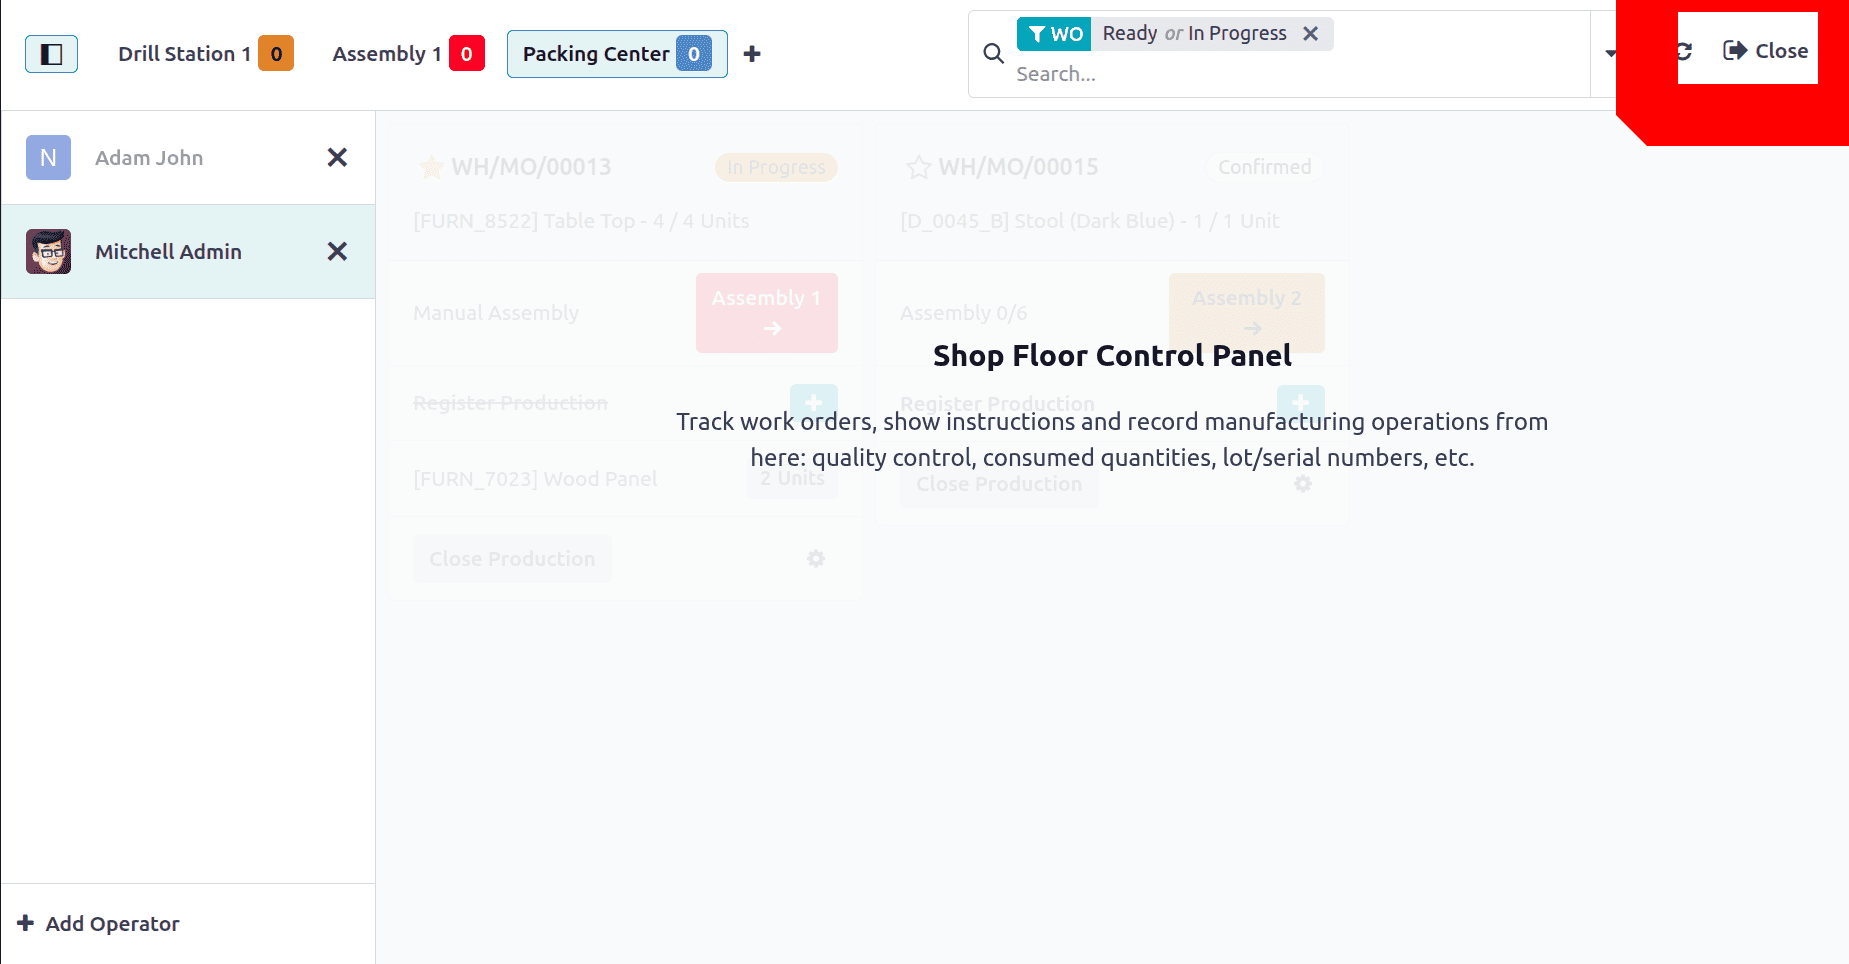
Managing Work Orders from the Shop Floor
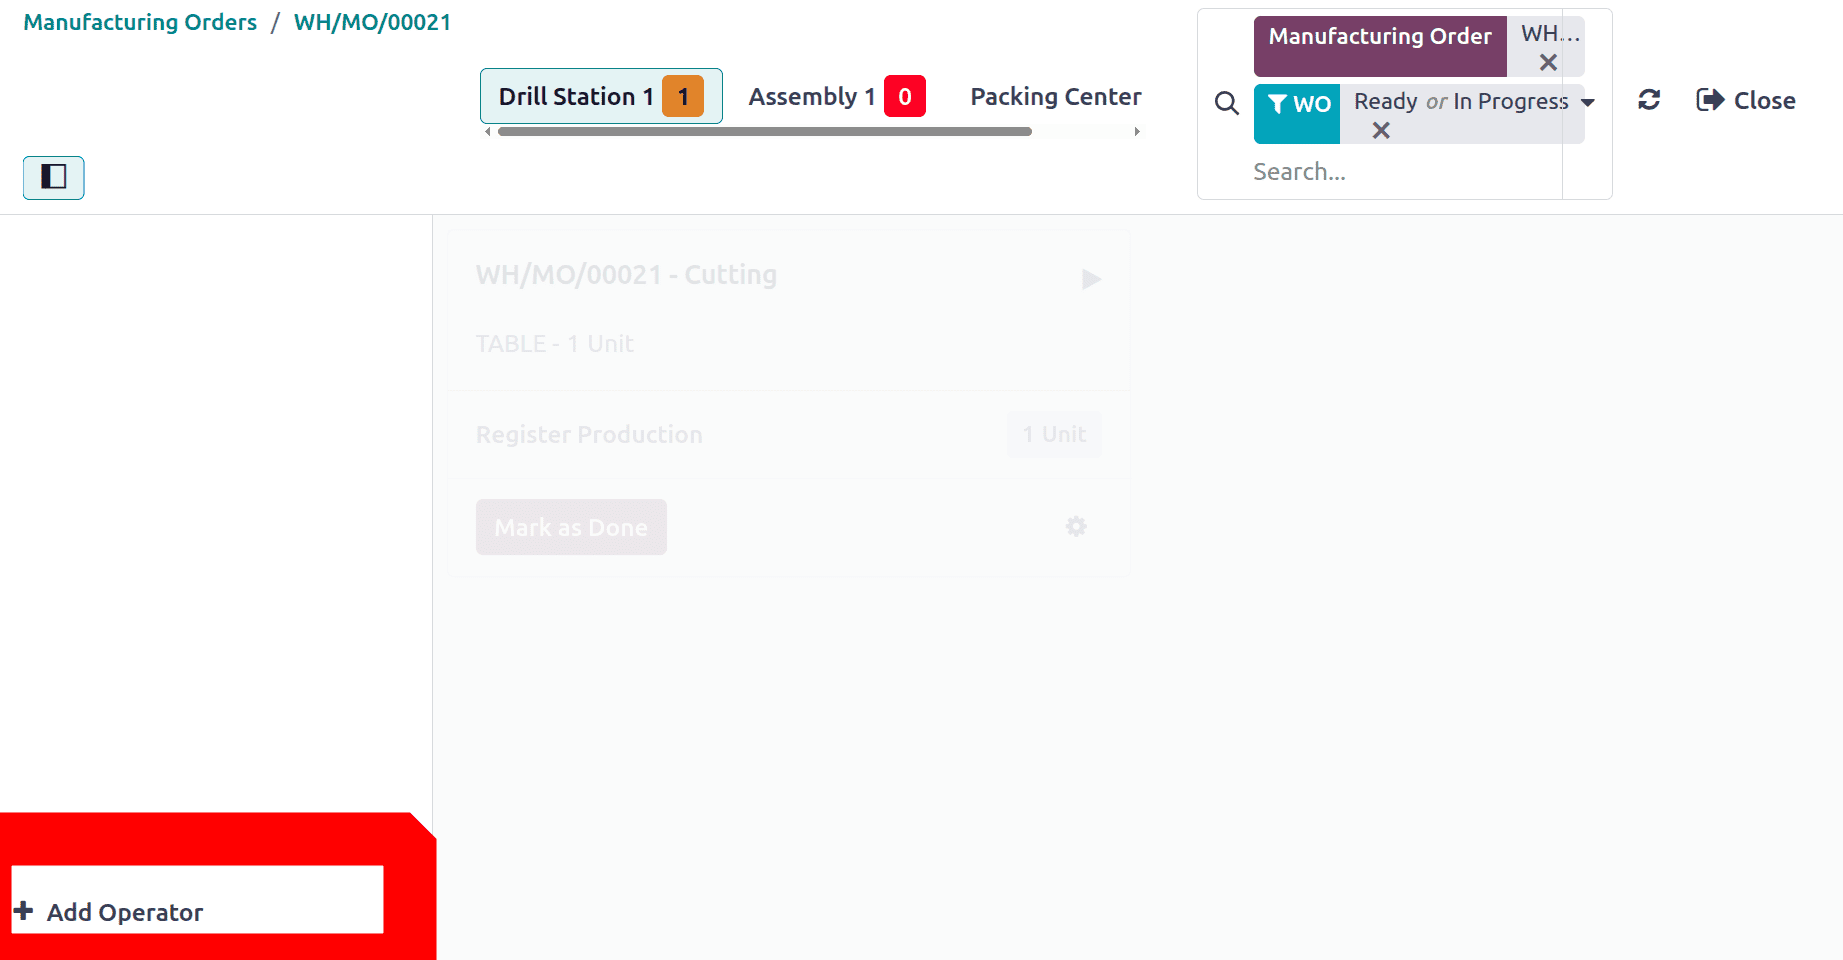
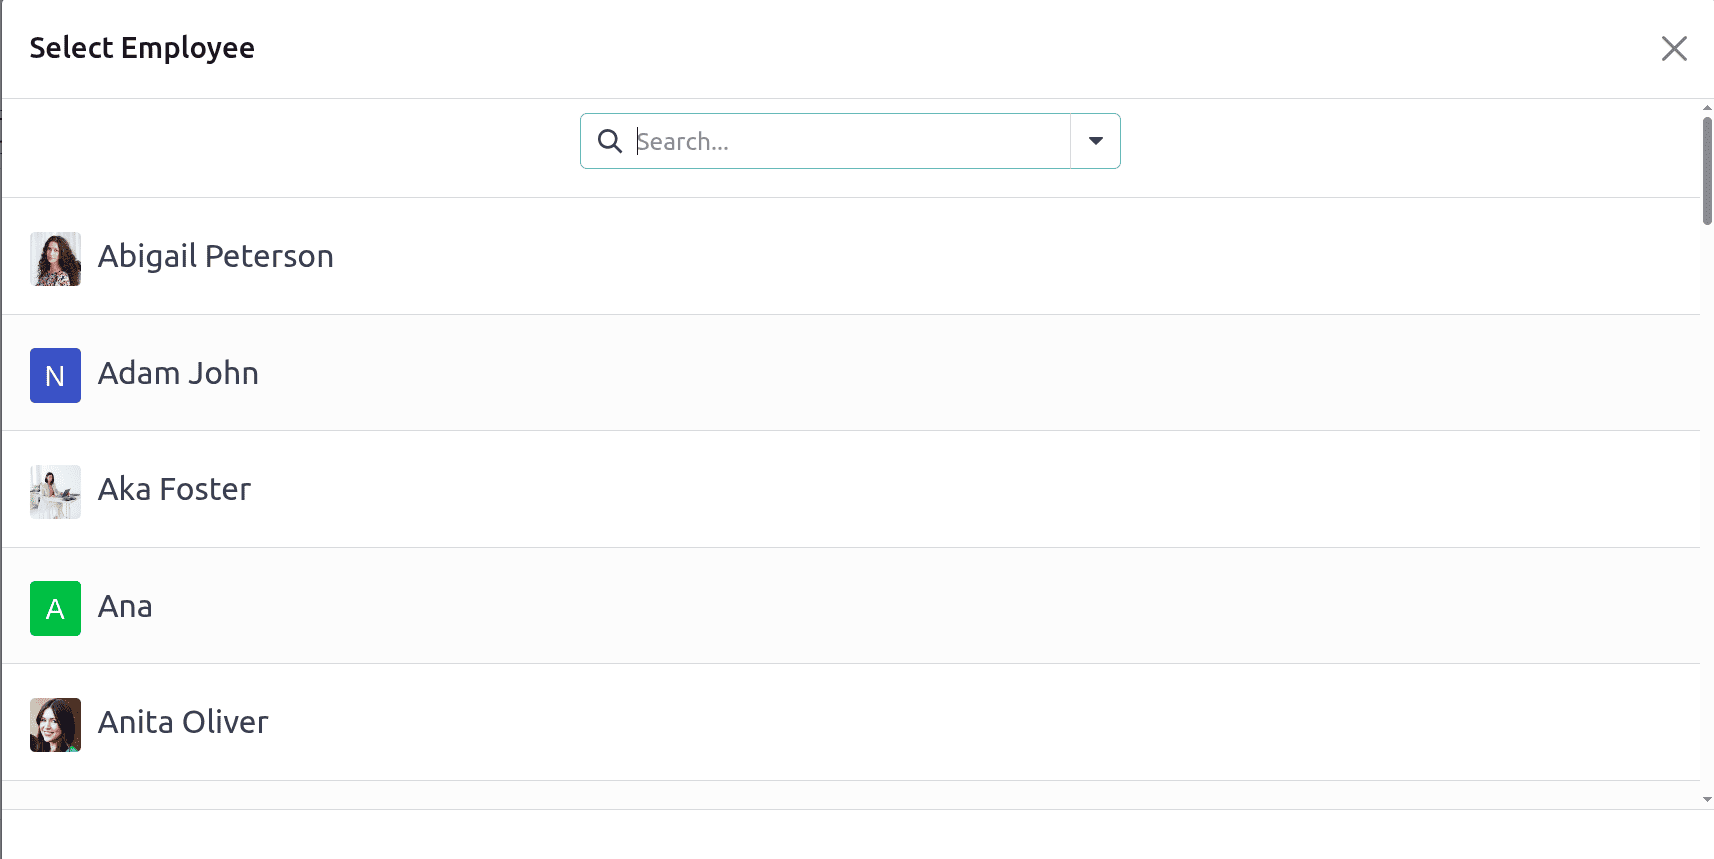
The opening screen of the Sh Floor is shown below. The operator needs to log in to the shop floor. To add an operator, click on the + Add Operator button placed on the left side of the screen.
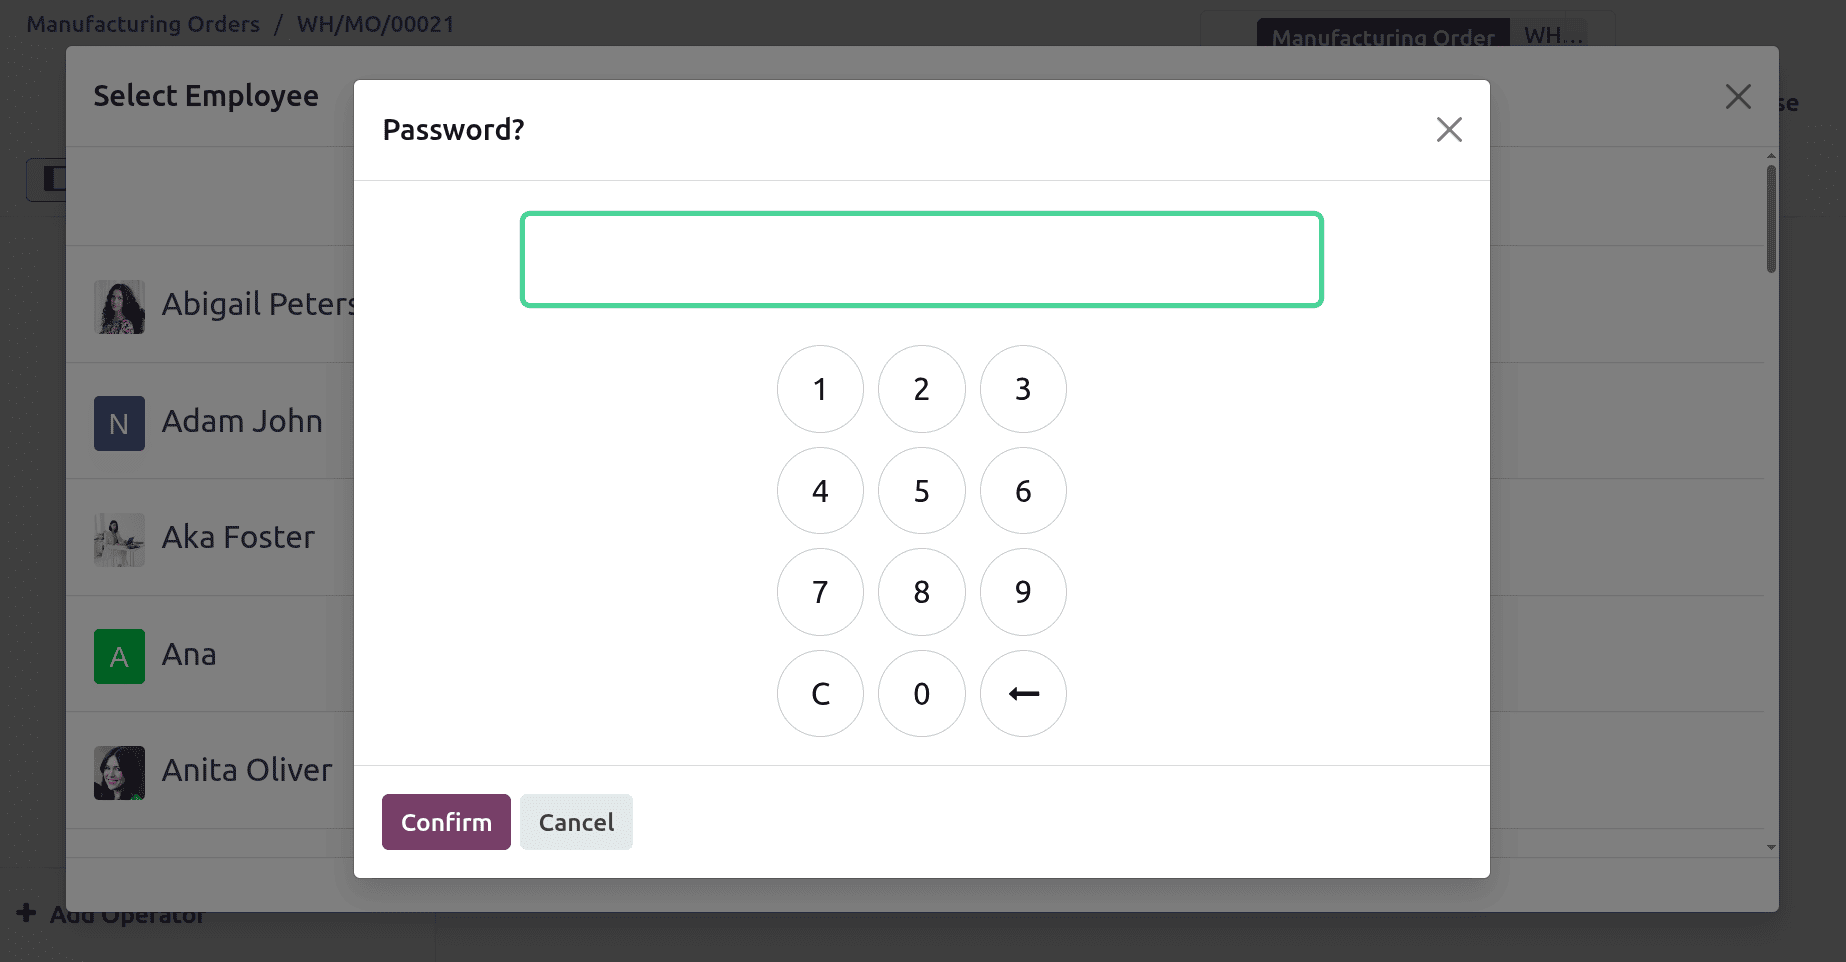
A list of employees is shown. Choose the employee first, then add the credentials to log in to the Shop Floor.
Every employee has separate credentials to log in. The password is set in the Employee form's settings tab.
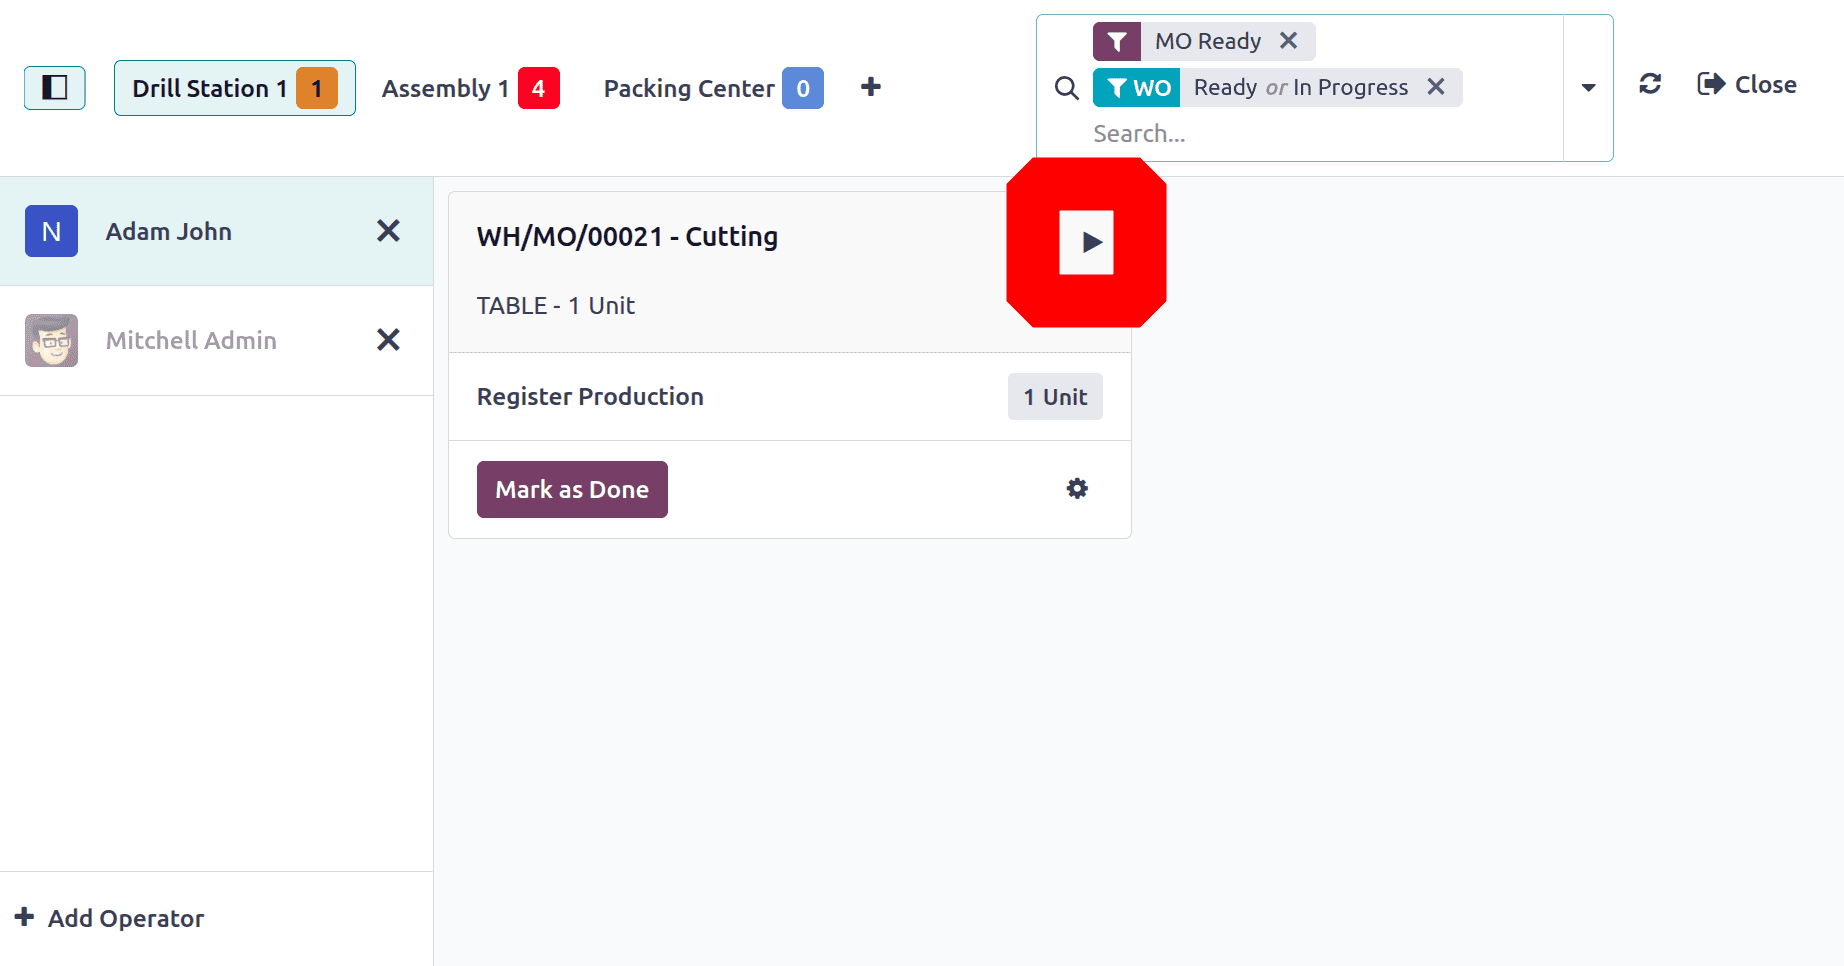
Once the employee is logged in, the operation can be seen as shown below. To start the operation, click on the arrow icon. Then the timer will run.
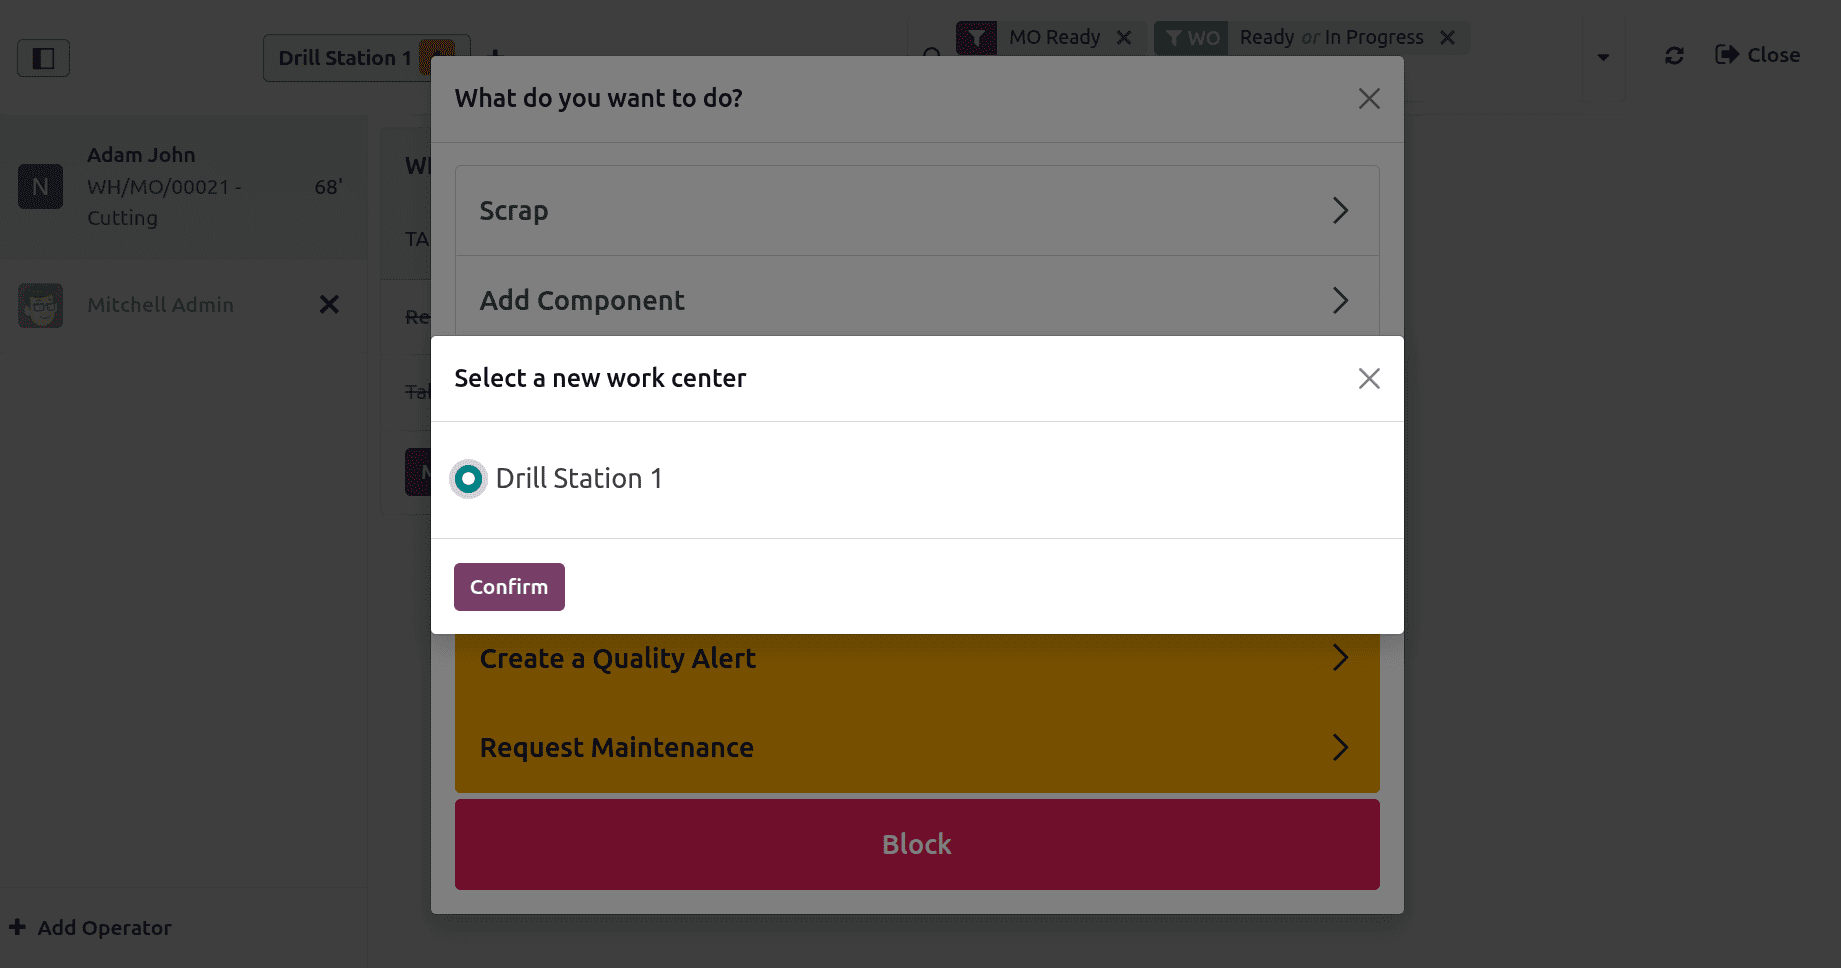
Using the gear icon reveals several options.
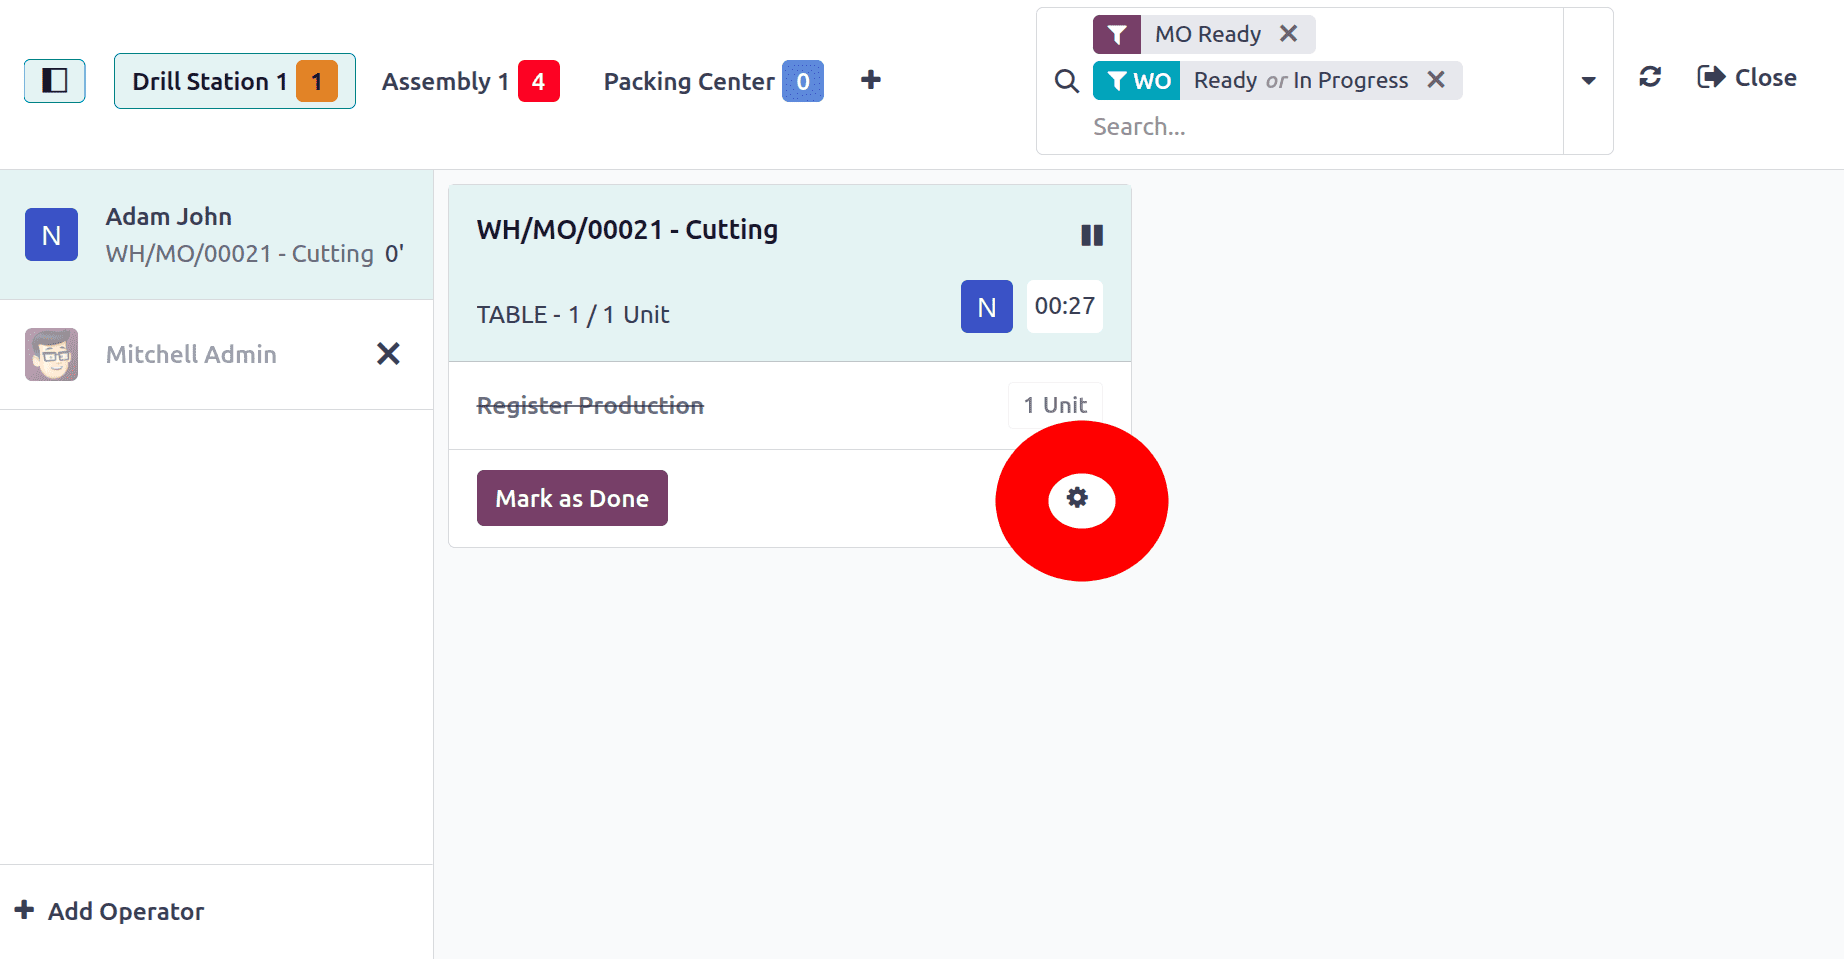
The options are listed there, including Add components, Scrap components, block work center, and add maintenance request. Let's check each one.
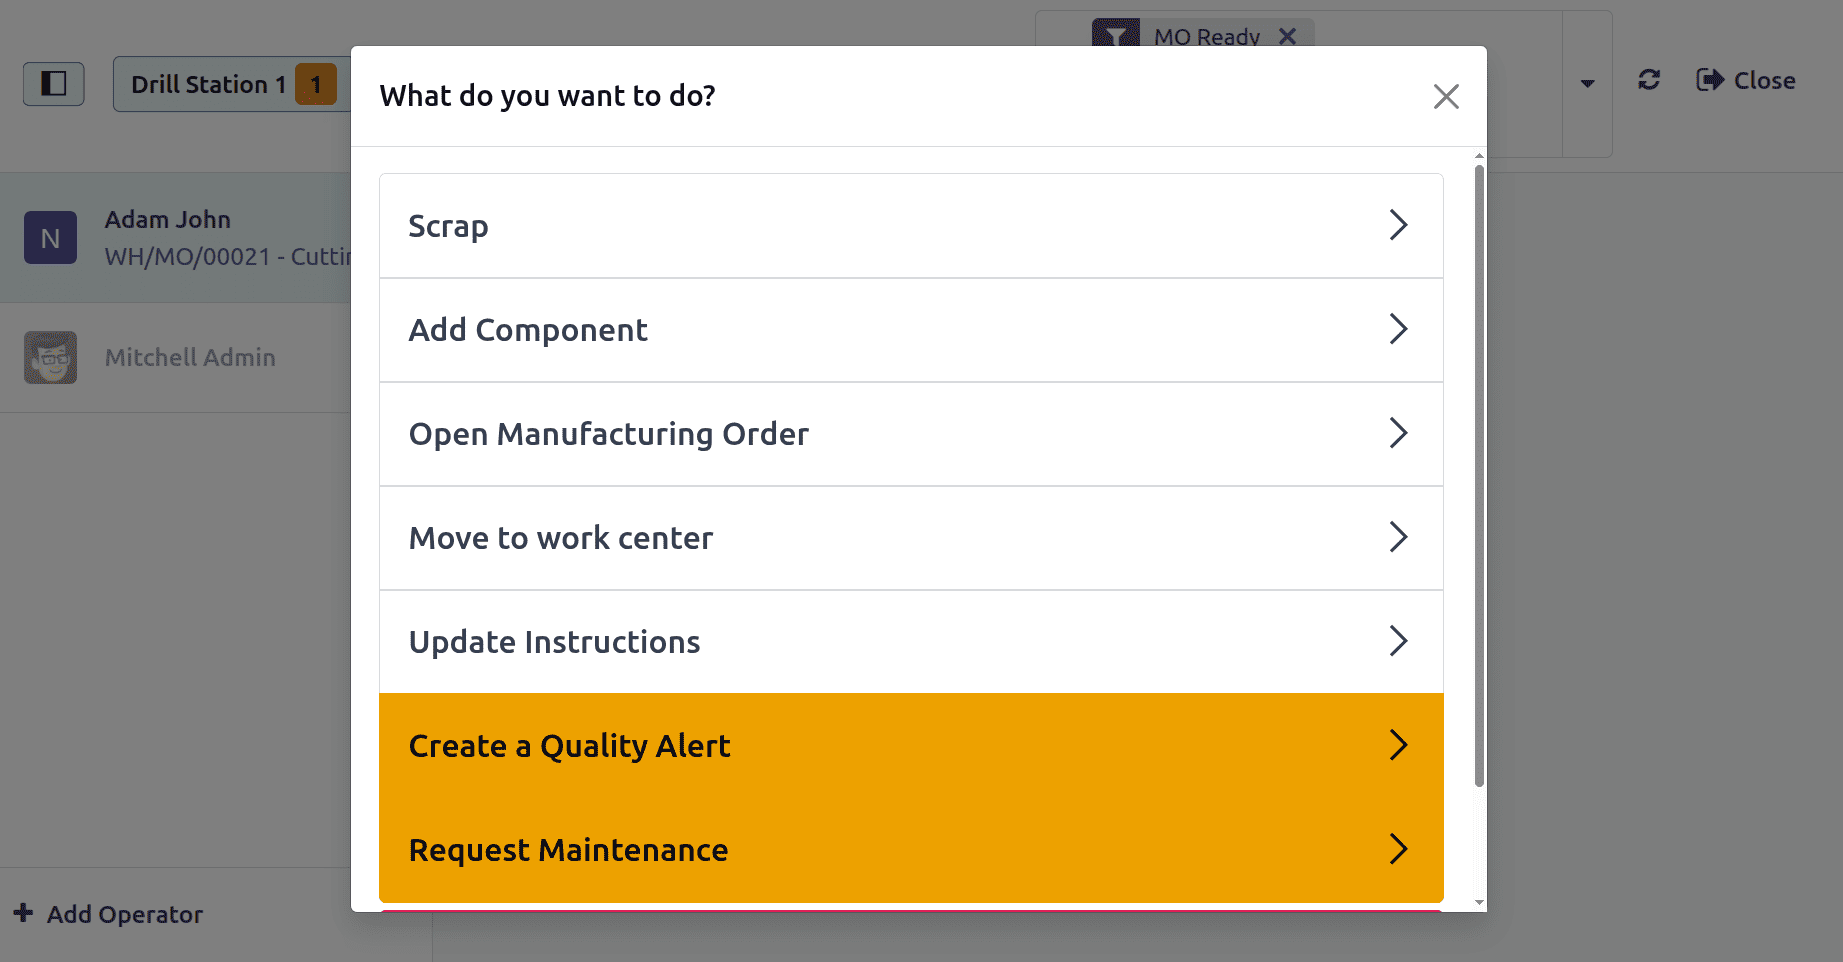
1. Scrap order
In Odoo 18, adding a scrap order during the manufacturing process facilitates the tracking and recording of items or materials that are faulty or unsuitable. Spotting problems in the production process helps with quality control and guarantees precise inventory levels.
Click on the first option, Scrap, then a new window will open as shown below. Add the product, quantities, Scrap Reason, source location, and destination location, etc.
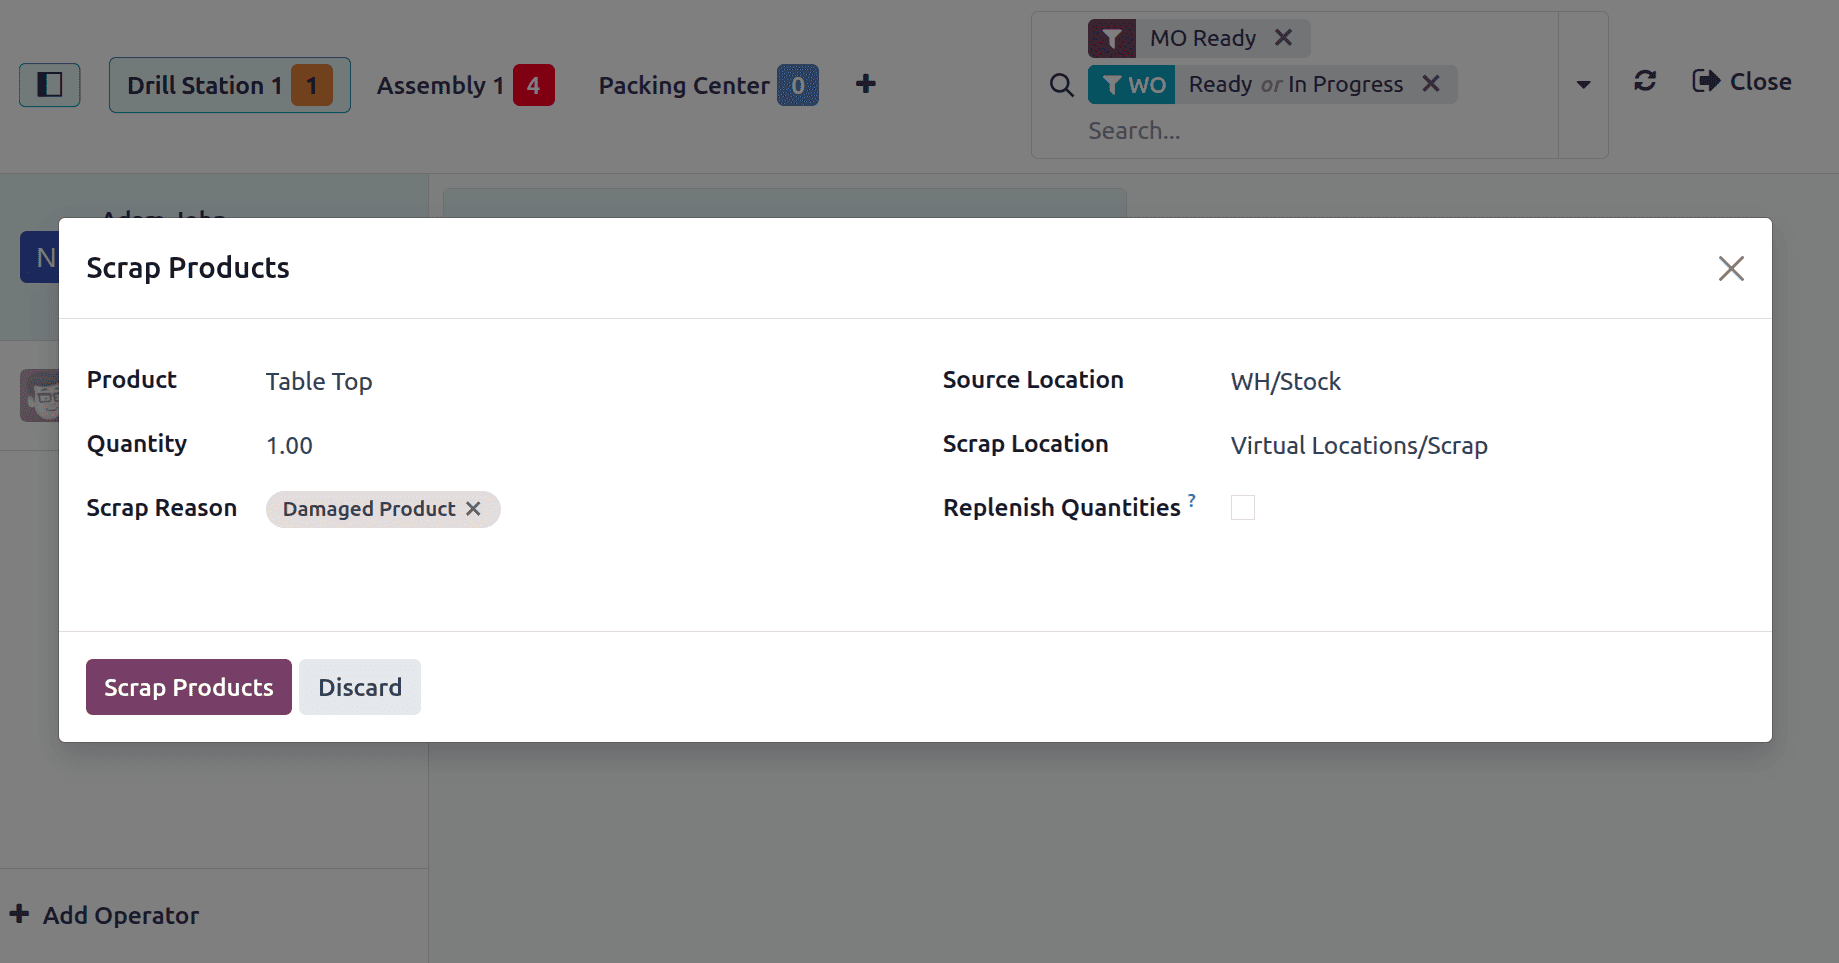
Enabling the Replenish Quantities checkbox will trigger replenishment for the scraped product. Then click on the Scrap Predicts button.
2. Add Component
In Odoo 18, the ability to add new components during the manufacturing process gives you the flexibility to account for any extra, missing, or replacement materials required to finish a production order. For improved cost and inventory management, it guarantees continuous workflow and precise tracking of real material use.
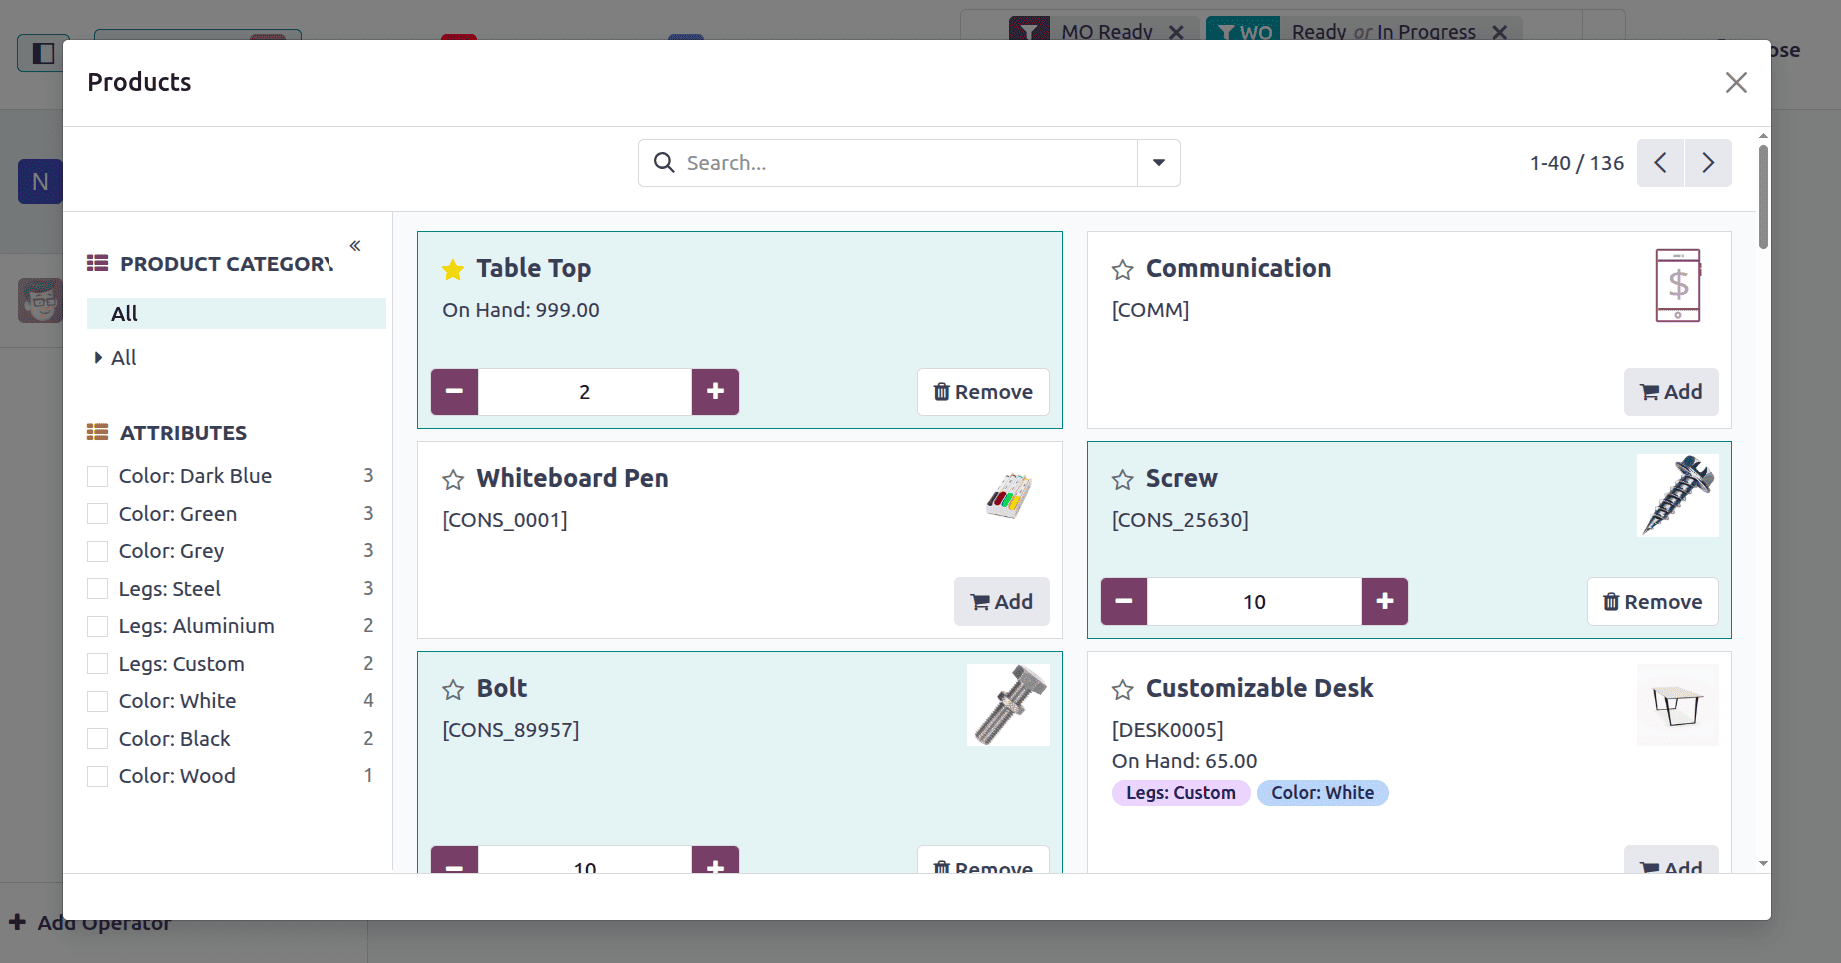
By clicking on the Add Components, users can add new components with quantities. A new window of the product catalog will open as shown. From the catalog, users can easily select products by quantity. Here, one more quantity of the Table Top is added.
3. Open Manufacturing Order
By clicking on Open manufacturing, users can easily return to the production order they created.
4. Move to the Work Center
By using the Move to Work Center button, users can move to a particular work center.
5. Update Instruction
The Update Instruction feature in the Shop Floor module during manufacturing allows supervisors or managers to modify work instructions in real time. This ensures operators receive the latest guidelines or changes immediately, improving accuracy and adaptability on the production line.
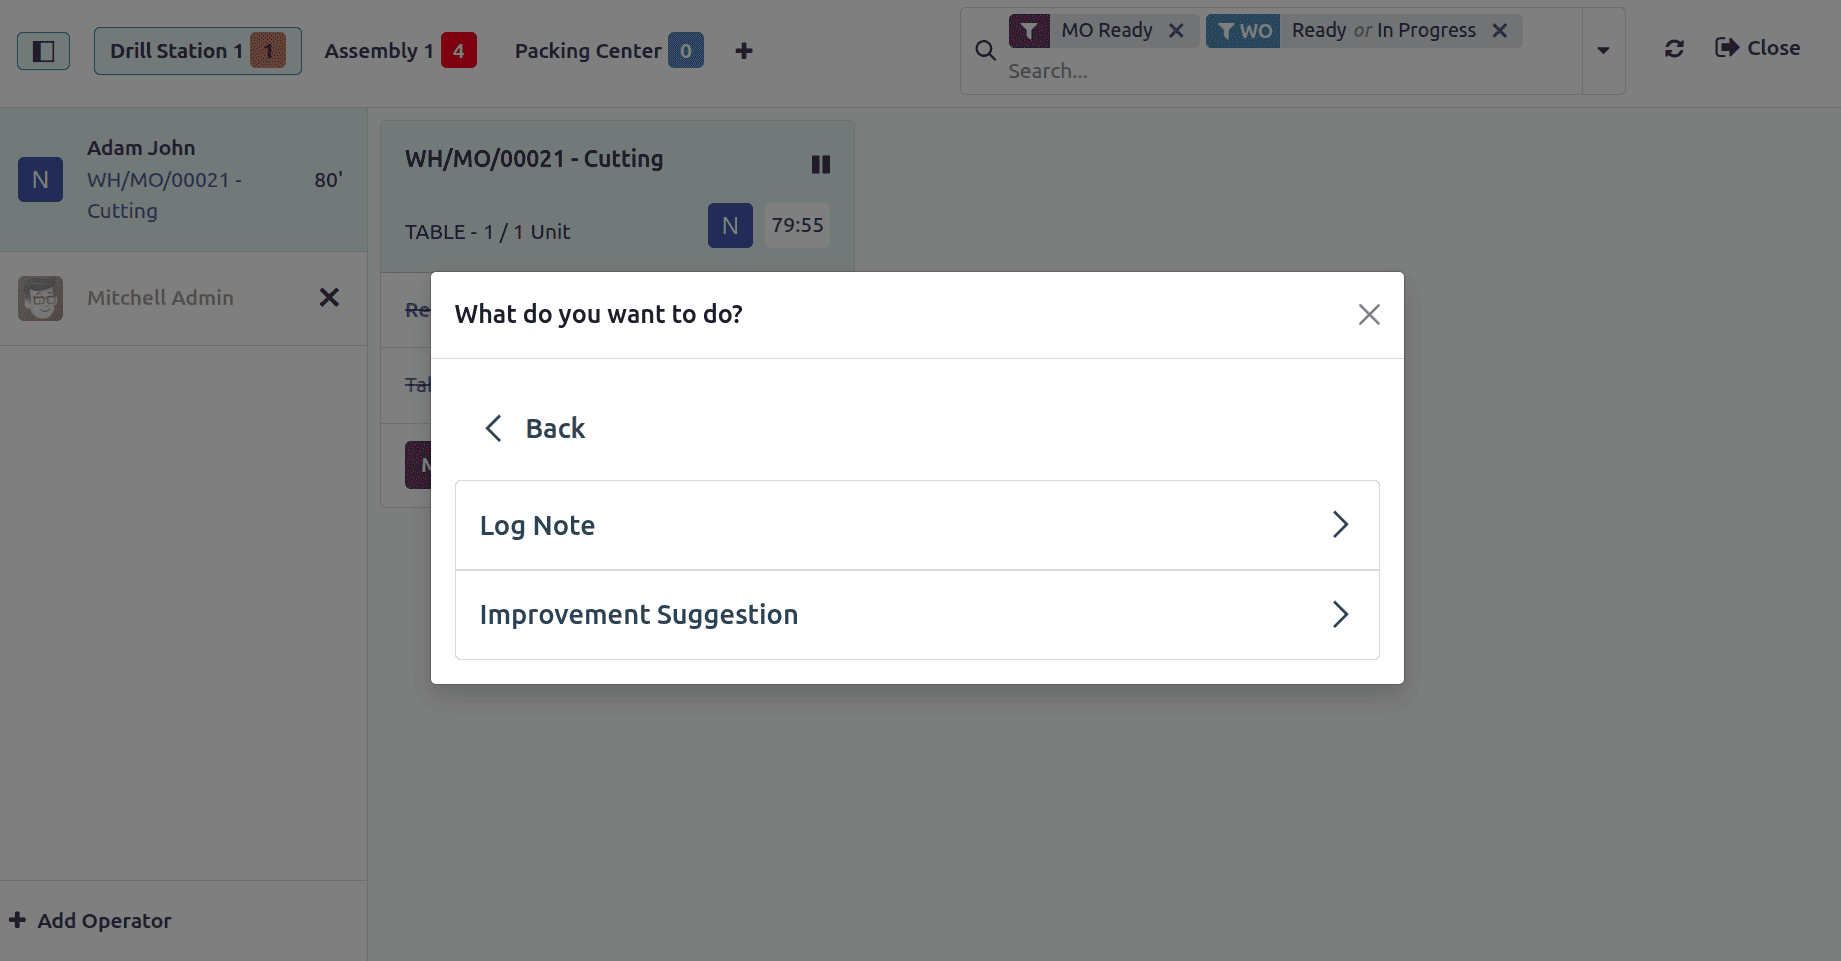
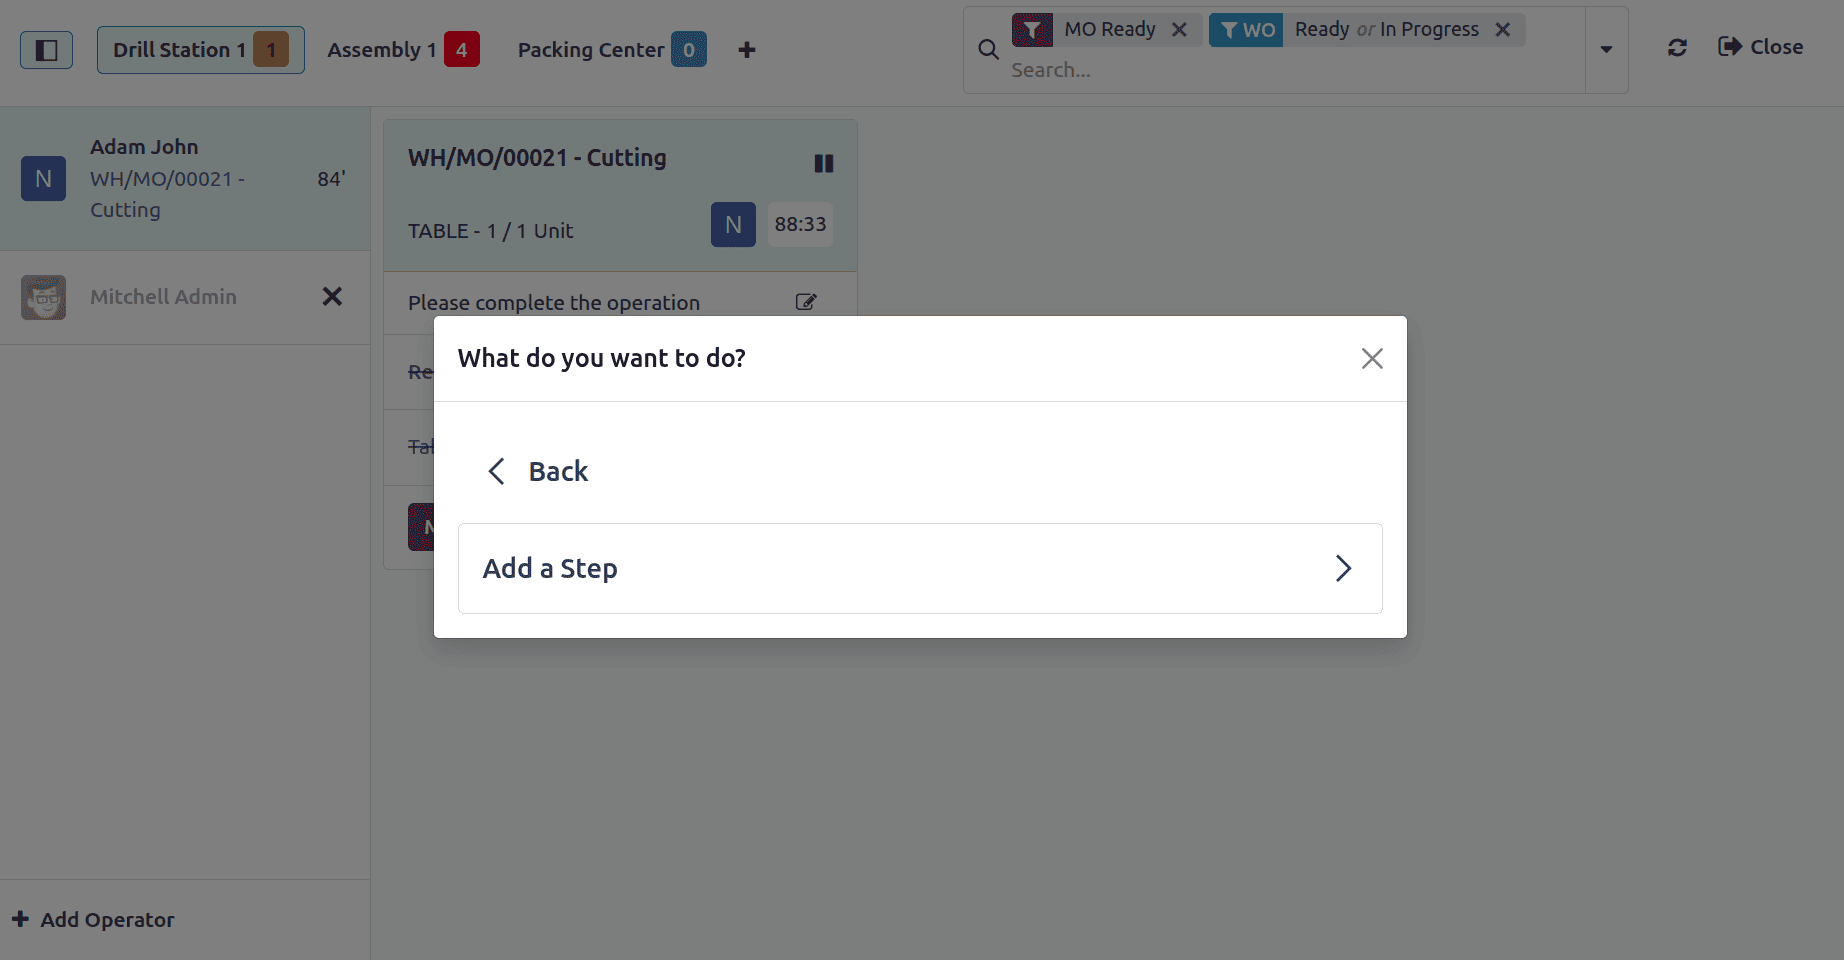
There are two types of instructions: a Log Note and an Improvement suggestion. By using the Log Note, the user can add log notes.

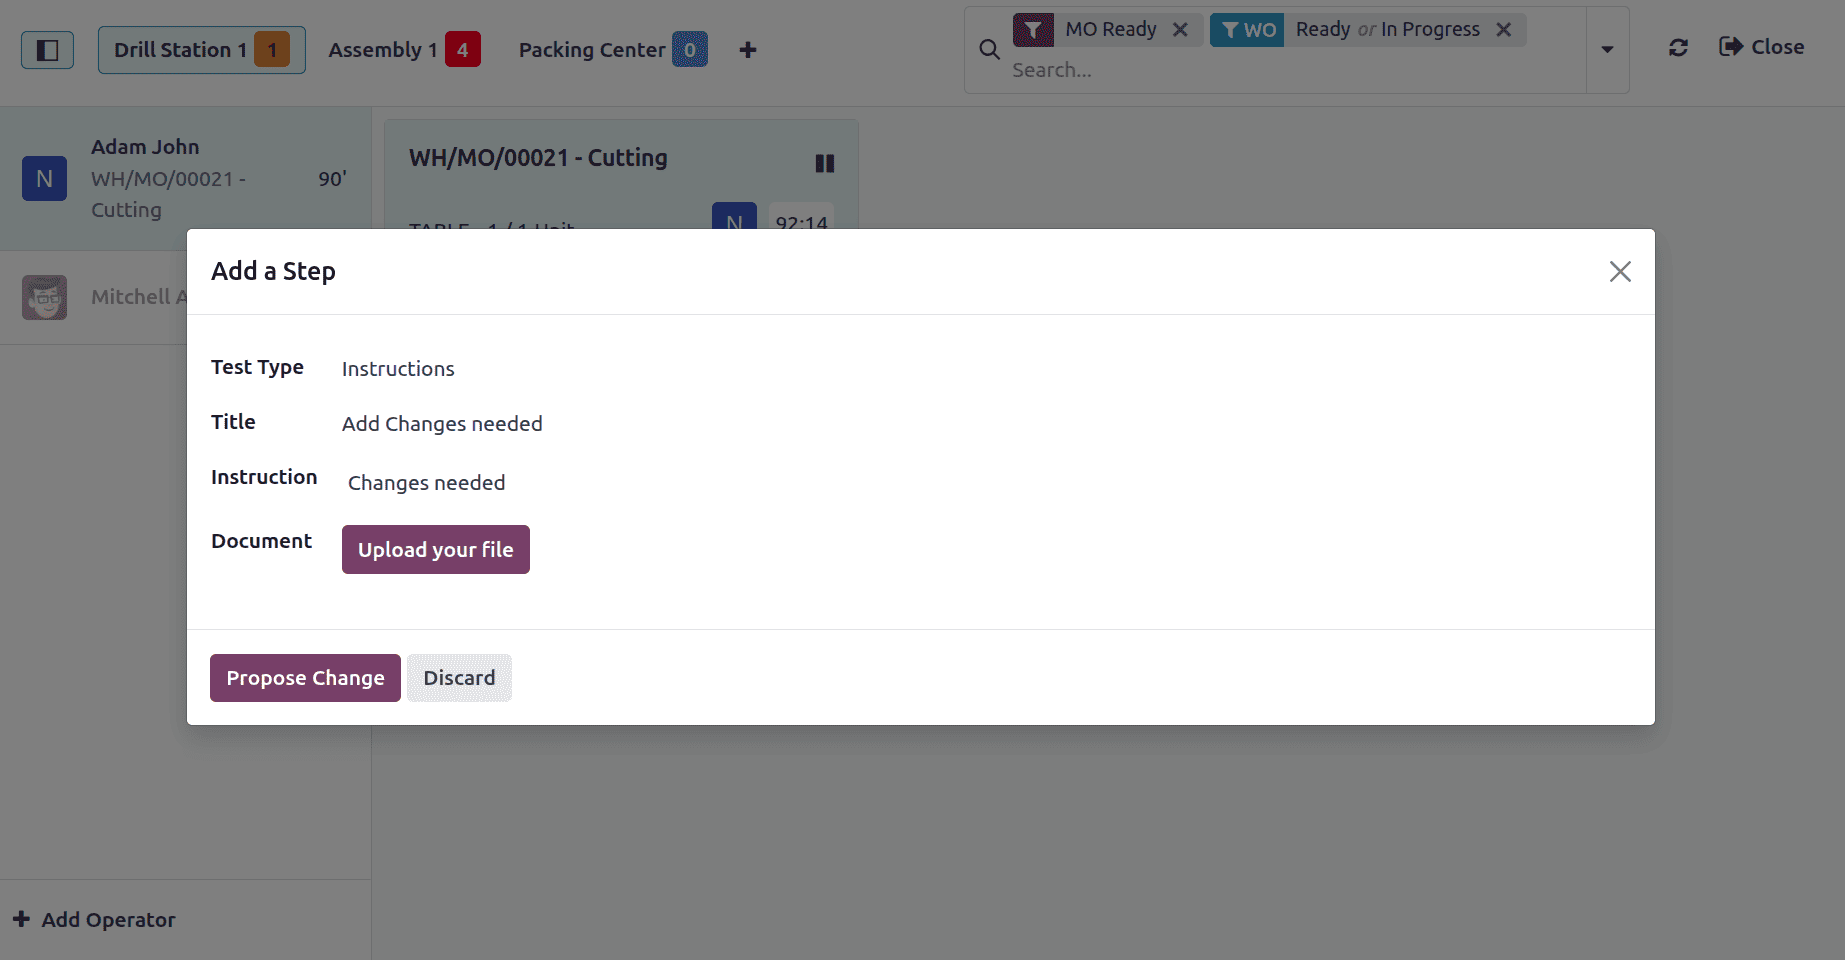
While clicking on the Improvement Suggestion, another window will appear, as shown below. Then click on Add a Step.
Then add the Test Type, title, and instructions. It's possible to upload files. Click on the proposed Change.
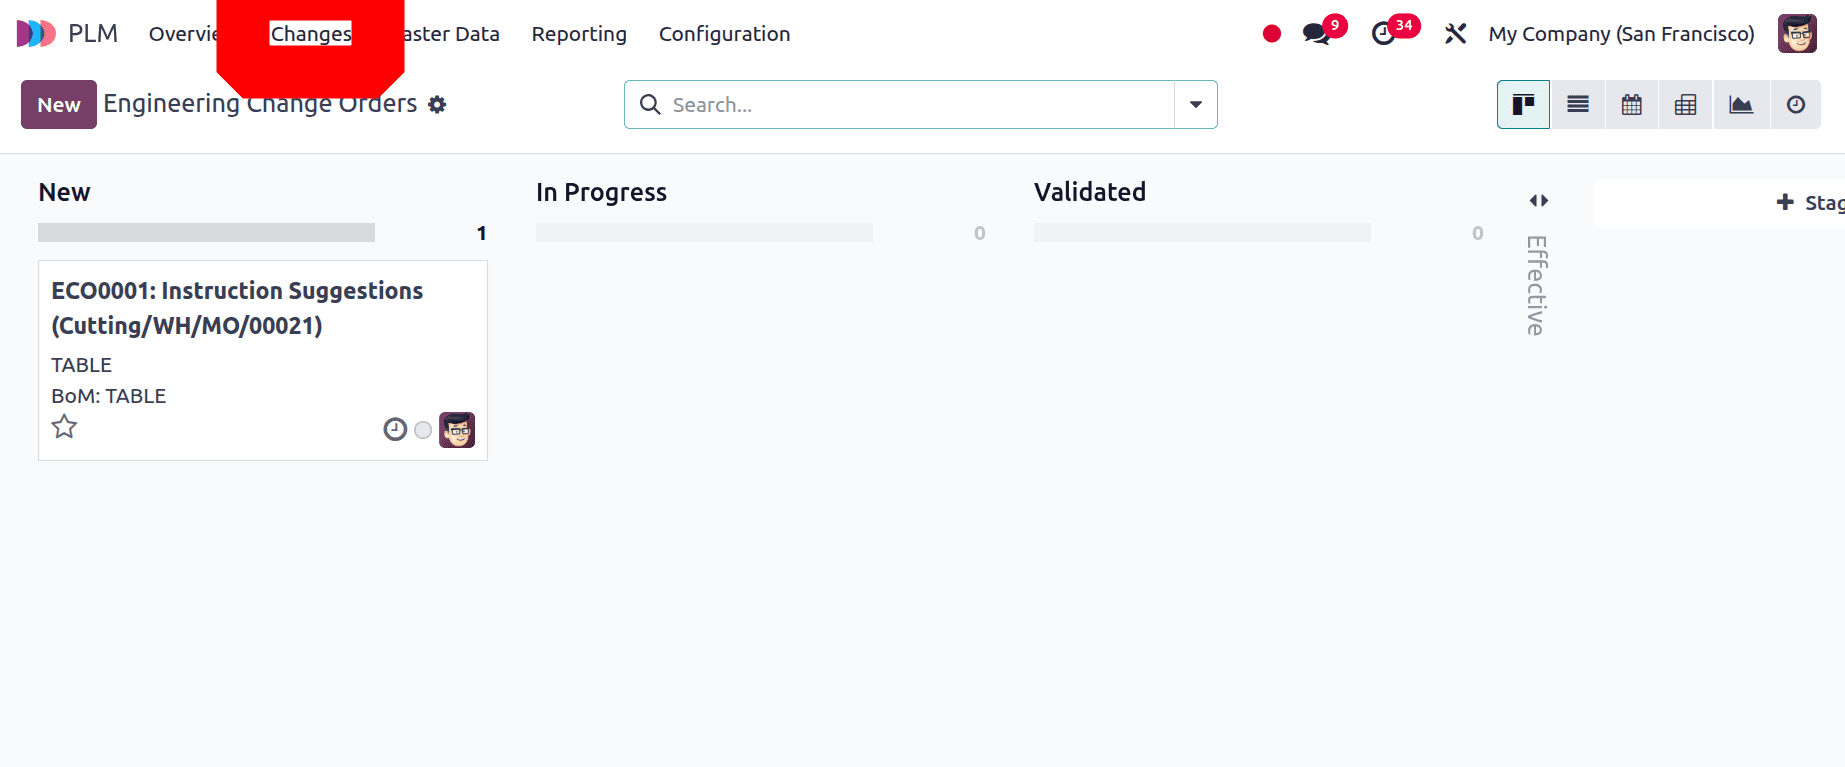
By clicking on the proposed Change button, an ECO change order will be created inside the PLM Module. Let's open the PLM module to view the order.
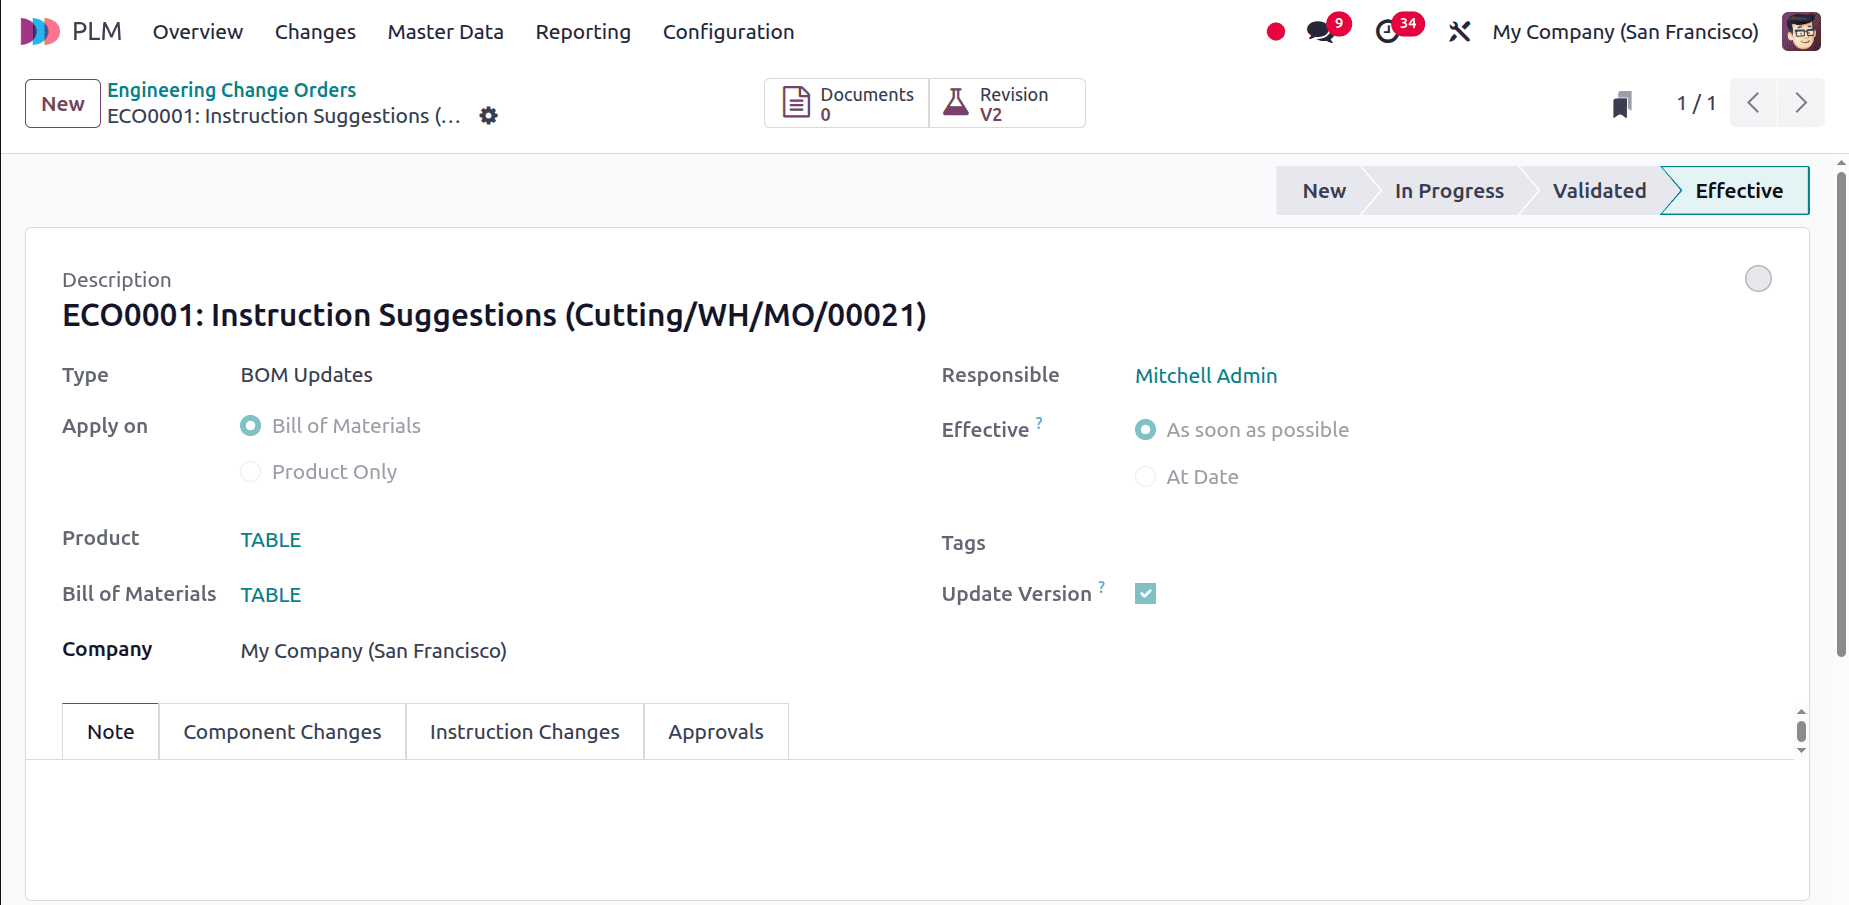
Open the engineering change order. Making necessary changes to the bill of material will then change the Version of the BoM.
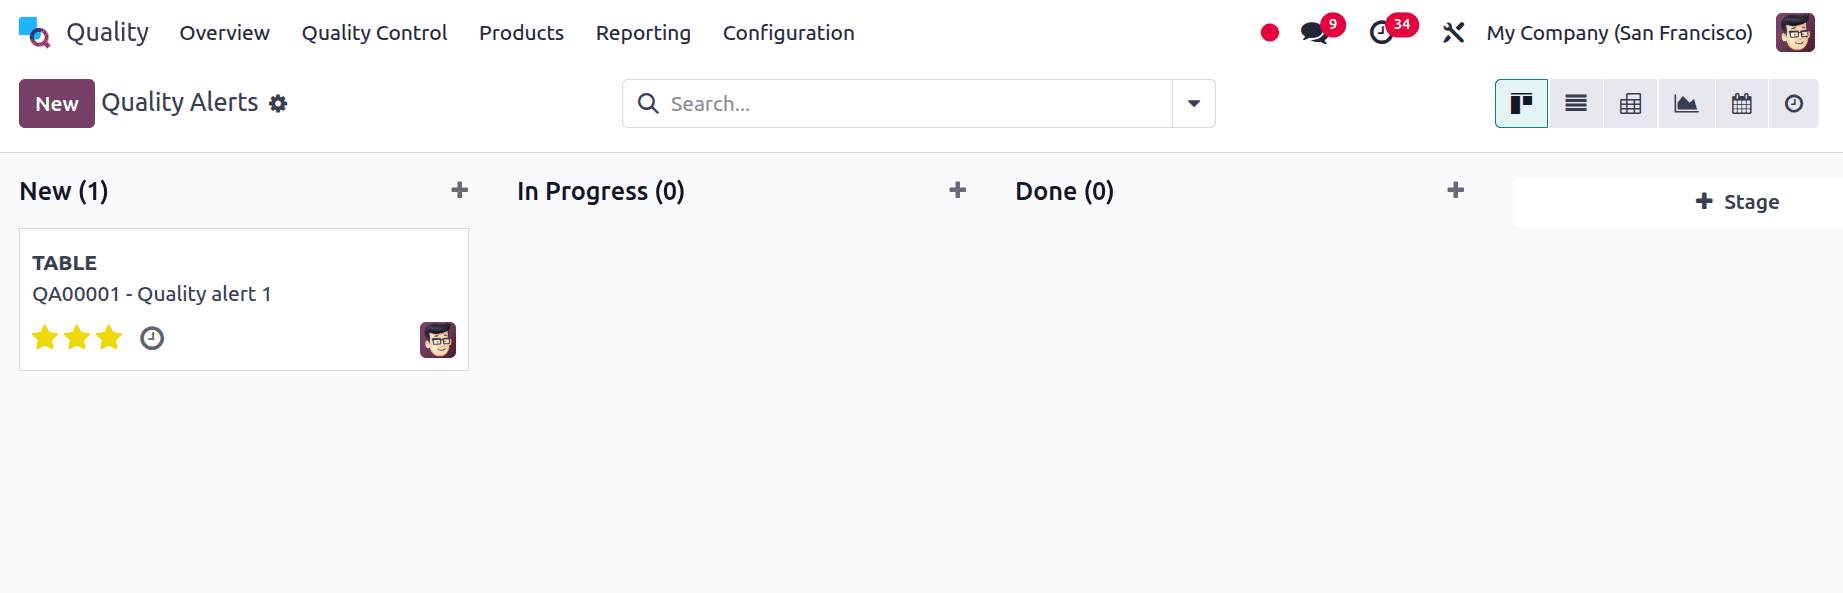
6. Create Quality Alert
Operators can quickly report any flaws or problems they find during production by setting up a Quality Alert on the shop floor during the manufacturing process. By initiating prompt inspections and remedial measures without interfering with operations, this aids in maintaining product standards.
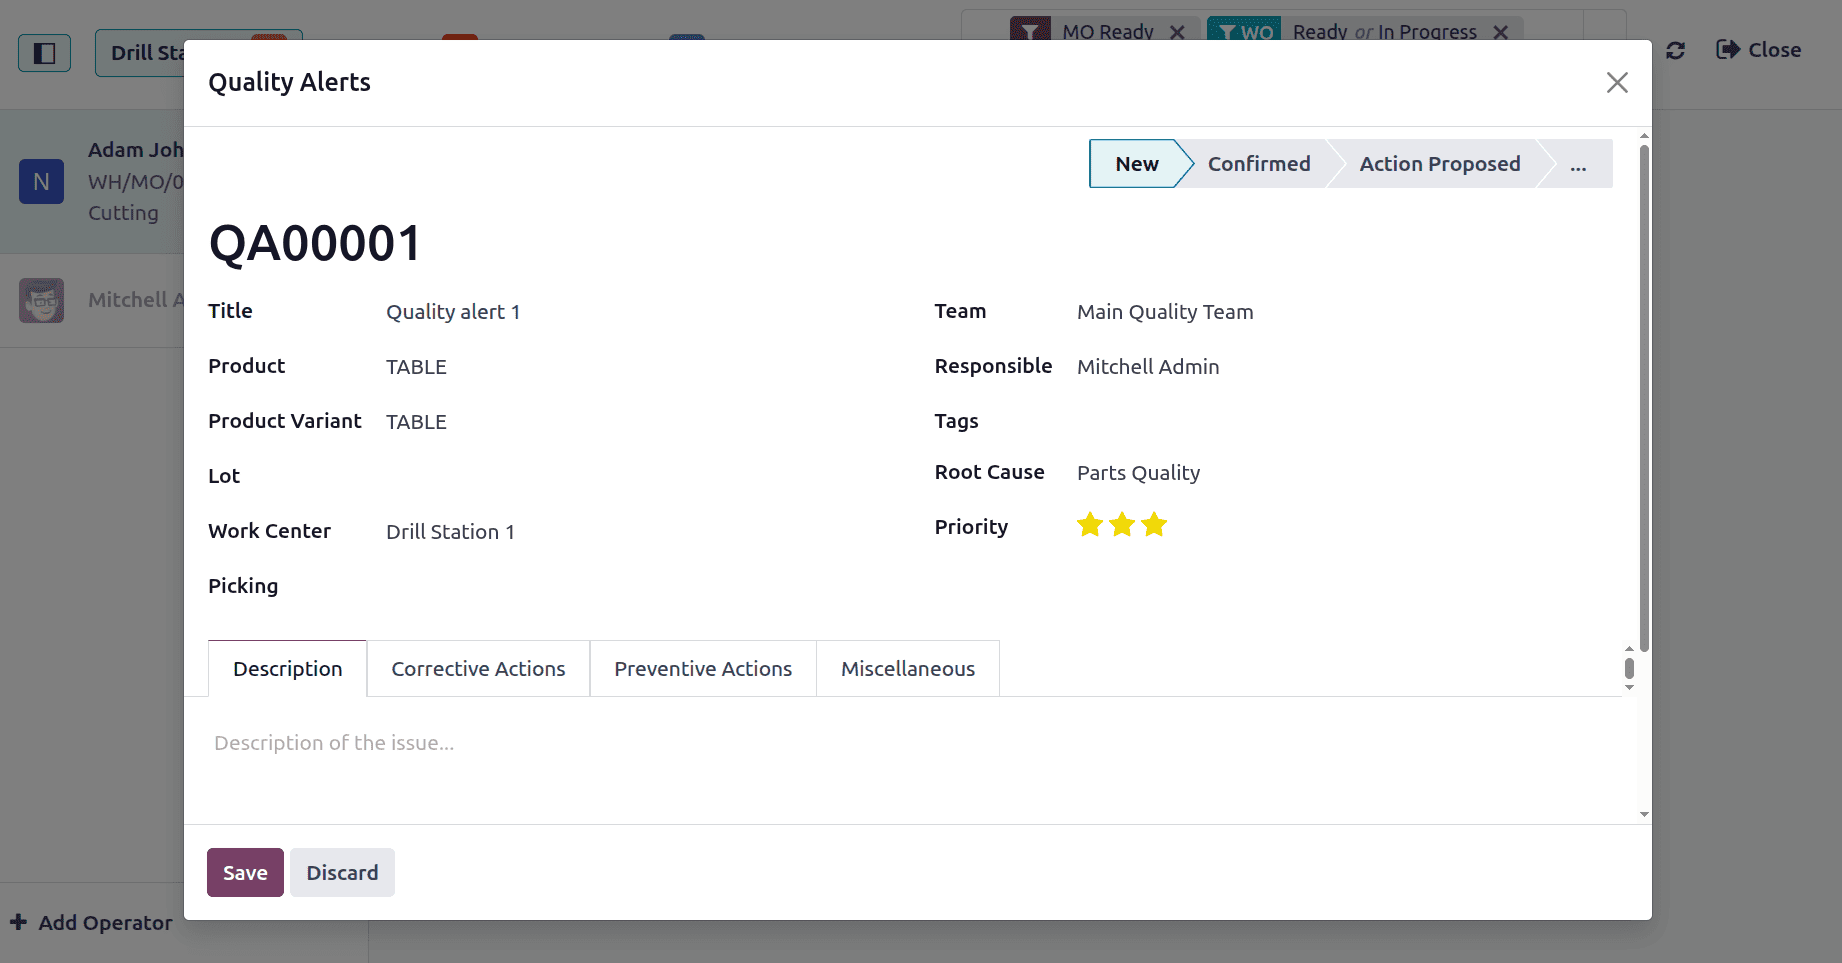
Click on the "Create Quality Alert" button; a window will then open as shown below. Add the title, tags, root cause, and other details, such as a description, then click the Save button.
Then move to the quality module. And choose the Quality Alerts from the Quality Control menu. The created quality alert can be viewed there. Currently, it is in a new stage. After solving the issue, change the stage to Done.
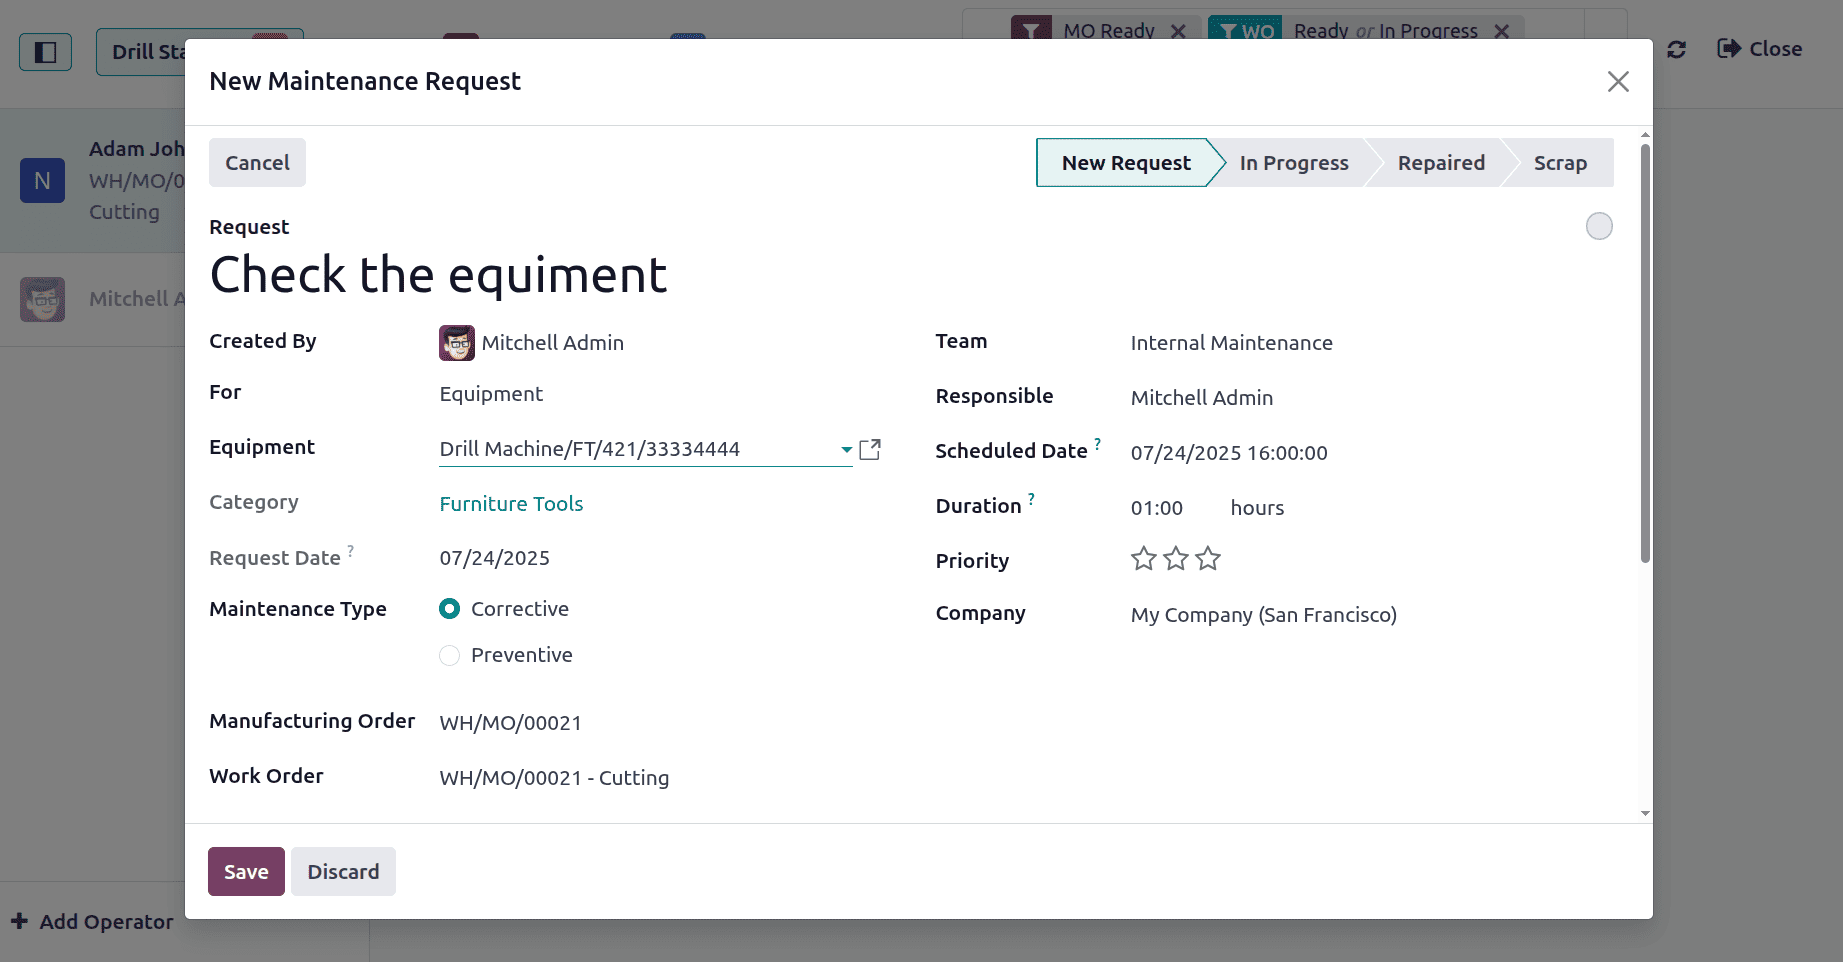
7. Request Maintenance
Operators can report equipment or workcenter problems or breakdowns straight from their shop floor by creating a maintenance request throughout the manufacturing process. This guarantees prompt maintenance team involvement, minimising downtime and maintaining uninterrupted production.
When you click on 'Request Maintenance,' a new window will appear as shown below. Add the request and other information. Users can add maintenance requests either for equipment or for the Warehouse. Here, the request for the equipment is created, and then the save button is clicked.
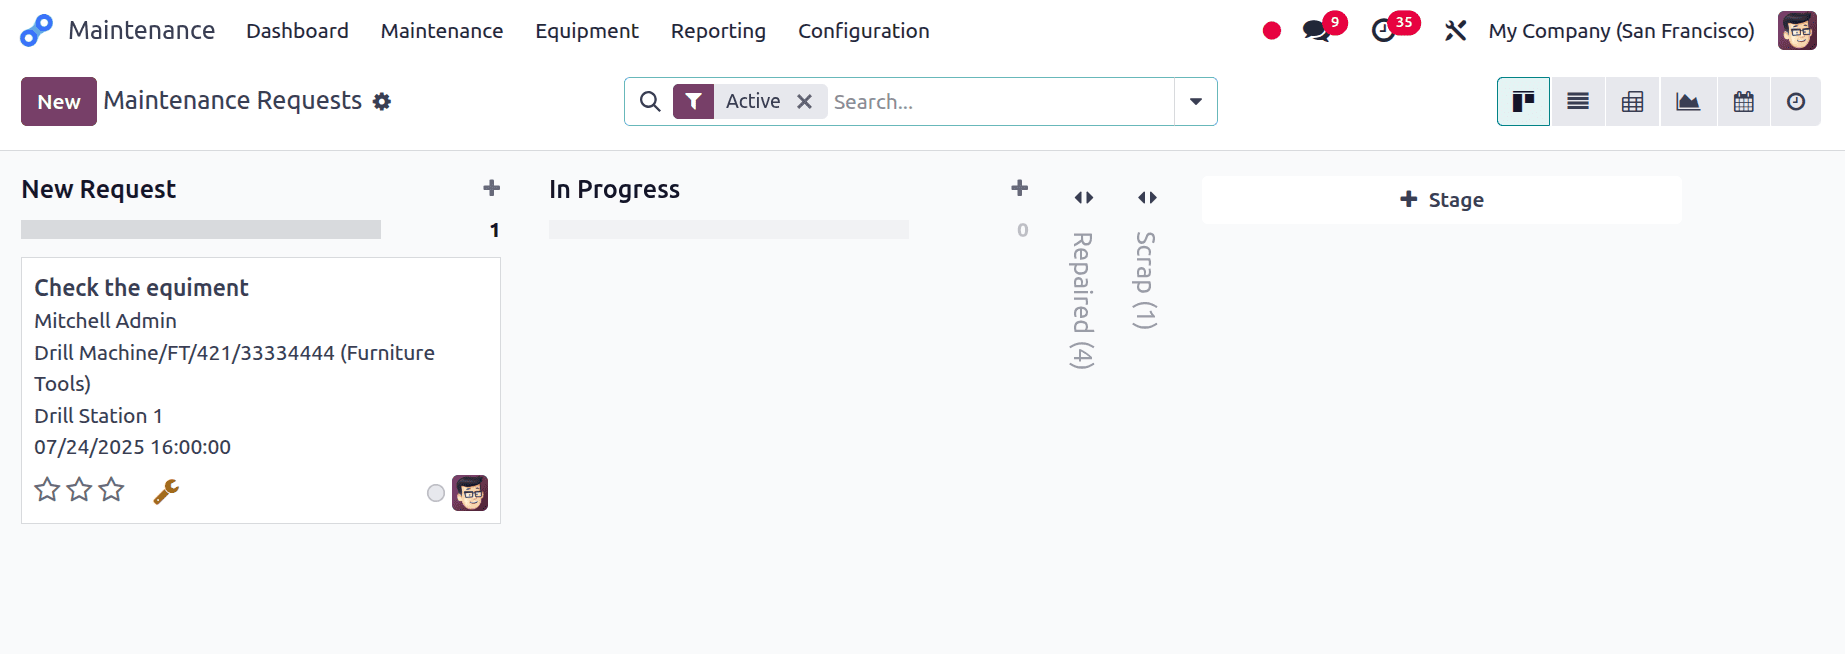
Then go to the maintenance module to view the maintenance request. The request is currently on the New Request stage. After resolving the issues, update the request to the Repaired stage.
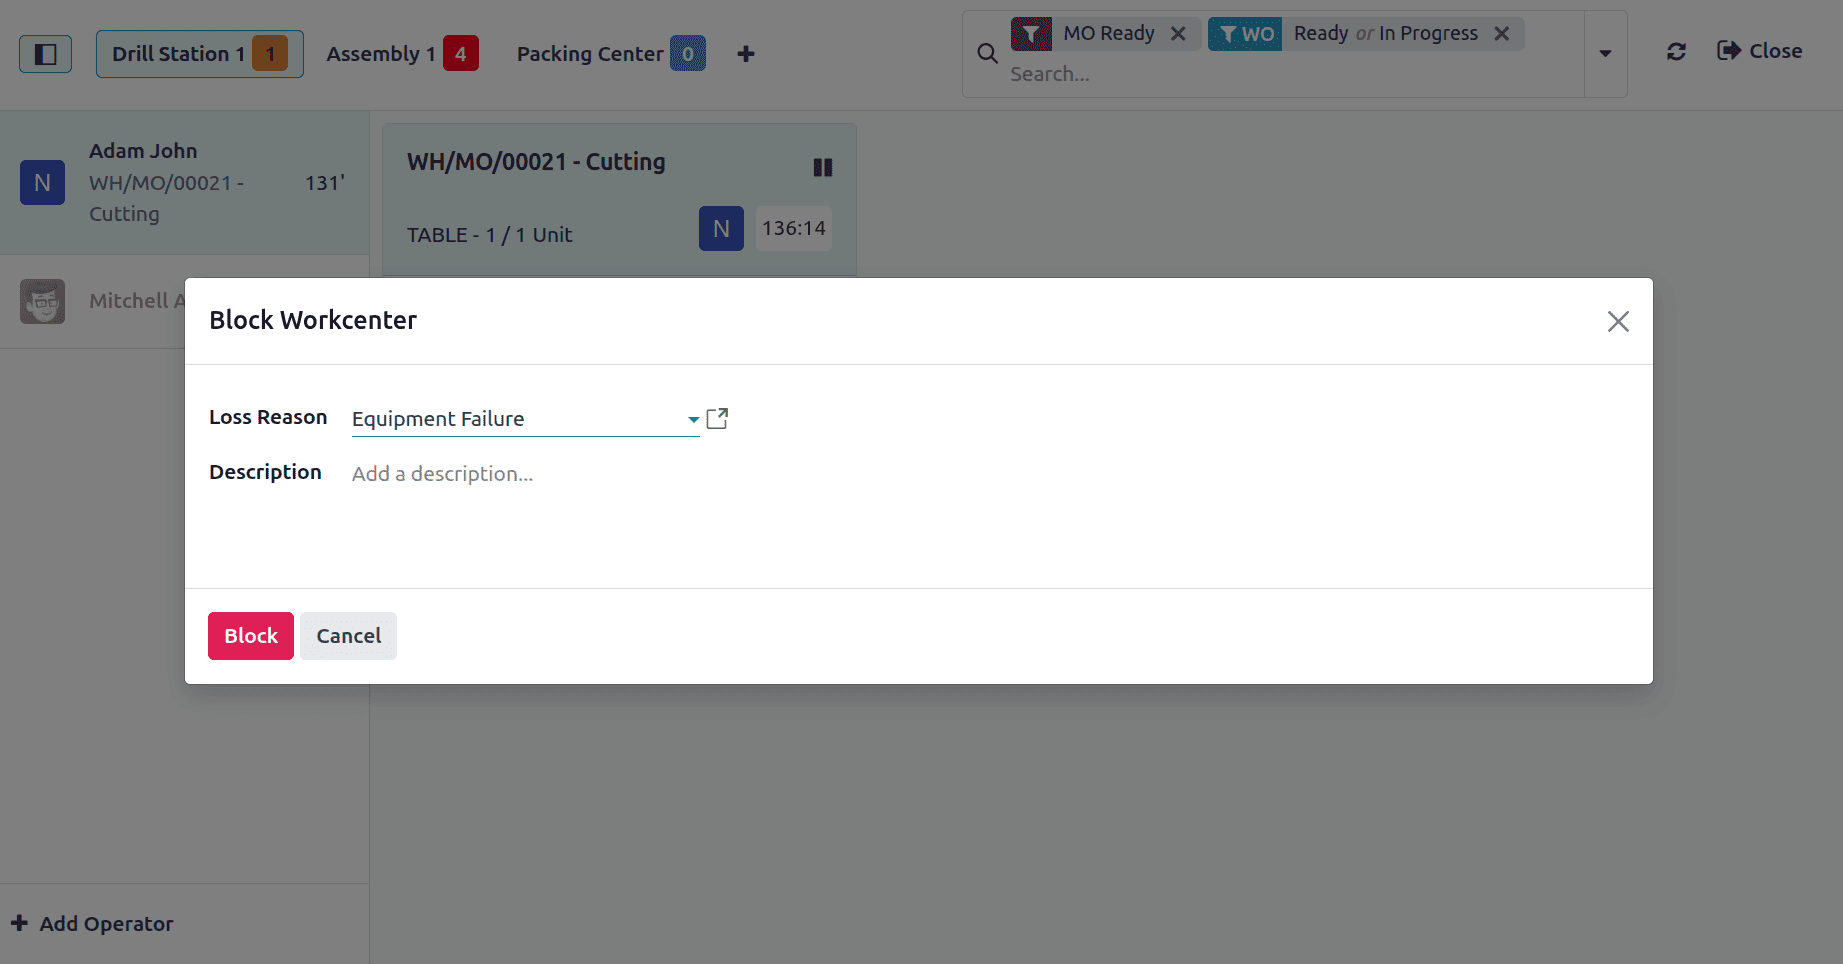
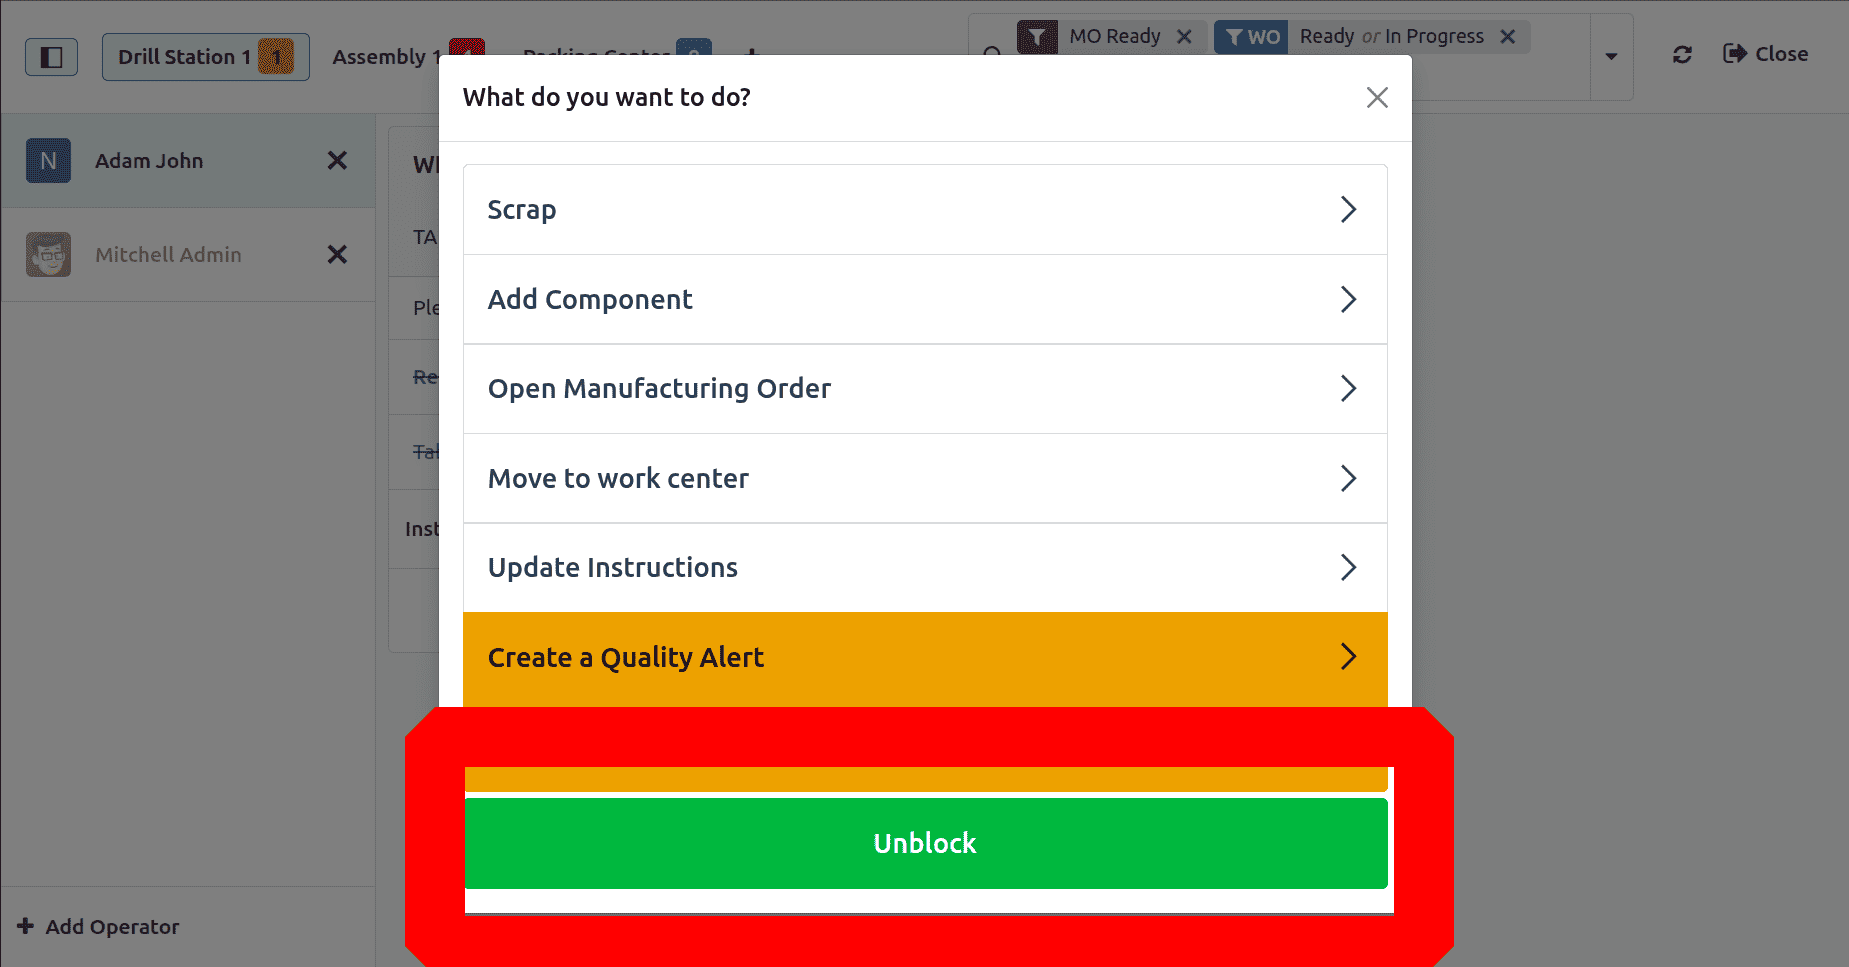
8. Block
Due to issues such as equipment failure or maintenance requirements, a workcenter may be blocked during the manufacturing process, temporarily halting operations at that station. By doing this, more work cannot be allocated to the impacted workcenter, reducing the possibility of production errors and improving workflow management.
Click on the block button, then add a reason for blocking the workcenter. After that, click on the Block button.
While blocking a work center, the work order time will pause automatically, as shown below. Then the users can't allocate more operations to this work center. To continue the workflow, the work center needs to be unblocked first.
The work order can then be resumed. Once the operation is finished, click the 'Mark as Done' button to confirm completion.
Let's continue manufacturing the Table. To proceed, log in as the next operator, Mitchell Admin. Then choose the next workcenter, Assembly 1, from the toolbar. The operation can be viewed there. Start the operation.

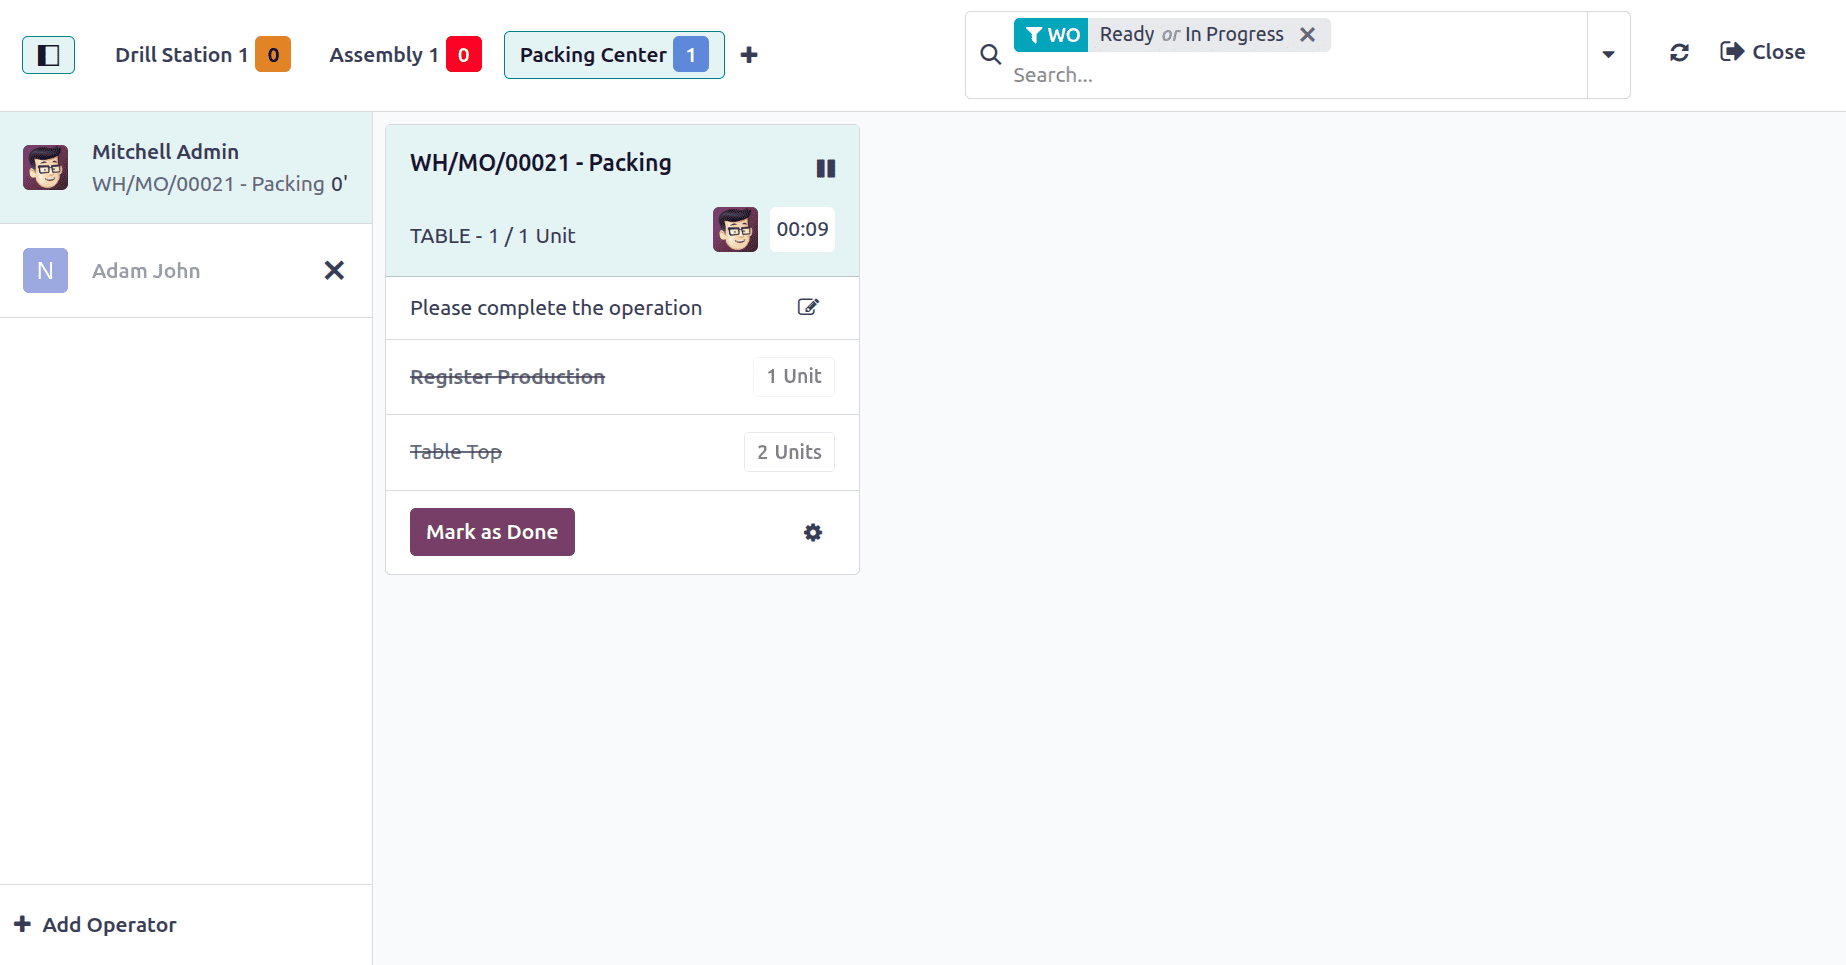
Click on the Mark as Done button to complete the work order. The next and the very final operation is Packing.
To complete the packing, choose the next workcenter, the Packing Center. The operator is the same Mitchell Admin. Begin the operation, and once finished, click the 'Mark as Done' button to complete it.
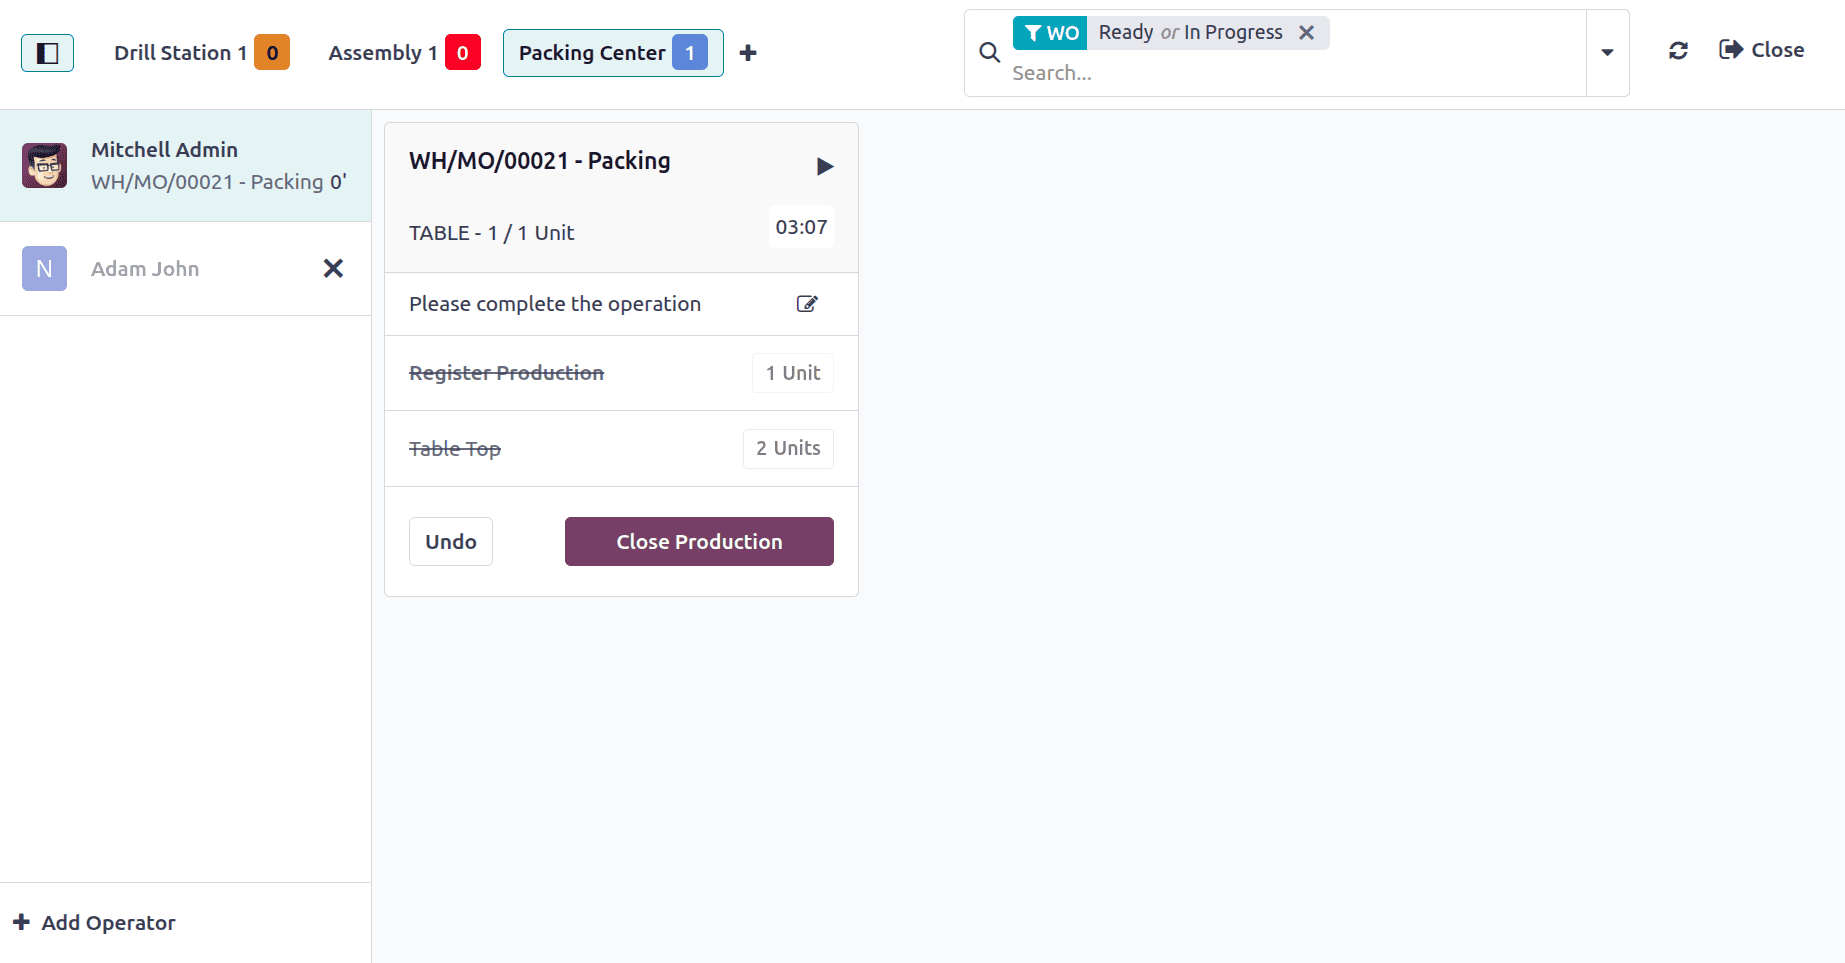
After completing all the operations, the users can close the manufacturing order from the shop floor itself. For that, click on the Close Production button.
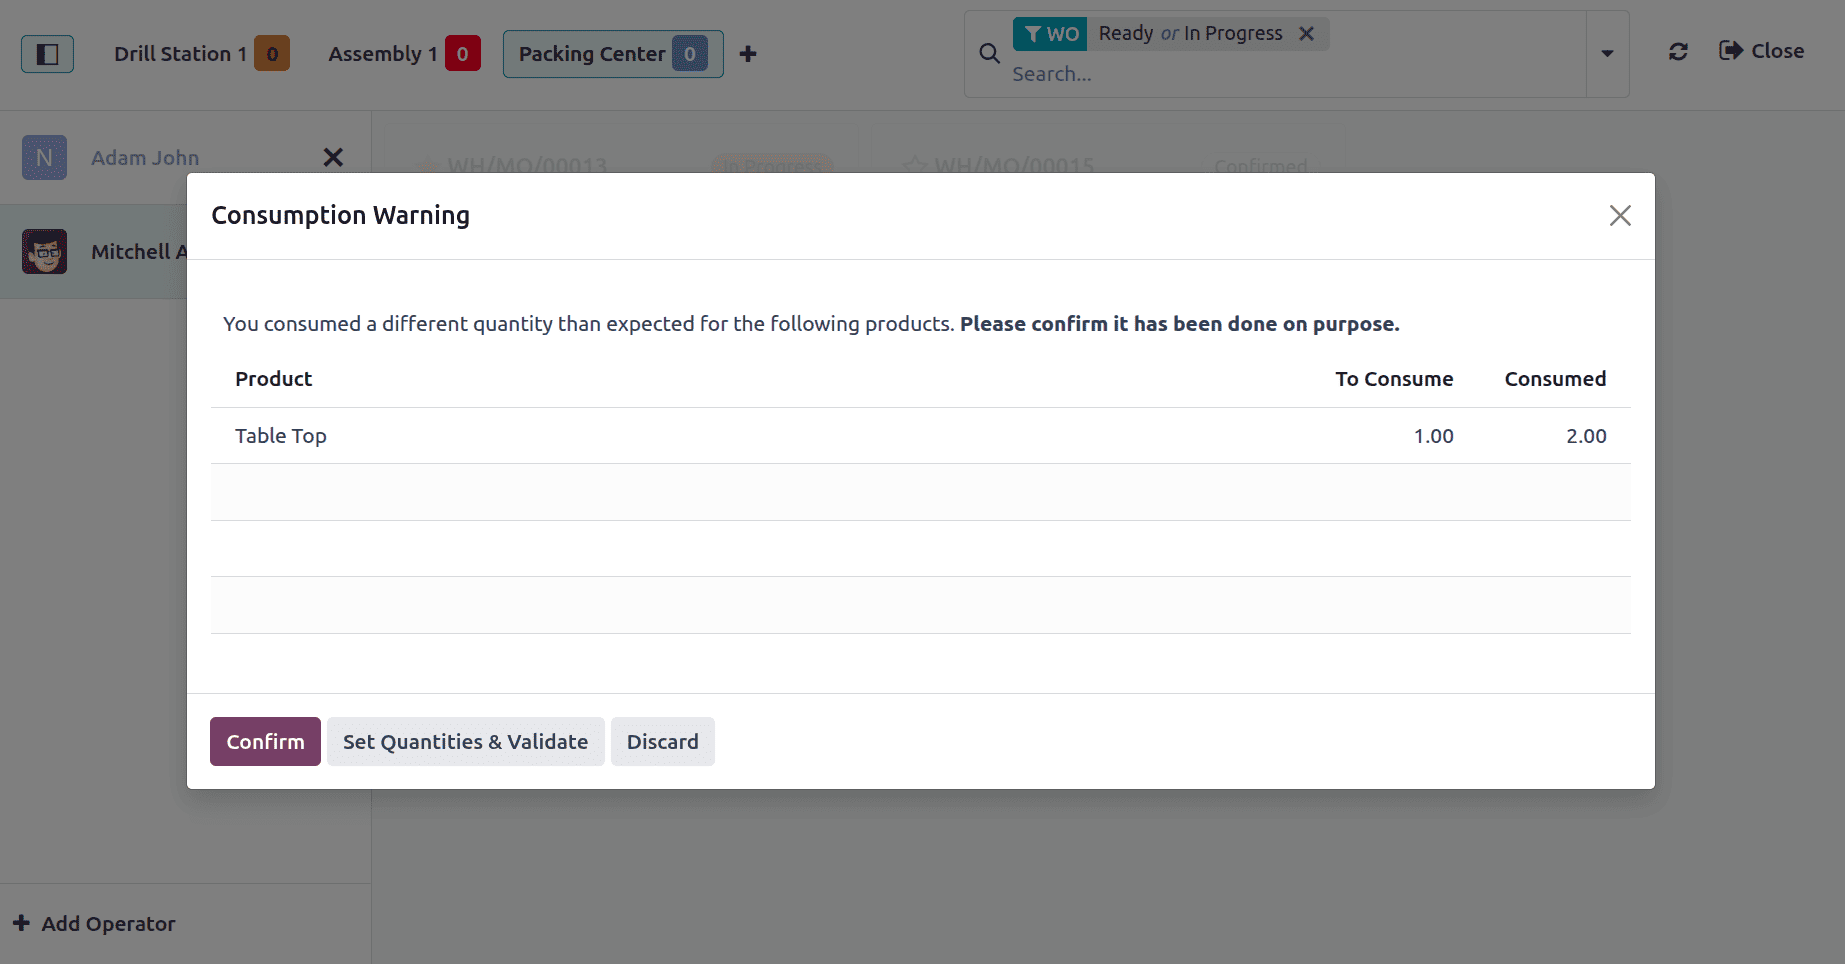
While closing, a consumption warning will appear there as shown below. This is because the product the user uses has more quantities than mentioned in the BoM. Additionally, one quantity of the component Table Top is added. Click on the confirm button.
The table is now fully manufactured. To close the Shop Floor, click on the Close button placed at the bottom right side of the screen.
 In conclusion, by offering real-time visibility and control over production activities, Odoo 18's Shop Floor module improves manufacturing efficiency. With its user-friendly features, operators may manage work orders, raise problems, and monitor progress right from the shop floor. It is essential to maintain efficient and effective industrial processes since it simplifies communication and increases accuracy.
To read more about How to Handle Manufacturing with One-Step Warehouse Configuration in Odoo 18, refer to our blog How to Handle Manufacturing with One-Step Warehouse Configuration in Odoo 18