In today's competitive manufacturing environment, precision and control over stock movement are critical. With Odoo 18, businesses can now streamline their manufacturing process using a three-step warehouse configuration that mirrors real-world logistics: picking components, executing production, and moving finished goods to stock.
This blog walks you through the entire manufacturing workflow in Odoo 18—starting from product creation, setting up a Bill of Materials (BoM), configuring work centers, enabling three-step routing, and finally analyzing cost and journal entries.
By the end, you’ll see how raw materials are consumed, how finished products are accounted for, and how every move is tracked across your warehouse and production units.
To start using the three-step warehouse process in Odoo 18, you first need to enable two important options: Multi-Step Routes and Storage Locations. These can be found under Inventory > Settings. Enabling Multi-Step Routes allows you to manage product movements in stages, such as picking, packing, shipping, or receiving goods in steps like input, quality check, and stock. At the same time, enabling Storage Locations lets you organize your warehouse into different areas, such as raw material storage, production, and finished goods. This setup provides you with better visibility and control over product locations at each stage of the manufacturing and delivery process.

To generate journal entries automatically for stock movements during the 3-step manufacturing process in Odoo 18, you absolutely must enable automatic accounting from the settings of Accounting.

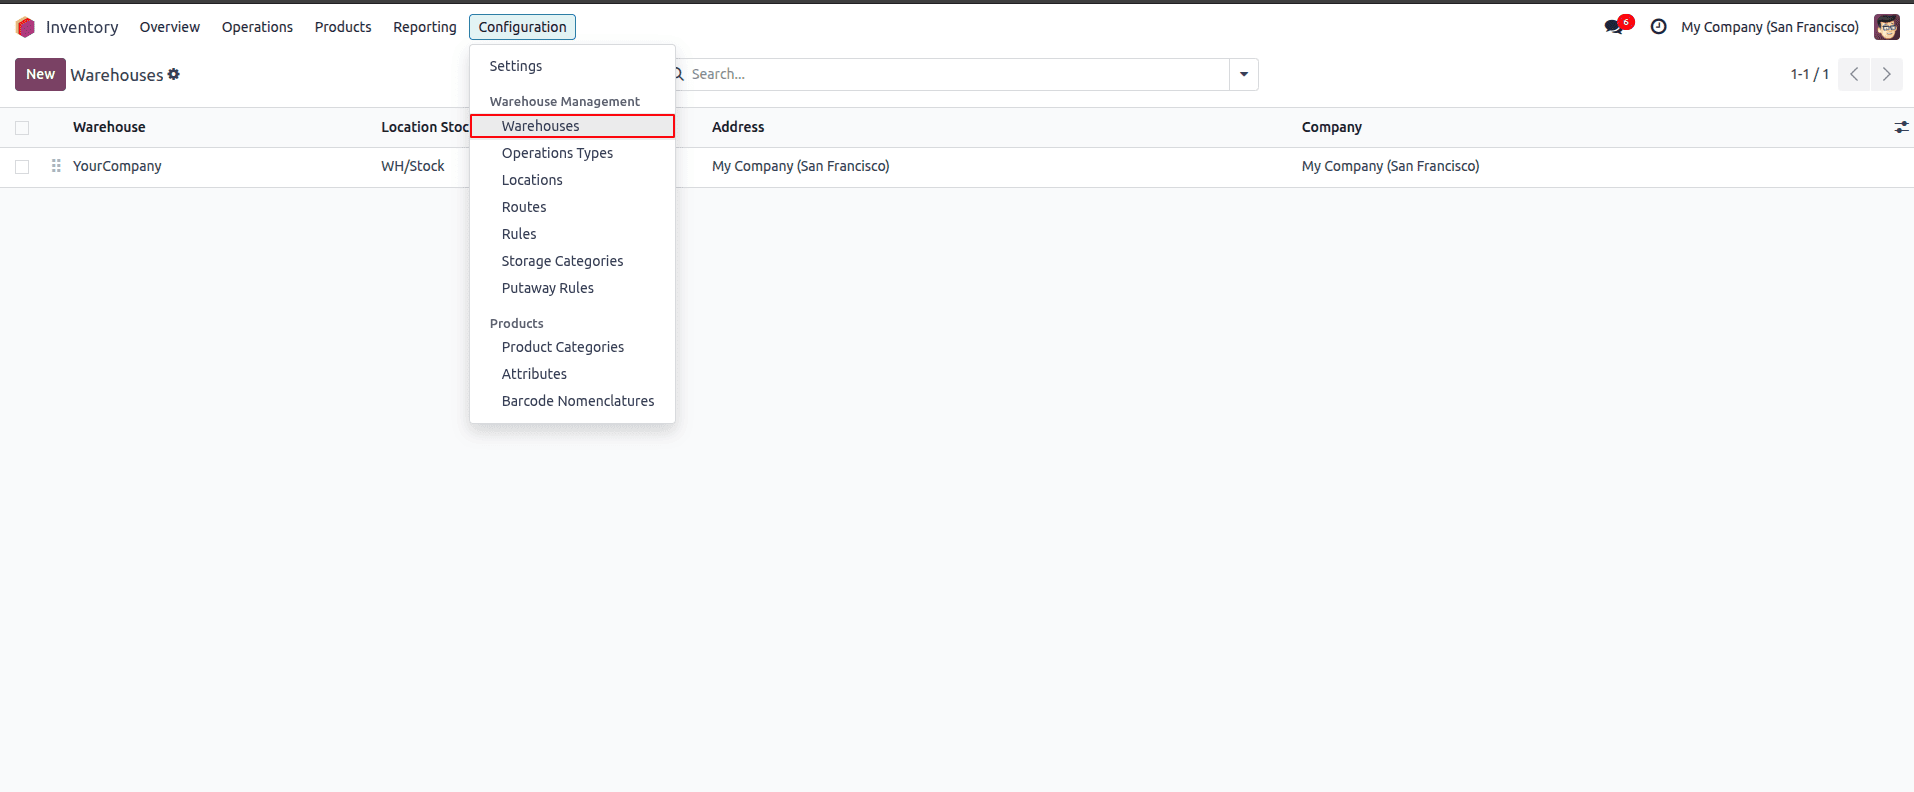
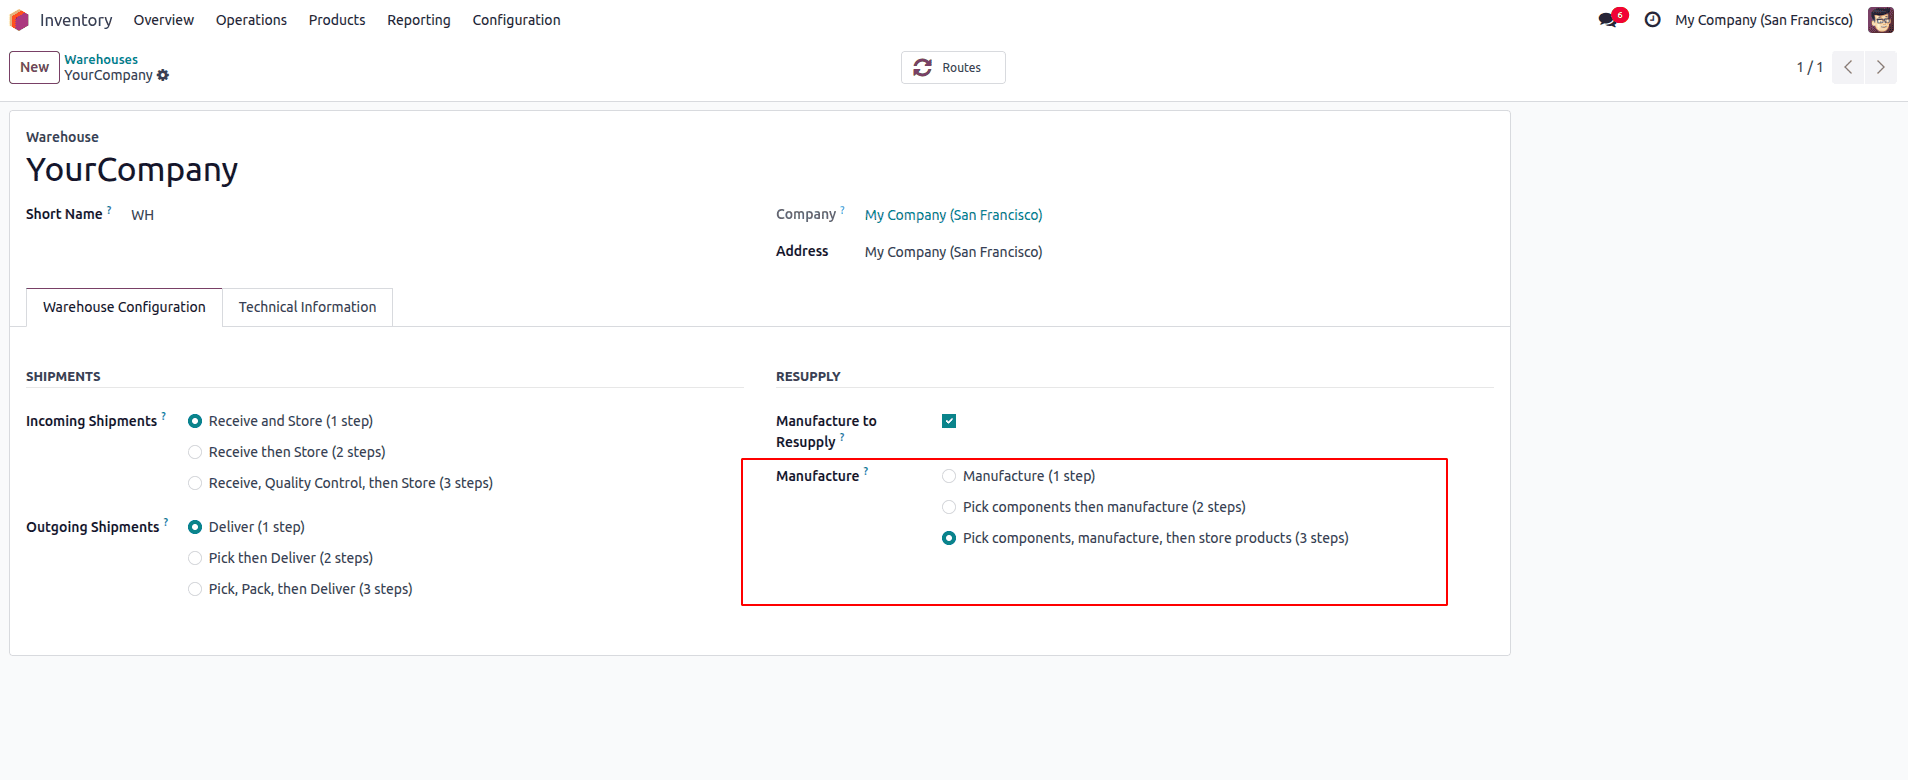
Once Multi-Step Routes and Storage Locations are enabled, the next step is to configure your warehouse to support the three-step manufacturing flow. To do this, go to Inventory > Configuration > Warehouses, select your warehouse, and scroll to the Manufacturing section.
Here, choose the option “Manufacture in 3 steps: pick components, manufacture, then store products”. This setting ensures that raw materials are first picked from their storage location, then moved to the production area for manufacturing. Finally, the finished goods are transferred to the stock location. It provides full traceability and control over each movement during the production process, closely matching real-life warehouse operations.
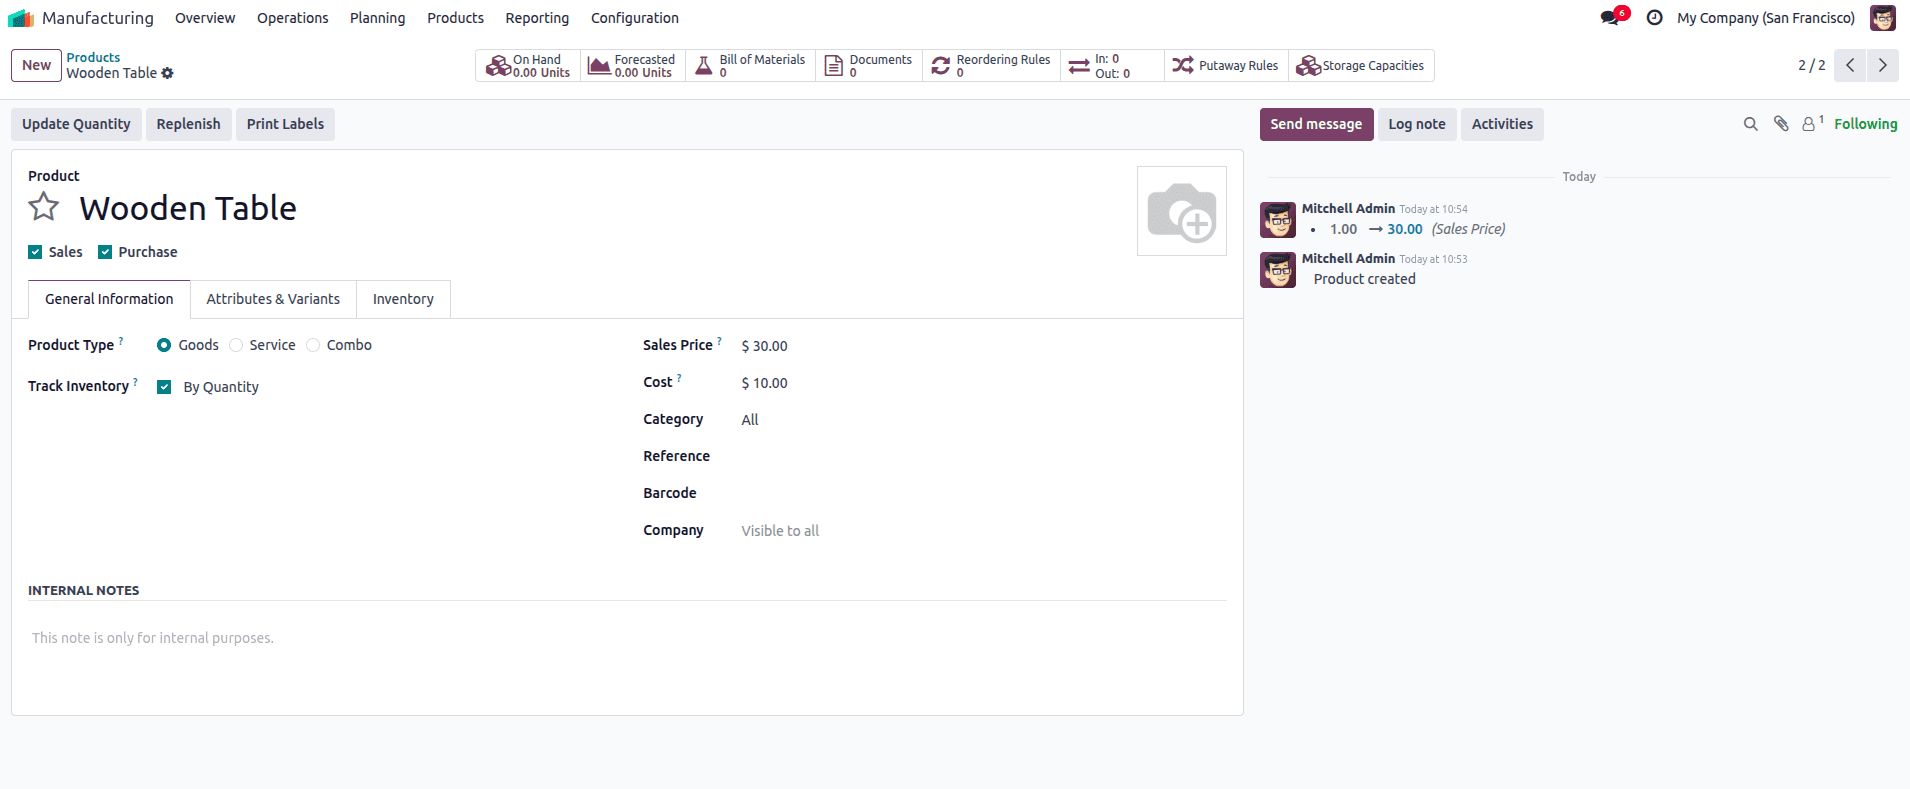
With the warehouse configuration in place, the next step is to create the product you want to manufacture. Go to Manufacturing > Products > Products and click Create.
Enter the product name, such as “Wooden Table”, and set the Product Type to Storable Product to enable inventory tracking.
After saving the product, open it again and go to the Inventory tab. Here, select the “Manufacture” route to indicate that the product will be produced through a manufacturing process. Unlike earlier versions, Odoo 18 doesn’t require a separate “Can be Manufactured” checkbox—instead, assigning the manufacturing route and creating a Bill of Materials (BoM) is enough to mark the product as manufacturable.
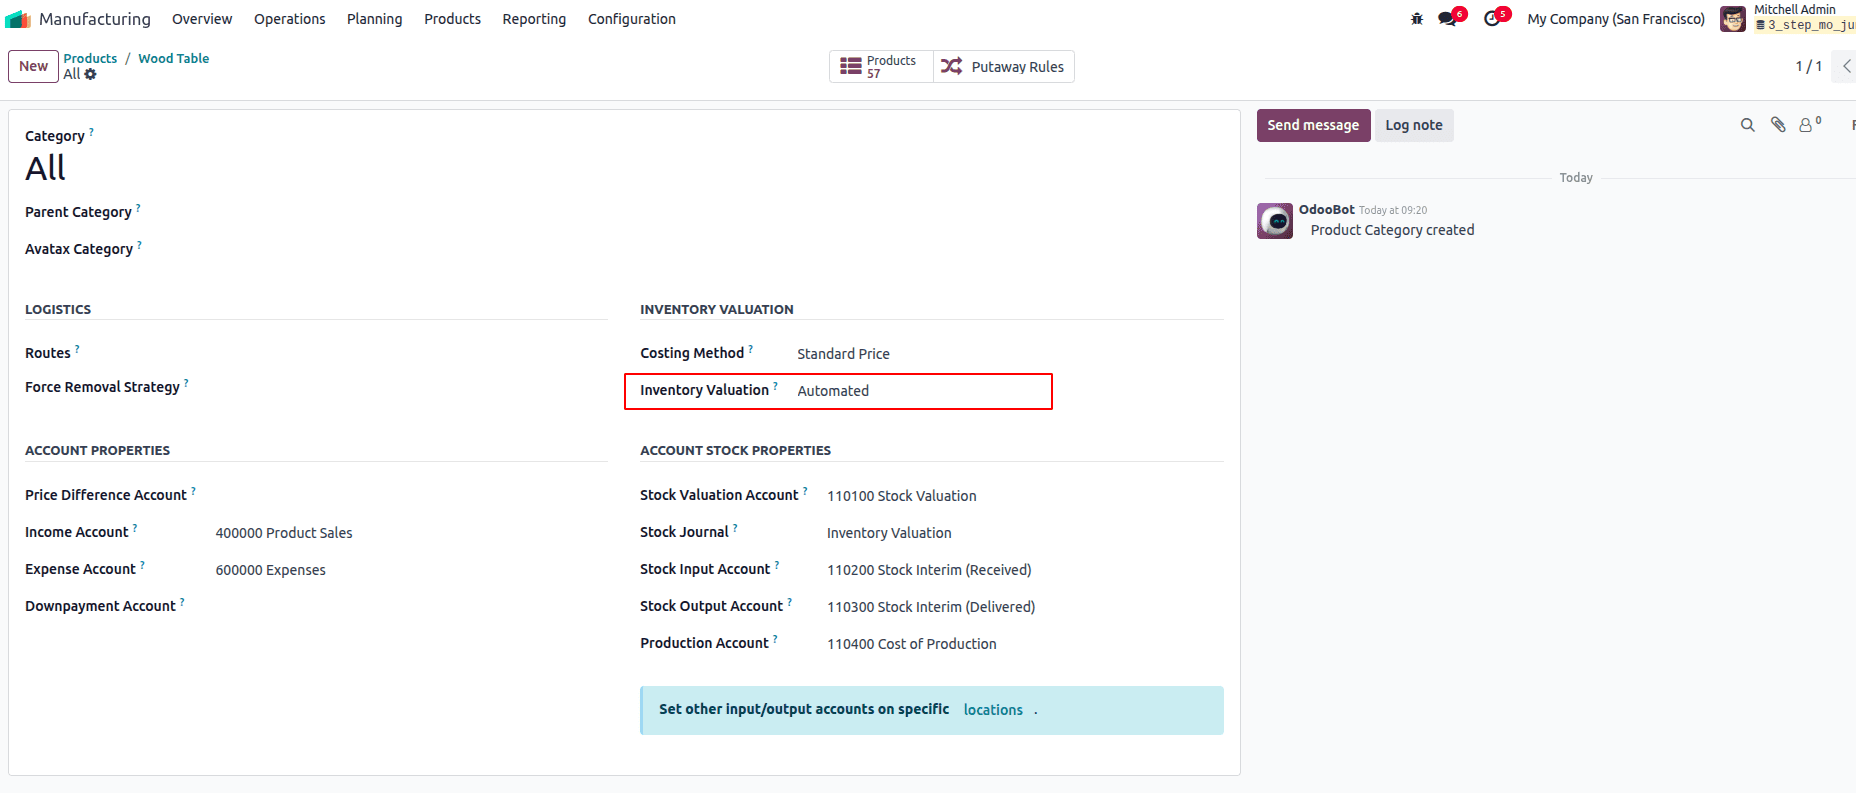
To ensure Odoo automatically generates journal entries for raw material consumption and finished goods production, you must set the inventory valuation method to "Automated" in the product categories of both raw materials and manufactured products. Additionally, relevant stock input, output, and valuation accounts should be configured under each category.
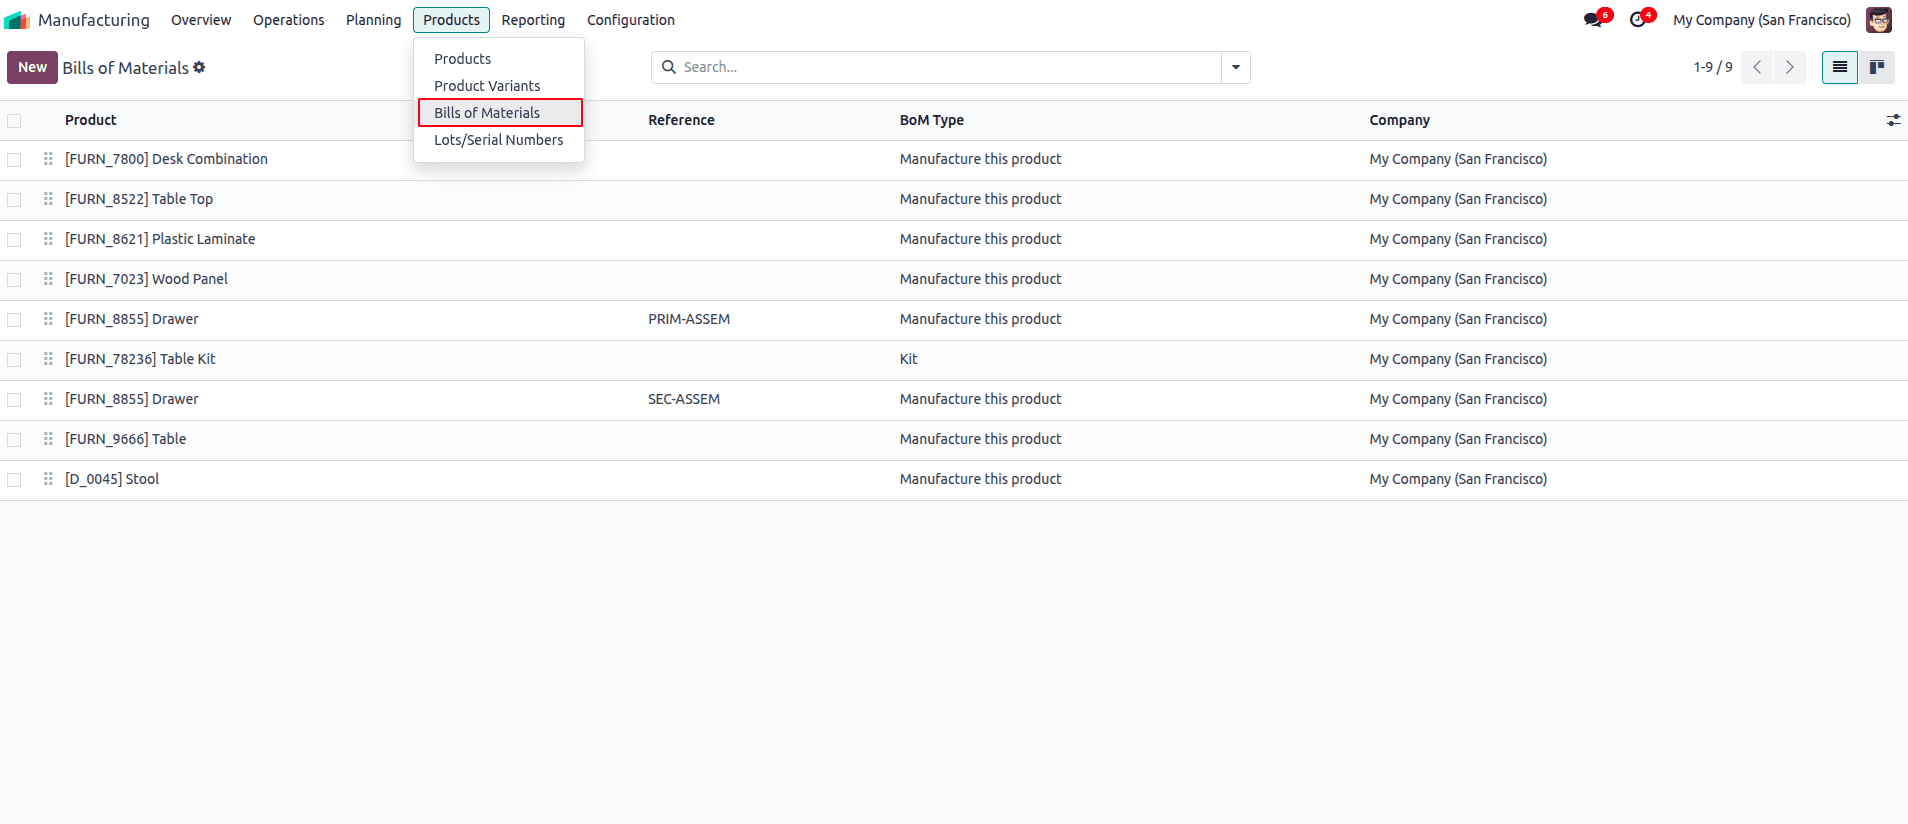
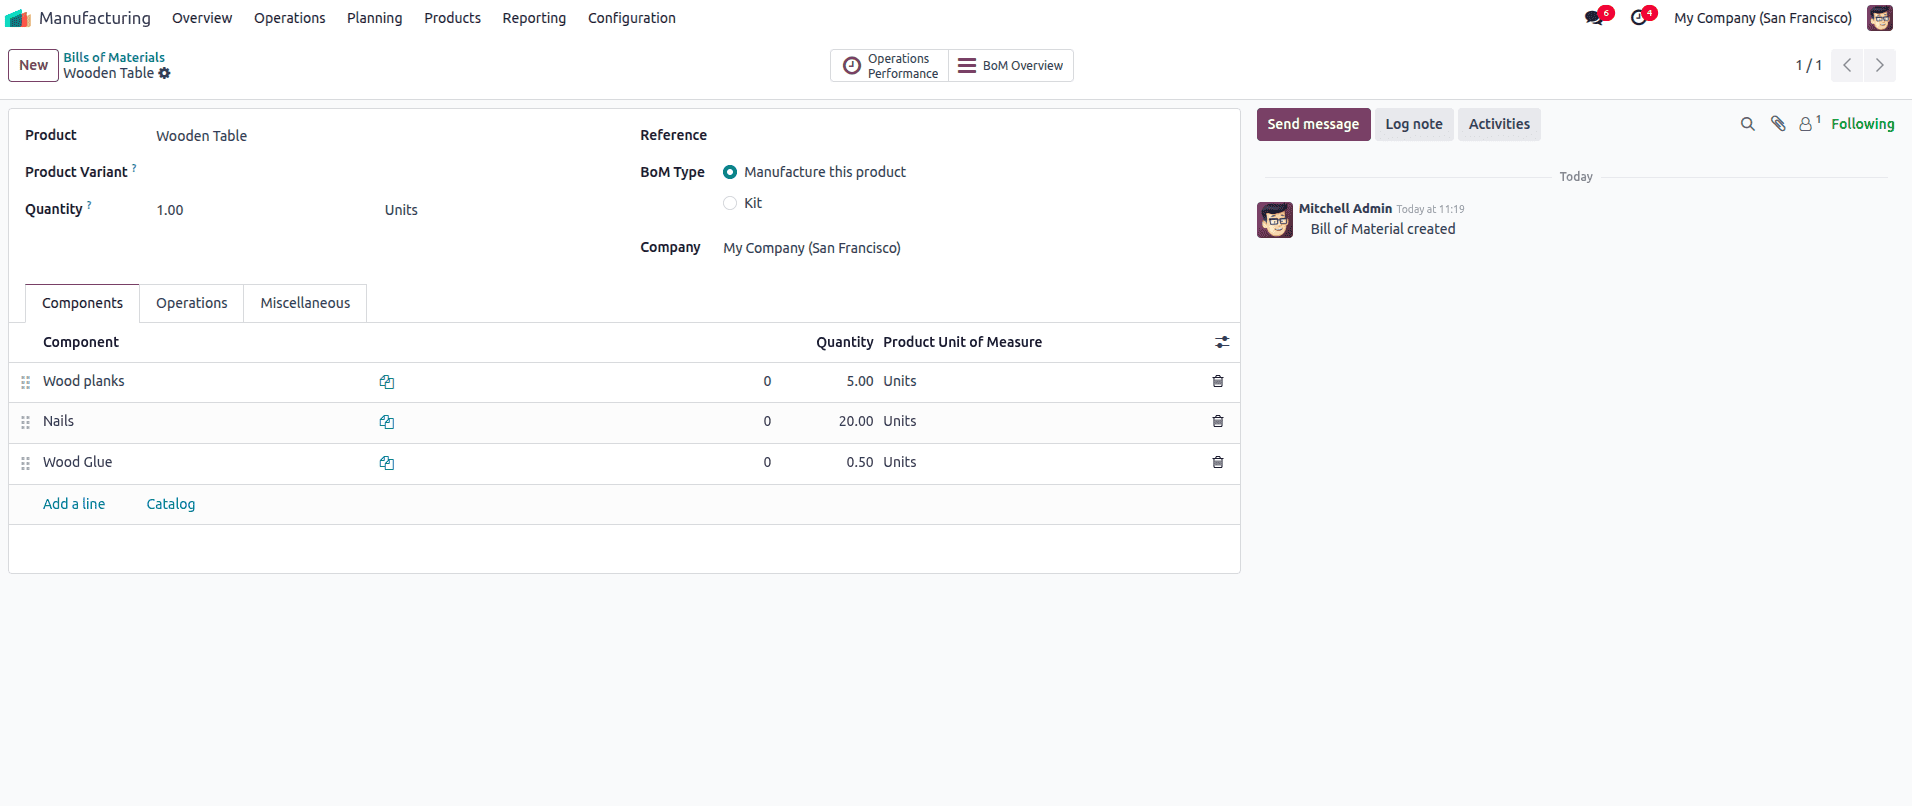
After creating your product, the next step is to set up its Bill of Materials (BoM), which defines all the raw materials and components required to manufacture the product. In Odoo 18, you can create a BoM by going to Manufacturing > Products > Bill of Materials and clicking Create.
Select the product you want to produce, such as the Wooden Table, and choose the BoM type to Manufacture this Product. Then, add the necessary components along with their quantities, for example, wood planks, nails, and wood glue. If the component products don’t already exist in the system, you’ll need to create them first as Storable Products so they can be tracked properly. You can also specify manufacturing operations, such as cutting or assembly, and assign them to specific work centers to organize the production steps. Once saved, this BoM will guide the manufacturing orders, ensuring that the correct materials are consumed and that the production process runs smoothly and efficiently.
To manage and track your manufacturing process efficiently, you need to assign
work centers where specific operations will be performed. In Odoo 18, work centers represent physical locations or machines used during production, such as cutting stations or assembly lines. To create and assign work centers, navigate to
Manufacturing > Configuration > Work Centers and click
Create.
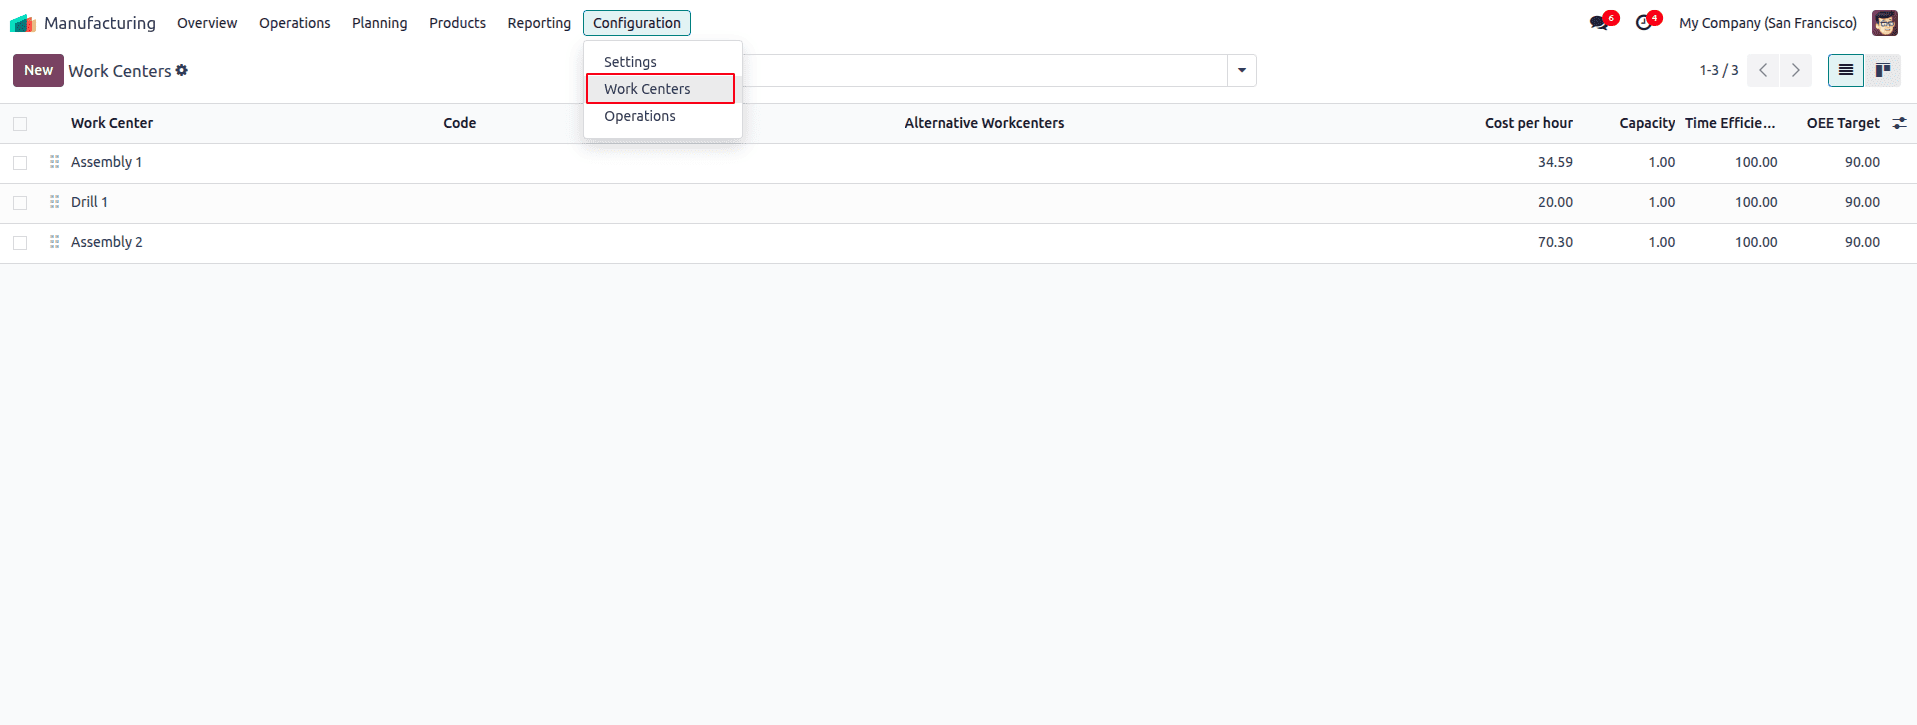
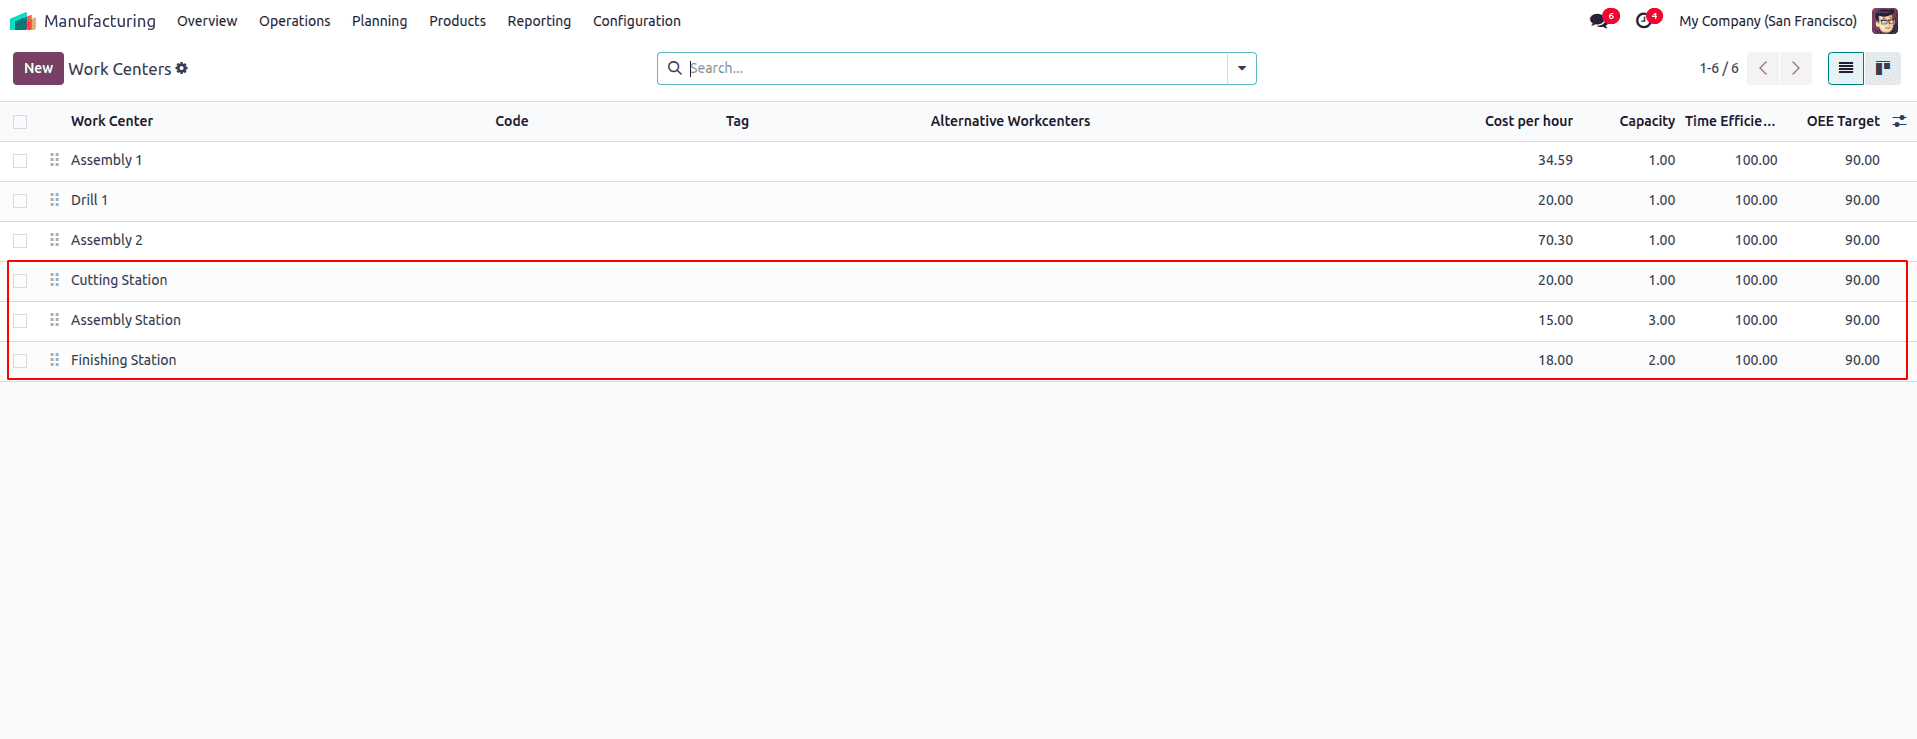
For manufacturing the Wooden Table, three main work centers are needed: the Cutting Station, the Assembly Station, and the Finishing Station. The Cutting Station is where the wood is cut to size, the Assembly Station is for putting the parts together, and the Finishing Station handles sanding and painting. Each work center should be configured by setting its capacity (how many tasks or workers it can handle at once), working hours, and the cost per hour, which includes labor and other expenses. Properly setting up these work centers helps Odoo manage production smoothly and calculate the correct costs for each step.
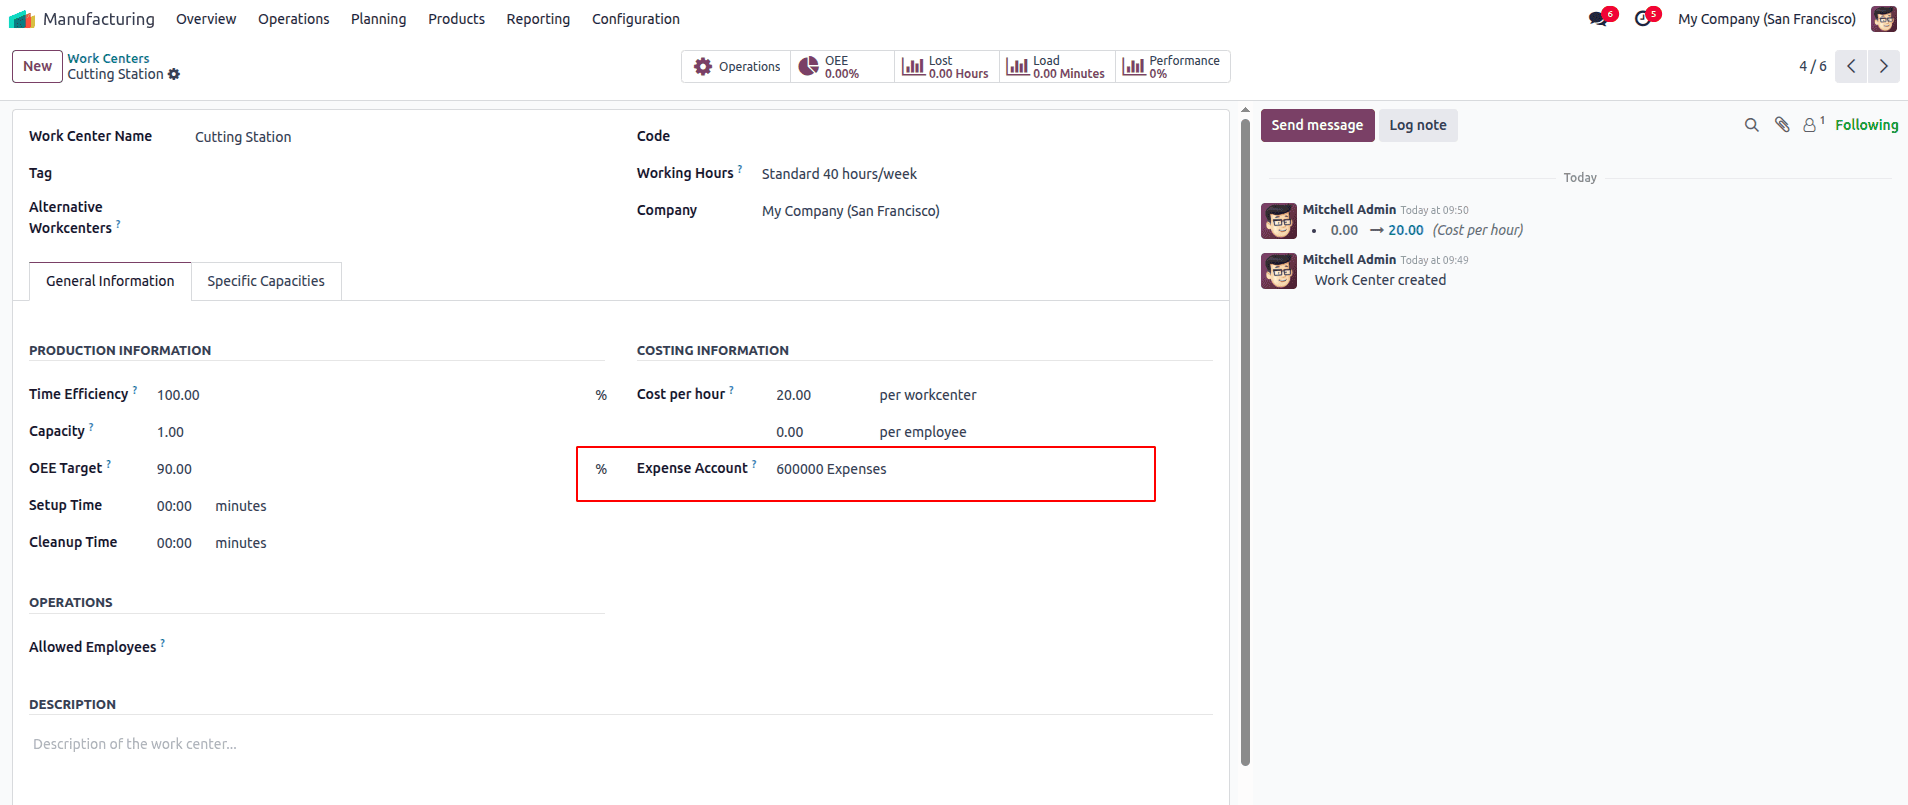
To ensure operation costs are accurately included in production accounting, you must set an Expense Account in each Work Center you create. This allows Odoo to record labor or machine costs as part of the total manufacturing cost during work order execution.
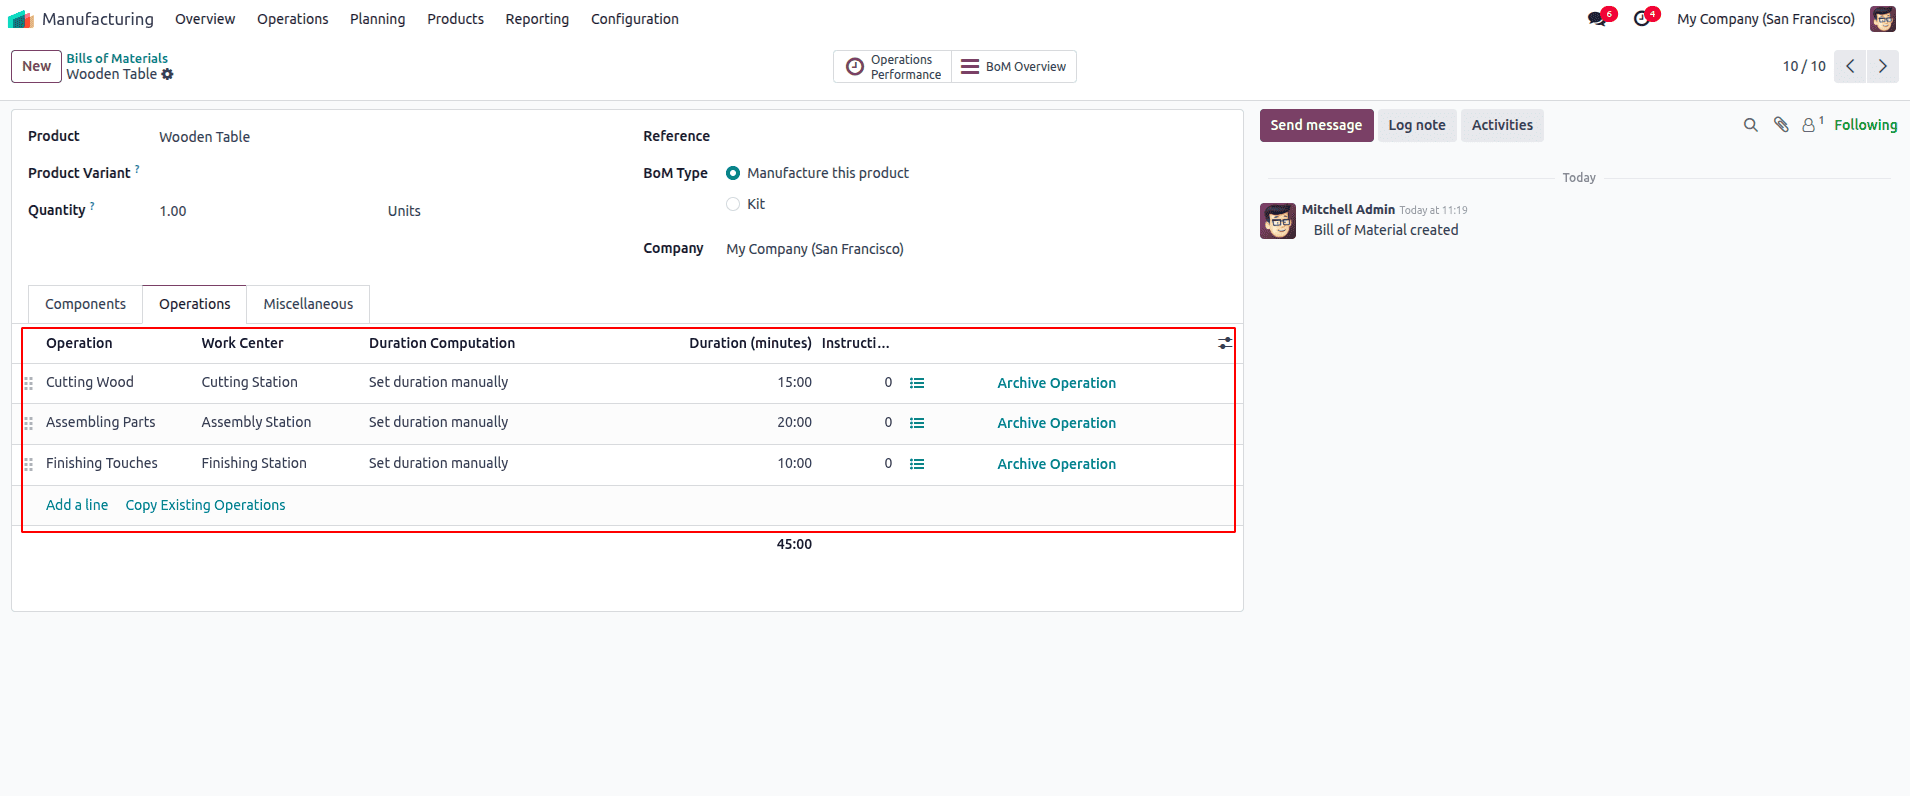
Once your work centers are set up, the next step is to define the operations involved in the manufacturing process and assign them to the appropriate work centers. Operations represent the specific tasks that take place during production, such as cutting, assembling, and finishing. You can add these operations directly in the Bill of Materials under the Operations tab. For each operation, give it a name (e.g., “Cutting Wood”), assign it to the correct work center (e.g., Cutting Station), and specify the duration or time needed. Repeat this for each stage, like “Assembling Parts” for the Assembly Station and “Finishing Touches” for the Finishing Station. This setup allows Odoo to schedule tasks accurately, track time spent on each operation, and calculate the total manufacturing cost more precisely.
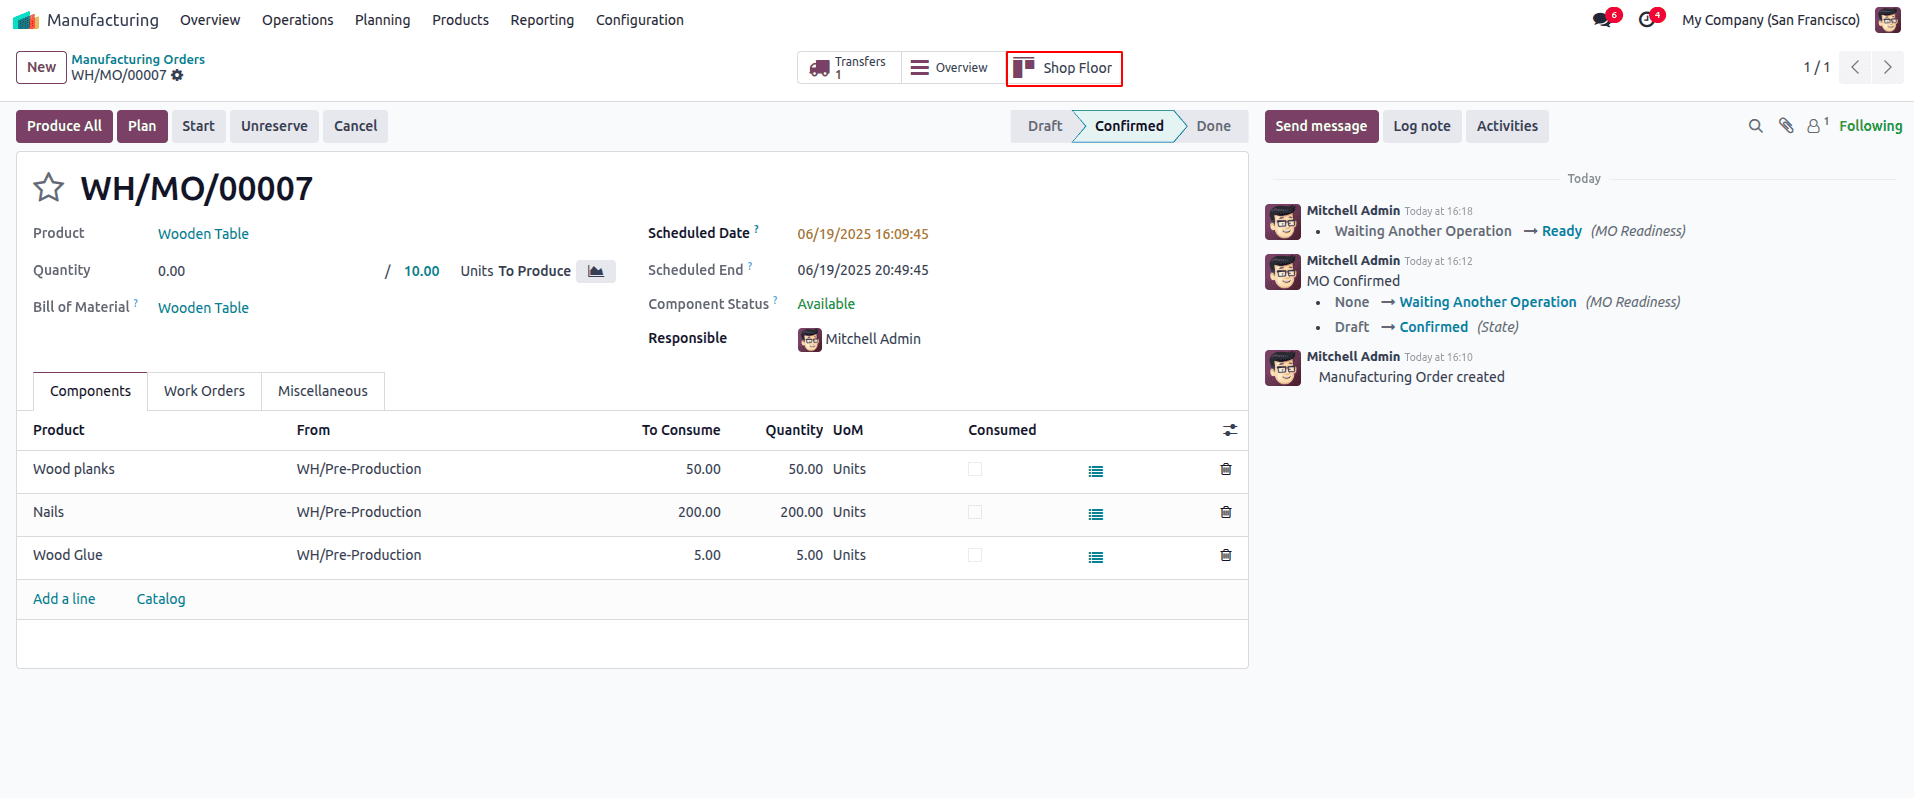
Once your product, components, BoM, work centers, and operations are fully set up, you can start the actual production by creating a Manufacturing Order (MO). To do this, go to Manufacturing > Operations > Manufacturing Orders and click Create. Select the product you want to manufacture (e.g., Wooden Table), and enter the quantity you want to produce—let’s say 10 units.
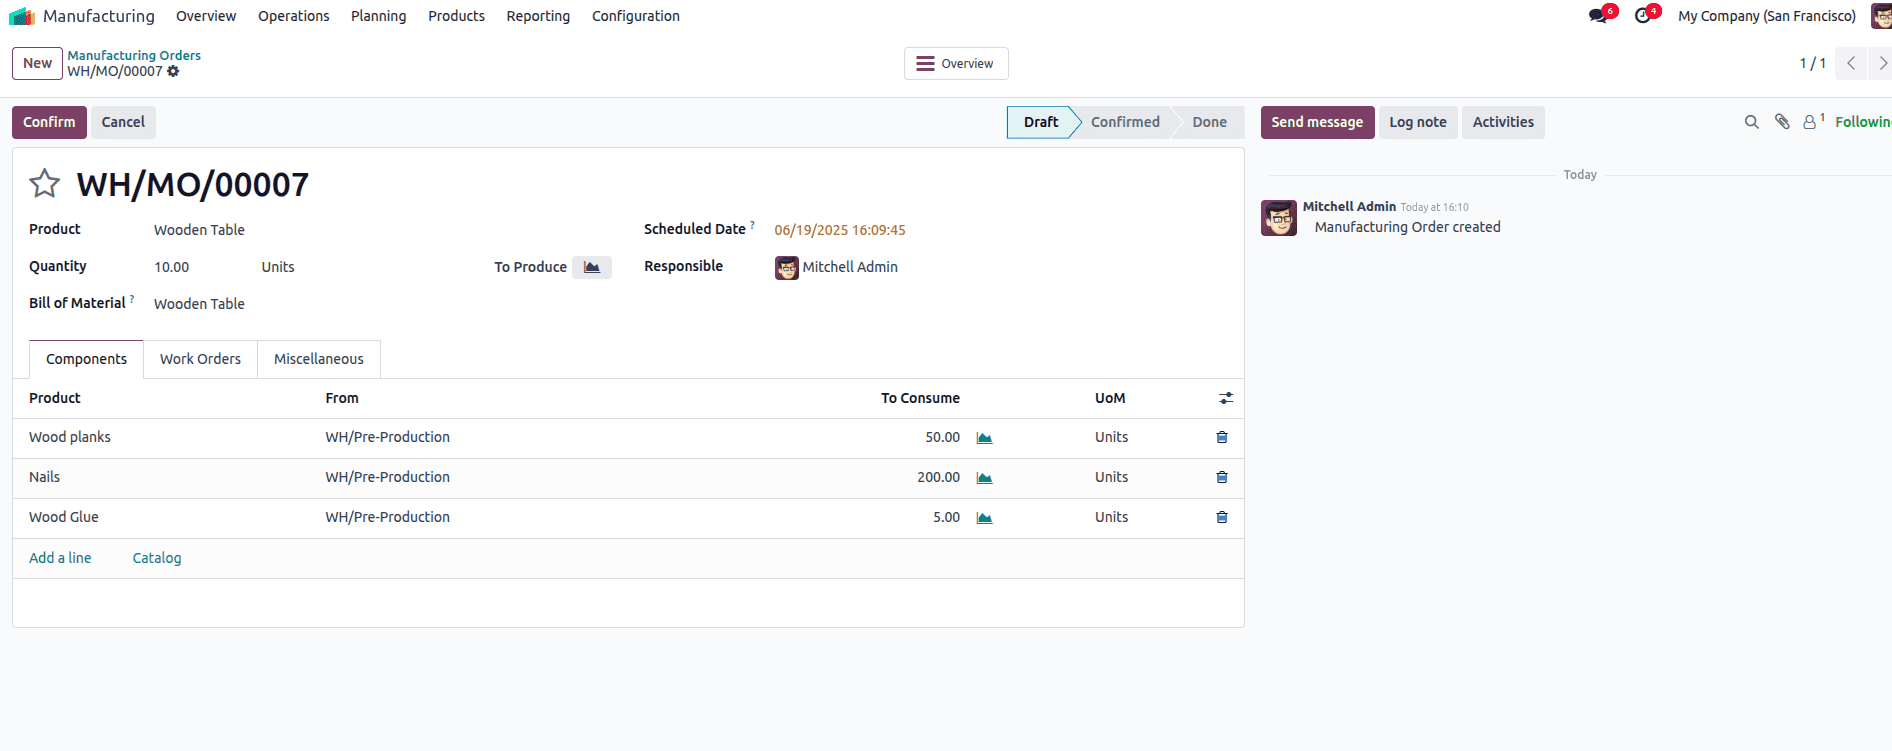
Odoo will automatically fetch the related Bill of Materials, list the required components, and generate the production steps (operations) based on your configuration. When you confirm the order, Odoo will reserve the required raw materials from your stock. At this point, the component status will show as “Available” in orange, indicating that the materials are reserved and ready to be picked. Additionally, a picking operation is created automatically for moving the components from storage to the production location.
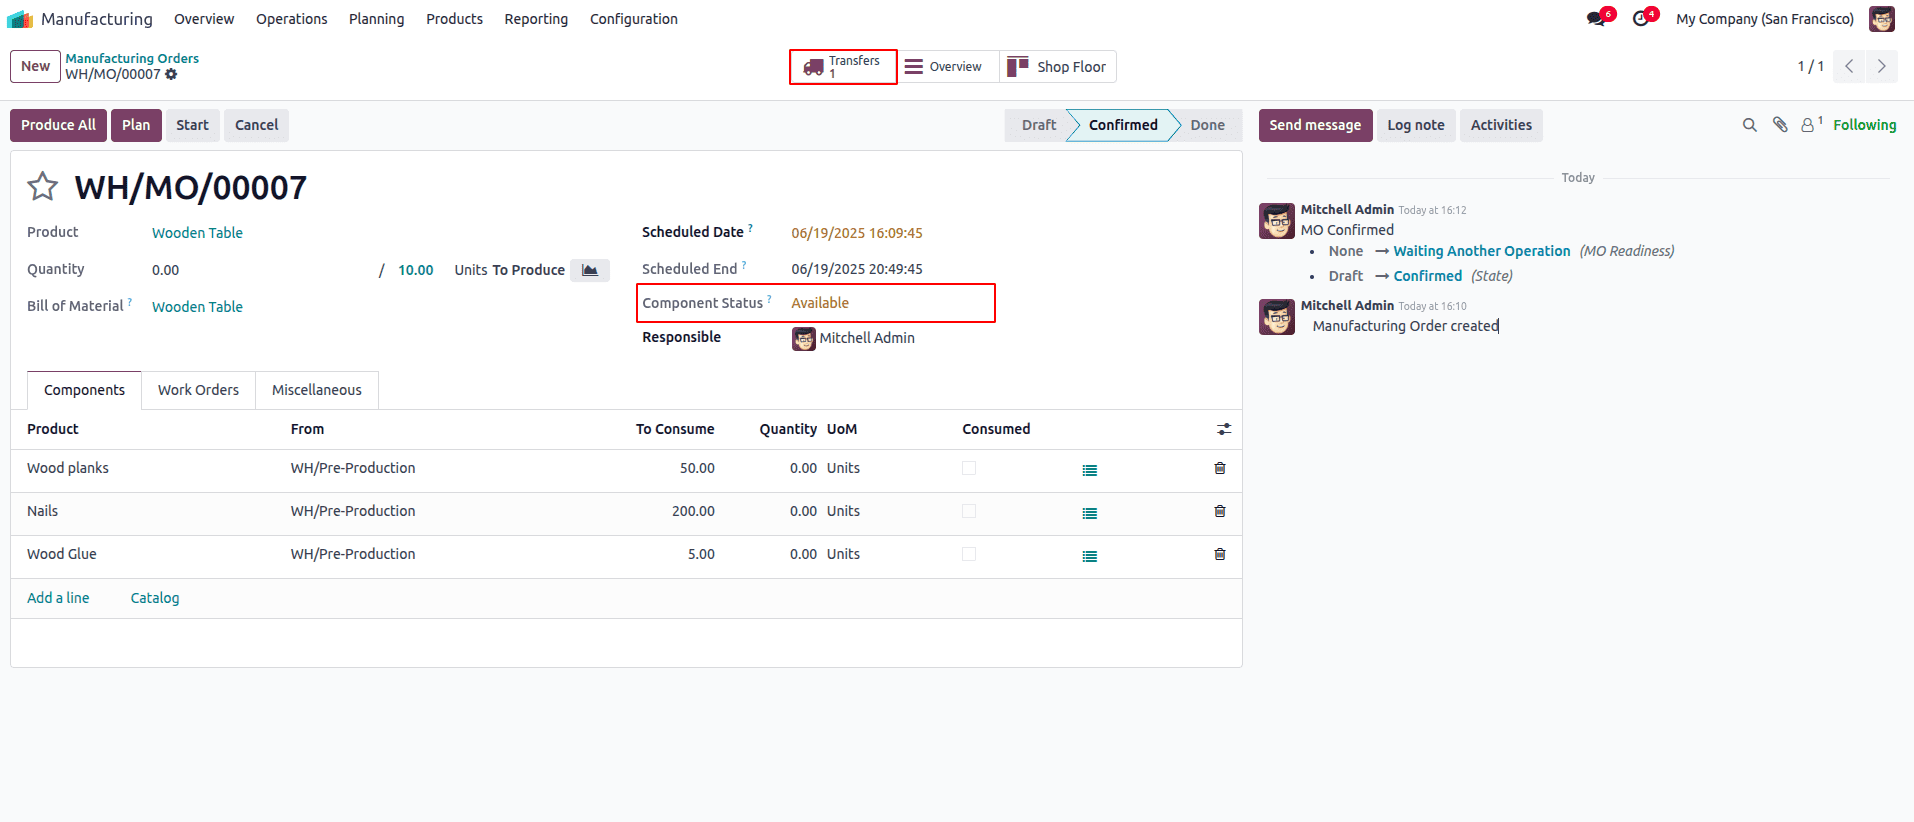
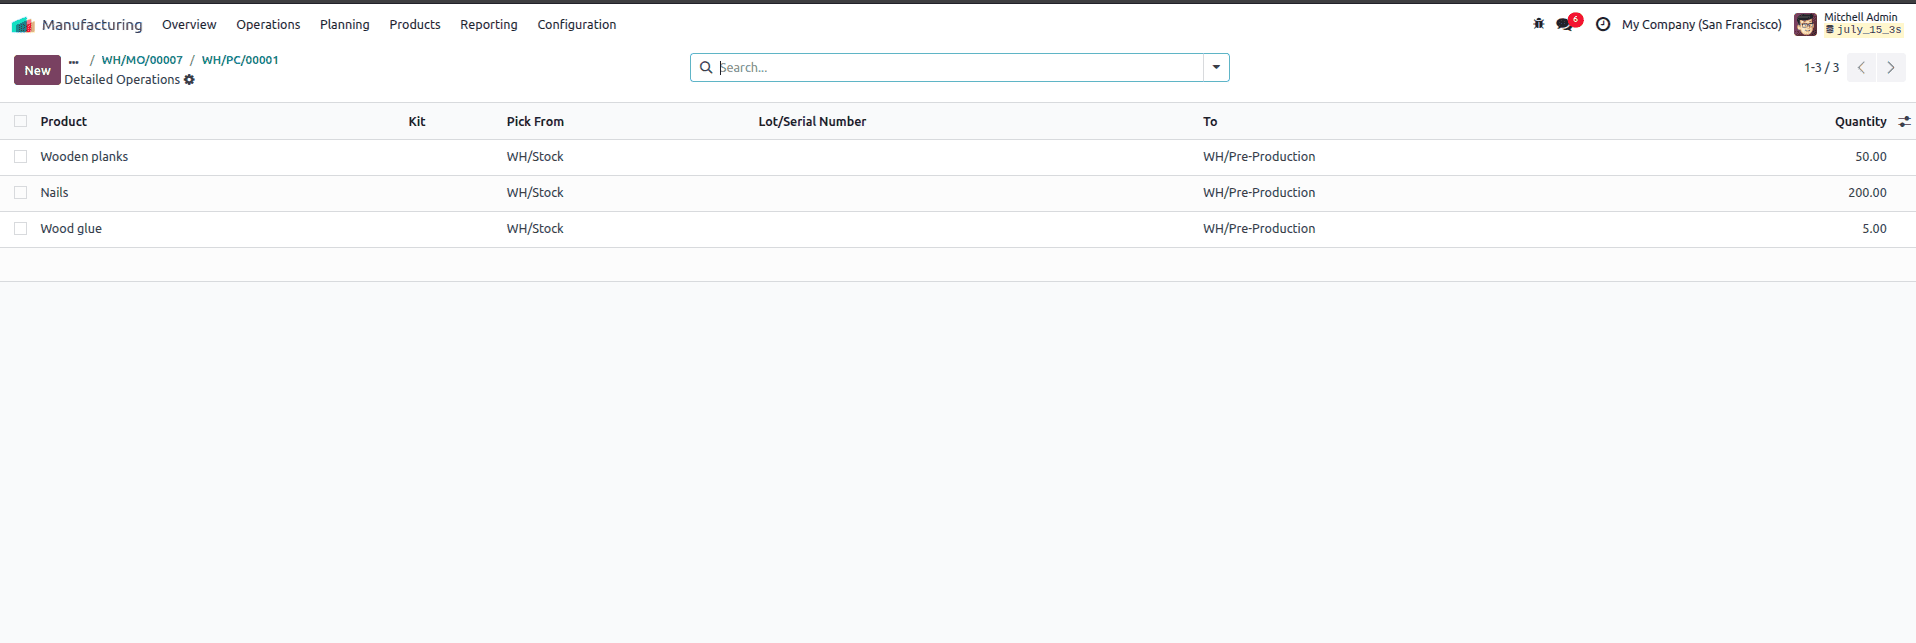
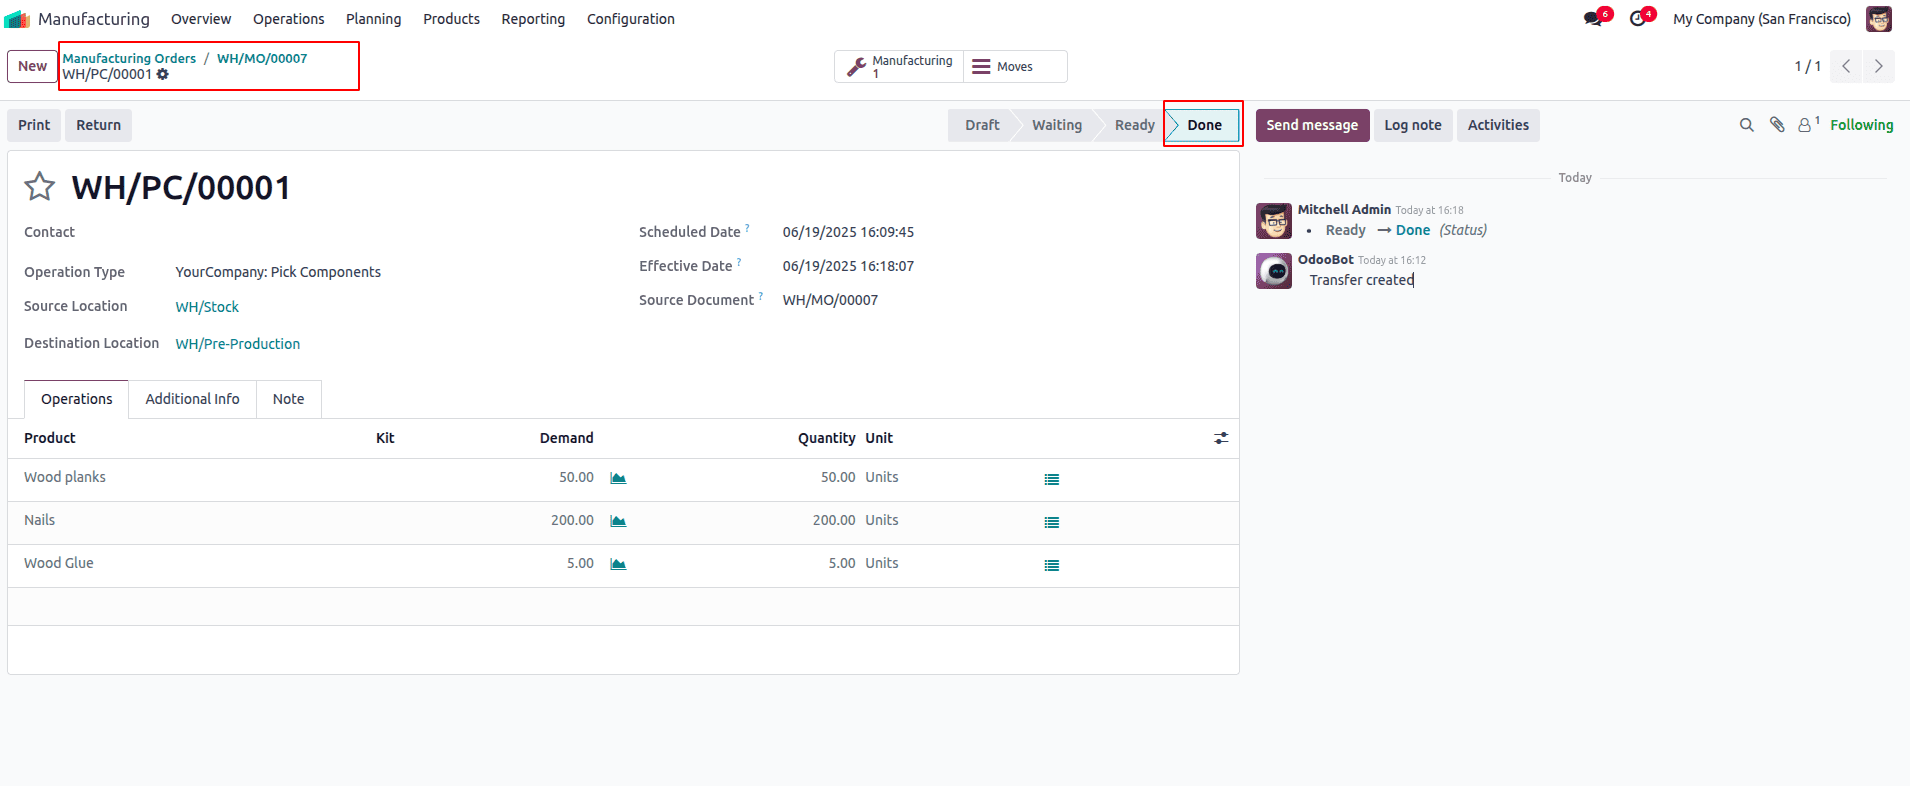
You can view this picking by clicking the Transfers smart button on the top right of the MO. Open the transfer, review the component quantities, and click Validate to complete the move and make the components officially available for production. The stock is moved from the warehouse location to a pre-production location. The manufacturing follows a 3-step configuration. This is the first step, picking from WH/Stock to WH/Pre-production location. We can see the productions by clicking the Moves smart button.
After validating the transfer, it goes to the Done state.
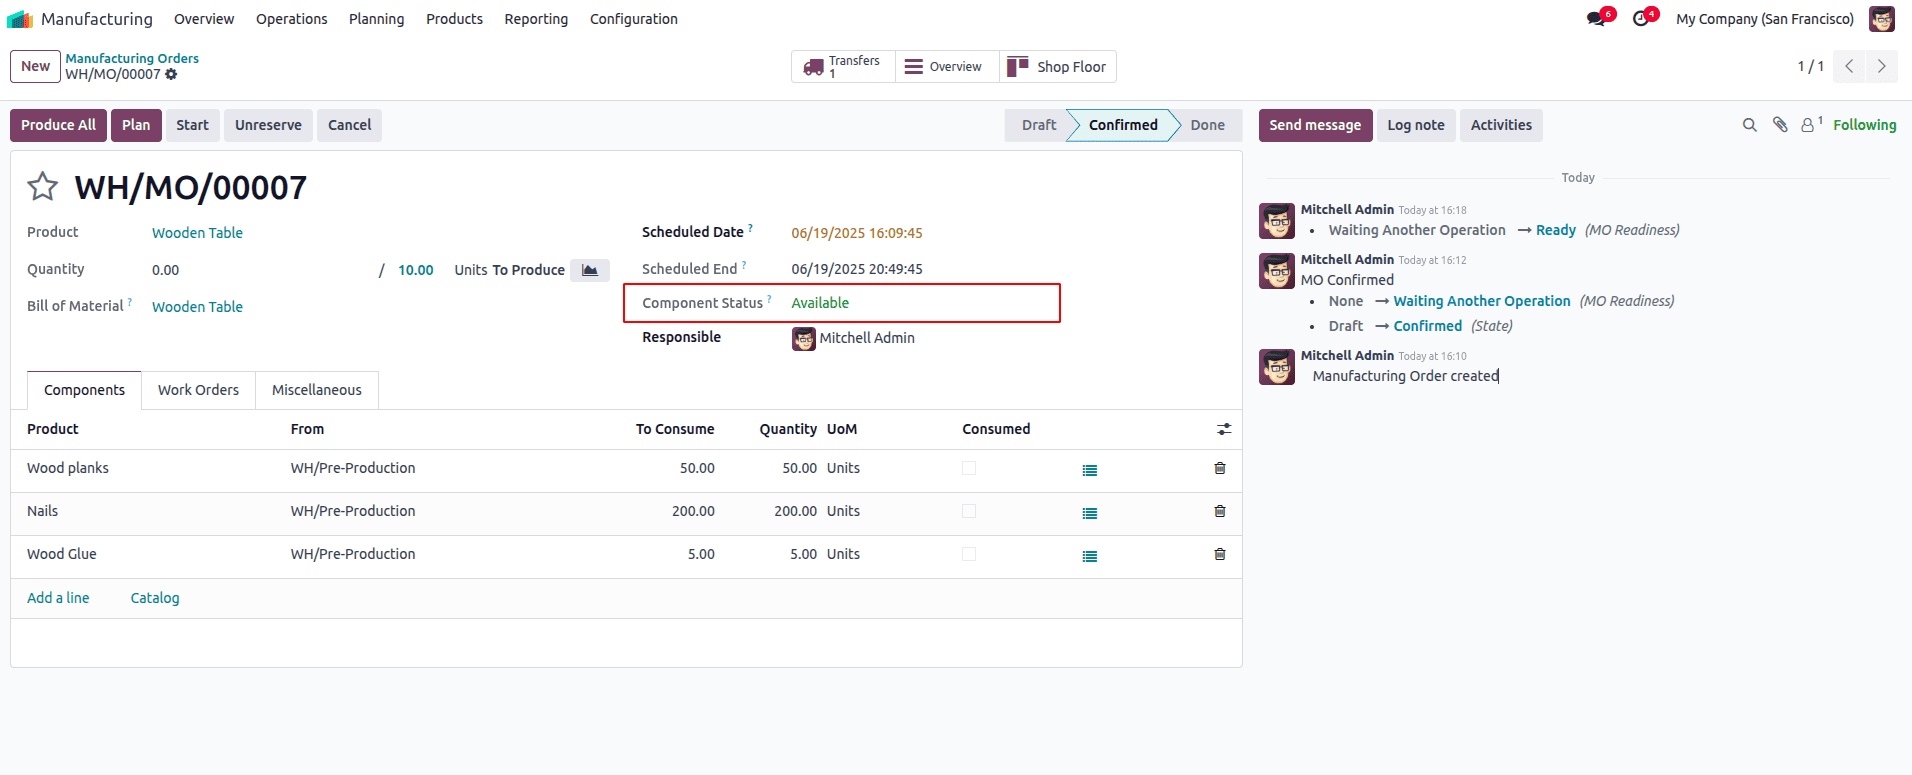
After validating the material transfer, the component status of the Manufacturing order is changed to ‘Ready’ and shown in green color.
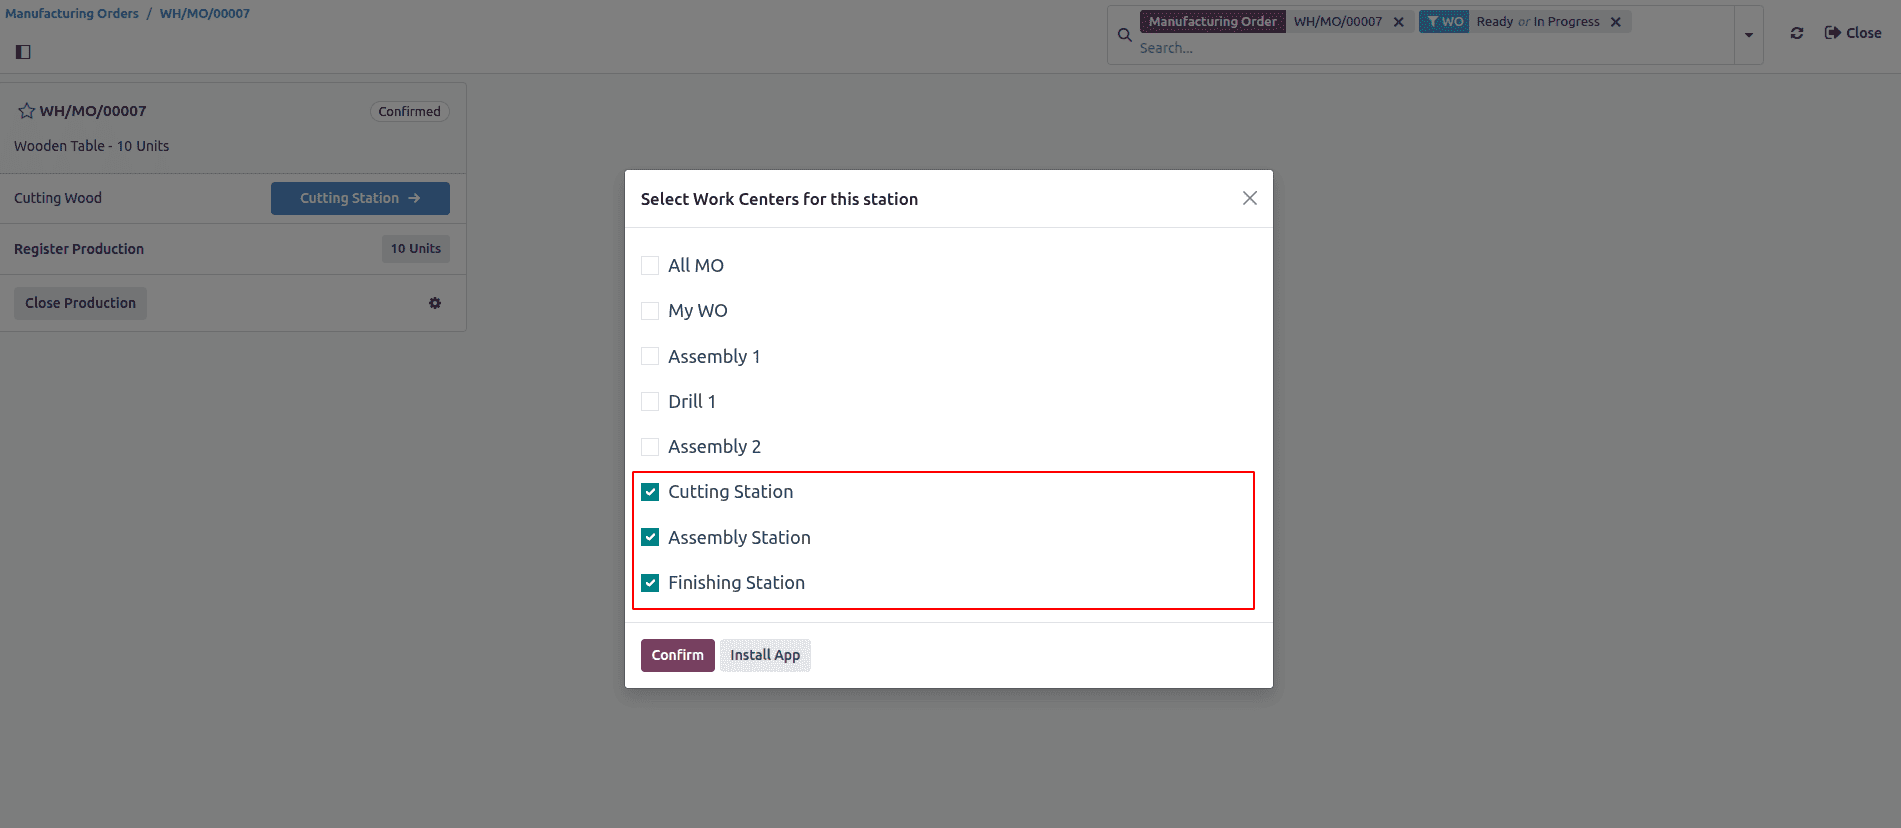
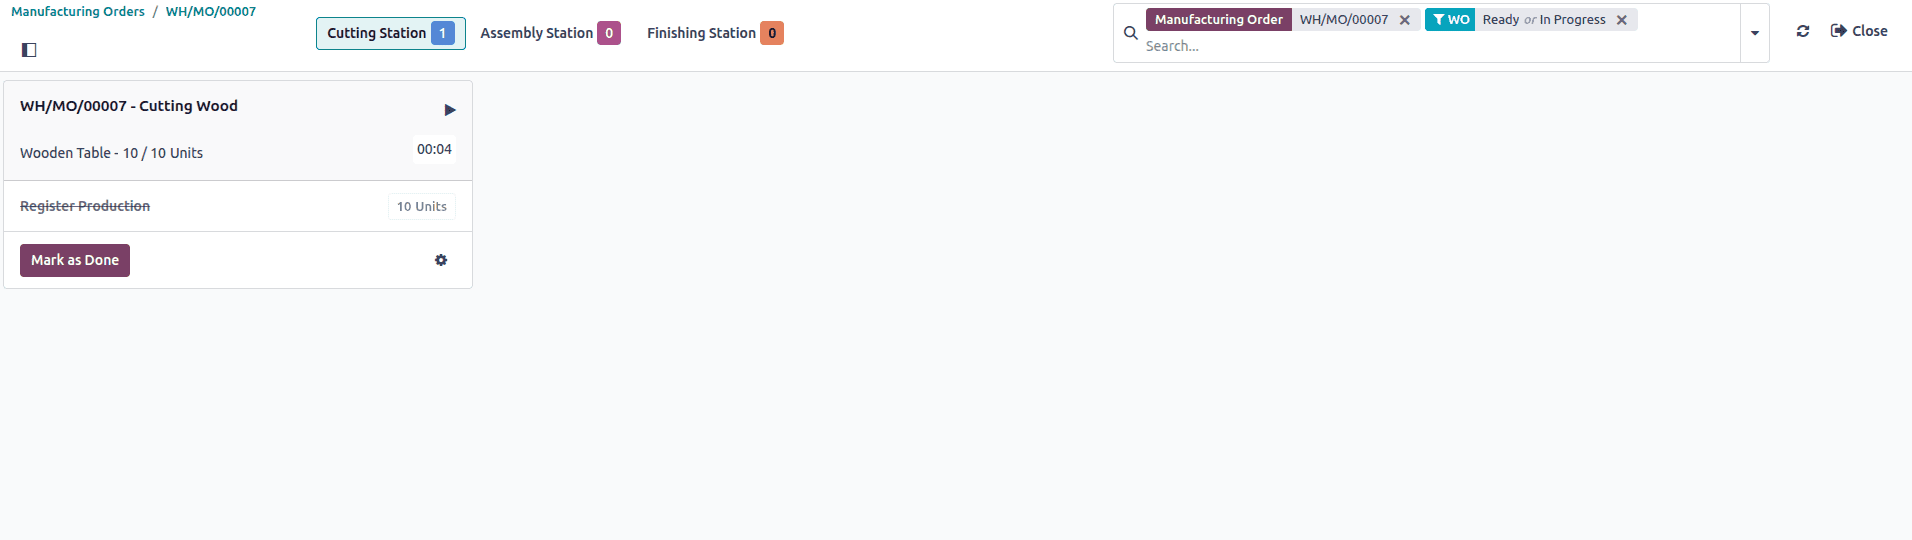
Once components are picked, you can begin the production process. Go to the Work Orders tab of the MO and process each operation (e.g., Cutting, Assembling, Finishing) by clicking Start and Mark as Done step by step. In Odoo 18, the Shop Floor module offers a user-friendly, tablet-optimized interface that allows production workers to carry out operations in real-time on the shop floor. After confirming a Manufacturing Order and validating the component transfer, operators can access the Shop Floor. Each assigned work order (e.g., Cutting, Assembling, Finishing) will appear in sequence. Workers can start, pause, and mark operations as done with just a few taps. The interface also shows which components to use, work instructions, and time tracking. Once an operation is completed, the system automatically records the duration, helping track labor time and cost. This real-time execution ensures accuracy, reduces manual errors, and keeps the production workflow fully synchronized with inventory and planning. You can access the Shop Floor view by clicking the “Shop Floor” smart button at the top of the MO.
This will open a simplified, step-by-step interface showing all the active work orders—such as Cutting, Assembling, and Finishing—assigned to that production. From here, we can choose the work centers for this station and confirm.
From here, operators can start, pause, or complete each task in real-time. The interface also displays the required components, instructions, and time tracking for each operation. This real-time execution ensures precise tracking of progress and production costs while keeping warehouse and inventory updates fully automated.
So once production has started, there comes the second step of product movement from the pre-production location to the production location. So at the pre-production locations, materials are assumed to be initially kept and prepared for production. Then, raw materials are taken from the pre-production location to the production location, which is a virtual location to produce the final finished goods, and finished goods are kept at the post-production location.
We can complete each operation by clicking the Mark as Done button. Once all the production operations (Cutting, Assembling, and Finishing) are completed and each work order is marked Done, the final step in the manufacturing process is to move the finished goods into stock from the post-production location. In Odoo 18, this happens through a final transfer that is automatically created when you complete the manufacturing order.
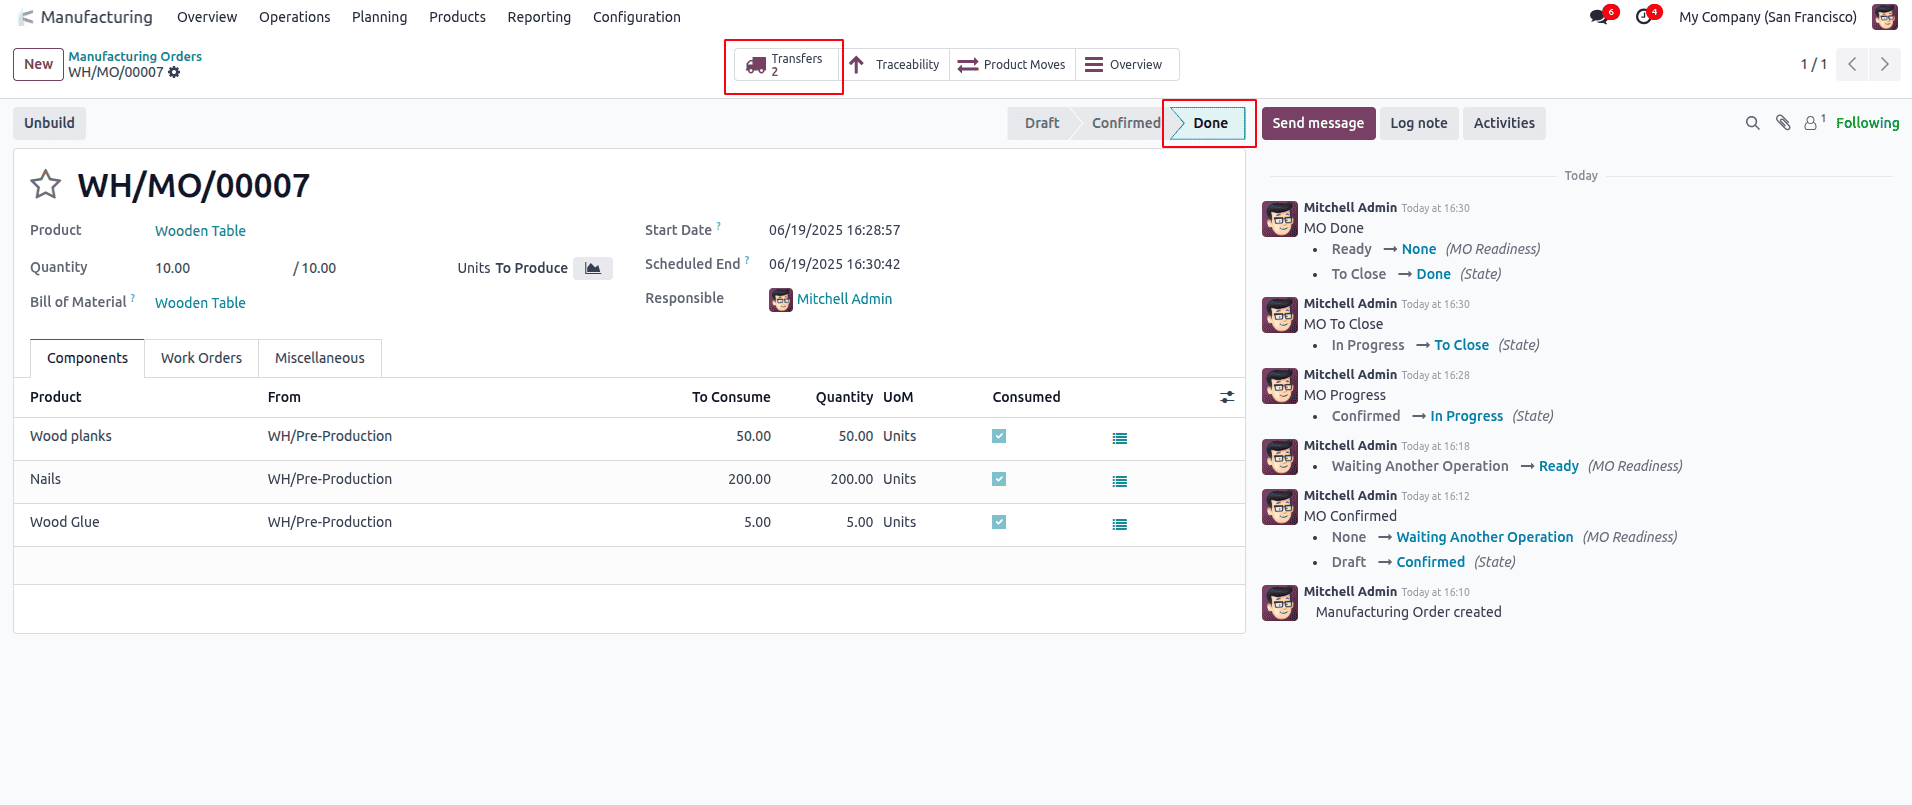
You’ll notice a “Transfers” smart button on the top-right corner of the MO. After completing all operations and clicking Mark as Done, a delivery transfer is generated to move the finished product from the WH/Post-Production to the WH/Stock location, as per the 3-step warehouse route.
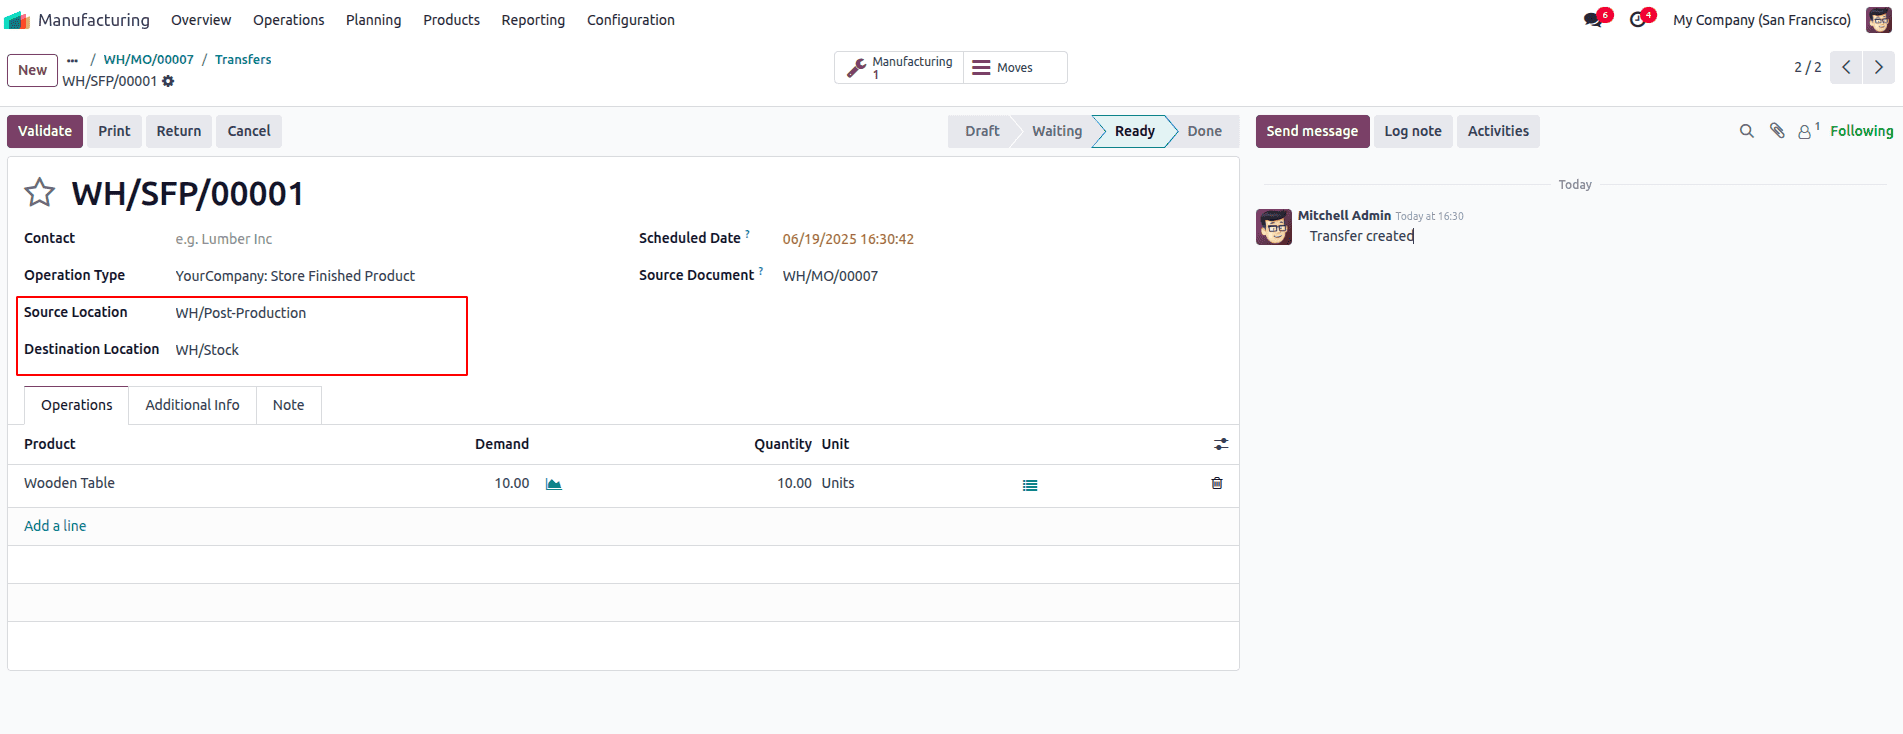
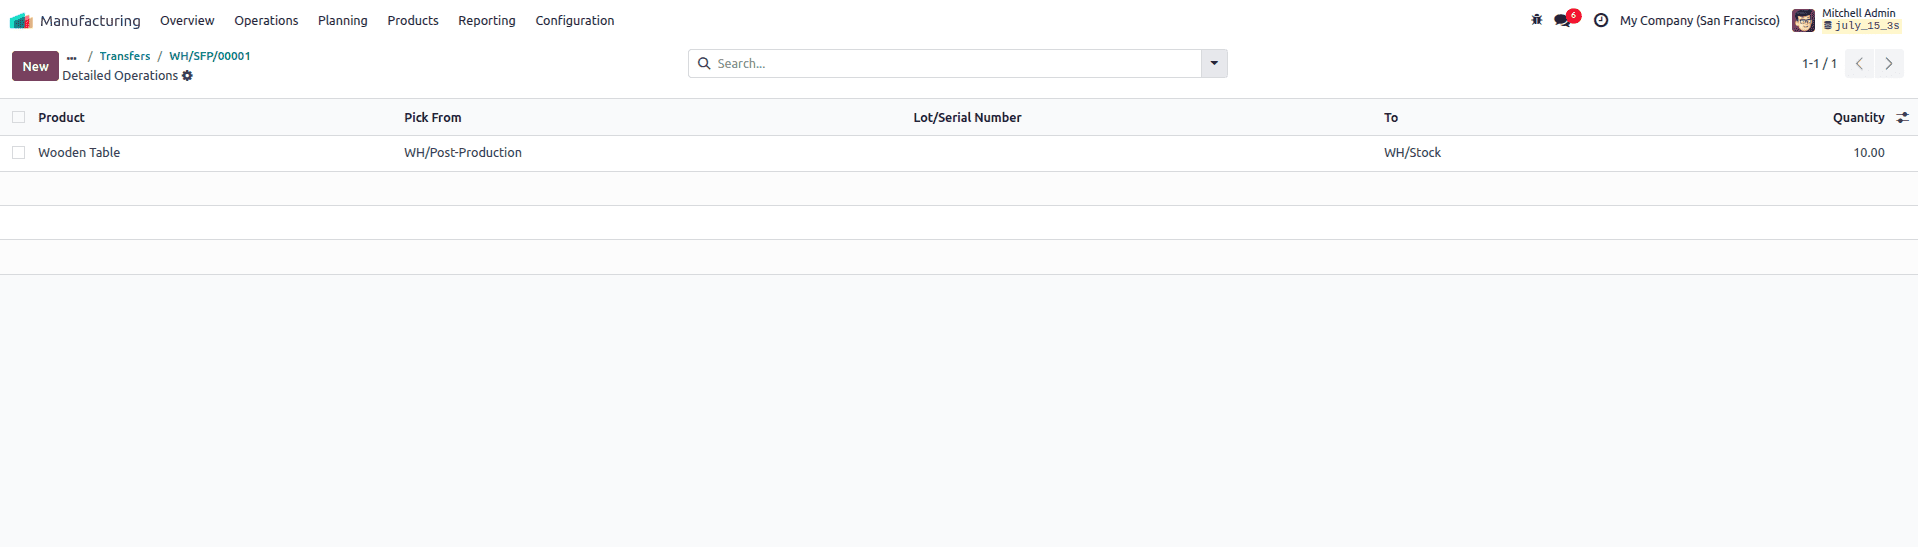
To finalize this, go to the Transfers tab, open the newly created transfer for finished goods, and review the quantity. We can see the details of the product moves tab. In this transfer, the manufactured product moves from the WH/Post-production location to the WH/stock location.
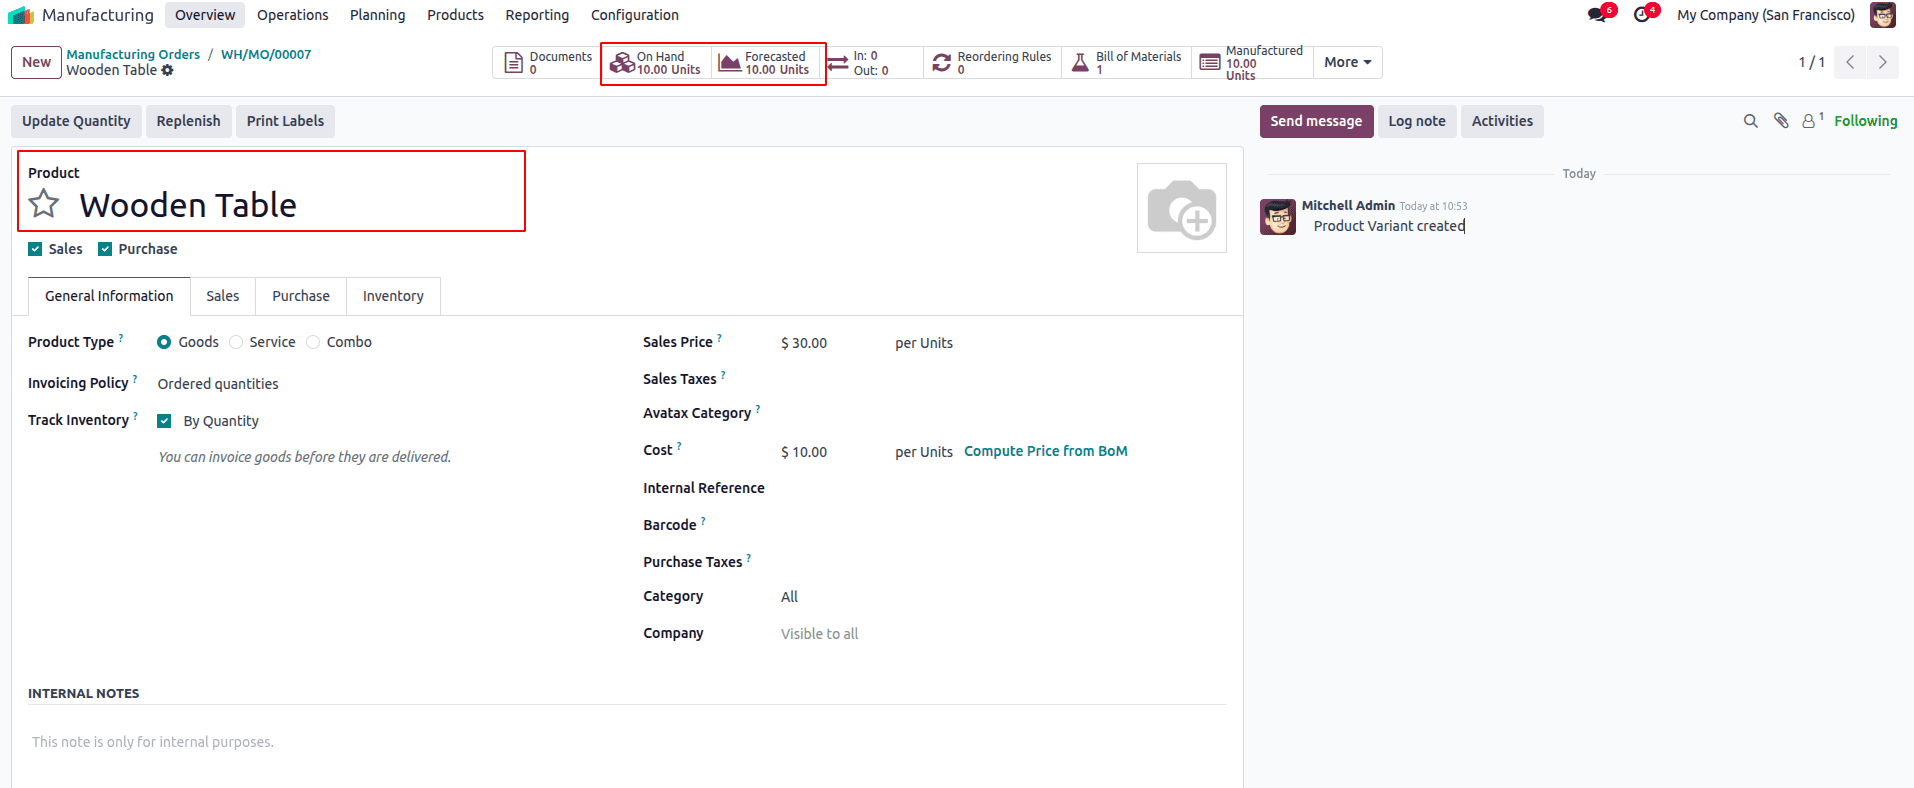
After clicking the Validate button, this action updates your inventory and officially adds the manufactured items to your stock, making them available for sale or internal use.
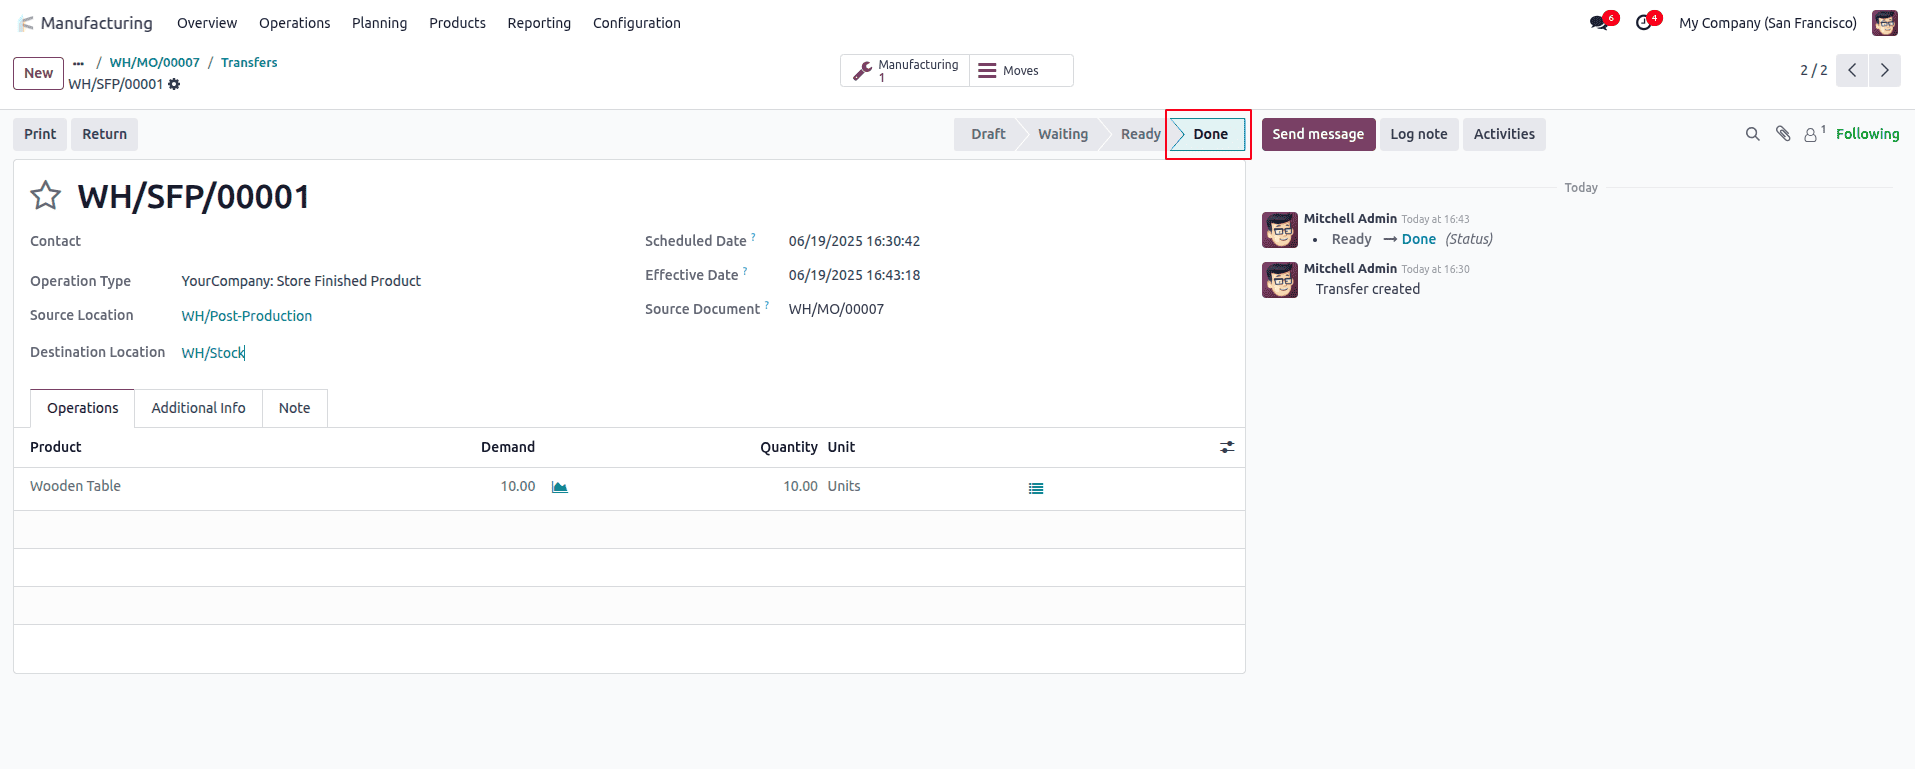
After validating the transfer, the quantity will be updated in the stock.
In Odoo 18, the 3-step warehouse process manages stock movement in a clear and organized way. When a Manufacturing Order is confirmed, raw materials are first picked from the Stock location and moved to the Production Location—this is the first step. Next, the actual production takes place at the Production Location, where the components are consumed through the assigned operations. Once all work is completed, the finished product is transferred from the Production Location back to the Stock (Finished Goods) location. This final step ensures the manufactured items are available for sale or further processing. The 3-step flow helps maintain full visibility and control over both raw materials and finished goods during the production cycle.
After completing manufacturing, we can see the product moves for the entire manufacturing process from the Product Moves tab of the manufacturing order.
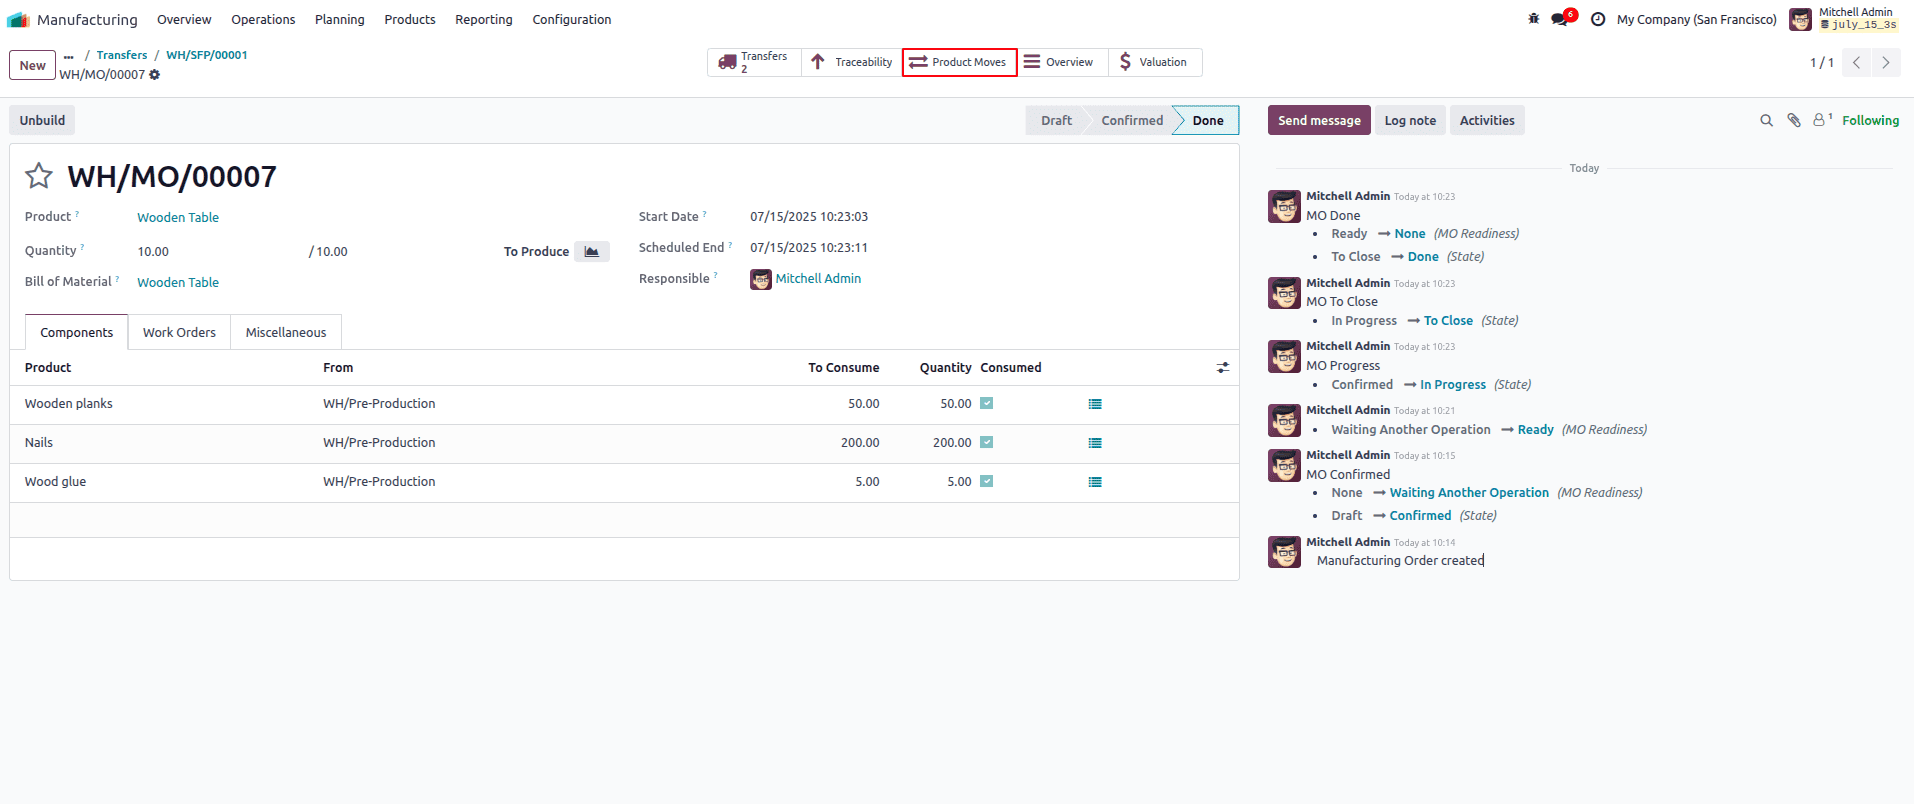
By clicking the Product moves, it will show the product moves of component products and finished goods.
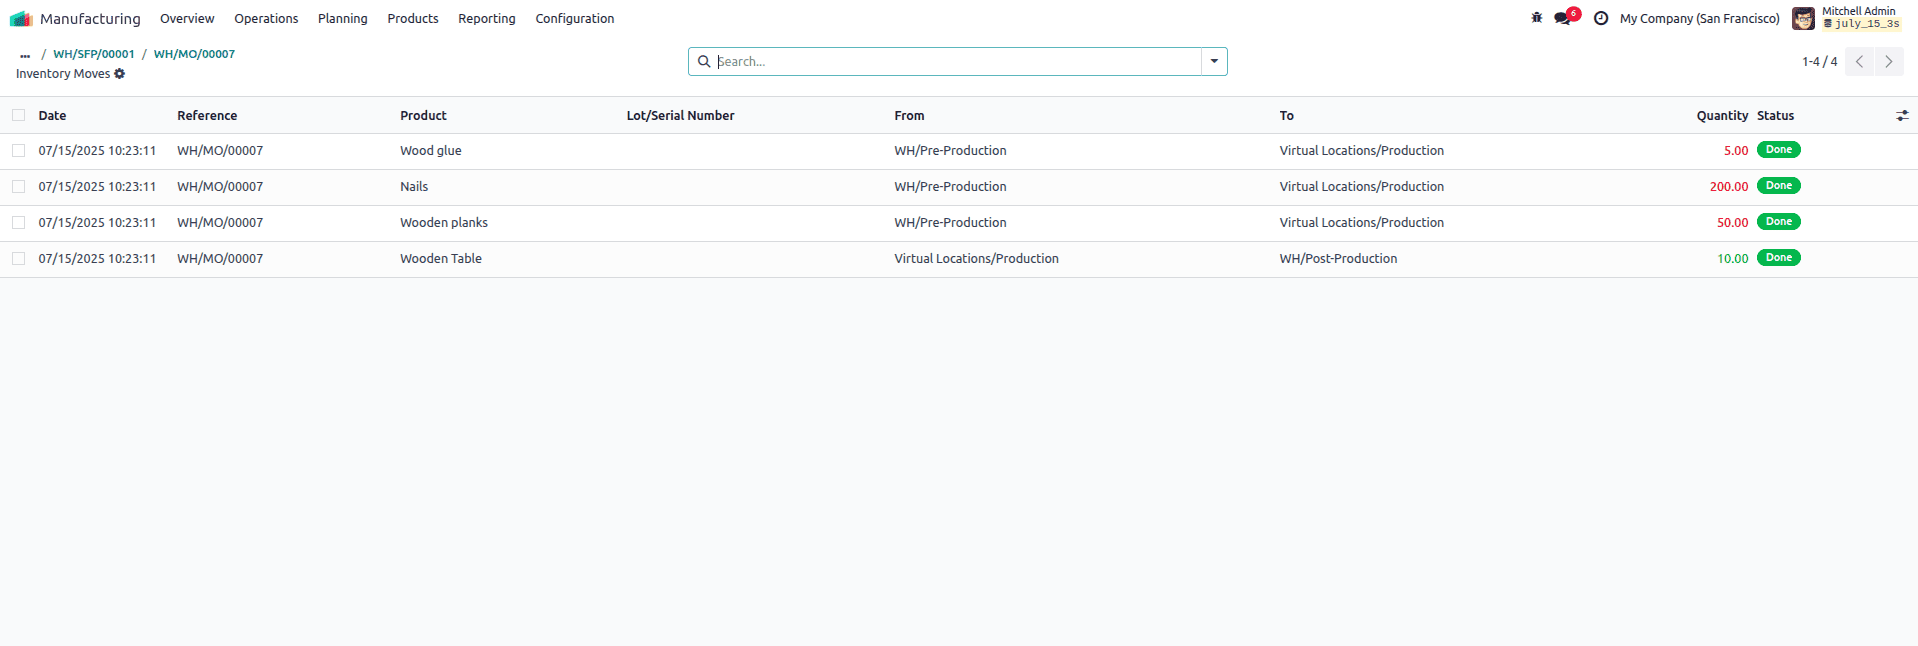
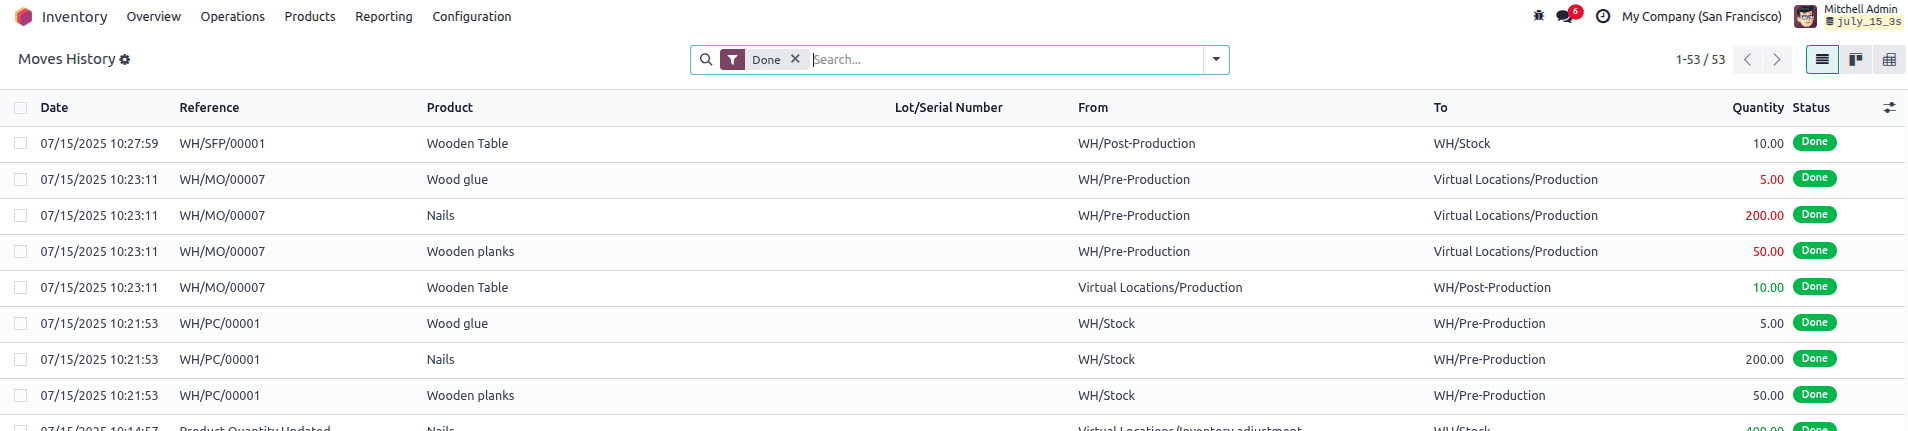
The first three lines of the first product move explain the transfer of Component products for manufacturing operations from WH/Pre-production to Virtual Location/ Production with Quantity. This quantity is left from the stock and it is indicated, ie, red colour. The last line shows the movement of finished products from the Virtual Location/ Production to the WH/Post-production. After that, it created another transfer to move the finished product from the WH/Post-production to the WH/StockThehe. The Move History reporting inventory module shows all the product moves of thi3-stepep manufacturing process as follows.
In Odoo 18, the Overview tab of the Manufacturing Order offers a comprehensive summary of both the production progress and the associated costs. As the manufacturing order progresses
Odoo automatically calculates the cost of production by combining the cost of raw materials consumed and the operational costs incurred. The raw material cost is derived from the quantities and unit costs specified in the Bill of Materials (BoM), reflecting what has actually been used during production. Meanwhile, operational costs are calculated based on the work centers assigned to the manufacturing order, factoring in the time spent on each operation and the corresponding cost rate of those work centers.
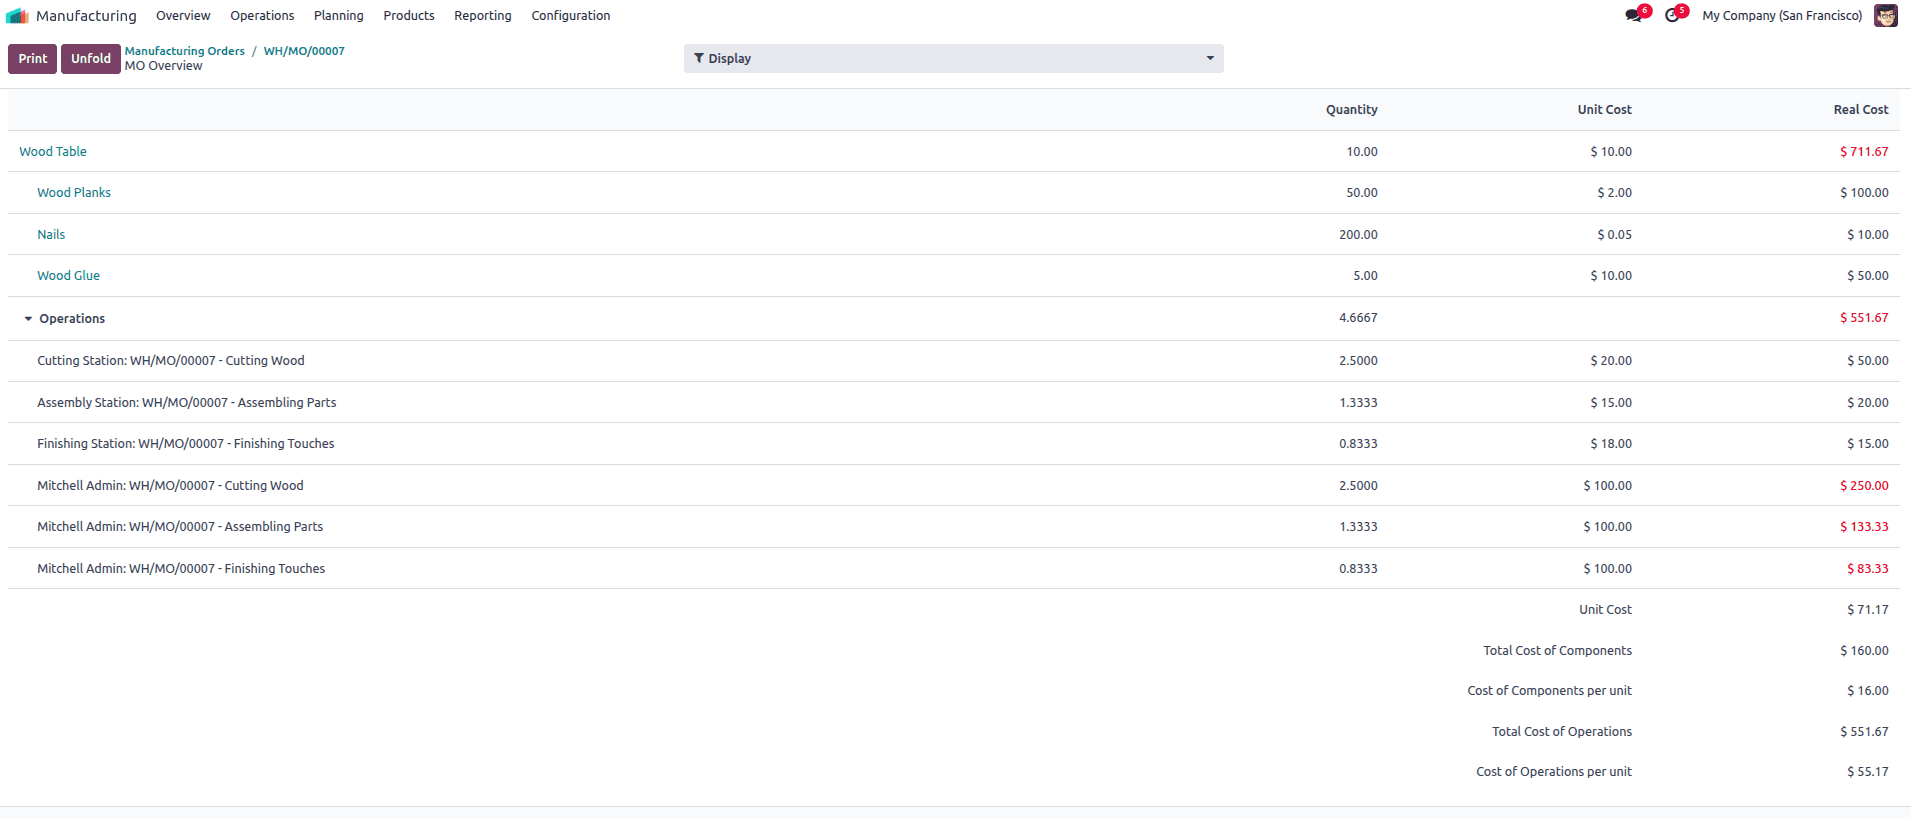
The Overview tab displays these costs in real time, providing a clear breakdown of components consumed, operations performed, and the total cost accumulated so far. It also shows the manufactured quantity and the status of each stage in the process, including raw material reservation, work order progress, and final completion. This dynamic snapshot helps managers and production teams monitor production efficiency and cost control, ensuring full visibility over the manufacturing workflow and financial impact at any given moment.
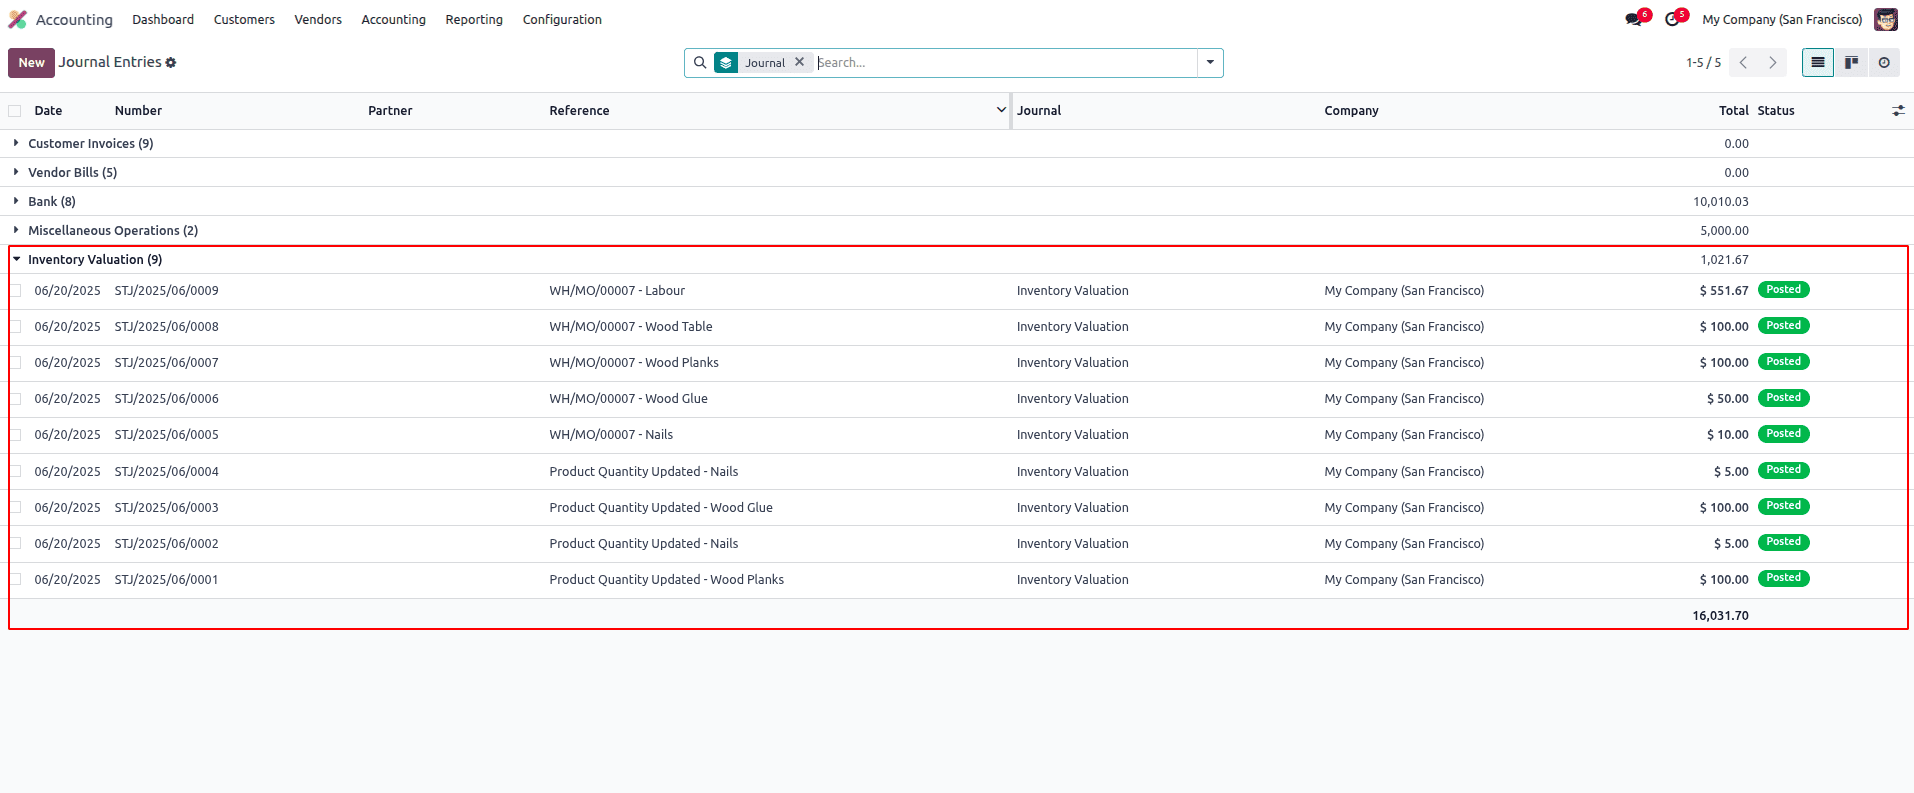
After a Manufacturing Order is completed in Odoo 18, the system automatically creates journal entries to reflect the stock movements if automated inventory valuation is turned on. When raw materials are used, Odoo records an entry that reduces the raw materials stock and moves their value into production. This shows that the materials have been taken out of storage and are being used to make the product. Once the finished product is ready, Odoo creates another entry to move the total cost—materials plus labor or machine time—into the finished goods inventory. This keeps both your stock levels and accounting values accurate without needing manual updates.
Using the three-step warehouse setup in Odoo 18 makes the manufacturing process more organized and easier to manage. It helps track how raw materials are used, how products are made, and where finished goods are stored. With everything connected—inventory, operations, and accounting—you get accurate stock levels and automatic cost updates without doing things manually. This setup is great for keeping your production process clear, your costs under control, and your business running smoothly. Whether you're a small business or a growing manufacturer, this method can save time and improve how you work.
To read more about How to Handle Manufacturing with Two Step Warehouse Configuration in Odoo 18, refer to our blog How to Handle Manufacturing with Two Step Warehouse Configuration in Odoo 18.