Web forms are widely used in websites to collect information from users, such as enquiries, documents, or service requests. In many scenarios, users also need the ability to upload files along with their submissions. Odoo 19 provides a flexible framework to handle this requirement using website controllers, models, and views.
In this blog, we will explain how to create a Web Form Attachment module in Odoo 19 that allows users to upload files from a public website form. The uploaded files are securely stored in the Odoo backend and can be managed by internal users through standard list and form views. The explanation follows a clear, functionality-based order and includes the complete module structure, required templates, backend configuration, and guidance on where screenshots can be added for better understanding.
This module uses standard Odoo components such as models, controllers, website templates, and security rules. It is lightweight, easy to understand, and suitable for learning or extending file upload functionality in real business applications.
web_form_attachment/
+-- __init__.py
+-- __manifest__.py
+-- controllers/
¦   +-- __init__.py
¦   +-- main.py
+-- models/
¦   +-- __init__.py
¦   +-- form_attachment.py
+-- security/
¦   +-- ir.model.access.csv
+-- views/
    +-- templates.xml
    +-- form_attachment_views.xml
    +-- blog_post.xml
The manifest file defines the module’s metadata, dependencies, and data files. It tells Odoo how and when to load the module.
{
'name': 'Web Form Attachment',
'version': '19.0.1.0.0',
'category': 'Extra Tools',
'summary': 'Allows users to upload files from a web form.',
'description': """
This module adds a web form where users can upload files,
which are then stored as attachments in the backend.
""",
'website': 'https://www.cybrosys.com',
'depends': ['base', 'web', 'website'],
'data': [
'security/ir.model.access.csv',
'views/form_attachment_views.xml',
'views/templates.xml',
'views/blog_post.xml',
],
'installable': True,
'application': True,
'auto_install': False,
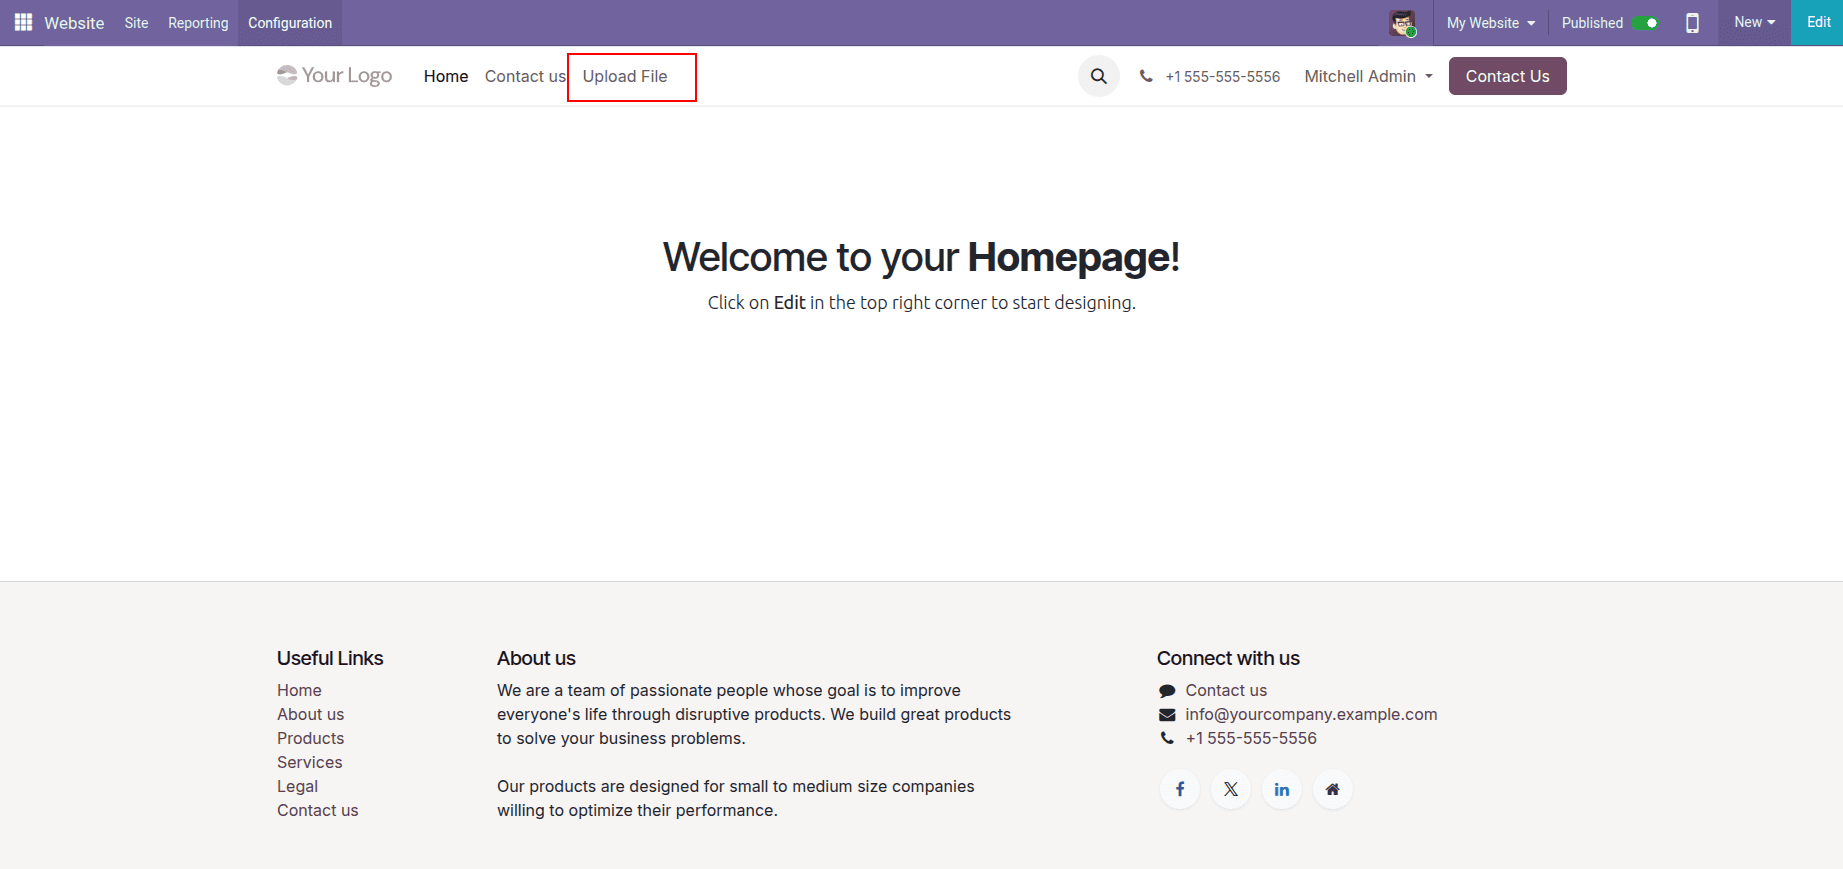
}To make the file upload form easily accessible to users, we add a custom menu item to the website header. This menu allows users to open the upload form directly from the website navigation bar without manually entering the URL.
The menu is added by inheriting the default website header template and inserting a new link that points to the /form route handled by our controller.
The following XML code is added inside the views/templates.xml file. It inherits the default website header and appends a new menu item named Upload File.
<template id="website_menu_form" inherit_id="website.template_header_default" name="Website Menu Form">
   <xpath expr="//t[@t-foreach='website.menu_id.child_id']" position="after">
       <li class="nav-item">
           <a class="nav-link" href="/form">
               <span>Upload File</span>
           </a>
       </li>
   </xpath>
</template>
When the website loads, Odoo displays the default header and navigation menu. By inheriting this header template, we can add our own menu item without changing any core Odoo files, which keeps the customization safe and upgrade-friendly.
The new menu item appears in the website’s top navigation bar and directs users to the file upload form when clicked. Since the route is public, any website visitor can access the form without logging in. This method follows Odoo’s recommended best practices for extending and customizing website features.
The website menu item added in the header acts as the entry point for the file upload functionality. When a user clicks the Upload File menu, the browser navigates to the /form URL. This URL is handled by a website controller defined in the module.
The controller listens for this route and renders the website form template. This means the menu does not directly display the form; instead, it triggers the controller, which then loads the correct page.
The controller manages both displaying the form and handling the submitted data. The first route renders the website form, and the second route processes the uploaded file.
# -*- coding: utf-8 -*-
import base64
from odoo import http
from odoo.http import request
class WebForm(http.Controller):
   @http.route('/form', type='http', auth='public', website=True)
   def web_form(self, **kw):
       """ Render the form template """
       return request.render('web_form_attachment.web_form_template', {})
   @http.route('/form/submit', type='http', auth='public', website=True, csrf=False)
   def web_form_submit(self, **kw):
       if kw.get('attachment'):
           attachment = kw.get('attachment').read()
           request.env['form.attachment'].sudo().create({
               'name': kw.get('name'),
               'attachment': base64.b64encode(attachment),
               'attachment_filename': kw.get('attachment').filename,
           })
           return request.render(
               'web_form_attachment.web_form_thank_you_template', {}
           )
       return self.web_form()
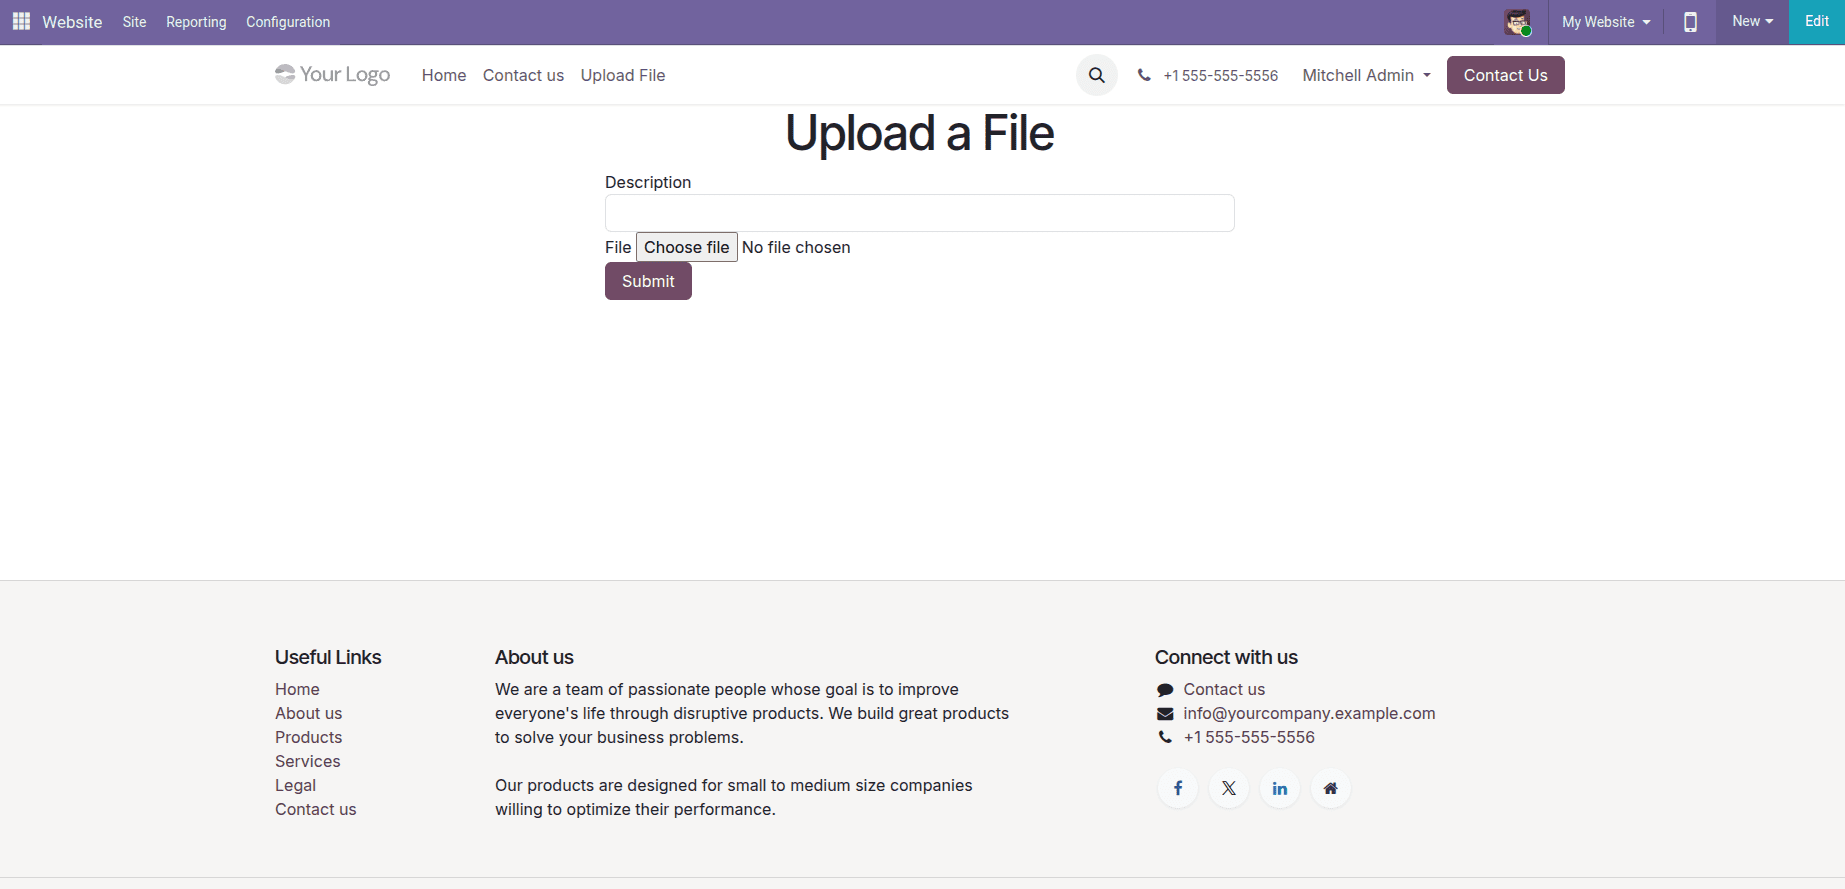
The website form template defines the user interface. It includes a description field and a file upload field. The form uses multipart/form-data to allow file uploads and submits data to the controller.
<template id="web_form_template" name="Web Form">
   <t t-call="website.layout">
       <div id="wrap">
           <div class="container">
               <div class="row">
                   <div class="col-md-6 offset-md-3">
                       <h1 class="text-center">Upload a File</h1>
                       <form action="/form/submit" method="post" enctype="multipart/form-data">
                           <input type="hidden" name="csrf_token"
                                  t-att-value="request.csrf_token()"/>
                           <div class="form-group">
                               <label for="name">Description</label>
                               <input type="text" class="form-control"
                                      id="name" name="name" required="1"/>
                           </div>
                           <div class="form-group">
                               <label for="attachment">File</label>
                               <input type="file" class="form-control-file"
                                      id="attachment" name="attachment" required="1"/>
                           </div>
                           <button type="submit" class="btn btn-primary">
                               Submit
                           </button>
                       </form>
                   </div>
               </div>
           </div>
       </div>
   </t>
</template>
To store the data submitted from the website form, a custom backend model is created. This model is used to save the uploaded file along with the description provided by the user. Each submission from the website creates one record in this model.
The model is named form.attachment, and it acts as the central storage for all uploaded files.
The model contains the following fields:
- Description (name)
Stores the text entered by the user in the website form.
- Attachment (attachment)
A binary field that stores the uploaded file content.
- Attachment Filename (attachment_filename)
Stores the original filename of the uploaded file, which helps when downloading the file from the backend.
# -*- coding: utf-8 -*-
from odoo import fields,  models
class FormAttachment(models.Model):
   _name = 'form.attachment'
   _description = 'Form Attachment'
   name = fields.Char(string='Description', required=True)
   attachment = fields.Binary(string='Attachment', required=True)
   attachment_filename = fields.Char(string='Attachment Filename')
For Odoo to load the model correctly, it must be imported in the __init__.py files
Even though the form is submitted from the website, backend users need permission to view and manage the uploaded files. This is handled using an access control file.
The ir.model.access.csv file grants internal users the rights to read, create, edit, and delete records of the form.attachment model.
access_form_attachment_user,form.attachment.user,model_form_attachment,base.group_user,1,1,1,1
When the user fills in the upload form and clicks the Submit button, the form data is sent to the /form/submit route. This route is handled by the controller and is responsible for processing the uploaded file and saving it in the backend.
The submitted data includes the description entered by the user and the selected file. The controller reads the file, converts it into a base64 format, and creates a new record in the backend model. After the data is saved successfully, the user is redirected to a confirmation page.
The controller method web_form_submit handles the form submission. It first checks whether a file is uploaded. If a file exists, it reads the file content, encodes it, and stores it along with the description and filename.
@http.route('/form/submit', type='http', auth='public', website=True, csrf=False)
def web_form_submit(self, **kw):
""" Function process submit action """
if kw.get('attachment'):
attachment = kw.get('attachment').read()
request.env['form.attachment'].sudo().create({
'name': kw.get('name'),
'attachment': base64.b64encode(attachment),
'attachment_filename': kw.get('attachment').filename,
})
return request.render('web_form_attachment.web_form_thank_you_template', {})
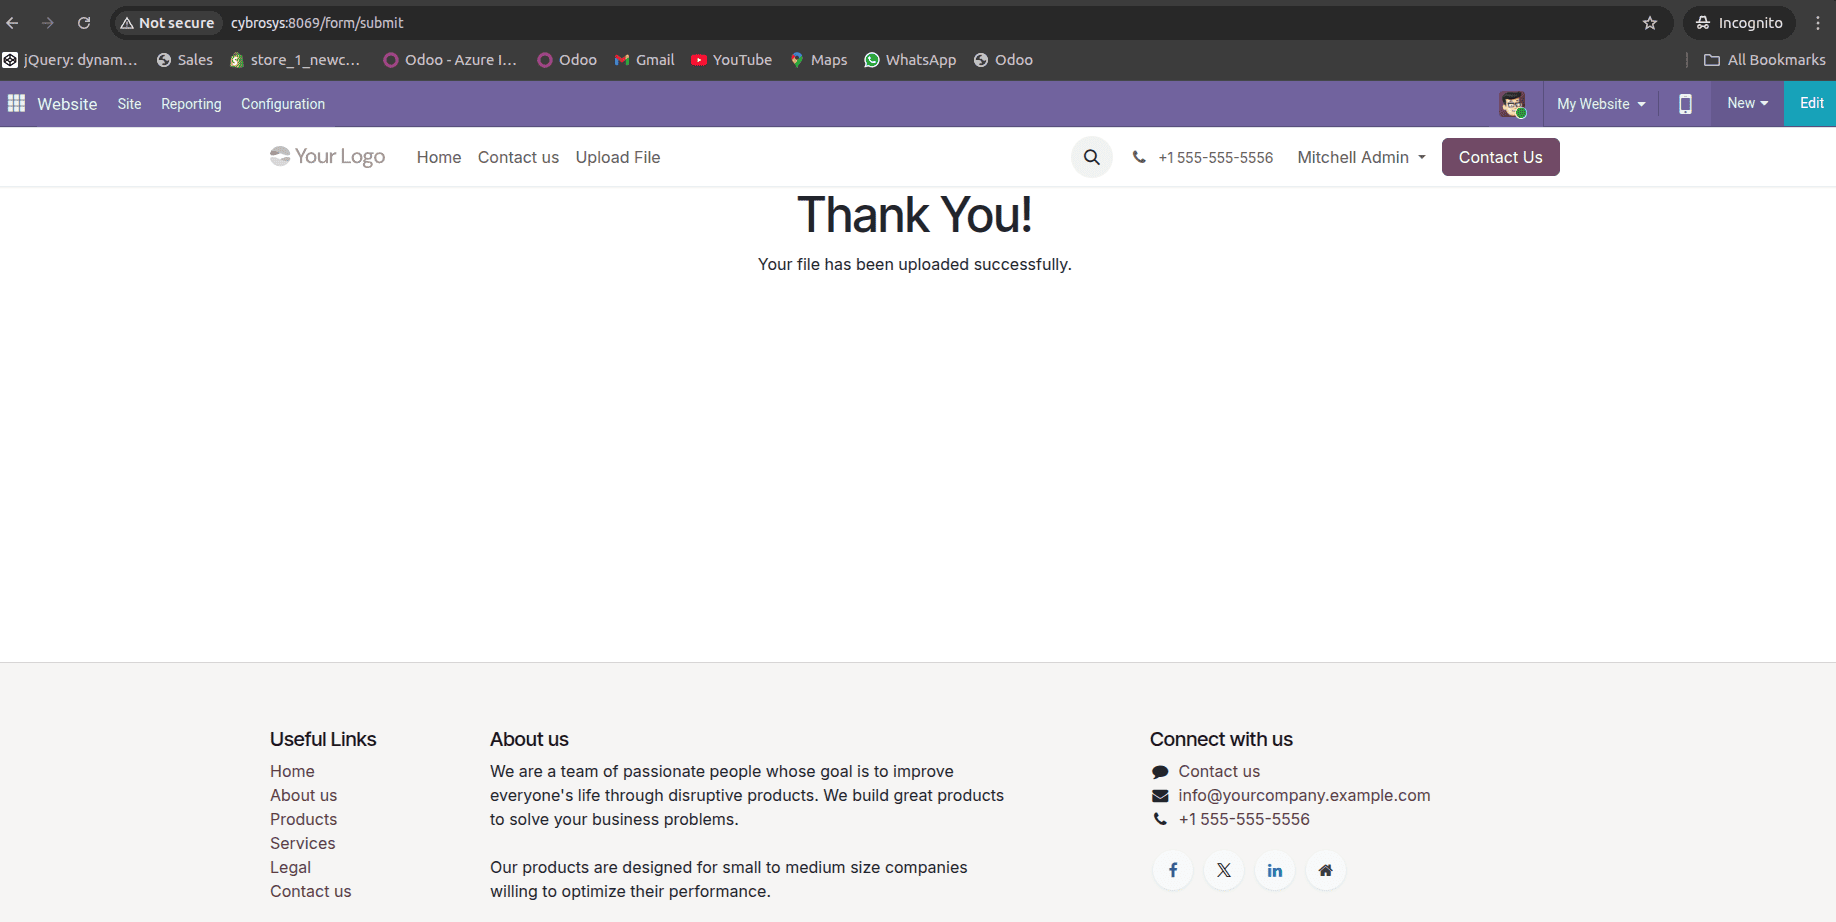
return self.web_form()After the file is successfully uploaded, the user is redirected to a thank-you page. This page confirms that the upload was completed and provides feedback to the user, improving the overall experience.
The thank-you page is a simple website template rendered by the controller after a successful form submission.
<template id="web_form_thank_you_template" name="Thank You">
   <t t-call="website.layout">
       <div id="wrap">
           <div class="container">
               <div class="row">
                   <div class="col-md-6 offset-md-3">
                       <h1 class="text-center">Thank You!</h1>
                       <p class="text-center">Your file has been uploaded successfully.</p>
                   </div>
               </div>
           </div>
       </div>
   </t>
</template>
After the files are uploaded from the website, backend users need a way to view and manage them. For this purpose, a custom backend menu and views are created for the Form Attachment model. This allows internal users to see all uploaded files, open individual records, and download attachments.
A new backend menu named Web Form Attachments is added to the Odoo main menu. Under this menu, an Attachments submenu opens the list of uploaded files. This menu is linked to an action that opens the model’s list and form views.
This setup provides a clean and organized way to manage all submissions received from the website.
<?xml version="1.0" encoding="utf-8"?>
<odoo>
   <record id="form_attachment_view_list" model="ir.ui.view">
       <field name="name">form.attachment.view.list</field>
       <field name="model">form.attachment</field>
       <field name="arch" type="xml">
           <list string="Form Attachments">
               <field name="name"/>
               <field name="attachment_filename"/>
           </list>
       </field>
   </record>
   <record id="form_attachment_view_form" model="ir.ui.view">
       <field name="name">form.attachment.view.form</field>
       <field name="model">form.attachment</field>
       <field name="arch" type="xml">
           <form string="Form Attachment">
               <sheet>
                   <group>
                       <field name="name"/>
                       <field name="attachment" widget="binary" filename="attachment_filename"/>
                       <field name="attachment_filename" invisible="1"/>
                   </group>
               </sheet>
           </form>
       </field>
   </record>
   <record id="form_attachment_action" model="ir.actions.act_window">
       <field name="name">Form Attachments</field>
       <field name="res_model">form.attachment</field>
       <field name="view_mode">list,form</field>
   </record>
   <menuitem id="form_attachment_menu_root" name="Web Form Attachments" sequence="10"/>
   <menuitem id="form_attachment_menu"
       name="Attachments"
       parent="form_attachment_menu_root"
       action="form_attachment_action"
       sequence="10"/>
</odoo>
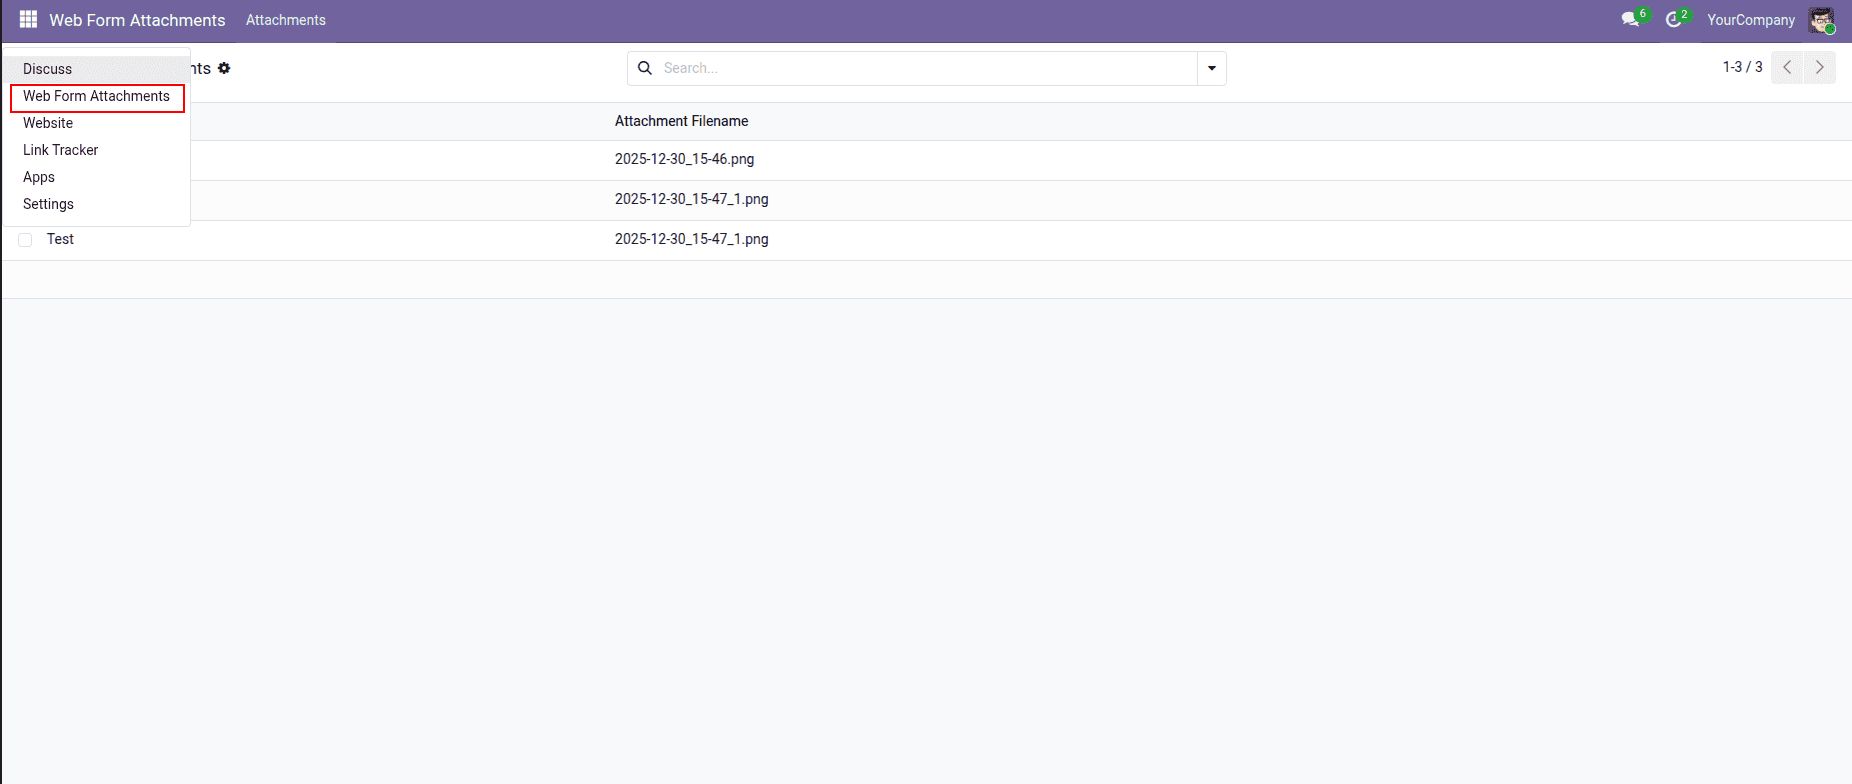
When a backend user clicks Attachments under Web Form Attachments, Odoo triggers the action linked to the form.attachment model. This opens the list view by default, where all uploaded records are displayed. Selecting a record opens the form view, allowing the user to download the file.
In this blog, we showed how to upload files from a website form in Odoo 19 using a simple and clear approach. We covered the full flow, starting from creating the module and website menu, building the upload form, handling the submission with a controller, and storing the files in a backend model.
We also explained how backend users can view and manage the uploaded files through custom menus and views. This implementation follows Odoo best practices and can be easily extended based on your business needs.
To read more about How to Upload Files From Web Form in Odoo 18, refer to our blog How to Upload Files From Web Form in Odoo 18.