Setting up a bar or restaurant operation requires precision, speed, and a seamless customer experience, and Odoo 18’s Point of Sale (POS) module is designed to deliver just that. With its enhanced interface and industry-specific features, configuring a bar or restaurant in Odoo 18 becomes both efficient and highly customizable. From managing floor plans and tables to streamlining kitchen orders and handling split bills, this version introduces tools that help hospitality businesses optimize every aspect of their service flow. In this blog, we’ll walk you through the steps to configure and tailor the POS system for use in bars and restaurants in Odoo 18.
Running a restaurant involves juggling multiple tasks, from taking orders and serving tables to ensuring smooth coordination with the kitchen. During peak hours, this complexity can create bottlenecks and confusion. To handle such operational challenges, many restaurants turn to smart POS systems that offer more than just billing, they help streamline the entire dining experience.
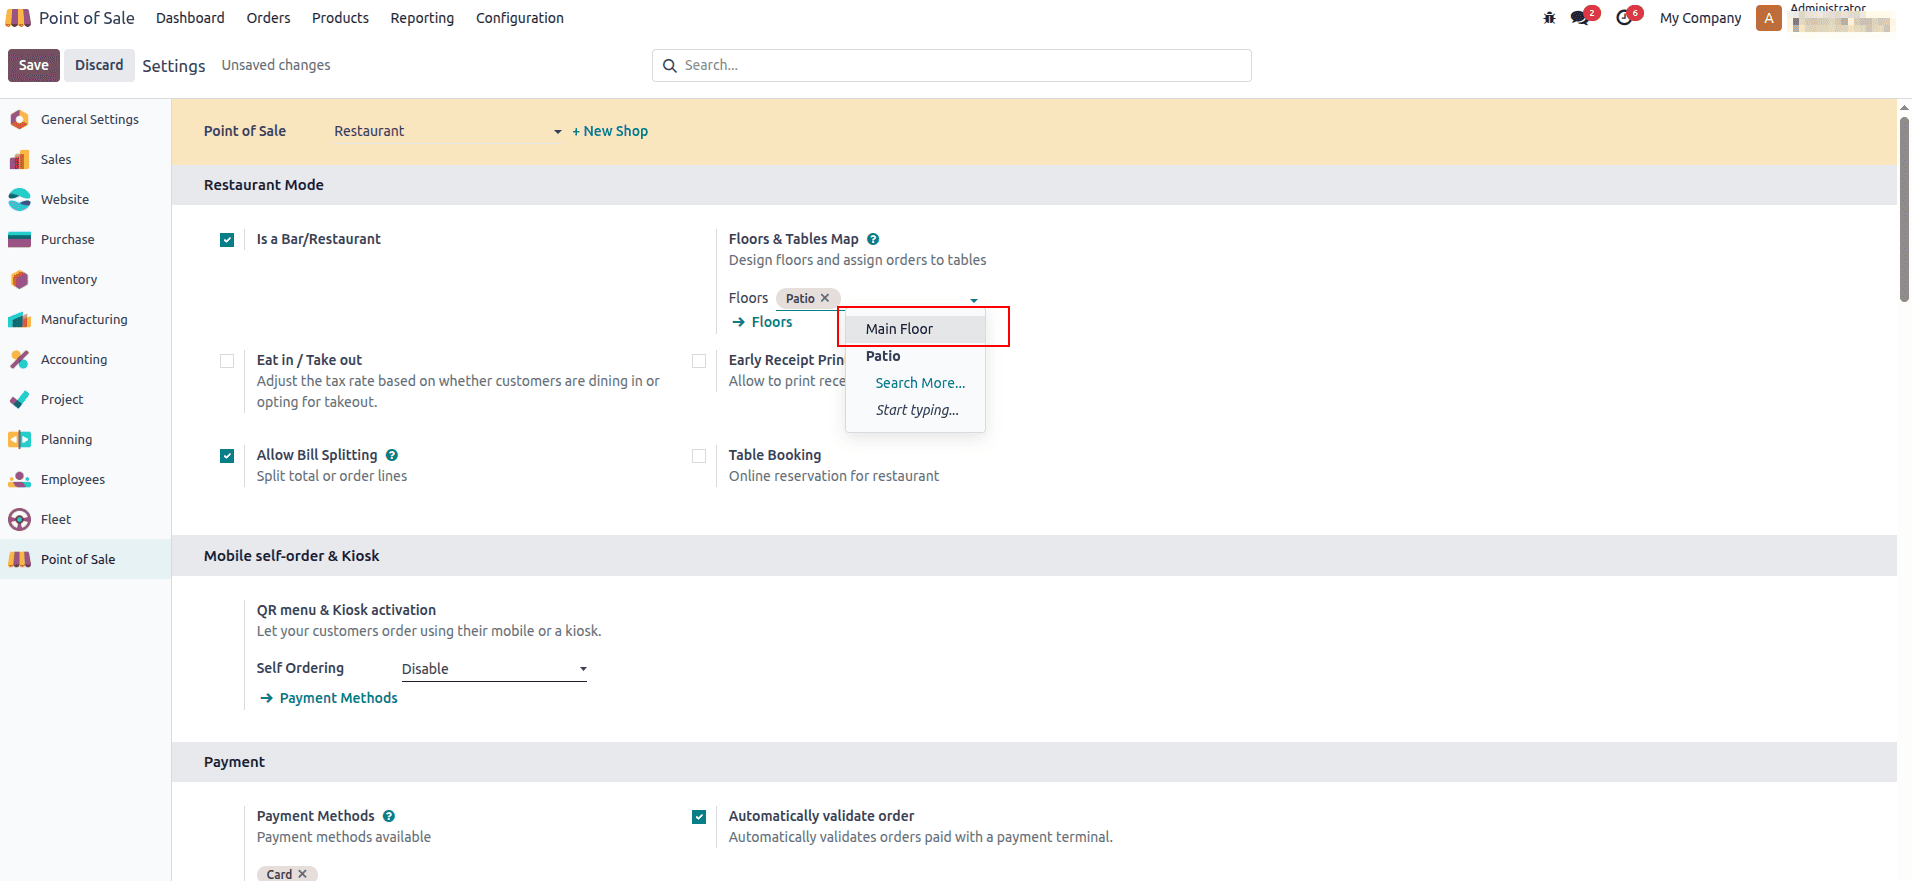
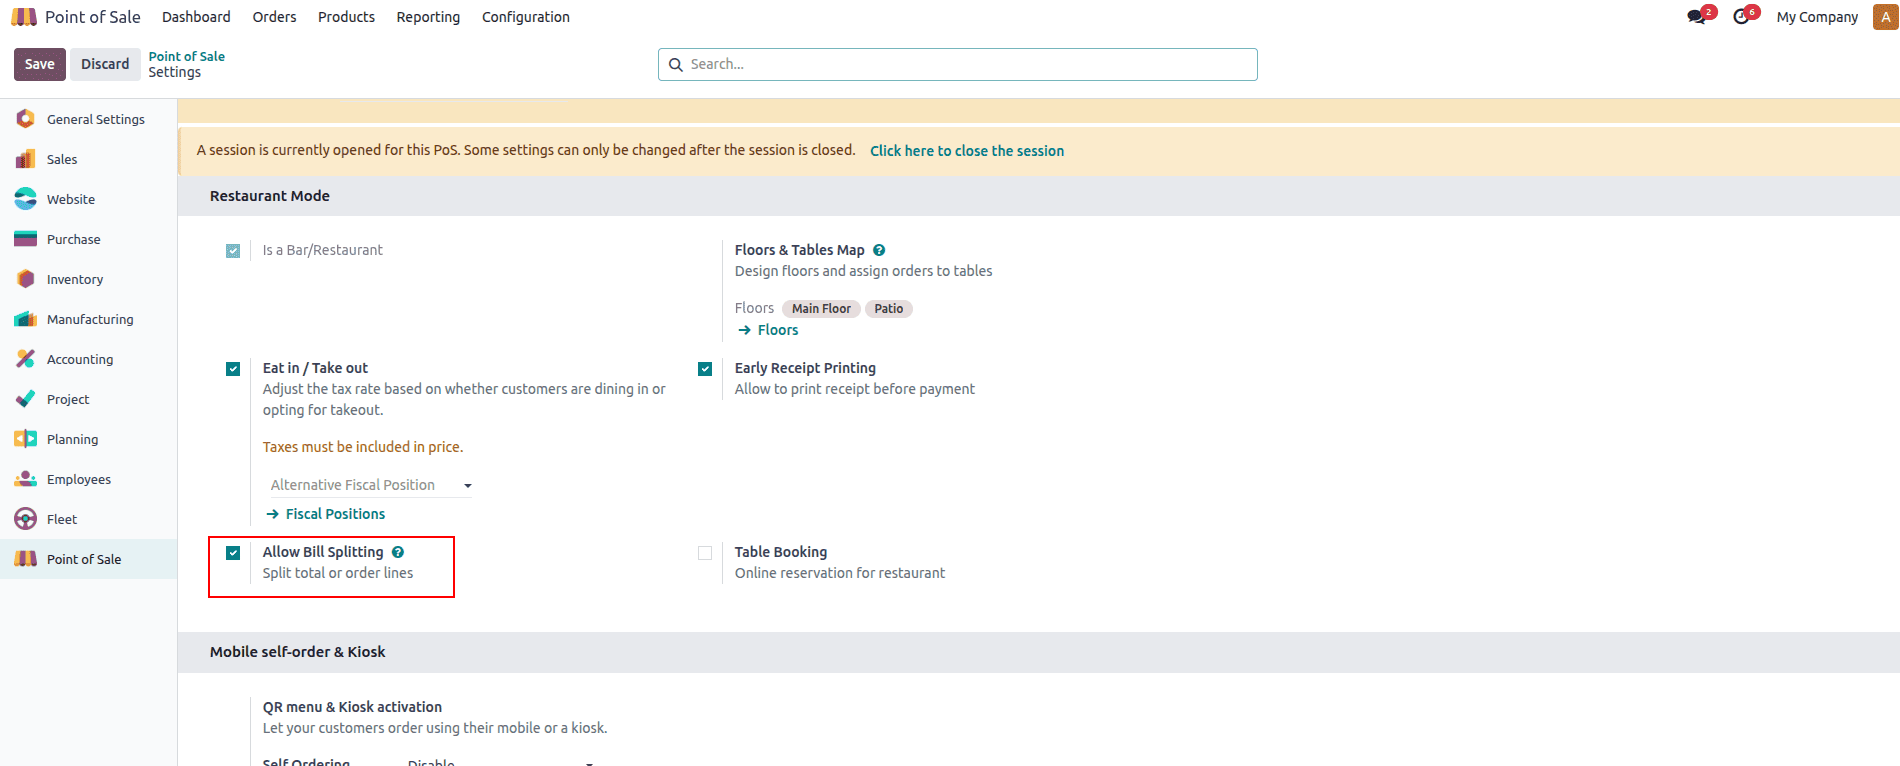
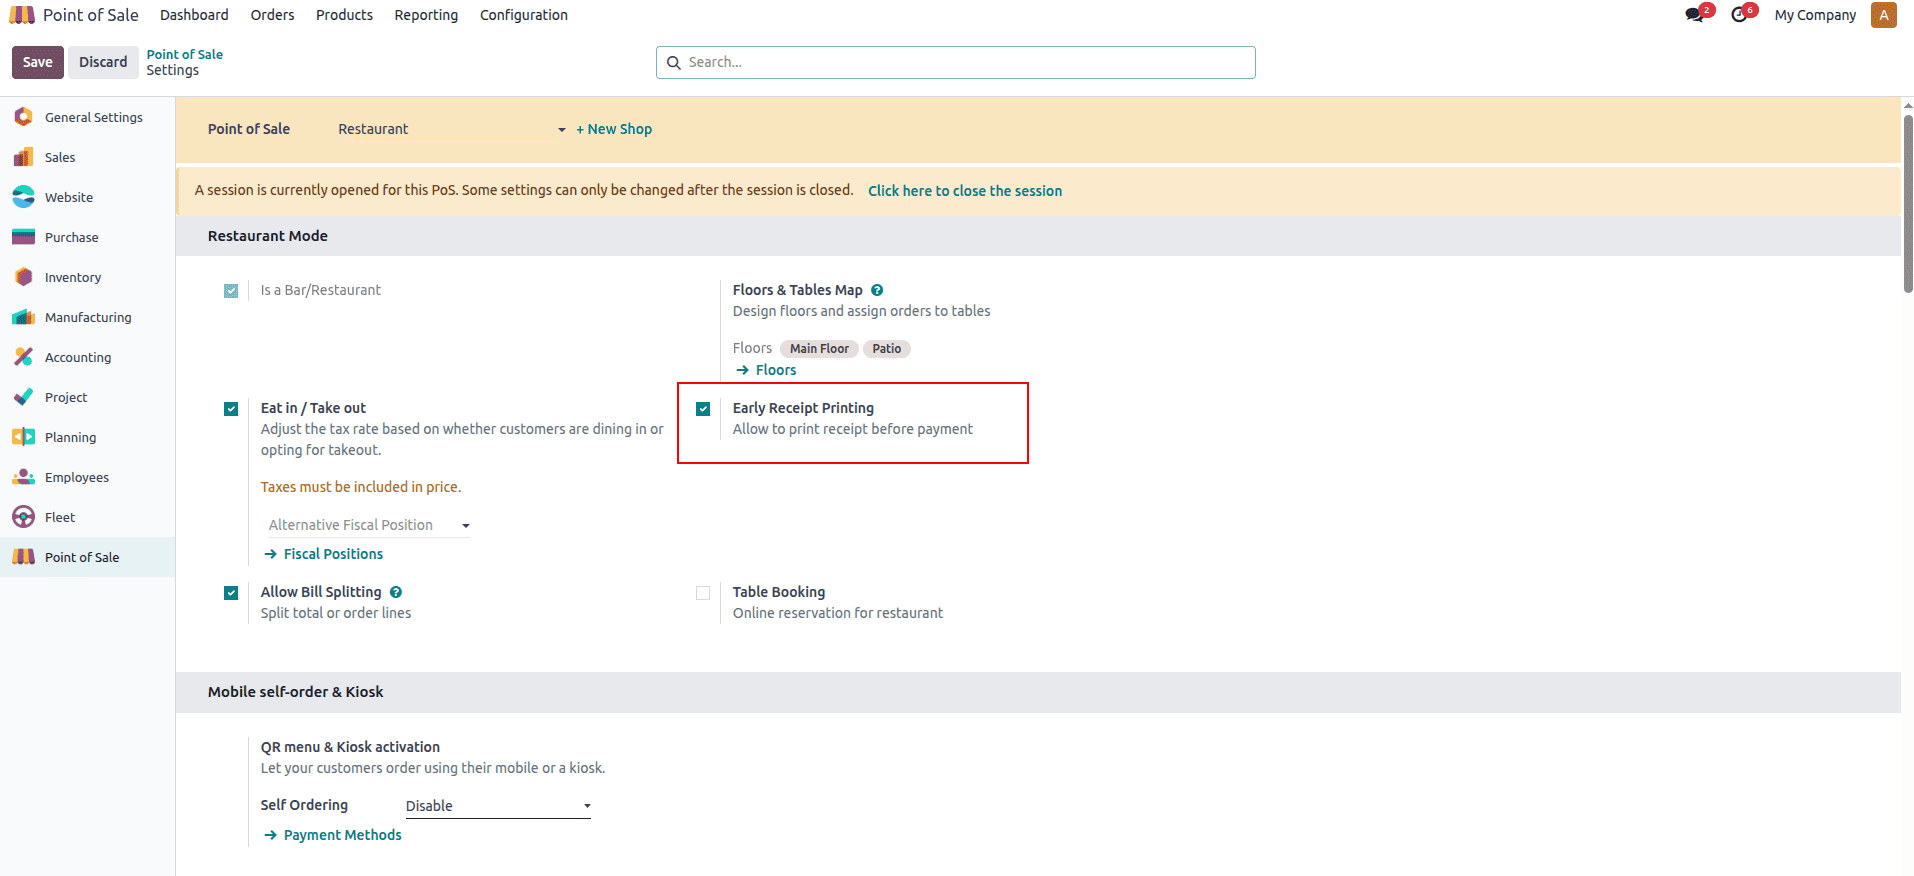
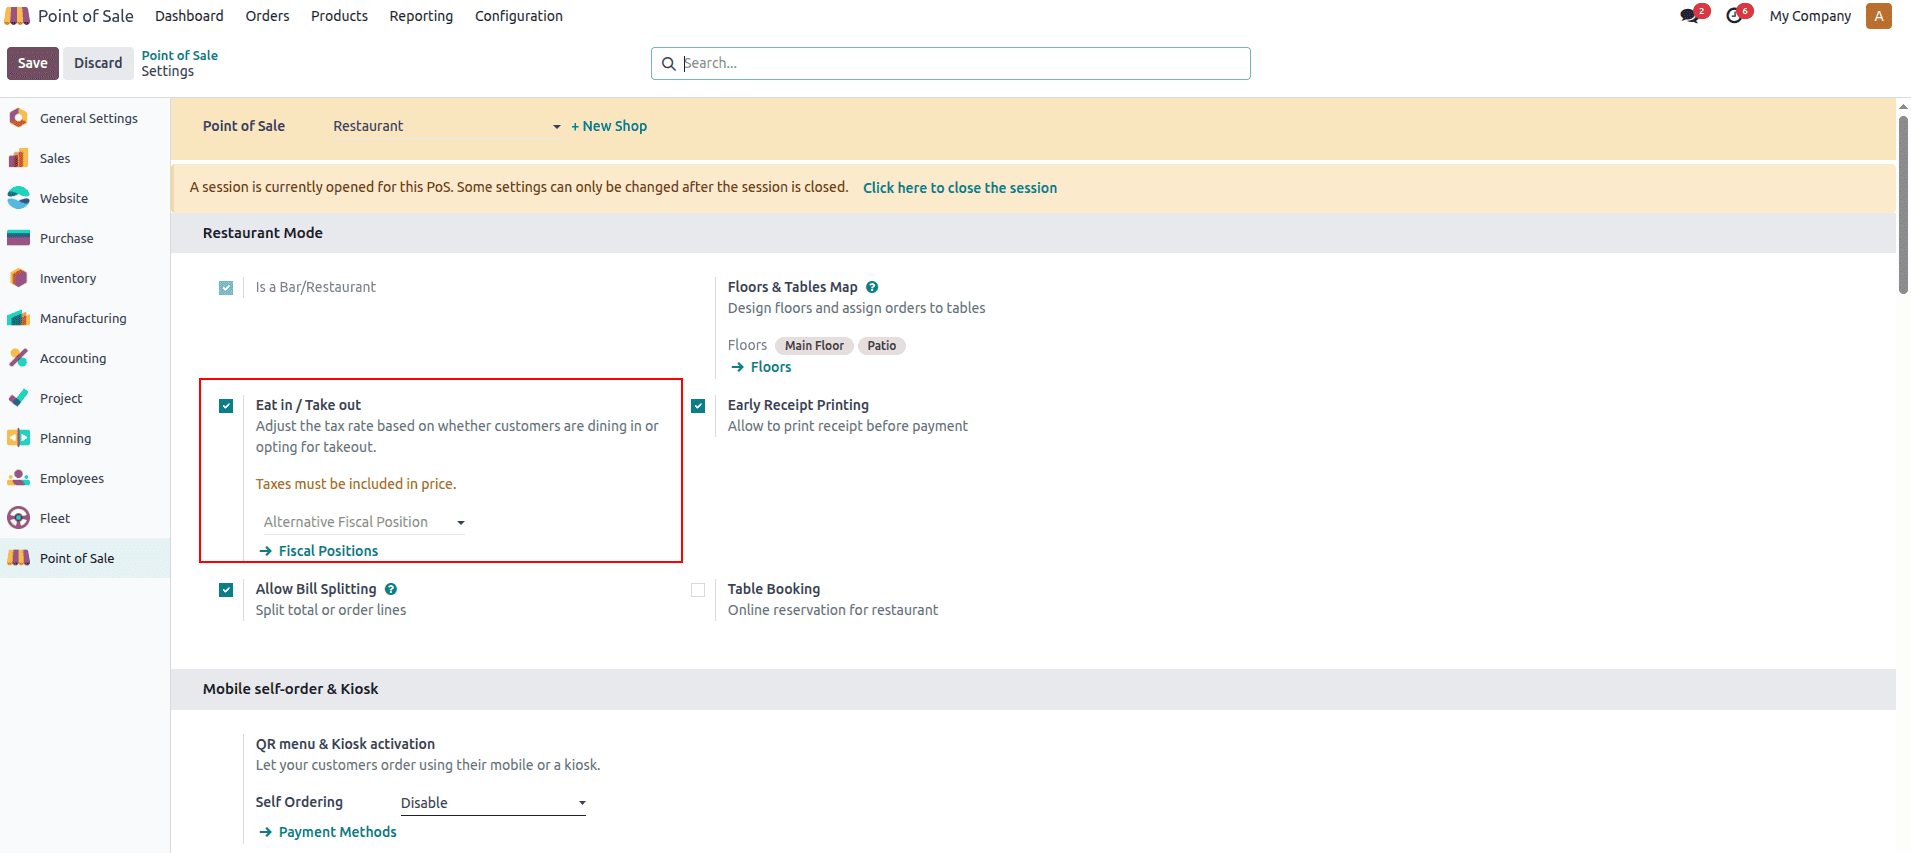
Odoo 18 introduces a more refined and powerful Point of Sale system specifically optimized for bar and restaurant management. With its user-friendly interface and feature-rich configuration, Odoo 18 allows you to organize floor plans, manage multiple orders at once, and improve service efficiency. To activate the restaurant-specific tools, head to the POS settings and enable the “Is a Bar/Restaurant” option, unlocking a tailored experience for food service businesses. Below is the picture illustrating the settings of the POS configuration.
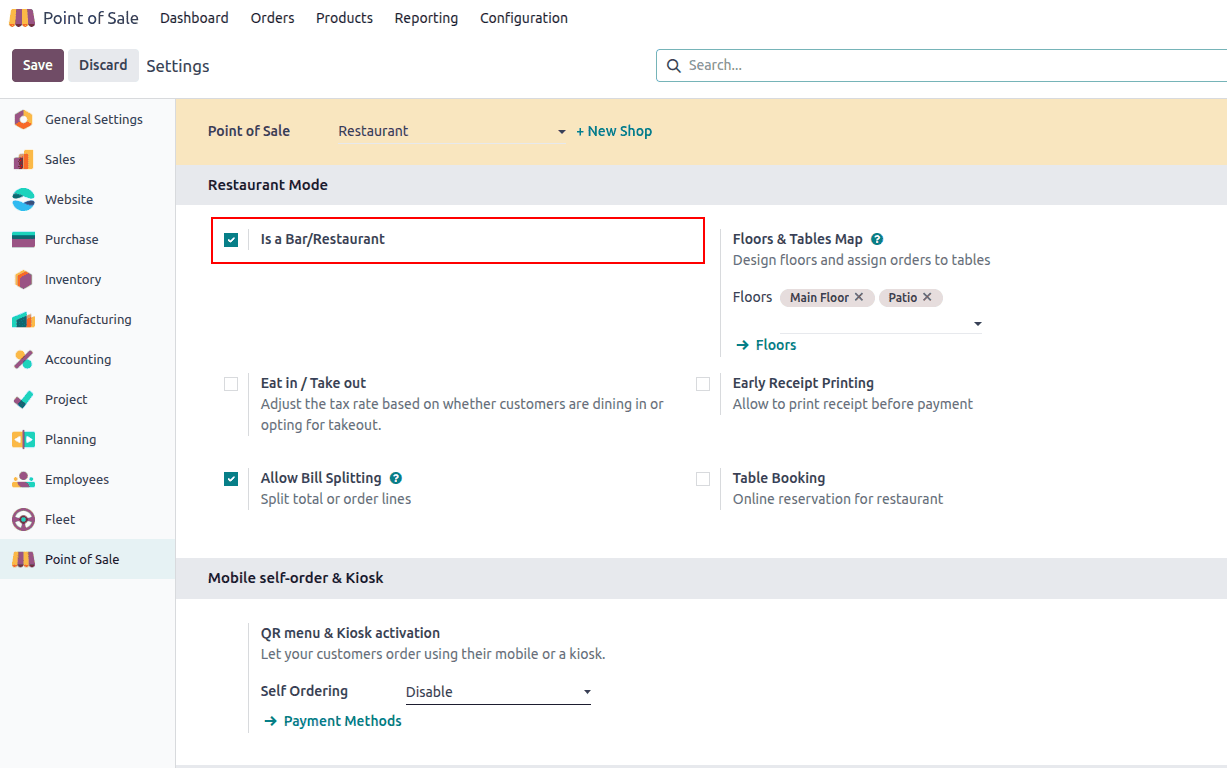
If you enable the Bar/Restaurant configuration, Odoo lets you manage the venue’s floors, tables, and individual seats to mirror your real layout and service flow. This structure is crucial because floor plans help hosts balance capacity and reduce bottlenecks during peak hours, while table mapping links every order to a location for faster routing and fewer mistakes. Seat-level management adds precision for coursing, split bills, and per-guest modifications, which speeds service and improves accuracy. Combined, these tools make it easier to track table status (free, occupied, reserved), optimize turns, and keep the kitchen and bar aligned with what’s happening on the floor.
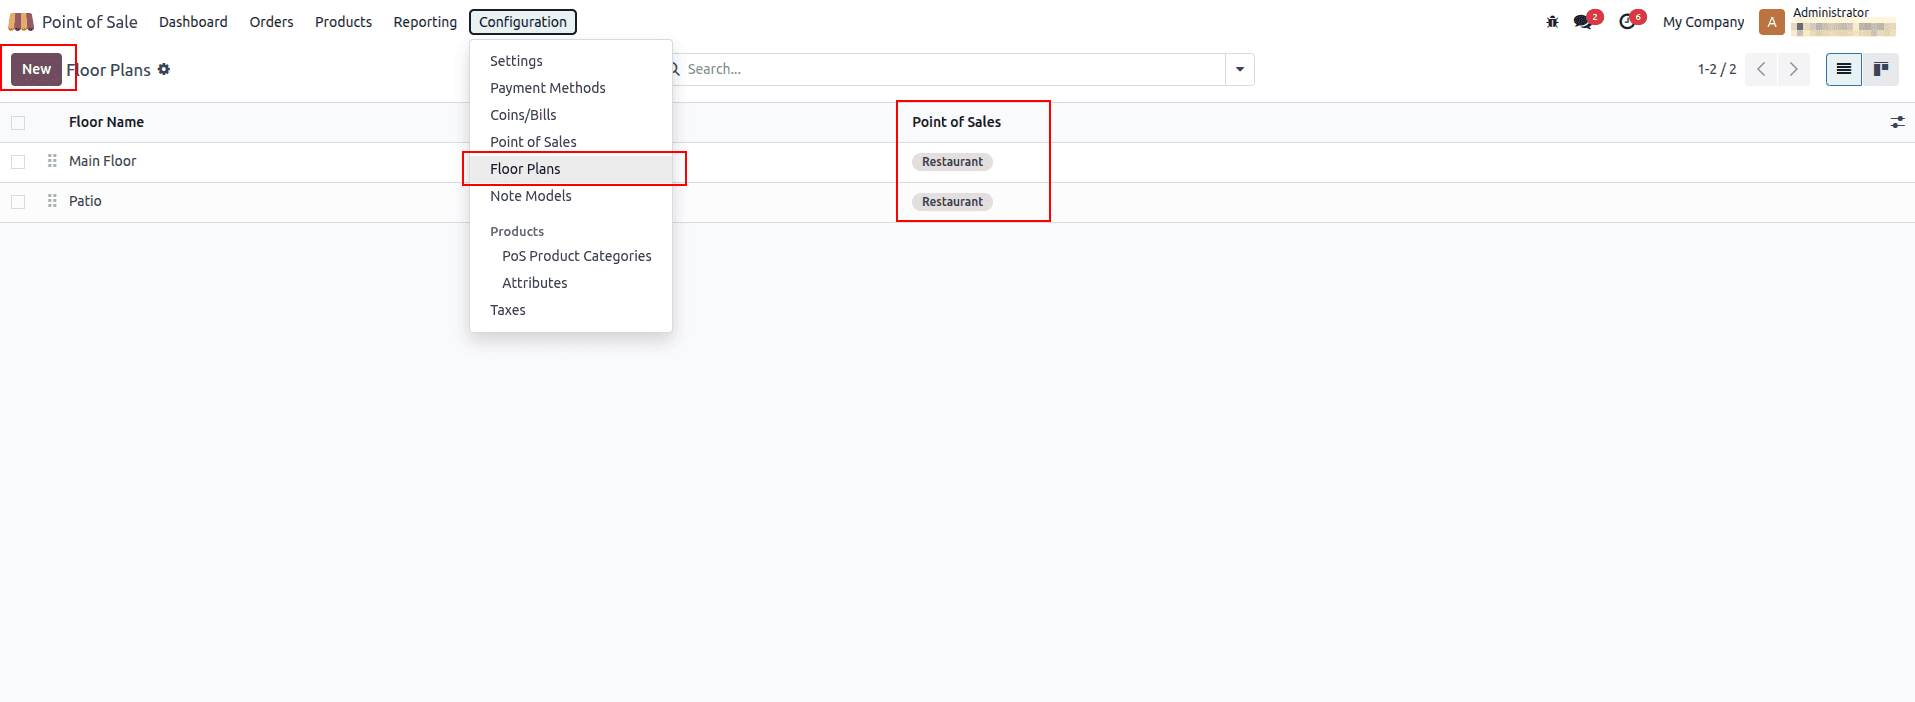
In the Configuration menu shown above, you can see the ‘Floor Plans’ option to manage floors and their related configurations. As you can see from the marked options, you can create new floors and specify which POS each floor is used with.
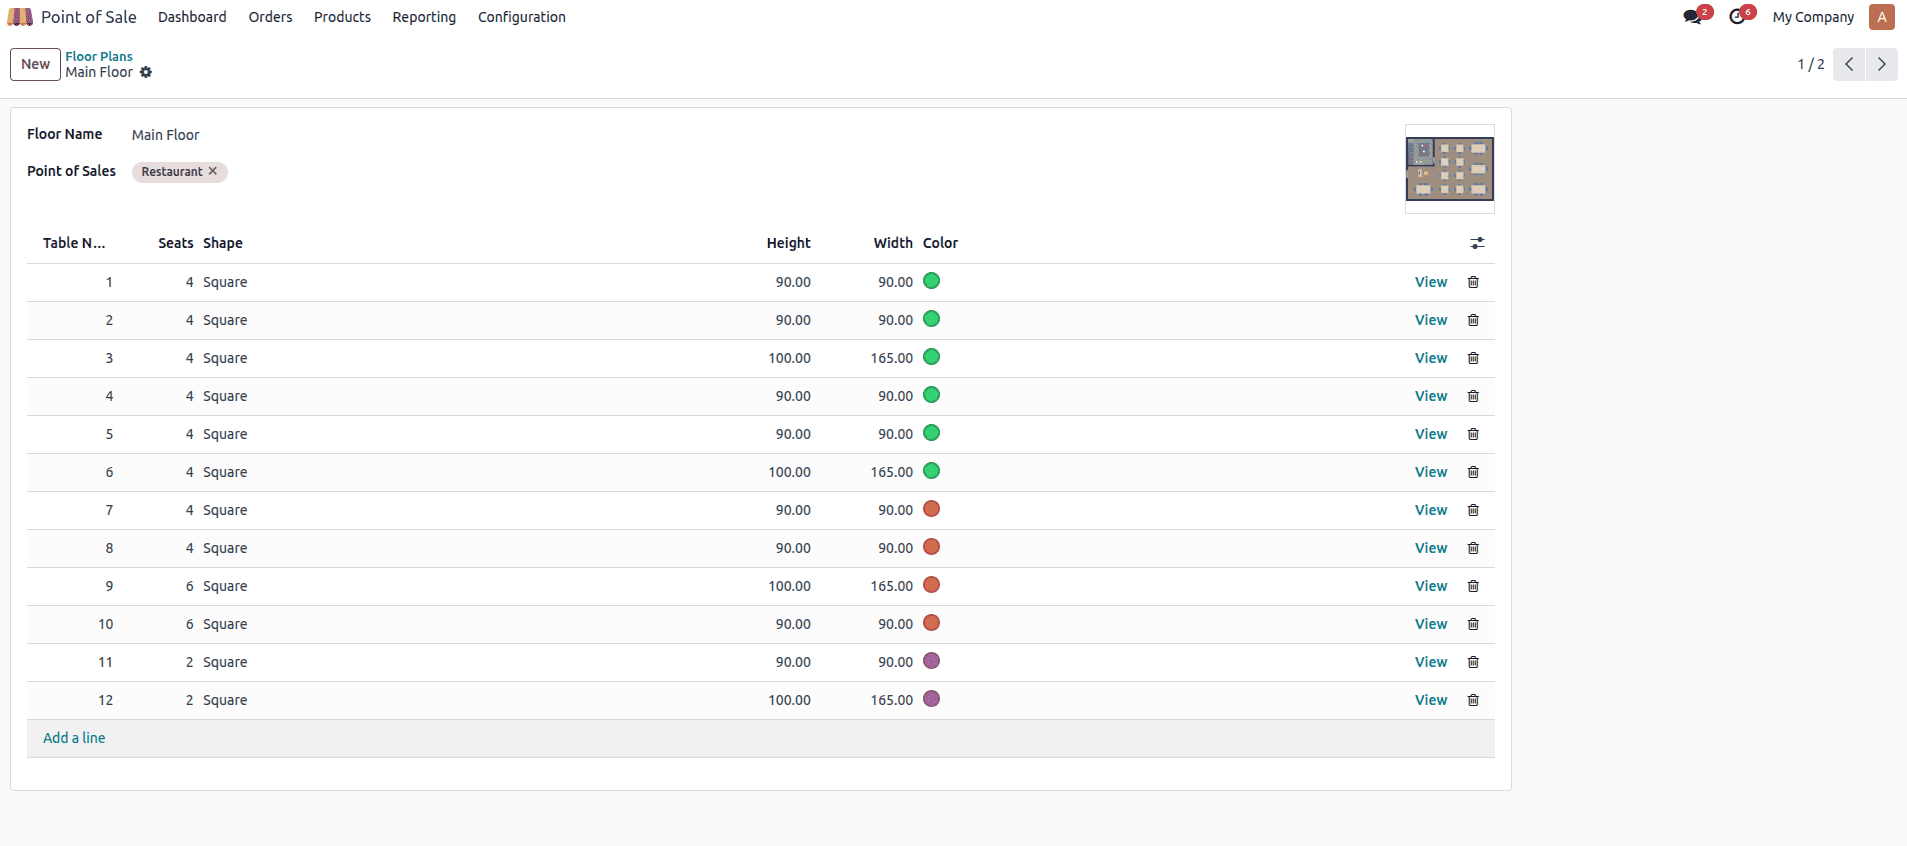
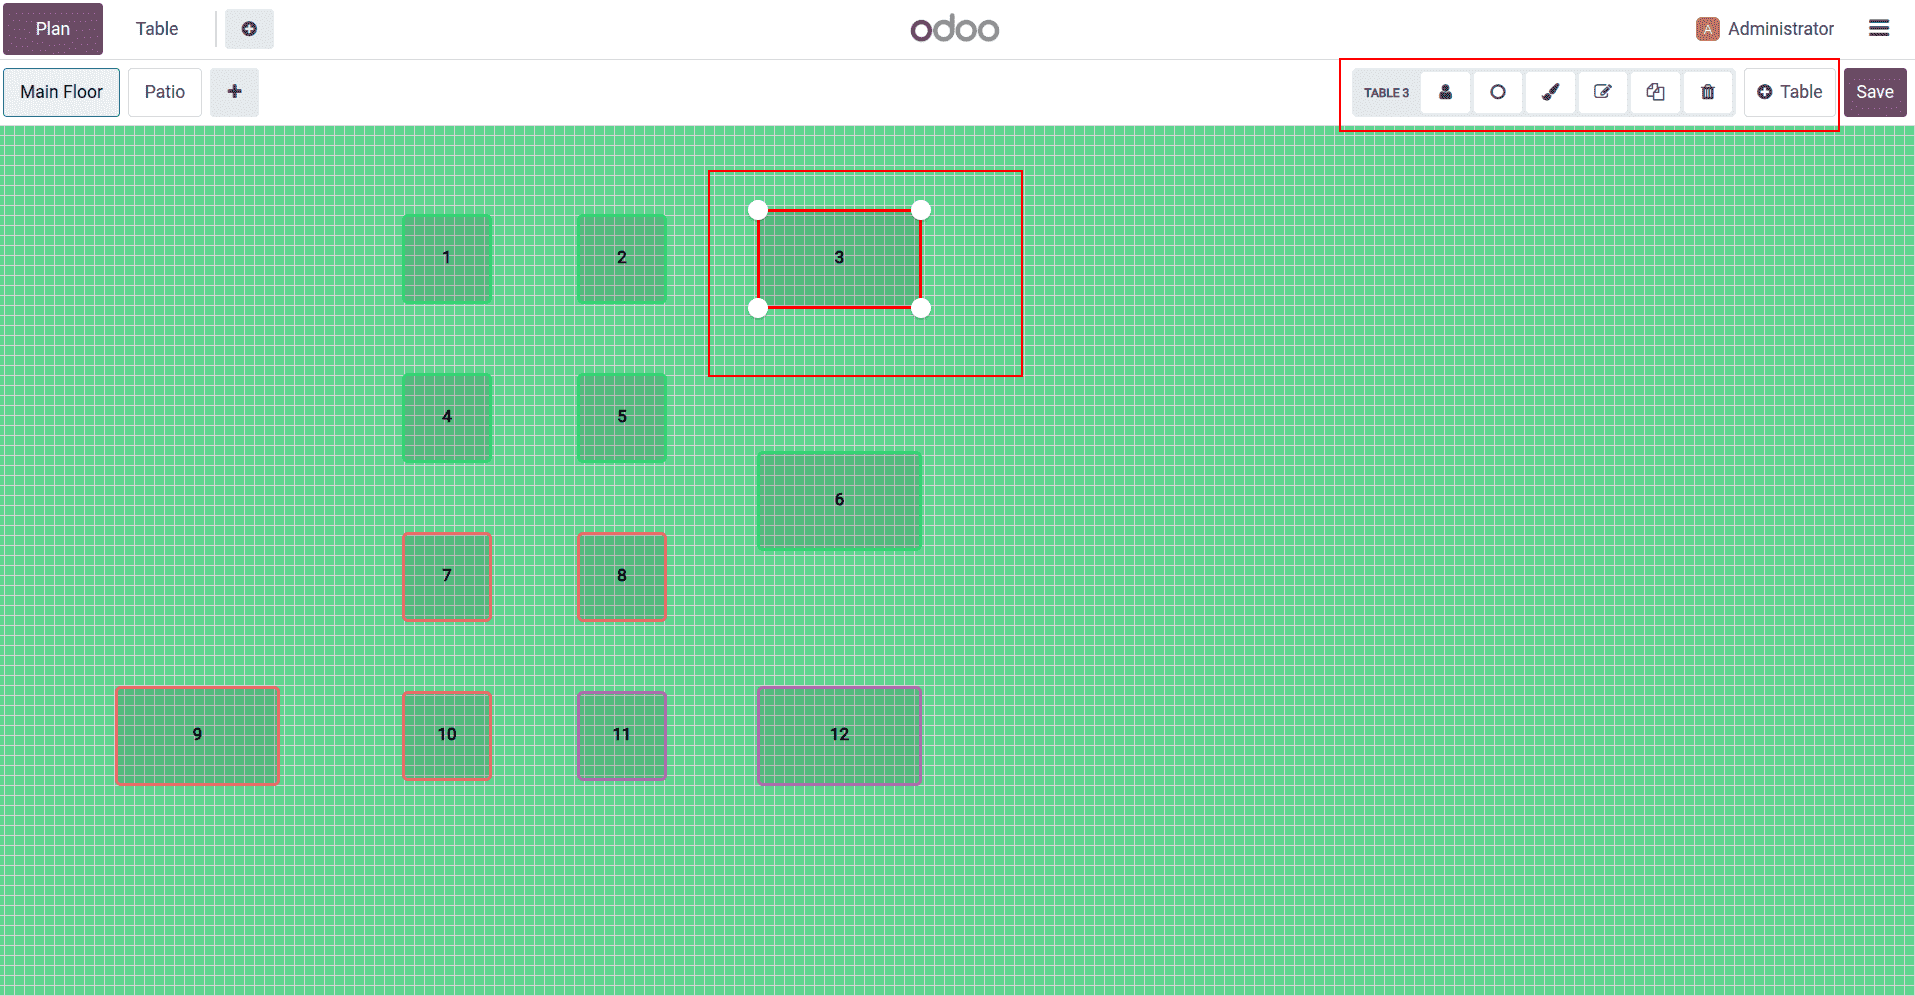
After creating a floor in Odoo 18, you can design each table to match your real layout. Set the number of seats, choose the table shape and color, and adjust dimensions like height and width for a precise fit.
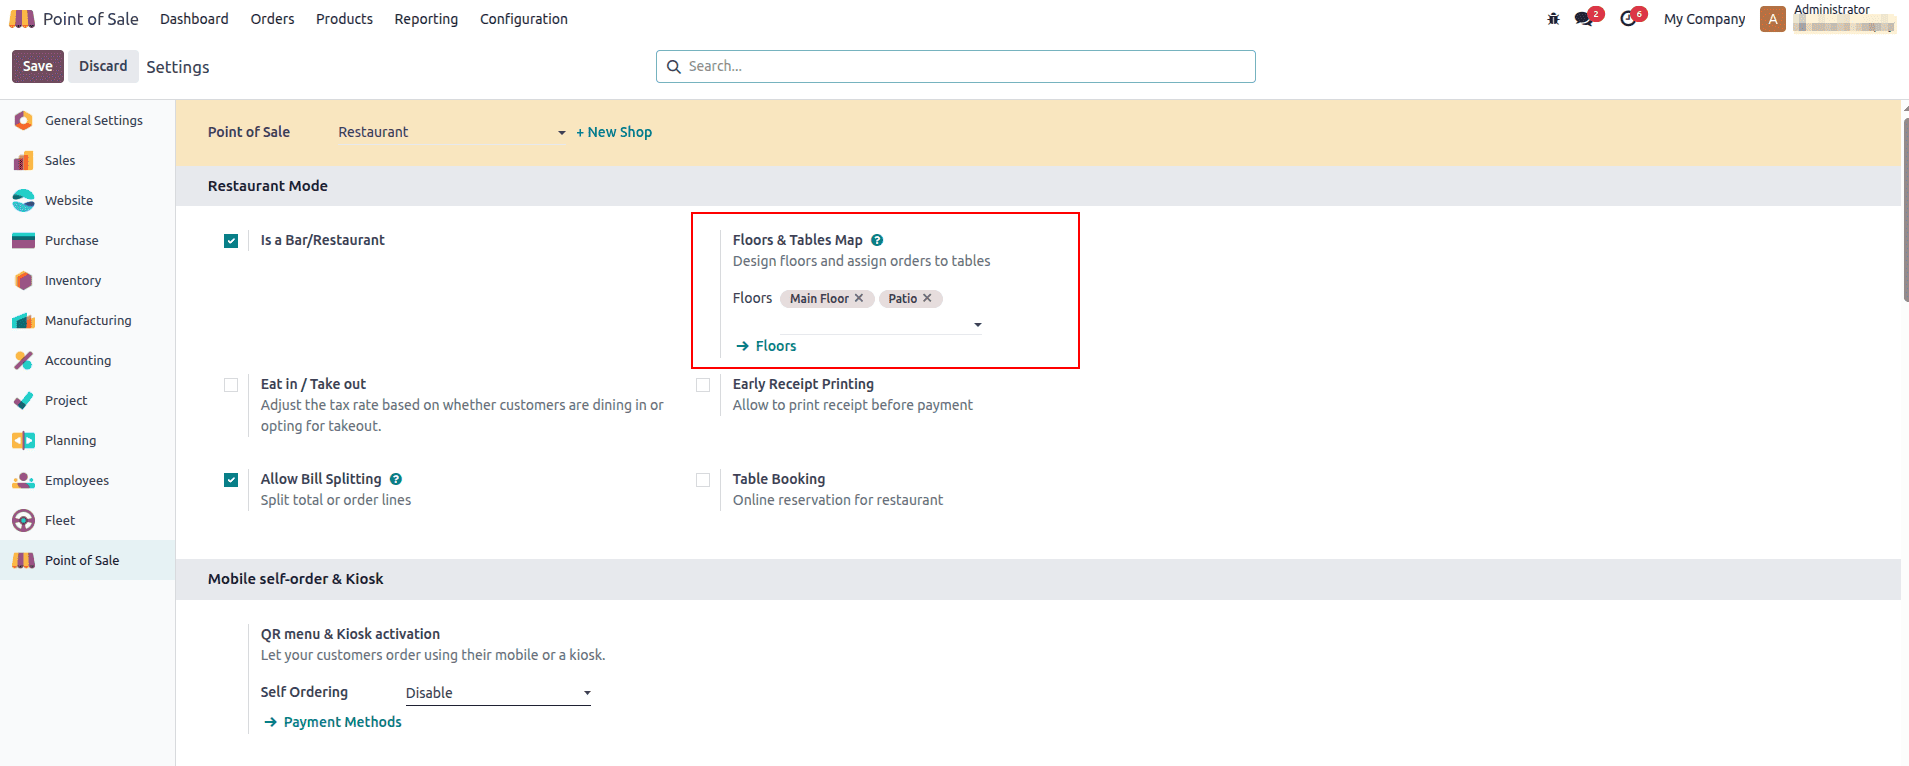
If you click View, Odoo opens the table’s detailed form, where you can see and edit all appearance and positioning fields, shape, color, seats, horizontal/vertical position, width, and height so the floor plan matches your real layout precisely. We can select the floor for each POS in its settings after we create the floors in the configuration.
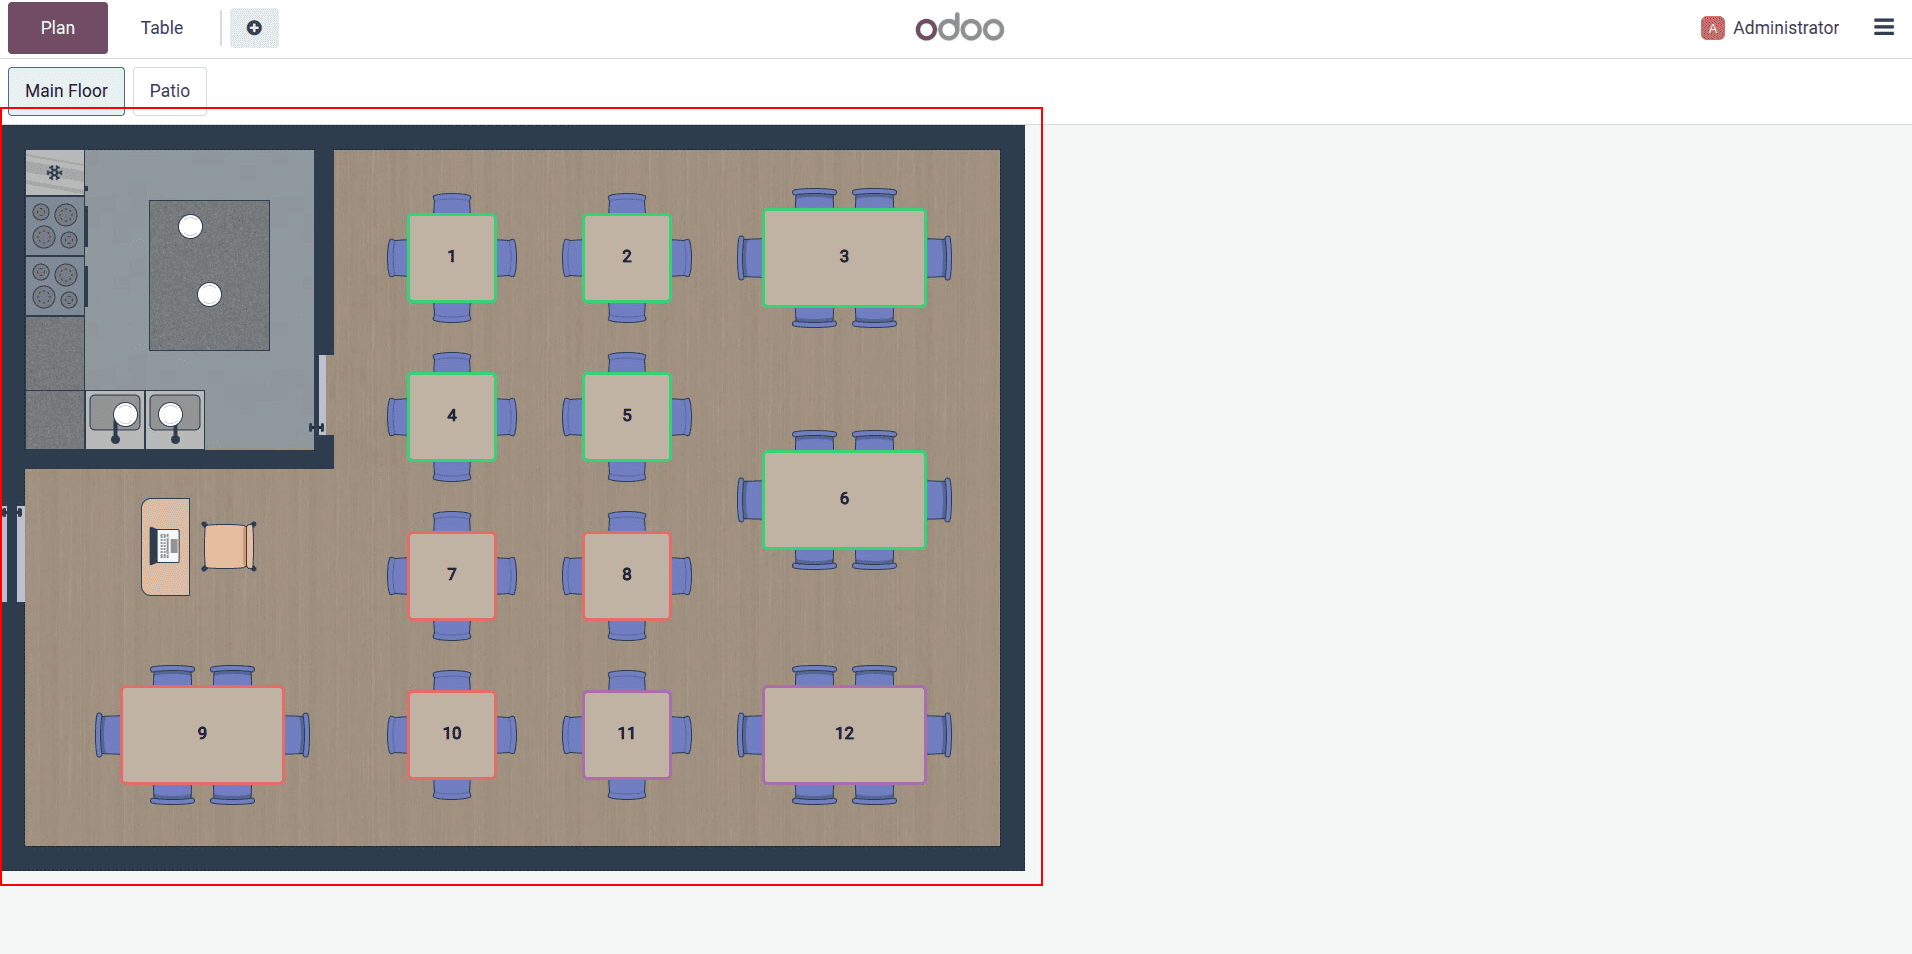
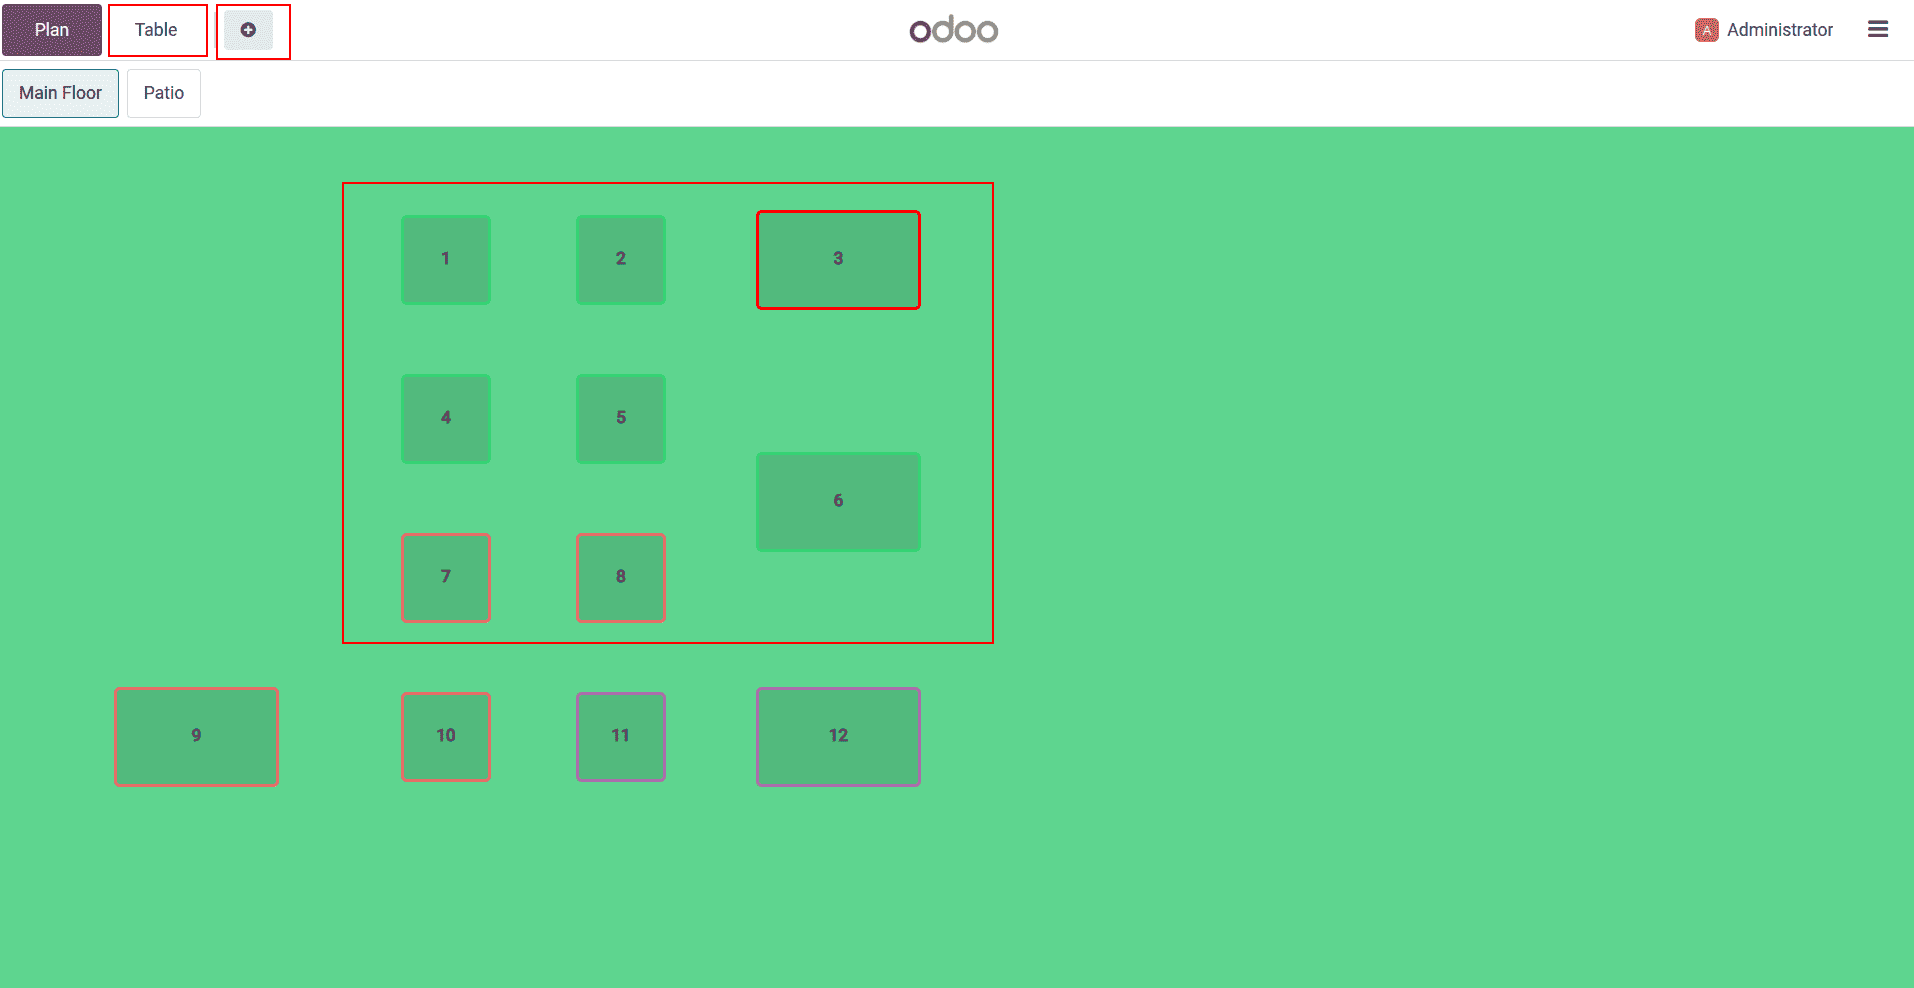
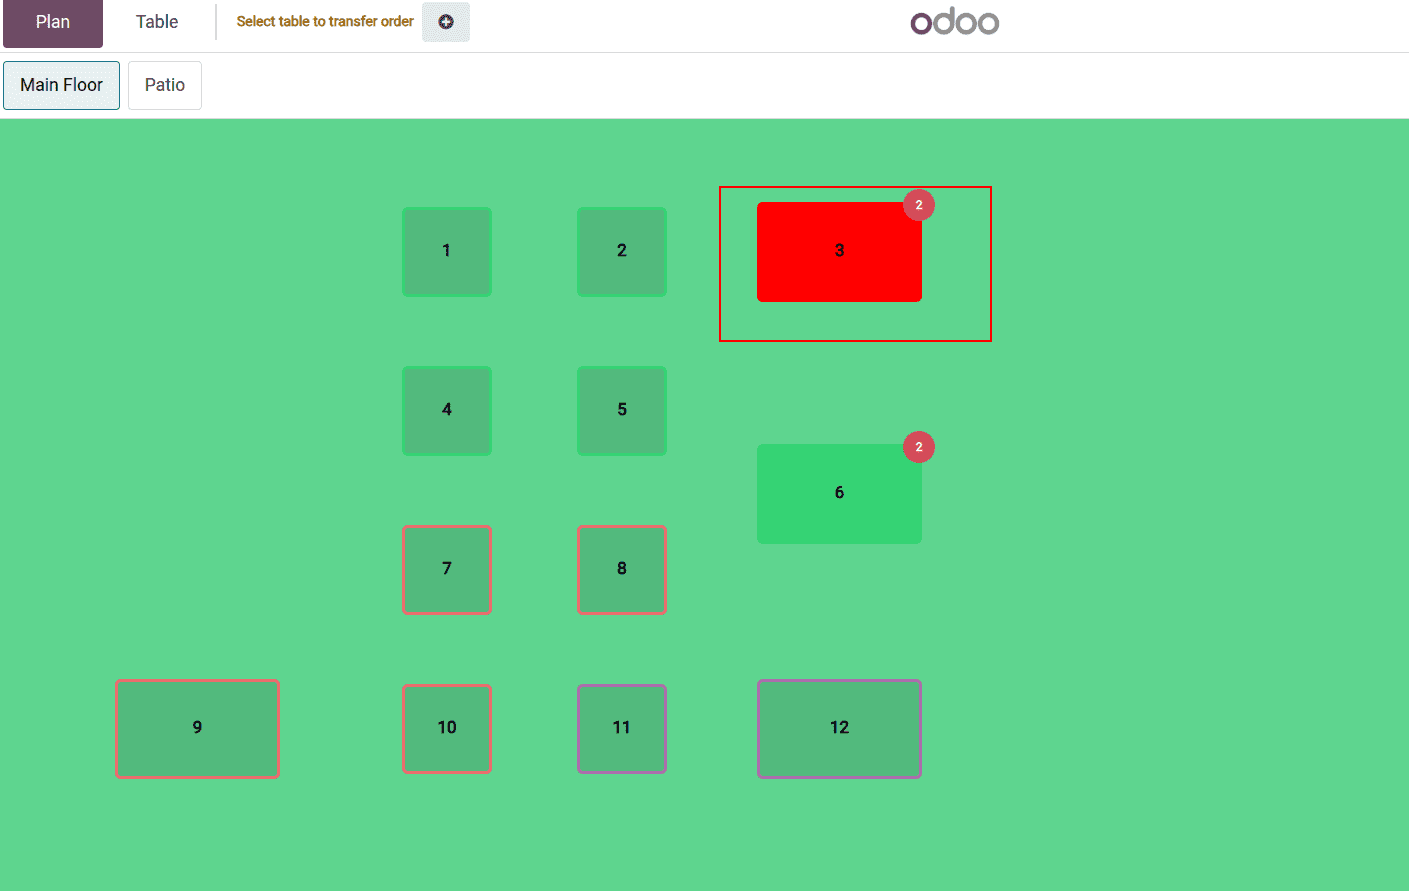
This is the POS front-end interface displaying the floor plans we created.
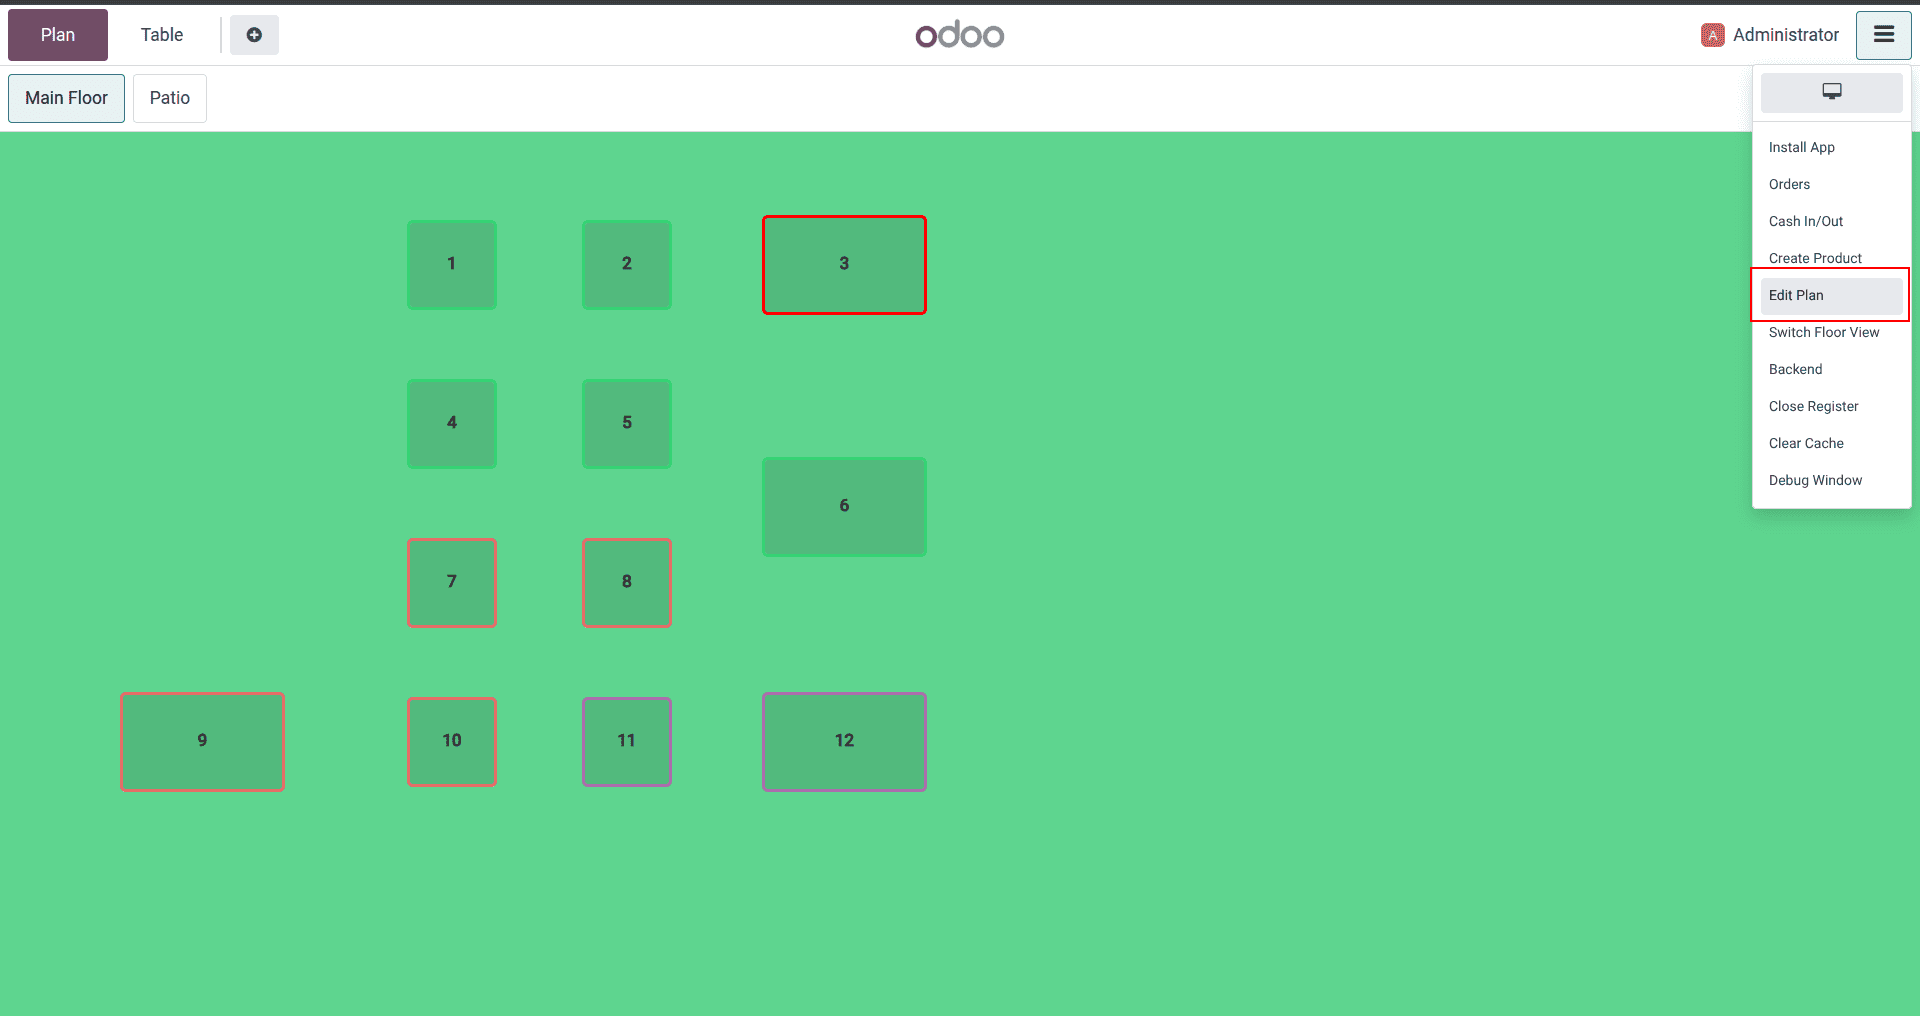
We can modify floor plans directly from the POS interface. From the options menu, select ‘Edit Plan,’ and the interface switches to edit mode.
In floor edit mode, it’s easy to refine the layout on the fly: add a new floor, change the background color, rename the floor, or remove it entirely. Within a floor, add new tables, then adjust each table’s seat count, color, and shape, or duplicate matching tables for faster setup. Tables can be dragged to reposition and resized to fit the room, letting the on-screen map mirror the real layout precisely. When the layout looks right, save to apply the changes to the POS session.
Floor edit:
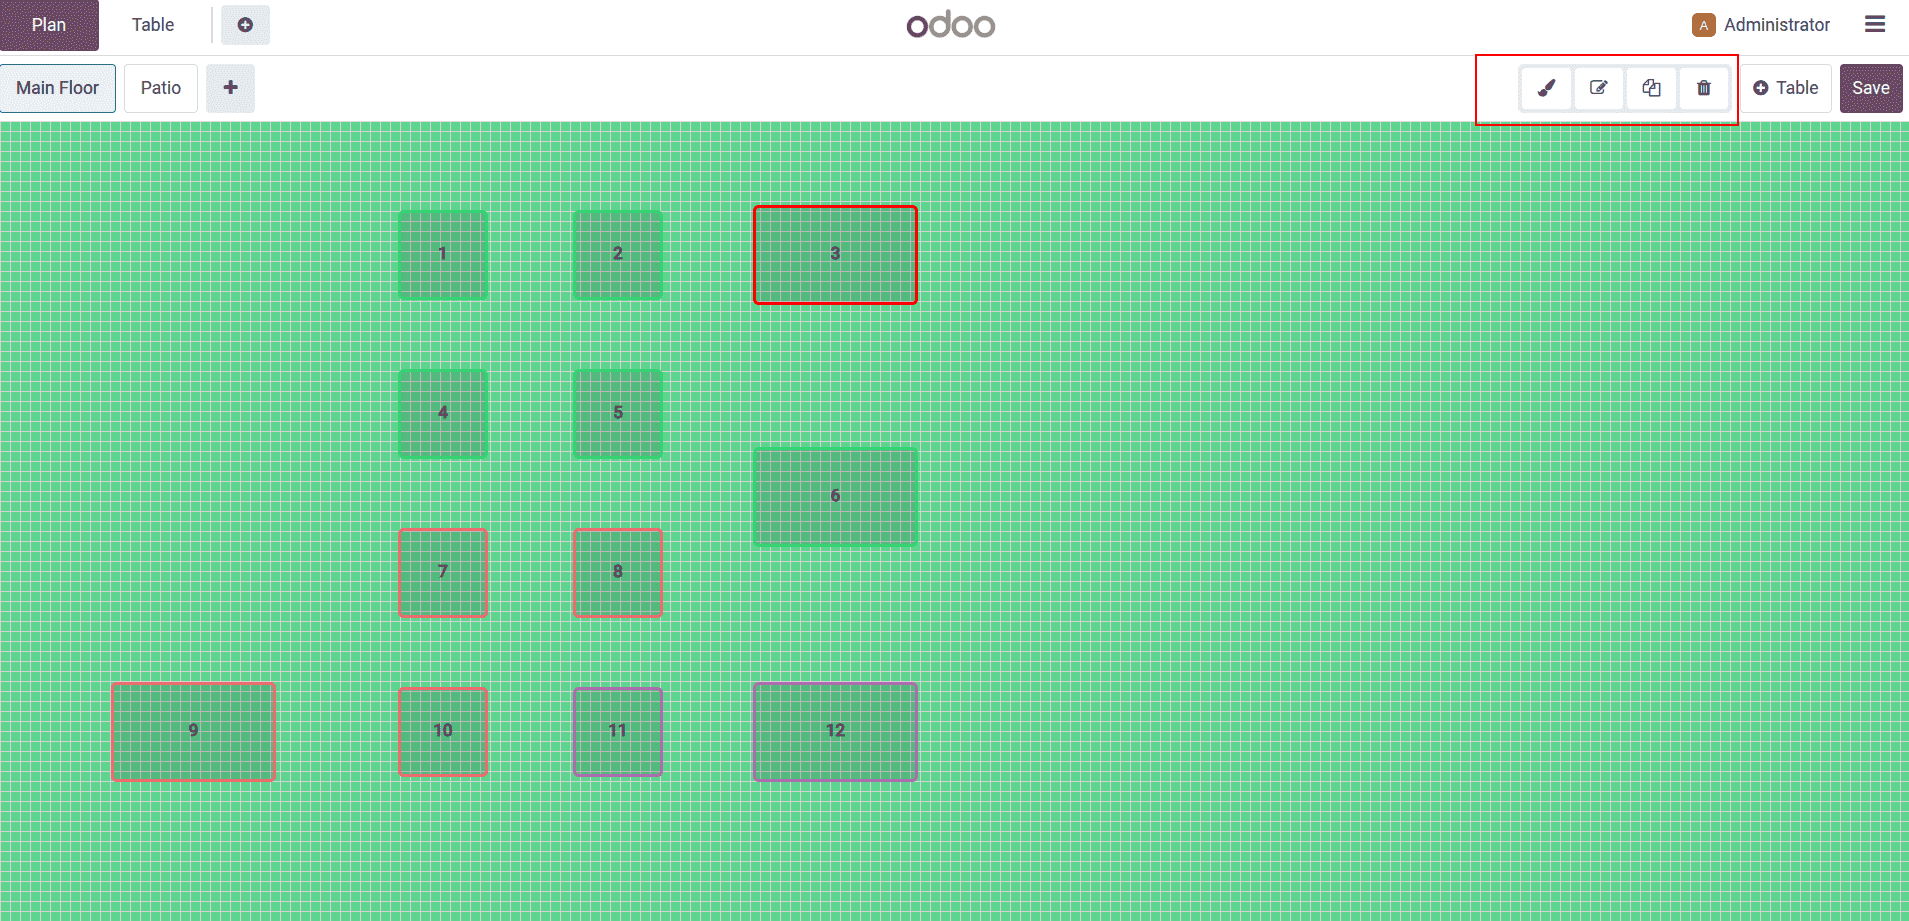
Table:
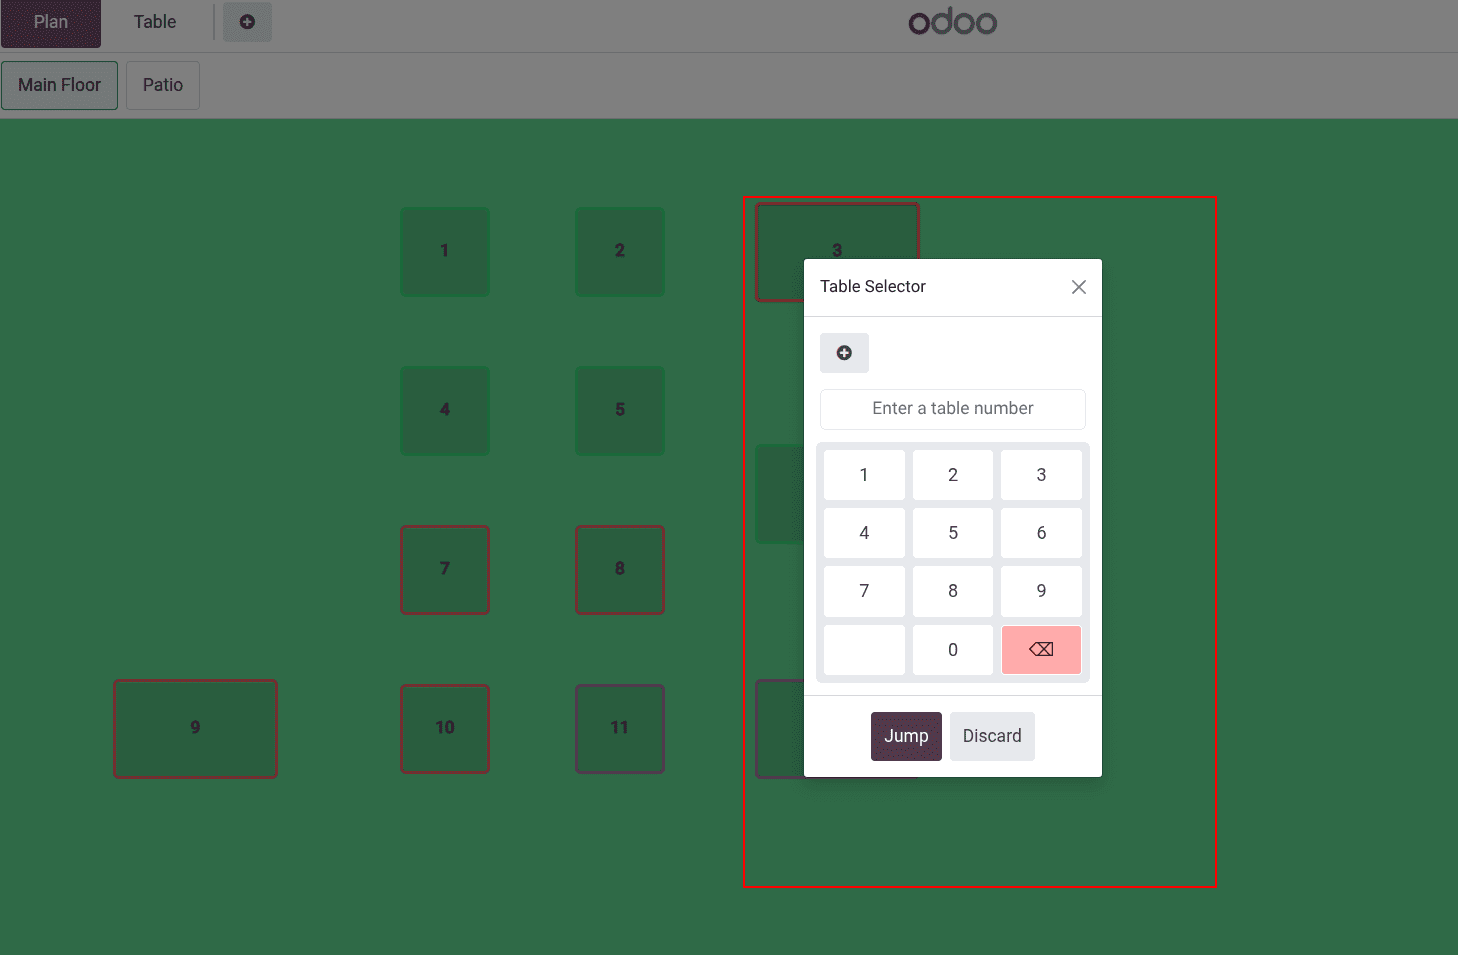
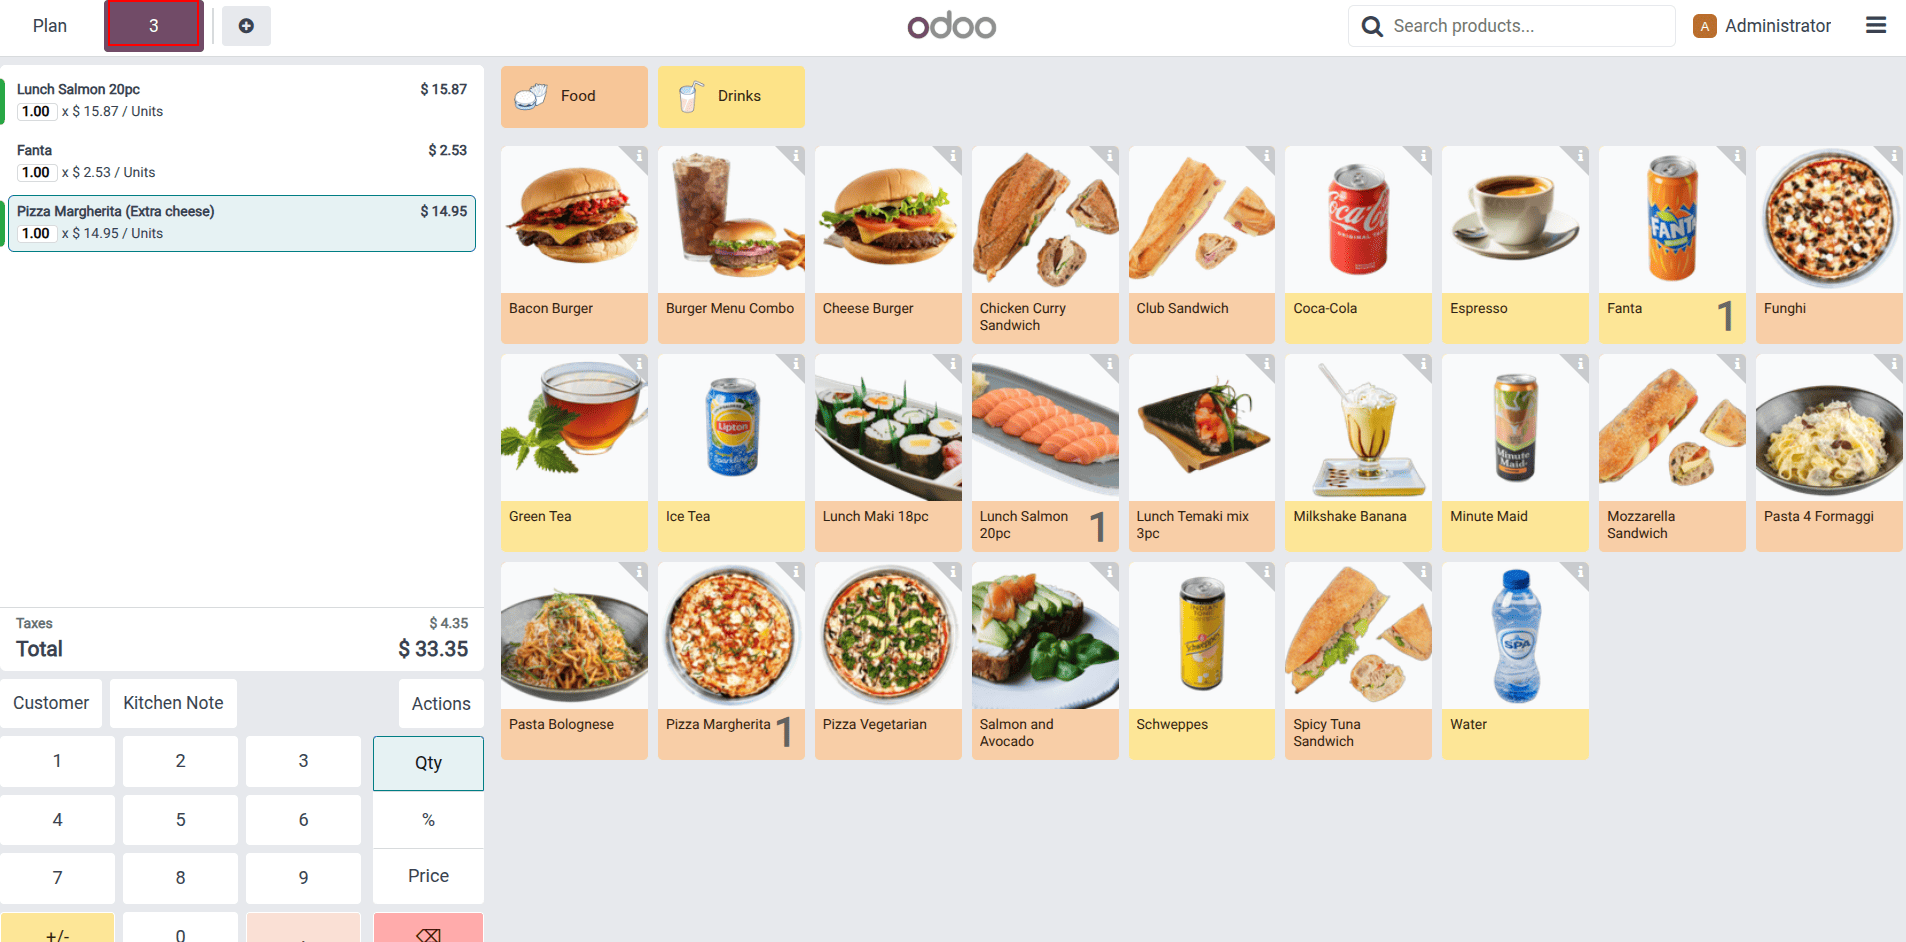
Now let’s see how ordering works in the Bar/Restaurant POS interface. From the floor plan, tap a specific table to start taking orders for that table. You can also jump to a table by entering its number, which is handy during rush hours. If you tap the “+” icon, Odoo creates a new order and assigns it to an available table automatically, so staff can open tabs quickly without hunting for a spot. Once inside a table, you add items, notes, and quantities just like in a regular POS, with the layout keeping everything tied to the correct table and seats.
This is the table number entry interface.
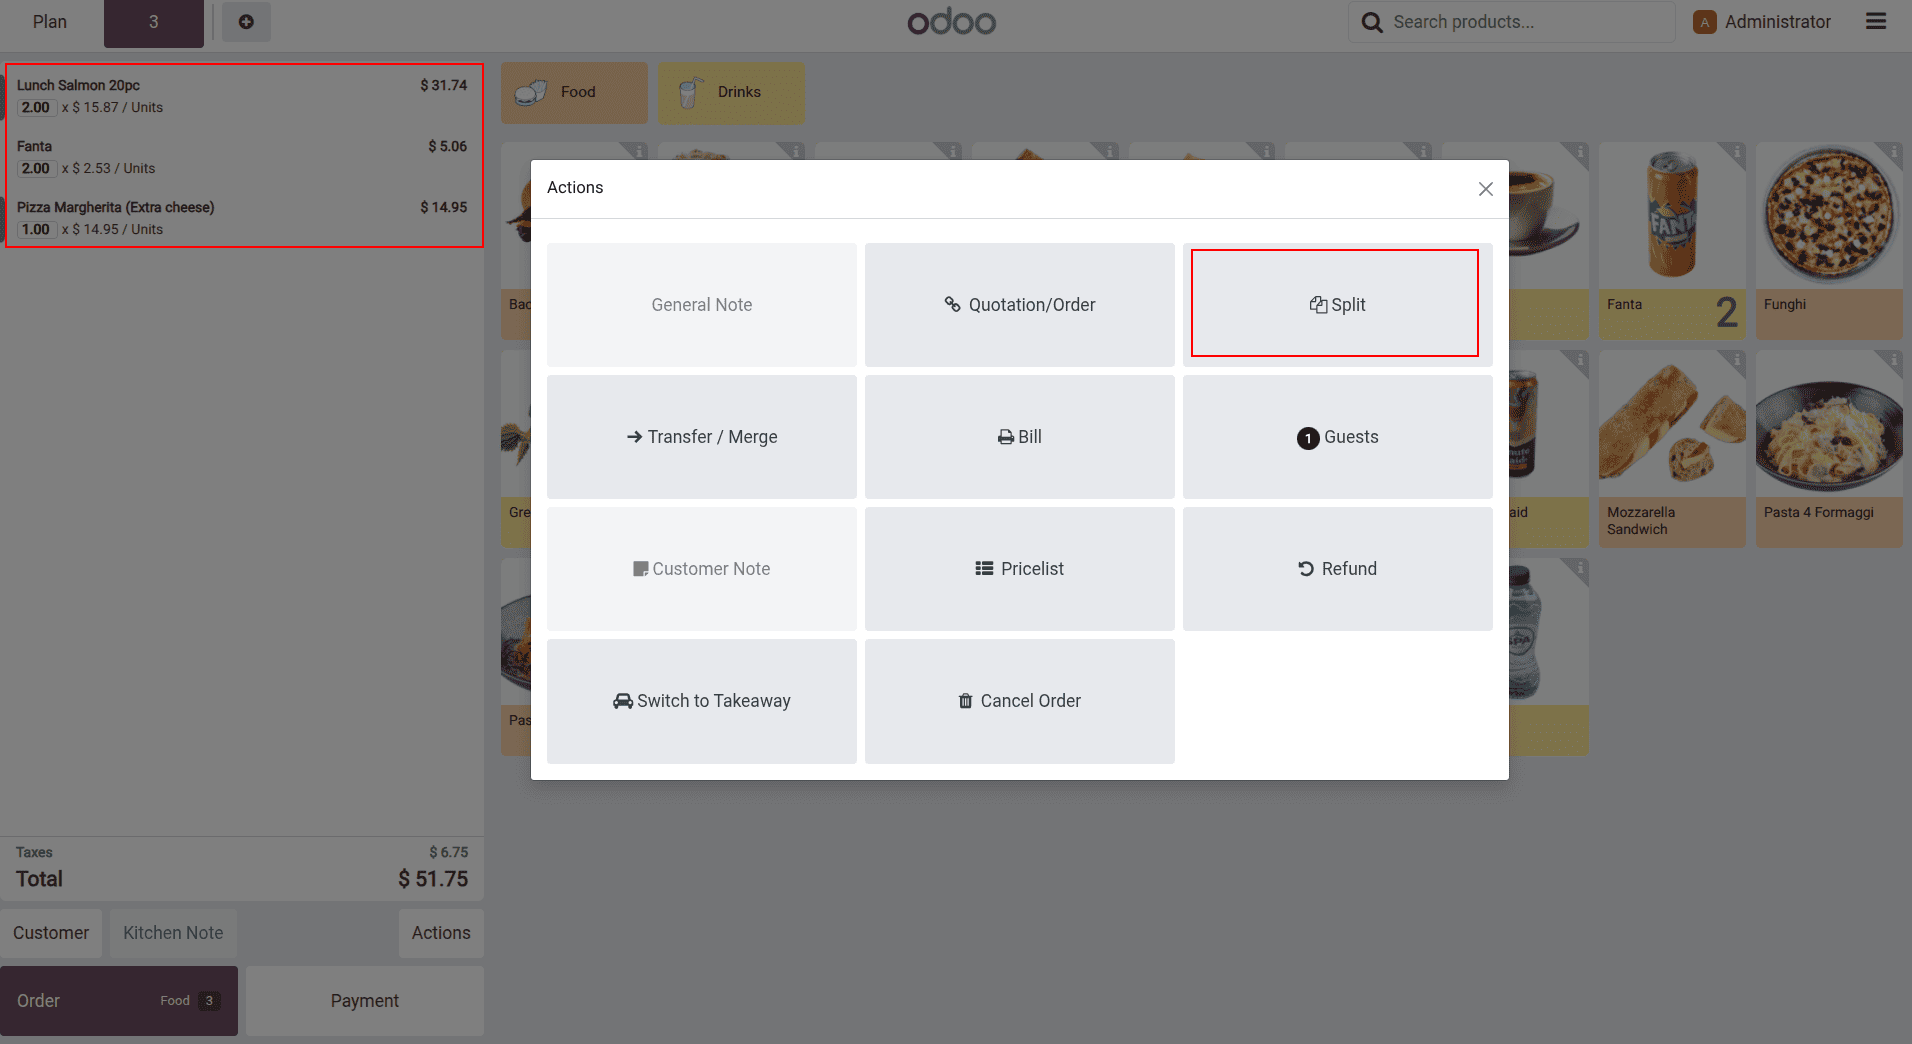
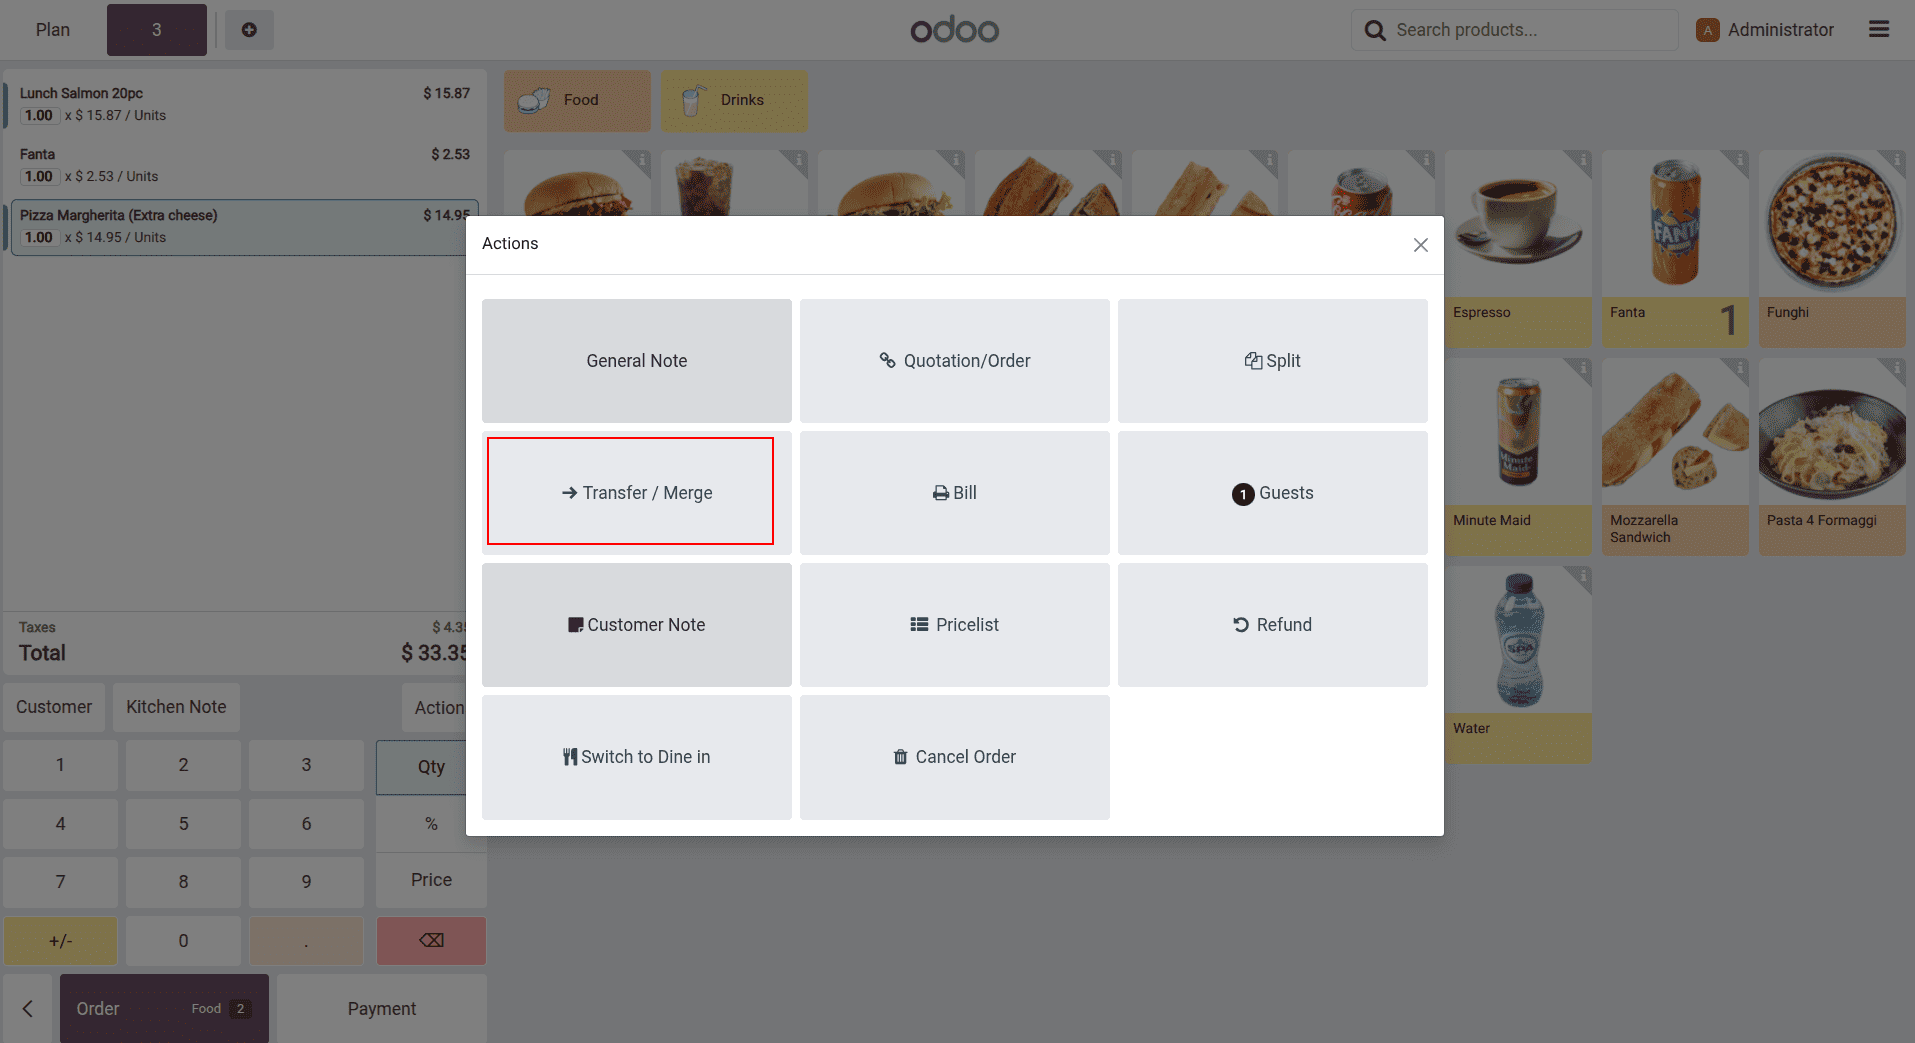
Now let’s check the additional features in Odoo 18’s Bar/Restaurant POS. You get predefined kitchen notes, a clear dine-in vs. takeaway toggle, early receipt printing, and precise bill splitting. It also supports table merges, faster multi-printer routing for kitchen/bar, tipping at payment, and flexible payment options for a smoother guest experience. These features can be accessed in the In POS interface by clicking the “Actions” button.
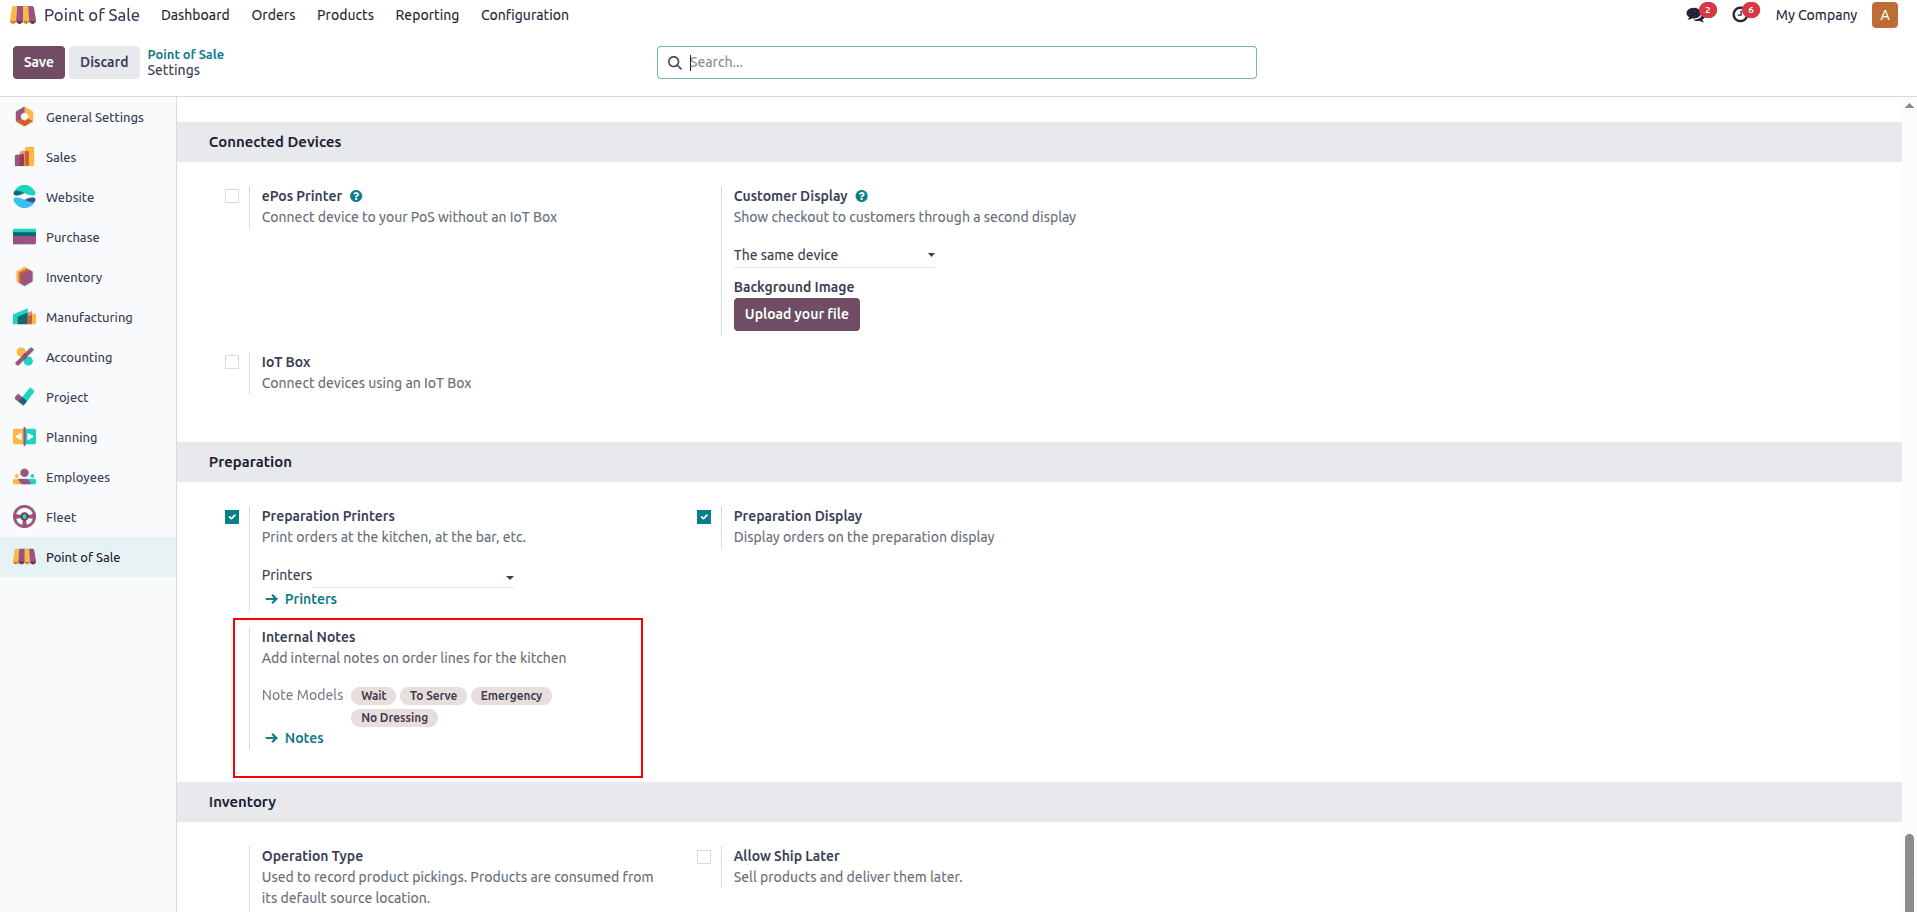
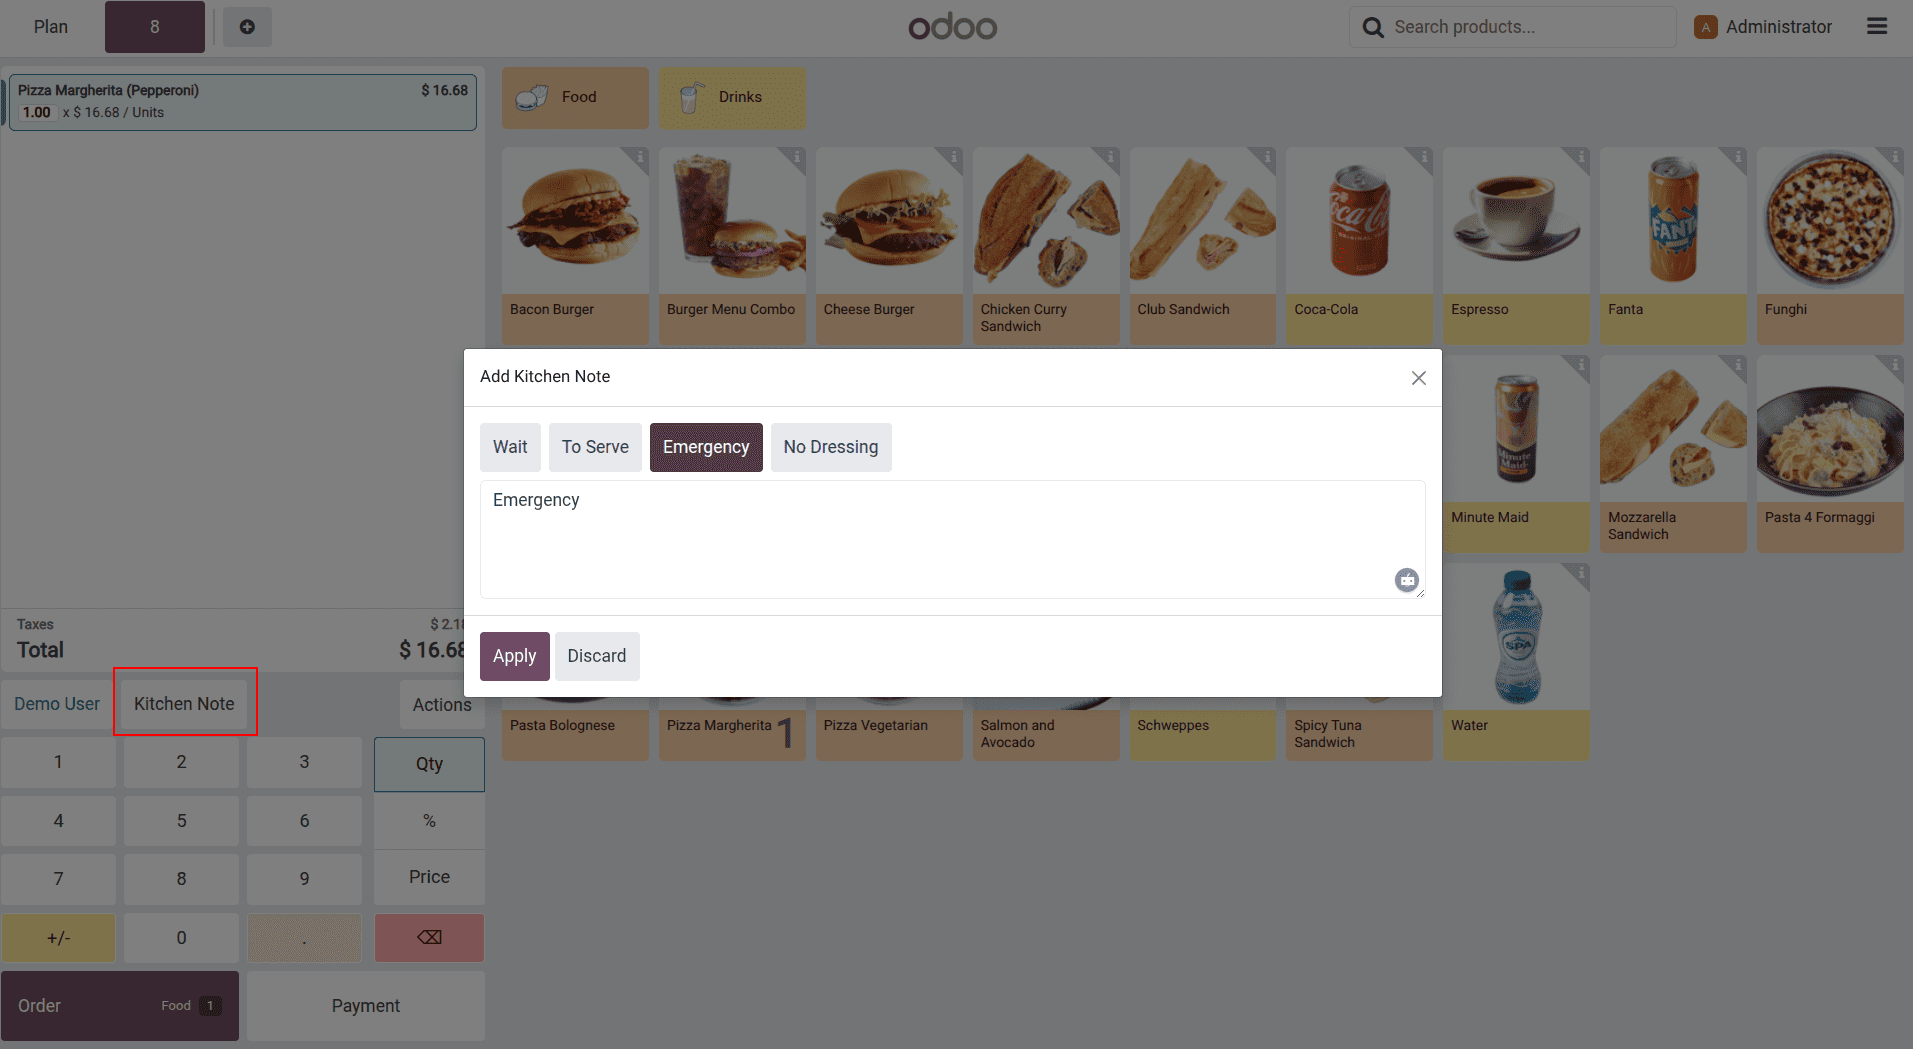
Kitchen/bar notes: Add internal notes per order line (e.g., “no onions,” “extra spicy”) and route them to the correct printer or kitchen display so staff see precise prep instructions without cluttering the customer receipt.
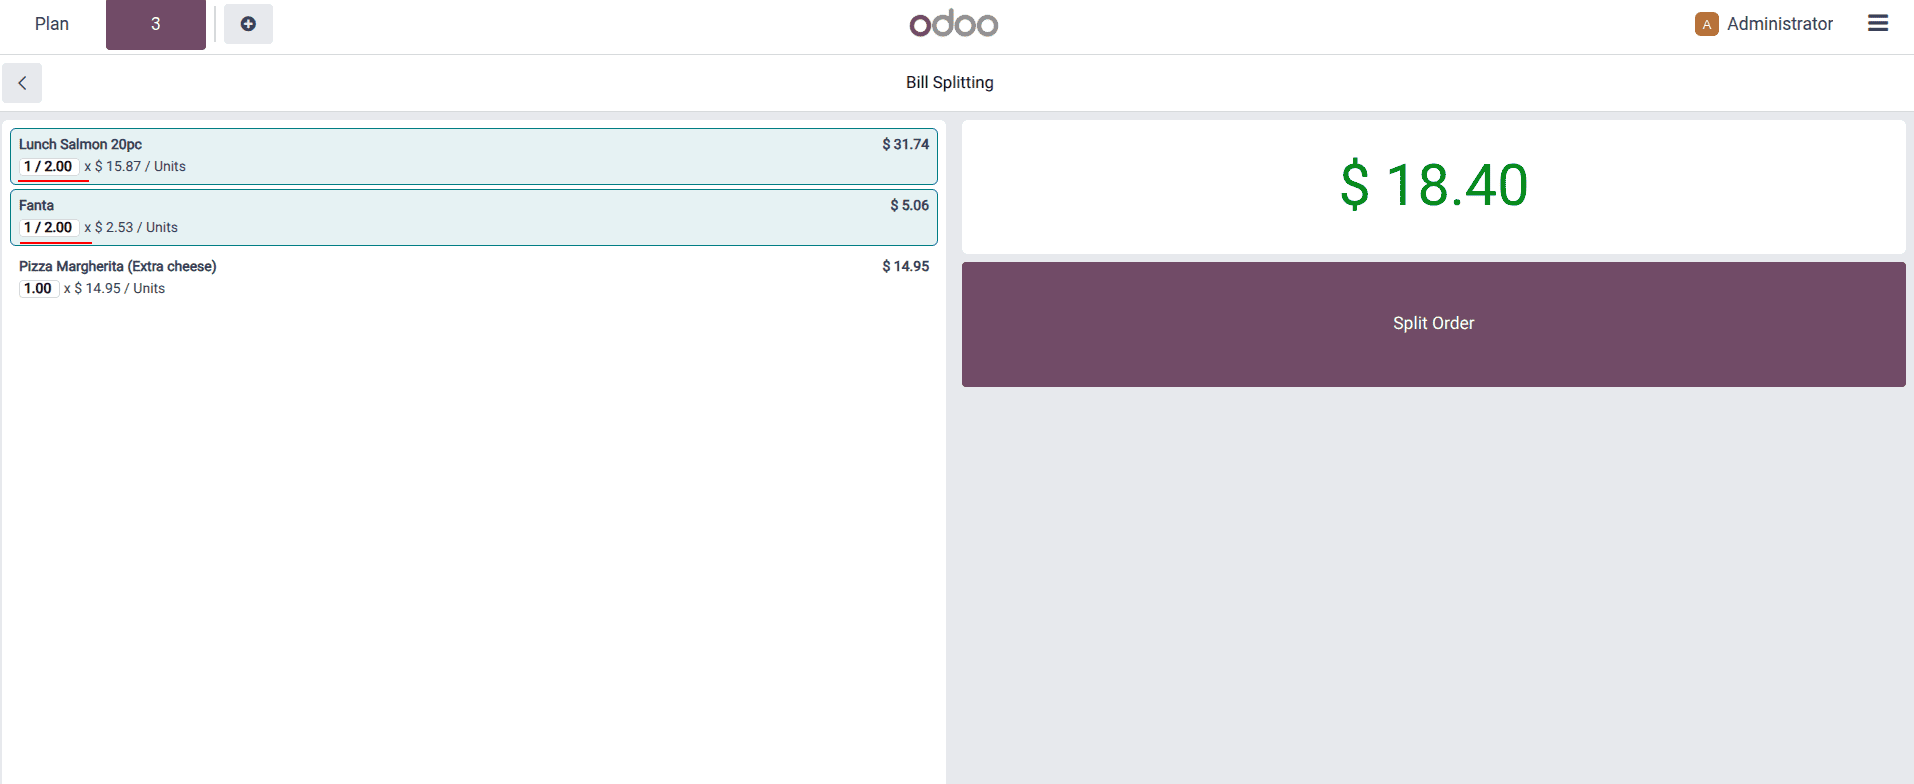
Split bills: Split by guest, by items, or by amounts; let different people pay with different methods without rewriting the order. Assign items to specific seats to simplify ordering and produce accurate, per-guest splits.
Splitting the quantities among the customers so that they will split orders.
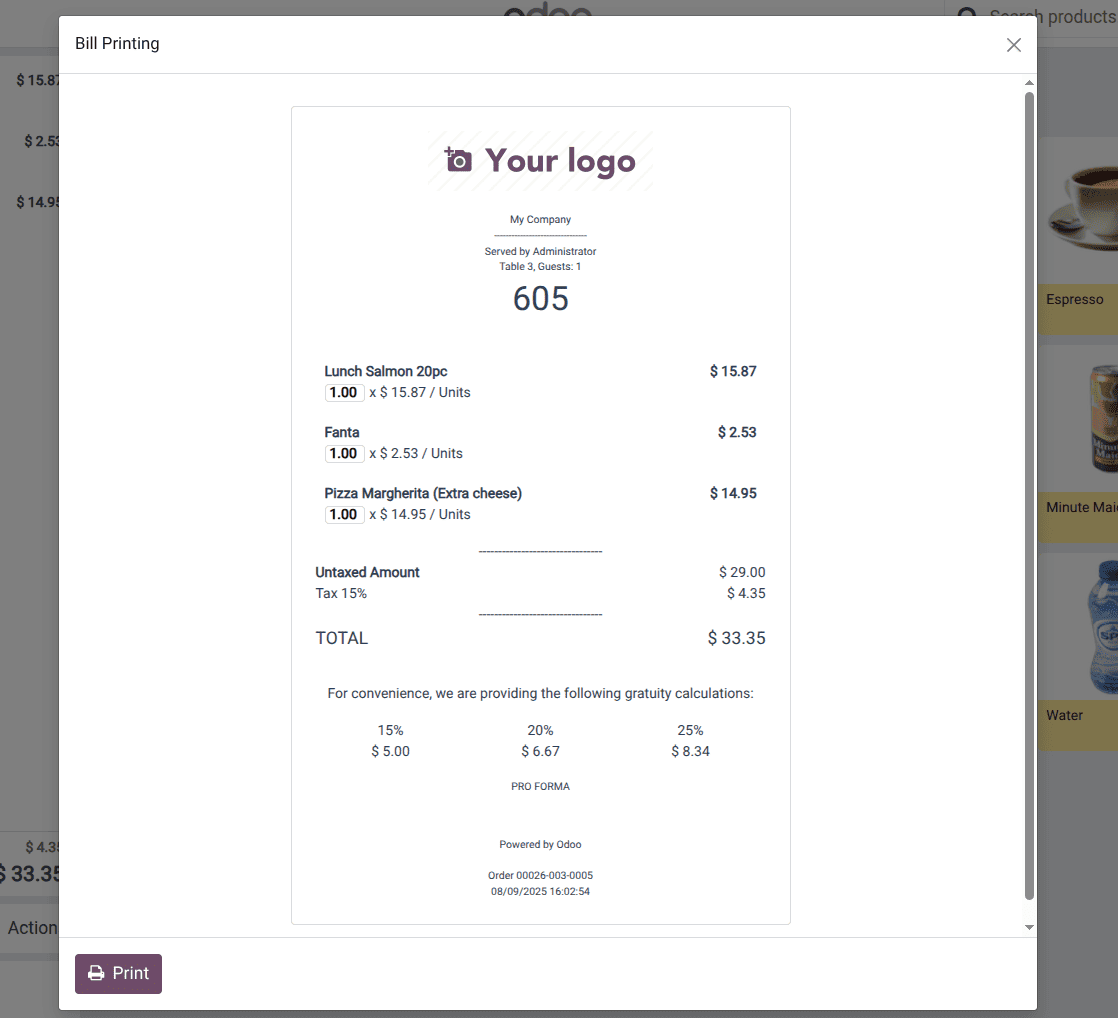
Early receipt/bill printing: Print a pro forma bill or customer receipt before payment on request (e.g., for expense claims or to speed checkout).
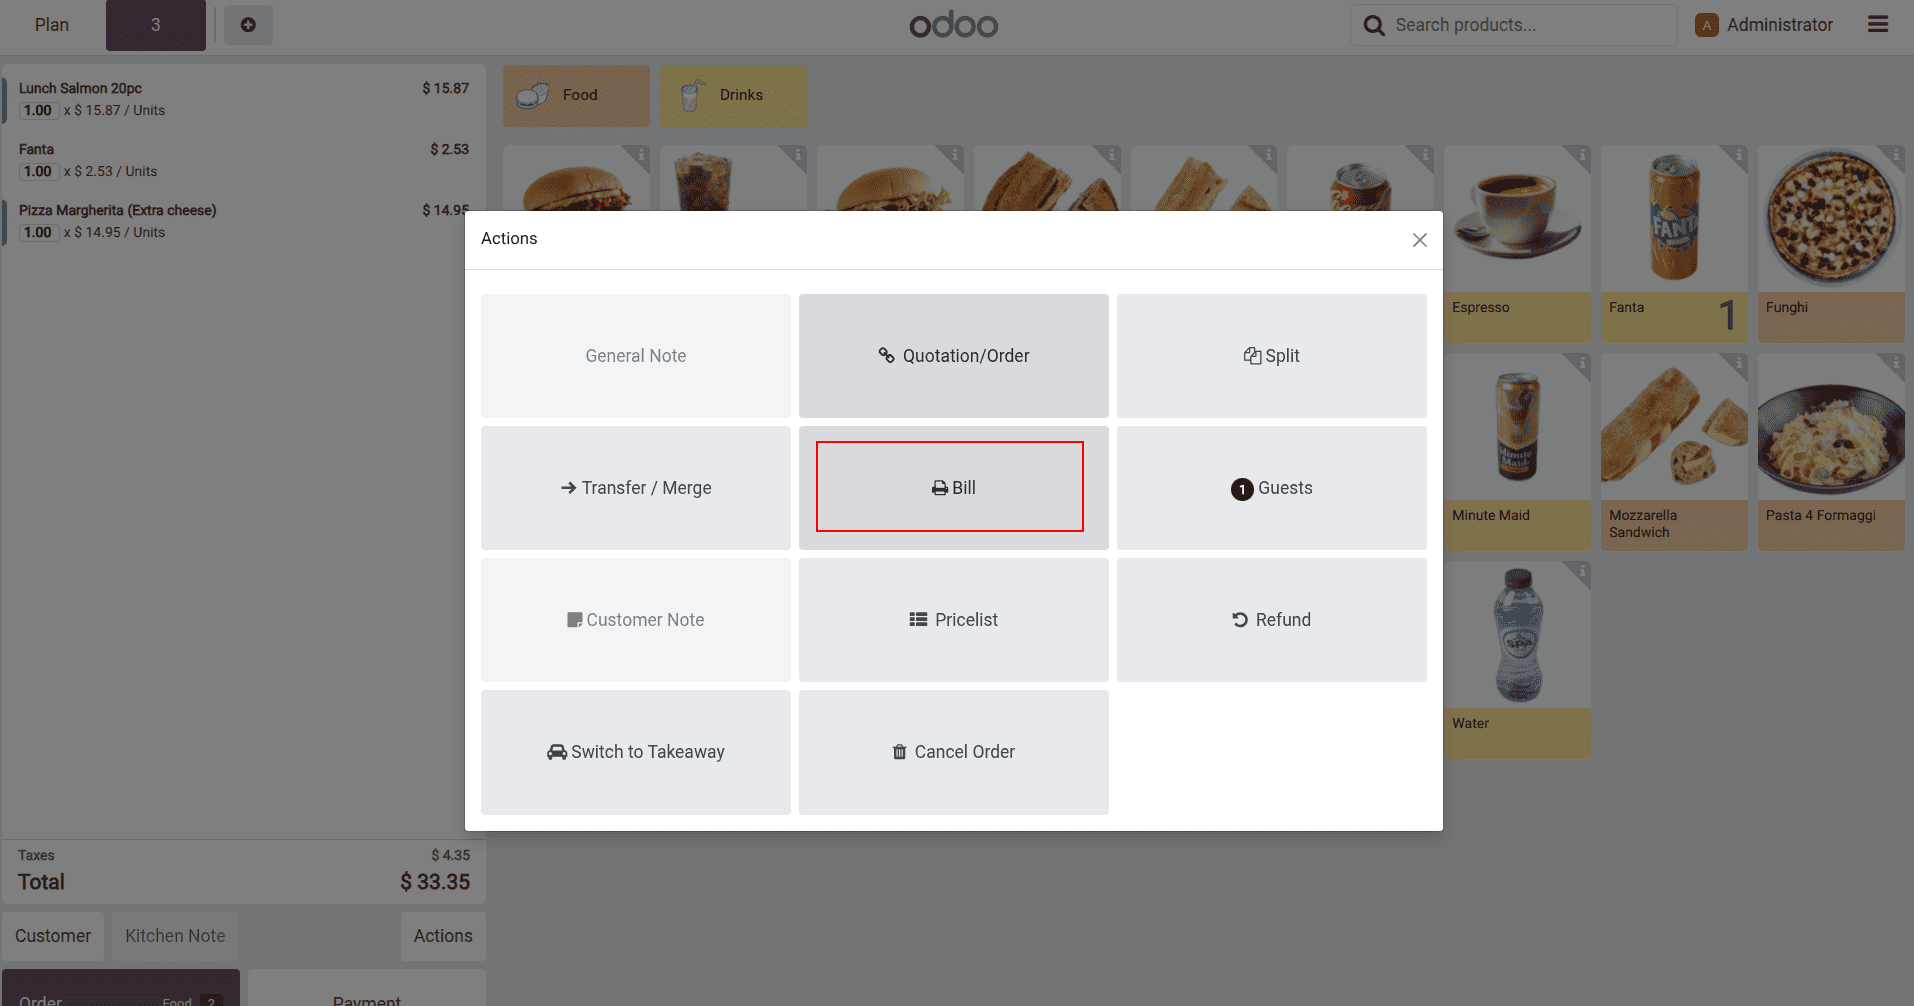
When the user clicks on the Bill button, Odoo allows printing the current bill without payments.
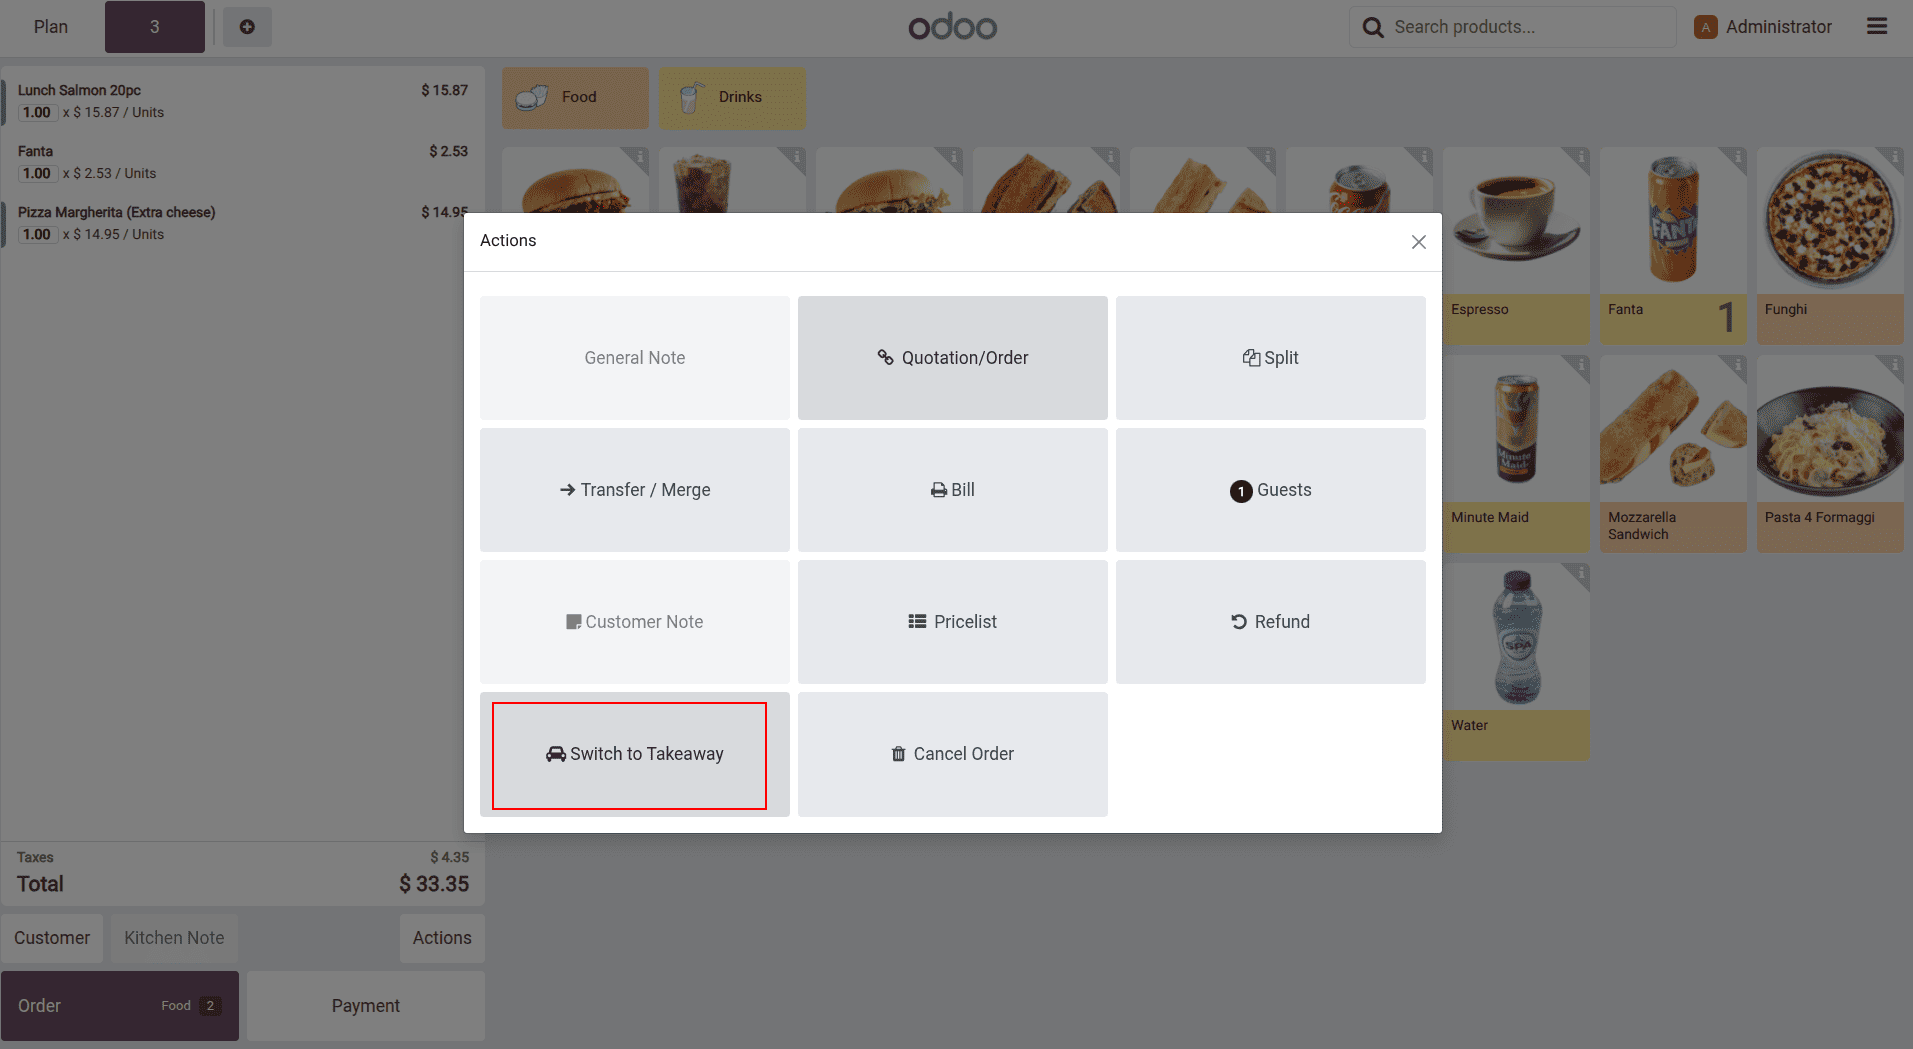
Dine-in vs. takeaway: Mark orders as dine-in or takeaway to apply the right taxes, packaging rules, and kitchen routing.
The user can switch the order by clicking the buttons.

Tips: Capture tips at checkout or before (Can be configured in the settings).
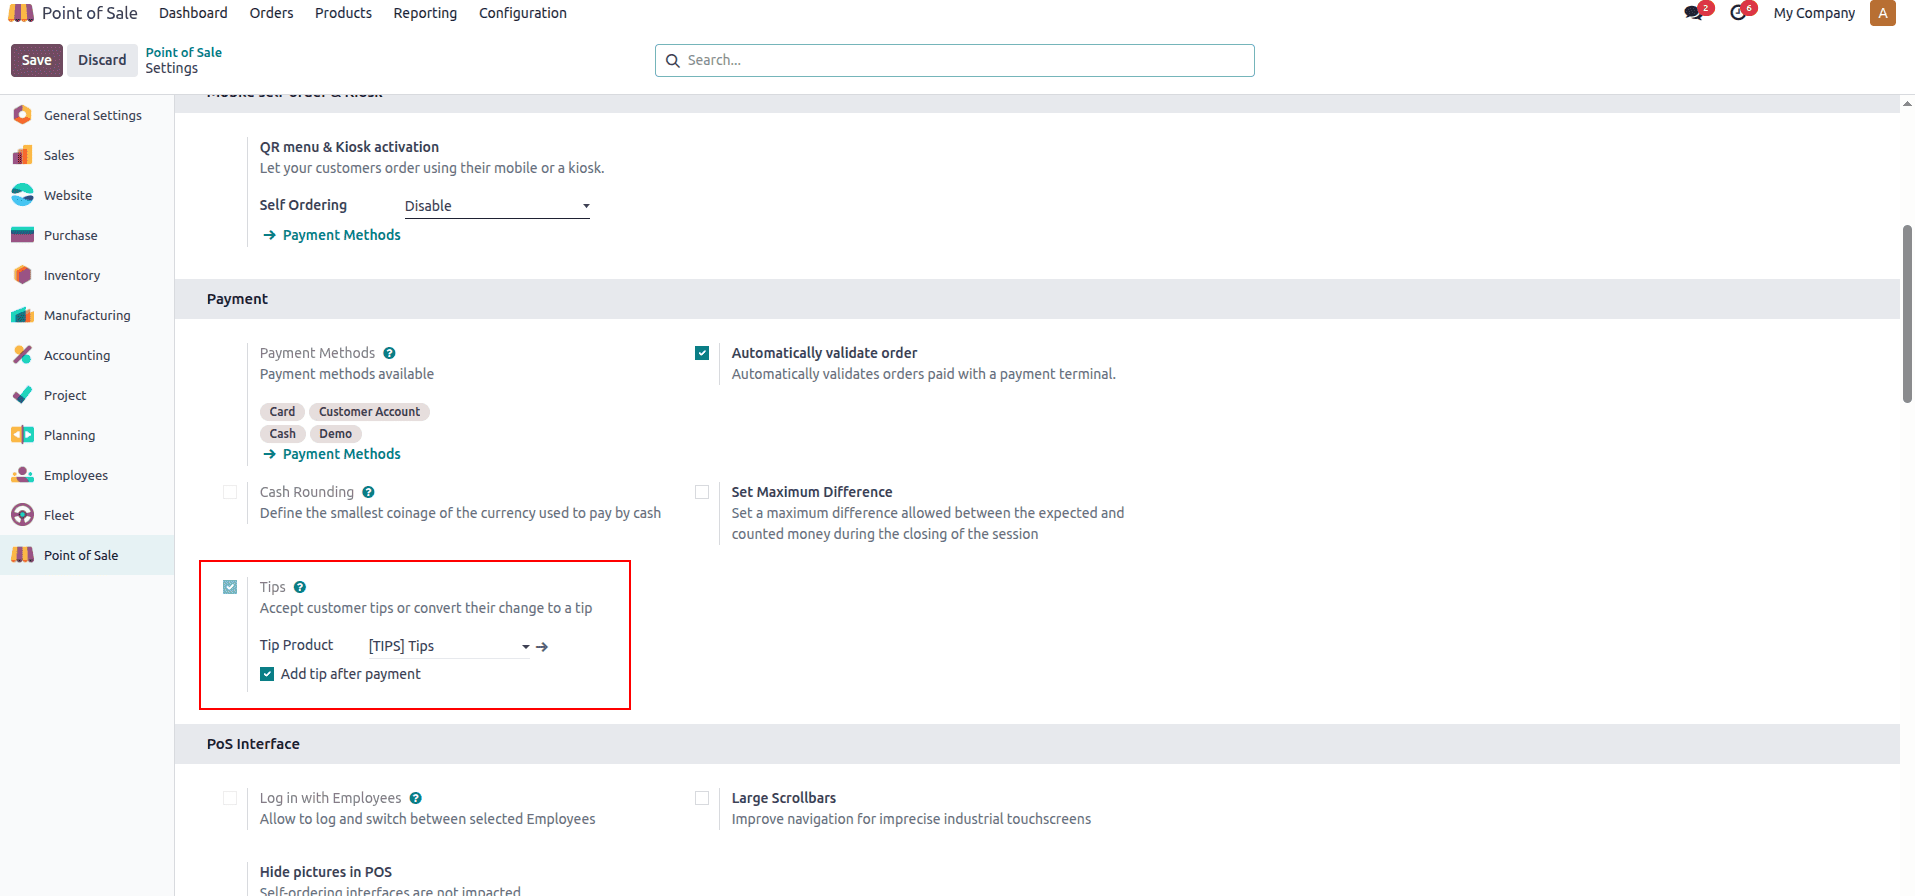
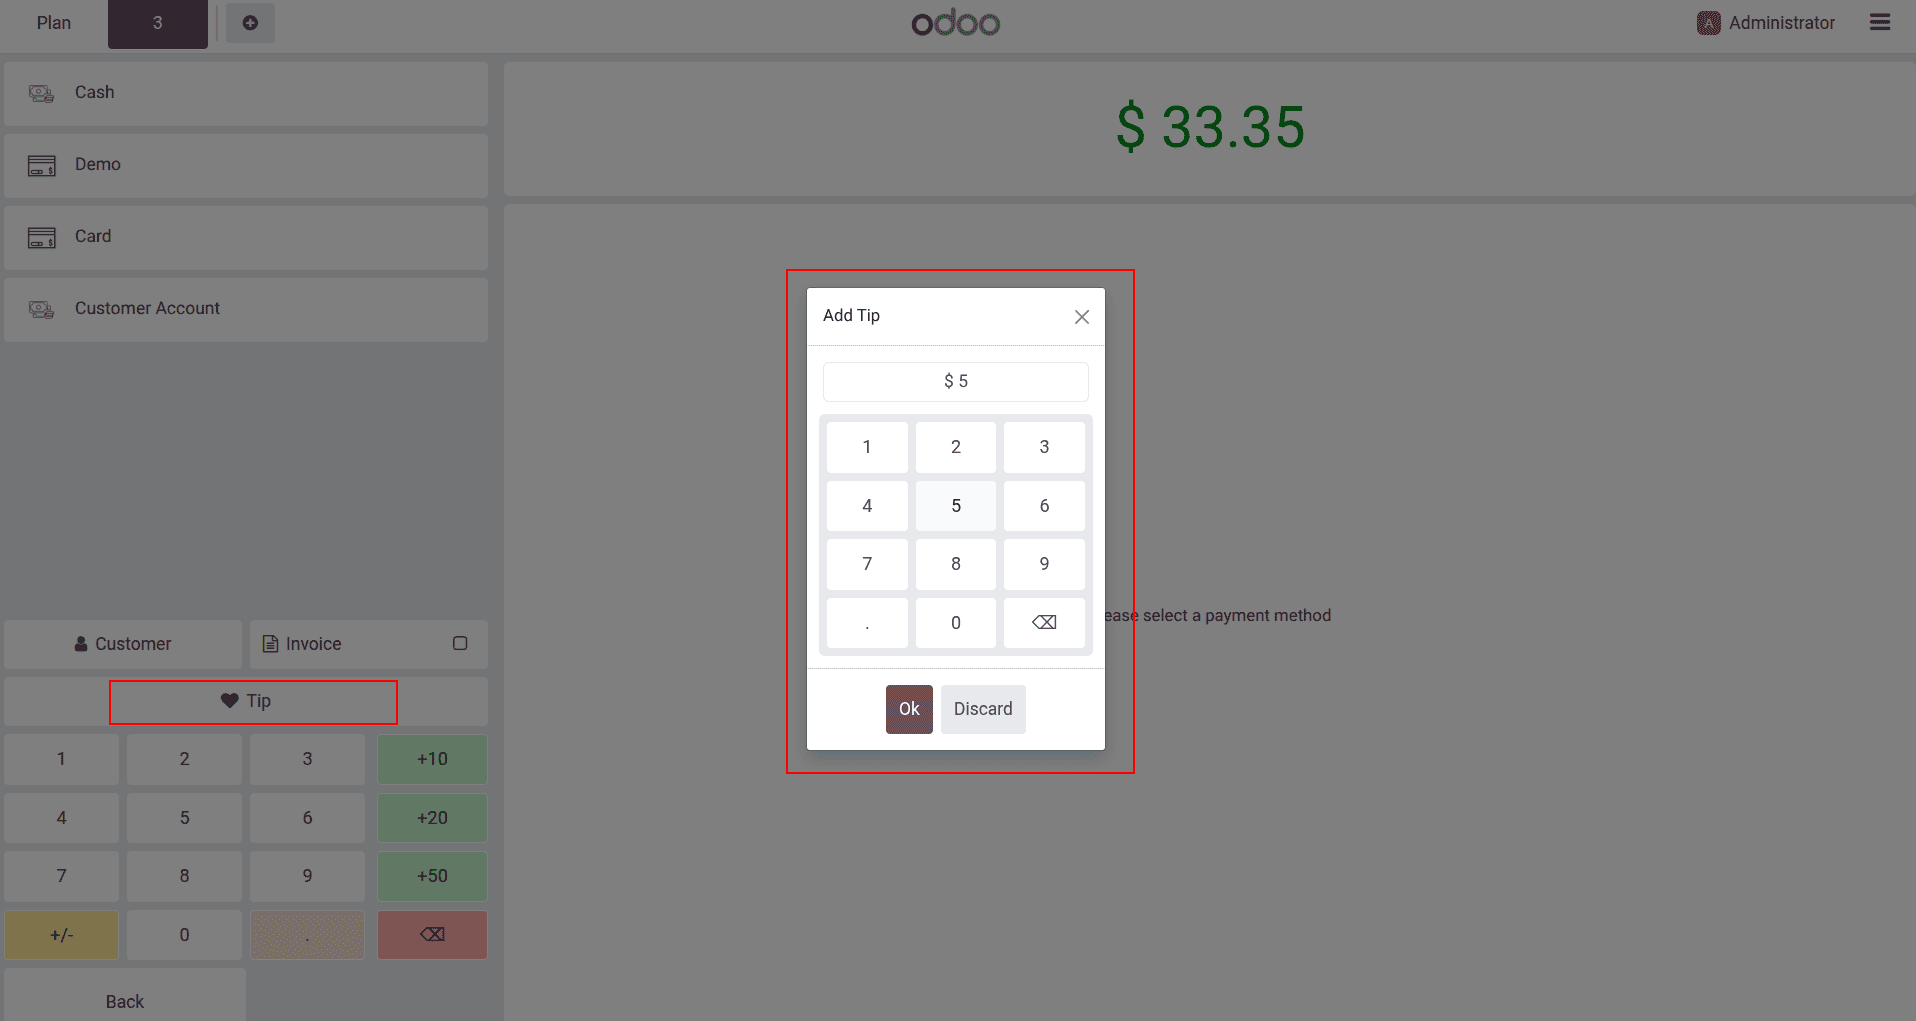
Table transfers and merges: Move an order to another table or merge/split tables when parties change, keeping tickets and production aligned.
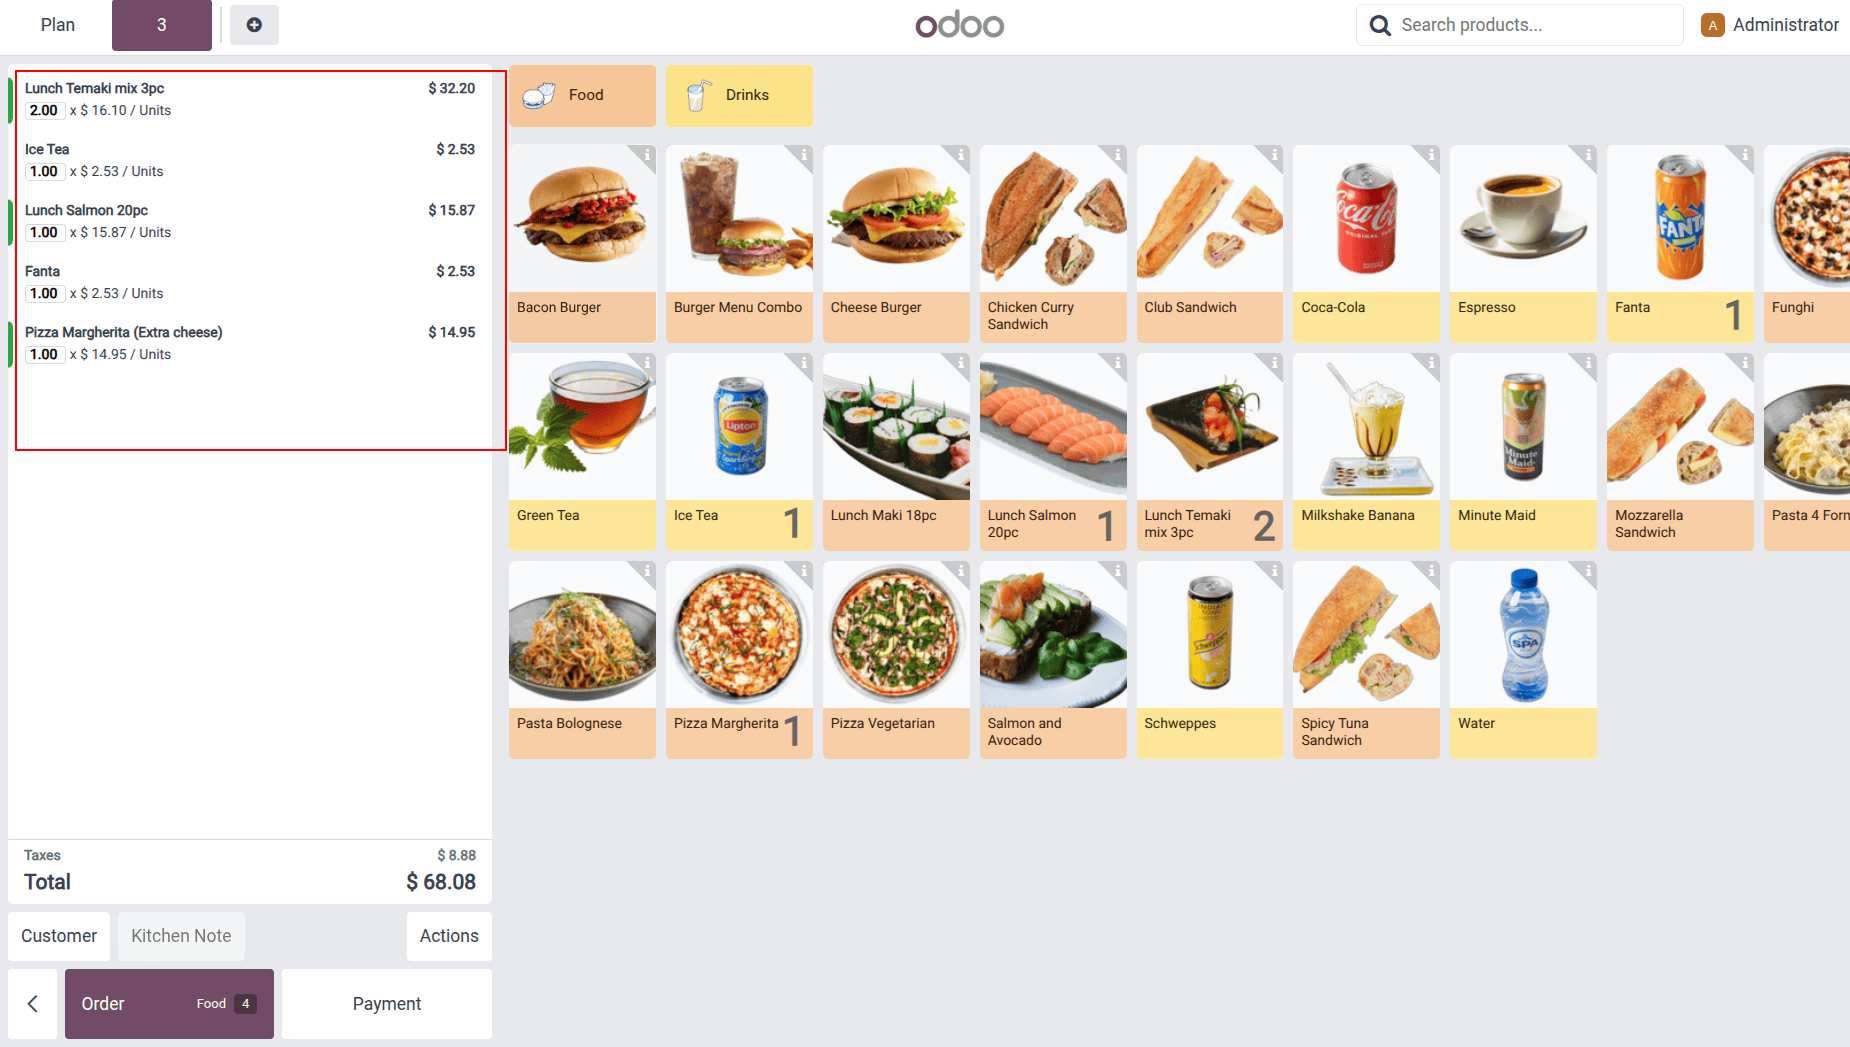
As you can see, the order is for table 3. Now, let’s see how we can transfer the table. In the Actions, click on “Transfer / Merge”.
Then select the desired table.
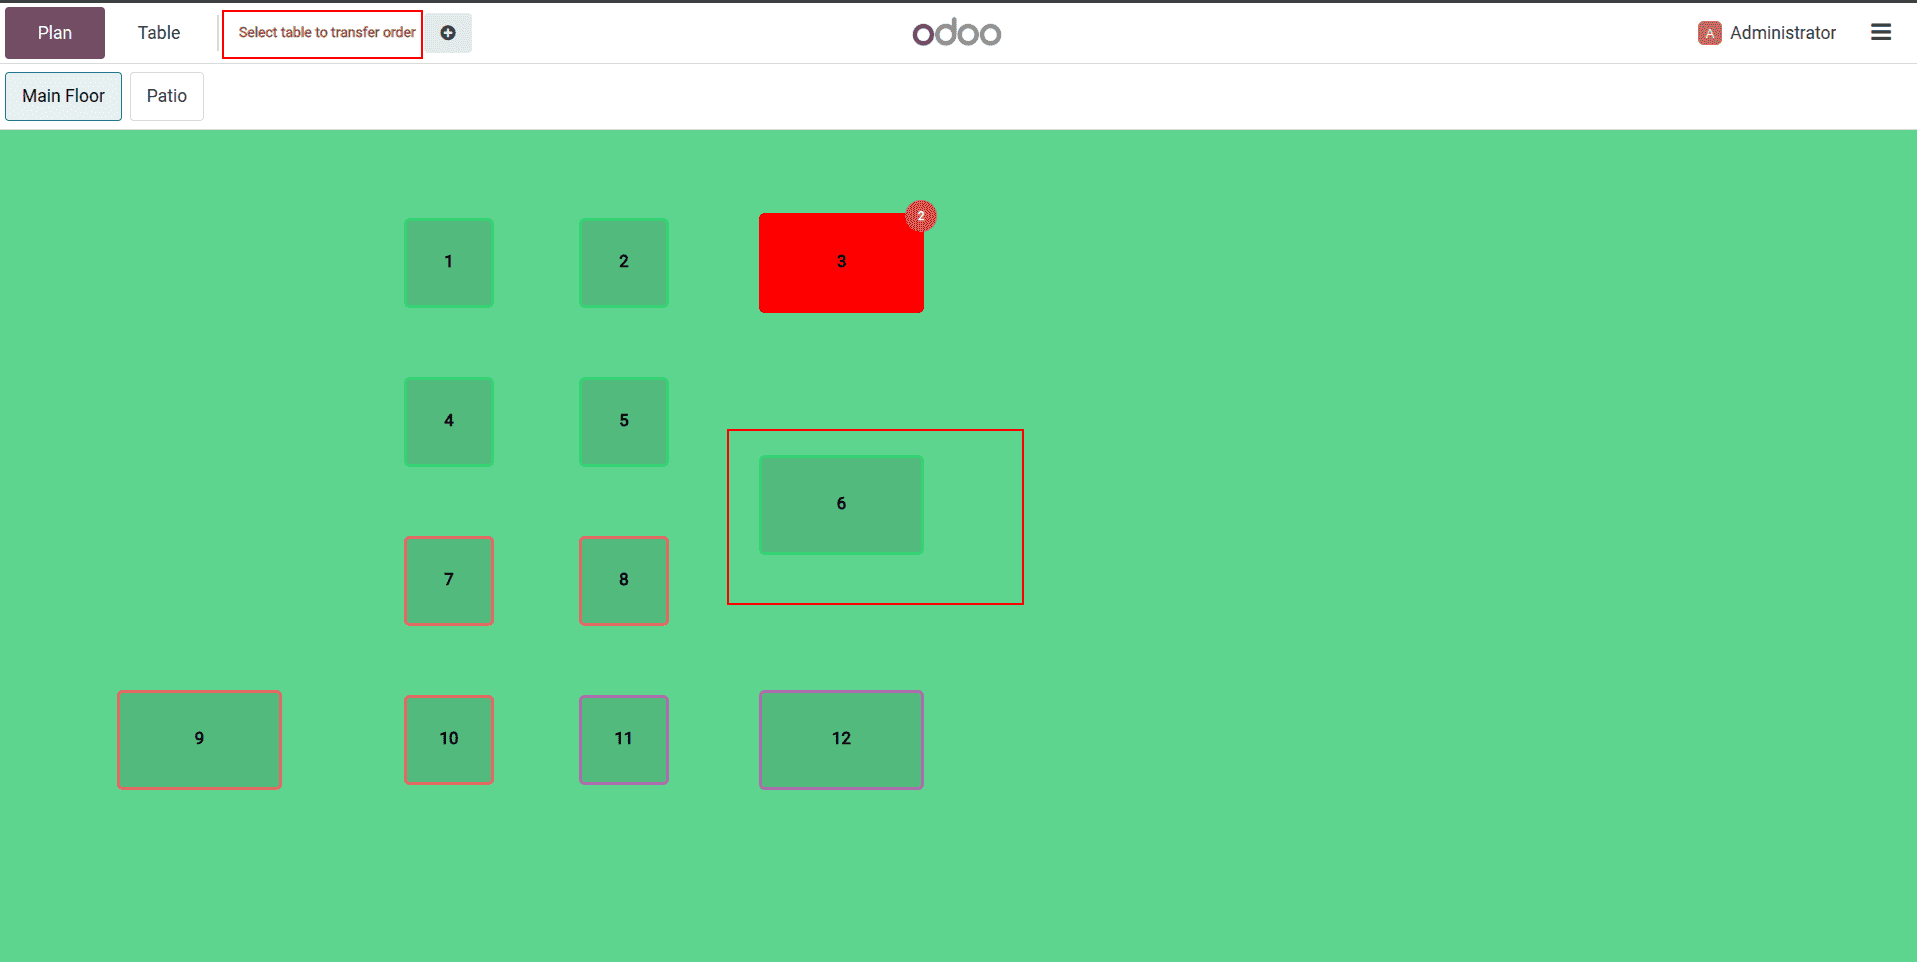
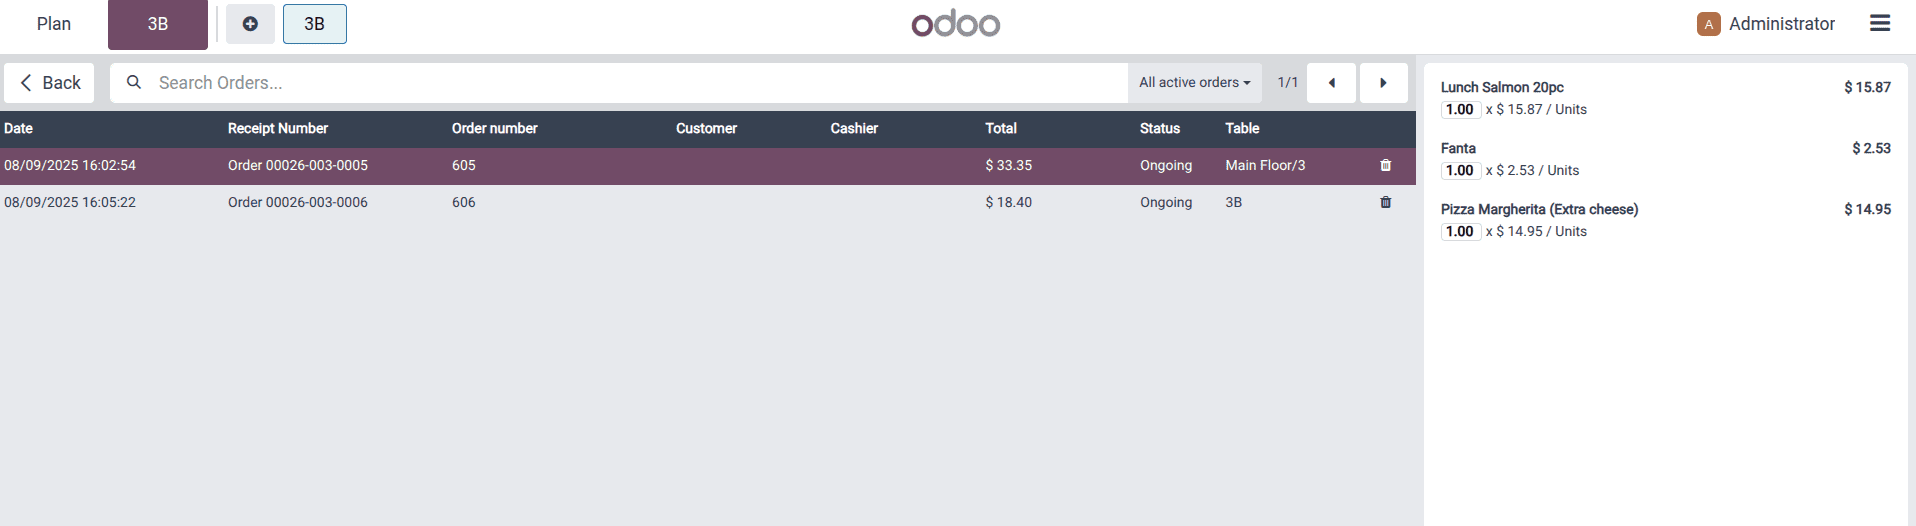
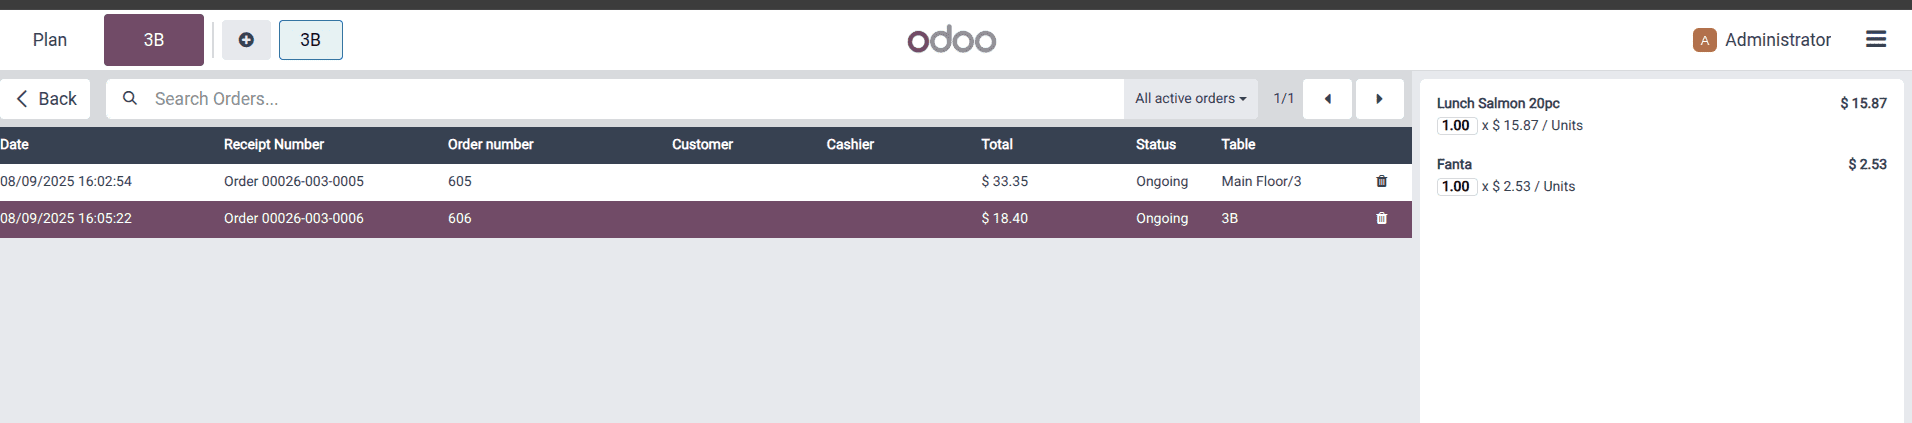
Now, let’s check how we can merge two orders. Merging the orders in two tables, one is table 3 and the other is table 6:

Now, click the same button “Transfer / Merge”, and select the table with orders already.
You can see the orders are merged into Table 3.
Kitchen printer options: Use a kitchen display system or traditional printers, with clear ticket grouping and bump actions.

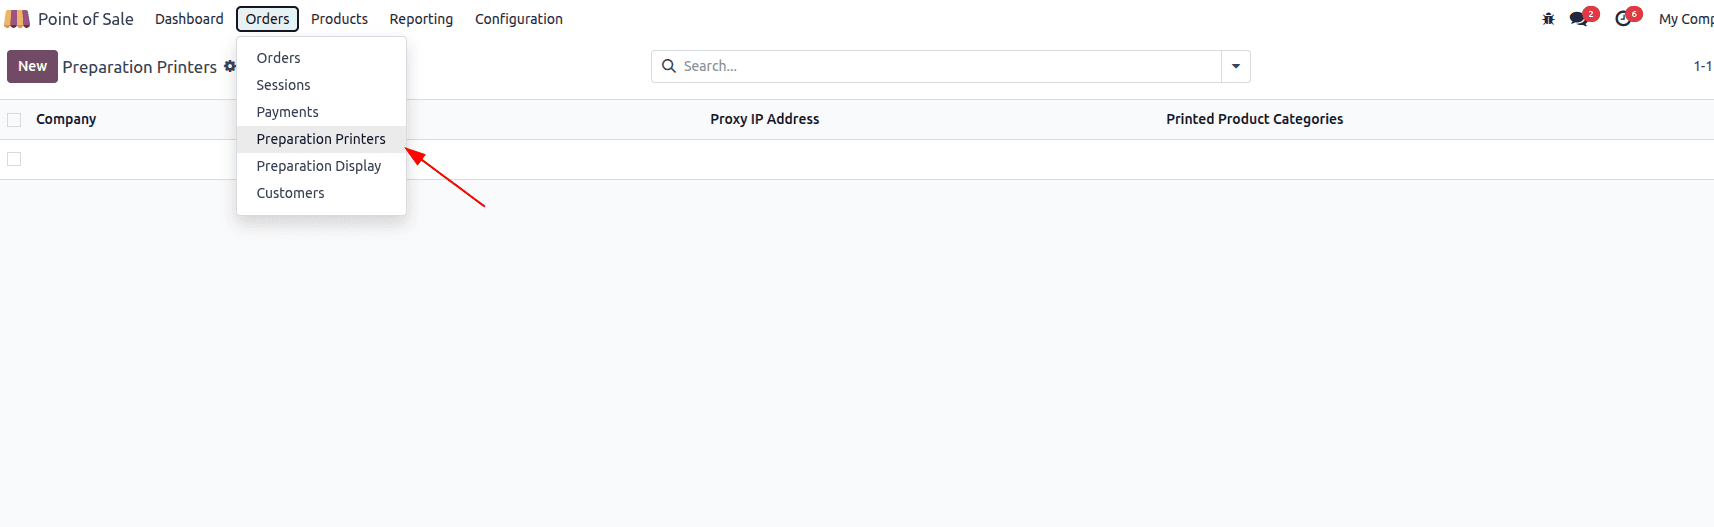
You can configure the printers in the configuration Orders>Preparation Printers
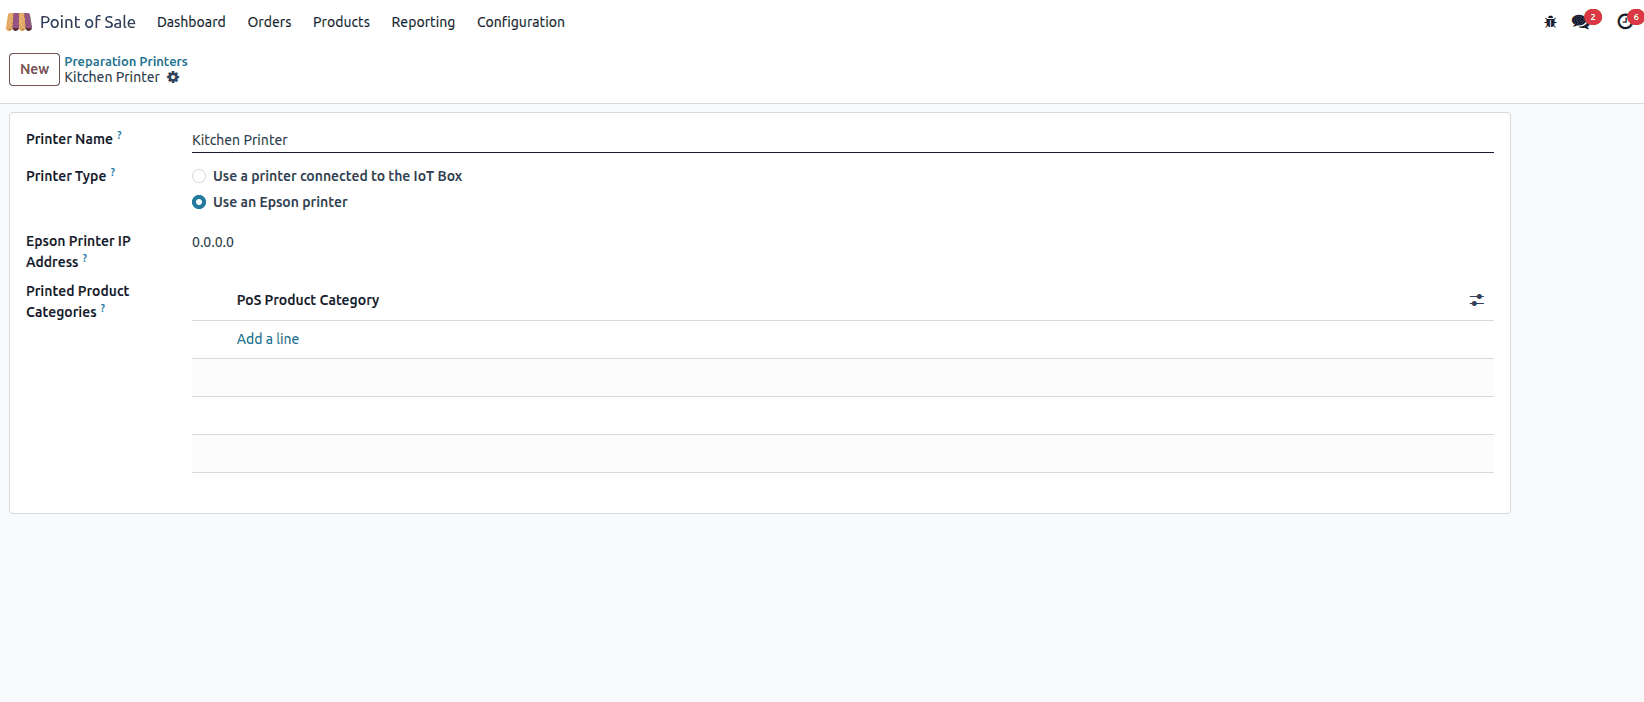
In Odoo 18’s Bar/Restaurant POS, you can configure a Kitchen Printer via an IoT Box or a direct network Epson/ESC/POS printer. Enter the printer IP and choose which product categories it should print (e.g., Food to kitchen, Drinks to bar). Using the IoT Box centralizes device pairing and supports USB/Ethernet printers; direct Epson setup works over the LAN for quick, reliable ticket routing.
Additionally, Odoo 18 offers a streamlined online table reservation feature that ties directly into the POS, making bookings more efficient and accurately reflected on the floor plan; for a deeper walkthrough, check out the blog “Online Table Reservation With Odoo 18 Point of Sale”. Odoo 18 also includes a powerful self-service Kiosk Mode, letting guests place their own orders with a simple, guided interface that speeds up service and cuts queue times. Learn how to set it up step by step in our guide, “How to Create a New Kiosk Mode Shopping in Odoo 18 Point of Sale (POS)”.
These are the core Bar/Restaurant features in Odoo 18 POS, and together they create a smooth, end-to-end workflow from seating to payment. With floor plans, table and seat management, and in-POS “Edit Plan,” staff work from a layout that mirrors the real venue, speeding seating and reducing errors. Kitchen/bar notes and multi-printer routing keep production precise, while options like dine-in vs. takeaway, early receipt printing, bill splitting, tips, and table transfers handle real service scenarios gracefully. You can also connect kitchen printers via IoT Box or a direct network setup for reliable ticketing. For a complete guest journey, pair this with Odoo 18’s online table reservations so bookings flow straight onto the floor plan and into the POS.
To read more about How to Split Restaurant Bills in Odoo 18 Point of Sale, refer to our blog How to Split Restaurant Bills in Odoo 18 Point of Sale.