Marketing automation is the marketing strategy used
for managing marketing activities with the help of software. Through marketing
automation, we can automate repetitive tasks such as promotional and
advertising operations of an organization with ease. The Odoo ERP also offers
you an efficient Marketing Automation tool.
The Odoo Marketing Automation aspect will allow you to
Plan, coordinate, run, and measure all the marketing campaign activities in an
excellent way. It is the best suitable platform to closely handle and retain
the generated leads with the aim to convert them into regular customers. So the
main aim of the marketing automation tool is to close more sales. The Odoo
marketing automation module provides you an insight to increase operational efficiency
and it will multiply your revenue faster.
Now let us list out the important Benefits of the Odoo
Marketing Module.
Provide better marketing efficiency
Automate all the tasks related to the marketing
Time-saving tool
Help to fulfill sales and marketing goals.
Visitor tracking facility
Helps to generate more and better-qualified leads
Helps to convert leads to regular customers
Email campaign development
Integrates various channels and devices to generate better results.
Improve productivity
Reduce overload of employees and ensure better employee performance.
Customizable marketing strategies
Well defined marketing campaigns
Generate various reports to evaluate each operation.
The Odoo Marketing automation module offers you
meaningful experiences for your business without much effort.
For activating the Odoo marketing automation module,
first, you should install the module.

If you enter the Marketing Automation module, you will
be depicted with a dashboard window as depicted in the below image.
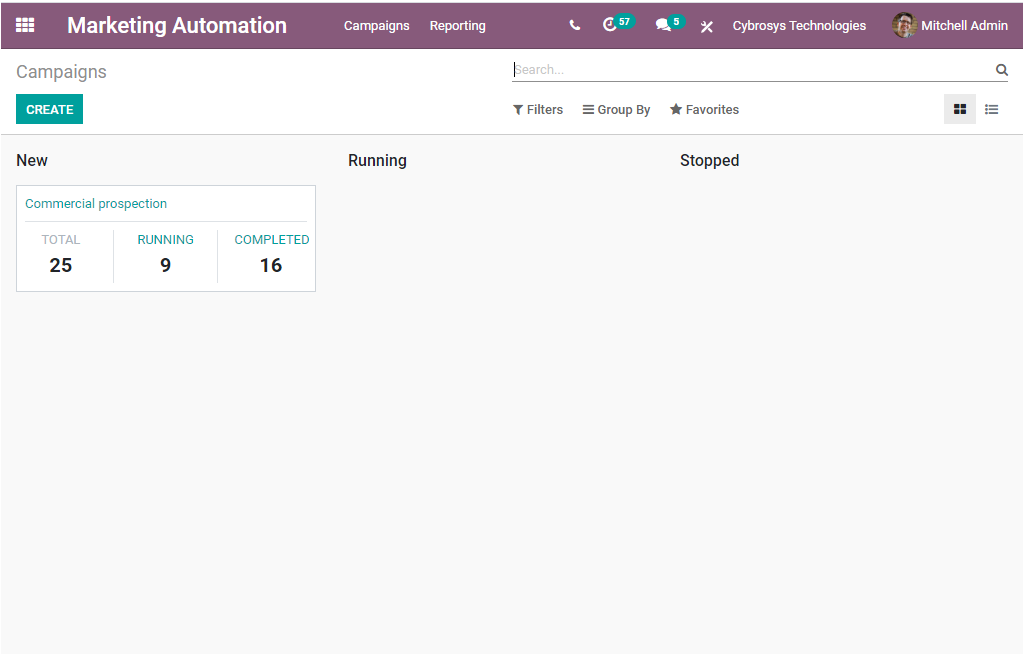
This is the window that
depicts all the campaigns created on the platform. This window is designed in
the way the data are depicted as in various stages based upon their status.
This is the Kanban view of the window. Here you can
view the various stages such as New, Running, and Stopped. At the left corner
of each stage, you can view a Settings icon. If you click on the icon, you will
be depicted with a drop-down menu where you can view the options Fold, Archive
All, and Unarchive All. The Fold icon available will allow you to fold the
corresponding stage. This option will be very helpful when the platform has
more stages. The Archive All option allows you to archive all the records of
this stage.
The Campaign window can also be viewed in List format.
The screenshot of the window is showcased below.
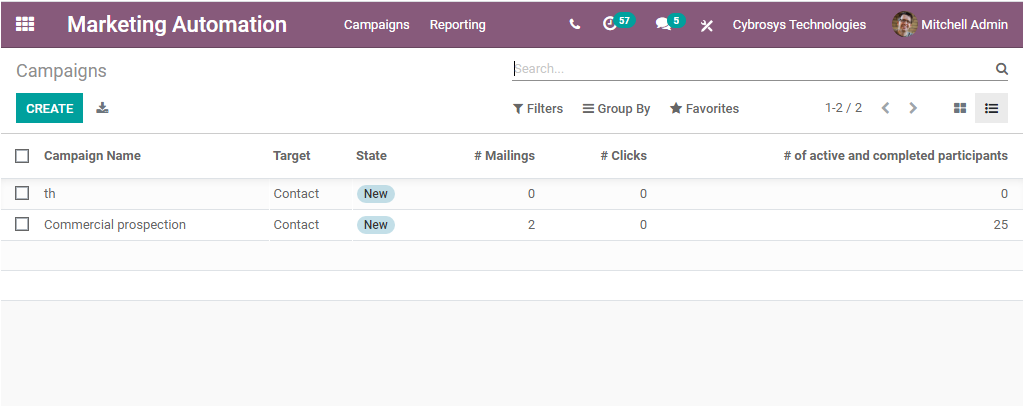
In the List view, you can view all the created
Campaigns along with their Campaign Name, Target, State, Number of Mailings,
Number of Clicks, and Number of active and completed participants. In addition,
all the default, as well as customizable options such as Filters, Group by, and
Favorite Search options are available with this window. These options will
allow you to sort out the data in various measures. Moreover, you can view the
Create icon and Export All icon left top corner of the window. The Export All
icon will help you to export all the data in the window to the excel file. Now
the Create icon assists you to navigate to the Campaign creation window as
depicted in the below image.
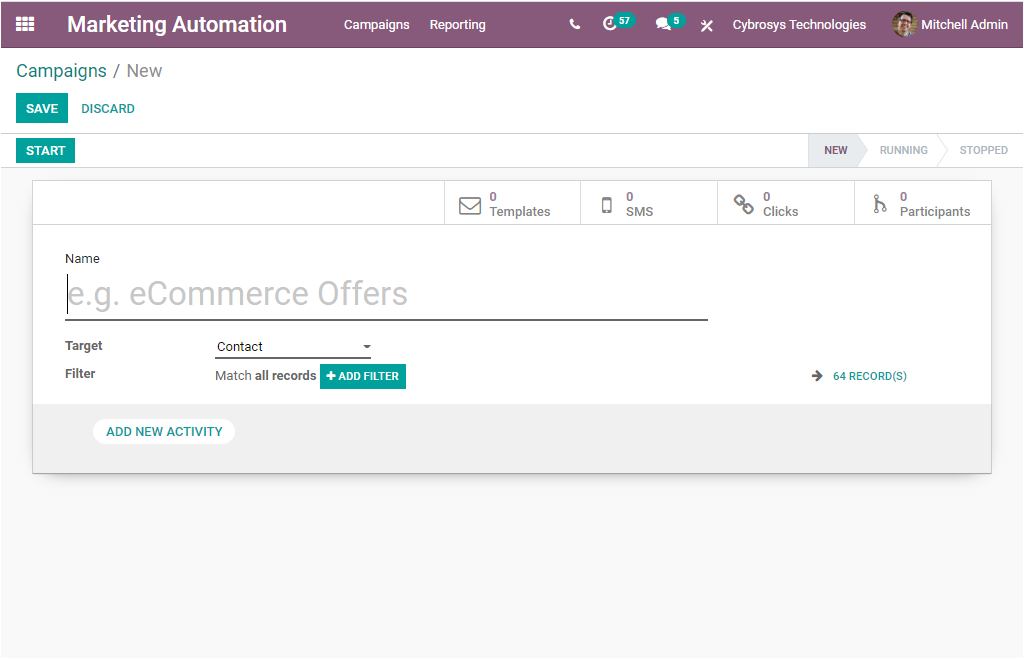
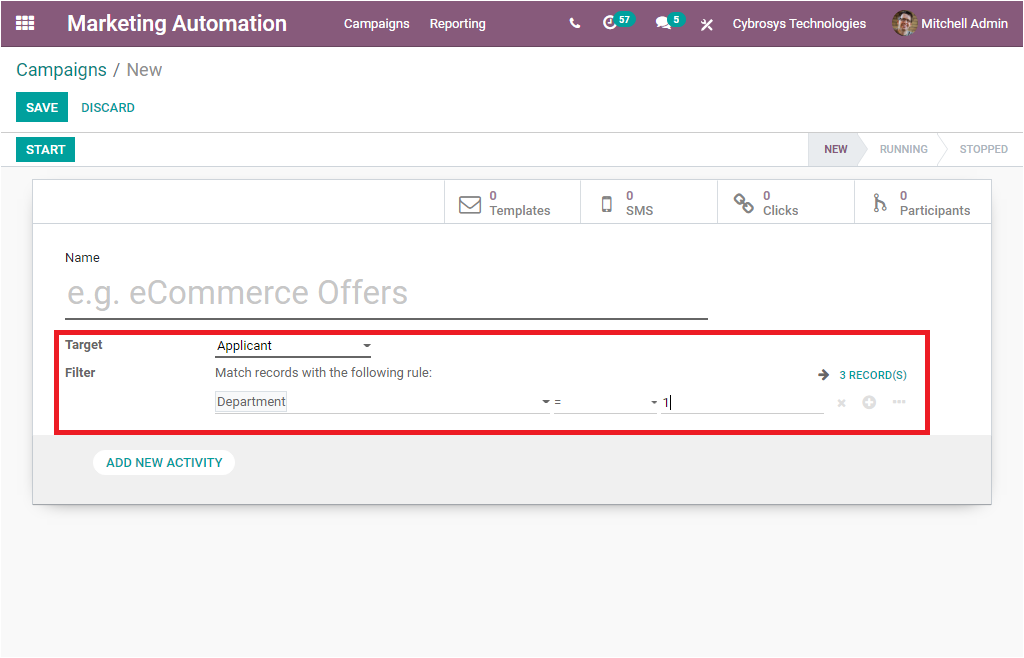
This creation window will help you to create new
Campaigns. First, you can provide the Name of the campaign and then you can
specify the Target group. This can be done by selecting and choosing the
required target group from the drop-down menu available with the field Target.
Here you can make use of the Filters option to match records with certain
rules. This option will be very helpful to find the exact target group.
You can add a new activity
by selecting the ADD NEW ACTIVITY button available. You can make use of this option to create multiple activities scheduled for this campaign. When you select this button, you will be depicted with a pop-up window as shown below.
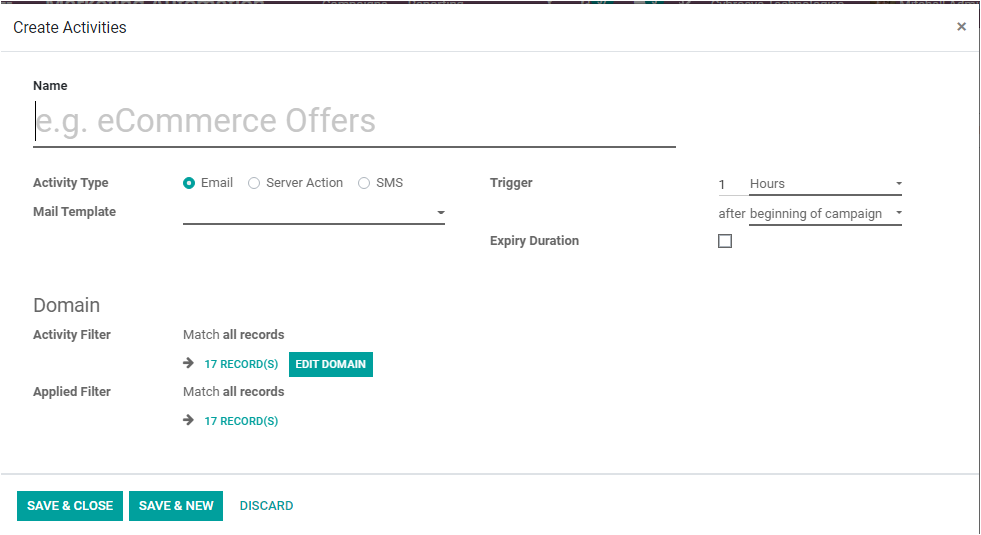
In this window, you can provide the required
information. The first thing to do is to allocate the Name of the activity,
then you can select the Activity Type from the options Email, Server Action,
and SMS. Then you can mention the Mail
Template and further you can set the Triggers option which can be set as Hours,
Days, Weeks, Months. The Expiry Duration option can also be used for setting
the expiry time for the activity. Then you can view the Domain which is auto
allocated. It is the domain that applied to this activity and its child
activities. Also, you can edit the
domain using the EDIT DOMAIN option available.
In addition, the applied filter can also be
auto-allocated under the option Applied Filter. The activity will only be
performed if the record satisfies this domain, obtained from the combination of
the activity filter and its inherited filter. After providing all the required
data, you can click on the SAVE & CLOSE button to save the created
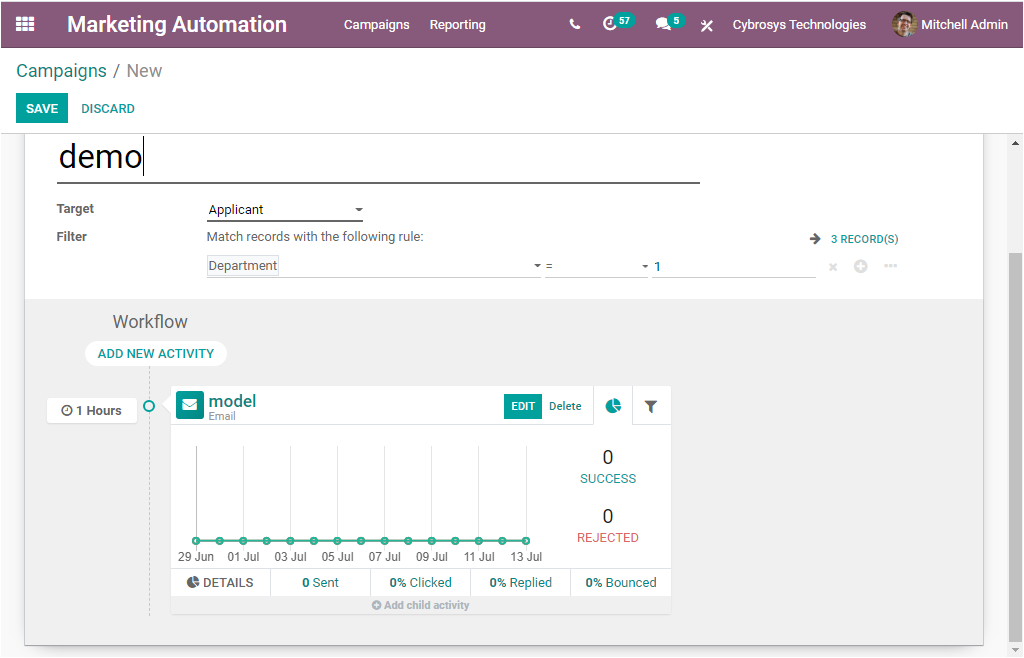
activity. The SAVE & NEW button allows you to save the created activity and create a new one. Now the Campaign creation window will look like the below
image.
Here in this window, now you will be visible with a
START icon and LAUNCH A TEST icon. Selecting the Start button will make the
campaign go live. The LAUNCH A TEST icon will allow you to launch a test
campaign.
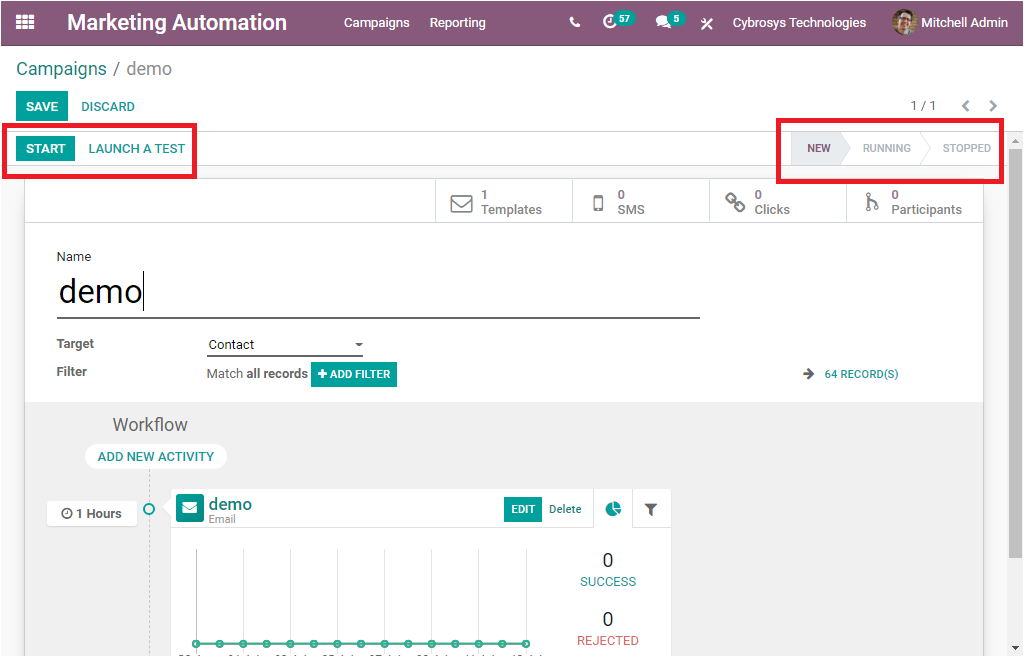
If You select the Start button, the status of the
campaign will be changed from New to Running. If you want to stop the marketing
campaign you can click on the STOP icon available. Now the status will be
changed to STOPPED.
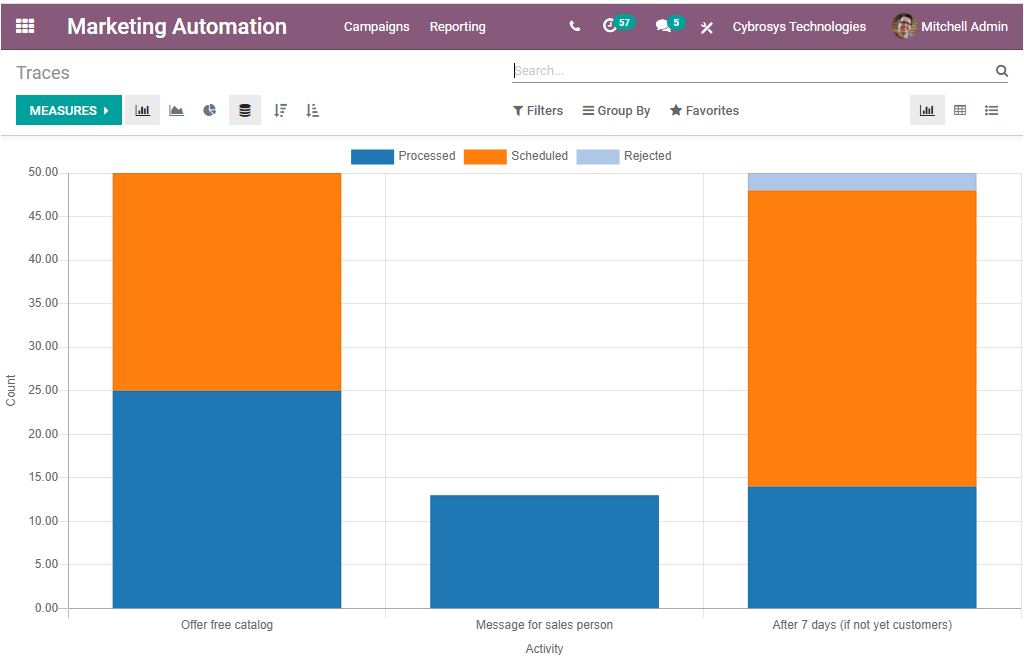
Reporting
Now let us discuss what are the options available
under the Reporting tab of the module. Under the Report tab, you can view
different reporting functionality Link Tracker, Traces, and Participants. All
these reporting aspects will allow you to generate reports in various measures.
Moreover, the reports can be generated in different visual formats such as
Graph, Pivot, and List formats. The Graph view again represents the data in
different views such as Bar Chart, Line Chart, and Pie Chart. The bar chart representation
of the Traces window is displayed below.
In each of the reporting windows, you have the default
and customizable sorting functionalities such as Filters, Group By, Favourite
Search options as you can view at the top of the window. The MEASURES icon
available in each window will allow you to generate reports in various
measures.
So the Marketing Automation in Odoo helps you to
create automated and effective marketing campaigns and it will manage your
entire workflow in a unique manner. Implementing Odoo marketing automation for
your business marketing will ensure the efficiency of your work and it will
help you to build a powerful marketing team.