The point of sale or point of purchase can be defined as the time and place where a customer makes a payment for the items he/she bought from a retail store. Or simply saying, the place and time where a retail transaction gets complete. At the point of sale, the seller calculates the amount owed by a customer and prepare an invoice for the customer. Later initiates the options for customers to make their payments say via credit card, internet banking or fiat currency.
POS can be used in those places, where fast billing is necessary. Retailers can largely benefit from Point of Sale as it initiates for quick billing of products and evades long wait of customers for the same.
Utilizing POS, one need not keep their customers wait for long hours to get billed their products, also it triggers for a different mode of payment preferred by the customer. In addition to the above, Odoo POS provides retailers with a chance of getting more business success by providing several extensive tools that enhances their business performance.
Odoo POS gives options like discounts, rewards, integrated inventory management, multiple payment methods, accounting, taking parallel orders, barcode support, offline order management streamlining different business operations.
Getting Started with Odoo POS:
Product:
Different shops may deal with different products. Utilizing Odoo Point Of Sale, one can seamlessly create the products and its variants if any.
Let us create a product first.
Configuration
Product -> Products -> Create
Here, one can create a new product and add the necessary details pertaining to it.
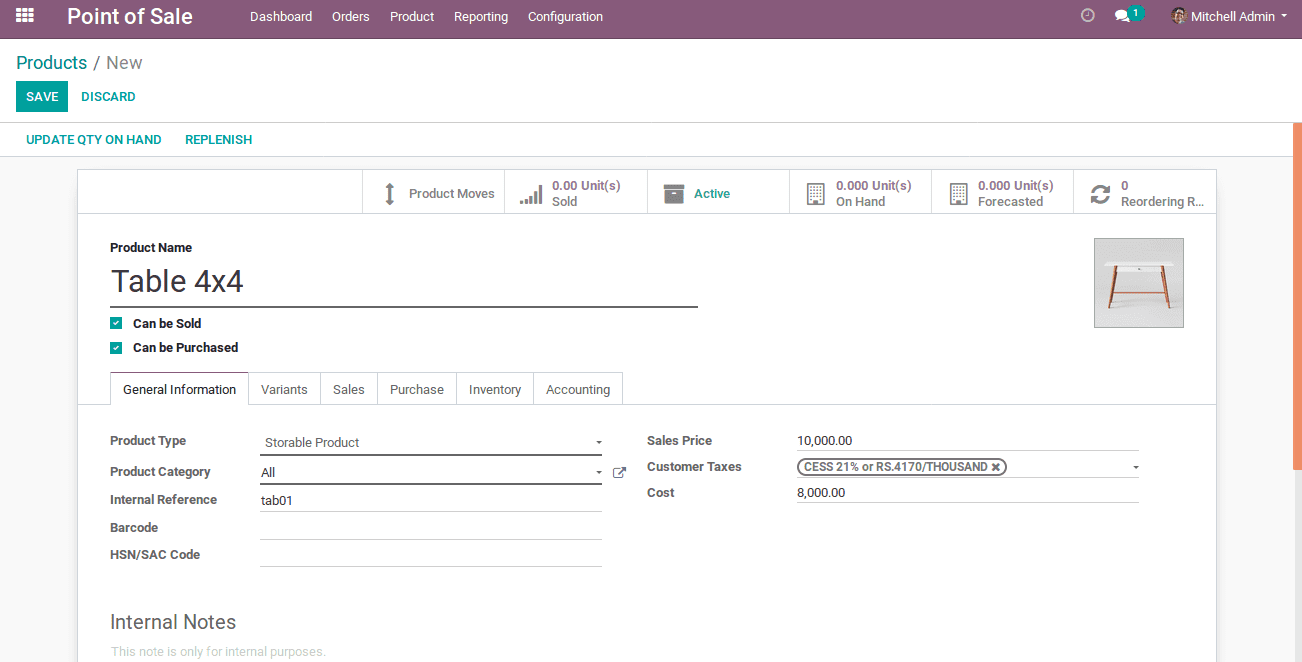
Screenshot - 1
Under the sales tab, one can see many options like below:
Available in POS: Tick the option, so that the particular product appears in your POS screen.
Category: Here, one can specify the category to which the product belongs to.
To weigh with scale: The field is to calculate the product weight using an electronic scale.
This is shown in the below screenshot.
Screenshot - 2
POS product categories:
Some products come along with common characteristics, in such cases, one can categorize those products. Under Odoo, one can create such categories among the products and can specify under which category that product comes.
Configuration -> POS Category -> Create
From here, one can create product categories that you sell.
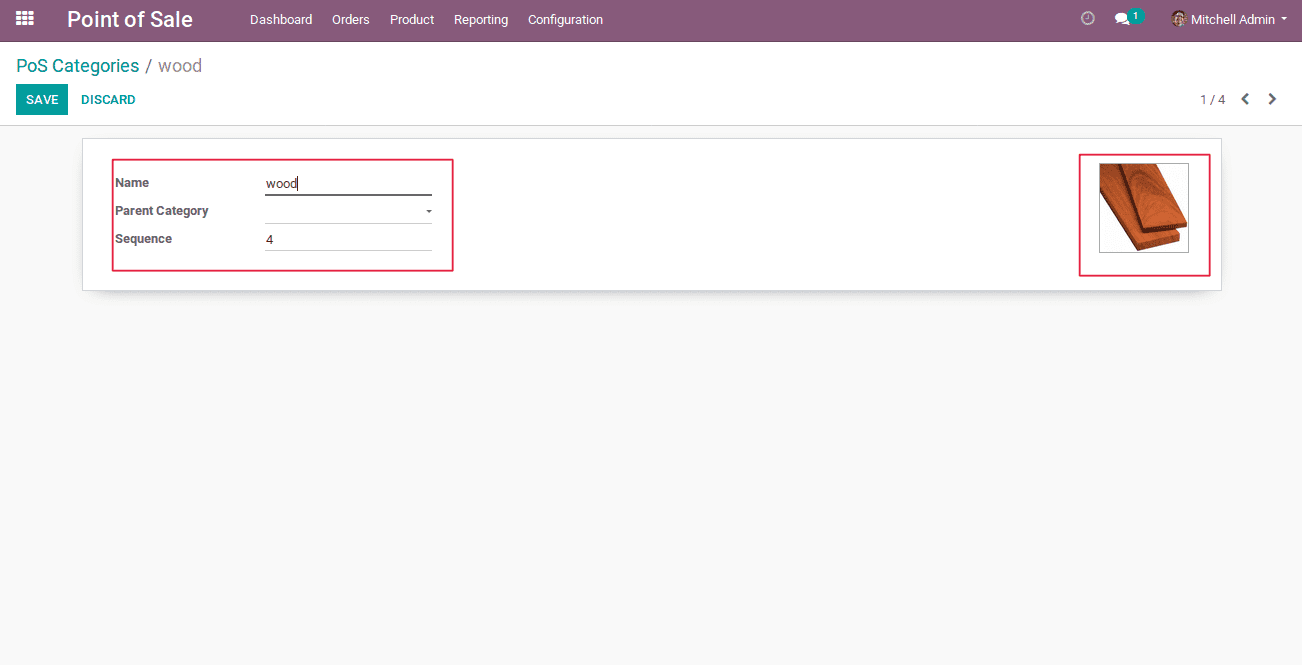
Screenshot - 3
Name: Give the category name.
Parent Category: This is for creating a hierarchy of categories i.e. if this category comes as a subcategory of another category, one can use parent category.
Sequence: This number is used for specifying the sequence order of the category in the POS UI.
One can also give a category picture for their easier access. And once a category is created, one can specify them in the products.
Loyalty Programs
Odoo gives you the option to trigger loyalty programs. Loyalty programs are those assured business strategies that only enhance customer satisfaction, but also the business sales to a great degree. By implementing loyalty programs, the retailers lure their customers via giving attractive offers, discounts, rewards and more. This keeps the customers happy and content.
Loyalty programs in Odoo are extensive. It provides the end user the options to award the customers with points per product, order, and currency. Thus for each sale, the customer points get increased. These points can be later utilized to give customers certain rewards.
Odoo rewards are of mainly three types:
Gift: Utilizing this, one can give away different gifts to their customers.
Discount: Offer discounts on the product.
Resale: One can convert the customer points into money.
You can see the detailed write up on Loyalty Programs in Odoo from following the link: loyalty programs in odoo v12 POS
Payment Methods
Odoo POS comes supportive of multiple payment types. This option helps retailers to get adjusted to the mode in which the customer is willing to pay. Among the public, there are customers who prefer different payment types- say card payments, internet banking, cheques or liquid cash. Therefore retailers should remain susceptible to the mode of payment preferred by the customer.
Here, we are taking the example of triggering cheque payment option.
Payment method can be created from Configuration -> Payment Method -> Create.
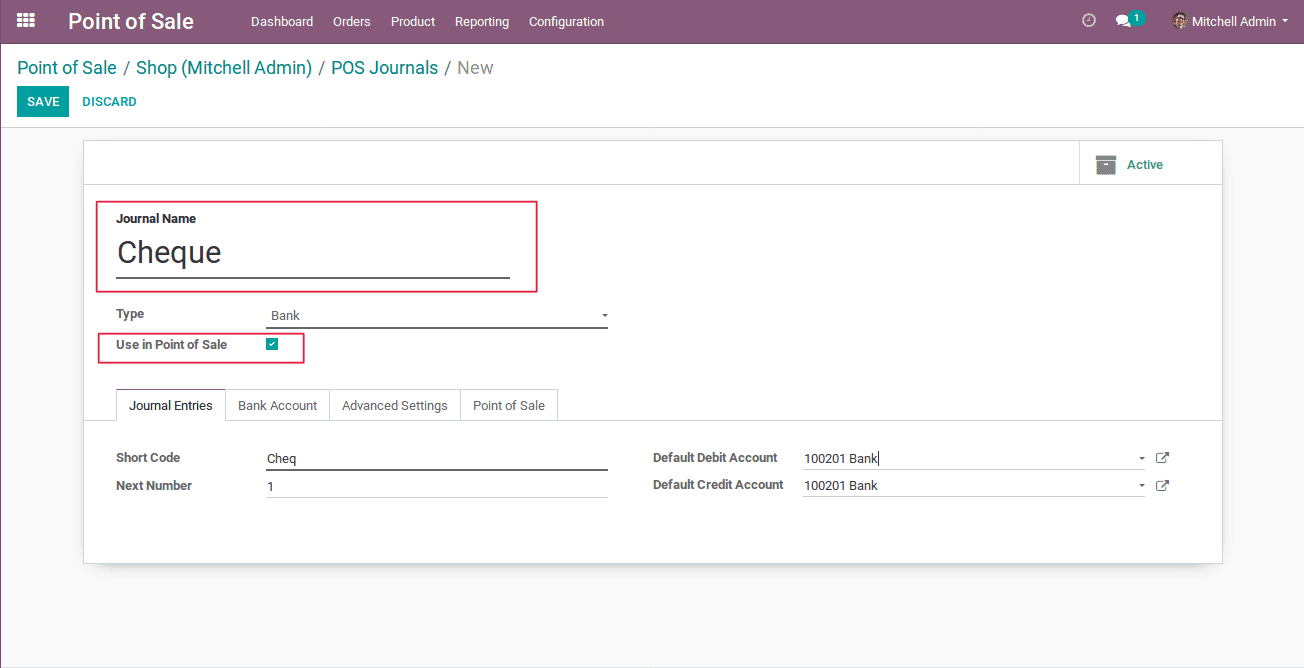
Screenshot - 4
As you can see in the above screenshot, there is a field asking for the journal name and other details associated with it. There is also an option -Use in Point of Sale, this should be ticked so as to make this payment option available in the PoS.
In order to make this payment method available in the PoS, one need to select this Payment method from the settings of PoS. This is shown in Screenshot-6.
Upon it, the payment method will be displayed at the time of payment. ( Refer Screenshot-20).
Creating a POS
Let’s now create a PoS for a furniture shop.
Configuration -> Point of Sale -> Create
While creating a PoS, you will be embedded with different options, these are shown in the screenshots- 5, 6 & 7.
Screenshot - 5
Screenshot - 6
Screenshot - 7
Prior to any, give the point of sale a name.
Is a Bar/Restaurant: This is an option for setting POS for Bars/ Restaurants. If you tick the option, the end user shall be embedded with extra options like table management, bill splitting, order line notes and so forth.
Here, as we are dealing with a retail shop, you need not tick this option.
Company: Here you can specify your company.
Category pictures: While creating categories, one can give pictures for each category. And for these pictures to be visible in the PoS UI, one can tick this option so that selecting the categories may become easier.
Set Start Category: If you want to take an order from a specific category, you can tick this option and select the category.
Virtual Keyboard: Via enabling the option, you can use virtual keyboards in touch screens.
Large Scrollbars: To use a bigger scrollbar in the case of touchscreens for ease of access.
PosBox: Odoo PoSbox is used to connect Barcode scanner, Electronic scale, Cash Drawer, Receipt printer, and Customer display.
Barcode scanner: Barcodes comes in handy when you have a large variety of products. It can also be used for customer cards etc. For this, you have to specify the Barcode Nomenclature.
Fiscal Position: By enabling the option, you will be able to give a default fiscal position like interstate, export or intrastate.
Fiscal Position per order: Check this option if you want to select the Fiscal position of the customer at the time of sale.
Pricelist: Price Lists can be used for giving different prices for the same products or for giving seasonal discounts. One has to select the price lists, so as to make it visible in the PoS UI.
Price Control: If this option is enabled, it gives access to the manager to change the product price at the time of sale.
Global Discounts: This option is used to giving discounts to customers.
Loyalty Programs: Tick this and select the Loyalty program.
Payment Methods: You can select the payment methods you want to use.
Cash control: This option can be used to set opening and closing balance.
Invoicing: Some customers may ask for an invoice. In that case, in order to print the invoice, the option shall be used.
If you have multiple counters in your shop, Odoo POS enables you to create a PoS for each counter.
Now on the dashboard, you can see the Furniture shop. Click “NEW SESSION” to begin the sale as shown below.
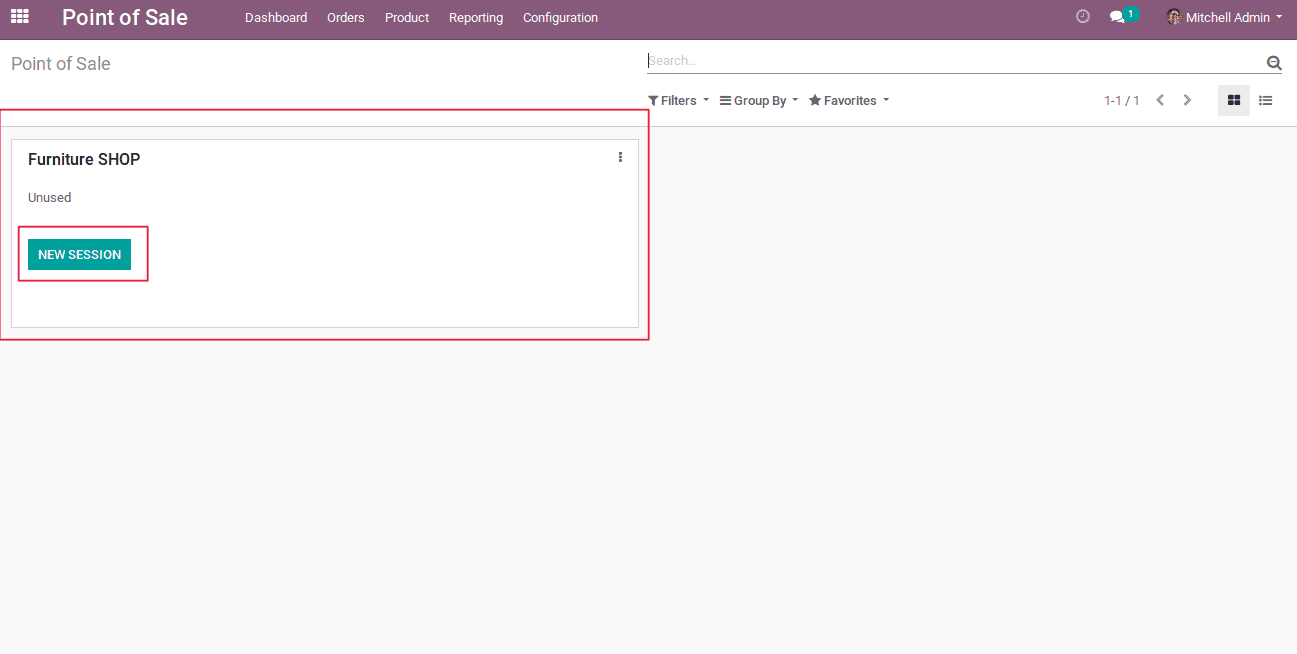
Screenshot - 8
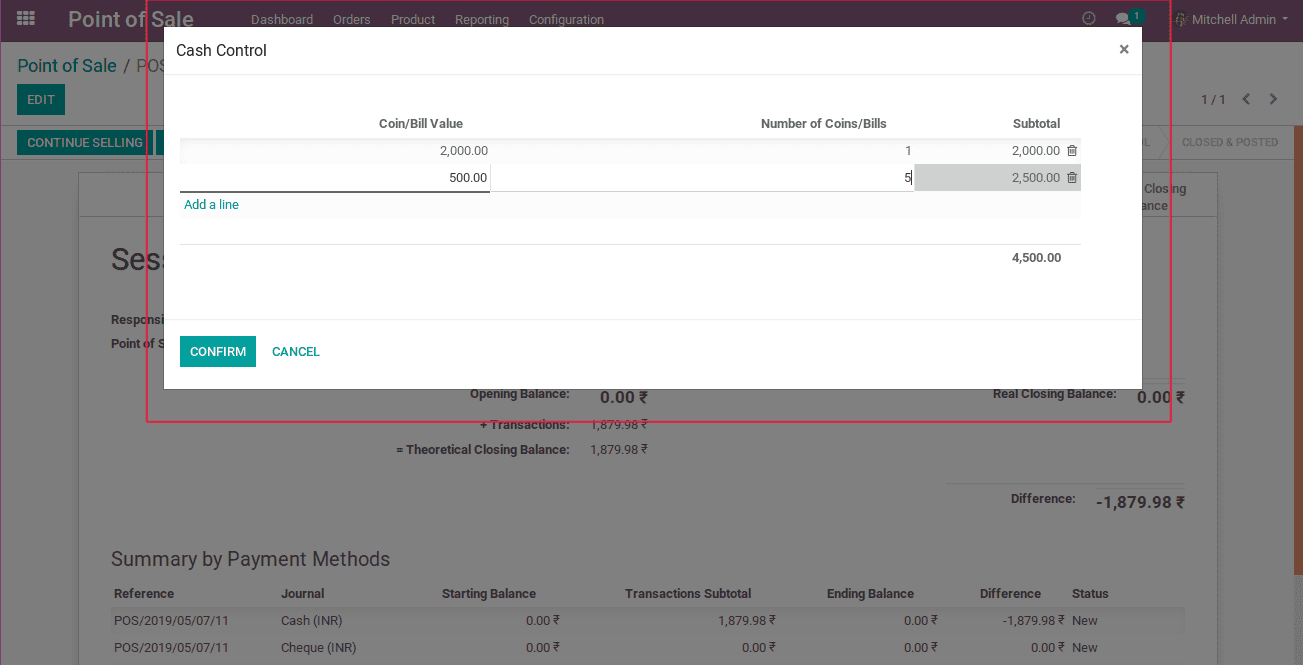
In order to start the session, click “OPEN SESSION”. But before that, if you want to set an opening balance, you can follow Screenshots-9 & 10.
Screenshot - 9
You can give the coin/bill value and the number of bills. Upon this, the subtotal will be automatically calculated. One can thereby confirm the opening balance.
Screenshot - 10
Now let us start the session via clicking “CONTINUE SELLING” as shown in the below screenshot.
Screenshot - 11
The POS UI will appear.
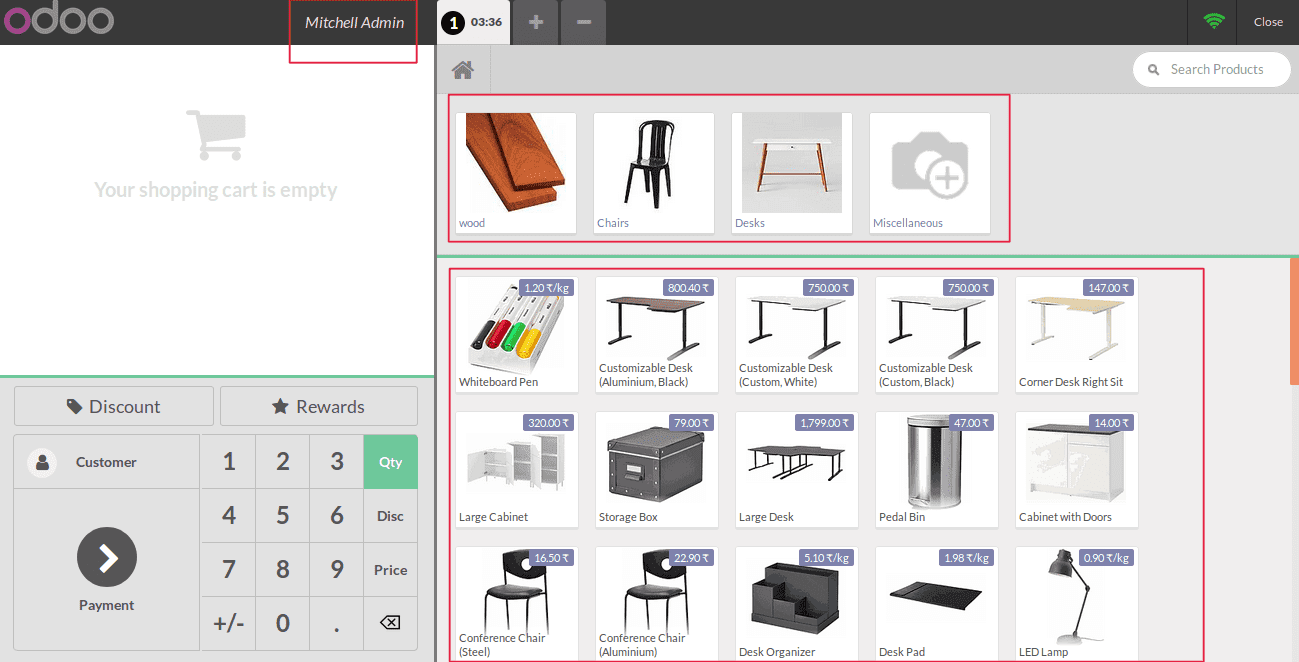
Screenshot - 12
Here, one can see the cashier’s name, the POS categories, and the products. In order to see the products belonging to a specific category- Select the category. This is shown in the below screenshot.
Screenshot - 13
Now you can go back and view all the categories via clicking on Home.
Now select the products. While selecting the products, one can change the quantity as well as the price of the product.
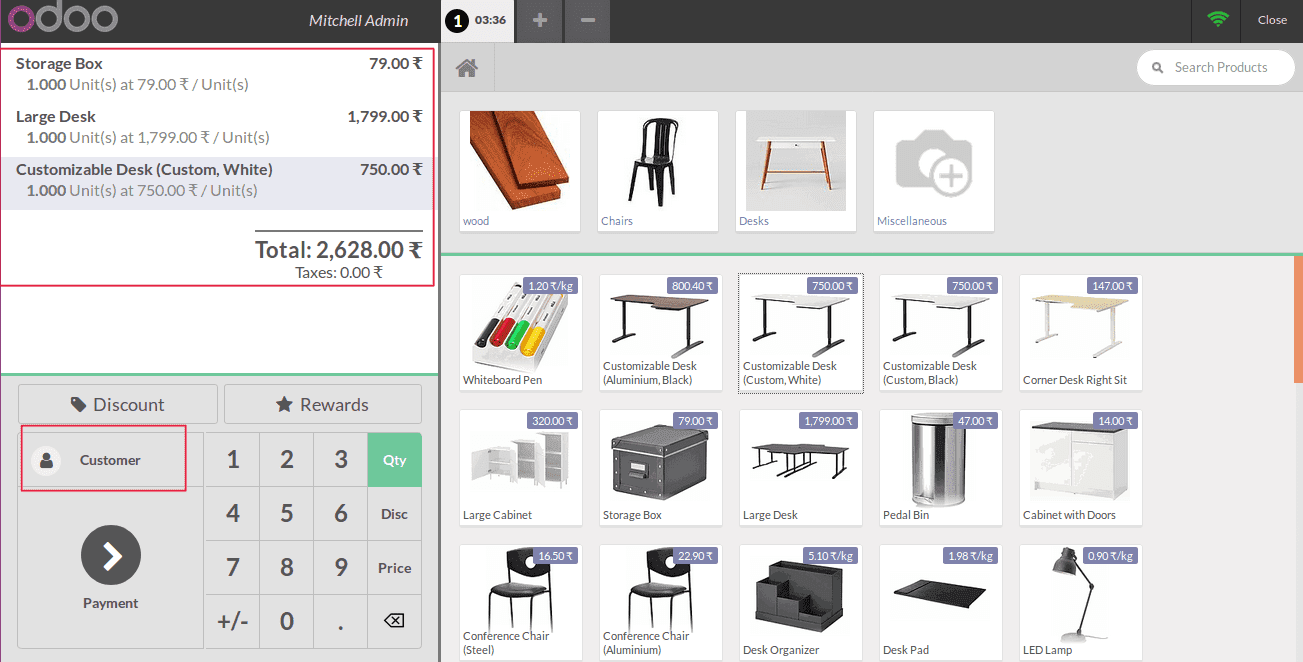
Screenshot - 14
After selecting the products, select the customer. When you click on customers button highlighted in the above screenshot, you can see the list of all existing customers. However, one can also create new customers here.

Screenshot - 15
Screenshot - 16
In the above screenshot, you can add customer details and save. So when a new customer comes to your shop, you can add them to your list.
After selecting the customer, if that customer is eligible for a reward, then rewards will turn green. One can also give a discount and select a price list.
Screenshot - 17
Screenshot-18 shows selecting the rewards
Screenshot-19 shows selecting discount.
Screenshot-20 shows selecting Price List.
Screenshot - 18
Screenshot - 19
After selecting these, one can go for the payment option.
Now select the payment method preferred by the customer. All the payment methods that got added in the POS settings shall be displayed here. In the case, if a customer wants the invoice, you can click “Invoice”. Both these options are highlighted in the below screenshot.
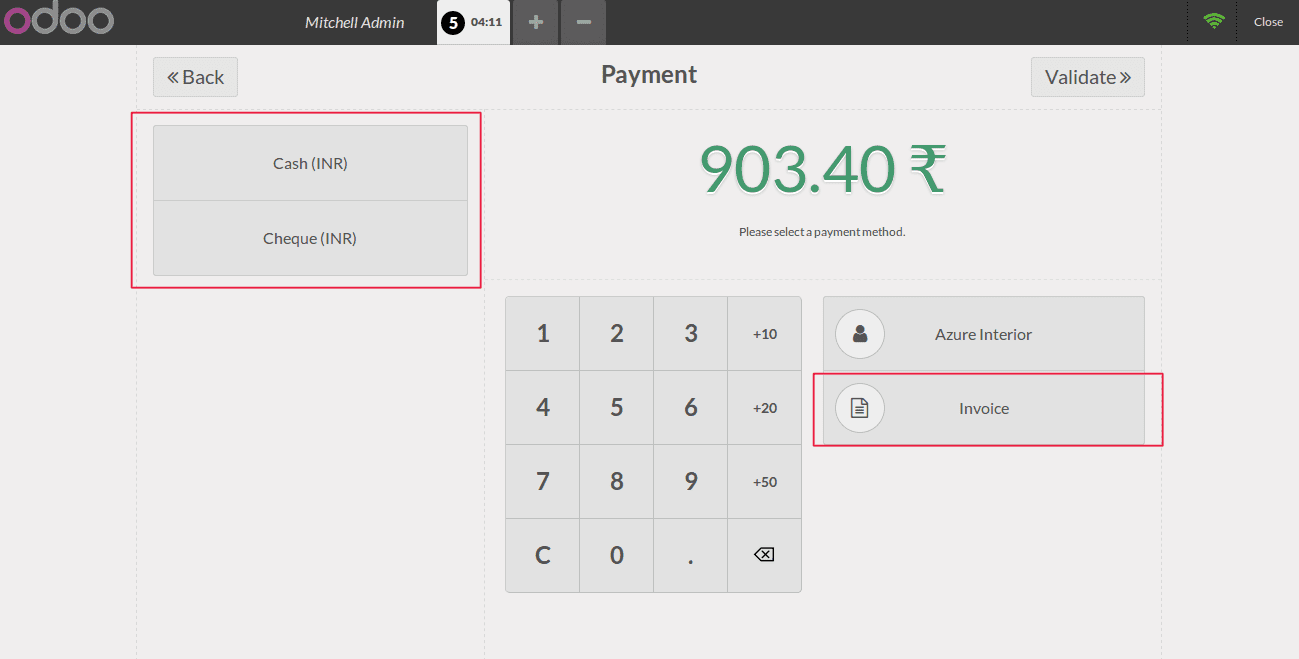
Screenshot - 20
Now receive the payment and validate as shown in the Screenshot-21. Now you can see the bill and print it to go to the next order as shown in Screenshot-22.
Screenshot - 21
Screenshot - 22
In the above screenshot, it shows the bill, however, you can see all the details regarding the sale such as your company details, the products purchased, alongside their quantity and price, also the loyalty program point details.
The standard procedure for a POS sale is explained above. Now let’s see some extra options.
If you want to change the cashier, you change as shown in Screenshot-23. To do so, click on the current cashier. A list of all the cashiers will be displayed. One can select the desired cashier from the list.
Screenshot - 23
Now another option in Odoo POS is of taking parallel orders. Consider a situation where a customer at the middle of the billing, goes in search of another product. In this case, you need not have to keep the next customer waiting. For this, you can click the “+” shown in Screenshot-24 and continue billing for the new customer, while not losing the data of the previous customer. Now when the first customer comes back, you can select his tab and continue the billing.
However, if you are taking parallel orders and want to cancel an order, you can click the “-” sign shown in the Screenshot - 25.
Screenshot - 24
Screenshot - 25
Although Odoo PoS needs internet at the time of opening and closing of a session, offline order taking is also made possible in Odoo. i.e. you can take orders and bill them without the actual need of the internet. And also in case of a power failure, the data isn’t lost. The data is stored in the browser’s cache memory and once the power is back, one can continue with the merchandise.
After the sale for the day, one can close the POS session.
Screenshot - 26
There are also options to record the money put into a register or the money taken from the register in Odoo. All you have to do is enter the reason and the amount. This is shown in screenshot-27 and screenshot-28 respectively.
Screenshot - 27
Screenshot - 28
You can also give the closing balance, where you can specify the bill value and the number of bills that you have at the time of closing. This is shown in the below screenshot.
Screenshot - 29
The cashiers are also given access to closing the session. However, they can only close the session if the cash difference is zero i.e. the difference between theoretical closing balance and the real closing balance is zero. It is shown in the screenshot-26. You can see the difference as Nil.
Now click “END OF SESSION” in screenshot-26 and you will be able to post the entries of that session.
Now you can go to Orders, in order to see the order details and session details.
Orders -> Orders
Screenshot - 30
Here you can see the order details of all the POS. The details given are Order reference, Receipt reference, Customer name, Order date, Salesperson, Total amount and Session.
Now going to the Session details
Orders -> Sessions
From here. you get the session-wise details. The details given are session ID, the responsible person, the opening date, the closing date and the status of the session. The status of the sessions which are not closed are given as In Progress.
Thus we can say that Odoo PoS is very advanced in characteristic, making it ideal for retail shop management. It possesses all the proficient options that a shop desires for their efficient management.