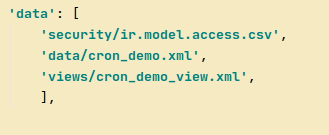
__manifest__.py
In this example I will create an automated action that runs daily. For that I am going to create a module and method just for printing on pycharm log. You can replace it with your own code there.
STEP 1 : Create a model and action in custom module
The following code will help you to create a model and action in the custom module:
from odoo import models,fields
class DemoClass(models.Model):
   _name = 'cron.demo'
   student_name = fields.Char(string='Name of the student', required=True)
   def cron_demo_method(self):
       print("Inside the function")
This will create a new model named ‘cron.demo’
STEP 2 : Define view for the custom module
STEP 3 : Create scheduled actions
Using the following code you can create a scheduled action:
<?xml version="1.0" encoding='UTF-8'?>
<odoo>
<data noupdate="1">
       <record id="demo_cron" model="ir.cron">
       <field name="name">Demo Cron Job</field>
       <field name="model_id" ref="model_cron_demo"/>
       <field name="state">code</field>
       <field name="code">model.cron_demo_method()</field>
       <field name="user_id" ref="base.user_root"/>
       <field name='interval_number'>1</field>
       <field name='interval_type'>days</field>
       <field name="numbercall">-1</field>
       <field name="doall" eval="False"/>
   </record>
</data>
</odoo>
Let me explain the above code in detail line by line..
<data noupdate="1">
This indicates that all code within this tag shouldn’t be updated when we update your module.
<record id="demo_cron" model="ir.cron">
id is the identifier and must be unique, ir.cron is the model which is used to handle all the cron jobs therefore, specify it after model =
<field name="name">Demo Cron Job</field>
This is what users can view from the UI. So let’s take care to specify a meaningful name for the field.
<field name="model_id" ref="model_cron_demo"/>
Indicates that on which model the automated action should be called.
<field name="state">code</field>
<field name="code">model.cron_demo_method()</field>
Here you need to specify the method name to be called.
<field name="user_id" ref="base.user_root"/>
This user id is referring to a specific user, in most cases this will be base.user_root.
<field name='interval_number'>1</field>
Always a number and here we specify the number of times the scheduler is to be called based on the “interval_type”. In this example the cron job is called daily
<field name='interval_type'>days</field>
The possible values are : minutes, hours, days, weeks, months.
<field name="numbercall">-1</field>
Scheduled actions are called based on the number specified here. When you want it to run forever you simply put ‘-1’.
<field name="doall" eval="False"/>
It’s a boolean field. If True : missed occurrences should be executed when the server restarts.
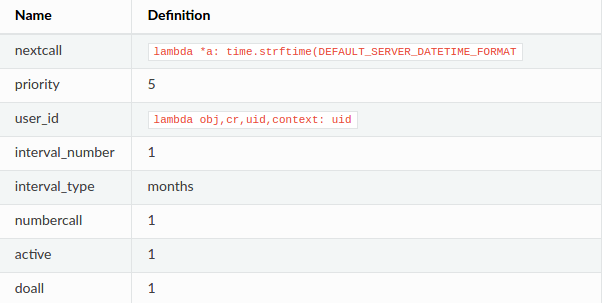
Some Extras :
<field name="priority" eval="5" />
Define the priority. Possible values are 0 - 10 and 0 have a higher priority than 10.
<field name="nextcall" >2020-6-15 23:59:59</field>
In date/time format, next planned execution date for this cron job.
Defaults
Tip
Q) In xml it has interval_number and interval_type. How to make it run at a specific time of day?
A) <field name="nextcall" eval="(DateTime.now() + timedelta(days=1)).strftime('%Y-%m-%d 12:00:00')" />
<field name="interval_type">days</field>
it will execute everyday at 12 o’clock
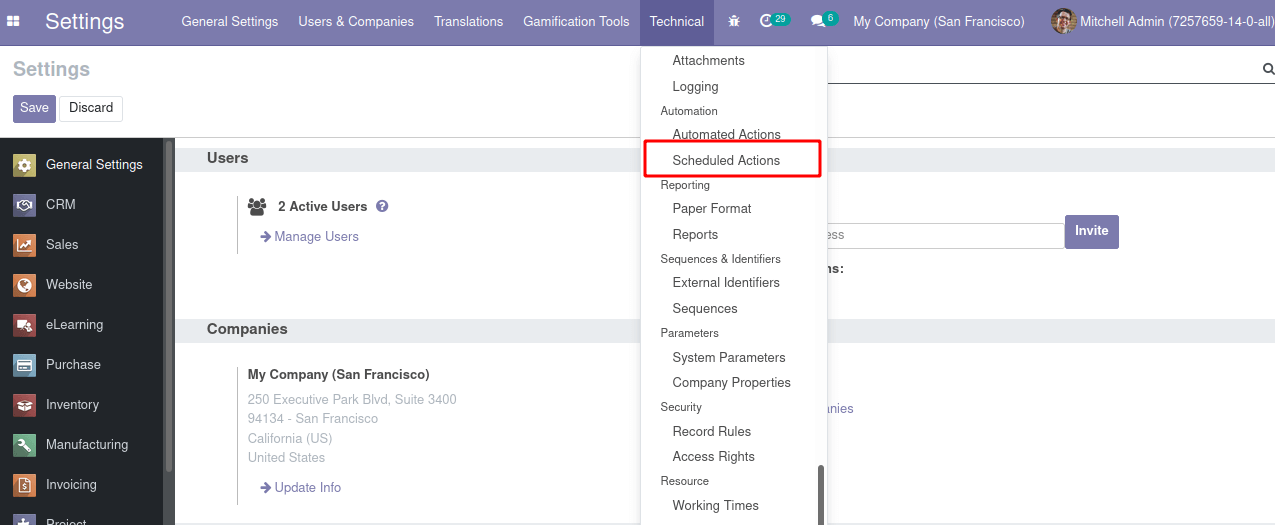
Now Let’s check with scheduled actions/cron jobs from UI. For that activate developer mode then Go to > Settings > Technical > Scheduled actions.
We will get already created scheduled actions and also we can create new by CREATE button.
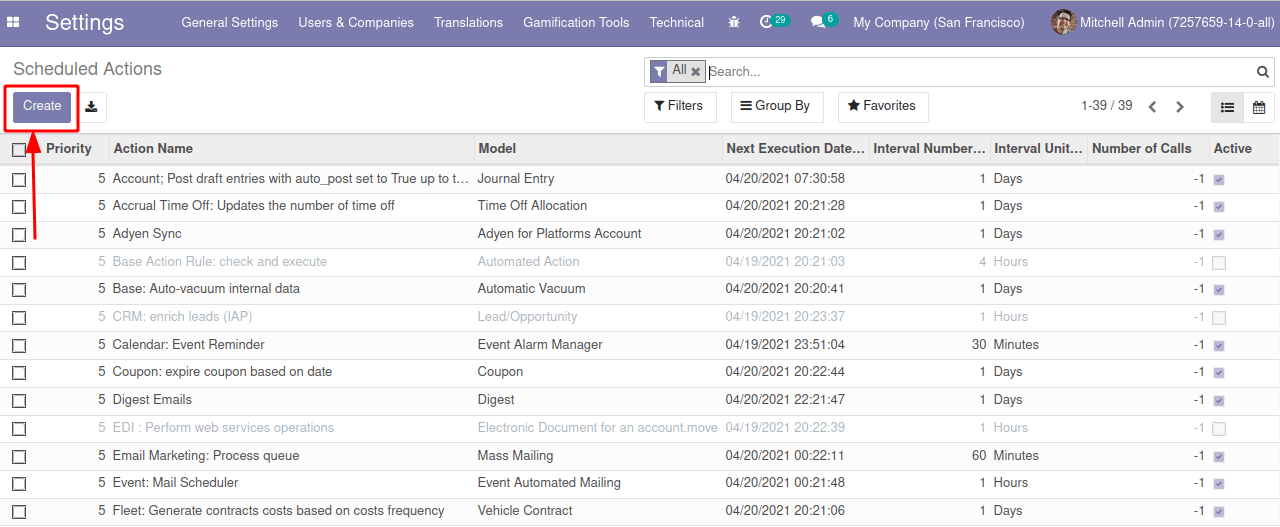
Enter your scheduled action details such as action name, model, next execution date etc. And also we can define your python method from this form. It will perform the method on specified time, if not we can run it manually.

This is all about the scheduled actions in Odoo 14. Hope you guys got the idea about scheduled actions. You can also refer to our huge collection blogs from
Odoo Blogs