Odoo's 18th version of its business management suite features a revamped Point of Sale (PoS) interface, aimed at providing a smoother, faster, and more intuitive experience for retailers, restaurants, and service-based businesses. This blog will provide a clear understanding of the key features, design updates, and functional enhancements introduced in the Odoo 18 PoS interface settings section. Also highlighting how they can enhance business operations and maximize efficiency and customer satisfaction at the point of purchase.
PoS Interface Settings
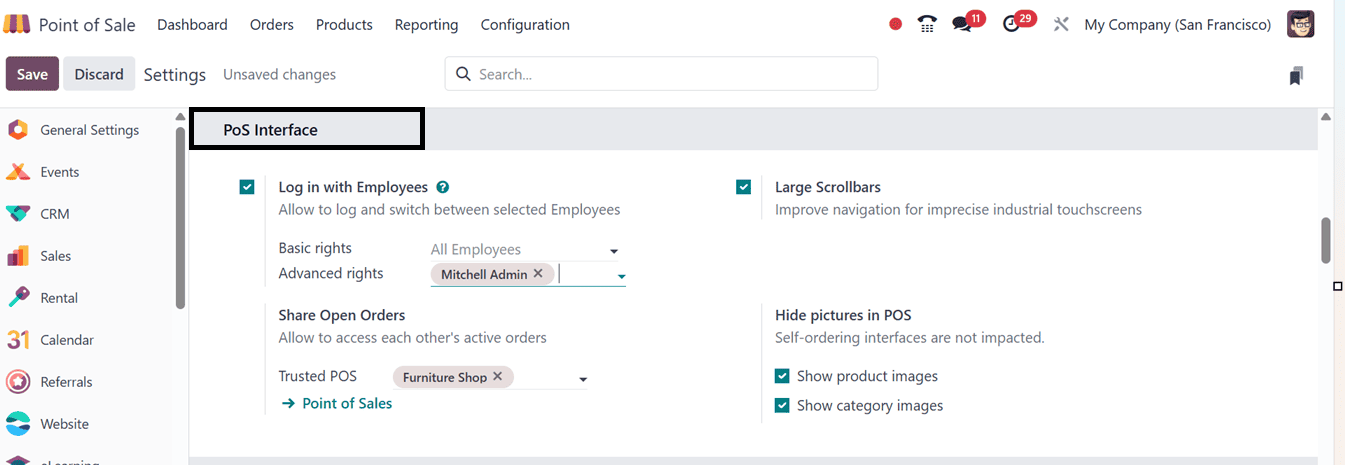
From the "Configurations" menu, select the "PoS Interface" tab in the "Settings" window to specify the primary PoS Interface settings.
The following are some of the customization choices provided by the PoS Interface settings:
- Login in with Employees: granting different levels of access to several employees each session. Additionally, it facilitates employee login via a badge ID or PIN for increased security and accountability.
- Share Open Orders: To provide a seamless operational flow, share open orders among several PoS terminals.
- Hide Pictures in POS: Product photos can be hidden or shown during a session in POS.
- Large Scrollbars: Aids in enhancing navigation on devices with poor touchscreens.
You can control the access to PoS sessions using the 'Login with Employees' option. Then, the employee login privileges can be set by users as "Basic" or "Advanced." The Employees Module's HR Settings tab allows employees to log in using their PIN or badge ID.
Login with Employees
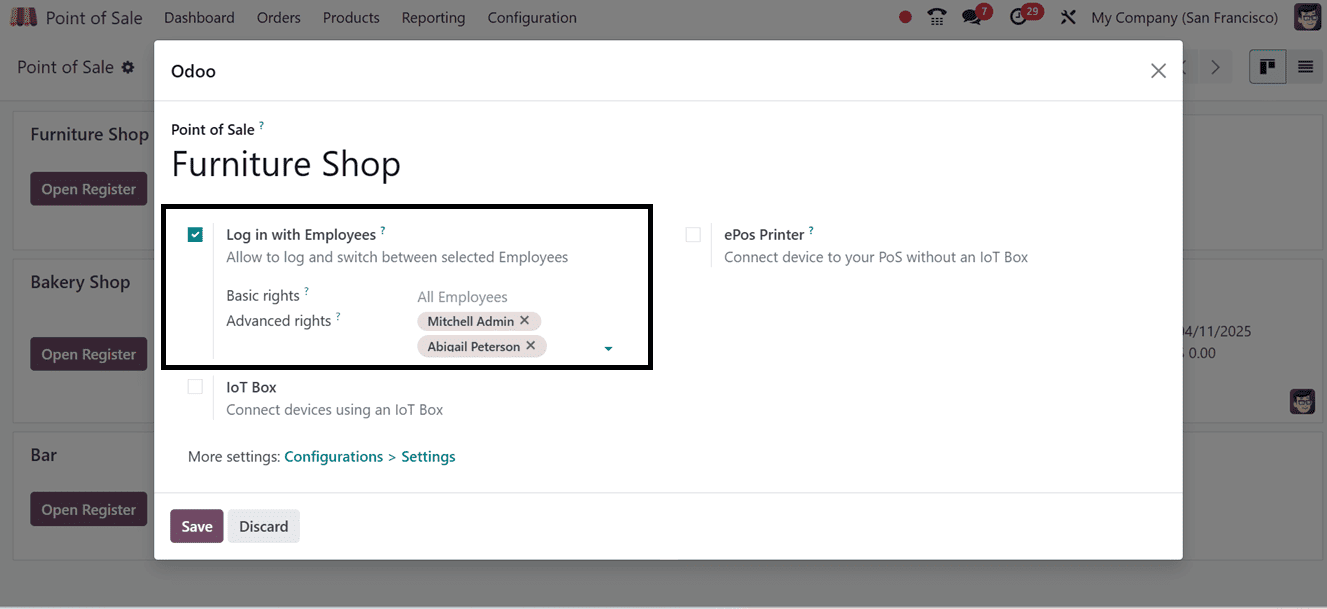
The 'Login with Employees' feature in the Point of Sale (POS) module of Odoo 18 is designed to increase accountability and security. By activating the "Multi Employees per Session" option, you can designate which employees are permitted to use the system when you are creating a new store. To activate this feature for an existing store, navigate to the Point of Sale dashboard. Then, select the three-dot menu on the shop's kanban card, and click on the 'Edit' button, as depicted in the screenshot below.

In the settings window, mention the employees in the relevant fields and save the data.
Employees have two options for accessing a PoS session: either input their PIN or choose their name from a trusted list. Without the need for extra security passwords, users with advanced rights can access the system. This prevents unauthorized access and makes it possible to precisely track sales activities. Employees can assign their own PIN or Badge ID to be used for logging in using the Settings tab of the Employees configuration form. The accuracy of sales data is maintained in this way.
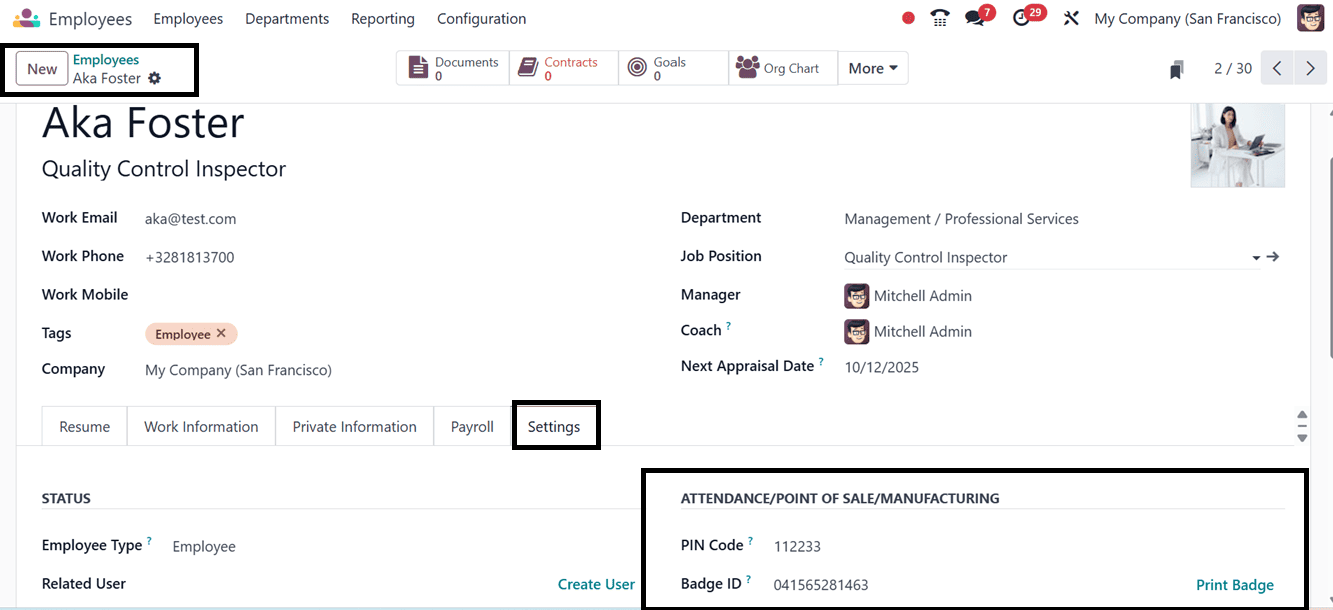
Additionally, you can also use the "Print Badge" button to create a Badge ID for that specific employee. To verify the feature, return to the Point of Sale module. As shown in the screenshot below, you will be redirected to a window after launching the specific POS session.
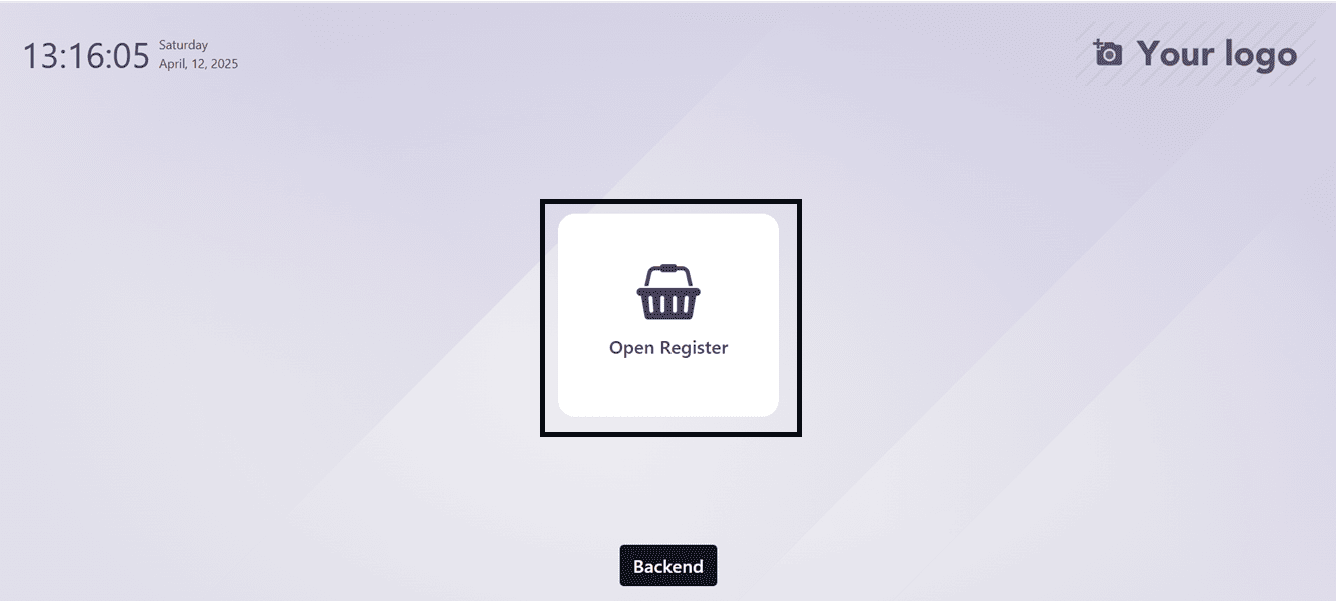
A popup with a form for entering the employee pin code will open when you click the "Open Register" button to begin the shop session.
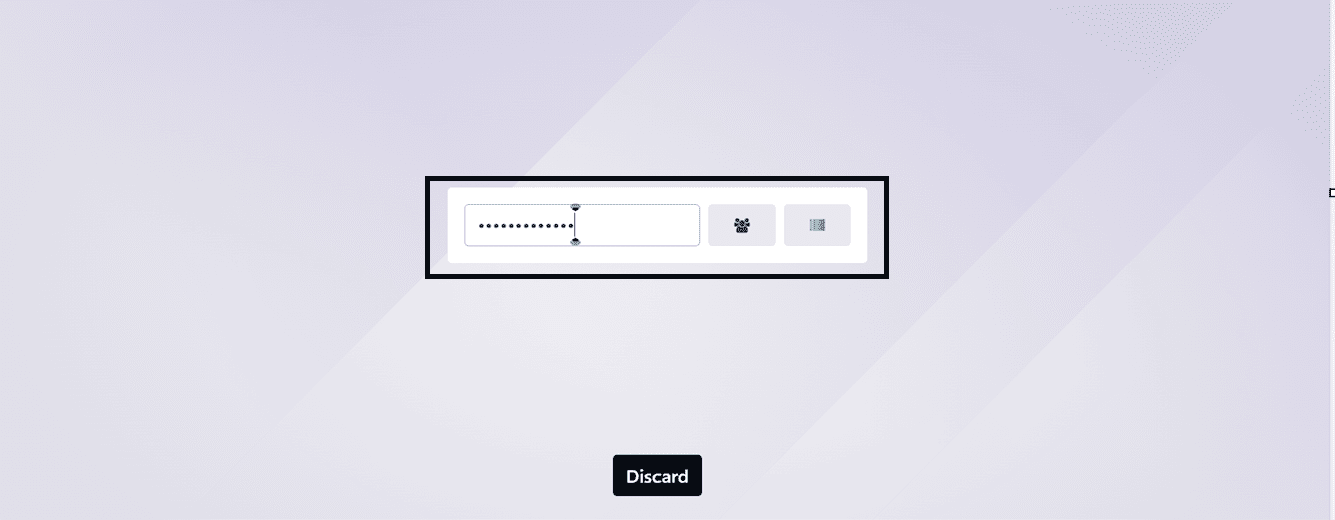
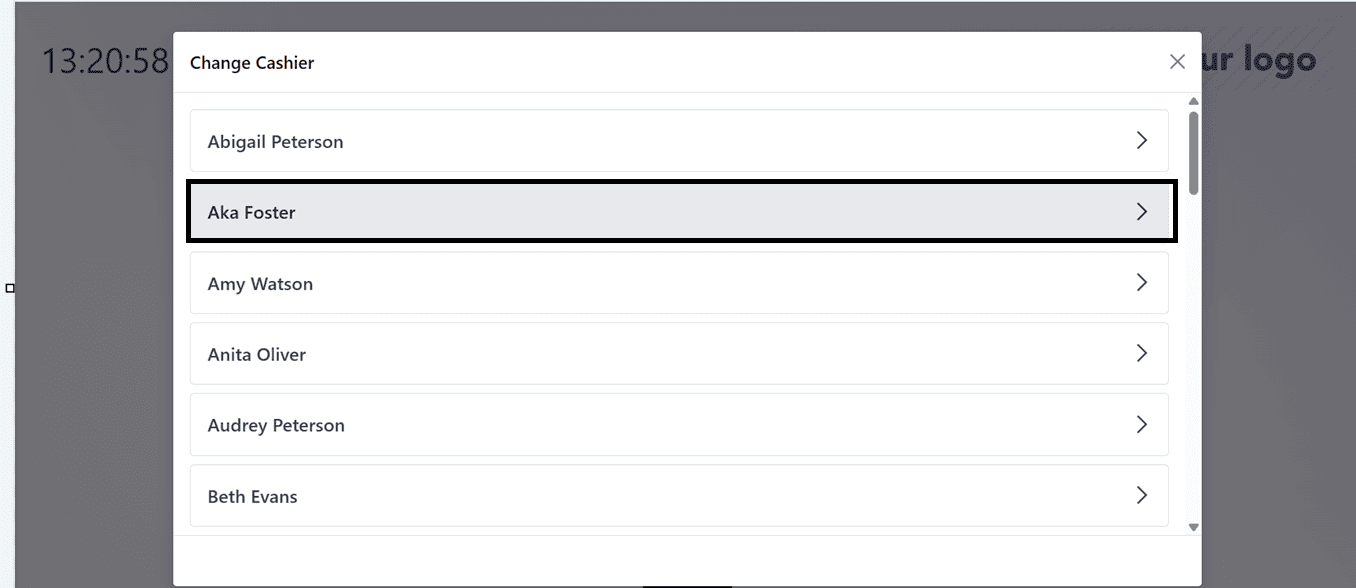
Then, choose the employee name from the employee icon or scan their barcode using the barcode icon.
Then, enter the employee pincode in the password editing field and press the “Ok” button.
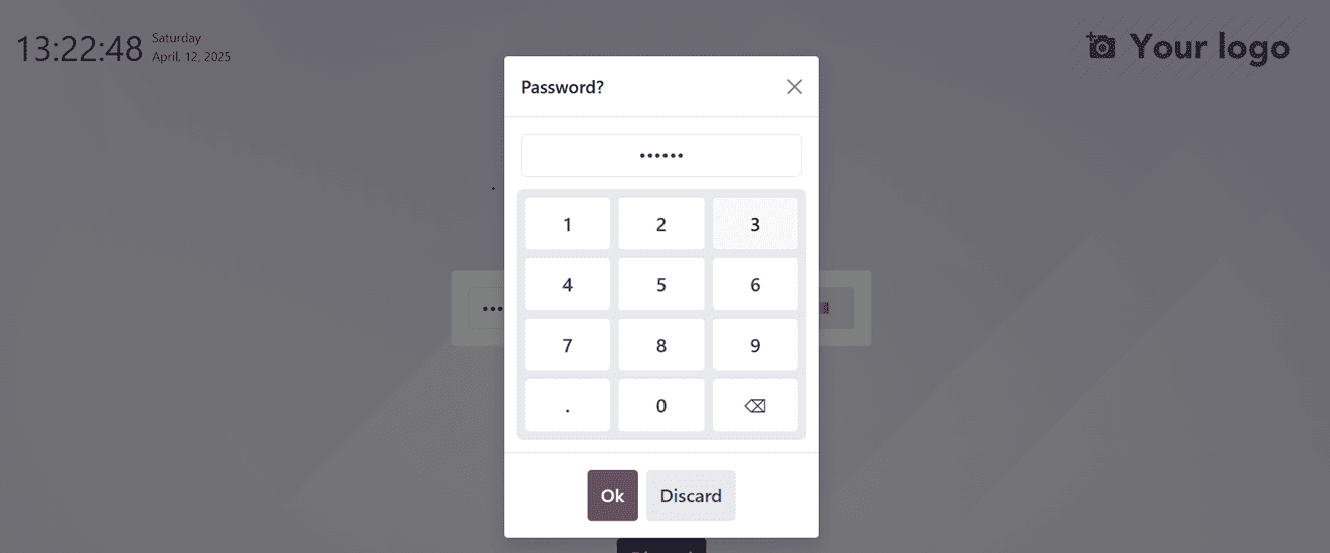
Once the employee has entered the PIN, they can click the "Ok" button to access the point of sale session. You can modify the Opening Balance and Opening Description by doing this, which will bring up the Opening Control information screen. Lastly, move forward with the sales procedure.
Cashier duties can be easily switched by signing in and out with their individual PIN numbers, and employees with advanced permissions can utilize the Point of Sale system without security passwords.
Multiple users or cashiers can view and manage the same open orders during a single Point of Sale (POS) session by selecting the "Share Open Orders" option in Odoo 18's POS settings.
Staff collaboration is facilitated by the "Trusted PoS" function, which makes it simple to transfer orders from one POS terminal to another. In settings like restaurants or retail establishments, where orders are likely to be changed or completed across multiple terminals, this feature is very helpful.
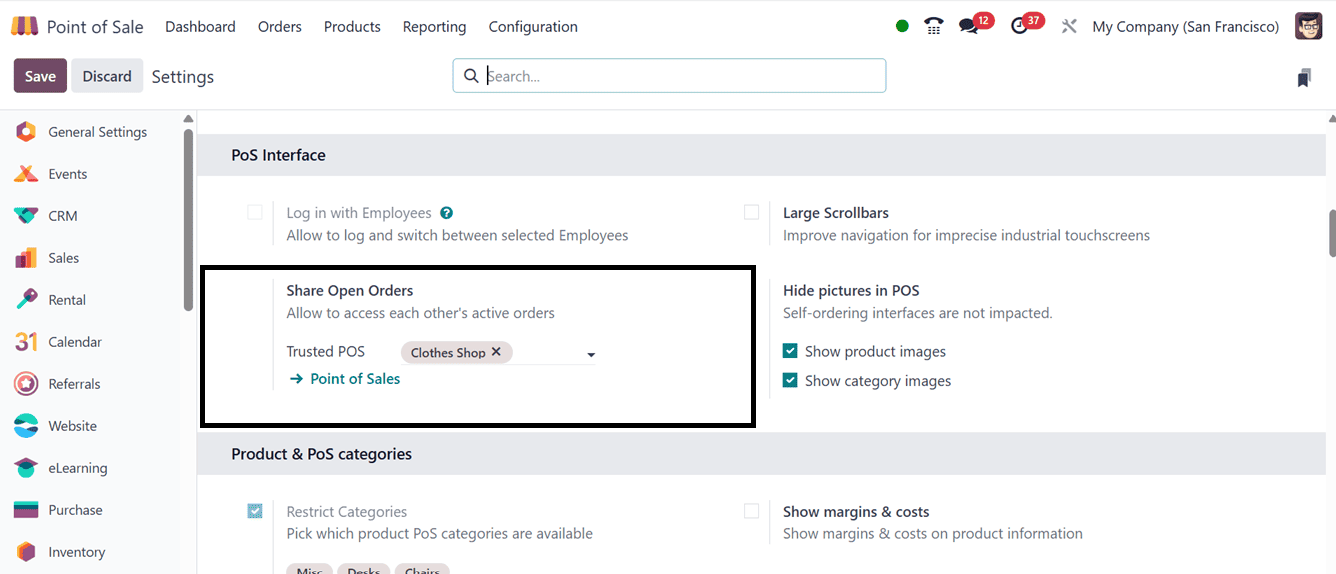
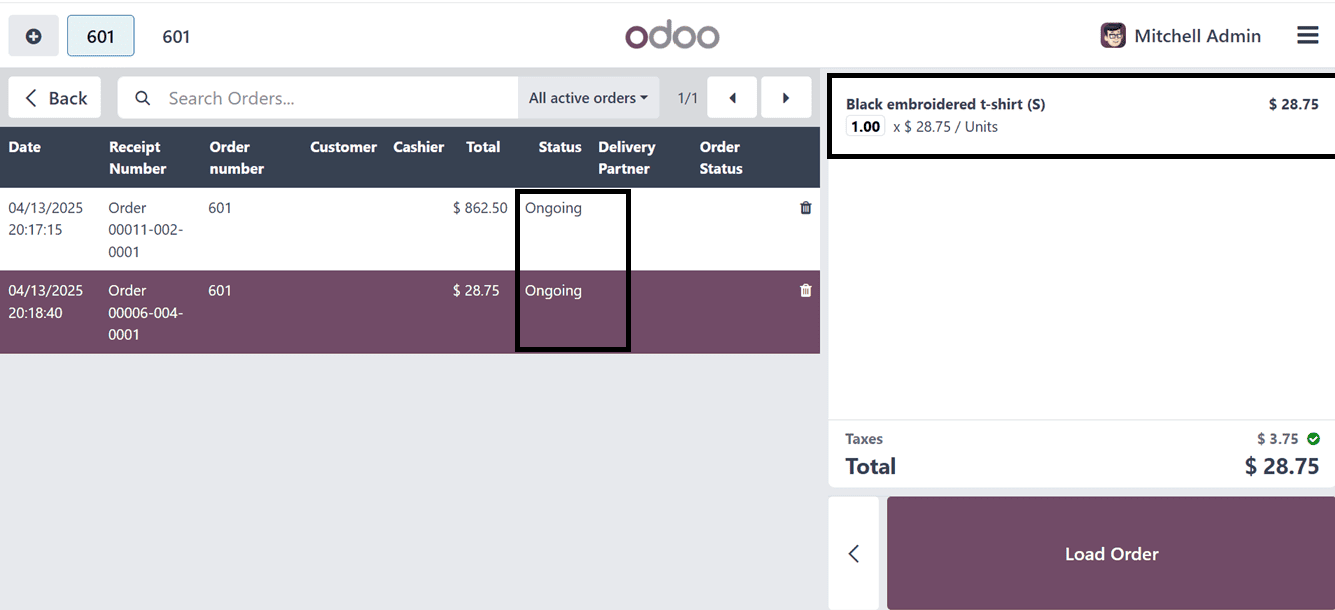
Sales orders can be created concurrently in two Point of Sale sessions by configuring the Trusted POS shop area. I ordered a "Customizable Desk" from the Furniture Shop session and an additional cloth from the Cloth Store session in order to test this functionality. As shown in the screenshot below, these two orders can therefore be stored within a PoS and tracked using the 'Orders' part of the POS terminal menu.
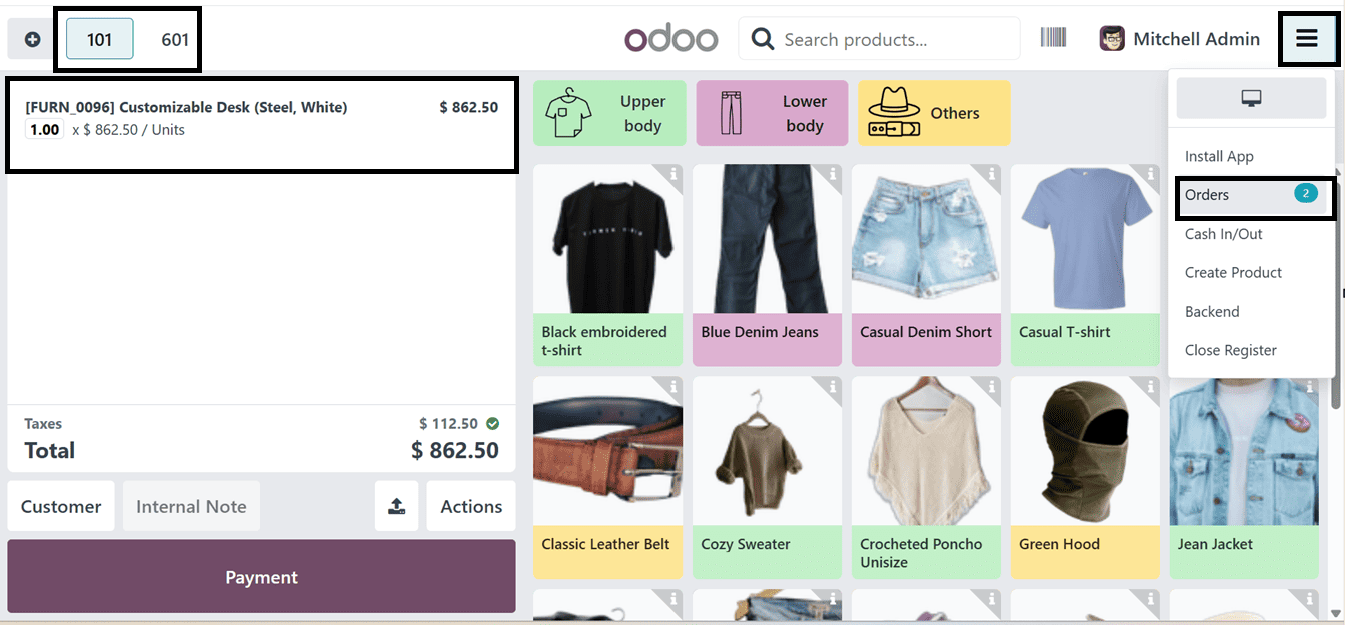
To view continuing order data from the other sales session, go to the Point of Sale and select "Orders" to launch a shared session. The orders from the two distinct Point of Sale sessions are displayed here. Thus, the cashier can use a single platform to handle both orders. To complete the order, click the "Load Order" button.
This feature enhances operational efficiency and customer service by providing flexibility and real-time access.
The "Large Scrollbars" options enhance accessibility and visibility in crowded restaurants and point-of-sale stores, while also making mobile touchscreens and devices with low accuracy easier to use.
Product and category photos in the point of sale (POS) can be hidden or displayed using the 'Hide Pictures in POS' option. Disabling the 'Show product images' and 'Show category images' options will prevent any images from appearing in the product catalogue window and vice versa.
After that, you may use the "Product & PoS Categories" area to manage the goods and categories.
- Restrict Categories: You can manage which PoS product categories are allowed for this Point of Sale Session by using the 'Restrict Categories' option on this tab.
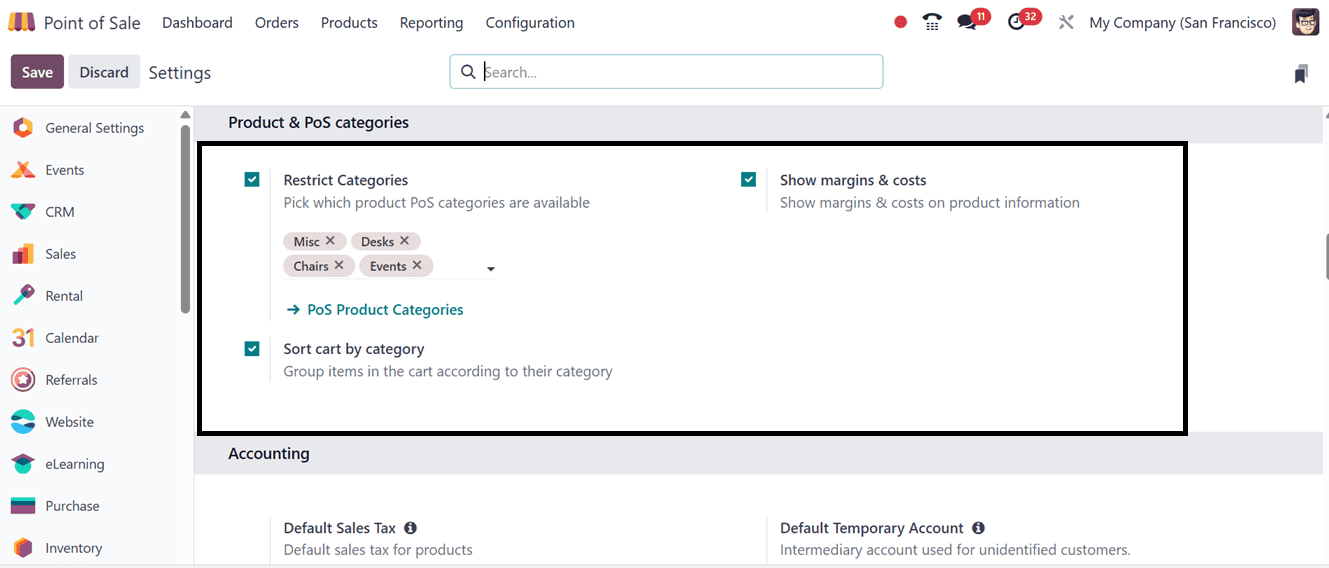
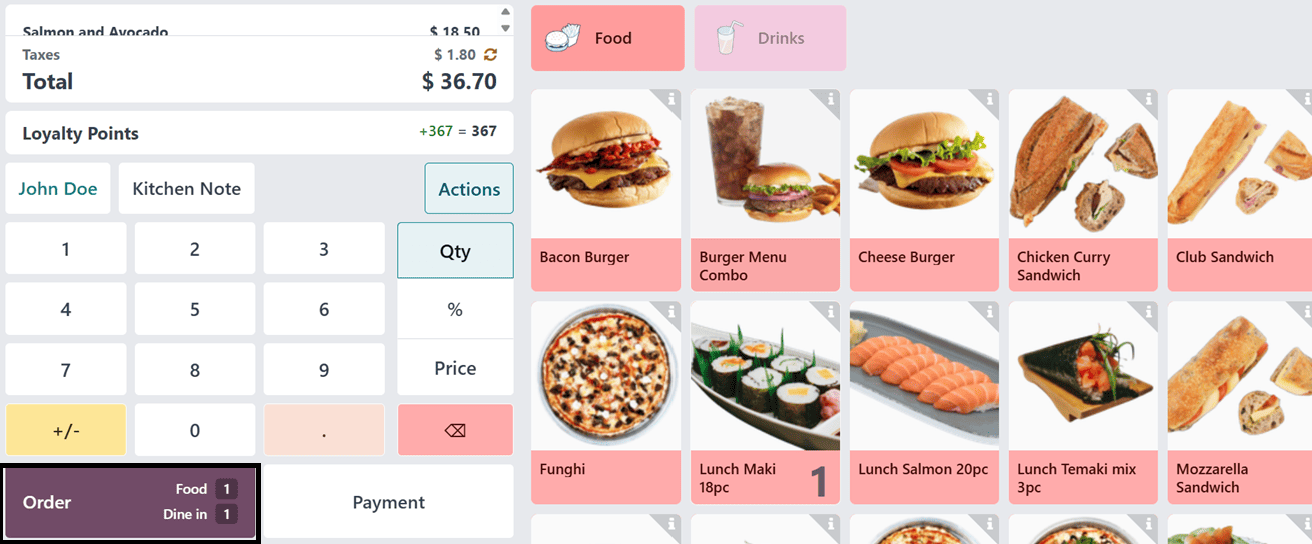
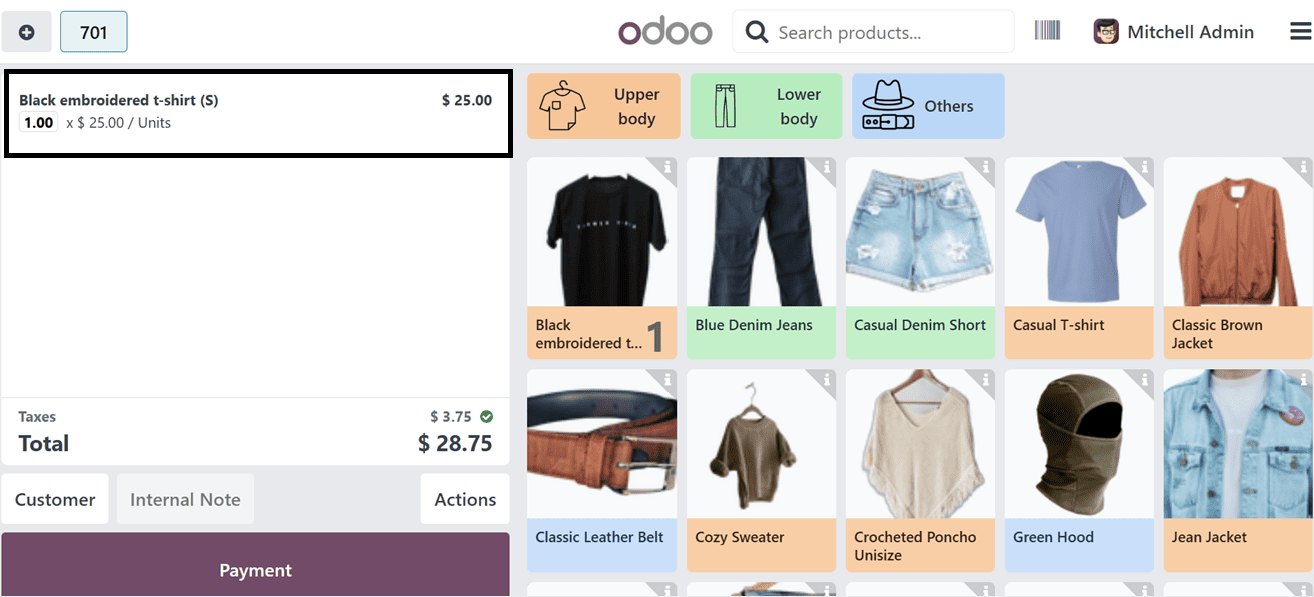
As seen in the screenshot below, the categories will be displayed inside the Point of Sale terminal at the top of the window.
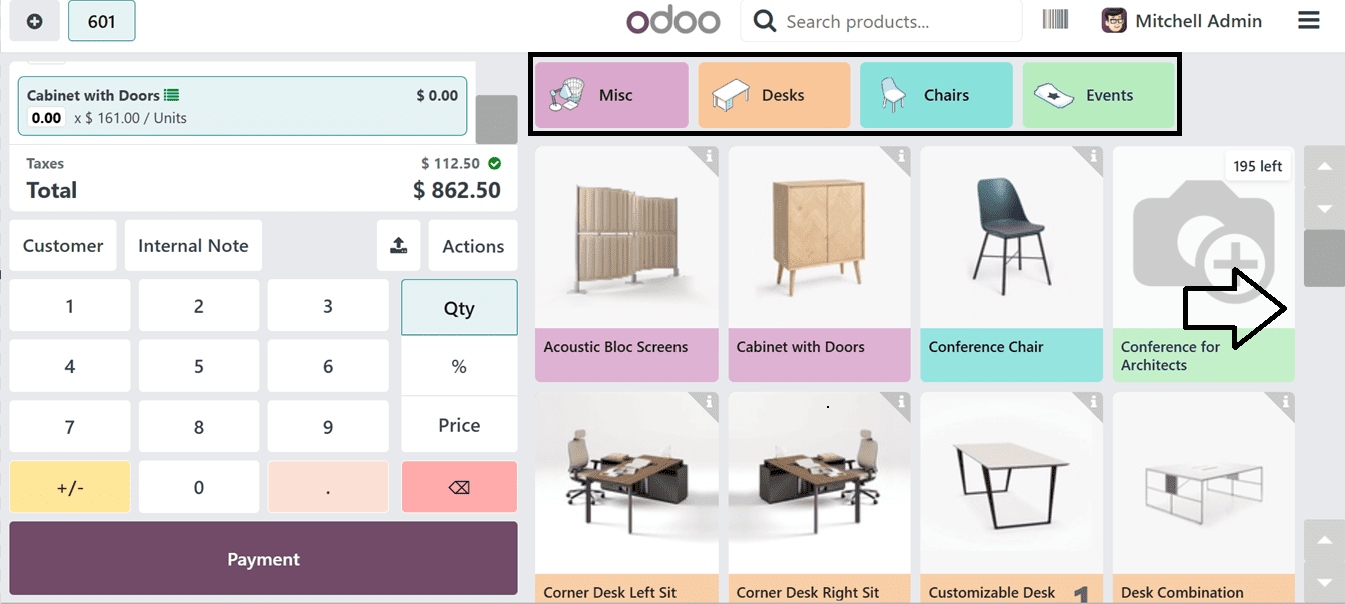
The ‘Sort by Category’ feature organizes products into categories within the shopping cart, ensuring streamlined order management.
Tax-Inclusive and Tax-Exclusive Pricing
By adjusting the Product Prices settings, which provide two choices: Tax-Included Price and Tax-Excluded Price, product prices on receipts can be controlled after payments are completed. Customers can choose how product prices are shown to them.
- Tax-Inclusive Price: Displays the total cost of a sales product, including tax, suitable for retail environments.
- Tax-Exclusive Price: Often used in business-to-business negotiations, this pricing shows the product's base price before any taxes are applied.
These options offer flexibility to meet various business models and regional tax regulations, while enhancing both transparency and compliance. To demonstrate this functionality, we can select a product and access its configuration form.
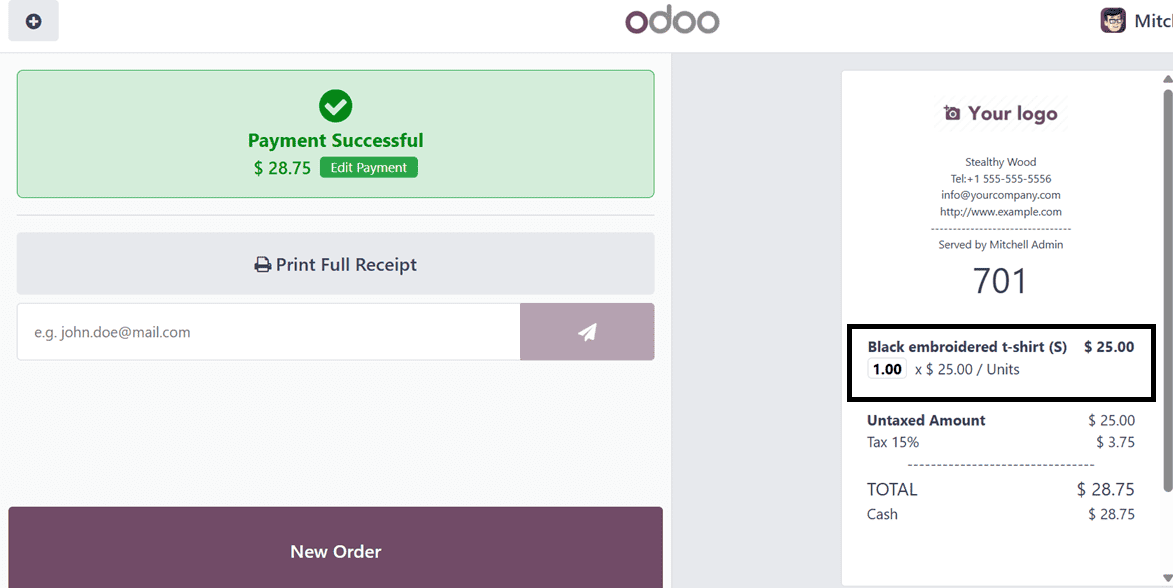
For instance, if the Tax-Excluded Sales Price of a product is set at $25, with a tax rate of 15%, the corresponding Tax-Included Price will be $28.75. Next, switch the setting to Tax-Excluded in a PoS configuration settings and start a new order. So, the product lines will display prices excluding tax, while the tax amount will be added separately to the Total section in a PoS terminal, as illustrated in the screenshot below.
The product prices in the product price section of the receipt will be displayed as ‘Tax-exclusive Amounts’ once the payment has been completed. However, in order to represent the final amount payable, the applicable tax will be clearly added to the total amount owed.
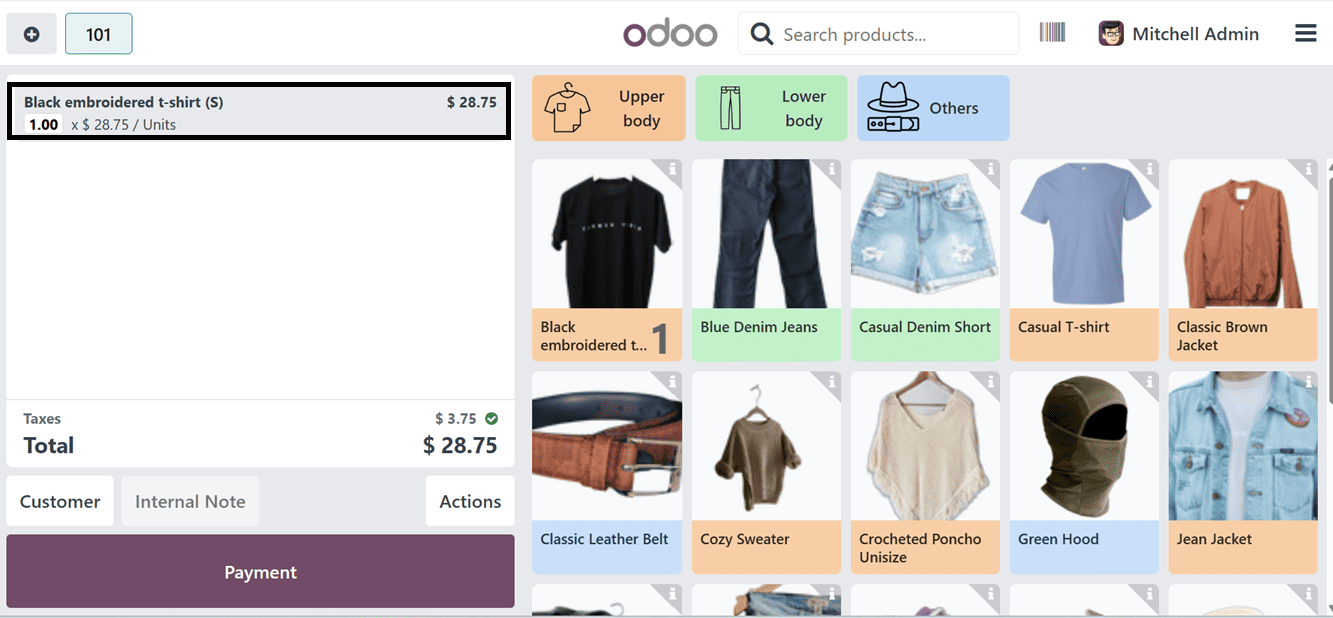
The product line in the cart will show the product price as well as the included tax amount if you use the Tax-Included option from the Product Prices options, as seen in the screenshot below.
Following the payment completion process, the product details and the tax-inclusive price will be shown on the receipt.
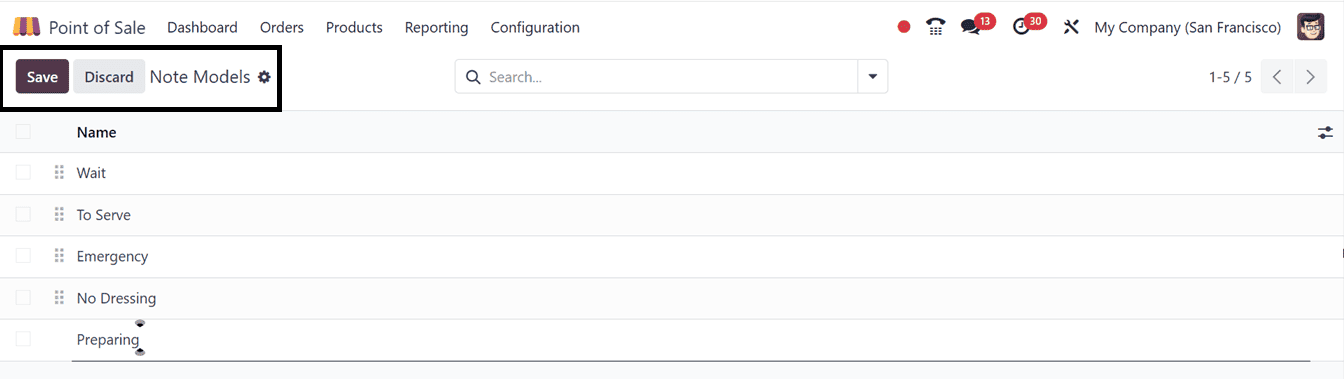
Note Models
Businesses can manage and customize extra notes or comments on orders or items with the help of Note Models, a feature of Odoo 18's Point of Sale (POS) module. These notes include specifics to be included in the order or product line, customer preferences, or particular instructions. To do this process, you can click the 'New' button to create new Note Models, view existing Note Models from the dashboard, and save them for later use.
The Point of Sale options in Odoo 18 provide a clever balance of control, usability, and flexibility for all kinds of businesses. Every feature, from inventory connectivity to payment jumps, is designed to increase productivity and enhance the client experience. Odoo 18 makes it simple to customize the PoS to fit your business, regardless of whether you manage a restaurant or a retail store. Keeping up with the most recent tools guarantees that your company stays competitive and flexible in a market that is changing quickly.
To read more about How to Configure & Use POS Product Categories in Odoo 18, refer to our blog How to Configure & Use POS Product Categories in Odoo 18.