In this blog we are going to create a custom popup in odoo 14 POS using OWL(Odoo Web Library),which is Odoo’s latest javascript framework. Owl is a component based framework, which is inspired from React js and Vue Js is written in Typescript Using Odoo’s POS app, all the needed tools are centralized in one place. This makes it easy to handle everything and helps us to save a lot of time and money.
Now let’s see how we can create a custom popup in odoo 14 when clicking on a button in POS. For learning how to create different types of buttons in detail, please go through the blog given below: How to Add Buttons in POS using OWL
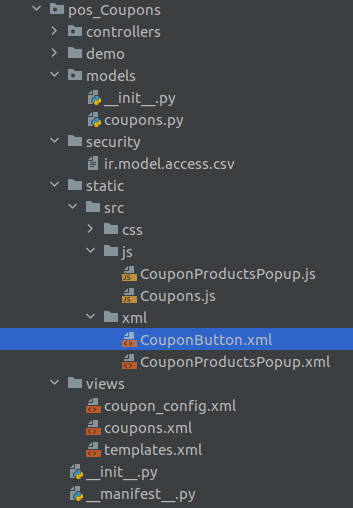
First of all we have to create a custom module. Here we will see how to create a products and other fields custom popup by clicking on the product screen button. The structure of our module is given below.
For creating the button we require python, xml and js codes Fields are declared in the python file , button view is created in XML file and we can add the button in POS and set its visibility using Js file.
Python File : Coupons.py
from odoo import models, fields
class PosCoupons(models.Model):
   _inherit = 'pos.config'
   _description = 'Pos Coupons'
   category_id = fields.Many2one('pos.category', string="Category")
   coupon_category = fields.Boolean(string="Coupon Category", default=False)
For adding the fields in in pos settings for adding the category for products and selecting the category the below given xml file is used.
<odoo>
   <record id="pos_coupons_config_view_form_" model="ir.ui.view">
       <field name="name">pos.config.coupons.form.view</field>
       <field name="model">pos.config</field>
       <field name="inherit_id" ref="point_of_sale.pos_config_view_form"/>
       <field name="arch" type="xml">
           <!-- Add boolean and many2one field in pos settings-->
           <xpath expr="//div[@id='category_reference']" position="after">
               <div class="col-12 col-lg-6 o_setting_box">
                   <div class="o_setting_left_pane">
                       <field name="coupon_category"/>
                   </div>
                   <div class="o_setting_right_pane">
                       <label for="coupon_category"/>
                       <div class="text-muted">
                           Coupon Category
                       </div>
                       <div class="content-group mt16" attrs="{'invisible': [('coupon_category', '=', False)]}">
                           <field name="category_id"/>
                       </div>
                   </div>
               </div>
           </xpath>
       </field>
   </record>
</odoo>
XML File : CouponButton.xml
<?xml version="1.0" encoding="UTF-8"?>
<templates id="template" xml:space="preserve">
   <!-- Coupon button-->
    <t t-name="CouponButton" owl="1">
        <button class="control-button" t-on-click="display_popup_products">
            <i class="fa fa-tag"/>
            <span>Coupon
        </span>
        </button>
    </t>
</templates>
Javascript File : Coupons.js
odoo.define('pos_Coupons.CouponButton', function (require) {
 "use strict";
   const { Gui } = require('point_of_sale.Gui');
   const PosComponent  = require('point_of_sale.PosComponent');
   const AbstractAwaitablePopup =    require('point_of_sale.AbstractAwaitablePopup');
   const Registries = require('point_of_sale.Registries');
   const ProductItem = require('point_of_sale.ProductItem');
   const ProductScreen = require('point_of_sale.ProductScreen');
class CouponButton extends PosComponent{
      //Generate popup
      display_popup_products() {
      var core = require('web.core');
      var _t = core._t;
       Gui.showPopup("CouponProductsPopup", {
       title : _t("Coupon Products"),
       confirmText: _t("Exit")
          });
      }
  }
  //Add coupon button and set visibility
      ProductScreen.addControlButton({
      component: CouponButton,
      condition: function() {
          return this.env.pos.config.coupon_category;
      },
  });
  Registries.Component.add(CouponButton);
  return CouponButton;
});
Here in this above js code we have extended the 'PosComponent' and added the class CouponButton for our button in pos and pop up generation. Then we specified the xml template CouponButton.xml where we added the button.
js files should be added in the static/src/js/ folder and we should add the paths of these js files by inheriting the 'point_of_sale.assets' in views/coupons.xml like given below.
<?xml version="1.0" encoding="UTF-8"?>
<odoo>
 <data>
   <template id="assets" inherit_id="point_of_sale.assets">
       <xpath expr="." position="inside">
           <script type="text/javascript" src="/pos_Coupons/static/src/js/Coupons.js"/>
             <script type="text/javascript" src="/pos_Coupons/static/src/js/CouponProductsPopup.js"/>
       </xpath>
   </template>
 </data>
</odoo>
We also need to specify the xml files 'views/coupons.xml', and 'views/coupon_config.xml' in the data part of the XML manifest file and 'static/src/xml/CouponButton.xml',
'static/src/xml/CouponProductsPopup.xml',
and 'static/src/xml/CouponPopupScreen.xml' paths in qweb section of the manifest file.
'qweb': [
   'static/src/xml/CouponButton.xml',
   'static/src/xml/CouponProductsPopup.xml',
   'static/src/xml/CouponPopupScreen.xml'
],
'data': [
   'views/coupons.xml',
   'views/coupon_config.xml'
],
For creating a custom popup we have to add one more js file and XML. Here in the below js file, the class CouponProductsPopup extends AbstractAwaitablePopup which is a default popup available in Odoo 14 pos. We can find a few more default pop-ups in the Point of sale module under the Static folder. By extending these already existing popups we can create various custom pop-ups in Odoo14 pos.

Qweb File: CouponProductsPopup.xml
This is for generating a pop-up and displaying coupon category products in it. We can also add various fields like a date field, text field, selection field, etc in the custom pop up in pos which is also given in the below XML code.
<?xml version="1.0" encoding="UTF-8"?>
<templates id="template" xml:space="preserve">
   <t t-name="CouponProductsPopup" owl="1">
       <div role="dialog" class="modal-dialog">
           <div class="popup popup-couponproducts" style="background-color: #7bcedb">
               <p class="title">
                   <t t-esc="props.title" />
               </p>
               <span class="body">
                   <!-- Display coupon category products in popup -->
                      <ProductList products="productsToDisplay" />
                   <!-- Adding text field-->
                   <input type="text" />
                     <!-- Adding date field-->
                   <input type="date" />
                     <!-- Adding selection field-->
                   <select name="cars" id="cars">
                       <option value="volvo">Volvo</option>
                       <option value="saab">Range Rover</option>
                       <option value="mercedes">Mercedes</option>
                       <option value="audi">Audi</option>
                   </select>
               </span>
               <div class="footer">
                   <div class="button cancel" t-on-click="confirm">
                       <t t-esc="props.confirmText" />
                   </div>
               </div>
           </div>
       </div>
   </t>
</templates>
JS File:CouponProductsPopup.js
odoo.define('pos_Coupons.CouponProductsPopup', function(require) {
   'use strict';
   const AbstractAwaitablePopup = require('point_of_sale.AbstractAwaitablePopup');
   const Registries = require('point_of_sale.Registries');
   const PosComponent = require('point_of_sale.PosComponent');
   const ControlButtonsMixin = require('point_of_sale.ControlButtonsMixin');
   const NumberBuffer = require('point_of_sale.NumberBuffer');
   const { useListener } = require('web.custom_hooks');
   const { onChangeOrder, useBarcodeReader } = require('point_of_sale.custom_hooks');
   const { useState } = owl.hooks;
   class CouponProductsPopup extends AbstractAwaitablePopup {
    constructor() {
    super(...arguments);
    useListener('click-product', this._clickProduct);
    }
   //To get coupon products category
    get productsToDisplay() {
    return this.env.pos.db.get_product_by_category(this.env.pos.config.category_id[0]);
    }
     get currentOrder() {
           return this.env.pos.get_order();
       }
//      get products details in orderlines when clicking on popup product
     async _clickProduct(event) {
           if (!this.currentOrder) {
               this.env.pos.add_new_order();
           }
           console.log("bbb")
           const product = event.detail;
           let price_extra = 0.0;
           let description, packLotLinesToEdit;
           // Add the product after having the extra information.
           this.currentOrder.add_product(product, {
               description: description,
           });
       }
    }

    //Create products popup
   CouponProductsPopup.template = 'CouponProductsPopup';
   CouponProductsPopup.defaultProps = {
       confirmText: 'Ok',
       cancelText: 'Cancel',
       title: 'Coupon Products',
       body: '',
   };
   Registries.Component.add(CouponProductsPopup);
   return CouponProductsPopup;
});
Using the above code we can create a products popup and by clicking on those products it will be added to the order lines. In the file Coupons.js, we can see the function display_popup_products for generating the popup.Gui.showPopup is used for this.
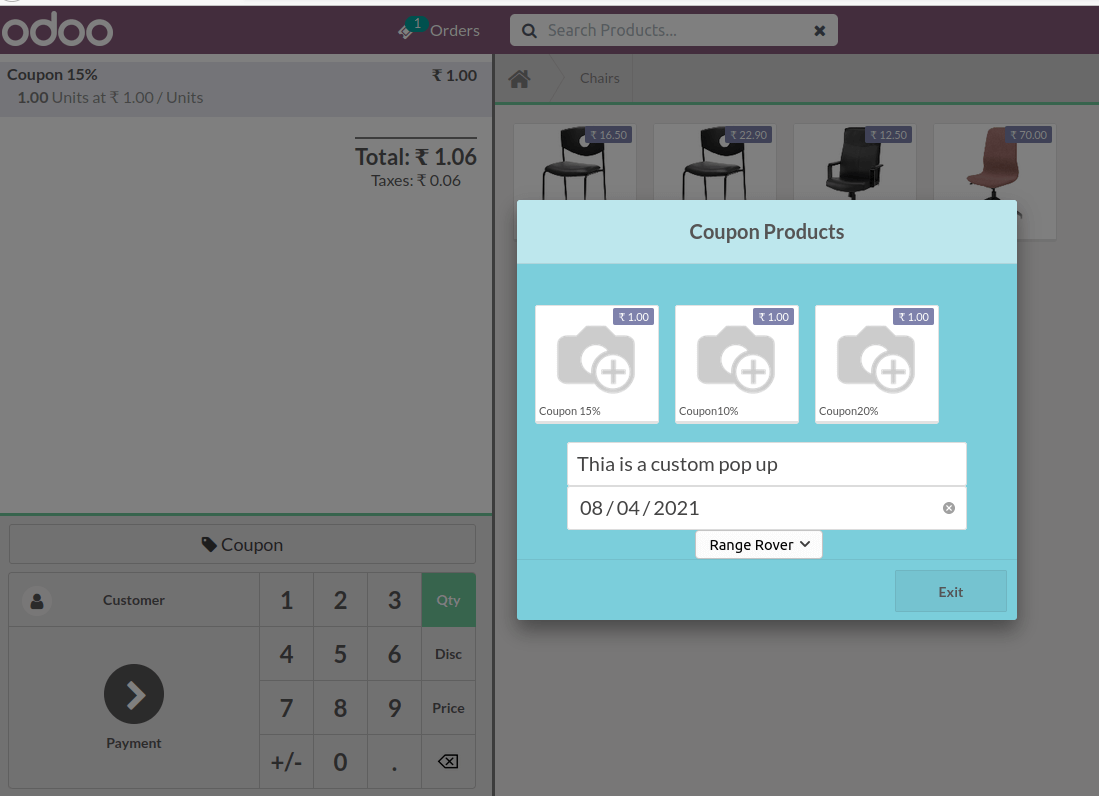
The above is our custom popup containing products, text field, date field, and a selection field