Point of Sale(POS) is one of the finest and most important modules in Odoo ERP. A web based application always needs to be attractive and easy to handle. As we know Odoo is a user friendly ERP with an attractive user interface. Moreover, JavaScript has a key role in ensuring a user-friendly interface for this ERP. Furthermore, Odoo uses Backbone JS to handle the front end on the last version such as Odoo13. We know that the latest version Odoo14 introduced a new web library called Odoo Web Library(OWL) - a UI modern framework by taking the ideas of React and Vue.
Adding a button to POS is different in the new version compared to the previous ones as we are using the owl framework for creating buttons in POS in the new one. In addition, you need to create a new module for this you can add this to your custom module also.
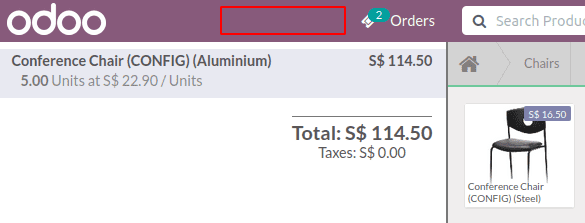
In this blog we are going to explain about adding buttons in 3 areas of POS such as, In the Product Screen, Near Order(Ticket Button) Menu, & in the payment screen.
Let's begin with Product Screen. This is our module files.
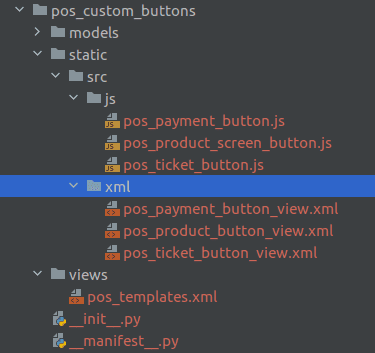
The JS files needed to be included inside the assets of PoS to load the file. So you need to add the XML file like this.
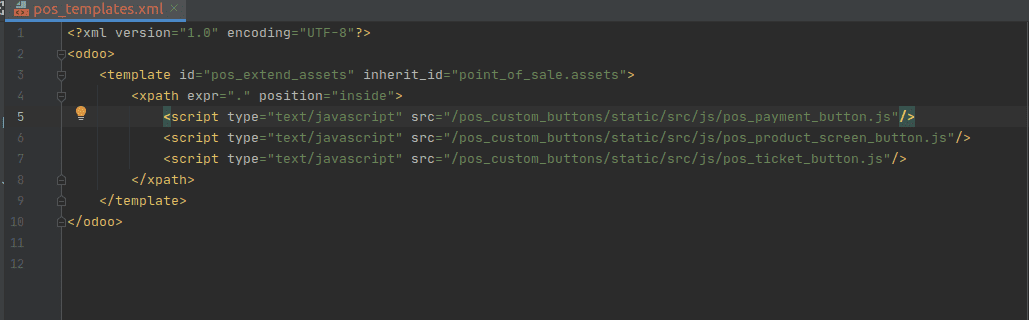
<template id="pos_extend_assets" inherit_id="point_of_sale.assets">
   <xpath expr="." position="inside">
       							<script type="text/javascript" src="/pos_custom_buttons/static/src/js/pos_payment_button.js"/>
       <script type="text/javascript" src="/pos_custom_buttons/static/src/js/pos_product_screen_button.js"/>
       <script type="text/javascript" src="/pos_custom_buttons/static/src/js/pos_ticket_button.js"/>
   </xpath>
</template>
After adding this XML file add it to manifest.py. Then you need to create a corresponding JS & XML file for the same.
For Adding Button in Product Screen you need to add the below XML code in static/src/xml.
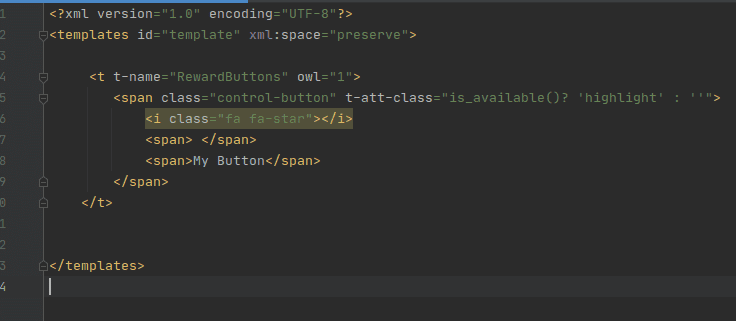
<?xml version="1.0" encoding="UTF-8"?>
<templates id="template" xml:space="preserve">
    <t t-name="CustomRewardButtons" owl="1">
       <span class="control-button" t-att-class="is_available()?    'highlight' : ''">
           <i class="fa fa-star"></i>
           <span> </span>
           <span>My Button</span>
       </span>
   </t>
</templates>
After adding the button in the product screen you need to add the js file. Additionally, inside the JS file you need to define the JS module using the odoo.define method and you also need to define the required screens.
odoo.define('pos_custom_buttons.RewardButton', function(require) {
'use strict';
const PosComponent = require('point_of_sale.PosComponent');
const ProductScreen = require('point_of_sale.ProductScreen');
const { useListener } = require('web.custom_hooks');
const Registries = require('point_of_sale.Registries');
The above mentioned codes are the required screens for adding buttons in Product Screen.
odoo.define('pos_custom_buttons.RewardButton', function(require) {
'use strict';
   const { Gui } = require('point_of_sale.Gui');
   const PosComponent = require('point_of_sale.PosComponent');
   const { posbus } = require('point_of_sale.utils');
   const ProductScreen = require('point_of_sale.ProductScreen');
   const { useListener } = require('web.custom_hooks');
   const Registries = require('point_of_sale.Registries');
   const PaymentScreen = require('point_of_sale.PaymentScreen');
   class CustomRewardButtons extends PosComponent {
       constructor() {
           super(...arguments);
           useListener('click', this.onClick);
       }
       is_available() {
           const order = this.env.pos.get_order();
           return order
       }
       onClick() {
                Gui.showPopup("ErrorPopup", {
                       title: this.env._t('Payment Screen Custom Button Clicked'),
                       body: this.env._t('Welcome to OWL'),
                   });
       }
   }
   CustomRewardButtons.template = 'CustomRewardButtons';
   ProductScreen.addControlButton({
       component: CustomRewardButtons,
       condition: function() {
           return this.env.pos;
       },
   });
   Registries.Component.add(CustomRewardButtons);
   return CustomRewardButtons;
});
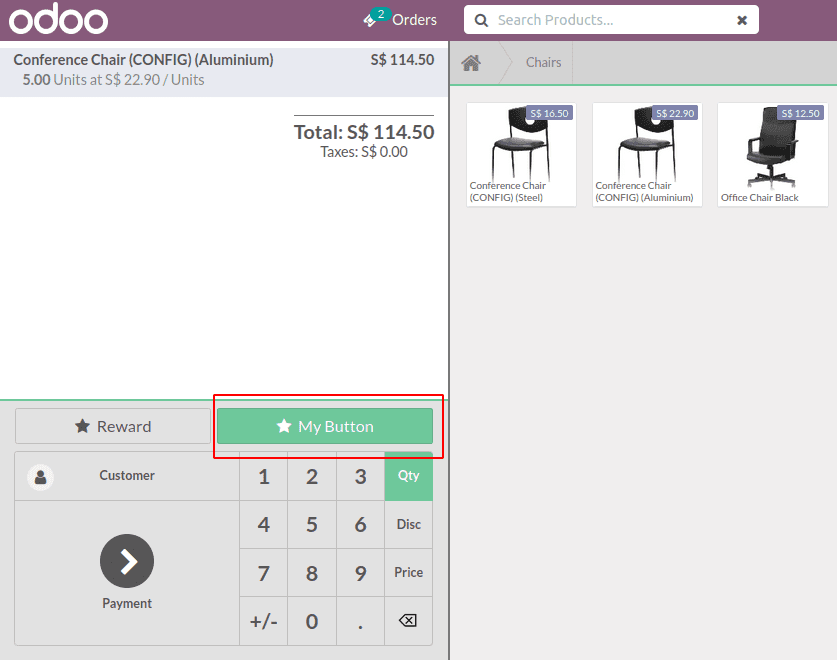
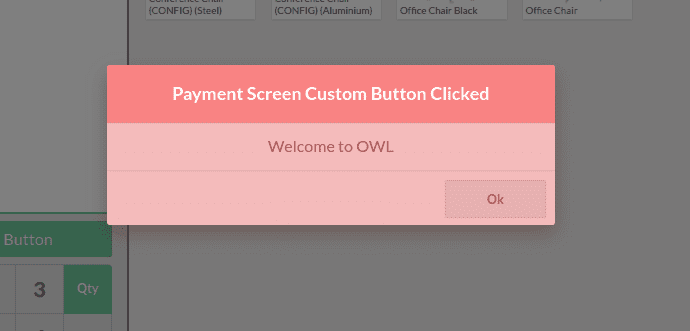
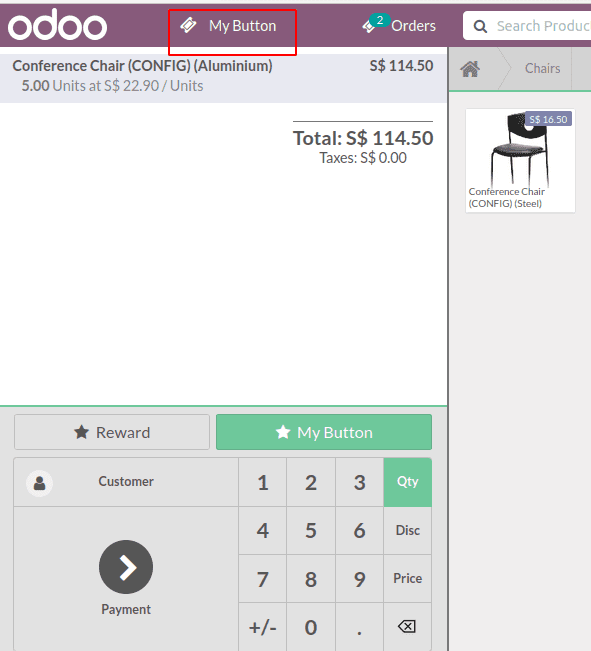
In this code we added a new class name CustomRewardButtons and we added a function named onClick(). Which ensures that upon clicking on the button the pop up error message will come. You can edit and add your code on onClick() function as per your customizations. Furthermore, the next line of code is adding the control button to the product screen. When you complete all these steps and add all files path in manifest.py file it will work well. The following image depicts the screenshot of the custom button functioning in the POS.
When you click on the button this pop up will appear.
Add buttons near tickets orders
Next we are going to explain the way to add buttons near tickets orders.
For adding buttons similar to ticket buttons, first we need to create a button like a ticket button with template name. Then add that template name in the inherited view of the default template named “Chrome”.
<t t-name="CustomTicketButtons" owl="1">
   <div class="ticket-button" t-att-class="{ highlight: props.isTicketScreenShown }" t-on-click="onClick">
       <div class="with-badge" t-att-badge="count">
           <i class="fa fa-ticket" aria-hidden="true"></i>
       </div>
       <div>My Button</div>
   </div>
</t>
The above code is to define our button structure. Next we need to inherit the default template name “Chrome’ and add our template “CustomTicketButtons” to it. In the module point_of_sale you can see that template we can inherit that template and add our custom buttons in it through xpath.
<t t-inherit="point_of_sale.Chrome" t-inherit-mode="extension">
   <xpath expr="//TicketButton" position="before">
           <CustomTicketButtons isTicketScreenShown="isTicketScreenShown" />
   </xpath>
   <xpath expr="//TicketButton" position="after">
       <CustomTicketButtons isTicketScreenShown="isTicketScreenShown" t-if="env.isMobile" />
   </xpath>
</t>
The full XML code is given below.
<?xml version="1.0" encoding="UTF-8"?>
<templates id="template" xml:space="preserve">

   <t t-name="CustomTicketButtons" owl="1">
       <div class="ticket-button" t-att-class="{ highlight: props.isTicketScreenShown }" t-on-click="onClick">
           <div class="with-badge" t-att-badge="count">
               <i class="fa fa-ticket" aria-hidden="true"></i>
           </div>
           <div>My Button</div>
       </div>
   </t>
    <t t-inherit="point_of_sale.Chrome" t-inherit-mode="extension">
       <xpath expr="//TicketButton" position="before">
               <CustomTicketButtons isTicketScreenShown="isTicketScreenShown" />
       </xpath>
       <xpath expr="//TicketButton" position="after">
           <CustomTicketButtons isTicketScreenShown="isTicketScreenShown" t-if="env.isMobile" />
       </xpath>
   </t>
</templates>
After adding this you need to add the following JS code in the file to configure the button.
odoo.define('pos_custom_buttons.CustomTicketButtons', function(require) {
'use strict';
   const { Gui } = require('point_of_sale.Gui');
   const PosComponent = require('point_of_sale.PosComponent');
   const { posbus } = require('point_of_sale.utils');
   const ProductScreen = require('point_of_sale.ProductScreen');
   const { useListener } = require('web.custom_hooks');
   const Registries = require('point_of_sale.Registries');
   class CustomTicketButtons extends PosComponent {
       onClick() {
                Gui.showPopup("ErrorPopup", {
                       title: this.env._t('Custom Ticket Button Clicked'),
                       body: this.env._t('Welcome to OWL'),
                   });
       }
   }
    CustomTicketButtons.template = 'CustomTicketButtons';
   Registries.Component.add(CustomTicketButtons);
   return CustomTicketButtons;
});
You can add your own code in onClick() function. The following screenshots is the resultant window image after adding a button near tickets order.
Add a button in the payment screen
Next we are going to add a button in the payment screen.
Like the previous buttons we need to add the xml file for the button first. However, the payment screen is already available. So we just only need to inherit the template view and add our button into it.
Code:
<?xml version="1.0" encoding="UTF-8"?>
<templates id="template" xml:space="preserve">
    <t t-inherit="point_of_sale.PaymentScreen" t-inherit-mode="extension">
           <xpath expr="//div[hasclass('payment-controls')]" position="inside">
               <div>
                   <div id="my_button" class="button js_invoice"
                       t-on-click="IsCustomButton">
                       <i class="fa fa-spinner fa-spin" /> My Button
                   </div>
               </div>
           </xpath>
    </t>
</templates>
t-on-click="IsCustomButton" is a click function which needs to add in the JS file.
We just inherited the PaymentScreen template added inside the payment-controls division. You can give your required class of operation on here and then you need to add the js file. Furthermore, as we already said, payment screen is a default class in odoo14 therefore, we just need to inherit that class in JS. ie, We just needed to inherit the predefined class PaymentScreen.
const CustomButtonPaymentScreen = (PaymentScreen) =>
   class extends PaymentScreen {
       constructor() {
           super(...arguments);
       }
       IsCustomButton() {
           // click_invoice
            Gui.showPopup("ErrorPopup", {
                   title: this.env._t('Payment Screen Custom Button Clicked'),
                   body: this.env._t('Welcome to OWL'),
               });
       }
   };
This is how we inherit the class and add our function IsCustomButton().
JS Code:
odoo.define('pos_custom_buttons.PaymentScreenButton', function(require) {
'use strict';
   const { Gui } = require('point_of_sale.Gui');
   const PosComponent = require('point_of_sale.PosComponent');
   const { posbus } = require('point_of_sale.utils');
   const ProductScreen = require('point_of_sale.ProductScreen');
   const { useListener } = require('web.custom_hooks');
   const Registries = require('point_of_sale.Registries');
   const PaymentScreen = require('point_of_sale.PaymentScreen');
    const CustomButtonPaymentScreen = (PaymentScreen) =>
       class extends PaymentScreen {
           constructor() {
               super(...arguments);
           }
           IsCustomButton() {
               // click_invoice
                Gui.showPopup("ErrorPopup", {
                       title: this.env._t('Payment Screen Custom Button Clicked'),
                       body: this.env._t('Welcome to OWL'),
                   });
           }
       };
   Registries.Component.extend(PaymentScreen, CustomButtonPaymentScreen);
   return CustomButtonPaymentScreen;
});
Upon adding it you need to upgrade and the result can be viewed in the payment screen.
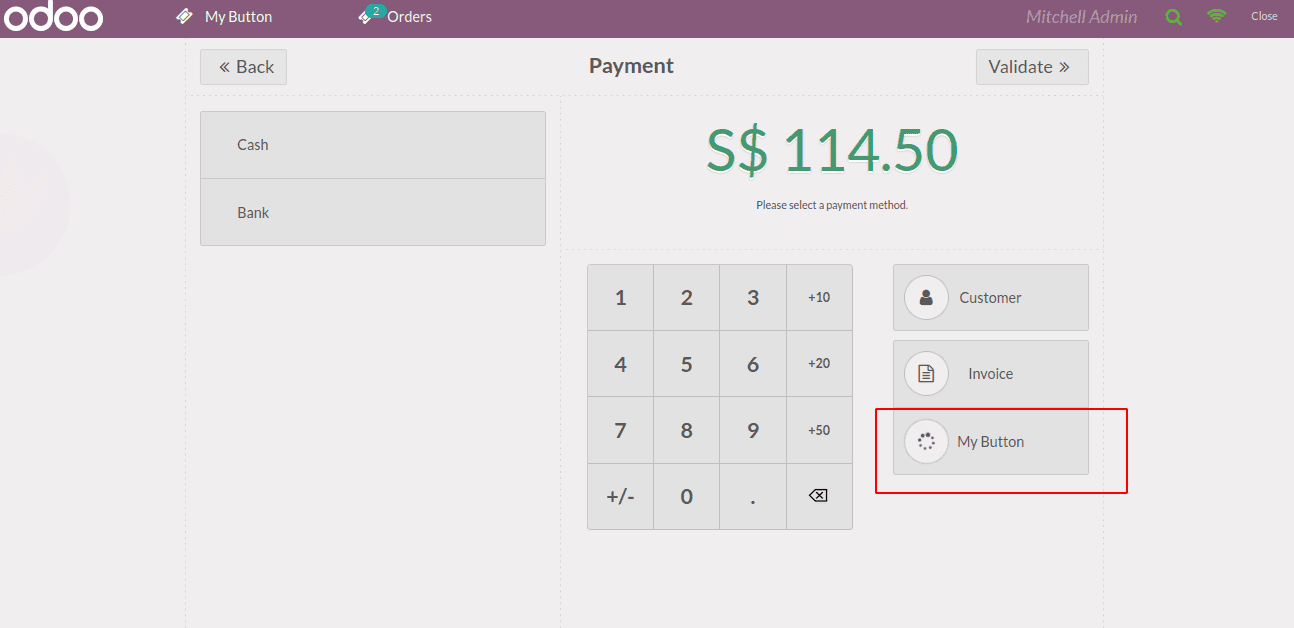
The above image depicts the resultant window of the payment window in the POS after adding a button. Moreover, the button can be added wherever you want by choosing the place by giving xpath.
When we click the button a popup screen will appear. If everything is completed, check your files path given in manifest and upgrade the module. In addition, a check on these three buttons should be done to ensure that they are working well.