In today's retail scenario, customer retention and engagement strategies are important for business success. With Odoo 18 Point of Sale (PoS), businesses can take full advantage of an advanced promotional engine that integrates seamlessly into daily sales operations. From simple discounts to complex loyalty strategies, Odoo offers diverse tools to enhance customer satisfaction, increase sales, and improve repeat purchase rates.
This blog will walk you through how to use Discounts, Promotions, and Loyalty Programs in Odoo 18 PoS, covering the creation and use of:
* Coupons
* Discount Codes
* Promotions
* Loyalty Cards
* Buy X Get Y Programs
* Next Order Coupons
To get started, ensure that the Promotions, Coupons, Gift Cards, and Loyalty Programs feature is enabled in the PoS settings:
* Go to Point of Sale > Configuration > Settings
* Enable the checkbox for Promotions, Coupons, Gift Cards, and Loyalty Programs
* Save changes
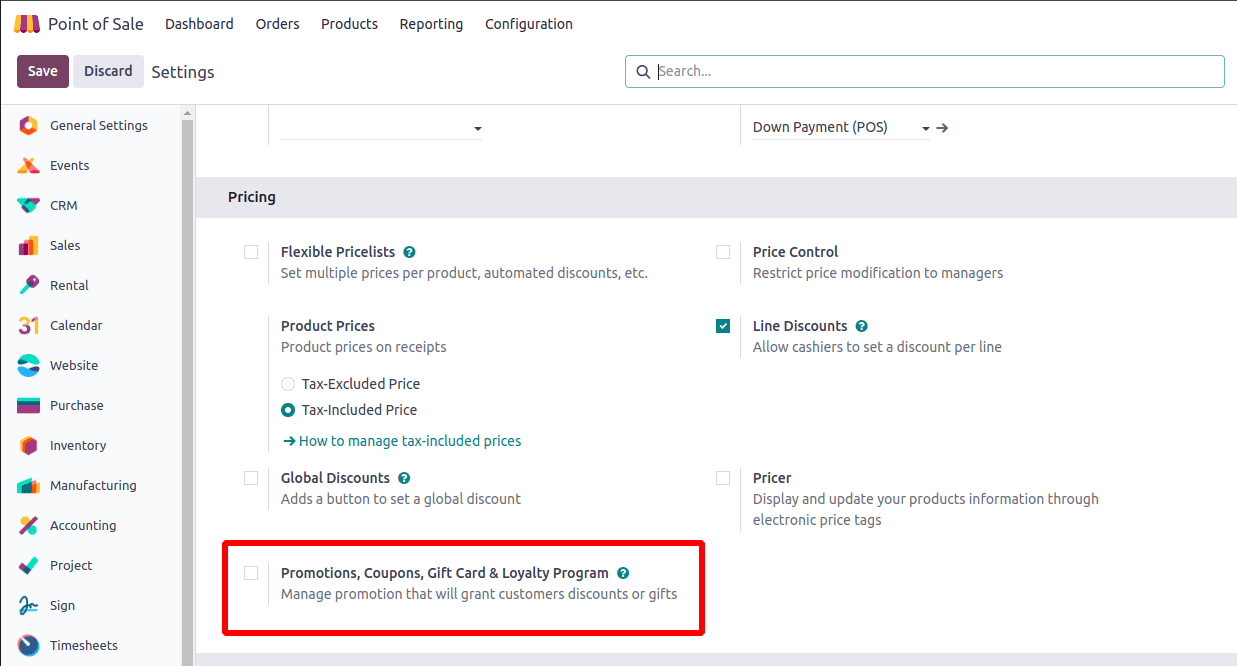
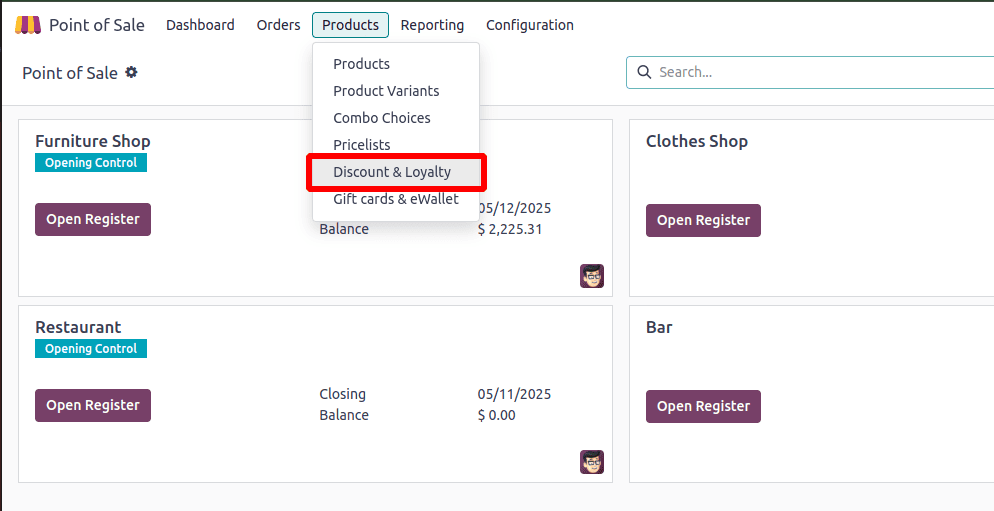
Once enabled, new menu options will be available under Products > Discount & Loyalty, where you can create and manage various promotional programs.
Coupons:
Coupons represent a form of discounts by customers during checkouts, provide percentage discounts, fixed monetary deductions, or granting shipping.
New Discounts or Loyalty programs can be created using the "New" button. Opening any item on the dashboard will reveal its respective program configuration form. Here, we are creating a new discount program.
Navigate to Discount & Loyalty Programs
* Go to: Products > Discount & Loyalty
* Click New to create a new promotional program.
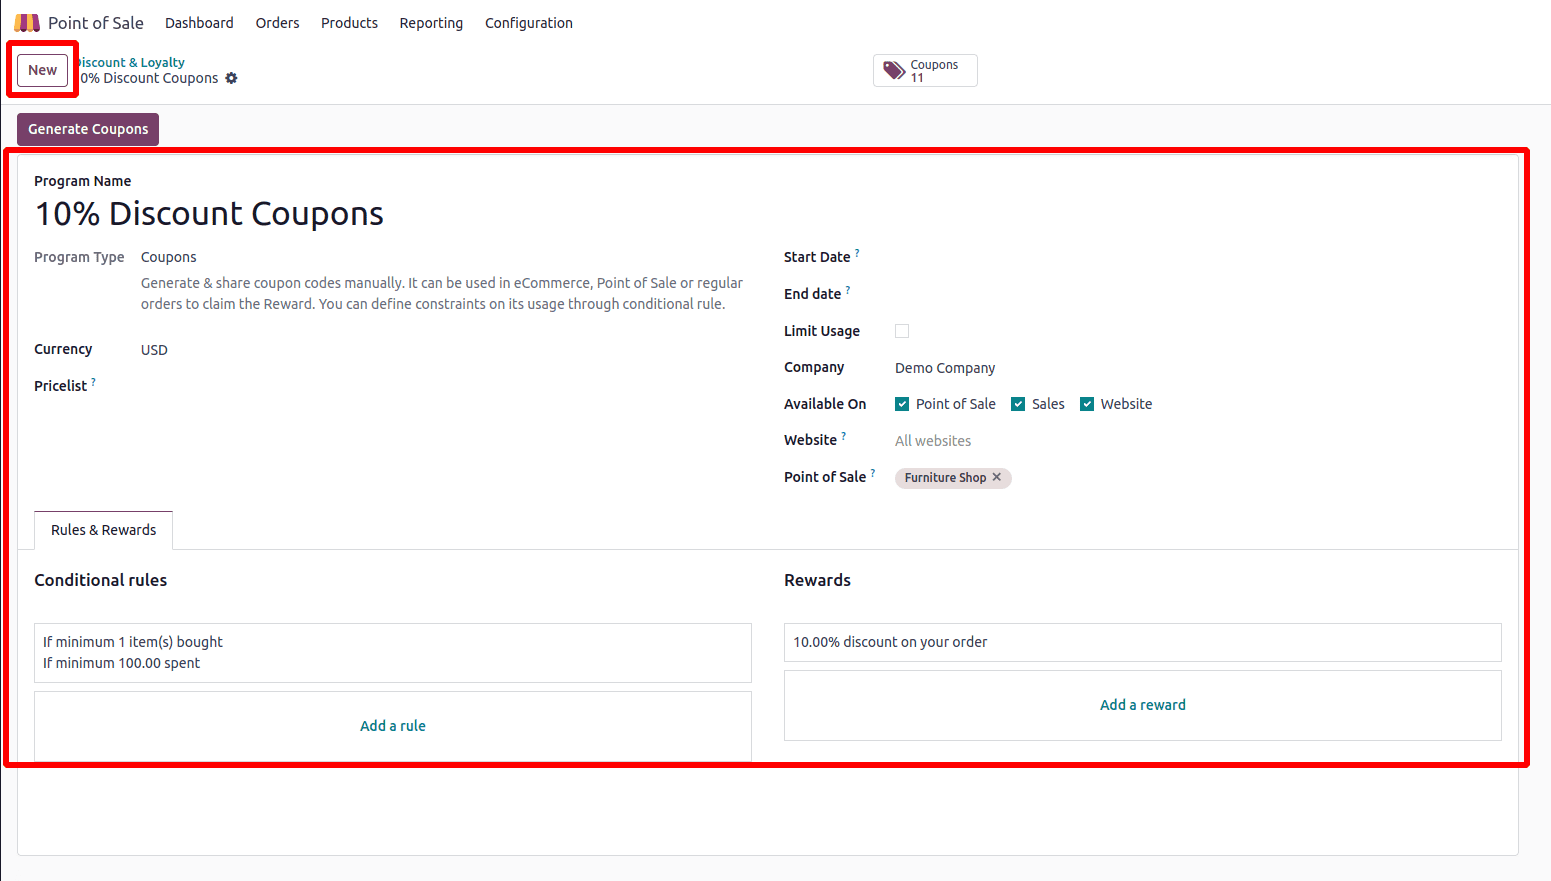
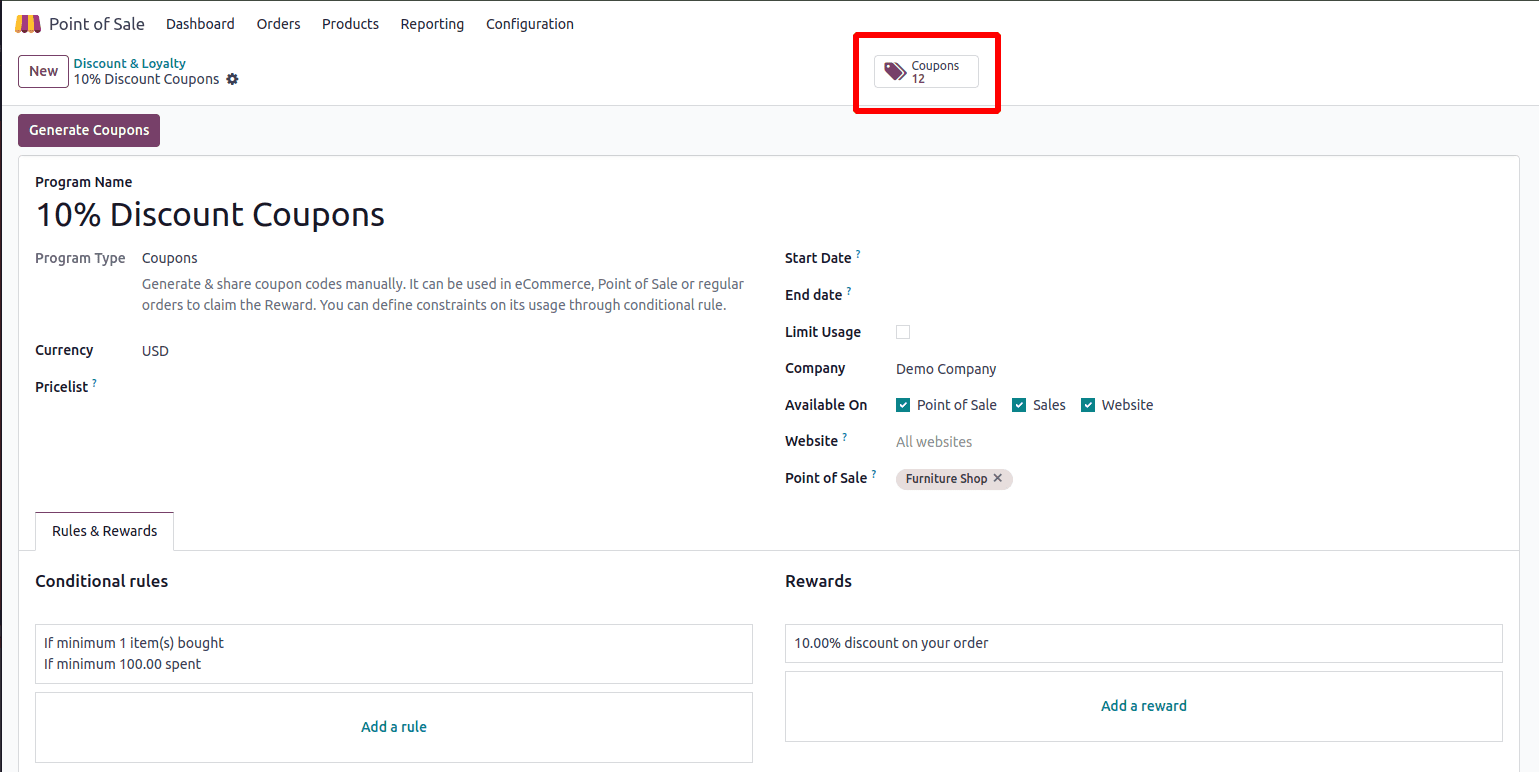
In the configuration form:
* Update the "Program Name" field to identify the coupon program (e.g., SAVE10 - 10% Off Coupon).
* From the "Program Type" dropdown, select Coupon.
* Set the desired currency for the discount.
* Define the program’s duration by choosing the "Start Date" and "End Date" from the calendar picker.
* In the "Limit Usage" section, specify how many times each coupon can be used per customer or in total.
* The "Company" field should reflect the business entity to which this promotion belongs.
* Under "Available On", indicate the platforms where this coupon can be applied—e.g., Point of Sale, Sales, or Website.
* To make the coupon available on specific websites or PoS stores:
a. Use the "Website" field to assign it to a particular online store.
b. Use the "Point of Sale" field to assign it to designated PoS shops only.
Under the Rules & Rewards tab, you will define the conditions required for the coupon to be applicable and set the corresponding rewards that will be granted upon successful use.
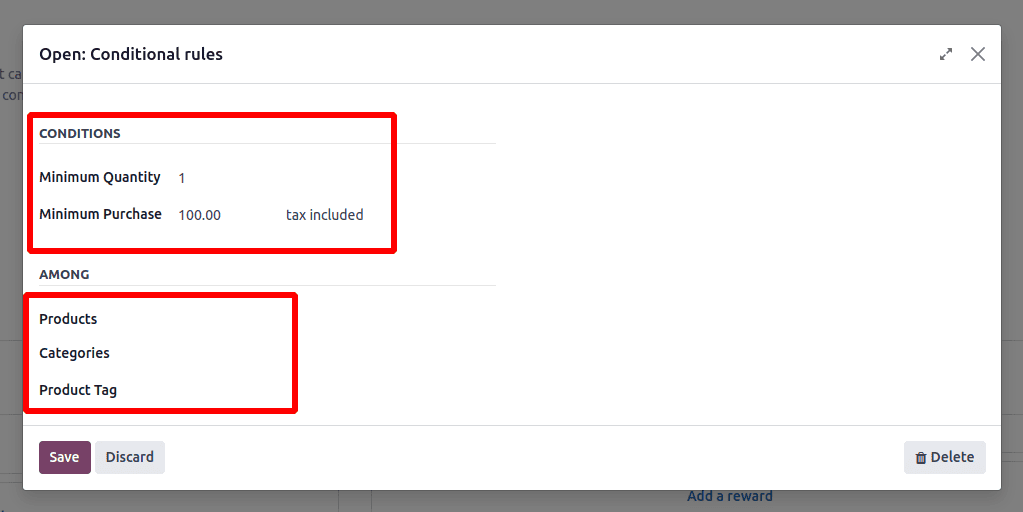
Adding Conditional Rules
Click the "Add" button within the "Conditional Rules" section to create a new condition.
A configuration popup window will appear.
Within this popup:
* Use the "Minimum Quantity" field to define the number of products to be purchased to qualify for coupons.
* Set a "Minimum Purchase" amount to enforce a spending threshold (e.g., orders above $100).
* Apply filters such as specific Products, Product Categories, or Product Tags to narrow the eligible items for the coupon.
After entering the necessary details, click "Save & Close" to finalize the rule. Alternatively, use "Save & New" to immediately create another condition.
You can create multiple rules under a single program to meet varied business requirements.
Creating Rewards
Under the Rewards section of the same tab, click the "Add" button to configure the discount the customer will receive.
This opens a Create Rewards popup.
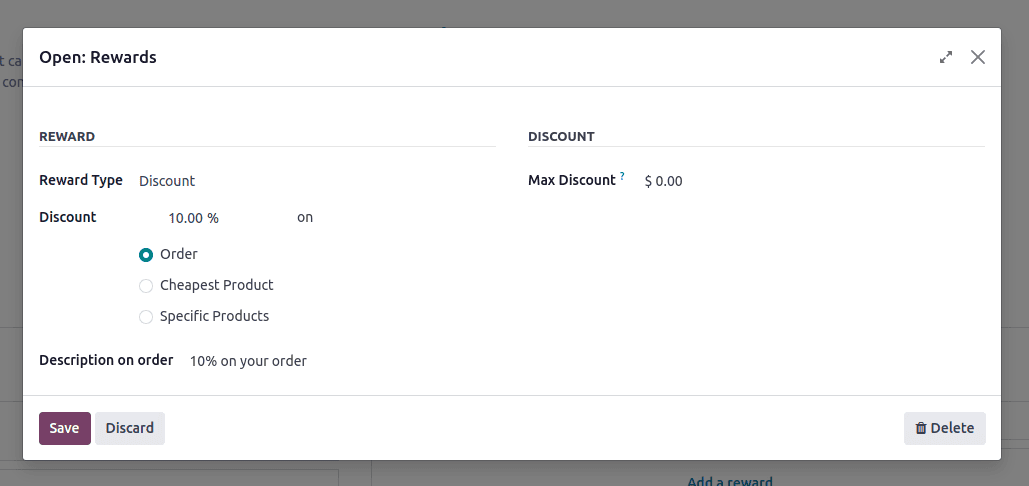
Inside the reward creation form:
* Choose the "Reward Type" from the dropdown (e.g., Discount).
* Enter the Discount Value (e.g., 10%).
* Select how the discount will be applied:
a. Order – applies the discount to the total order value
b. Cheapest Products - Carts gives the least expensive item discount
c. Specific Product – targets a predefined product
You may optionally define a Maximum Discount amount under the DISCOUNT section to cap the benefit.
The "Description on Order" field allows you to customize how the reward appears on the PoS receipt or invoice.
Once the reward details are set, click "Save & Close".
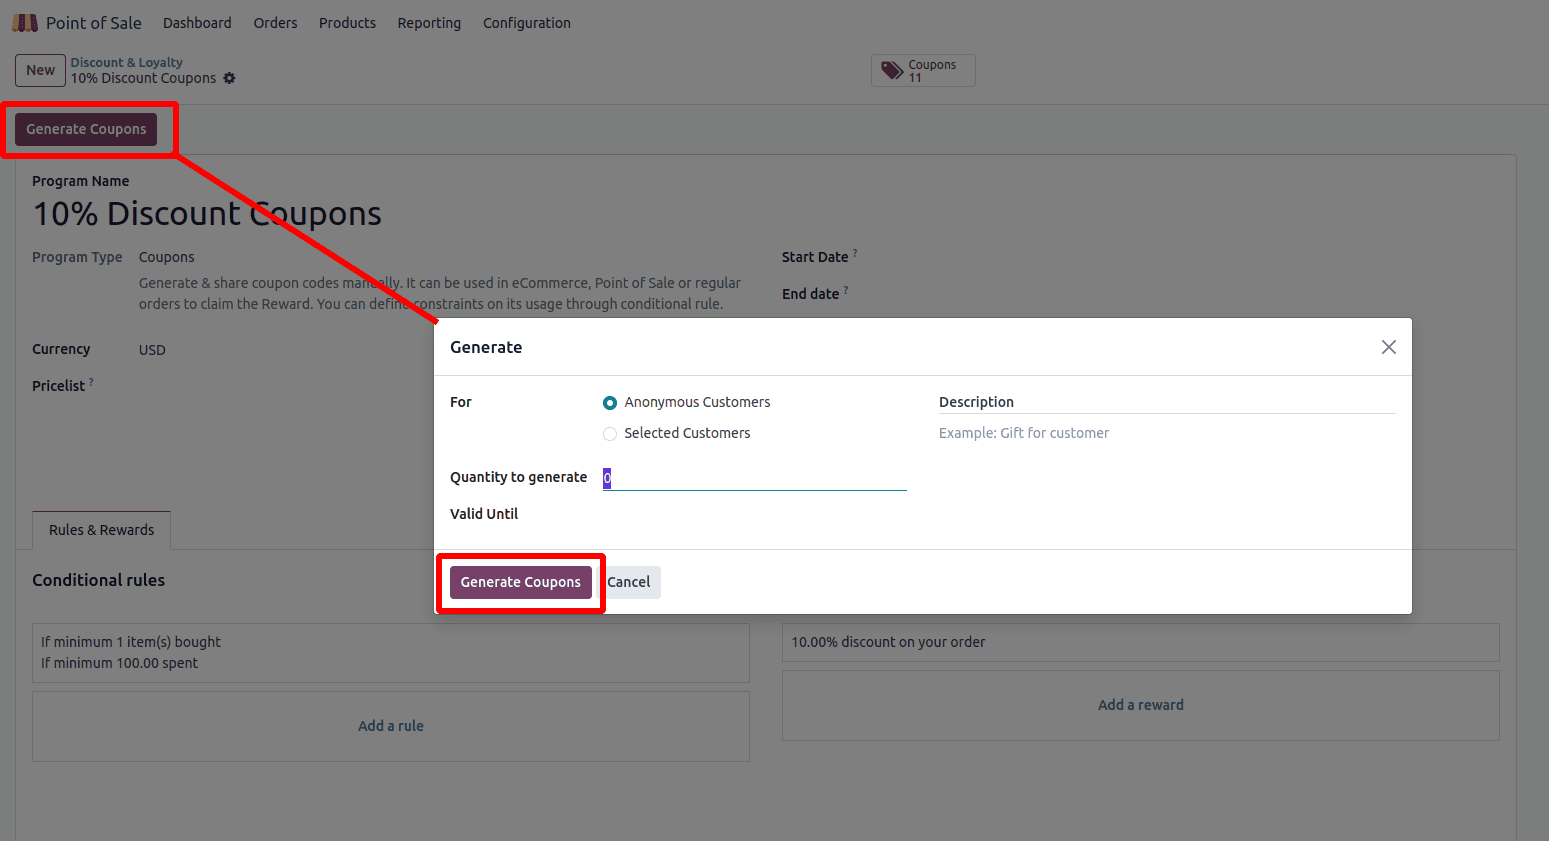
Generating Coupons
After configuring the rules and rewards, proceed to generate coupon codes.
Click the "Generate Coupons" button found at the top of the coupon program form.
A pop-up window will appear:
* Choose the Customer Type (e.g., Anonymous Customers, Selected Customers).
* Enter the Quantity of coupons you wish to create.
* Set the Validity Until date to define how long the generated coupons will remain active.
Finally, click "Generate Coupons."
Once generated, coupons can be tracked via the "Coupons" smart button on the program form.
Managing Coupons
Clicking the "Coupons" smart button opens a dashboard listing all generated coupons.
For each coupon, you can view:
* Coupon Code
* Remaining Balance
* Expiration Date
* Associated Program
* Customer (Partner)
If more coupons are needed, you can return to this view and use the "Generate Coupons" button again.
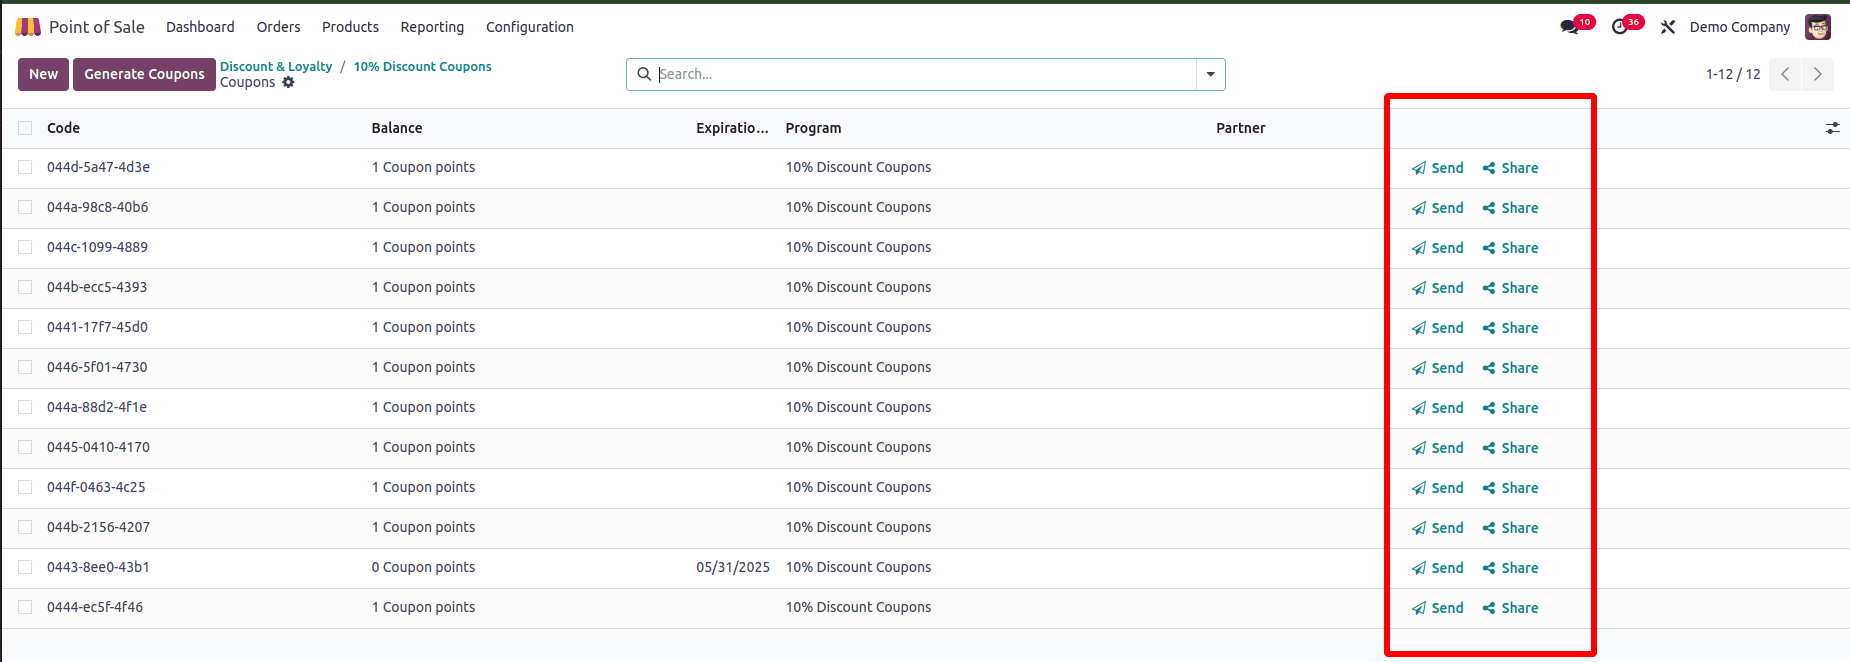
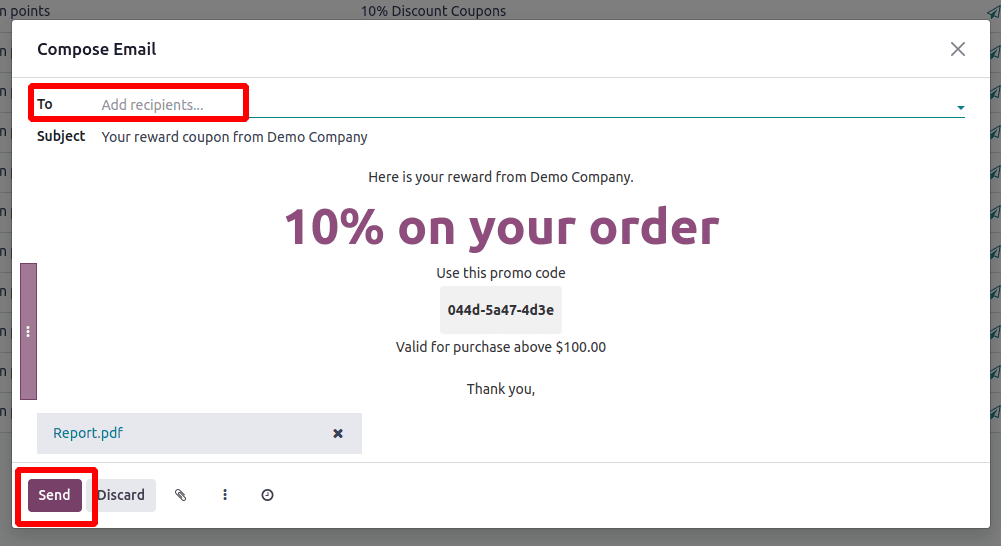
Sending Coupons
To distribute coupons via email:
1. Open the Coupons dashboard.
2. Click the "Send" button.
3. A popup will appear showing the coupon code and allowing you to enter or confirm the customer’s email address.
4. Click Send to deliver the coupon directly to the recipient.
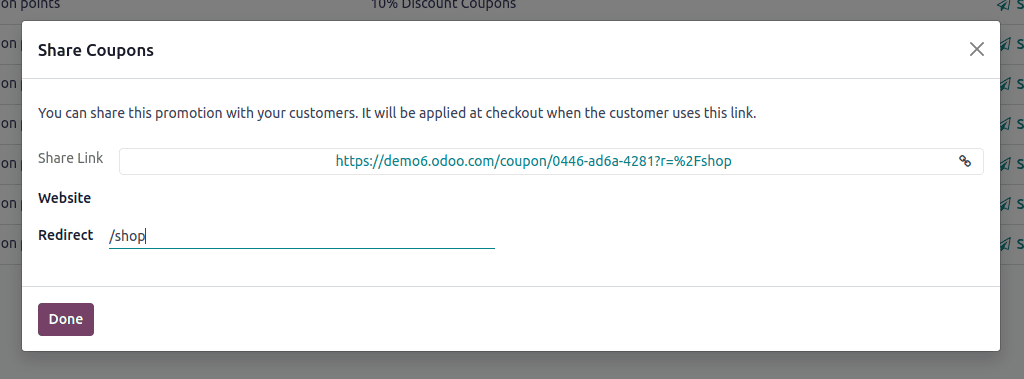
Sharing Coupons
Coupons can also be shared as URLs for use in marketing campaigns or social media.
* Click the "Share" button for the relevant coupon.
* If a website is linked in the coupon’s "Website" field, the coupon card will be made public.
* Copy and paste the coupon URL to share via external platforms, such as WhatsApp, Instagram, or newsletters.
Discount Codes
Discount Codes are similar to coupons but typically used in mass campaigns. Customers manually enter a known code at checkout to receive a discount, making them ideal for promotions across social media, email marketing, or printed flyers.
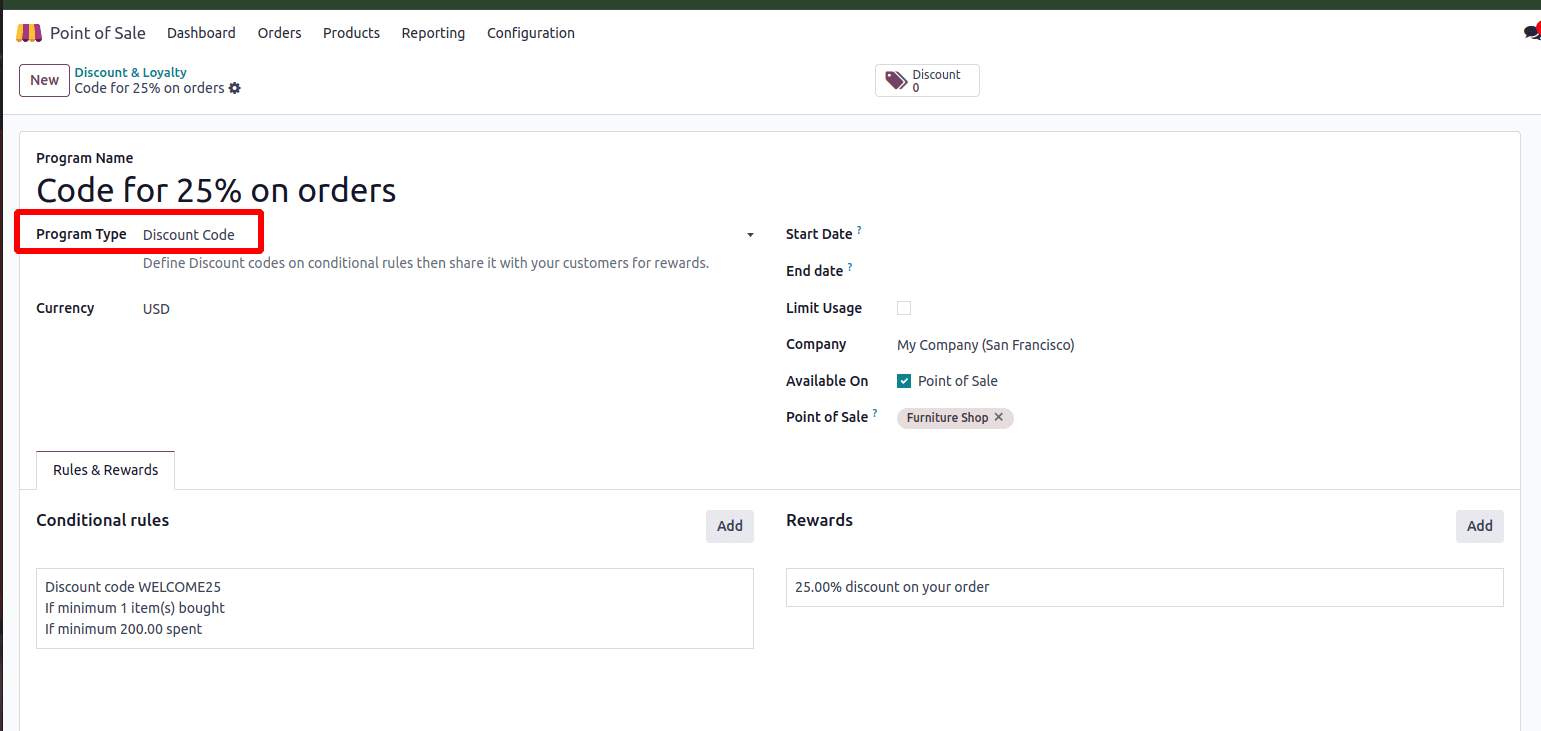
General Settings of the Discount Code Program
Start by navigating to Products > Discount & Loyalty > New.
In the configuration form:
* Set the Program Name (e.g., WELCOME25).
* Select the program type as a discount code from the dropdown.
* Set the Currency, Start Date, and End Date.
* Under Limit Usage, define the maximum number of redemptions (globally or per customer).
* Assign the program to the correct Company.
* Use the Available On options to enable this for PoS, Website, or Sales.
* To restrict usage, specify the Website and/or Point of Sale location(s).
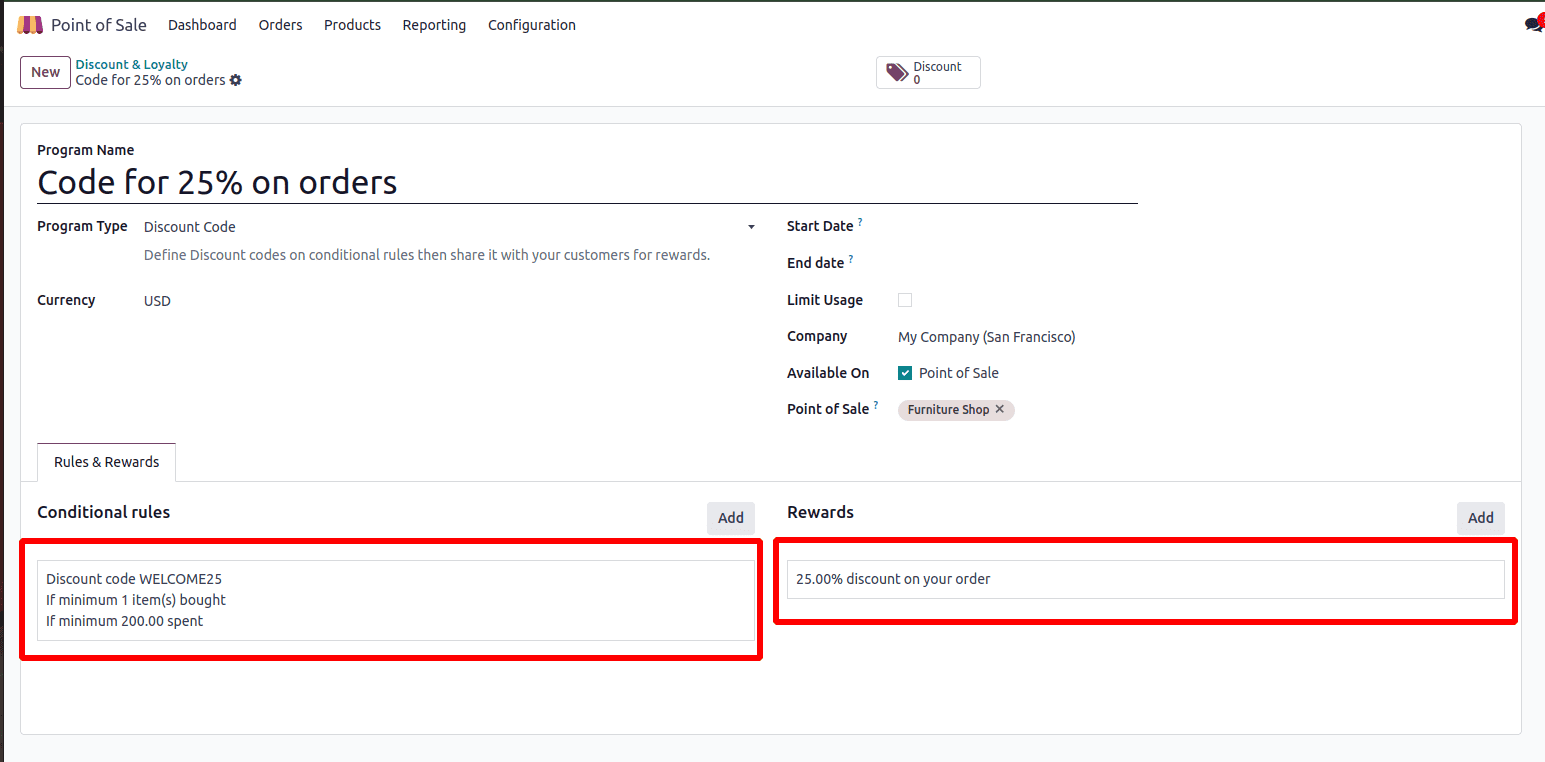
Under the Rules & Rewards tab, begin by adding conditions in the Conditional Rules section. Click the Add button to open a configuration popup, where you can set the Minimum Purchase amount (for example, $200), and optionally narrow the applicability by selecting specific Products, Categories, or Tags. Once defined, save the condition to apply it to the program.
Next, in the reward section, click add to configure the reward. Choose the Reward Type as Discount, then set the discount value (e.g., $25) and select Apply To: Order to apply it to the entire purchase. If needed, specify a Maximum Discount to cap the reward. You can also customize how the discount appears on receipts by filling in the Description on order field. Once all the details are recorded, save the reward configuration and click Close.
Using the Discount Code
Discount Codes do not need to be generated or emailed individually.
Simply provide the code (e.g., WELCOME25) in your marketing material.
In the PoS:
* Cashier clicks Enter Code, types the code, and confirms.
* Discount is instantly applied to the order if all rules match.
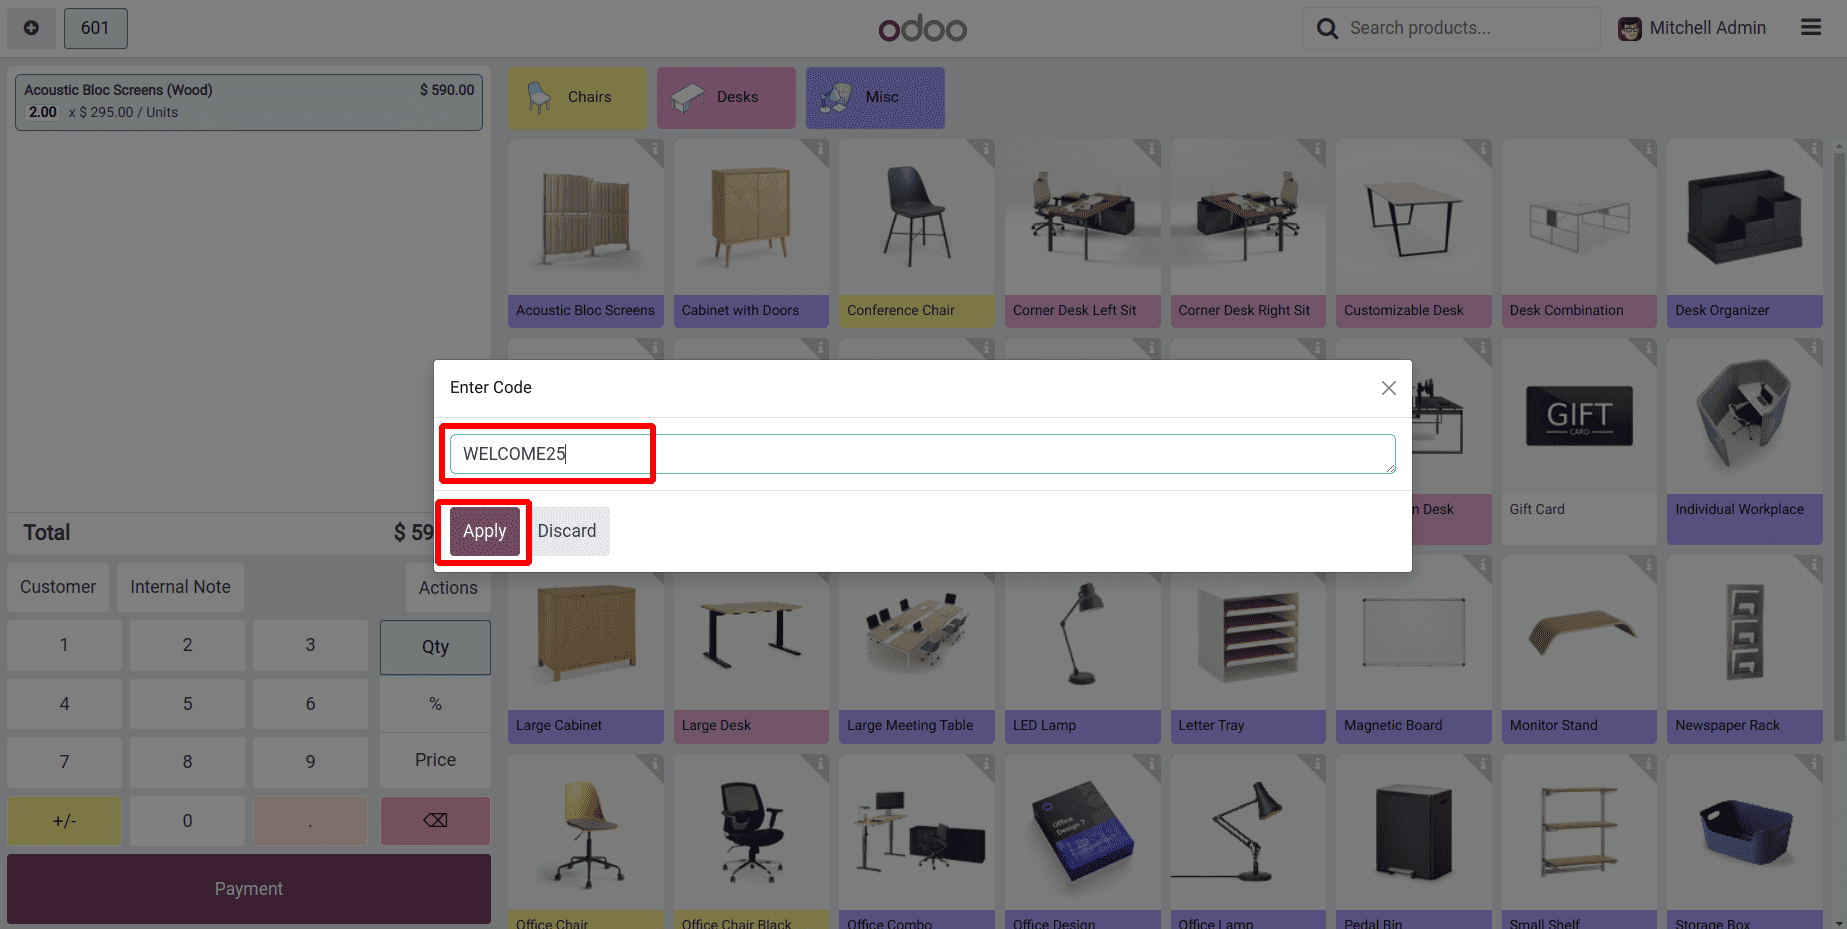
To apply the discount, the cashier clicks the Enter Code button in the PoS interface and enters the provided discount code.
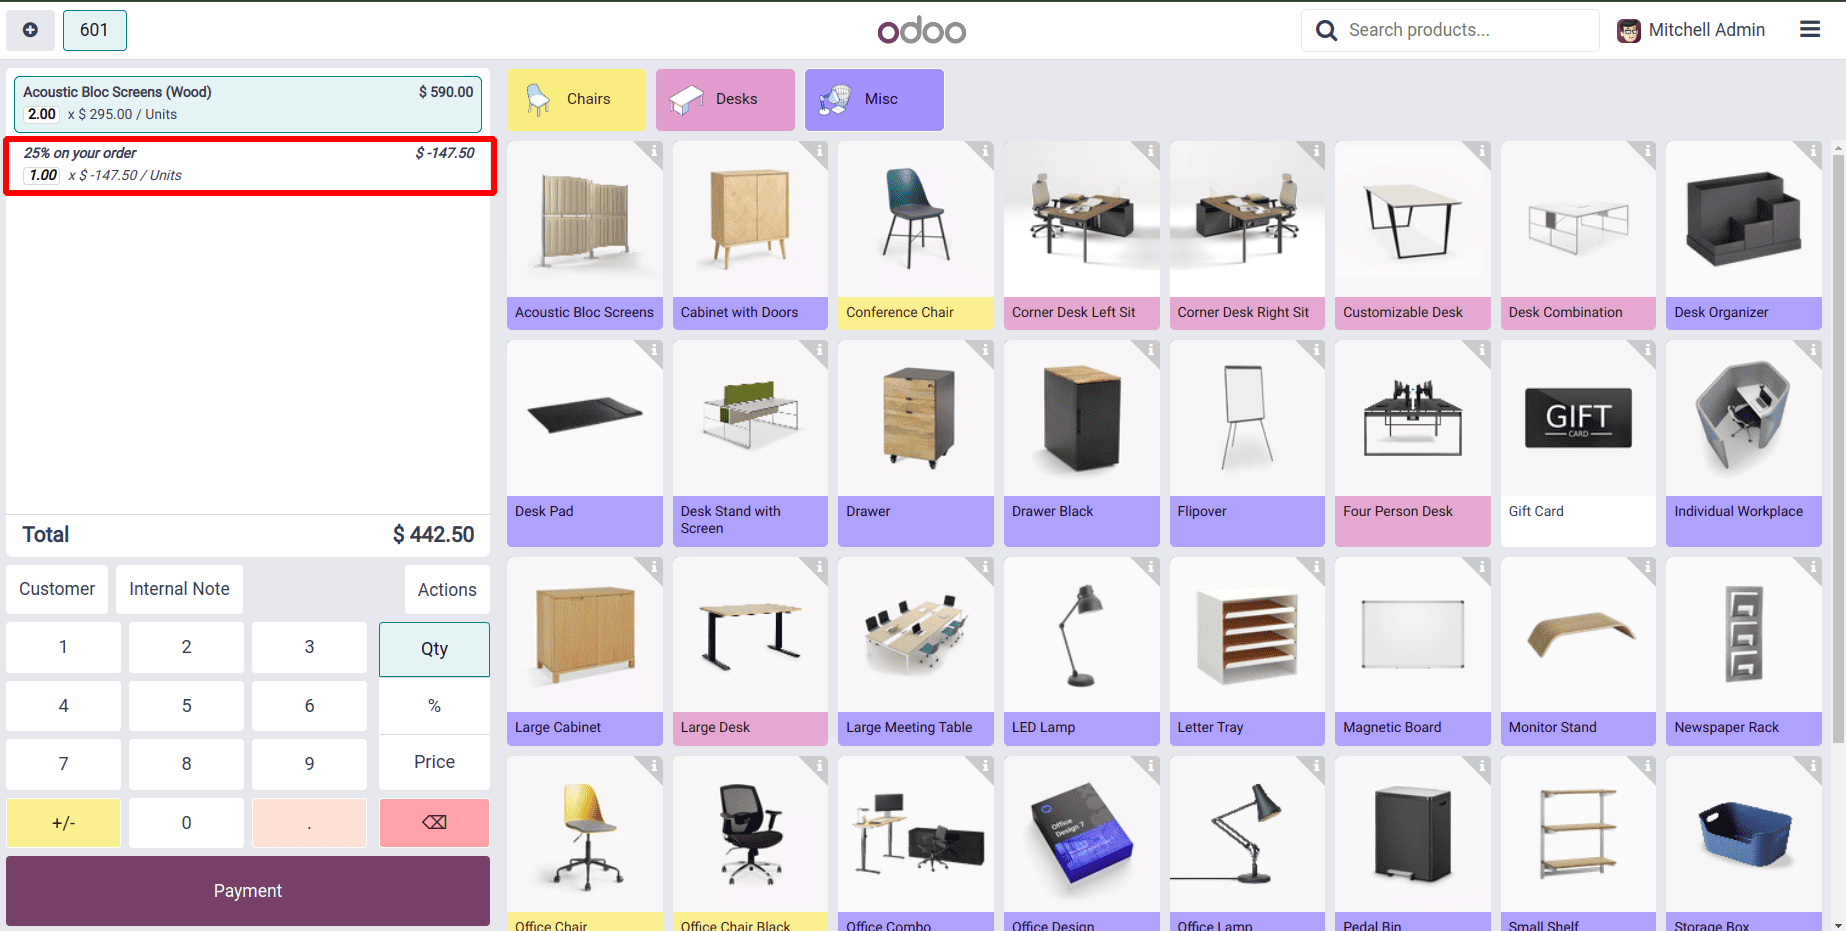
Once confirmed, the discount is automatically applied to the order, as shown on the PoS order line.
Promotion Program :
Promotion codes are primarily used to attract new customers and reward them in order to increase sales. They enable businesses to offer discounts, free products, or special deals to customers who enter a designated code at checkout. The initial steps for creating a promotion are similar to those for other programs. To proceed, go to the rules and rewards section. To add a rule, click the Add button under the Rules section.
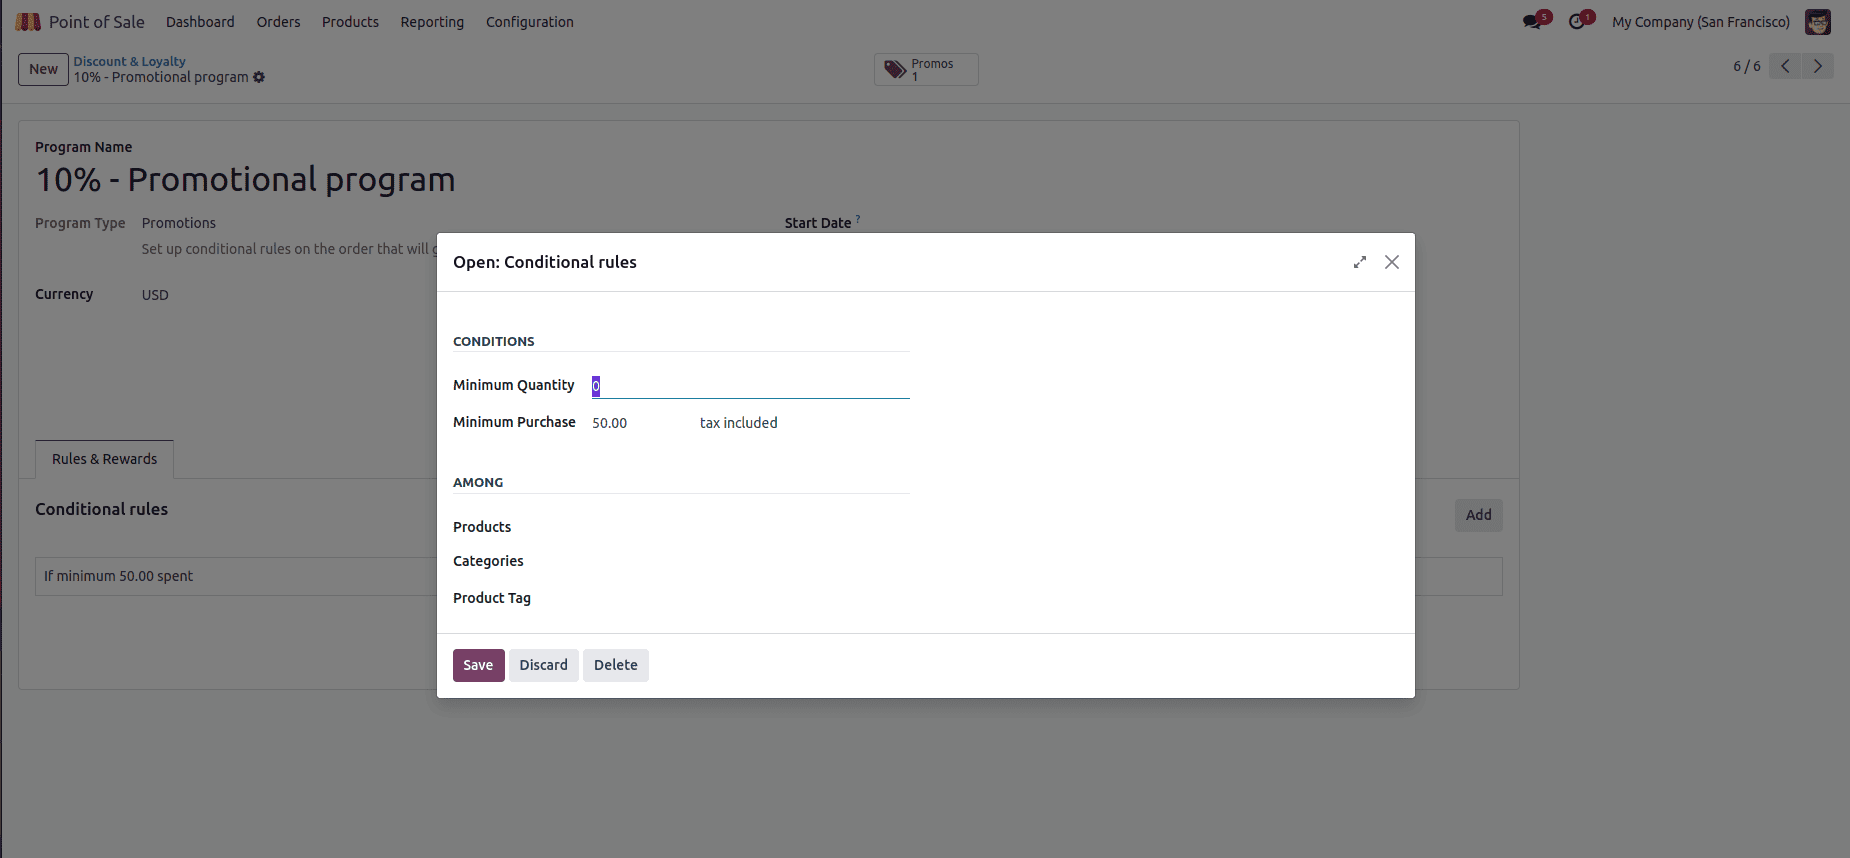
Configure any conditions as required by the company, then click the Save & Close button. In this example, the rule is set to require a minimum purchase of 1 item with a total amount of at least 50 (including tax). The next step is to define the reward. To do this, click the Add button in the Rewards section.
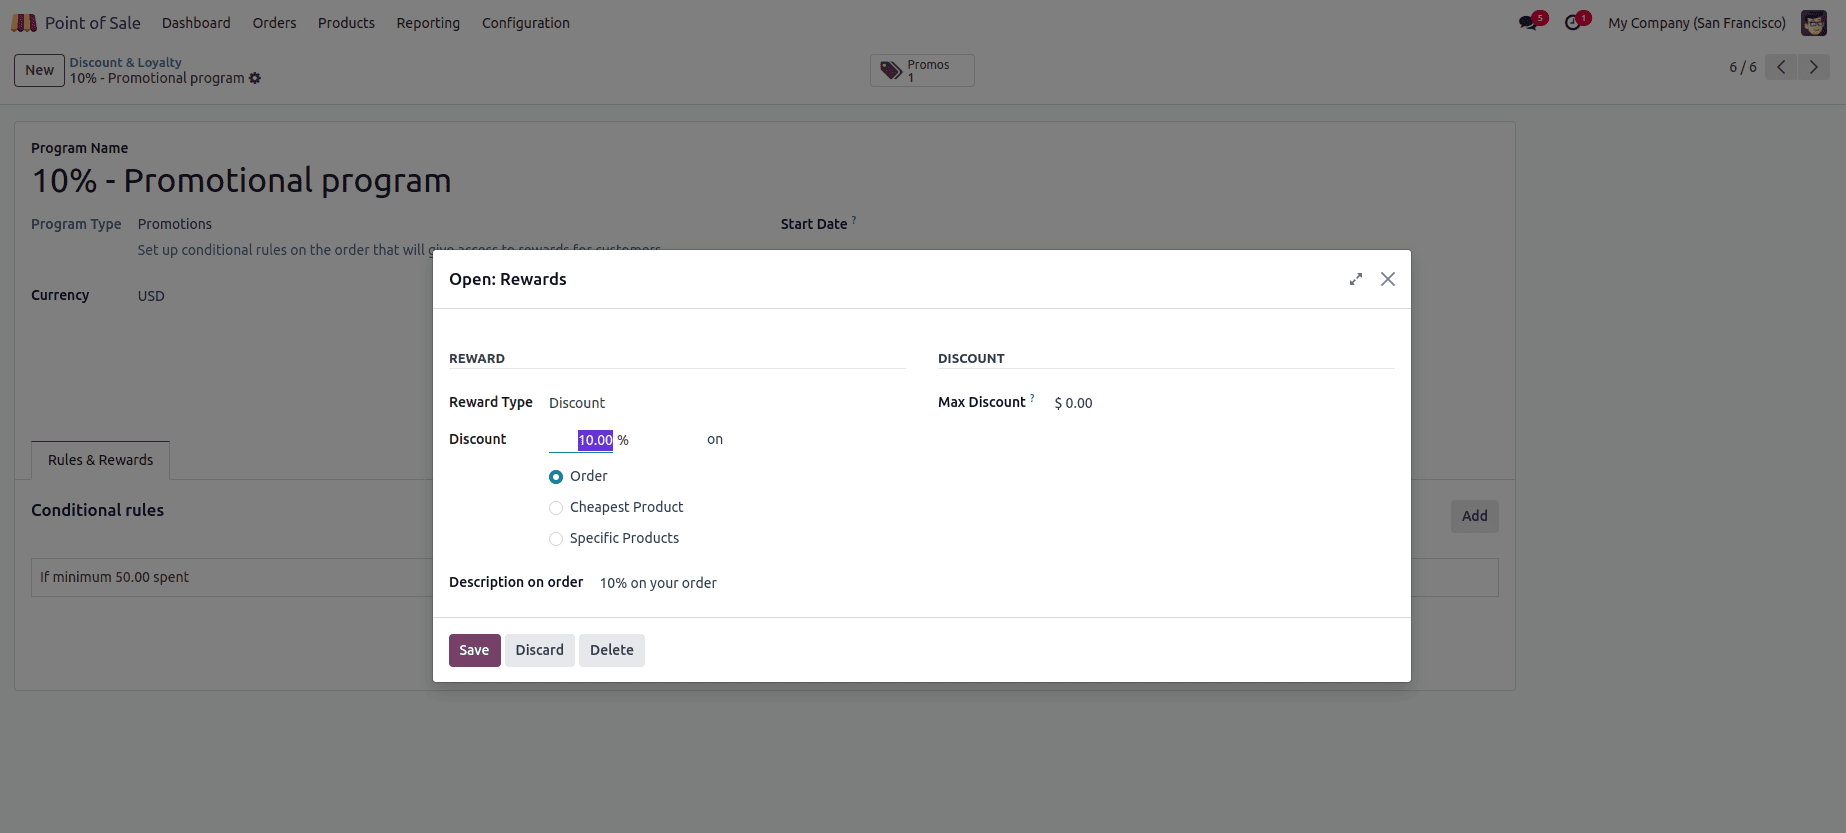
To apply a Promotion Program in PoS, select a product that falls under the rule defined in the program. Then, click on the action button, and in the visible popup.
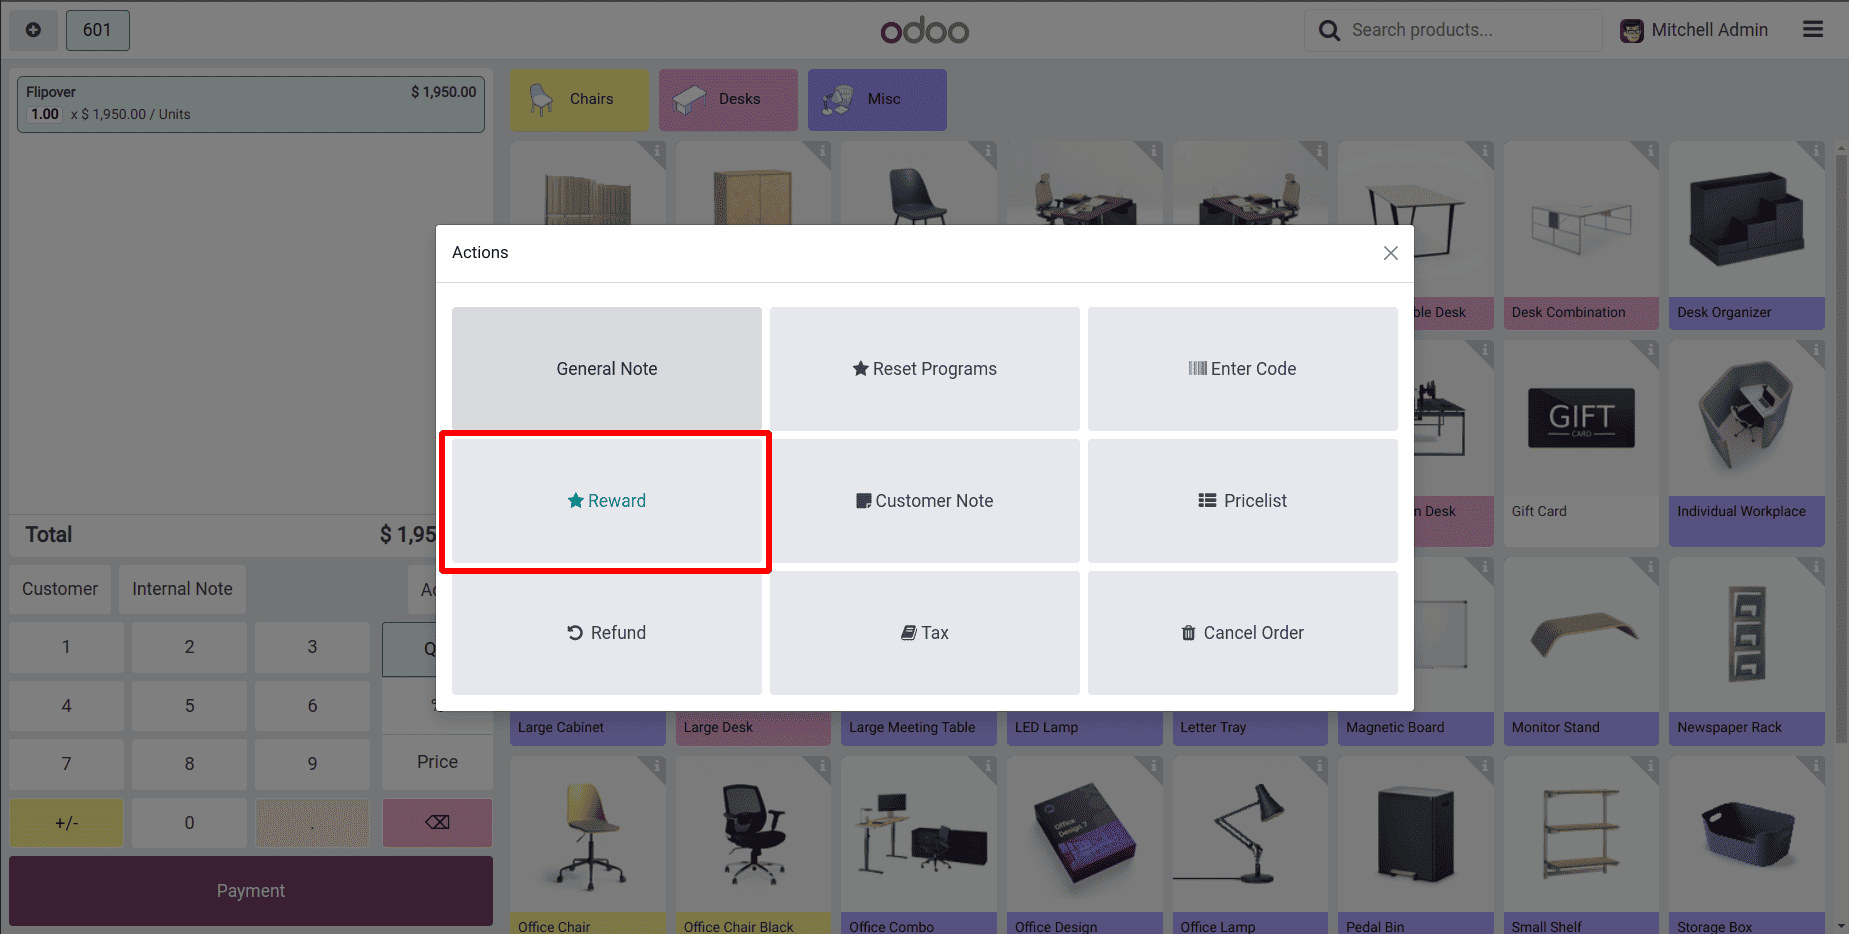
you'll see a Reward button—click it to apply the promotion to the current order.
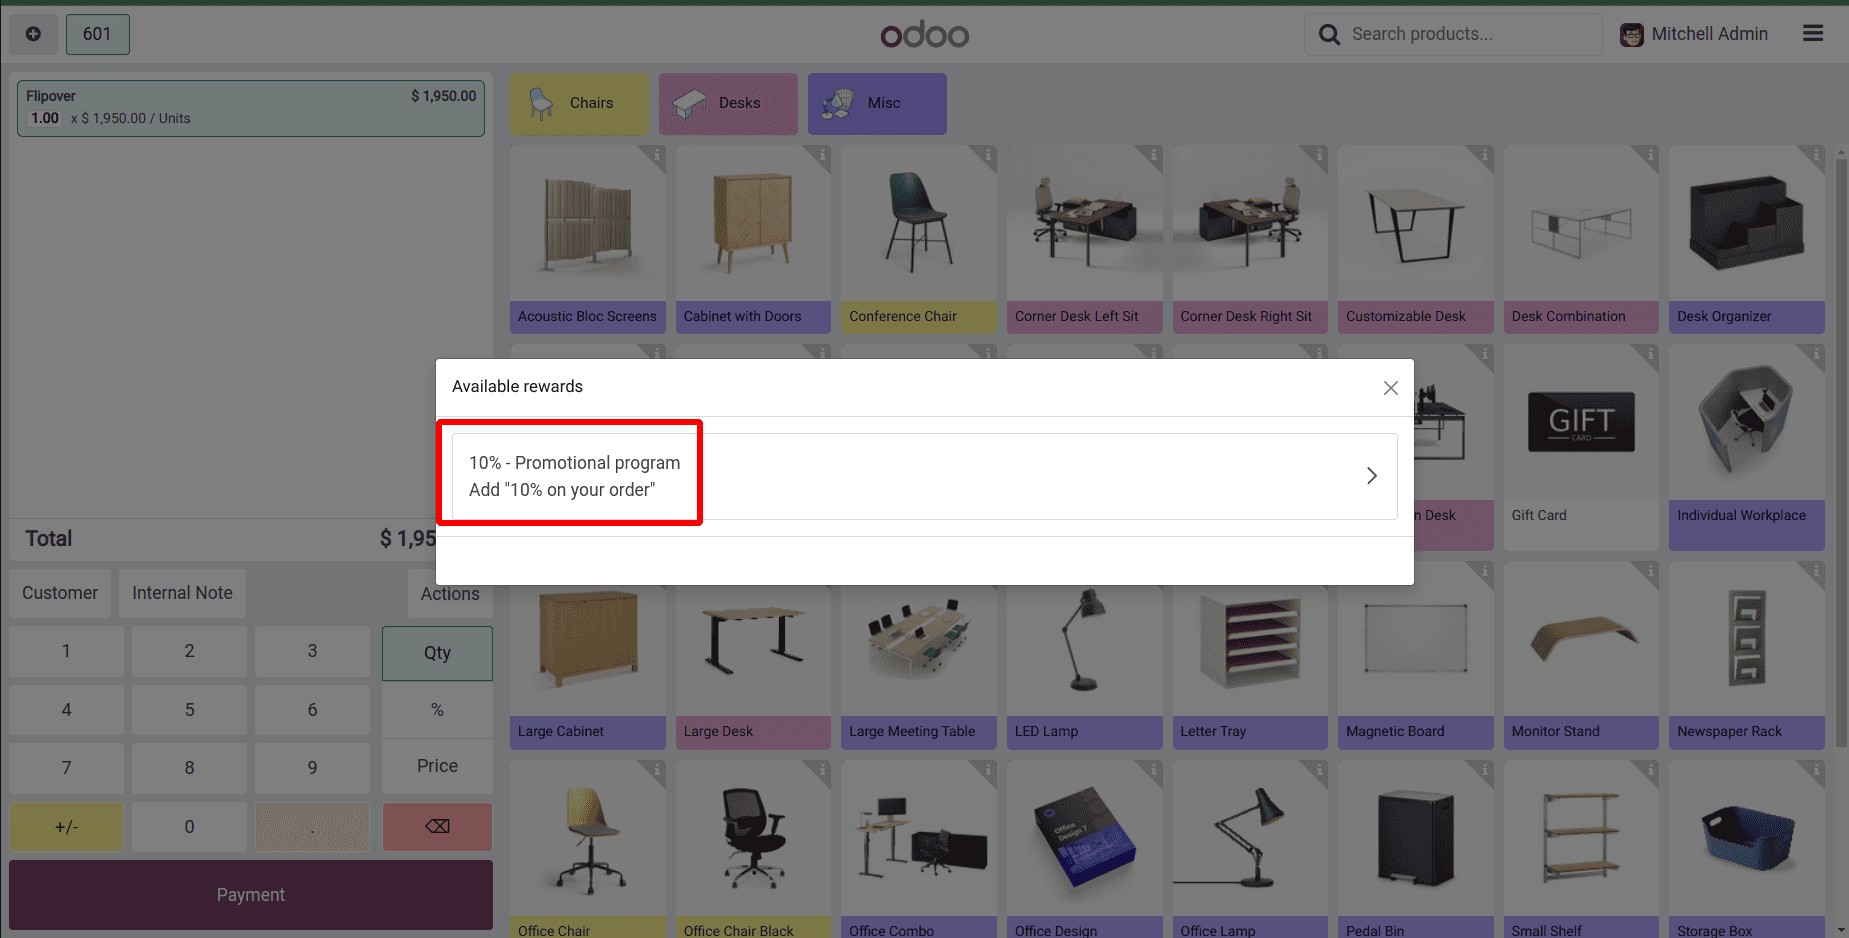
When you click the Reward button, another popup will appear displaying the available Promotion Program(s) that match the selected product and rules—allowing you to choose and apply the desired promotion.
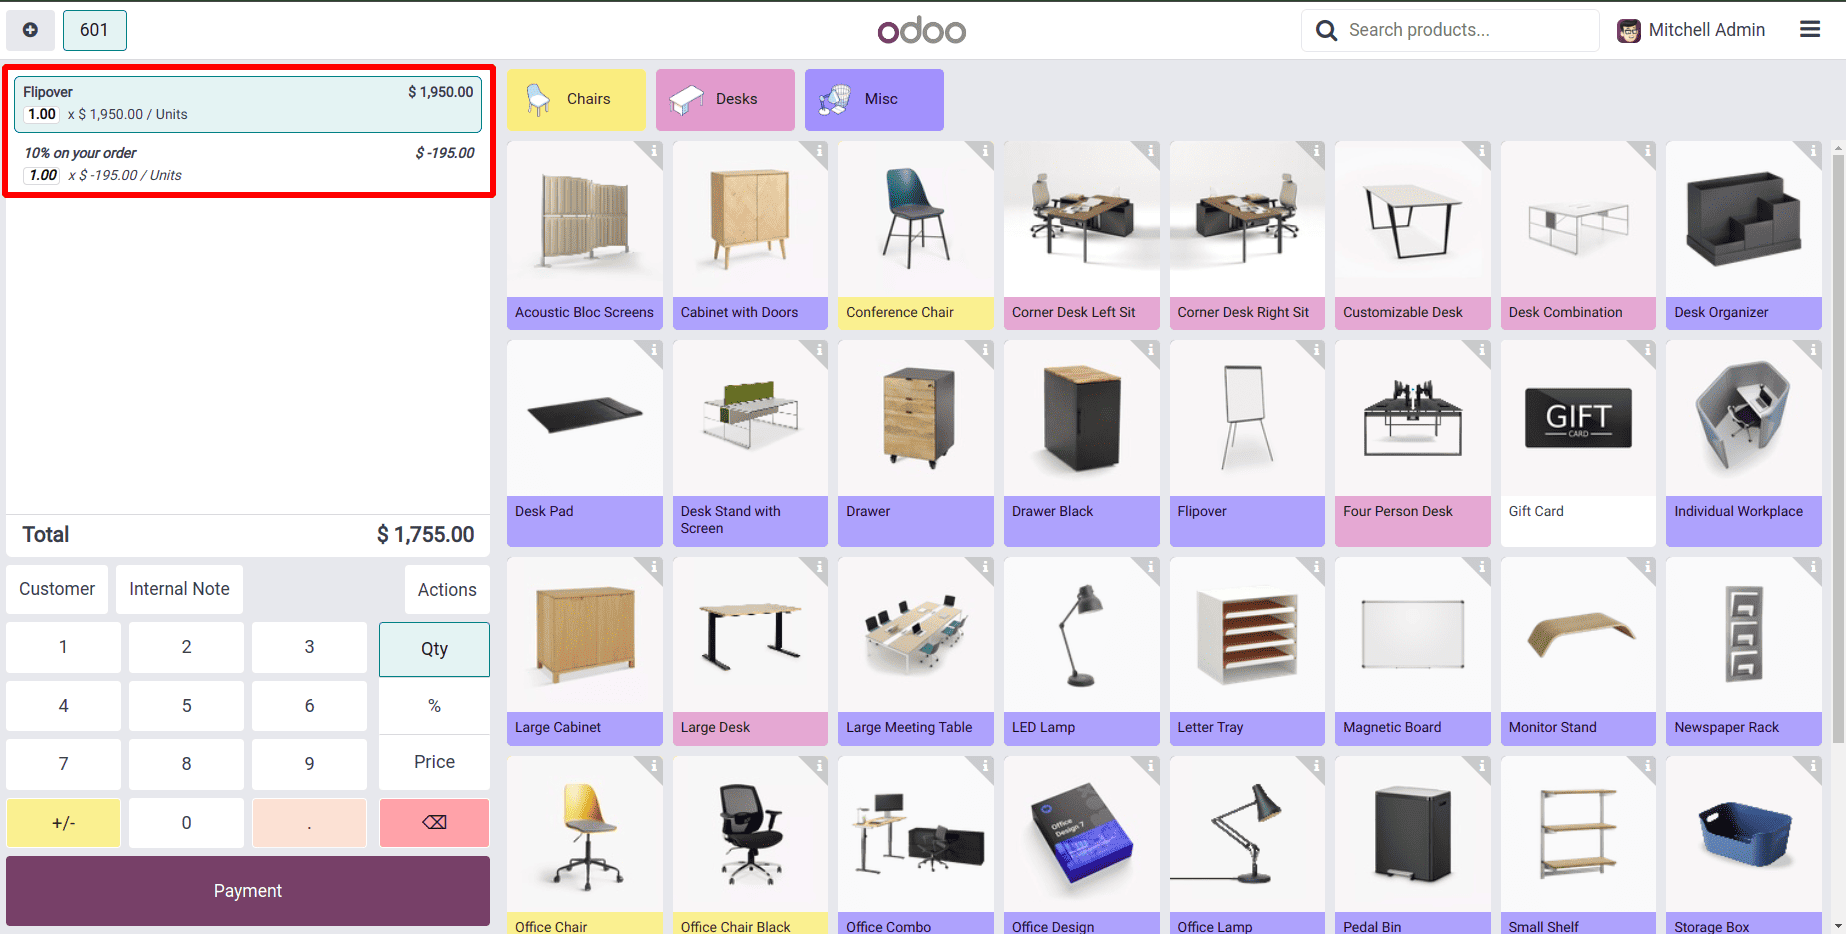
When you click on the selected Promotion Program in the popup, the promotion is immediately applied, and you can see the discount reflected on the PoS interface.
Buy X Get Y :
"Buy X Get Y" is a flexible promotional approach used to encourage customers to buy more by providing them with an additional product. To set this up, first select the program type as Buy X Get Y, and then define the necessary conditions.
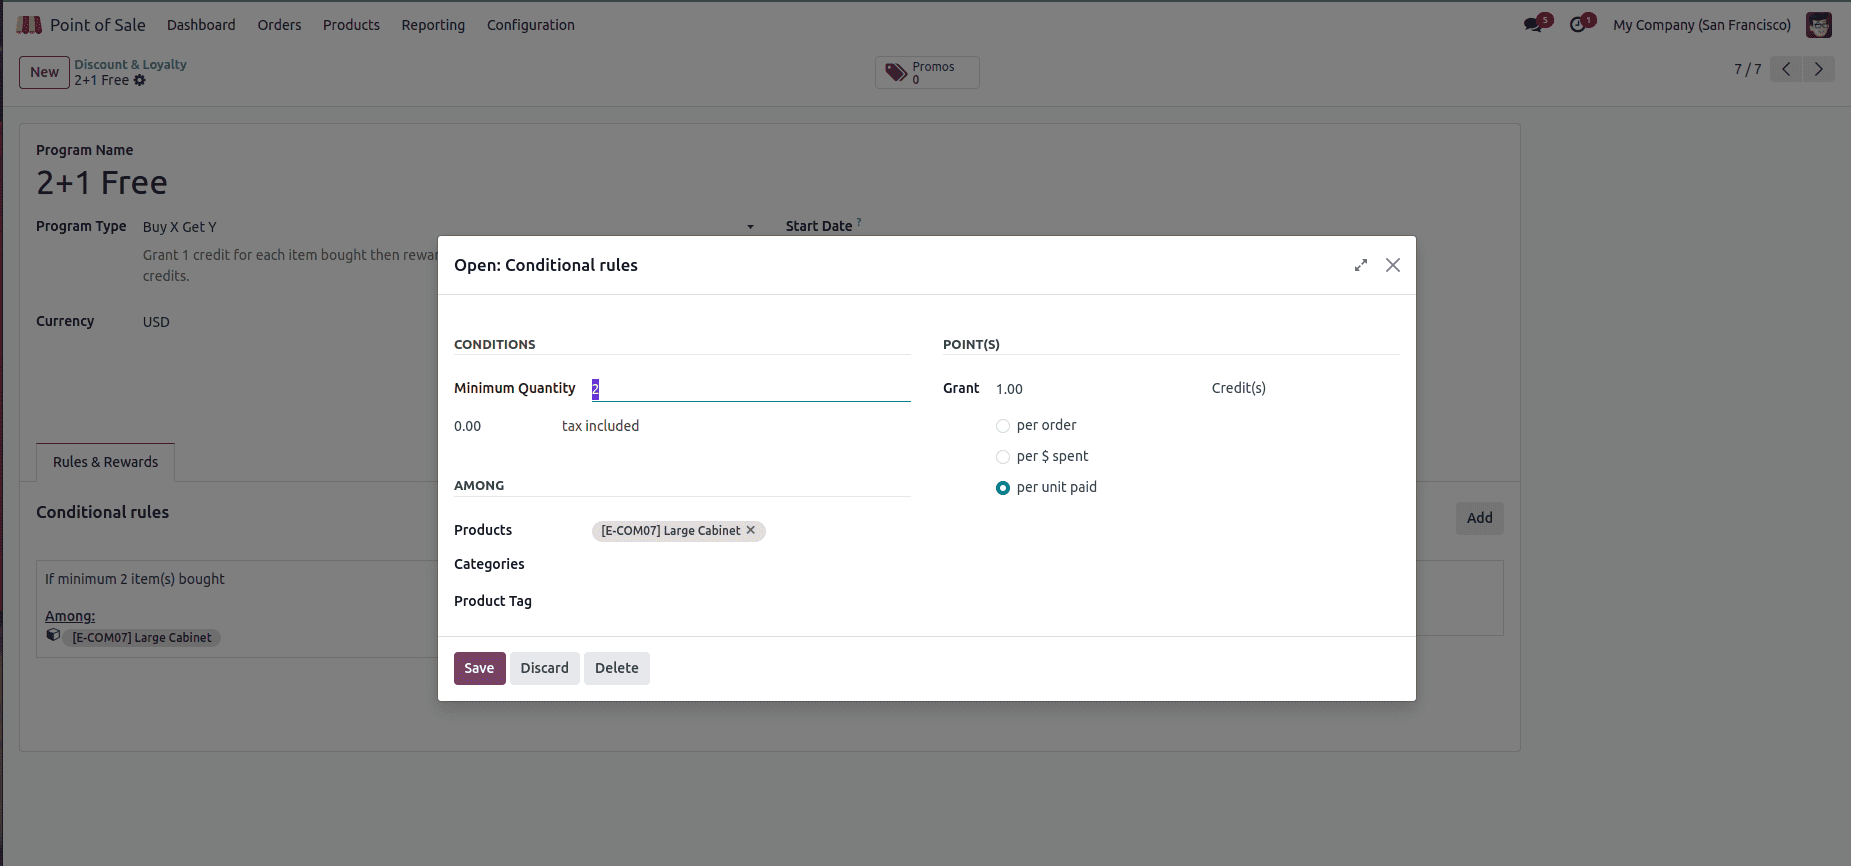
In this case, the rule specifies that one credit will be granted for each unit purchased when at least two large cabinets are bought. The next step is to configure the reward.

In this scenario, Odu automatically selects the reward type as a free product. According to the rule, one free item is granted in exchange for 2 credit points.

When the product Large Cabinet is selected in the PoS interface, a popup appears showing the applicable Buy X Get Y promotion program available for that product.
Next Order Coupon
In the Next Order Coupon program, the customer can apply the reward earned from their initial purchase to a future order. To configure this, select the program type as Next Order Coupon and define the necessary conditions for the program.
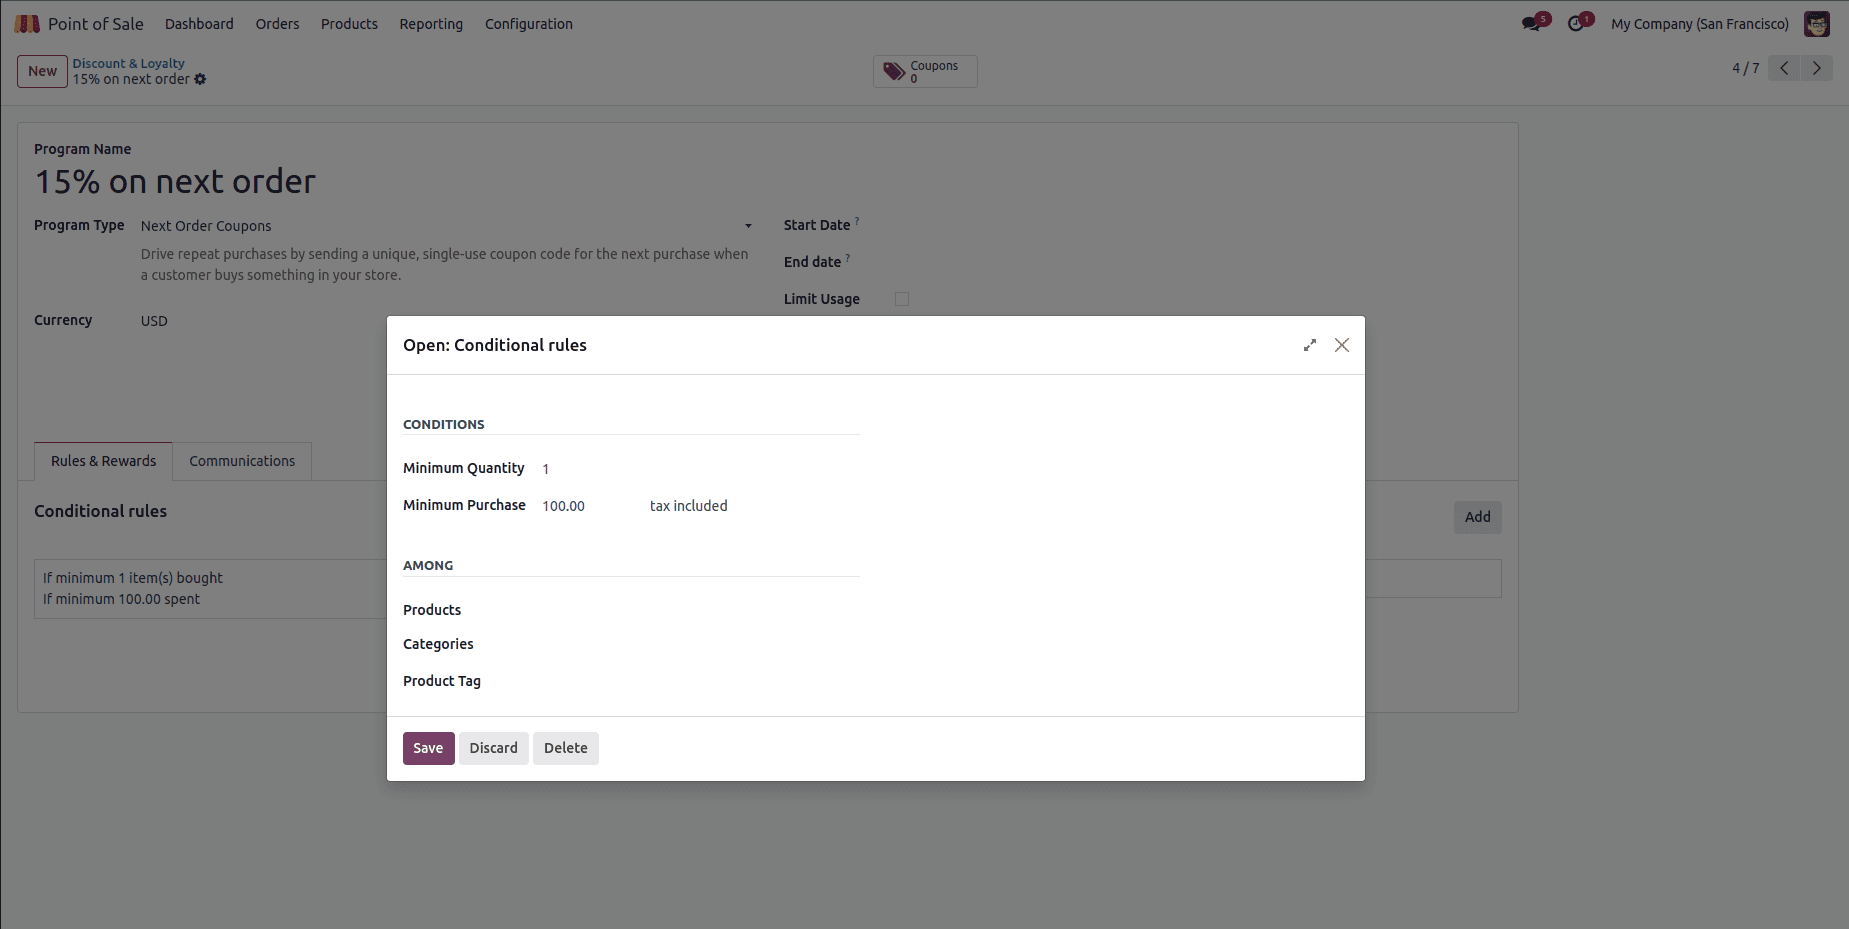
The condition for this program requires the customer to purchase at least one item, with the order totaling a minimum of $100. After setting this rule, the next step is to define the reward by clicking the Add button in the Rewards section.

The reward is configured as a 15% discount on a selected product within the order. The specific discounted products can be added in the designated field. After the reward is created, the customer will be able to apply it to their next purchase.
Loyalty Cards
Each time a customer places an order, they earn points that can be redeemed for rewards on either the current or a future purchase. The initial steps for setting up the loyalty card are similar to those used for the coupon program type. After that, navigate to the Rules and Rewards section and click the Add button to define the condition.

Under Conditions, the rule specifies that if a minimum quantity of 1 item is purchased—specifically the product [E-COM10] Pedal Bin—loyalty points will be granted.
On the right side under Points, the system is configured to grant 10 loyalty points per $1 spent on the eligible product.
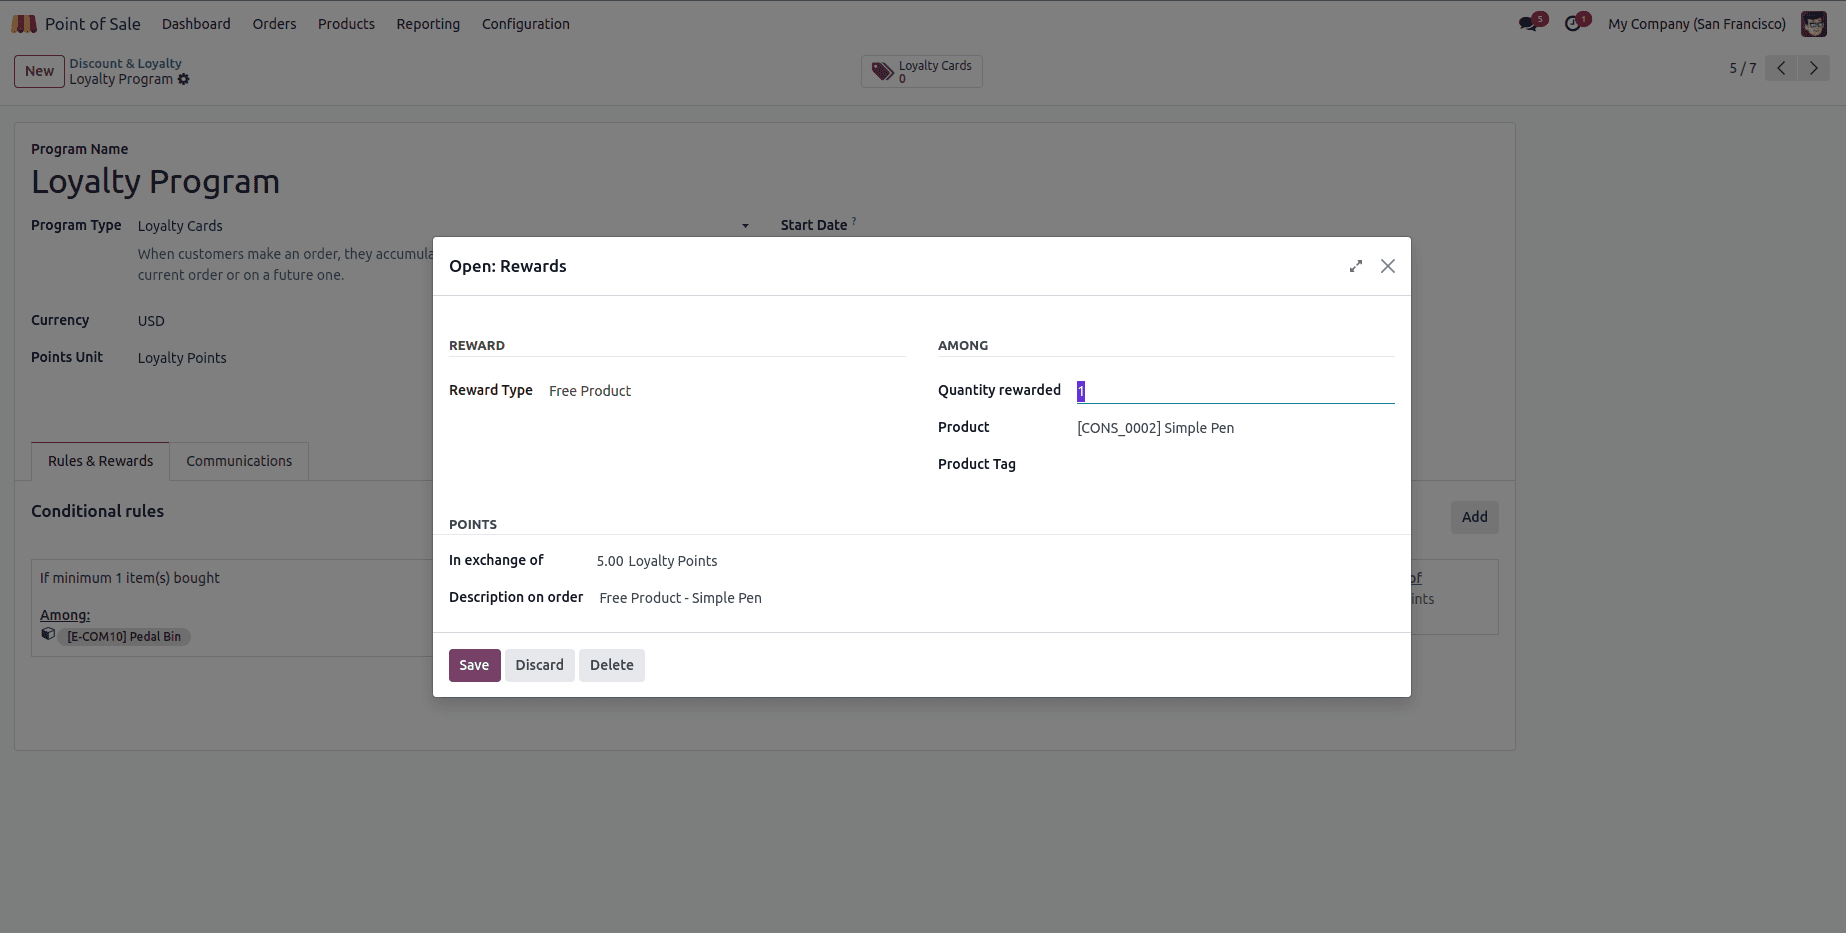
In this reward configuration window, a Free Product reward is being defined as part of the Loyalty Program. Under Reward Type, the option Free Product is selected. The customer will receive 1 quantity of the product [CONS_0002] Simple Pen. This reward is granted in exchange for 5.00 loyalty points, which the customer earns through qualifying purchases.
So, in Odoo 18, there are various types of customer support and business growth programs. These include Coupons, Discount Codes, Promotions, Loyalty Cards, Buy X Get Y, and Next Order Coupons. Each program is designed to encourage customers to make more purchases, helping to increase sales and boost overall company profits.
To read more about How to Manage Loyalty Programs in Odoo 17 POS, refer to our blog How to Manage Loyalty Programs in Odoo 17 POS.