Offering excellent after-sales service goes hand in hand with making the initial sale in today's customer-centric business environment. A properly managed after-sales process facilitates building trust, improving customer retention, and boosting brand loyalty.
Odoo 18 Helpdesk allows managing customer complaints, returns, repairs, or any other service-related requests from one place. In this blog, let's walk through the configuration of after-sales services in Odoo 18 Helpdesk and demonstrate how it makes customer support operations easier.
Why Enable After-Sales Services?
After-sales services help you:
- Seamlessly handle customer support beyond the initial sale - for instance, handle returns, repairs, and refunds from the very same ticket environment.
- Keep full traceability of customer interactions, product issues, and follow-up tasks, since everything links back to the ticket.
- Empower your service/support teams to handle more than just “issue resolution” – they can generate coupons, schedule field visits or process credit notes without switching apps.
- Improve customer satisfaction and retention by solving after-sales issues more quickly and professionally. You bridge the gap between product-sale and product-service with Odoo Helpdesk’s after-sales features.
Prerequisites & Considerations
Before you begin to configure After-Sales services, remember:
- Some of the after-sales features, namely returns, repairs and field service, do depend upon other Odoo applications, namely Inventory/Warehouse, Repairs, Field Service, Accounting. Enabling them may install additional modules.
- Make sure relevant modules are installed and configured. For instance, if you want to use returns, make sure that deliveries and warehouses are set up.
- Ensure proper user access rights across the apps, such as Helpdesk, Repairs, Inventory, etc., so that this team handles such operations.
- Decide which Helpdesk team(s) will deliver after-sales services: you may not want all teams to offer all options. For example, perhaps only some of the teams will handle repairs.
Best Practices & Tips
- Define clear team roles: Ensure the Helpdesk team members are trained and authorised to manage refunds/returns/repairs. Coordinate with Inventory, Accounting, and Field Service teams.
- Link data flows: In cases of returns and repairs, make sure the original Sale Order / Delivery is correctly recorded so that the “Return” button shows up.
- Use smart buttons: Encourage agents to click the smart buttons (Credit Notes, Coupons, Returns, Repairs, Tasks) to review linked documents and maintain traceability.
- Warranty tracking: Use the “Under Warranty” checkbox in the Repair Reference for zero-price services when applicable.
- Customize your service mix by team: For example, one Helpdesk team might only handle refunds & coupons, while another handles returns and repairs. This avoids confusing agents with unused options.
- Portal access: Customers who have portal access are able to track repair or field-service tasks in the same portal interface.
- Monitor metrics: Track key metrics on after-sales through the reporting and analytics features available in Helpdesk. This would include the number of returns, repair lead-time, voucher usage, etc., to improve service quality.
Step-by-Step: Configure After-Sales Services
Here’s how you enable and configure after-sales on a Helpdesk team:
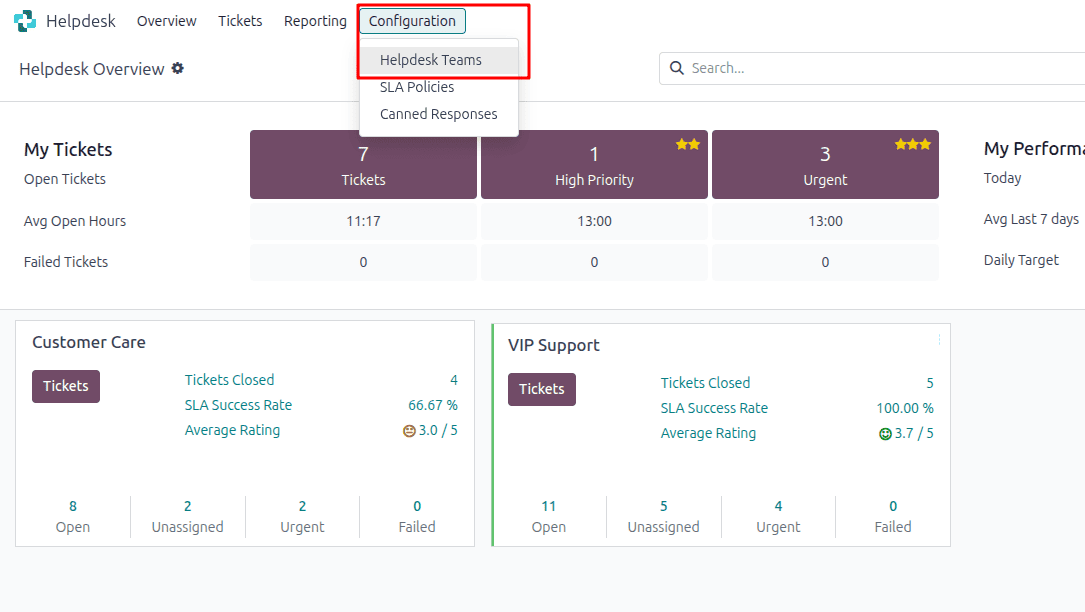
Step 1: Access the Helpdesk Team Settings
- Navigate to: Helpdesk > Configuration > Helpdesk Teams
- Select the team for which you want to enable after-sales service, or click New to create one.
- Scroll down to the “After-Sales” section of the team settings.
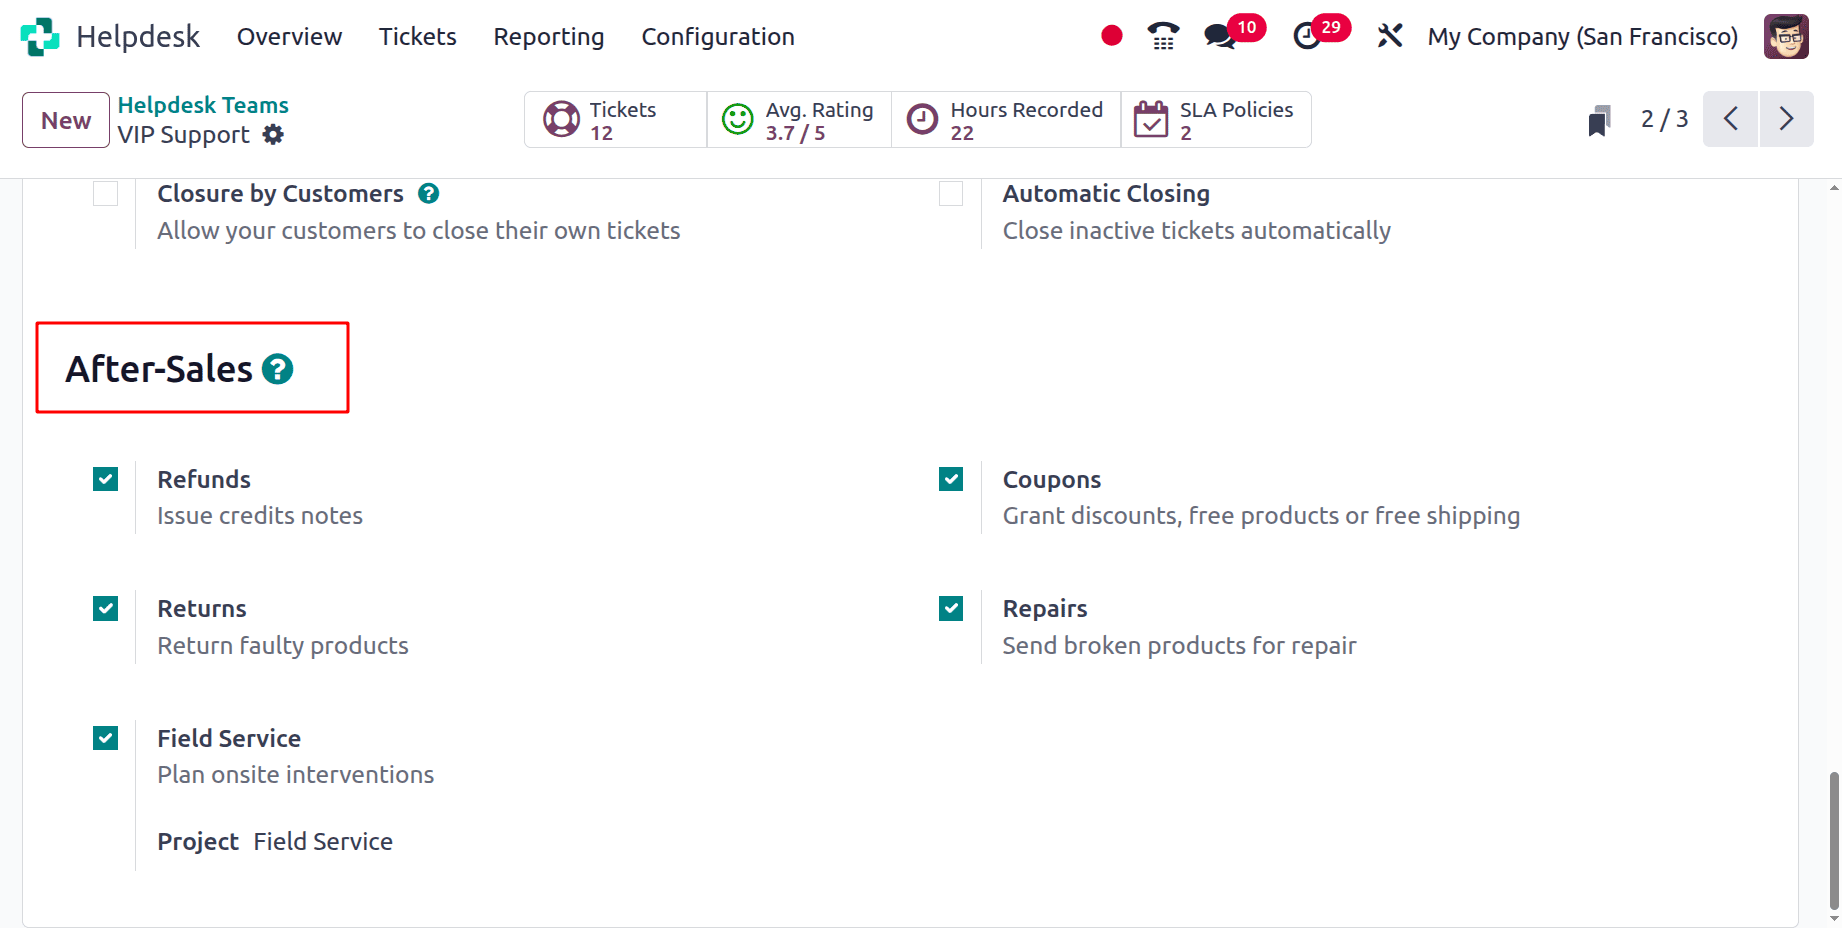
Step 2: Enable the After-Sales Options
In the After-Sales section, select which of the following you want to enable:
- Refunds – This allows the issuance of credit notes to customers or the adjustment of remaining amounts.
- Coupons – Provide discount or free product coupons to customers as part of support.
- Returns – Initiate product returns by means of reverse warehouse operations.
- Repairs – create repair orders from the ticket via the Repairs app.
- Field Service – schedule on-site interventions via the Field Service App.
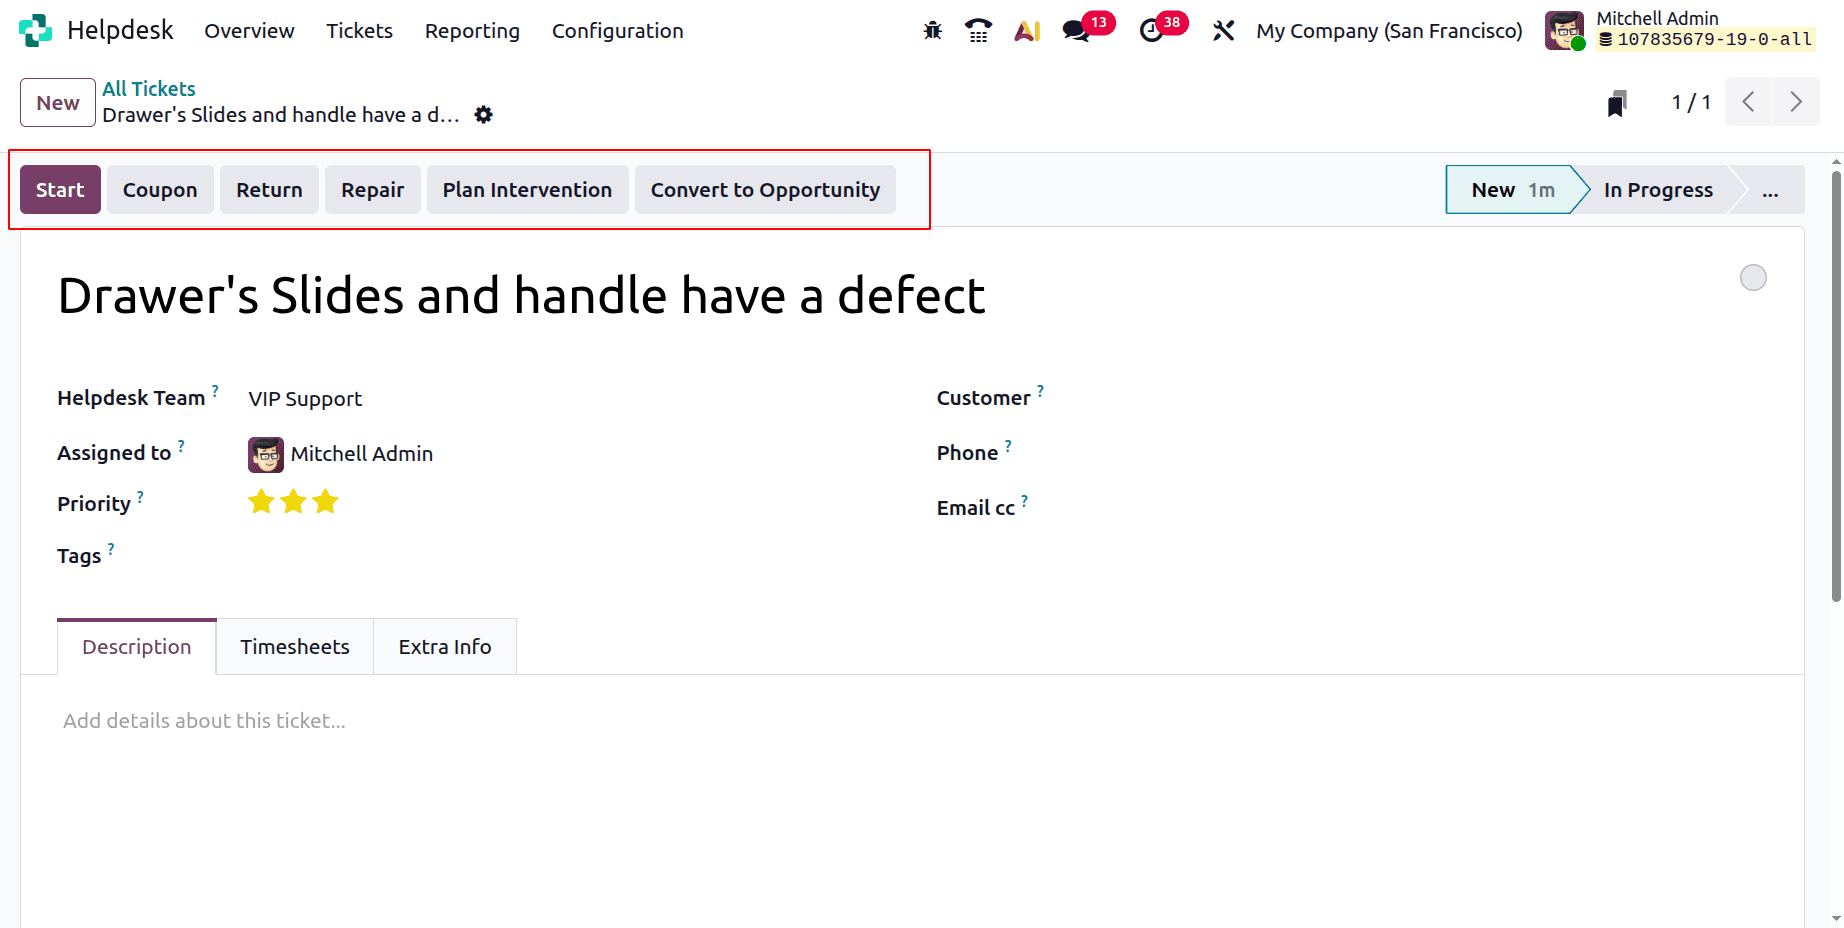
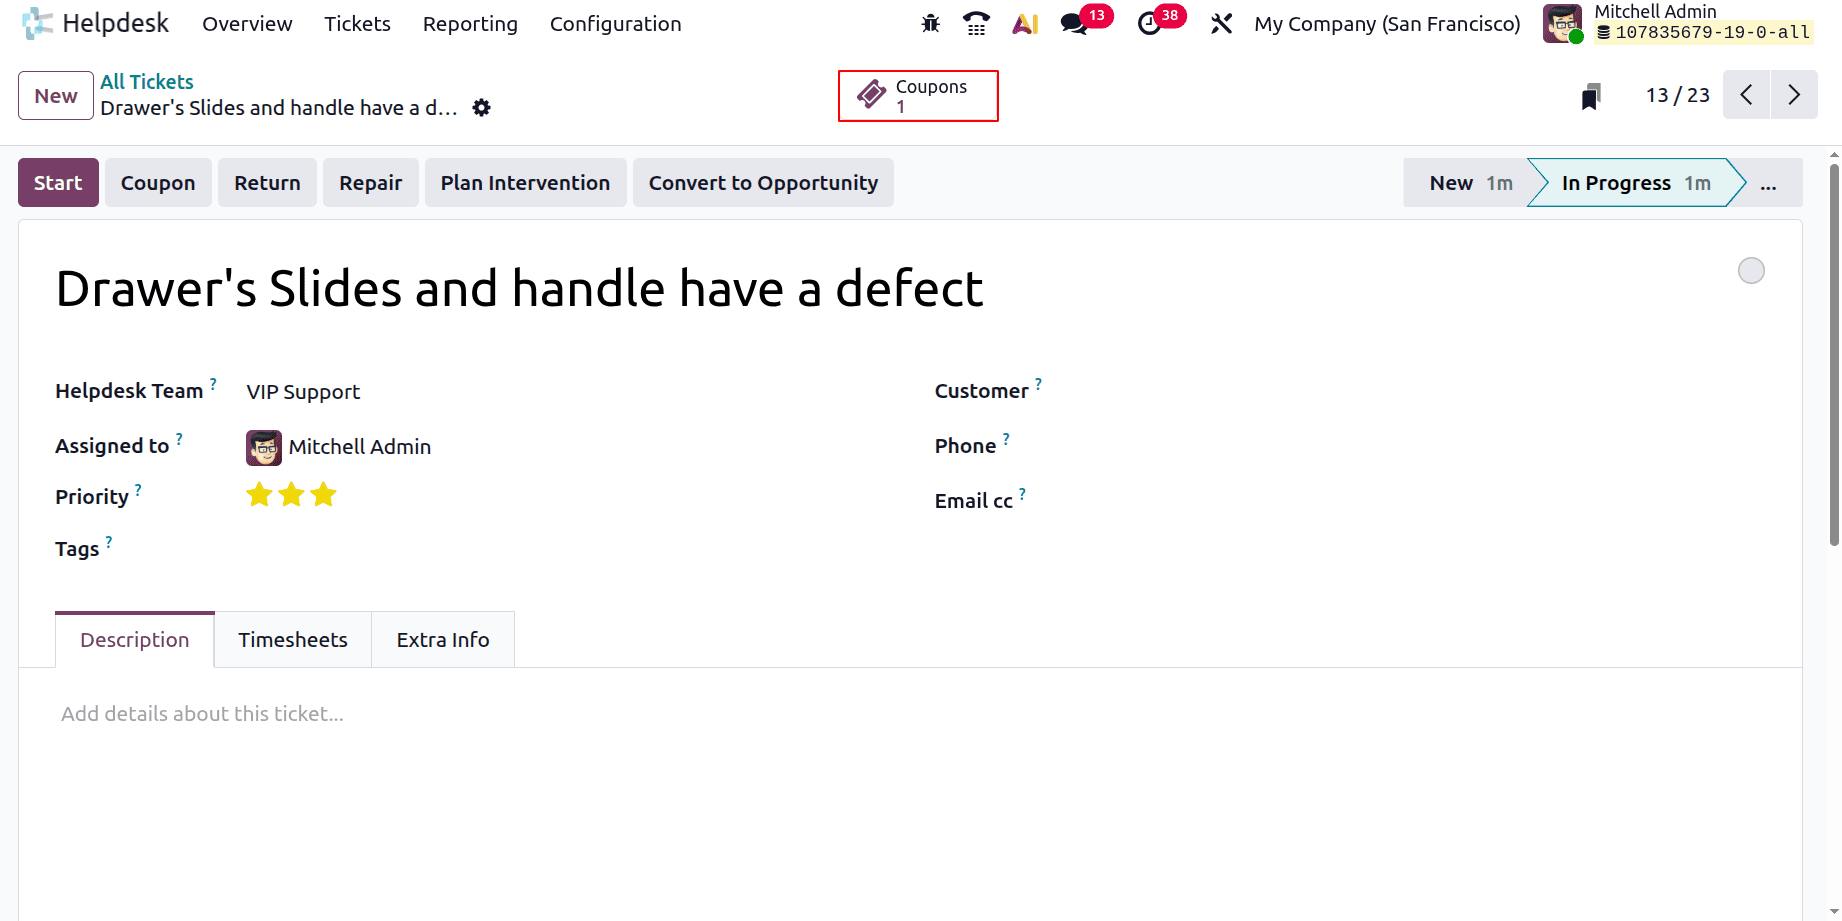
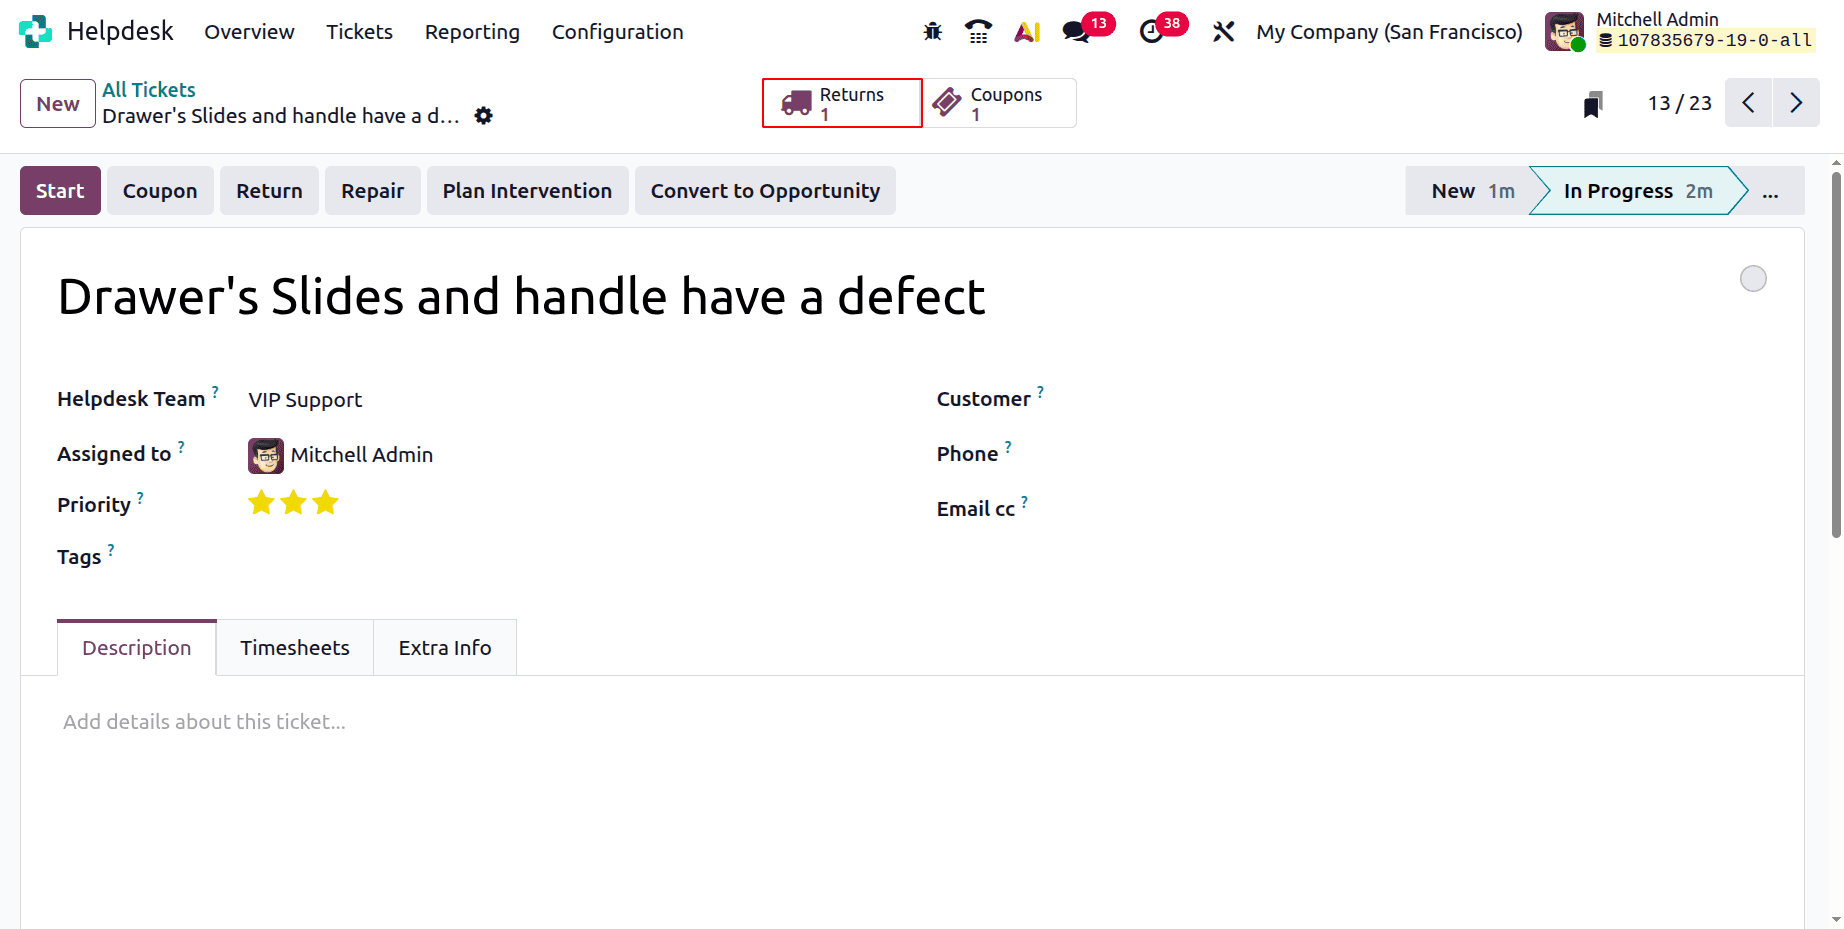
Using After-Sales Features from a Ticket
Once set up, the support agent can access after-sales actions directly from the ticket. The following are the main options:
1. Issue a Refund (Credit Note)
- On the top-left of a ticket form, a Refund button appears.
- A pop-up opens where you select fields: Sales Order (if applicable), Product, Lot/Serial (if applicable), Invoices to Refund, Reason, Journal and Reversal Date.
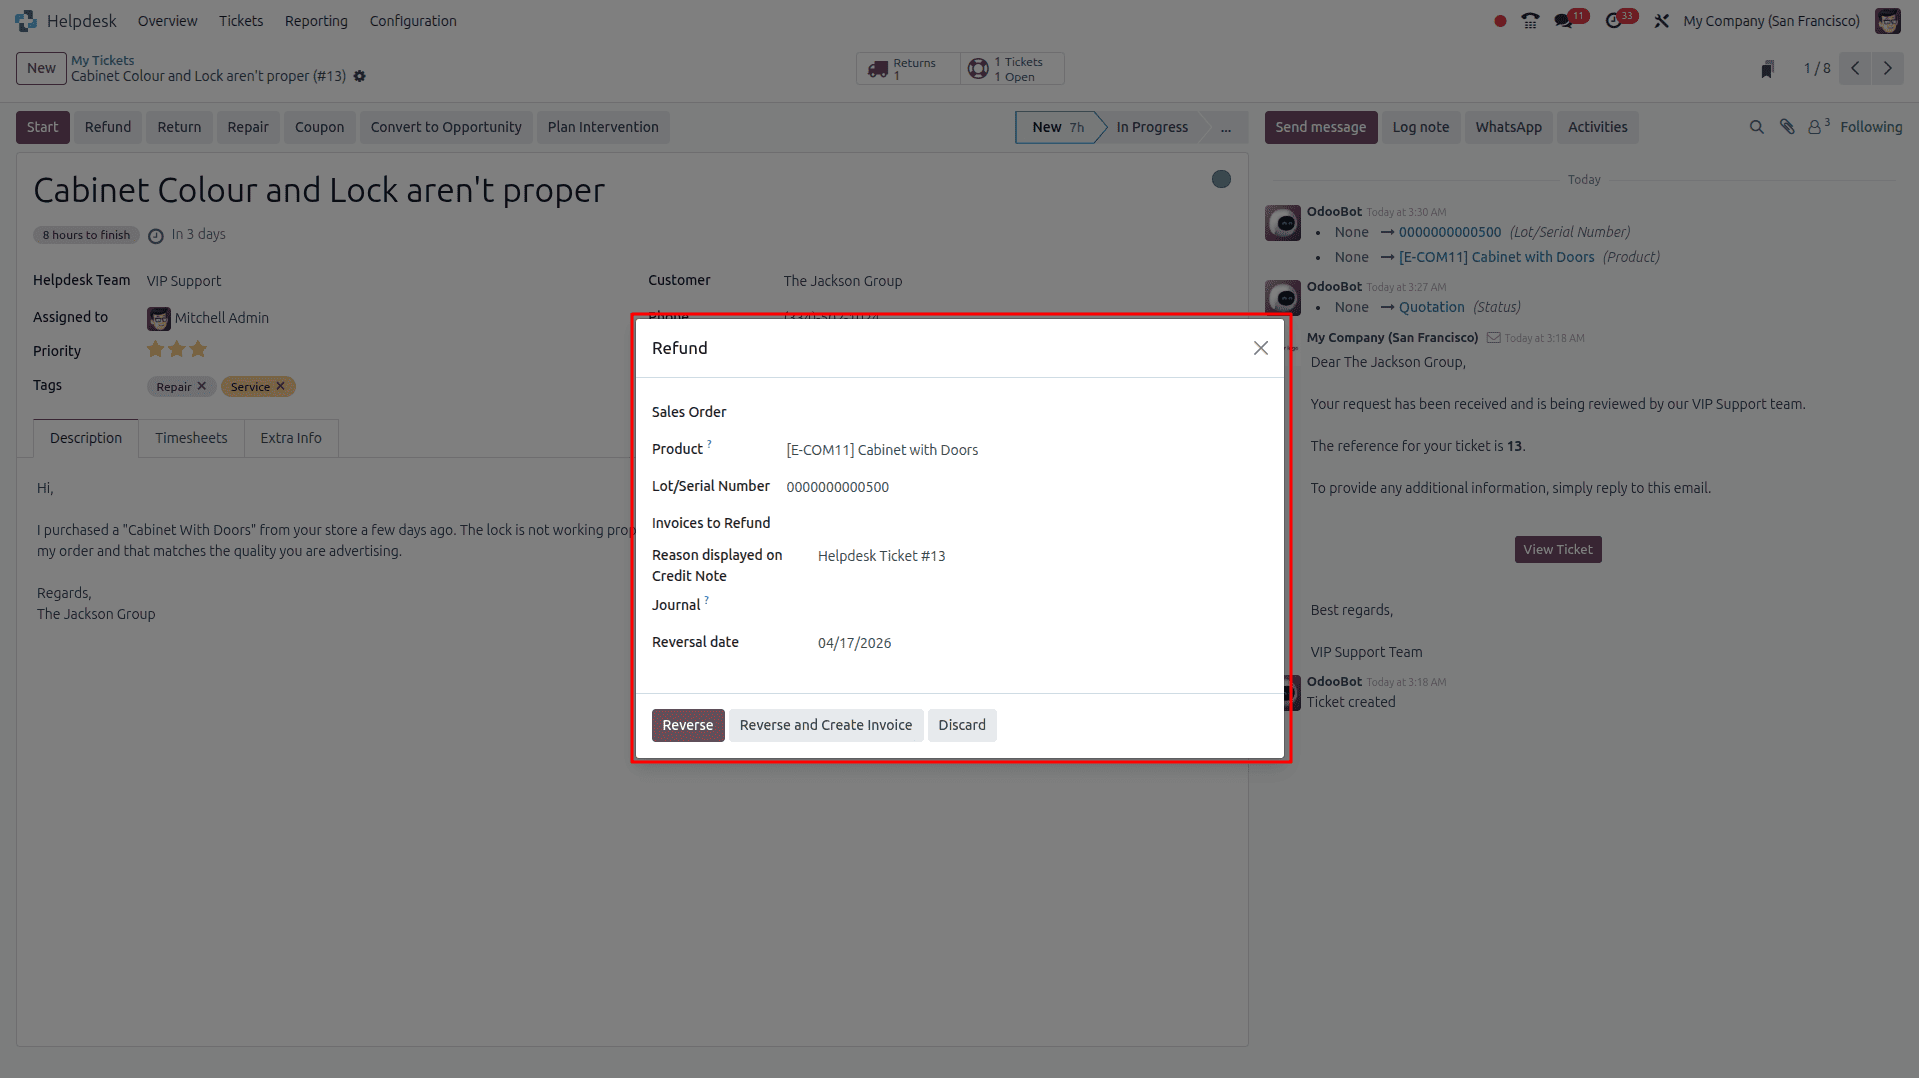
- You have two choices here: Reverse, which allows edits and creates a draft credit note, or Reverse and Create Invoice, which auto-posts the credit note and a new draft invoice.
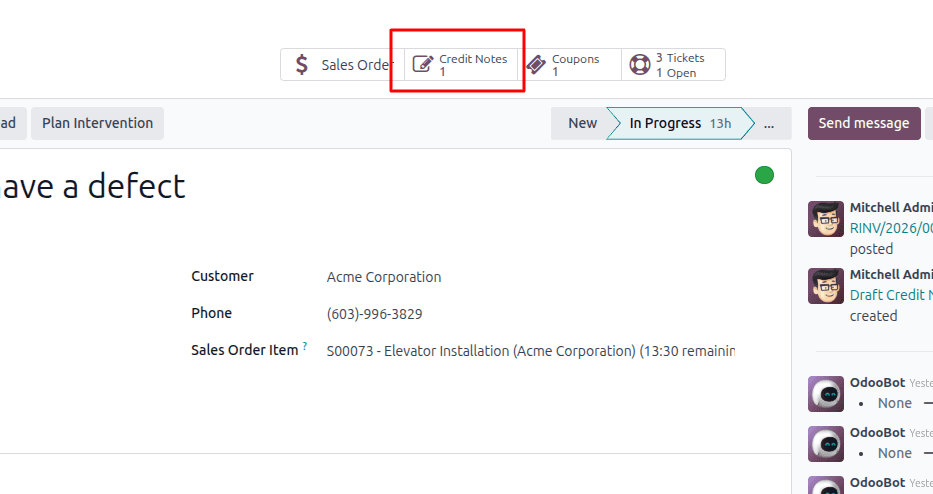
- Once posted, a Credit Notes smart button will appear on the ticket to link the credit note.
2. Generate Coupons
- From the ticket, click the Coupon button.
- Choose a Coupon Program from the dropdown. Make sure you have created such a program in Sales / Website or POS with Program Type = Coupons
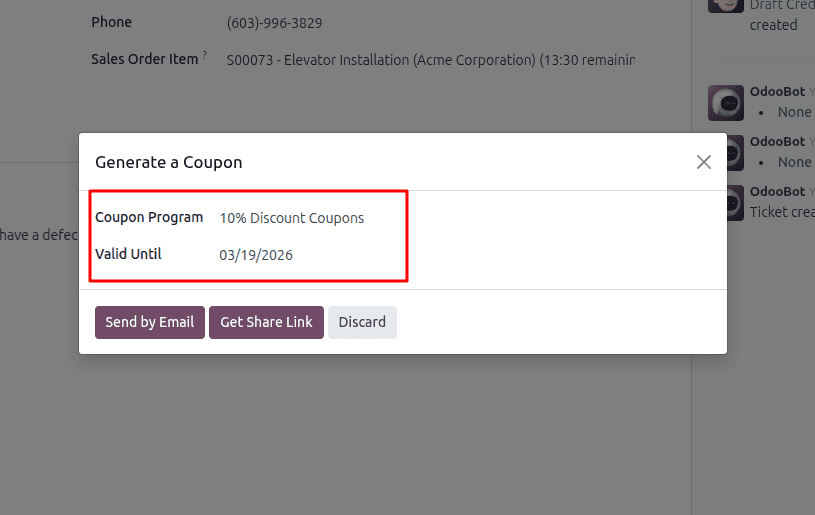
- Set a “Valid Until” expiry date, if required. Click Send by Email or Get Share Link to issue it to the customer.
- A smart button for Coupons will appear on the ticket after generation for tracking.
3 Return Products
- Click the Return button on the ticket - only appears if there's a delivery recorded in the system.
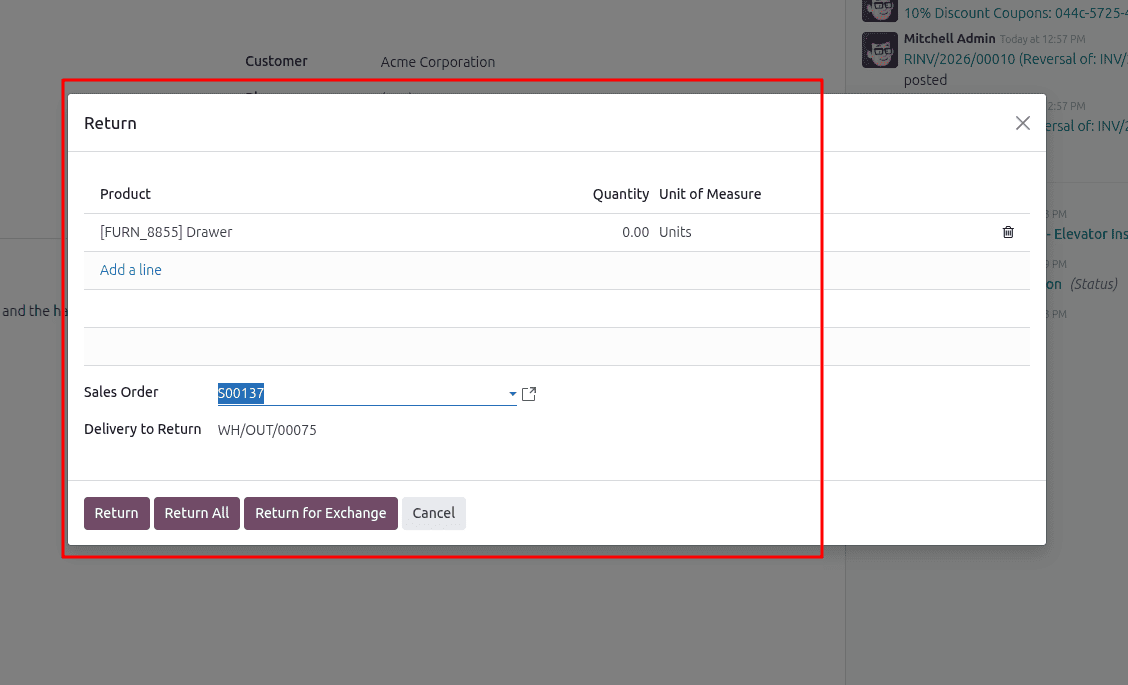
- In the pop-up: choose the Sales Order/Delivery from which to return; adjust quantities (default is validated delivery quantity); choose the Return Location.
- Click Return for the basic return or Return for Exchange to deliver a replacement. This will create a reverse warehouse operation.
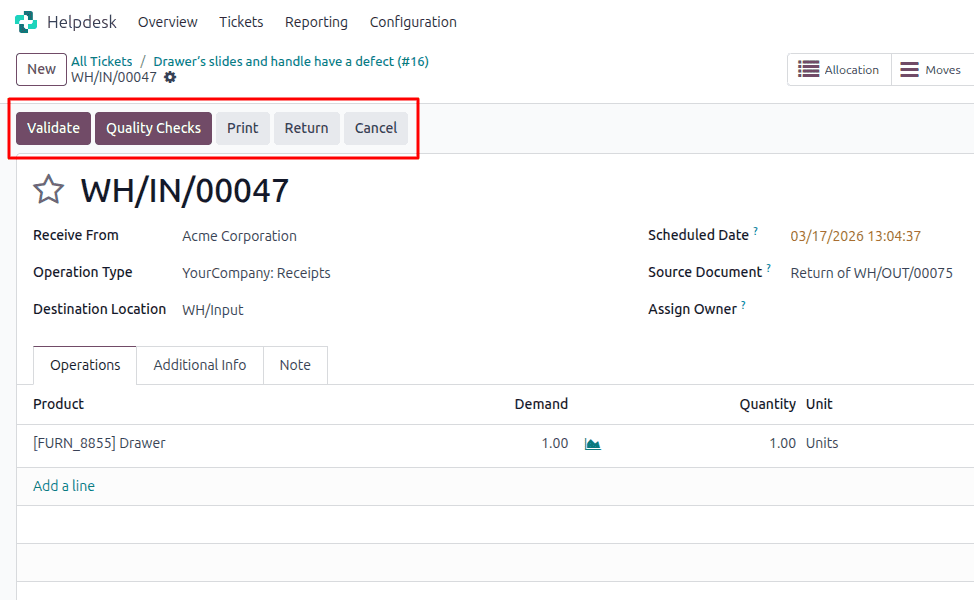
- Once completed, the current screen will be displayed, where you can proceed by clicking the Validate button.
- Once processed, a Returns smart button will appear on the ticket.
4 Send Products for Repair
- Click the Repair button on the ticket.
- Populate the Repair Reference: Customer (auto-populated), Product, Lot/Serial - if tracked, Return- if applicable, Under Warranty flag, Scheduled Date, Responsible user, and Tags.
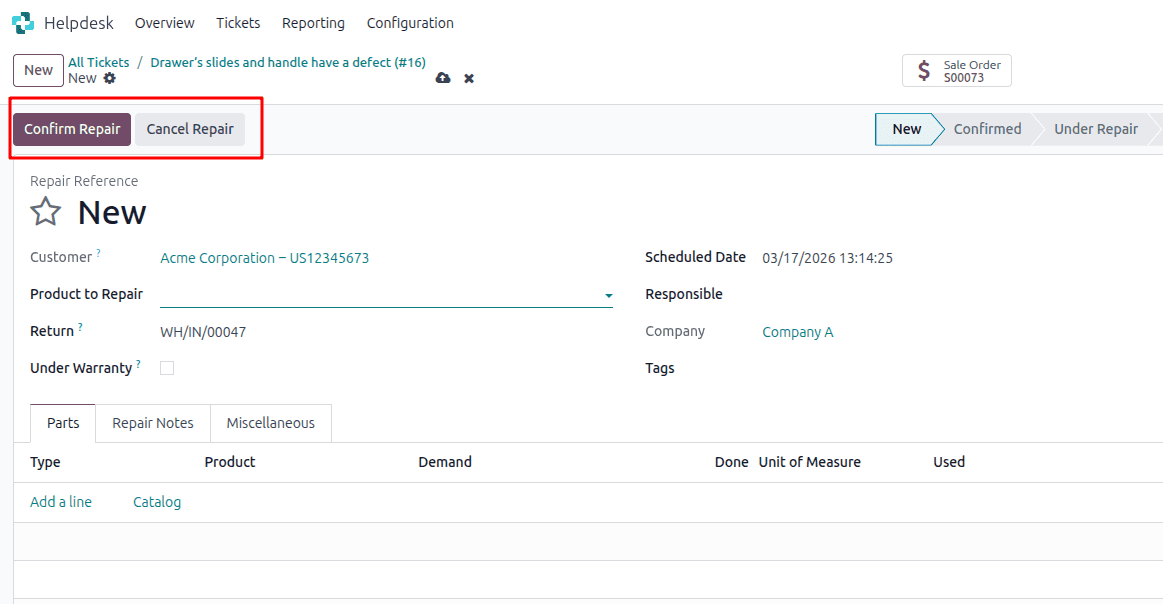
- Under the Parts tab, add required spare parts; under the Notes/Quotation tabs, add additional info.

- Click Confirm Repair > you can then Create a Quotation. Once done, a Repairs smart button appears on the ticket.
5 Field Service Tasks from Ticket
- On a ticket, click Plan Intervention to create a Field Service task.
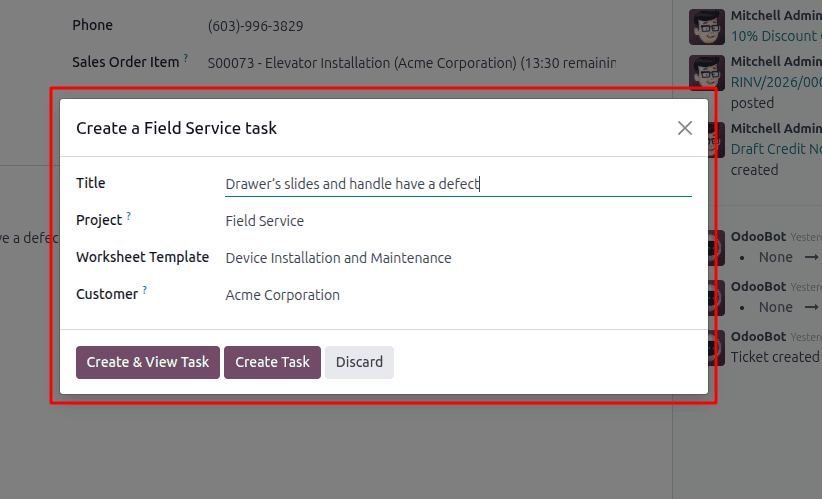
- Title defaults from ticket: Project defaults from the team’s setting - you can change. Optionally, choose a Worksheet Template if the assigned project has worksheets enabled.
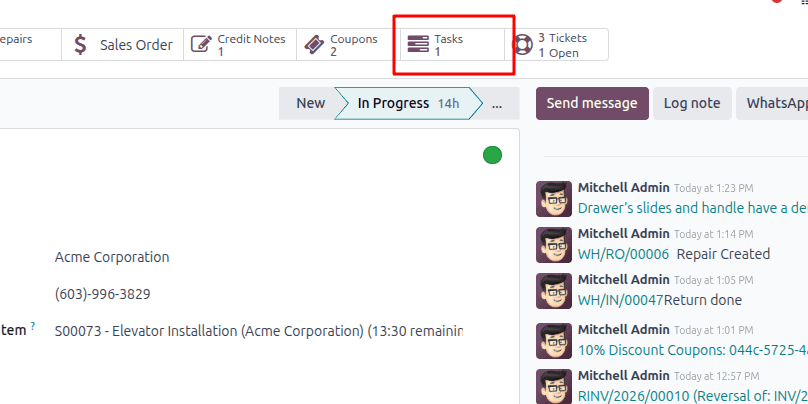
- Click Create Task or Create & View Task. A Tasks smart button is added to the ticket, linking the service task.
Setting up after-sales services within Odoo 18 Helpdesk transforms your support team from purely reactive to truly service-centric. Enabling refunds, coupons, returns, repairs, and field interventions right within the ticketing workflow gives your team the ability to provide an unparalleled post-sale experience. Train your team using the above-mentioned steps, then enable these features to measure success via service metrics. Your customers will thank you, and your business will benefit from stronger retention and fewer manual handoffs.
To read more about How to Configure Your Help Desk in Odoo 18, refer to our blog How to Configure Your Help Desk in Odoo 18.