Shimmer animation is a visual effect that mimics the appearance of a shimmering or sparkling light on a surface. It's often used to indicate loading or to draw attention to certain elements on a screen. The animation involves smoothly transitioning the brightness or opacity of a UI component.
This article will show how to create a shimmer animation in Flutter.
Before we move on to the coding process, we need to start a new project and channel in Flutter. To create a new Flutter project, please follow the steps below: Go to “File” -> “New” -> “New Flutter Project”.
After creating the project, a channel must be created. Create the device by selecting "Create Device" in the left window. Commence by establishing a variable symbol and import the required items as follows:
import 'package:flutter/material.dart';
import 'package:shimmer_animation/shimmer_animation.dart';
Create a new class that extends StatelessWidget
class FullPageShimmer extends StatelessWidget {
  @override
  Widget build(BuildContext context) {
    return MaterialApp(
      home: ShimmerPage(),
    );
  }
}
Inside StatelessWidget the MaterialApp widget is returned. This widget is the root of the Flutter widget tree and is typically used to set up the basic structure of a Material Design app. home: ShimmerPage(): The home property of MaterialApp is set to an instance of the ShimmerPage widget. This means that the ShimmerPage widget will be the main content of the app. home: ShimmerPage(): The home property of MaterialApp is set to an instance of the ShimmerPage widget. This means that the ShimmerPage widget will be the main content of the app.
class ShimmerPage extends StatelessWidget {
  @override
  Widget build(BuildContext context) {
    return Scaffold(
      body: Shimmer(
      ),
    );
  }
}
This defines a class called ShimmerPage that extends StatelessWidget. StatelessWidget is used when the user interface does not depend on state changes.
Design is a necessary process for every widget. Returns a widget tree that represents the widget's user interface.
Scaffolding is the backbone of application development. It provides a foundation for creating works of art using simple tools.
Adds child: Container() inside body: Shimmer() to add button and shimmer effect.
Code for add button in flutter body as below:
class ShimmerPage extends StatelessWidget {
@override
Widget build(BuildContext context) {
return Scaffold(
body: Shimmer(
child: Container(
child: Column(
mainAxisAlignment: MainAxisAlignment.center,
children: [
SizedBox(height: 20),
Row(
mainAxisAlignment: MainAxisAlignment.spaceEvenly,
children: [
ElevatedButton(
onPressed: () {
},
child: Text('Button 1'),
),
ElevatedButton(
onPressed: () {
},
child: Text('Button 2'),
),
],
),
SizedBox(height: 20),
Row(
mainAxisAlignment: MainAxisAlignment.spaceEvenly,
children: [
ElevatedButton(
onPressed: () {
},
child: Text('Button 3'),
),
ElevatedButton(
onPressed: () {
},
child: Text('Button 4'),
),
],
),
],
),
),
),
);
}
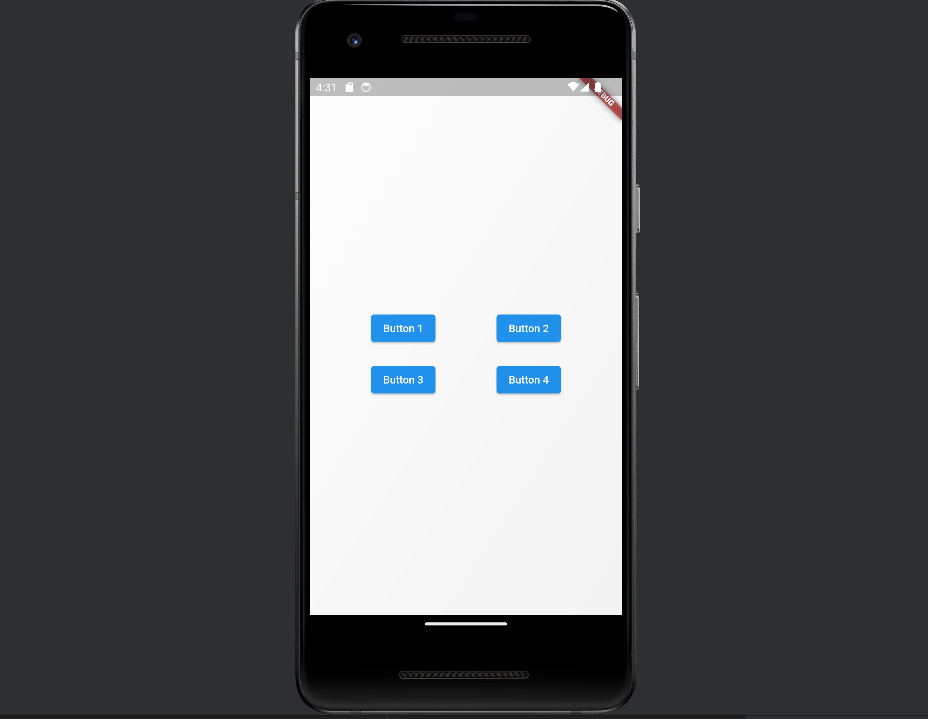
}The output of the code is given below:
To add a button in Flutter, just add the following code inside the children
ElevatedButton(
                    onPressed: () {
                    },
                    child: Text('Button 3'),
                  ),
You can also specify the direction of the button inside onPressed: () {}
Now add a Shimmer animation inside the body, For adding, follow the below given code:
class ShimmerPage extends StatelessWidget {
@override
Widget build(BuildContext context) {
return Scaffold(
body: Shimmer(
child: Container(
color: Colors.white,
),
duration: Duration(seconds: 3),
interval: Duration(seconds: 0),
color: Colors.black,
colorOpacity: 0.7,
),
);
}
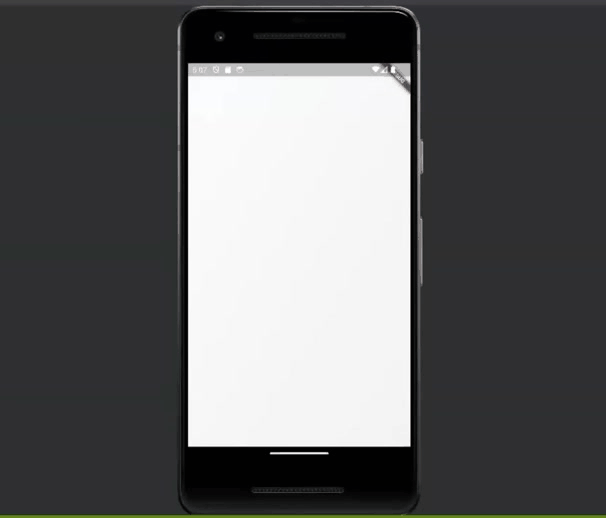
}Here you can set your custom duration, interval, color, and colorOpacity. The output of the code is given below:
The combined code is given below:
import 'package:flutter/material.dart';
import 'package:shimmer_animation/shimmer_animation.dart';
void main() {
  runApp(FullPageShimmer());
}
class FullPageShimmer extends StatelessWidget {
  @override
  Widget build(BuildContext context) {
    return MaterialApp(
      home: ShimmerPage(),
    );
  }
}
class ShimmerPage extends StatelessWidget {
  @override
  Widget build(BuildContext context) {
    return Scaffold(
      body: Shimmer(
        child: Container(
          color: Colors.white,
          child: Column(
            mainAxisAlignment: MainAxisAlignment.center,
            children: [
              SizedBox(height: 20),
              Row(
                mainAxisAlignment: MainAxisAlignment.spaceEvenly,
                children: [
                  ElevatedButton(
                    onPressed: () {
                    },
                    child: Text('Button 1'),
                  ),
                  ElevatedButton(
                    onPressed: () {
                    },
                    child: Text('Button 2'),
                  ),
                ],
              ),
              SizedBox(height: 20),
              Row(
                mainAxisAlignment: MainAxisAlignment.spaceEvenly,
                children: [
                  ElevatedButton(
                    onPressed: () {
                    },
                    child: Text('Button 3'),
                  ),
                  ElevatedButton(
                    onPressed: () {
                    },
                    child: Text('Button 4'),
                  ),
                ],
              ),
            ],
          ),
        ),
        duration: Duration(seconds: 3),
        interval: Duration(seconds: 0),
        color: Colors.black,
        colorOpacity: 0.7,
      ),
    );
  }
}
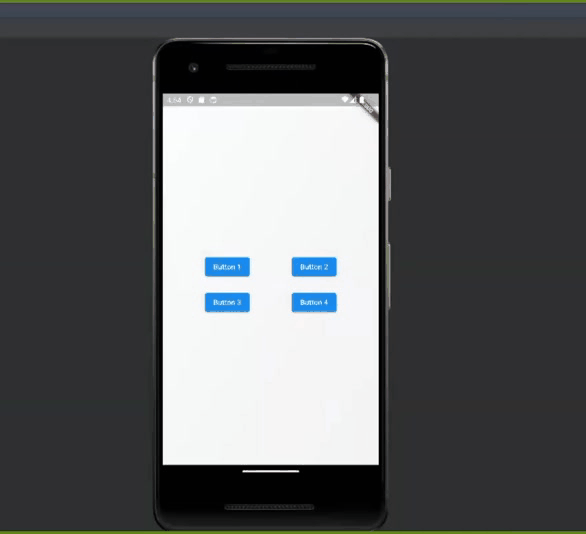
And the Output is given below:
In this blog, we discussed how to create a Flutter app with shimmer animation and buttons. The shimmer effect is used to indicate loading or draw attention to UI elements.
This blog serves as a starting point, and you can further enhance and customize the UI based on your application's requirements.
To read more about creating various animated toggles in Flutter, refer to our blog How to Create Various Animated Toggles in Flutter