To manage a company effectively, utilizing personalized software systems is essential. The Odoo platform offers tailored administrative solutions for specific needs, along with a user-friendly interface for developing applications, eliminating the complexities of backend operations. This platform facilitates the creation and customization of Odoo applications through intuitive drag-and-drop features and built-in tools. Moreover, the Odoo Studio module in the Enterprise edition allows for the creation and refinement of unique applications based on functional requirements, all on a low-code platform.
We'll delve into the functionalities of the "Views" and "Reports" menus accessible within the Odoo 17 Studio module. Within this module, we have the capability to customize various views such as Form views, Reporting Views, Timeline Views, and other record views. Additionally, the Odoo Studio module provides tools and features for customizing reports, allowing for the establishment of diverse business procedures.
This feature enhances operational management within the company by crafting personalized reports and refining data. Moreover, the Enterprise edition empowers users with low-code development capabilities, facilitating the creation of complex operational functions and thereby further optimizing company operations management.
Views and Customizing Views in Studio Module
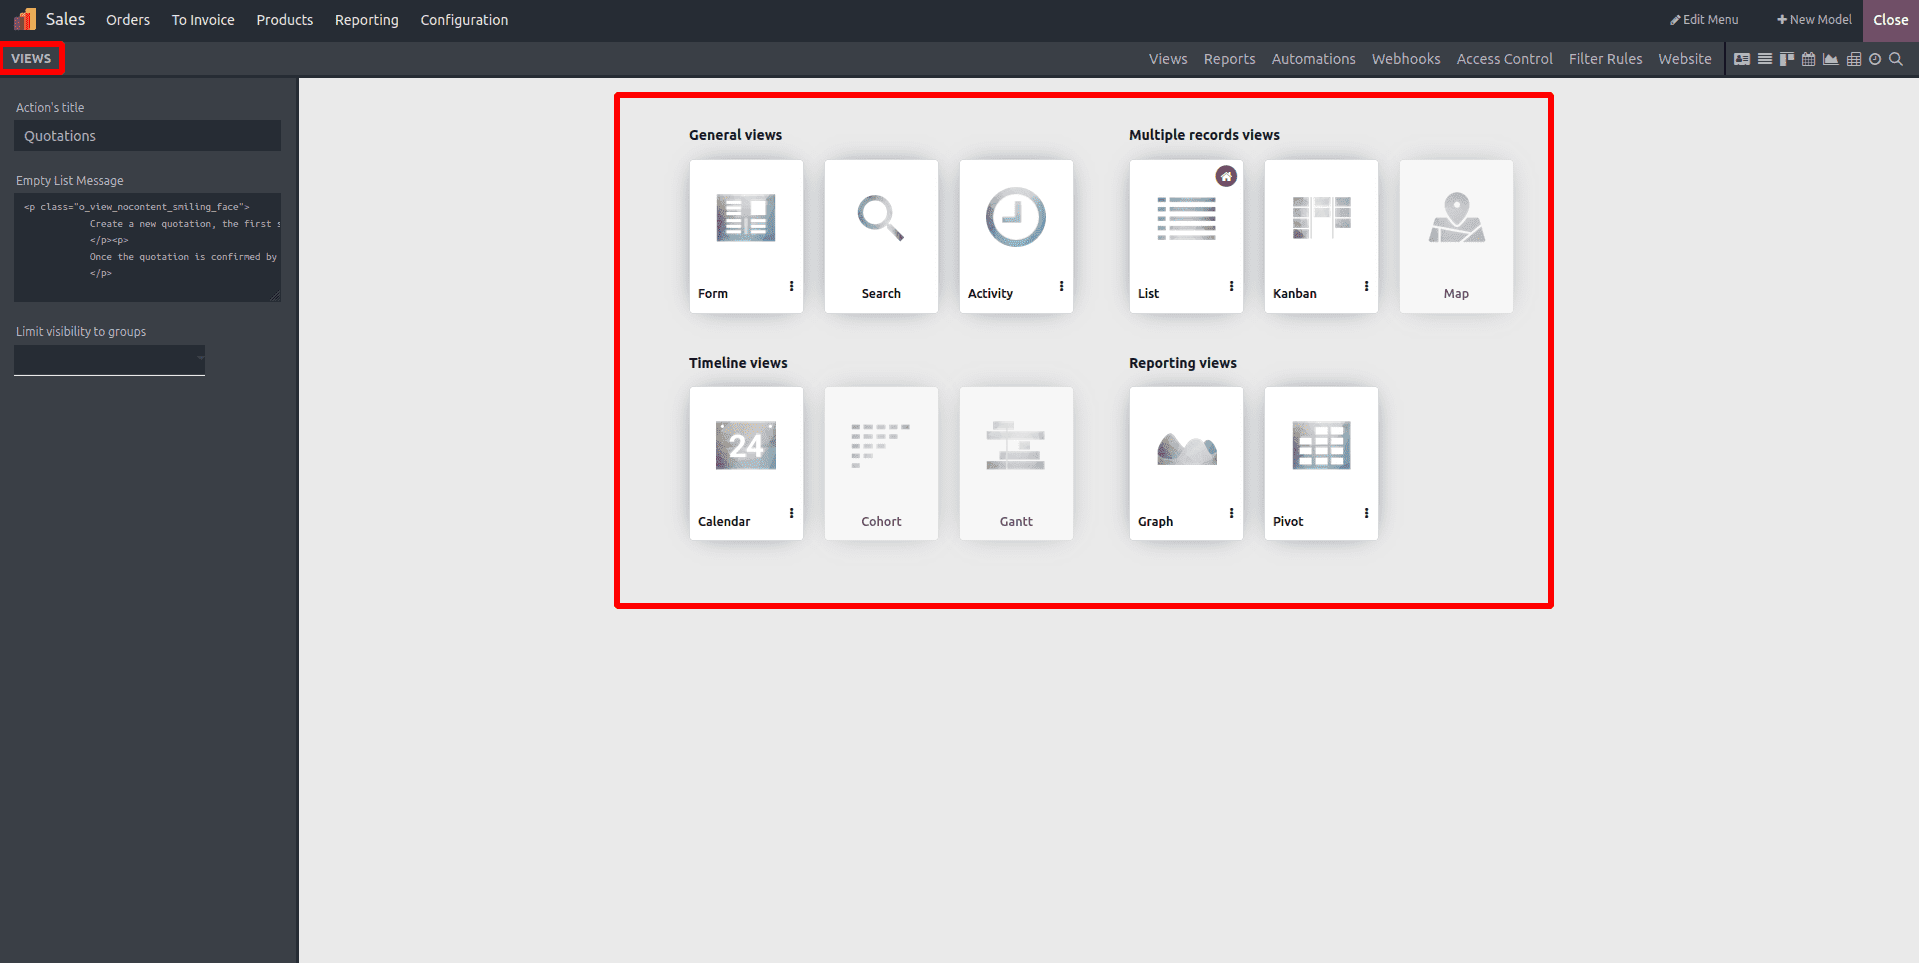
Within the Odoo Studio Module, the Views menu facilitates the creation of diverse view types for applications, enhancing their functionality and visual attractiveness. This menu encompasses a range of views, including those categorized under General Views, Multiple Record Views, Timeline Views, and Reporting Views.
Odoo also provides the capability to designate or modify a view as the default view for a particular application. To alter the default view of a model, you can navigate to the "Views" menu and choose the "Set as Default" option from the three dots accessible on each view.
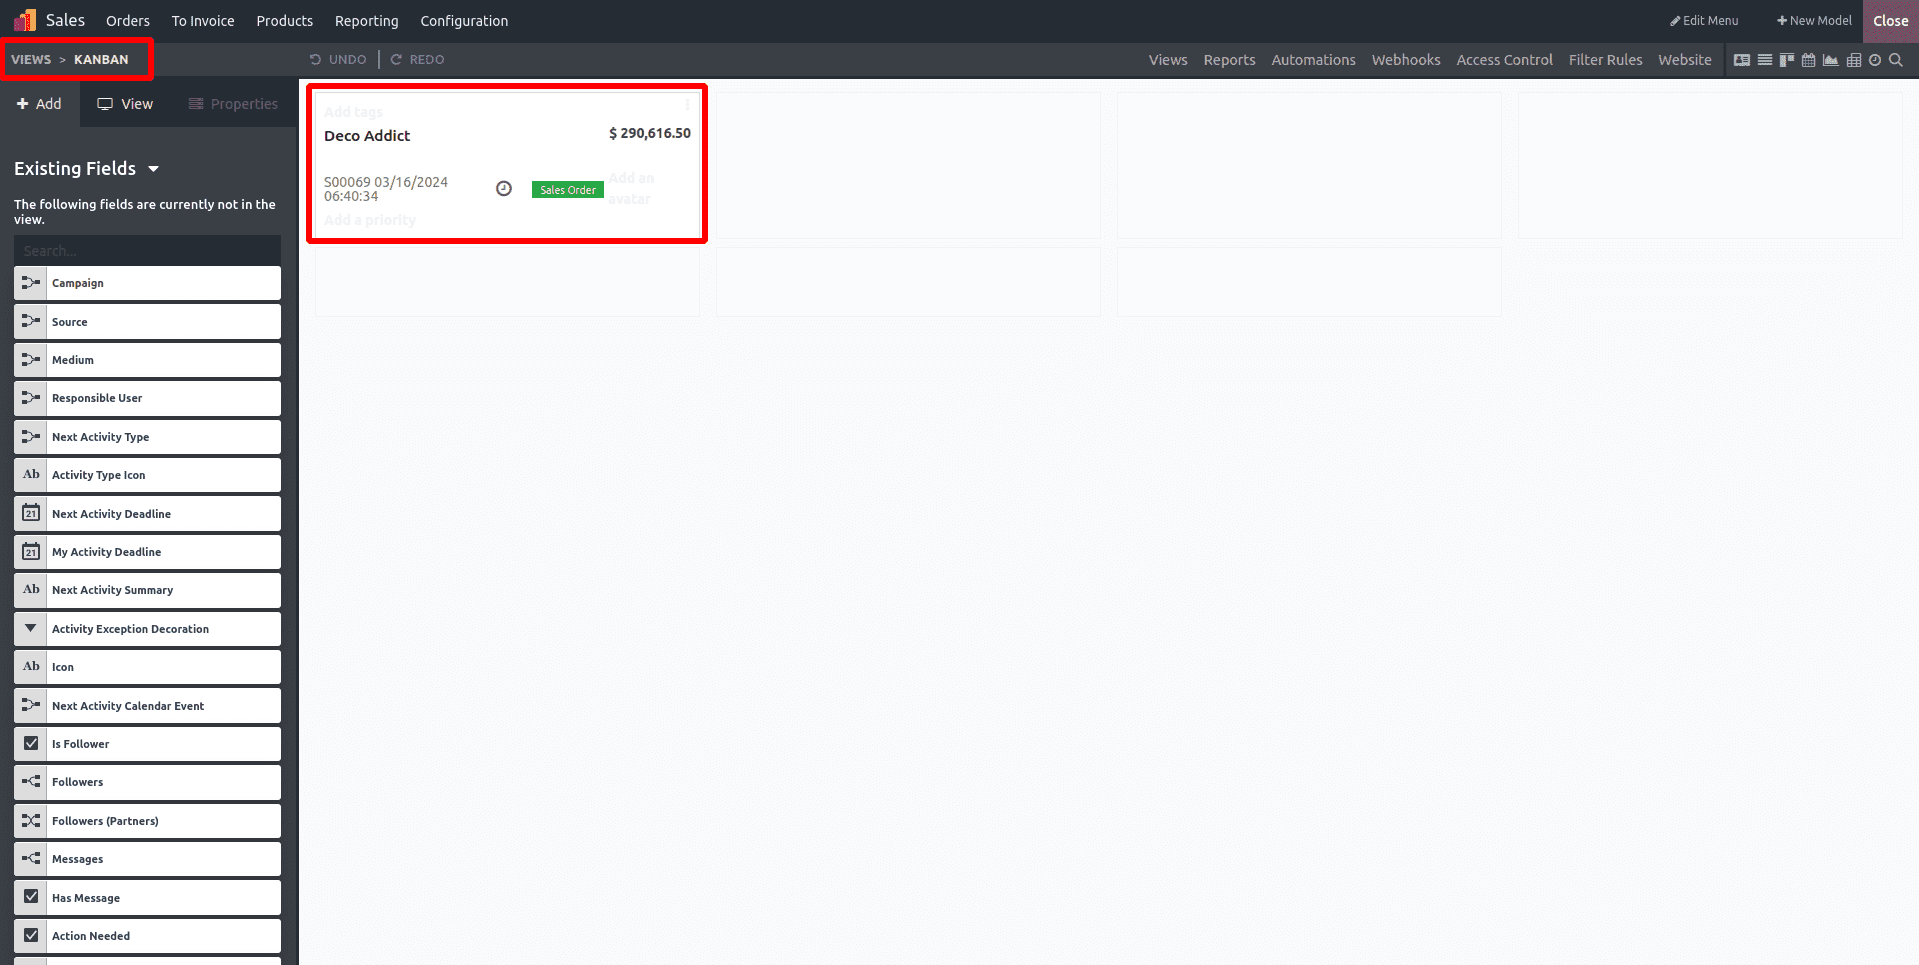
General Views and Form View
The Form, Search, and Activity Views are categorized as the general views within the menus. The "Form" view holds primary significance within an application platform, as it enables the configuration of various functions.
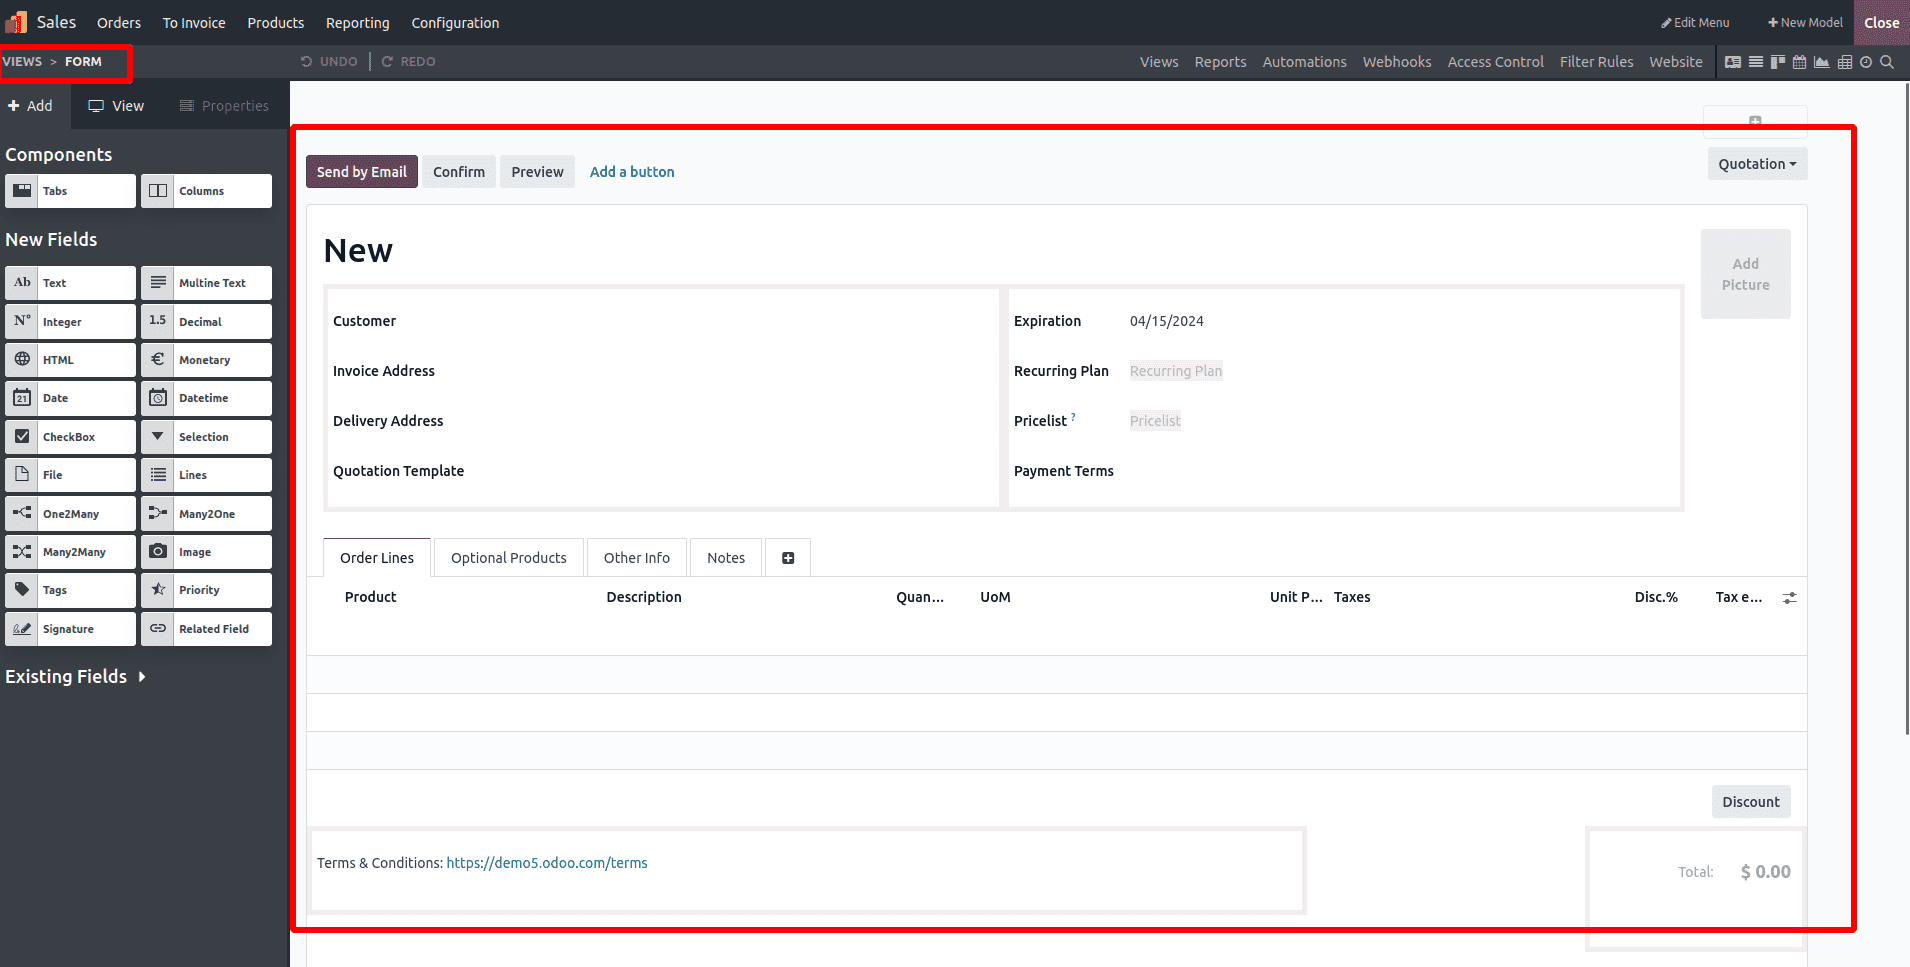
Elements such as the Form's title and button configurations can be tailored to suit your operational needs within the Form view. Various editing tools and components for form customization are located on the left side of the page. On the right side, status buttons like NEW, IN PROGRESS, and DONE are visible, all of which are fully adaptable.
To incorporate additional action items such as Delete, Archive, Unarchive, and Mark, you can utilize the "+" button, which becomes visible when hovering over the upper right corner. Furthermore, you can integrate an image and a Kanban view by utilizing the "Image" and "Kanban State" buttons situated near the "Description" area in the upper right corner of the form.
Tab sections can be added using the "+" icon near the "Details" tab to further organize the form.
Search View
Within Odoo Studio, various filtering components can be accessed and positioned within the "Search" view. These tools serve to organize essential elements effectively. With customization capabilities, users have complete control over how they employ the Filter tool, enabling them to specify the usage of filter options according to their requirements.
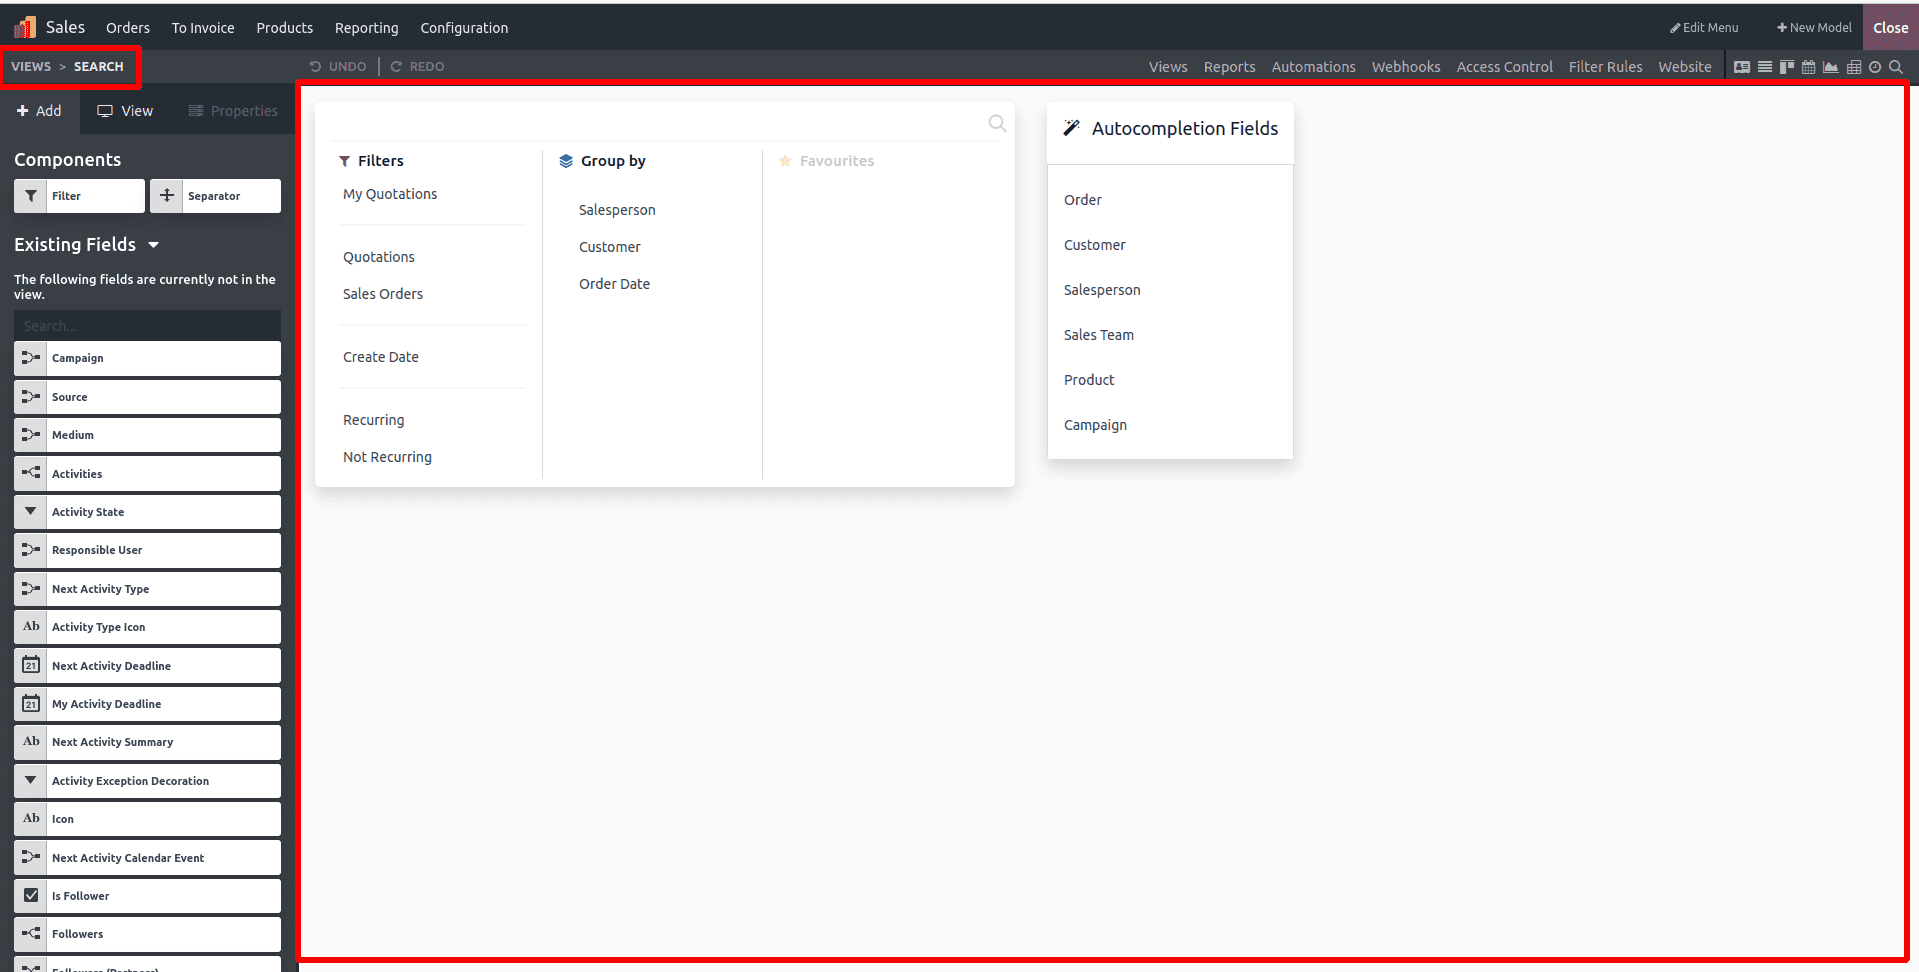
Each "Filter" and "Group by" option box features a clickable link, allowing users to customize it according to their specifications. Within the editing column, positioned on the left side, options can be edited or removed as desired. Additionally, users can specify the fields that are automatically populated when entering specific data on the form within the "Auto Completion Fields" section. Furthermore, additional fields can be added or removed from this section to tailor it to specific needs.
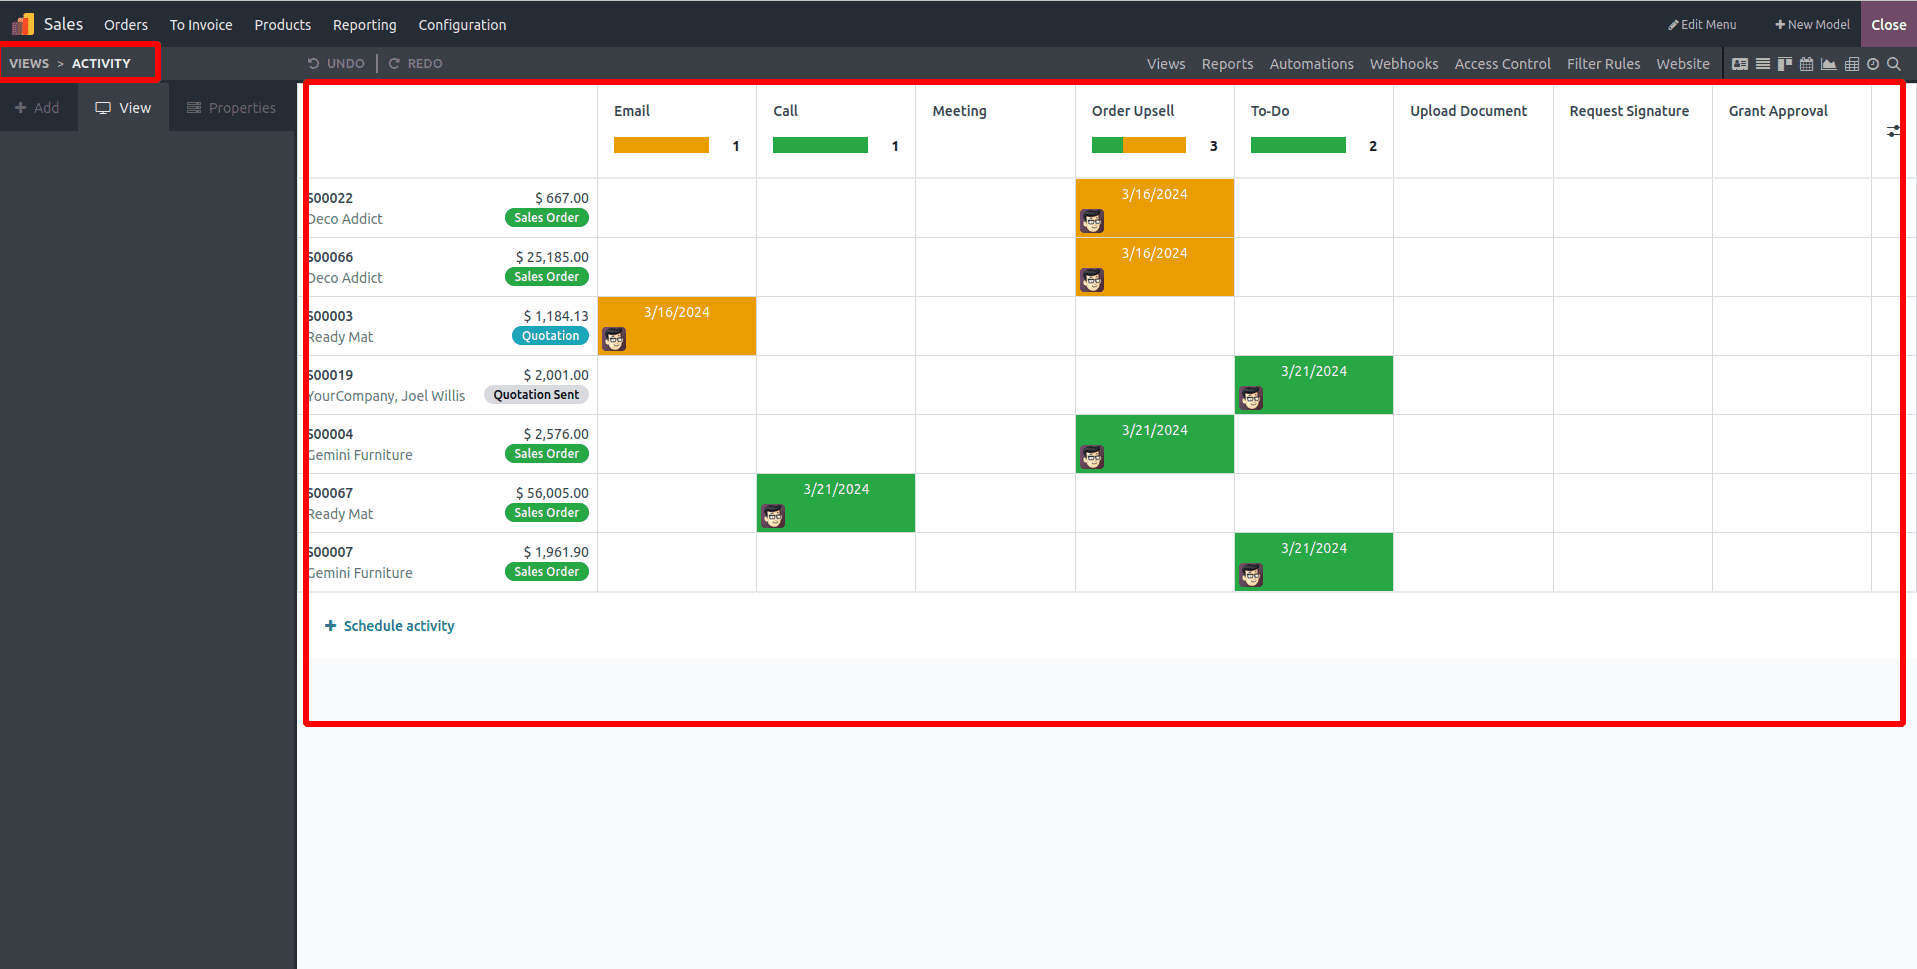
Activity View
The "Activity" view provides users with a platform to organize activities through the Chatter element, facilitating conversations among participants ahead of scheduled times. This ensures a space for all to engage in productive discussions. Users can schedule emails, calls, meetings, to-do lists, and more by utilizing the "+Schedule Activity" button.
Multiple Records Views and Kanban View:
Multiple Kanban views can be established from the "Multiple Record Views" section, as demonstrated below.
You can customize the Kanban display by clicking on the sample template and editing the fields and components as required using the options provided on the left side.
List View:
In the "List" view of your application, you have the ability to edit various operational fields, such as the Priority Field and Contact Field. These fields can be adjusted to provide the necessary instructions. Depending on user requirements, they can be hidden, modified, or entirely removed from the List View.
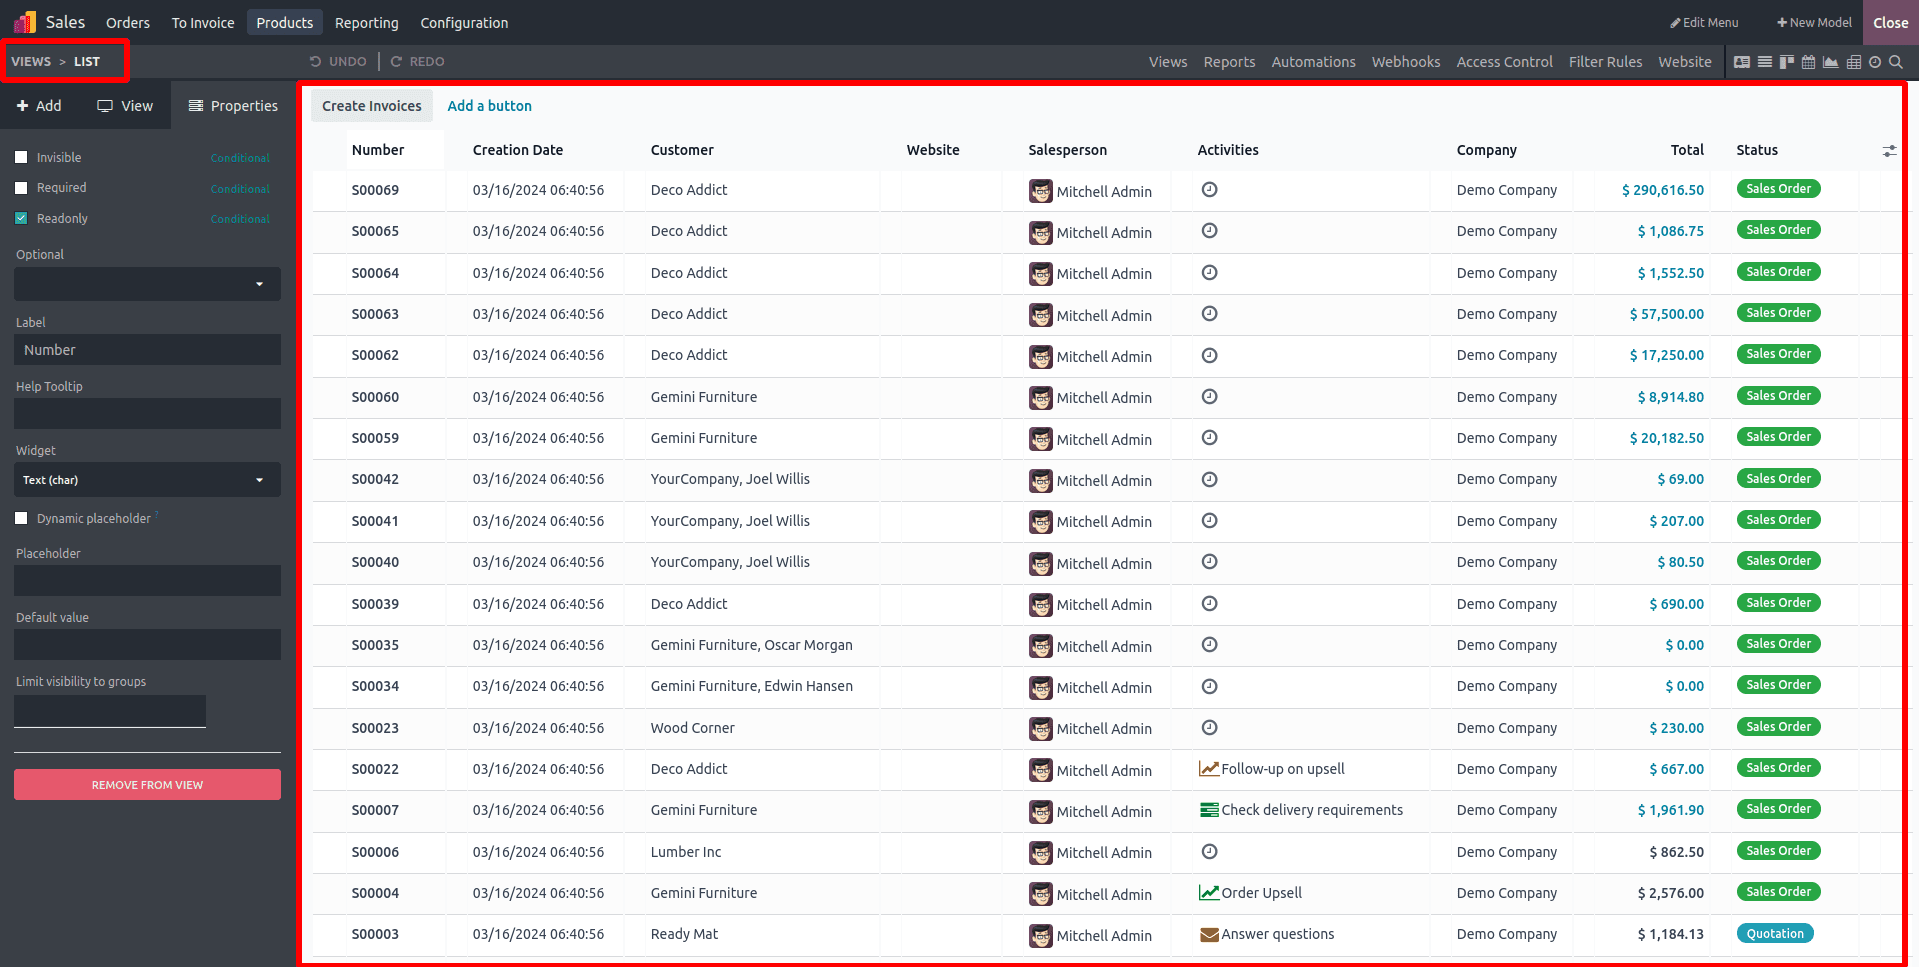
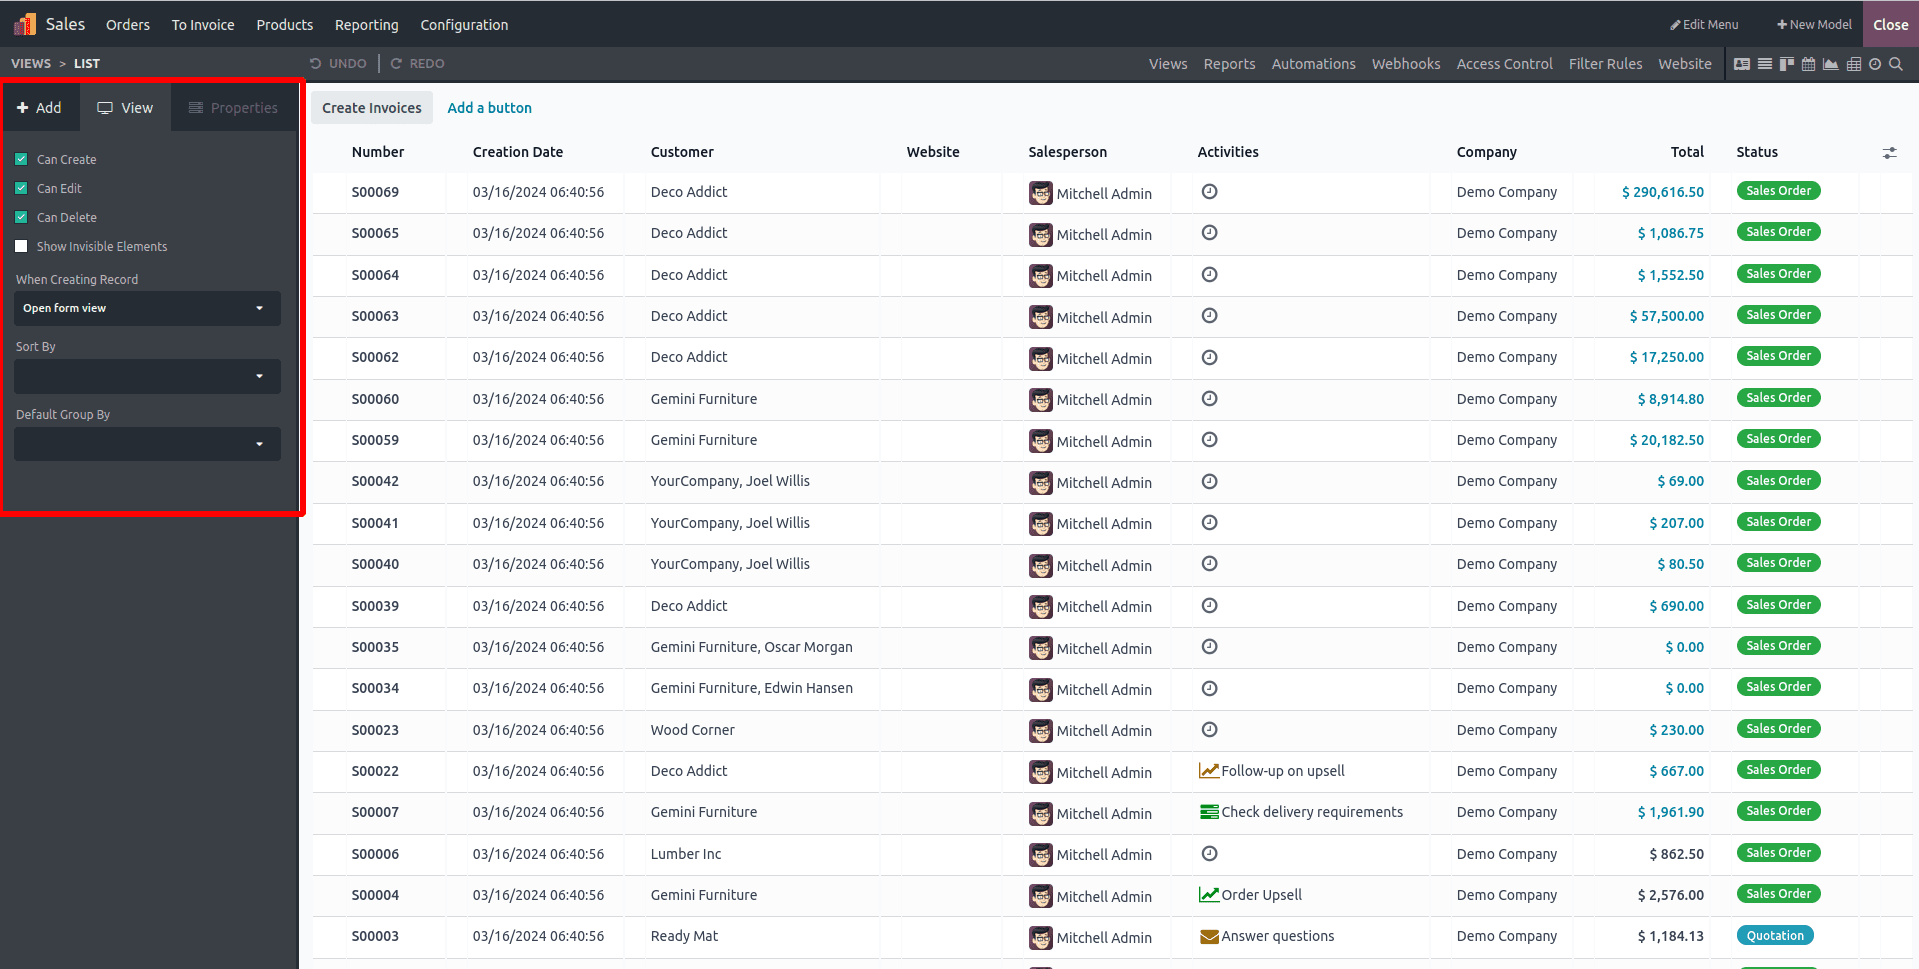
The List view serves as a valuable tool for simultaneously viewing and modifying large records. Users can disable the checkboxes next to "Can Create," "Can Edit," and "Can Delete" to prevent data addition by users. To create and modify records instantly, users can select either "New Record at the top" or "New Record at the bottom" under the "Editable" option. Additionally, by selecting a field under "Sort By," users can simultaneously enable mass editing for multiple records and alter the default sorting, as demonstrated below.
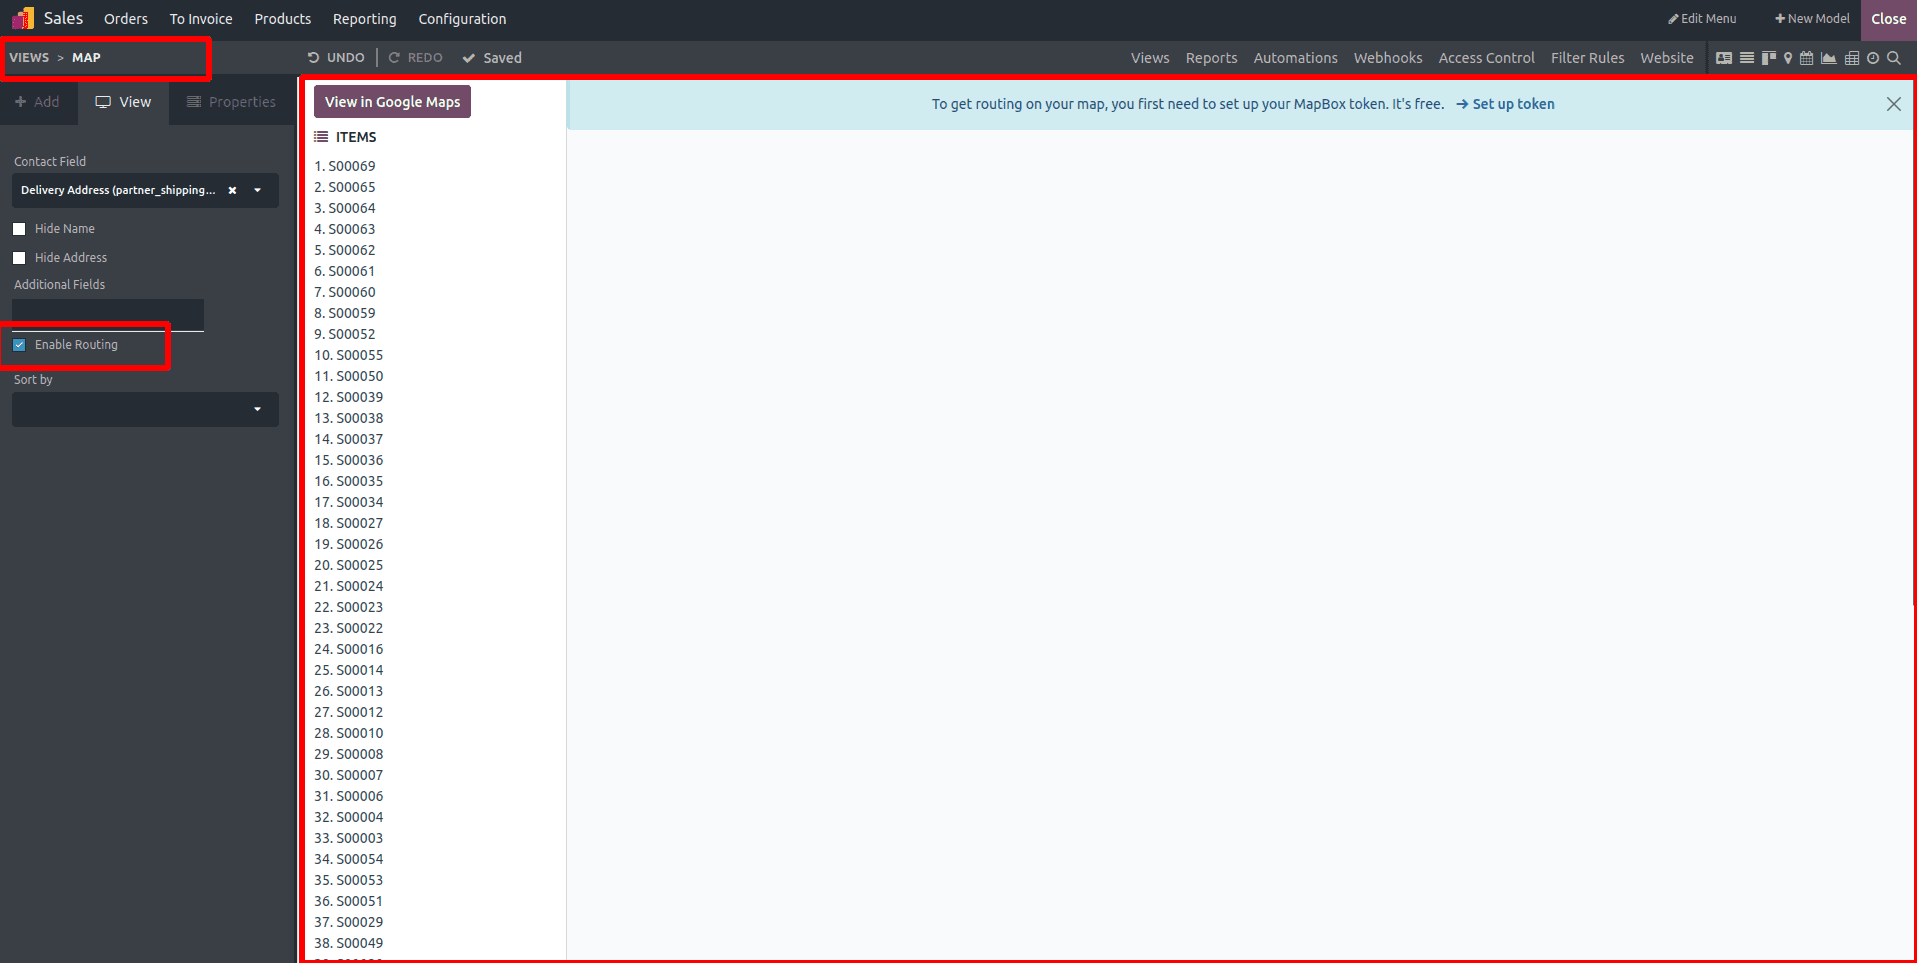
Map View
In a "Map" view, you can customize the Name and Address components by utilizing the "Hide Name" and "Hide Address" options provided in the editing section. Additionally, you have the choice to enable the "Enable Routing" option, which facilitates understanding the address and planning travel to the relevant locations. Furthermore, you can incorporate Additional Fields to enhance the view as needed.
Timeline Views and Calendar:
Under the "Timeline views" category, you can set up Calendar, Cohort, and Gantt views.
In the "Calendar View," you can configure options such as the Start Date Field and Stop Date Field. Additionally, administration features like the Delay Field, Color, All Day setup, and Default Display mode can be customized from the editing section, as demonstrated in the provided screenshot.
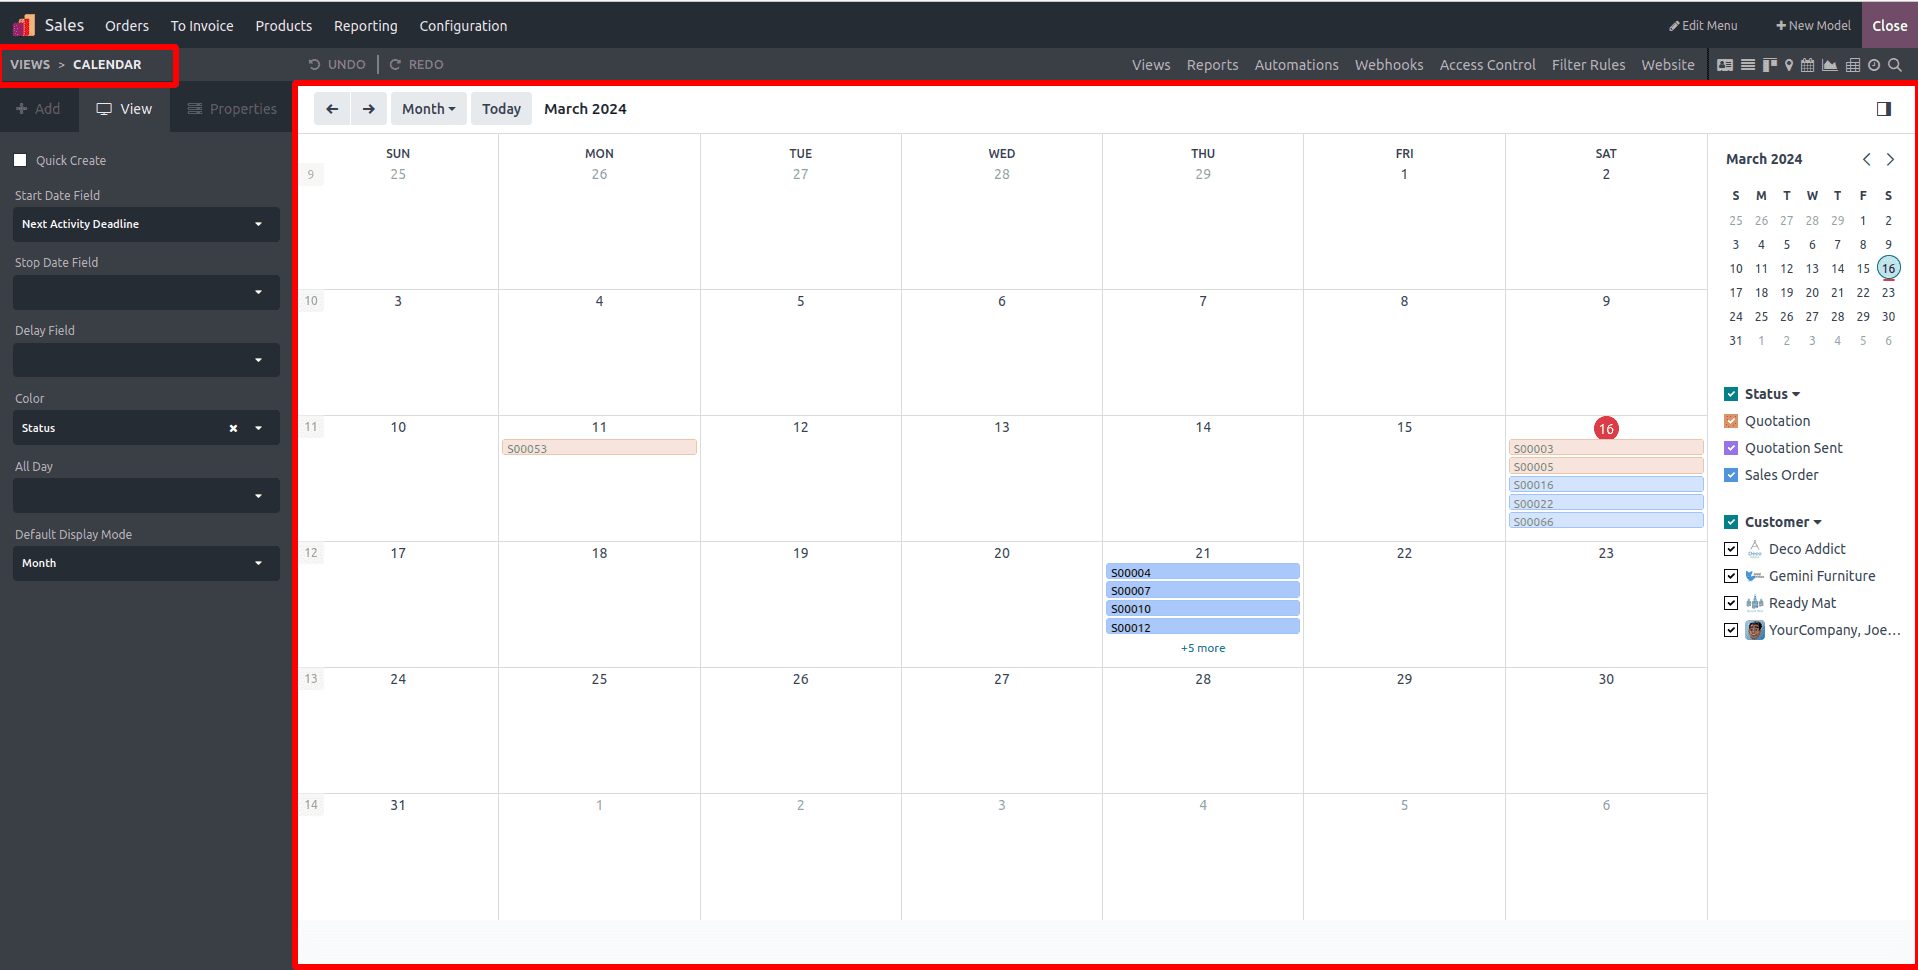
You can activate this feature to enable Quick Create, which allows records to be created without opening the Form view. However, it's worth noting that only models that can be swiftly created with a name are eligible for this function, as most models require more detailed information.
In addition, you can choose a field under the "Color" field to add color to calendar entries. This aids in organizing and visually displaying similar types of events on the calendar.
Furthermore, you can select Day, Week, Month, or Year under the Default Display Mode to set the default time scale for events. This determines how events are initially displayed on the calendar.
Gantt View
The Gantt view is a powerful tool for analyzing and forecasting record progress. In this view, records are depicted as bars along a time scale.
Several customization options are available, including the ability to enable or disable features such as "Display Unavailability," "Display Total Row," and "Collapse First level" of the Gantt view.
Moreover, users can edit various parameters, such as the Start Date Field, End Date Field, Label, Day Precision, Week Precision, and more, to fine-tune the Gantt view according to specific requirements.
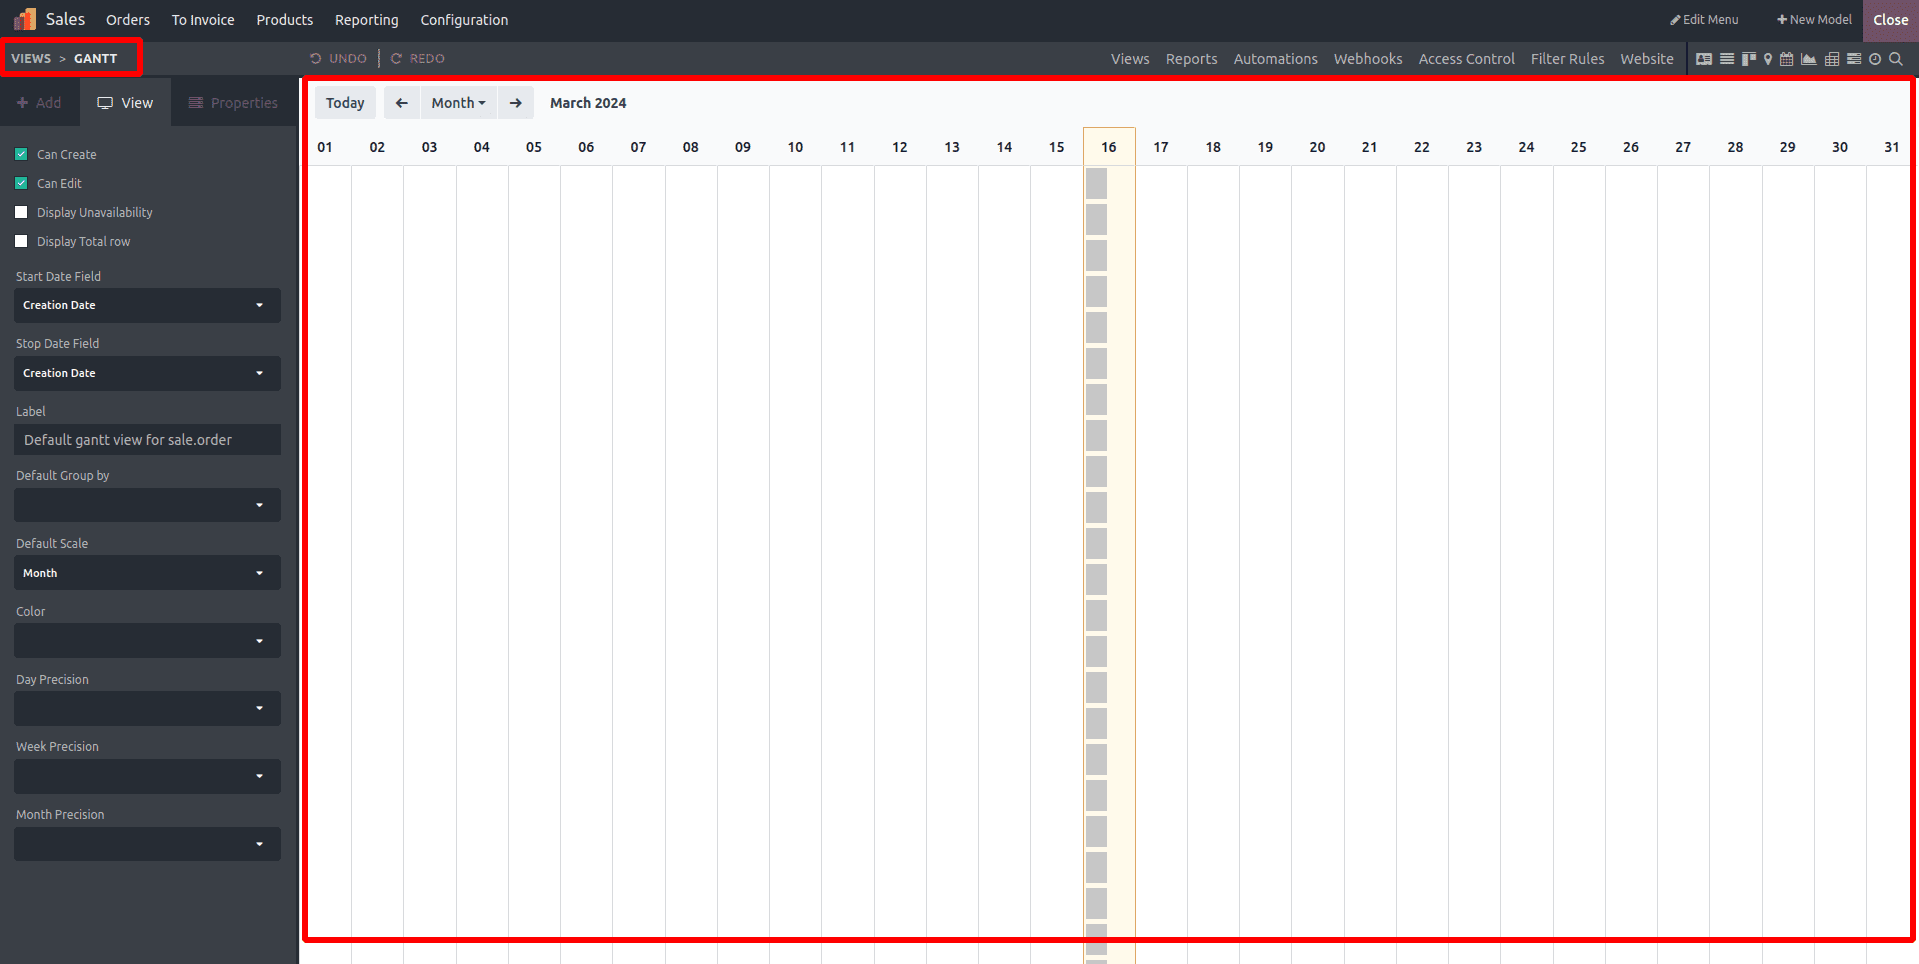
Users can prevent records from being created or edited by deactivating the "Can Create" or "Can Edit" options. By selecting the "Display Unavailability" option, records can be shown in grey, and the "Display Complete" row field allows users to view the complete row. The "Collapse First Level" button collapses multiple records simultaneously.
Under the "Default Scale," users can configure a default time scale, and records can be grouped by default. Additionally, the field under the "Color" field can be utilized to add color to records, aiding in their organization and visualization.
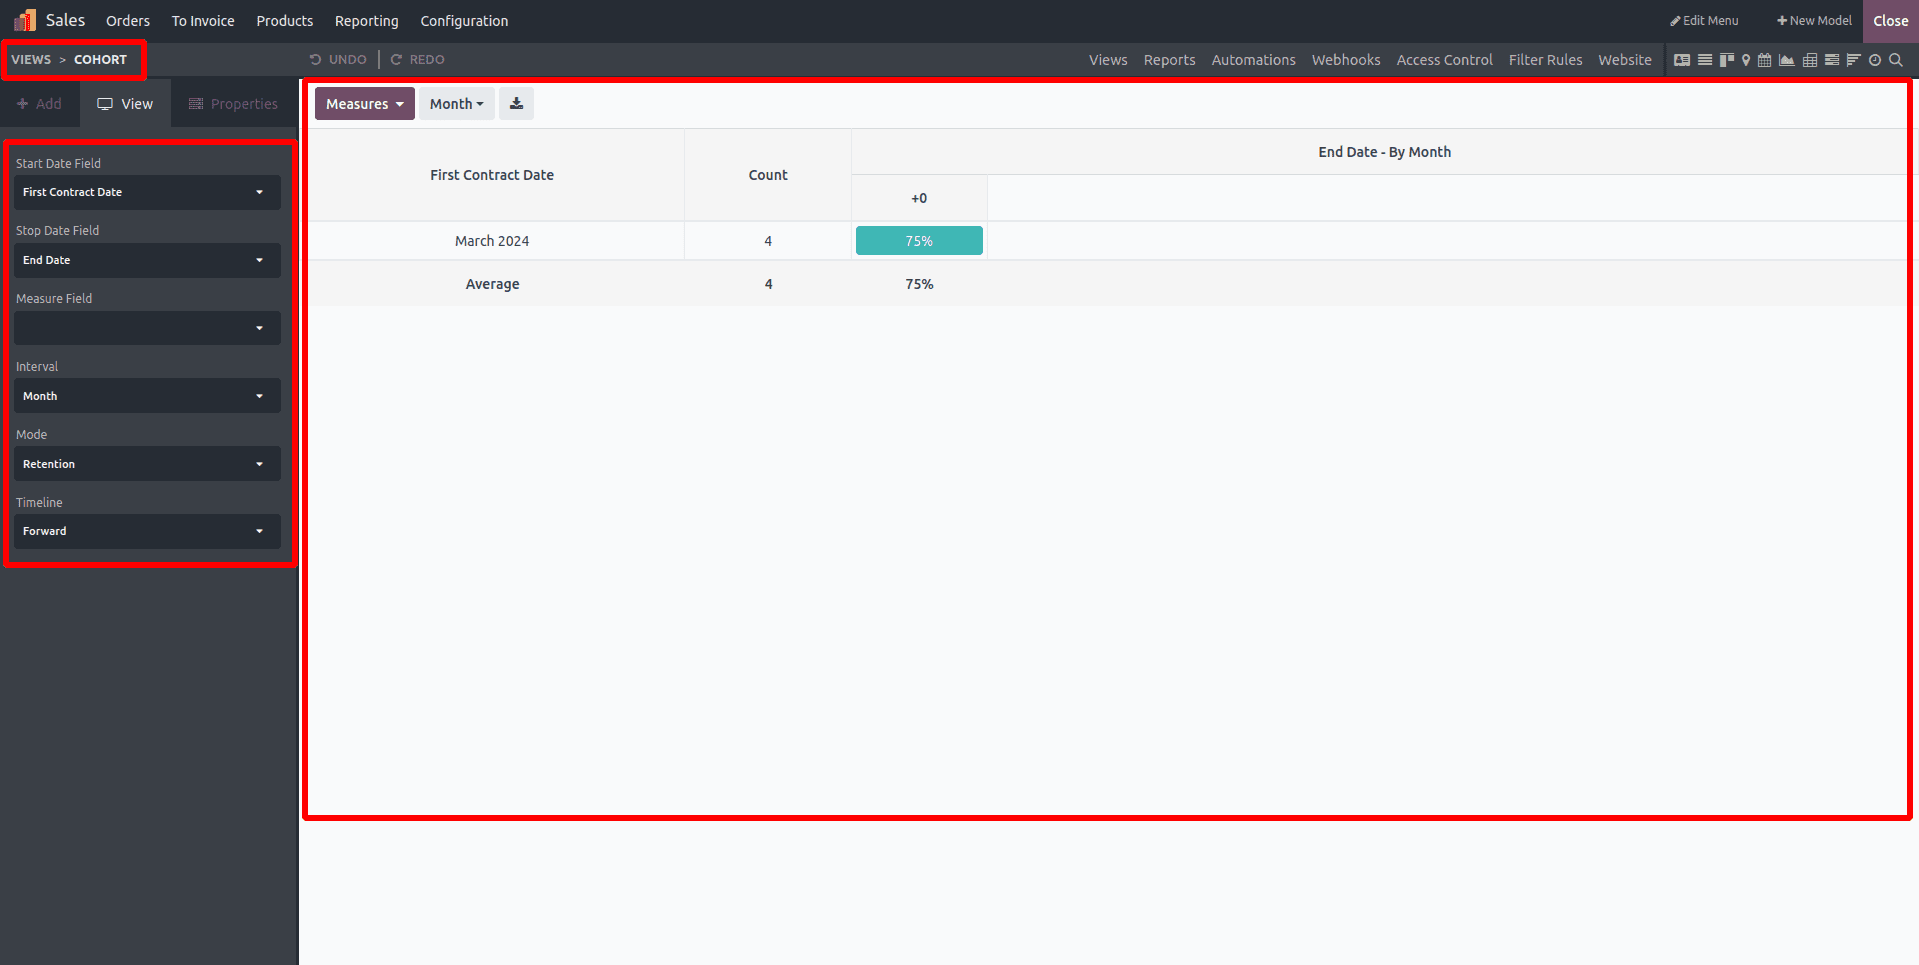
Cohort View
Under the "Cohort" View, both the Start Date Field and the Stop Date Field can be tailored to suit specific requirements. Additionally, users have the flexibility to customize parameters such as the Timeline, Interval, Mode, and Measure Field to refine the presentation and analysis of data.
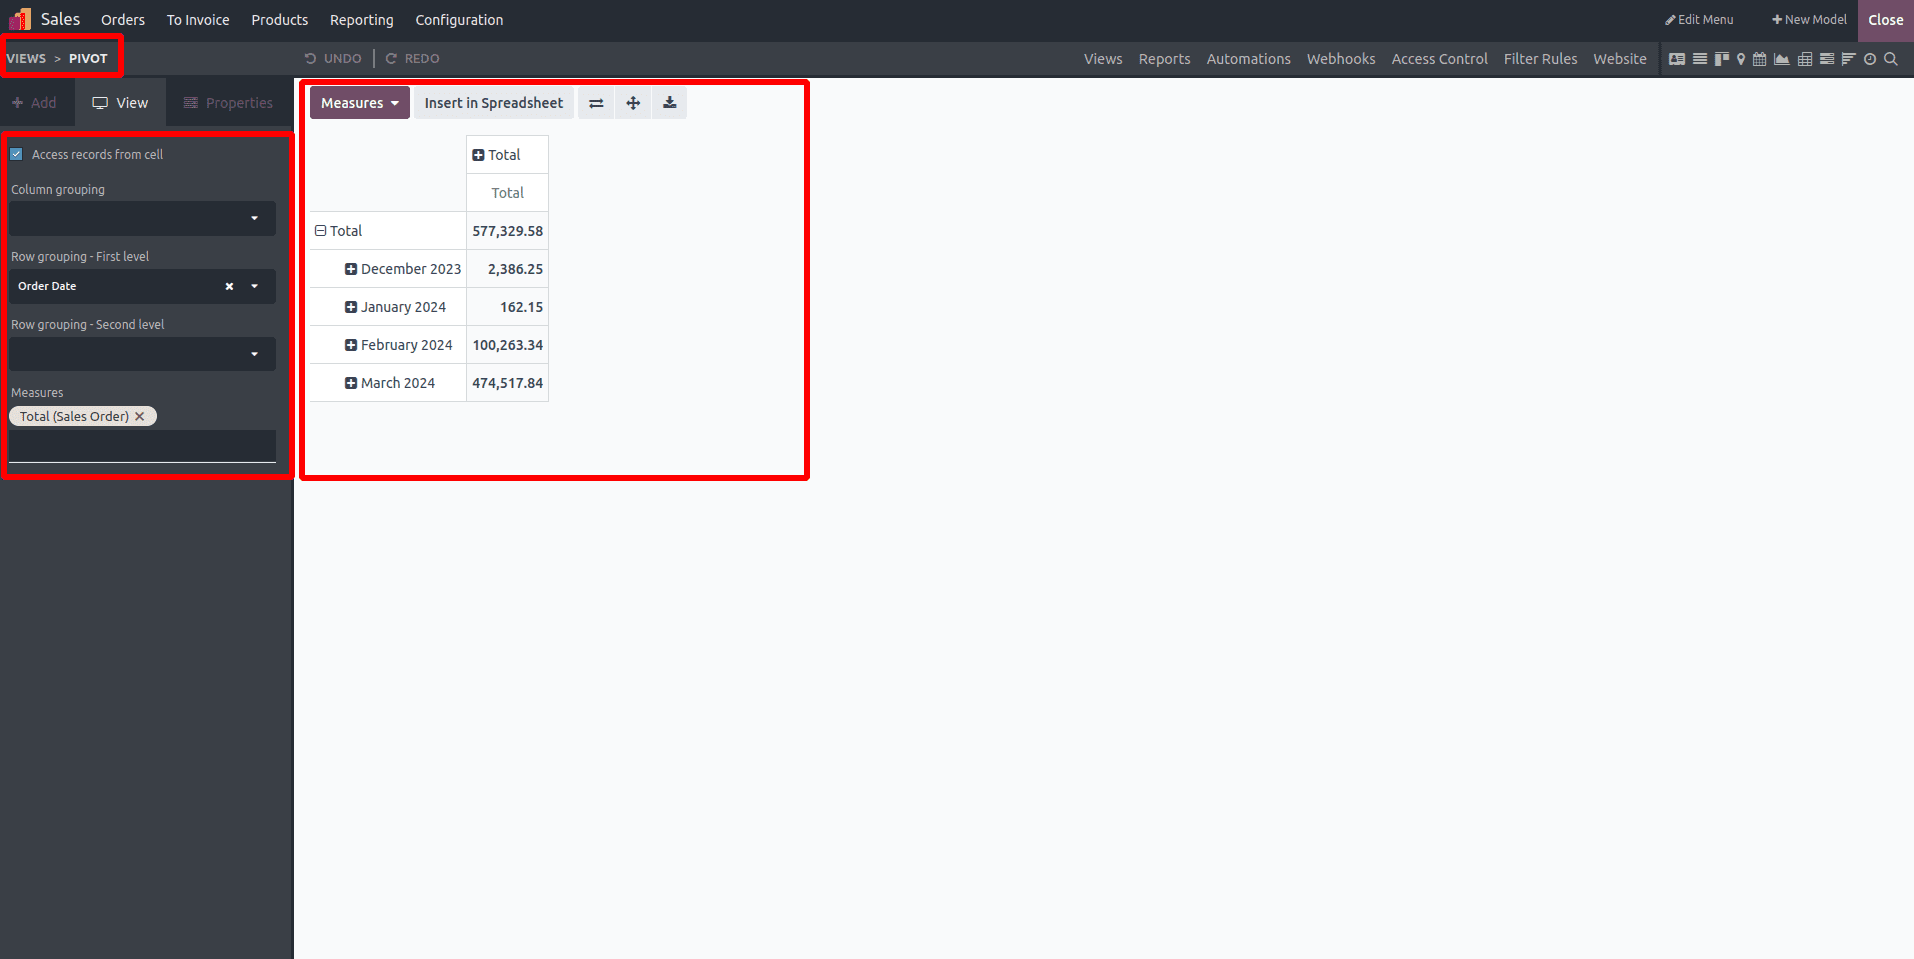
Pivot View
Users can access data records directly from a pivot table by enabling the "Access records from cell" option. Depending on the requirements, various aspects such as Column grouping, Row grouping (First level and Second level), Measures, and Display count can be activated under the Pivot View to facilitate data analysis and visualization.
Graph View
In the Graph view, data is presented through bar, line, or pie charts. This view encompasses various options such as Graph types, Sorting options, First and Second Dimensions, and Measures to customize the visualization.
During the creation process, users have the ability to add new dimensions to further refine the representation of data in the graph.
Under the "Type" field in the Graph view, users can select options such as Bar, Line, or Pie to adjust the format of the chart. Additionally, users can specify a default data category for both the "First dimension" and "Second dimension." Moreover, in the "Measure" field, users can select a default data type for the measure.
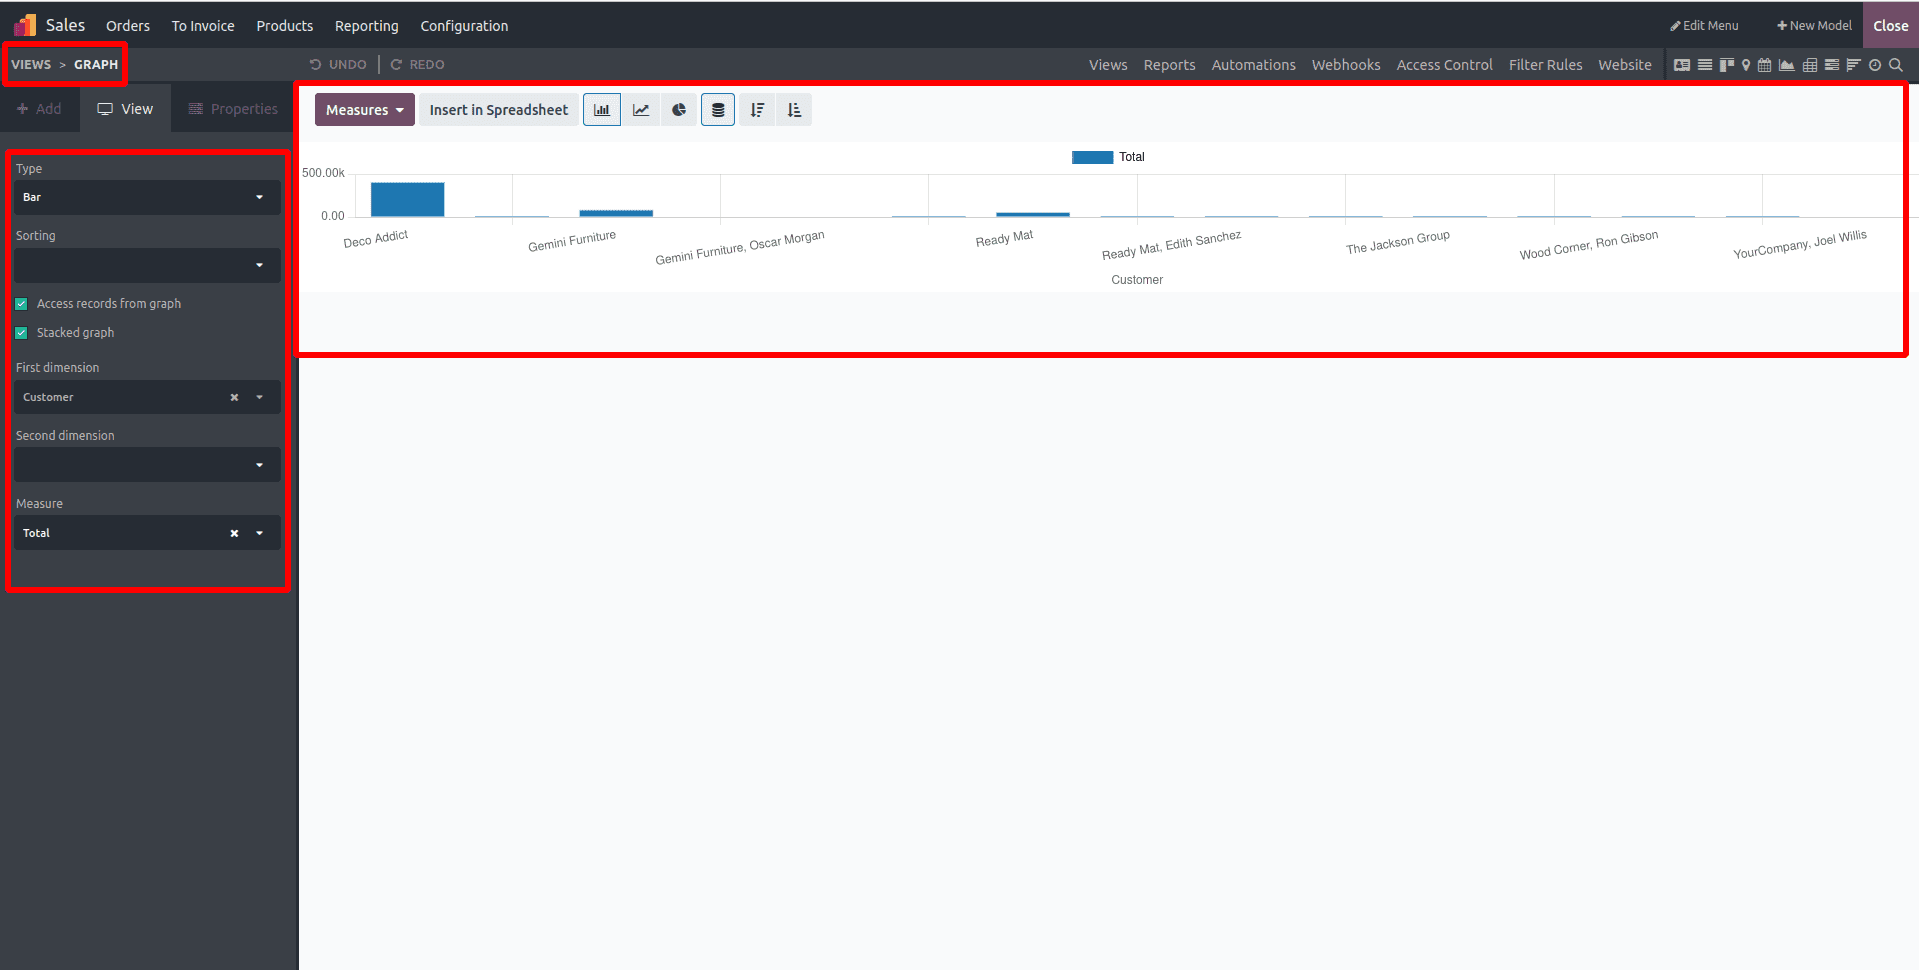
Users can enable the "Access Records from Cell" option to download data records from the graphical report view and activate the "Stacked Graph" option to display a stacked graphical representation of the data.
These are the available options in the "View" menu of the Odoo 17 Studio Module. Now, we can move on to discussing the "Reporting" section of the platform.
Reporting Menu
The Odoo platform offers features for filtration and grouping within the "Reports" menu. It provides built-in tools and functions for creating and processing customized features that are accessible and facilitate the configuration of various reporting windows when creating new apps. Each report created using the Odoo platform is defined on this page. Additionally, users have the flexibility to customize the Search, Filtering, and Group by options to suit their needs.
To explore the functionalities offered in the reports section, navigate to the "Reports" menu within the Studio Module.
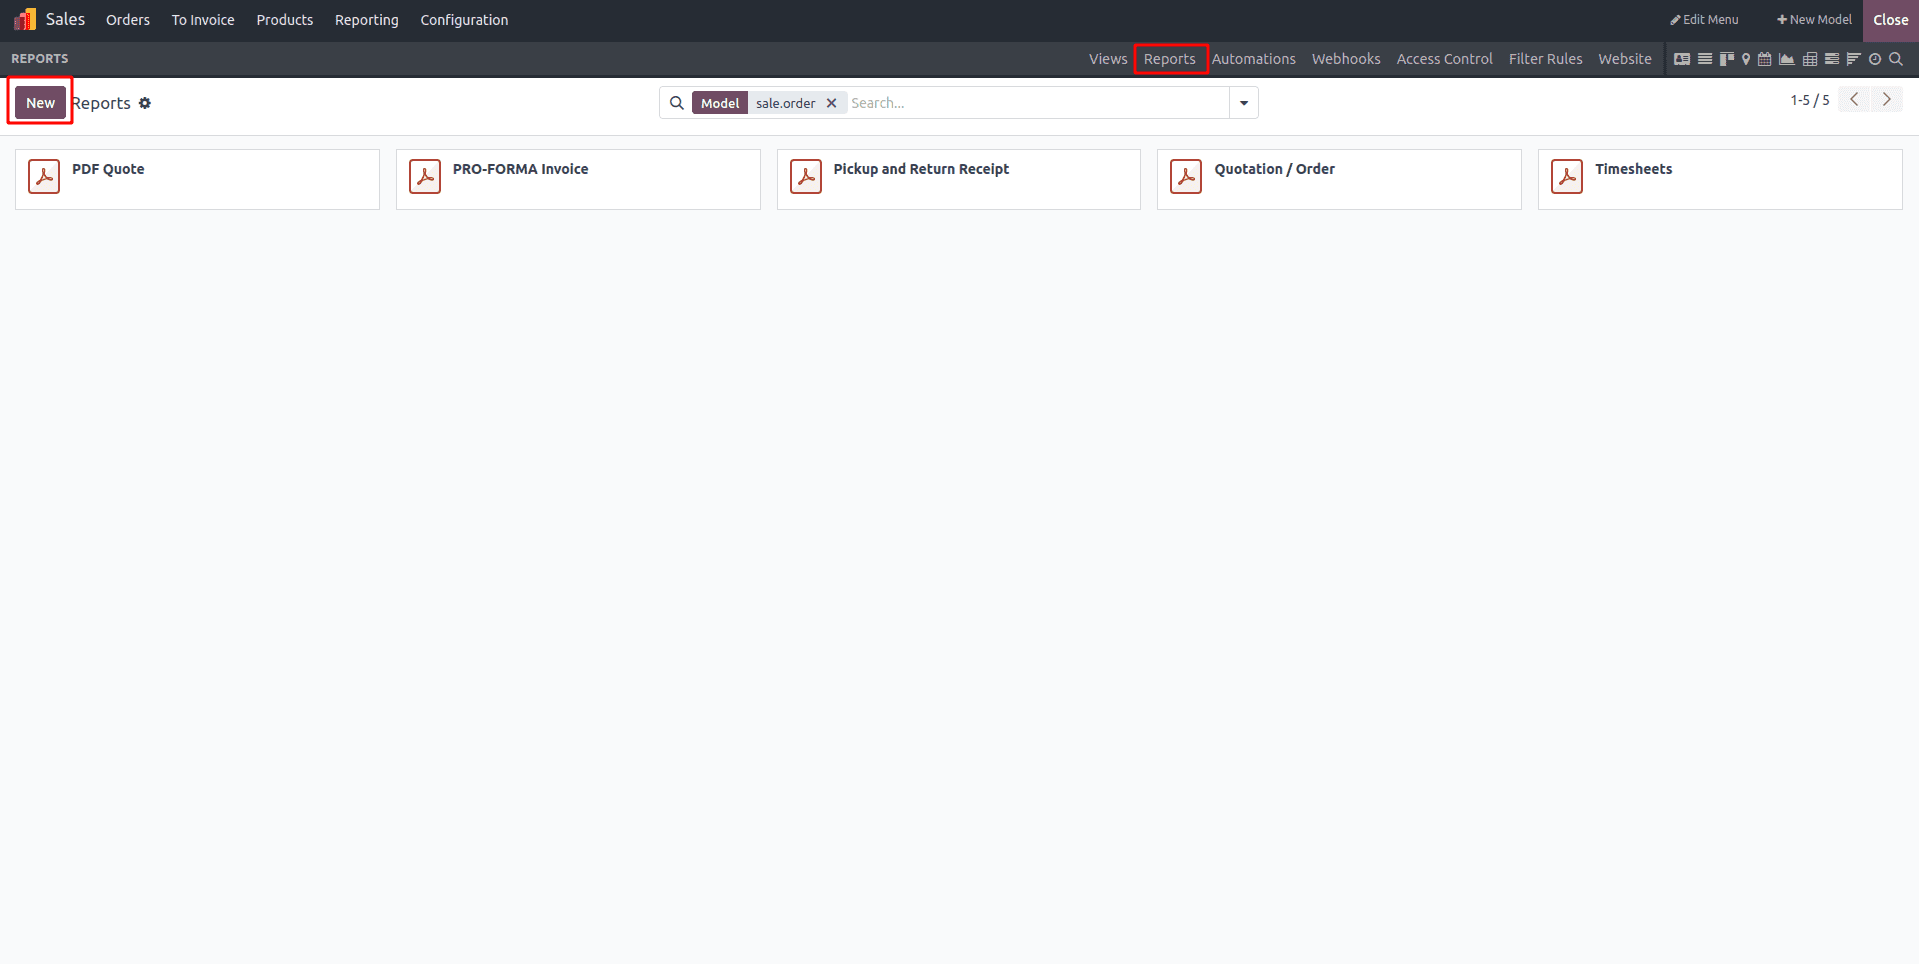
You'll find the application model for which you want to generate the report visible in the filter search area. Simply select the desired model. Then, click on the "New" button to initiate the creation of a new Reporting section.
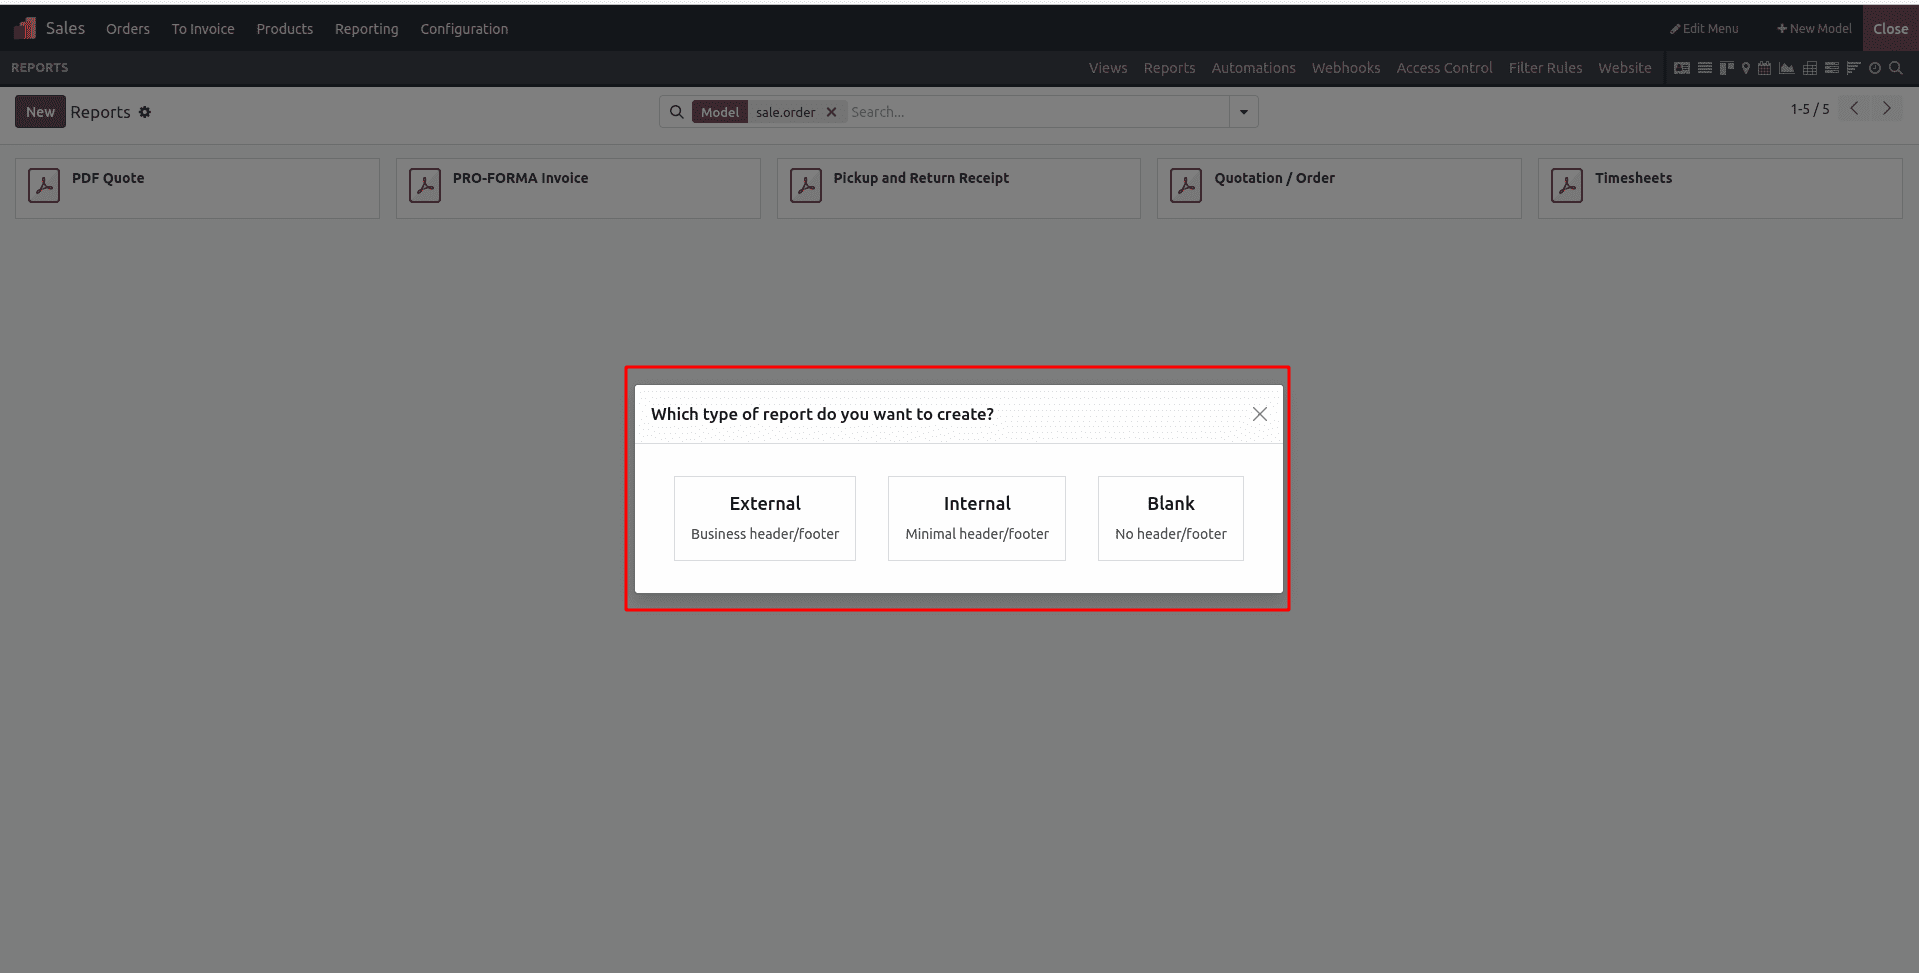
Upon selecting the application model and clicking "New," a dialogue box will appear presenting relevant report types. You'll need to decide whether to generate External, Internal, or Blank Reports. Depending on the Report Type chosen, you will be presented with the settings menu, where you can configure all the necessary information for the Translate View menu. Selecting any of these options will trigger the opening of the corresponding report configuration form.
Creating a New Report
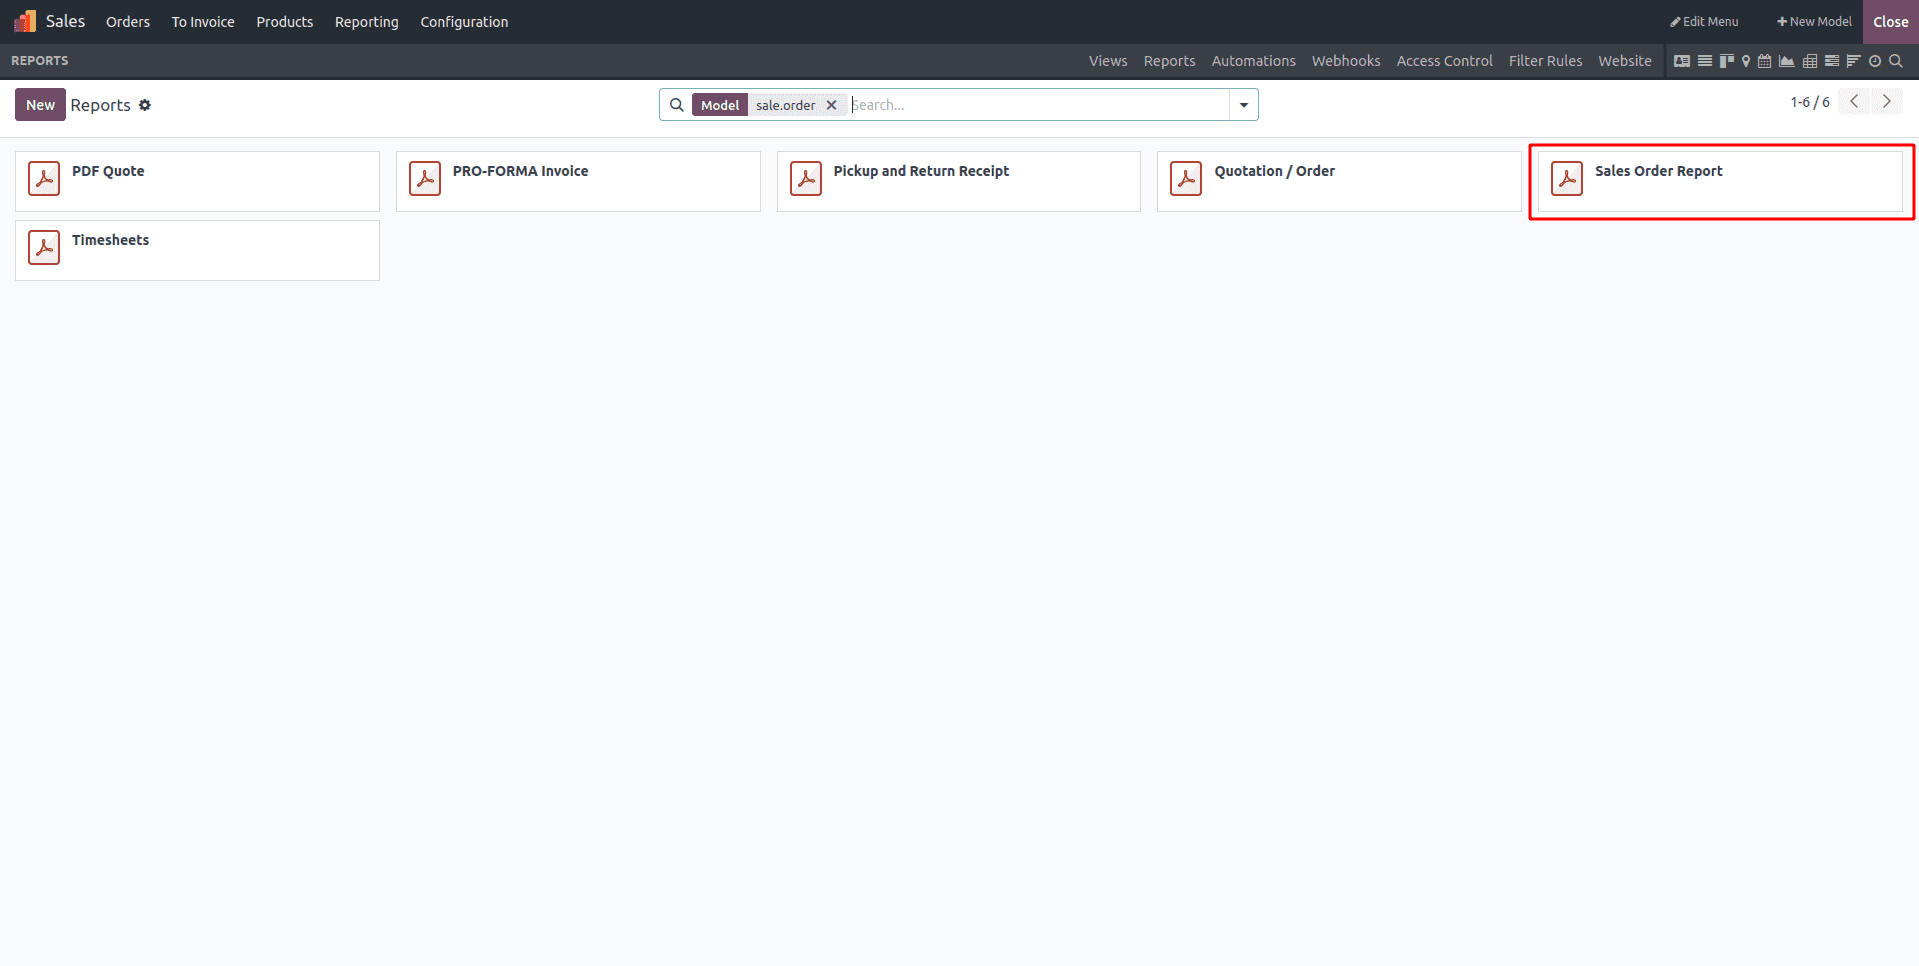
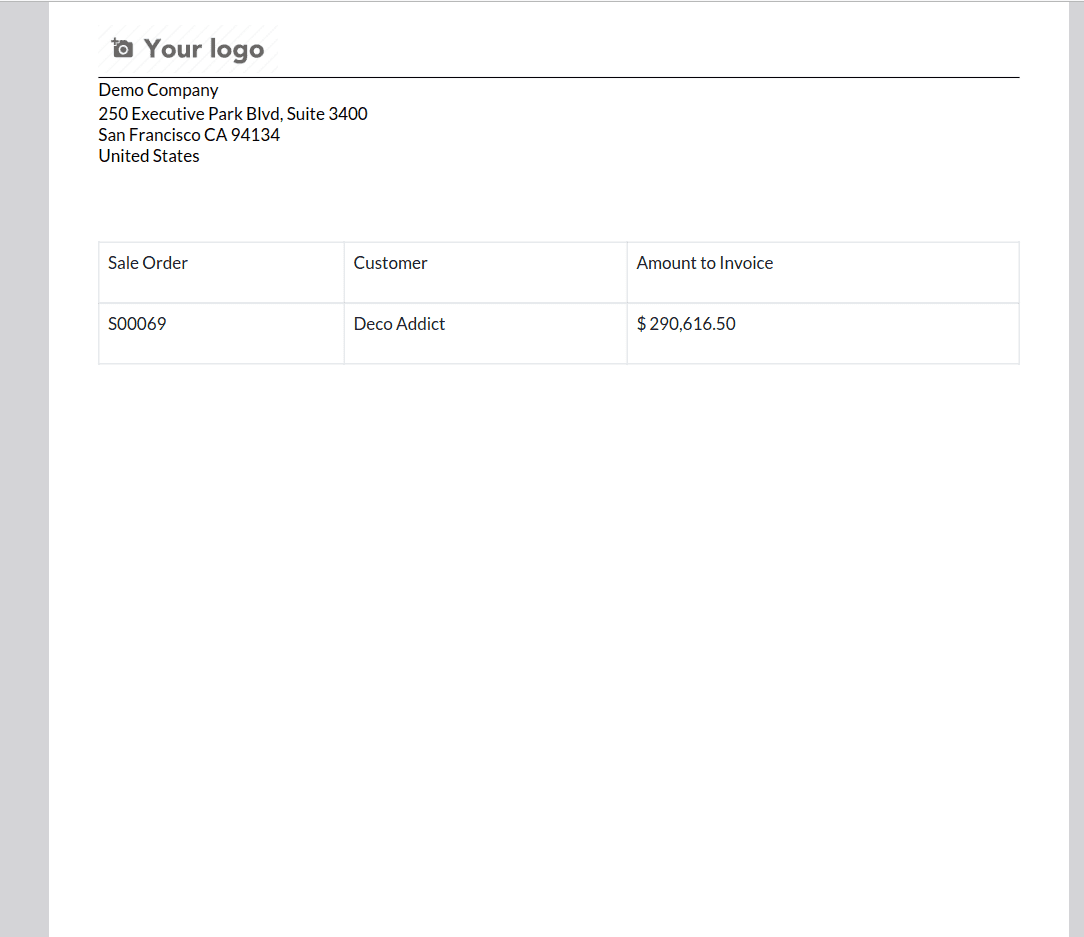
Selecting the External Reporting option will add a report section to your "Reports" dashboard, as demonstrated below.
To edit specific details of a report, records must be available in your application database. Once records are accessible, you can edit the report specifics by clicking on the displayed card. This action will open the report configuration section, as depicted below.
In the Report menu, users have the flexibility to choose the report title, paper format, and set visibility restrictions. Additionally, users can print generated reports directly from the same window by toggling on the "PRINT PREVIEW" button. Furthermore, visibility can be restricted to specific user groups by enabling the "Limit Visibility to Groups'' option, allowing for separate access rights.
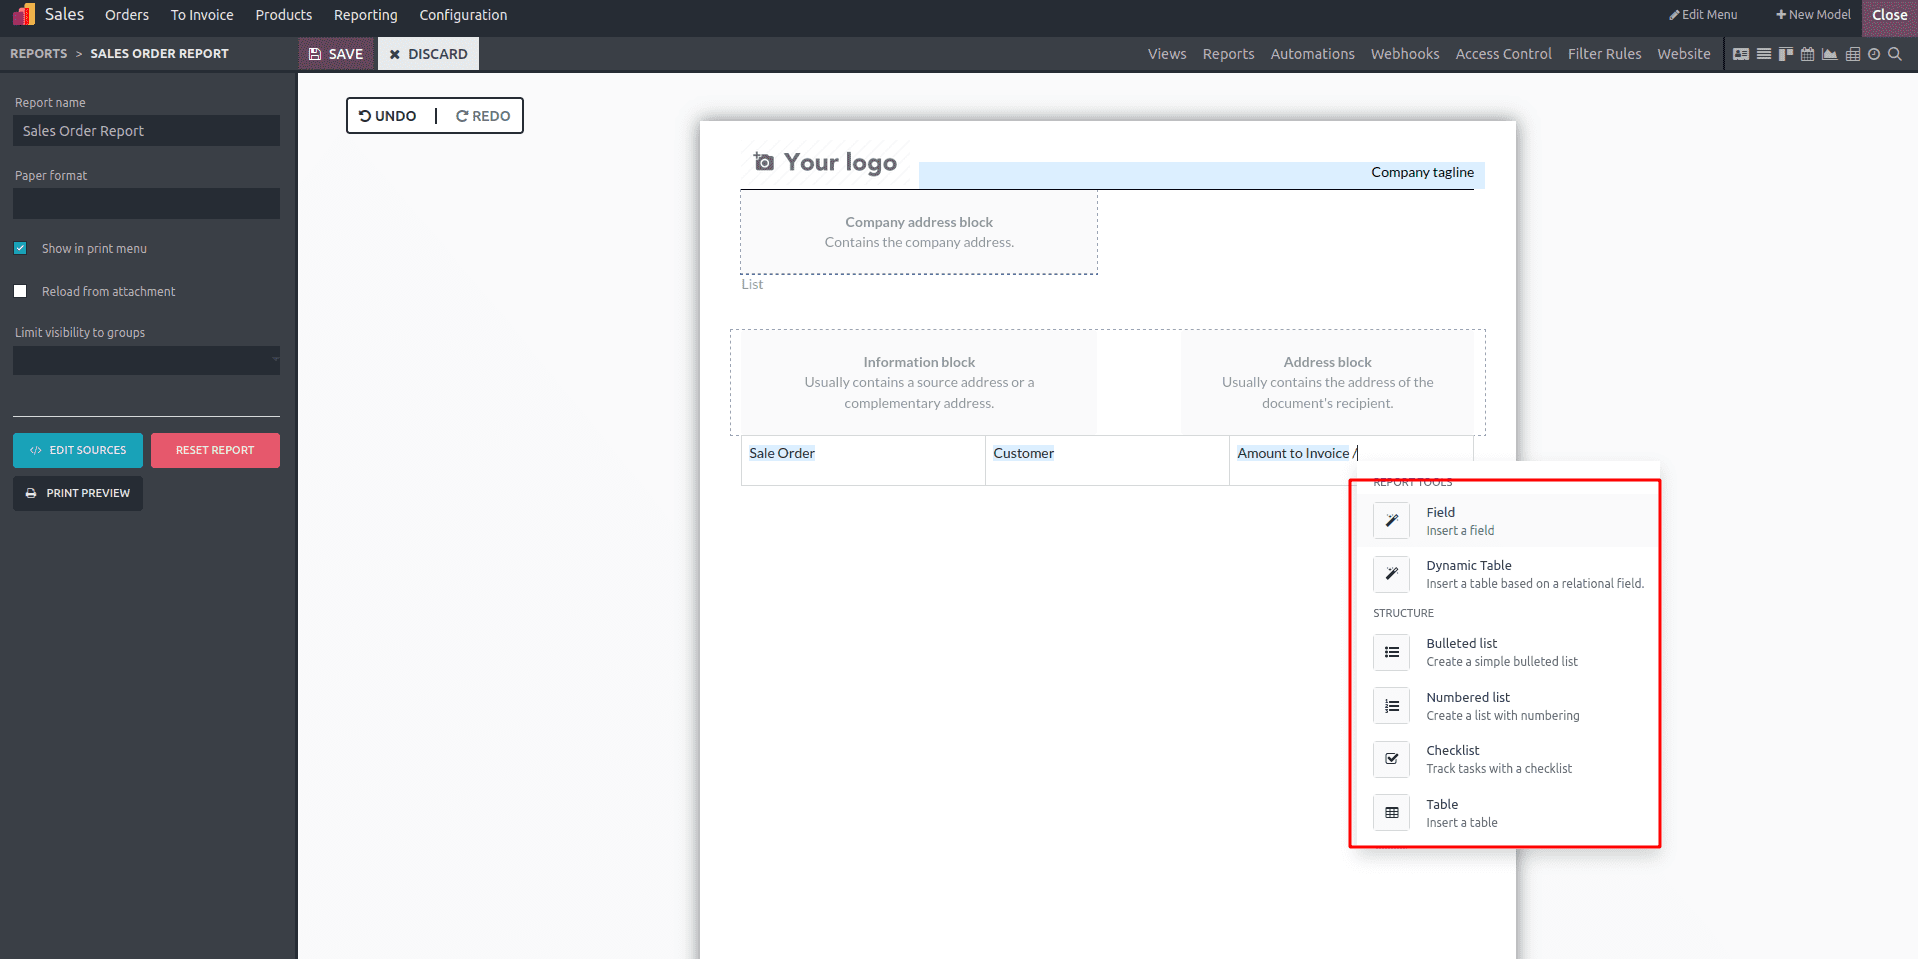
To craft a customized report design, start by selecting the appropriate report type. Then, proceed to create the report template by inserting various tools and components. These components can be selected from the dropdown menu by typing '/' and choosing the desired option.
To expand the desired area in your report template, you can utilize blocks such as Text, Field, Title Block, Field and Label, Image, and Address Block. These blocks offer various characteristics that can be configured using "Inline" aspects like Text and Field components. Additionally, you can define tables through the Reporting menu, including components such as Data Table, Field Column, Text in Cell, Field in Cell, Subtotal, and Total. "Column" types can also be used to establish two or three columns within your report design.
Below is a simple demonstration of a Report page that I have created for illustration purposes. You can customize this page by adding more columns and data according to your application type and specific requirements.
Users utilizing the Odoo Studio module have the ability to customize report menus using a diverse range of operational tools specifically designed for business needs. You can preview and verify activities by selecting the "PRINT" button and editing the Print Preview if necessary. Additionally, reports can be downloaded in PDF format, providing further flexibility in data management and distribution. If you want to read more about how to customize views & reports in odoo refer to our previous blog.