In mobile application development, user feedback is crucial, and one effective way to gather it is through ratings. Flutter, a popular UI toolkit, provides various widgets to implement rating screens effortlessly. In this blog post, we'll explore a Flutter Rating Screen using the flutter_rating_bar packages.
Before we move on to the coding process, we need to start a new project and channel in Flutter. To create a new Flutter project, please follow the steps below: Go to “File” -> “New” -> “New Flutter Project”.
After creating the project, a channel must be created. Create the device by selecting "Create Device" in the left window. Commence by establishing a variable symbol and import the required items as follows:
import 'package:flutter/material.dart';
import 'package:flutter_rating_bar/flutter_rating_bar.dart';
Create a new class named RatingScreen that extends StatefulWidget, indicating that it will have mutable state.
class RatingBarScreen extends StatefulWidget {
  @override
  _RatingBarState createState() => _RatingBarState();
}
The createState method is overridden to return an instance of the state class _RatingBarState. This is where the mutable state for the RatingBarScreen widget will be managed. The => syntax is shorthand for returning a single expression.
class _RatingBarState extends State<RatingBar> {
}
The _RatingBarState class extends State<RatingBar>, indicating that it is the associated state class for the RatingBar widget.
Initially, add the following variables into _RatingBarState class.
double value = 3.5;
double _userRating = 3.0;
IconData? _selectedIcon;
TextEditingController _ratingController = TextEditingController();
bool _isVertical = false;
value: Represents some initial value (not currently in use).
_userRating: Represents the user's rating, initially set to 3.0.
_selectedIcon: Represents the selected icon for the rating (can be null).
_ratingController: A TextEditingController for the TextFormField.
_isVertical: A flag indicating whether the rating bar should be displayed vertically.
The basic structure of the screen for the rating bar is given below:
@override
  Widget build(BuildContext context) {
    return Scaffold(
      appBar: AppBar(
        title: Text('Rating Screen'),
      ),
      body: Padding(
        padding: EdgeInsets.symmetric(horizontal: 16.0),
        child: Column(
          mainAxisAlignment: MainAxisAlignment.center,
          children: [
          ],
          ),
          ),
          );
          }
It returns Scaffold, which is a fundamental building block for creating the basic structure of a Material Design app. It provides a layout structure that includes various common elements, such as an app bar, a bottom navigation bar, and a body where the main content of the screen resides. The Scaffold widget helps organize and structure the visual hierarchy of a Flutter application.
Now, add a rating bar widget to the screen. To achieve this, add the following code inside the children[] array.
RatingBar.builder(
              initialRating: 2,
              minRating: 1,
              direction: Axis.horizontal,
              allowHalfRating: true,
              itemCount: 5,
              itemBuilder: (context, _) => Icon(
                Icons.star,
                color: Colors.amber,
              ),
              onRatingUpdate: (rating) {
                print(rating);
              },
            ),
The full code for adding RatingBar.builder() inside the children[] array is as follows:
import 'package:flutter/material.dart';
import 'package:flutter_rating_bar/flutter_rating_bar.dart';
class RatingBarScreen extends StatefulWidget {
  @override
  _RatingBarState createState() => _RatingBarState();
}
class _RatingBarState extends State<RatingBar> {
  double value = 3.5;
  double _userRating = 3.0;
  IconData? _selectedIcon;
  @override
  void initState() {
    super.initState();
    _ratingController = TextEditingController(text: '3.0');
  }
  TextEditingController _ratingController = TextEditingController();
  @override
  Widget build(BuildContext context) {
    return Scaffold(
      appBar: AppBar(
        title: Text('Rating Screen'),
      ),
      body: Padding(
        padding: EdgeInsets.symmetric(horizontal: 16.0),
        child: Column(
          mainAxisAlignment: MainAxisAlignment.center,
          children: [
            RatingBar.builder(
              initialRating: 2,
              minRating: 1,
              direction: Axis.horizontal,
              allowHalfRating: true,
              itemCount: 5,
              itemBuilder: (context, _) => Icon(
                Icons.star,
                color: Colors.amber,
              ),
              onRatingUpdate: (rating) {
                print(rating);
              },
            ),
            ],
            ),
            ),
            );
            }
The output of the code is given below:
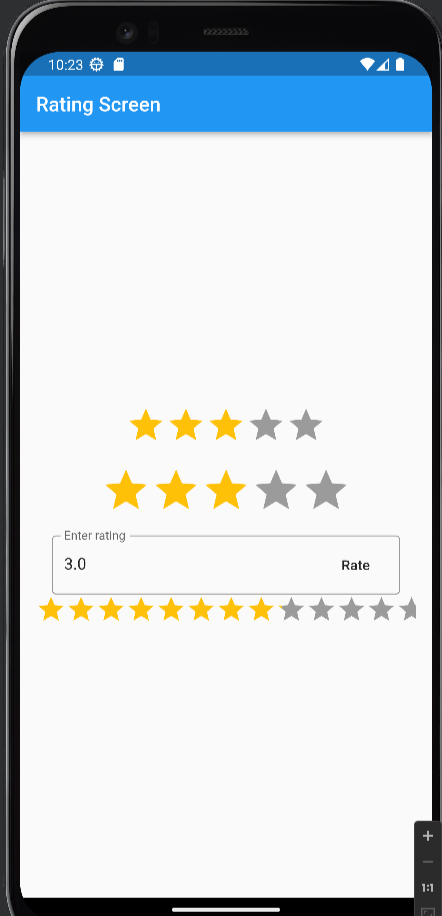
This blog provides complete code for the RatingBar display, giving Flutter an efficient way to rate content. This blog post can provide useful tips for developers looking to incorporate coding functionality into their Flutter apps.