Importing Customer Invoices and Vendor Bills into Odoo 19 is an essential step when setting up a new database or migrating from another system. Within the Accounting module, this process helps bring in existing financial transactions such as outstanding customer invoices and unpaid vendor bills, ensuring that receivables and payables are accurately reflected from the beginning. Instead of manually entering each record, Odoo provides a structured import mechanism that allows bulk data upload using predefined templates, saving time and reducing errors.
To ensure a successful import, it is important to correctly map key fields such as Customer, Vendor, Invoice Date, Due Date, Journal, Product, Taxes, and Accounts. Proper configuration of Journals, Payment Terms, and the Chart of Accounts before initiating the import helps maintain consistency and avoid validation issues during the process.
Odoo 19 also allows importing invoices in both Draft and Posted states, depending on the business requirement. This flexibility ensures that opening balances and historical transactions are properly recorded. By using the import feature effectively, businesses can maintain accurate financial data, ensure smooth reconciliation, and continue their accounting operations without interruption.
Importing a customer invoice
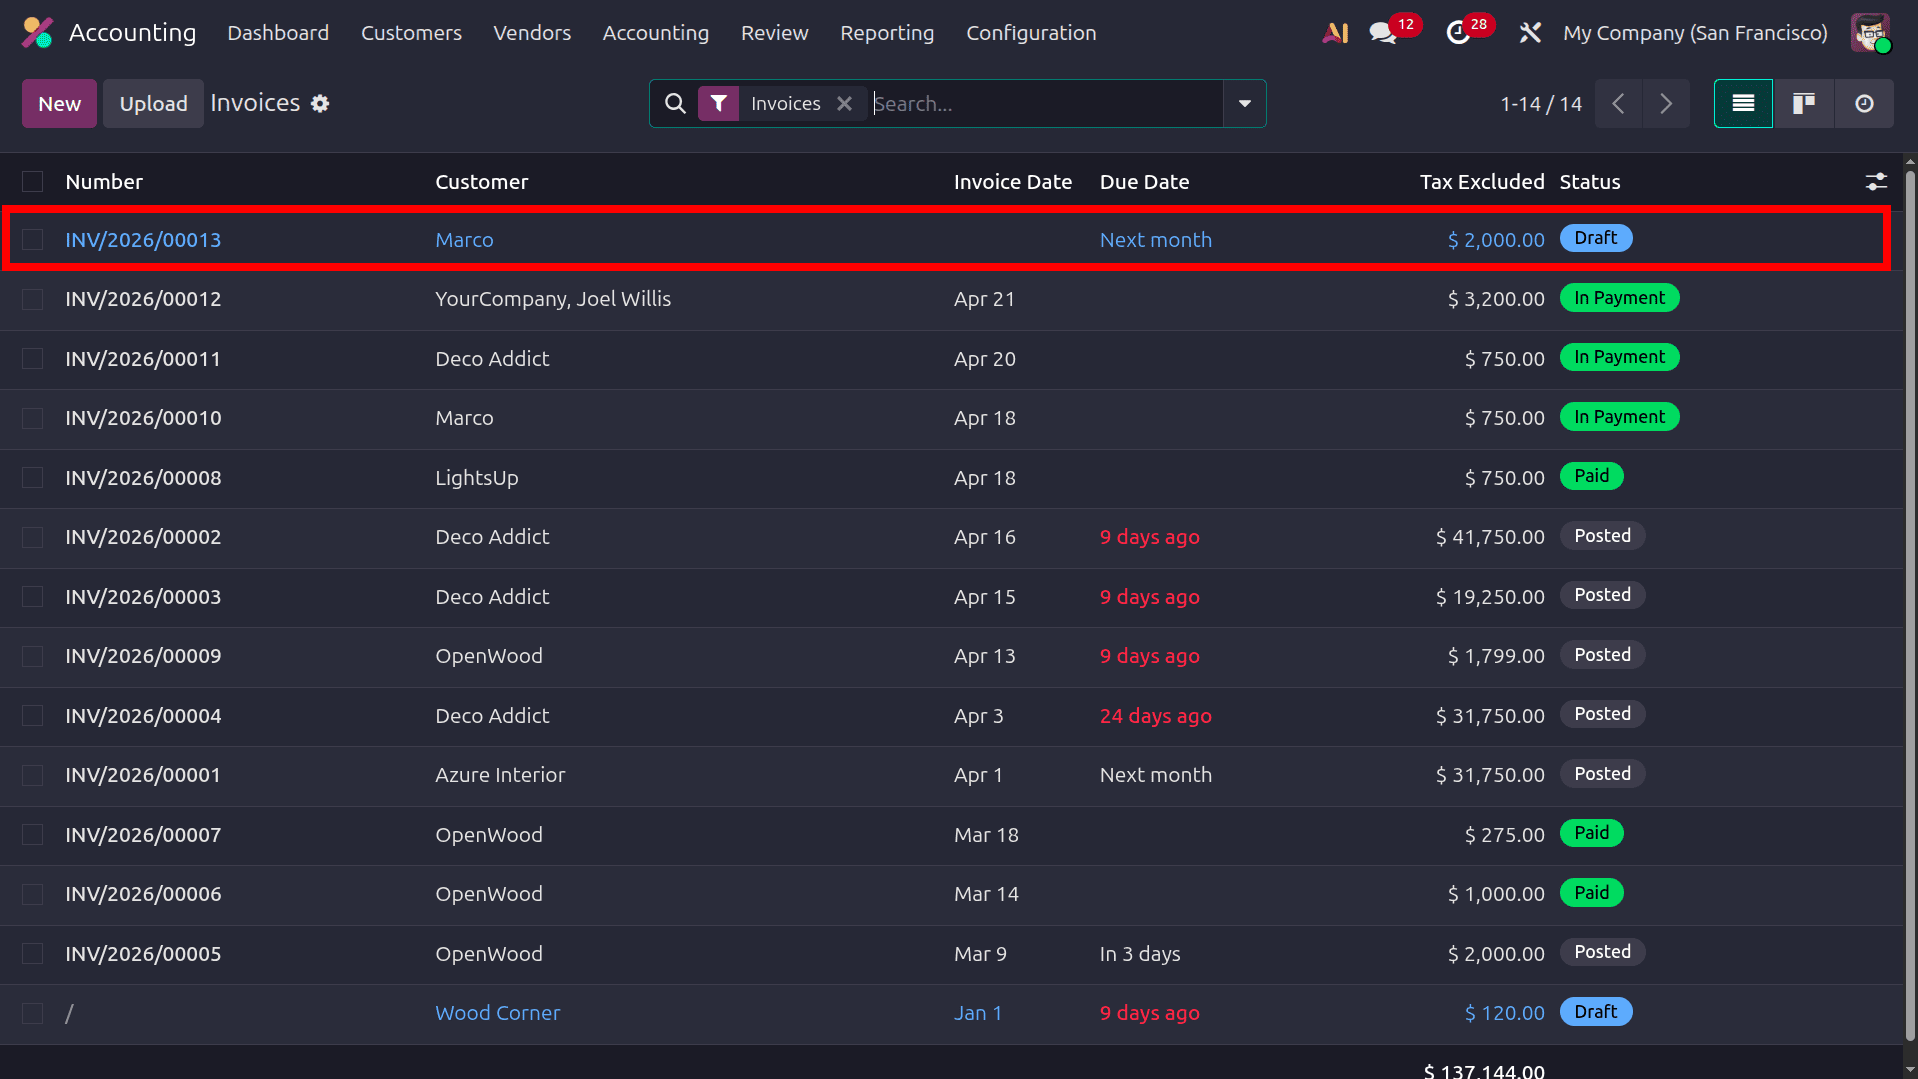
To import customer invoices into Odoo, it is recommended to first prepare an import template containing the required invoice fields. The easiest method is to export an existing customer invoice from the Accounting module. Navigate to the Customers menu and open the Invoices menu to access the customer invoice records. Select a sample invoice and use the Export option to download the invoice data structure, which can then be used as a reference template for importing invoice details into Odoo.
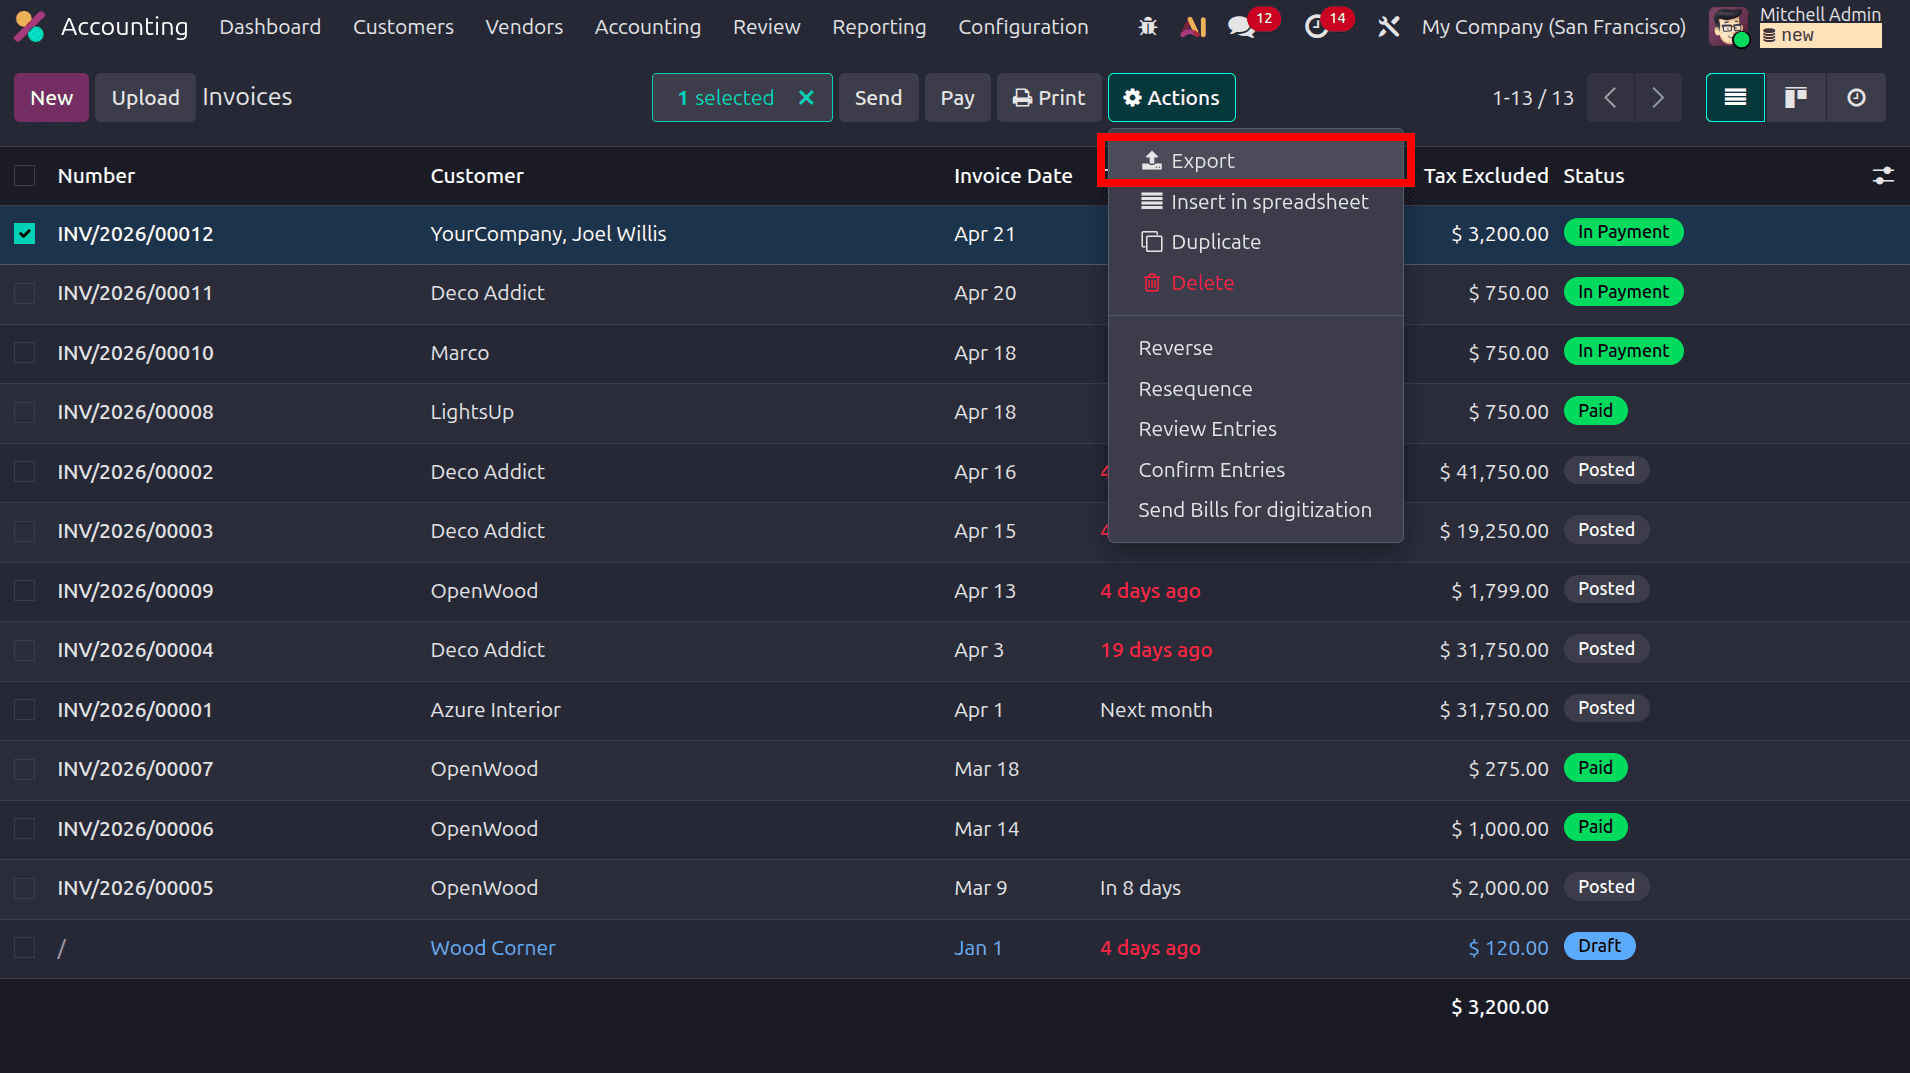
Choose a customer invoice from the invoice list view and click the Action menu highlighted in the screenshot above. From the dropdown options, select Export to open the export configuration wizard. In the export window, the Available Fields section displays all invoice-related fields, while the Fields to Export section contains the selected export fields. Additional fields can be added by clicking the + icon beside the required fields. Odoo also provides the option to save the selected field configuration as an export template, allowing the same format to be reused for future exports. Include all essential customer invoice fields in the Fields to Export section to prepare a complete invoice import template.
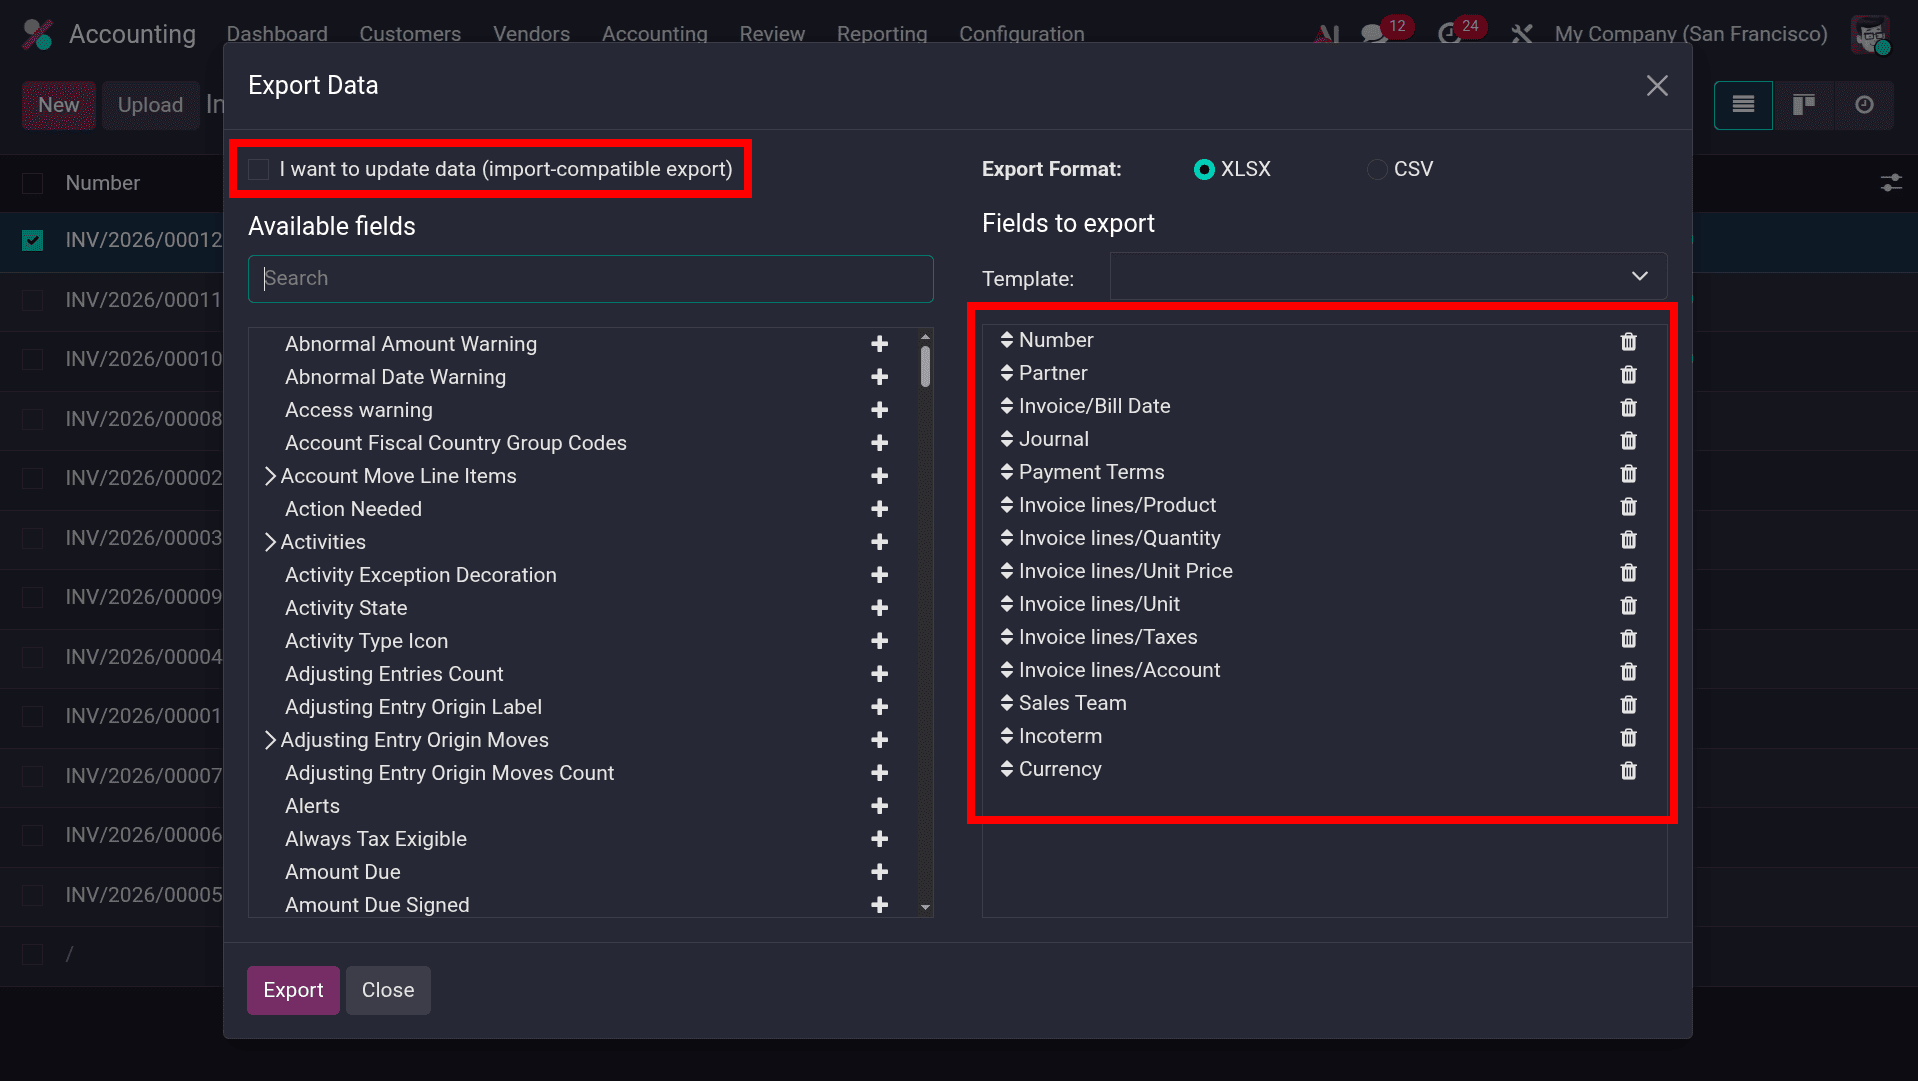
Number, Partner, Invoice/Bill Date, Journal, Payment Term, Invoice line/Product, Invoice line/Quantity, Invoice line/Unit Price, Invoice line/Unit, Invoice line/Taxes, Invoice line/Account, Sales Team, incoterm, Quantity.
- Number: Indicates the unique invoice reference assigned to the customer invoice.
- Partner: Represents the customer partner associated with the invoice and responsible for the payment.
- Invoice/Bill Date: Specifies the invoice date recorded for the customer invoice.
- Journal: Defines the accounting journal in which the invoice entries are posted.
- Payment Term: Refers to the payment terms configured to determine the invoice due date and payment conditions.
- Invoice line/Product: Identifies the invoice line product or service added to the customer invoice.
- Invoice line/Quantity: Specifies the quantity entered for the selected product or service in the invoice line.
- Invoice line/Unit Price: Represents the unit price configured for the invoice line item.
- Invoice line/Unit: Defines the unit of measure applied to the invoiced product or service.
- Invoice line/Taxes: Refers to the customer taxes applied to the corresponding invoice line.
- Invoice line/Account: Corresponds to the income or expense account used for recording the accounting entries of the invoice line.
- Sales Team: Indicates the sales team assigned to manage the related sales transaction.
- Incoterm: Defines the Incoterms used to specify the delivery responsibilities between the buyer and seller.
- Currency: Specifies the currency applied to the invoice transaction.
After adding all the required customer invoice fields to the export template, the configuration can be saved for future use. Once the template setup is completed, choose the preferred export format.
Odoo supports two primary export file formats for data export: XLSX and CSV. Select the required format and click the Export button to generate the file. The system will then download the exported customer invoice data to the local device for further editing and import preparation.


The data shown in the screenshots above was generated by exporting an existing customer invoice from Odoo. This exported file can then be used as a structured import template for entering the customer invoice details that need to be imported into the database.
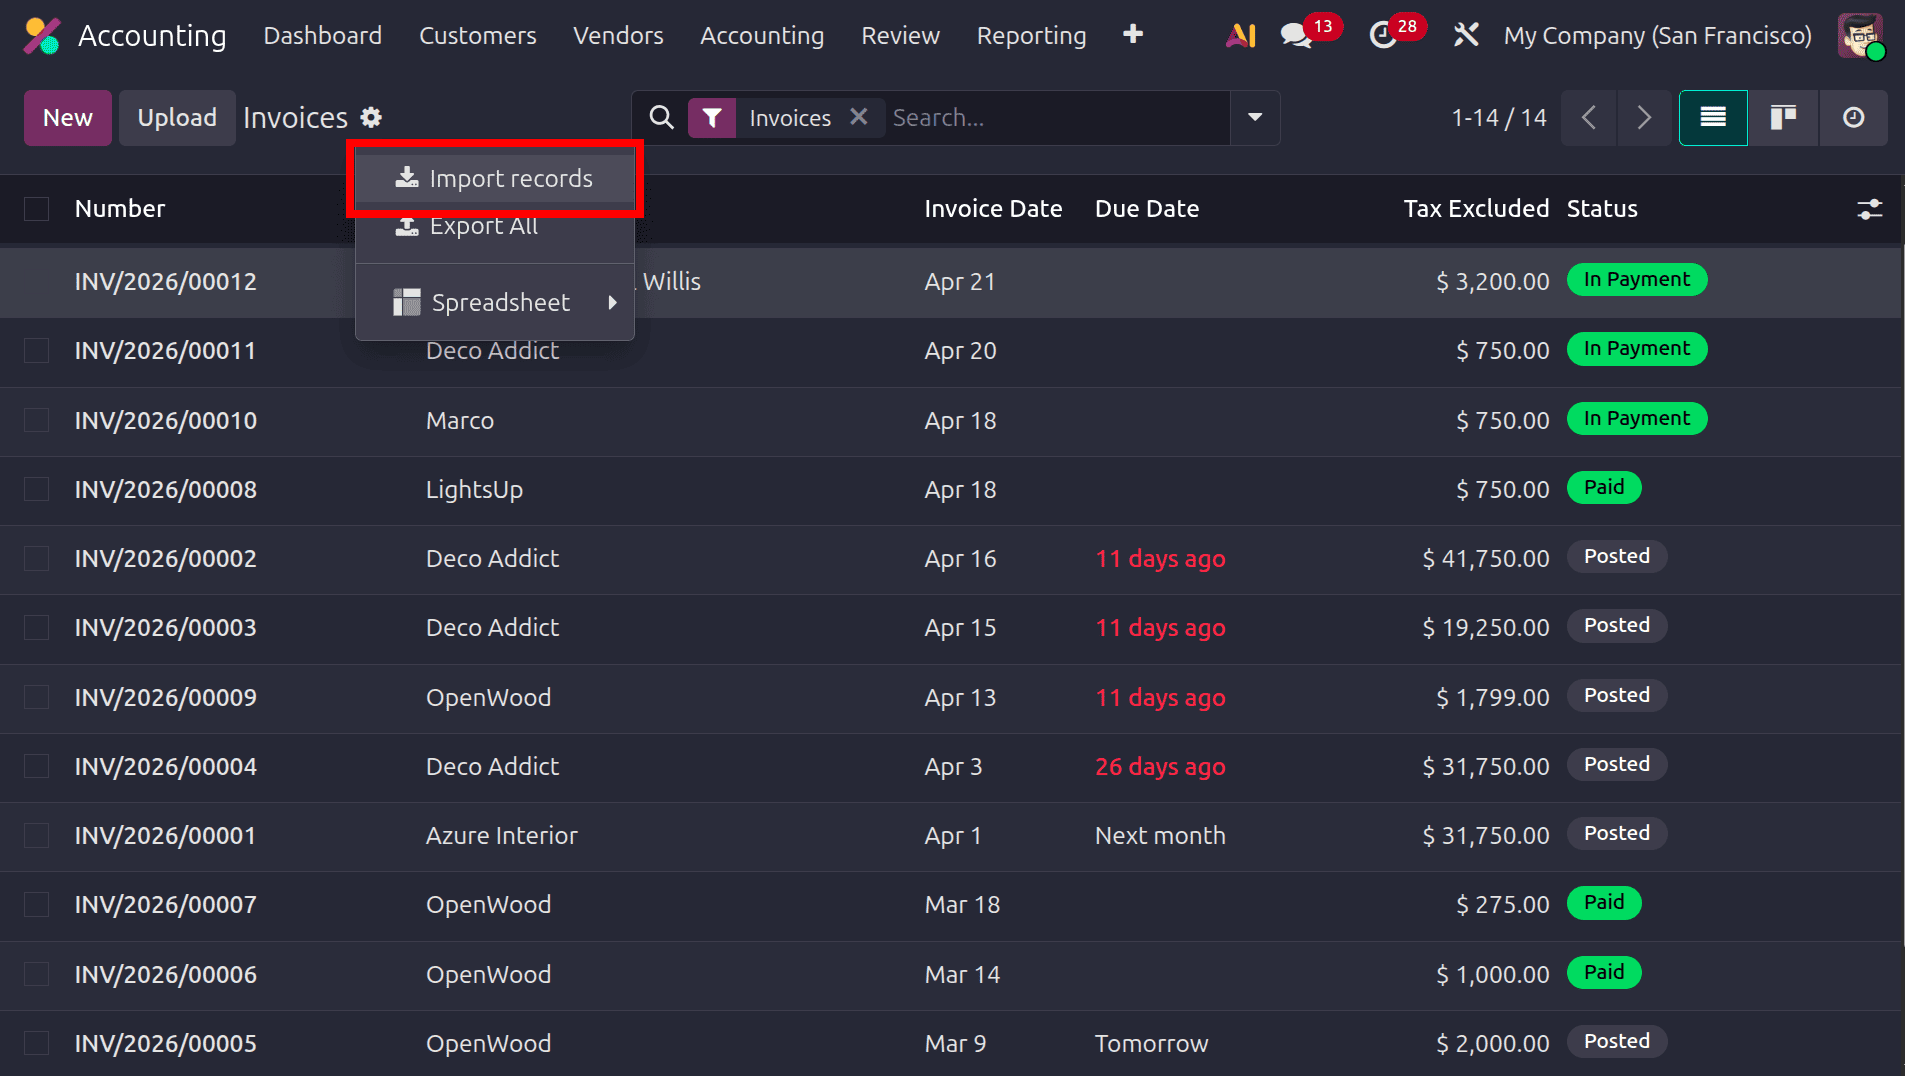
After preparing the file, navigate back to the customer invoice list view, open the Action menu, and select the Import Records option to begin the invoice import process.
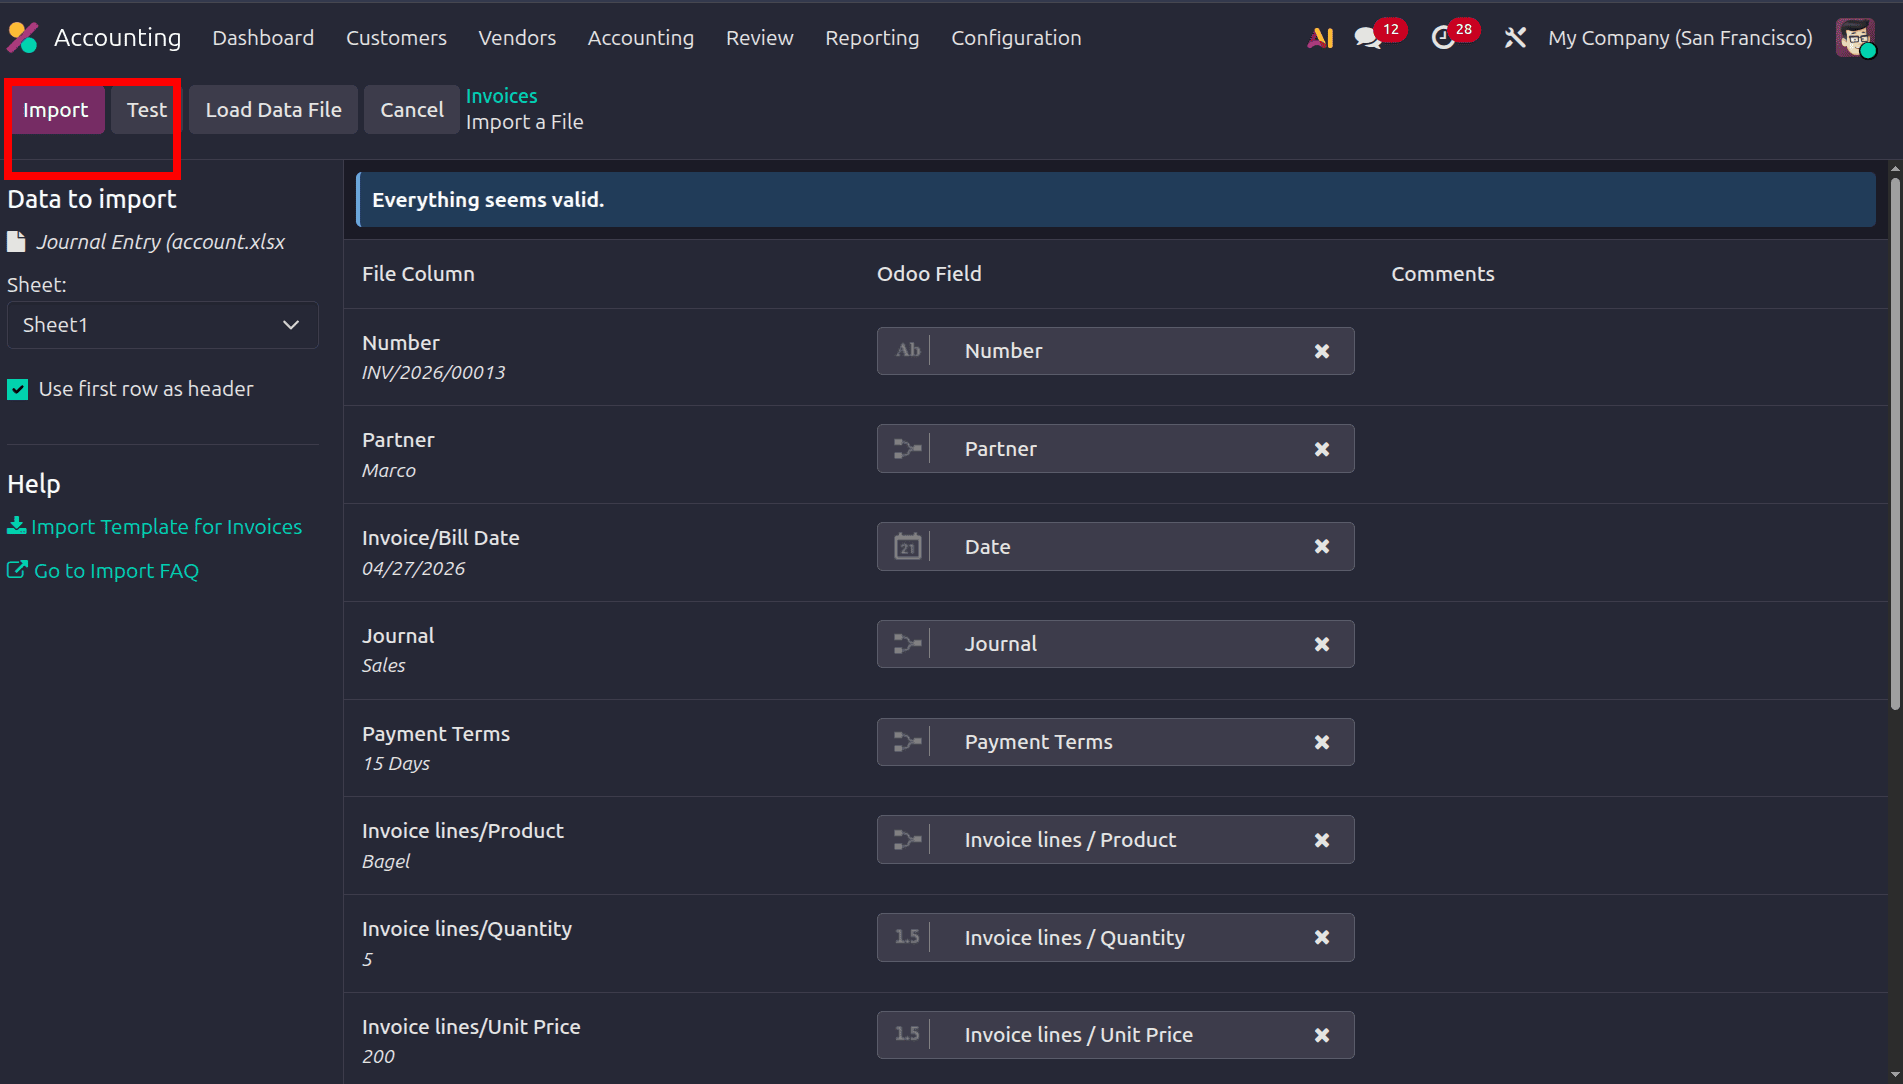
After selecting the Import Records option, Odoo opens the import interface where the prepared import file can be uploaded. Choose the file containing the customer invoice data to be imported and click the Test button to validate the file structure and field mapping.
If the uploaded data and mapped fields are configured correctly, Odoo displays the validation message, “Everything seems valid.” Once the validation is completed successfully, click the Import button to import the customer invoice records into the Odoo database.
After the import process is completed, Odoo displays a confirmation message indicating that the customer invoice records have been imported successfully. The newly imported invoices will then be available in the customer invoice list view within the Accounting module.
When the imported customer invoice is opened, all the data entered in the import file will be reflected in the invoice form view. By default, the imported invoice will remain in the Draft stage until it is confirmed and posted in the Accounting module.
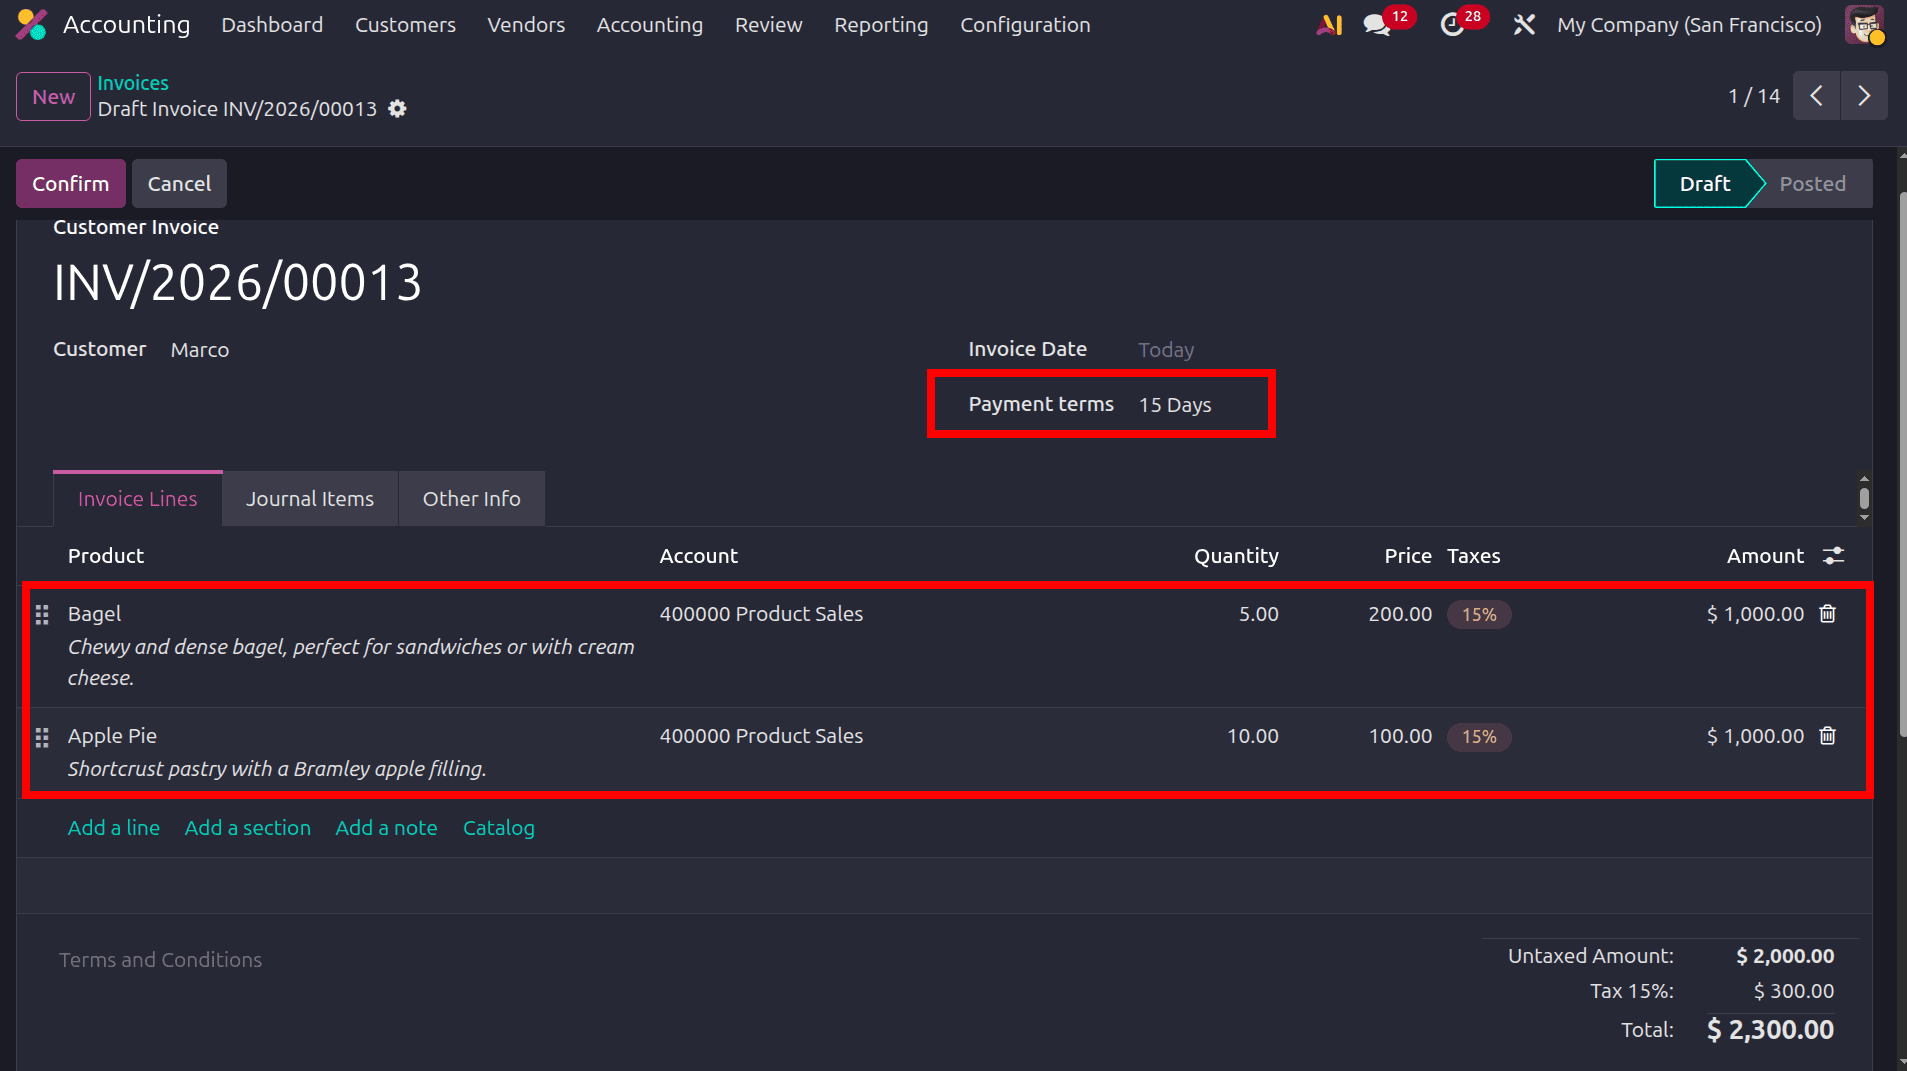
In the invoice form view, all imported accounting and sales-related information were available. On moving to the other info tab the remaining details will be available.
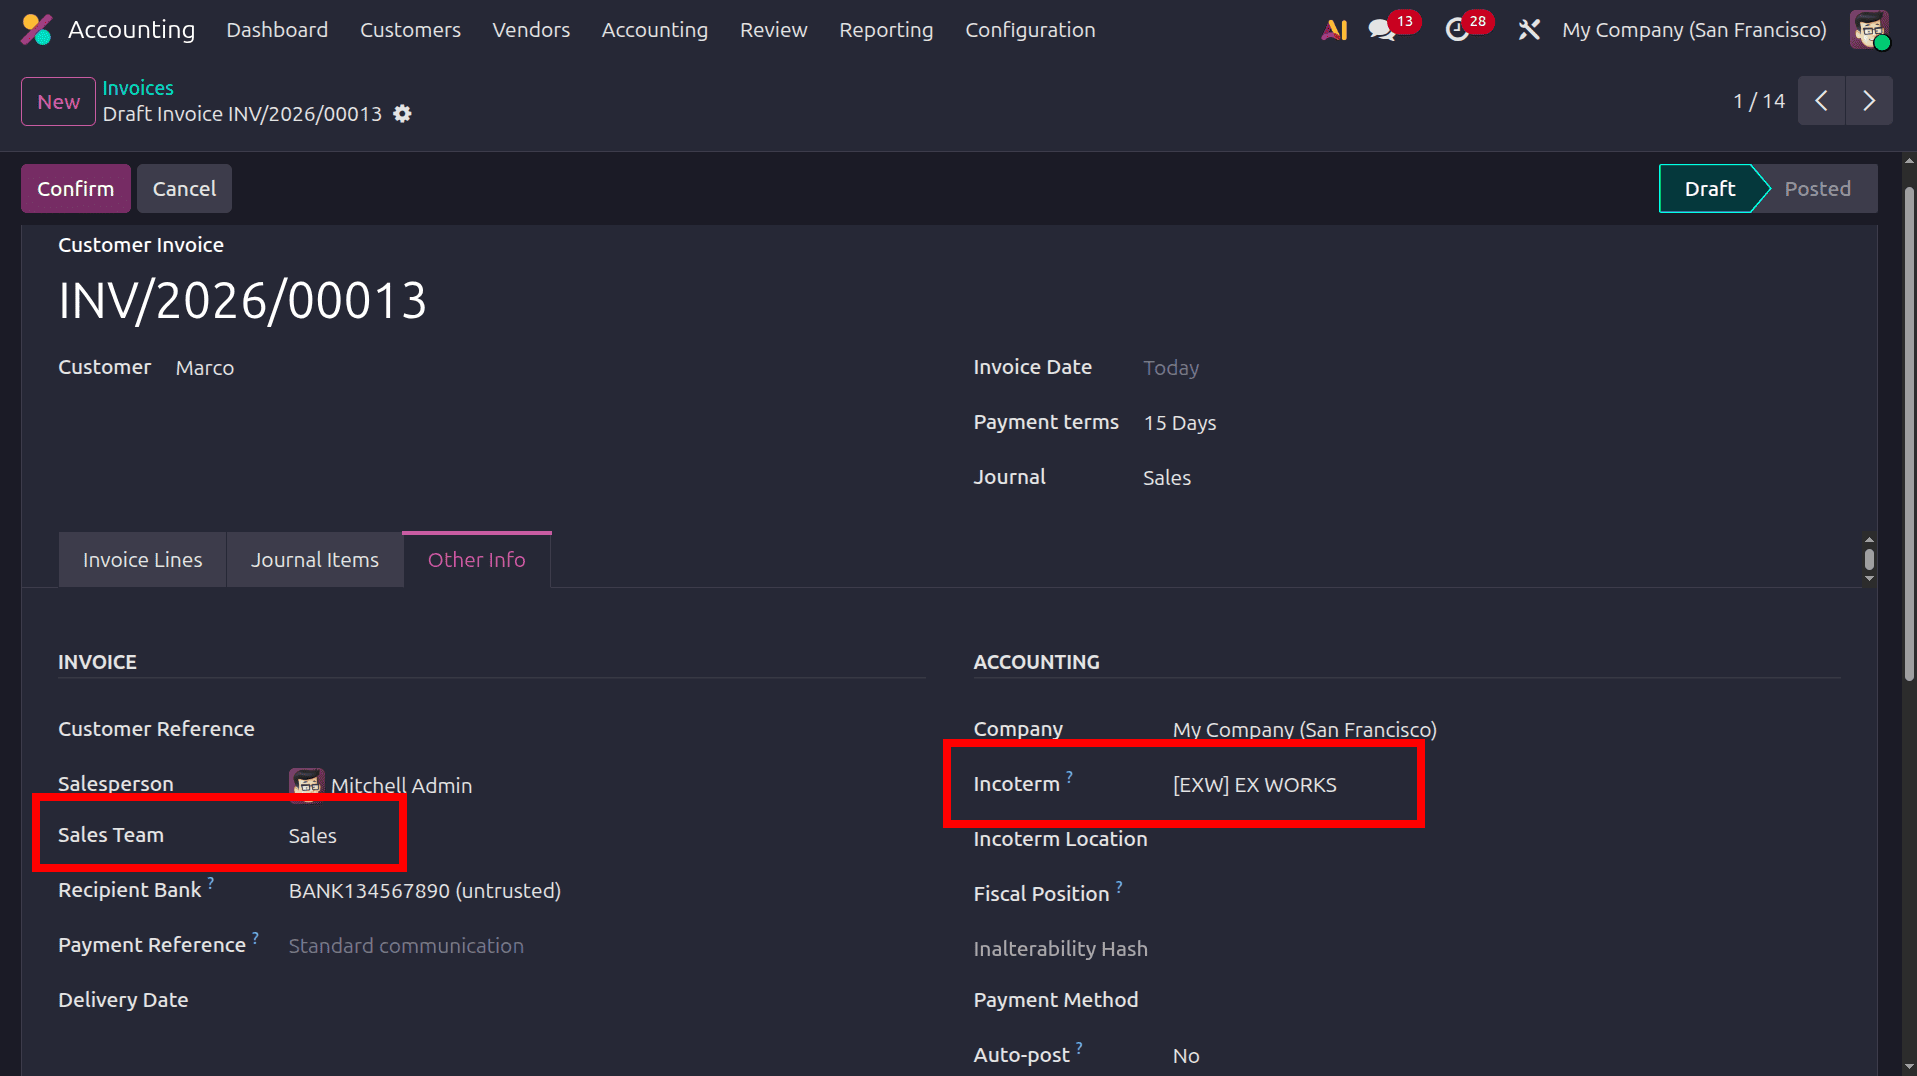
payment terms, accounting journals, accounts, Incoterms, sales teams, and other configured invoice details, can be verified successfully within the customer invoice record.
Importing customer invoices into Odoo 19 simplifies the process of migrating accounting data and managing large volumes of financial records efficiently. By using the built-in import and export features available in the Accounting module, businesses can quickly upload invoice data while maintaining accuracy in journals, payment terms, taxes, accounts, and invoice line details. Preparing a structured import template and validating the data before importing helps reduce configuration errors and ensures smooth accounting operations within the database.
The import functionality in Odoo 19 also improves productivity by eliminating repetitive manual data entry and supporting bulk invoice creation through XLSX or CSV files. Once imported, all accounting and sales-related information is automatically reflected in the customer invoice form view, allowing users to review, validate, and post invoices directly from the system. With proper field mapping and accounting configuration, Odoo provides a reliable and efficient approach for maintaining accurate customer invoicing and financial records during database setup or business migration activities.
To read more about An Overview of Creating Customer Invoices in Odoo 19, refer to our blog An Overview of Creating Customer Invoices in Odoo 19.