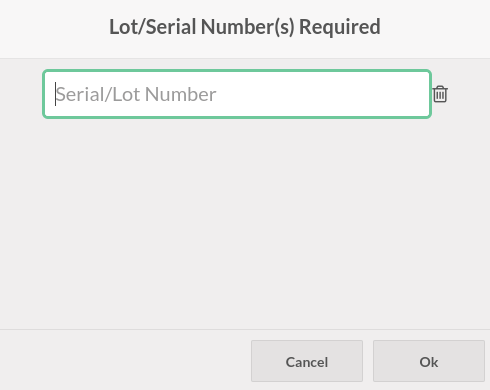
Point of sale is one of the most significant modules in odoo ERP. In this blog, we can see how to override a widget in POS. Before going to the programming we want to know what a widget is. A widget is the most important building block of a user interface or we can say In Odoo, most of the components in the user interface are controlled using a widget. So basically a widget can have a template linked with it. Now let us look into the working, when the widget is initialized, It will be rendering the template and appending it into the user interface. Here I am going to override the EditListPopup widget. Now let us see how an error popup is displayed when we click the ‘Ok’ button of the Lot and serial number popup.
Now we are going to create a custom module. The custom module structure is shown below.
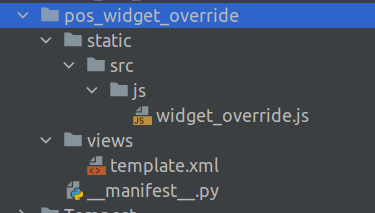
src folder is created under the static folder and a folder named js is created under the src.Js folder contains all js files. Create a folder named views to inherit the assets.
XML File: template.xml
There is a template called asset in point of sale where all the scripts are loaded. We have to inherit this template and we have to load our js file. This is the template that we create to inherit point-of-sale assets. We have to specify the path of the js file inside the script tag.
<?xml version="1.0" encoding="UTF-8"?>
<odoo>
	<data>
    		<template id="assets" inherit_id="point_of_sale.assets">
        		<xpath expr="." position="inside">
       <script type="text/javascript"       src="/pos_widget_override/static/src/js/widget_override.js"/>
        	   </xpath>
    		</template>
	</data>
</odoo>
js File : widget_override.js
First of all, we have to extend the EditListPopup. The Editlist popup is used to show the serial and lot number operation of the products in your company. EditListPopup is given below.
odoo.define('pos_widget_override.widget_override', function (require) {
'use strict';
 const { useState } = owl.hooks;
 const AbstractAwaitablePopup = require('point_of_sale.AbstractAwaitablePopup');
 const Registries = require('point_of_sale.Registries');
 const { useAutoFocusToLast } = require('point_of_sale.custom_hooks');
 const EditListPopup = require('point_of_sale.EditListPopup')
 var core = require('web.core');
 var _t = core._t;
	const WidgetsOverride = (EditListPopup) =>
    	class extends EditListPopup {
    	async confirm(event){
    	this.props.resolve({ confirmed: true, payload: await this.getPayload() });
        	return this.showPopup('ErrorPopup', {
                                    	'title': this.env._t('Error'),
                                    	'body': this.env._t("Please Enter a Value"),
                                	});
     	}
}
   Registries.Component.extend(EditListPopup, WidgetsOverride);
  return EditListPopup;
});
First of all, we have to extend the EditListPopup widget and write code displaying an error popup when we click the ok button. Here we can set the title and content which we want to show inside the error popup based on our needs. After adding that, add it to the registries.
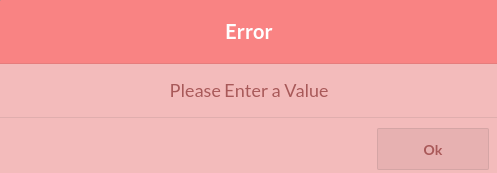
This is the error popup displayed when we click the ok button. Here I just added an ErrorPopup to show how to override a widget. In this way, we can override a widget and add whatever we want.