According to the manufacturer, an expiry date is the final day a consumable product, such as food or medication, will be at its highest condition. While federal law requires prescription and over-the-counter medicine manufacturers to provide expiry dates, food expiration dates guarantee the product's flavor and texture until that date. The packaging or container is labeled with dates such as "sell by," "use by," "best by," or "do not use after," which serve as a warning against tossing the product because of possible safety or efficacy concerns. Store employees are also given instructions on when to take products off the shelf by the expiration date.
To minimize loss and stop clients from obtaining outdated items, Odoo tracks the lifecycles of perishable products using their expiration dates. It enables businesses like food producers to specify exact expiry dates by assigning lots and serial numbers to items in order to determine their expiration information. This can be done from the Odoo 17 Inventory Application.
Configuring Lots/Serial Numbers
In order to designate expiration dates for your inventory items, we must first configure the choices for Lot/Serial Number. So, navigate to the “Configuration” menu and choose the “Settings” window. Inside the “Settings” window, you can see the “Traceability” section and tick the checkbox to enable the “Lots & Serial Numbers” option in order to allow expiration dates in the Inventory app. After enabling this feature, Odoo will add another field named “Expiration Dates” so enable the feature.
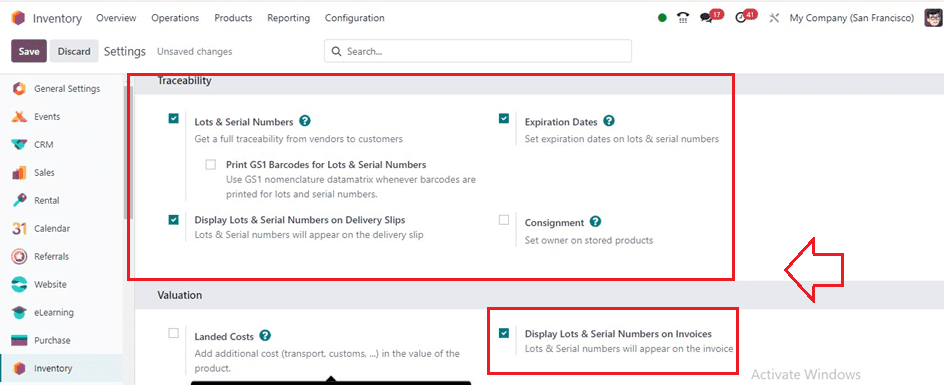
You can also enable the “Display Lots &Serial Numbers On Delivery Slips” and “Display Lots & Serial Numbers On Invoices” options to display the product Lots/Serial Numbers on the delivery slips and invoices, respectively. Finally, save the modifications and go to a product configuration form or create a new product by selecting the “Products” section of the “Product” menu.
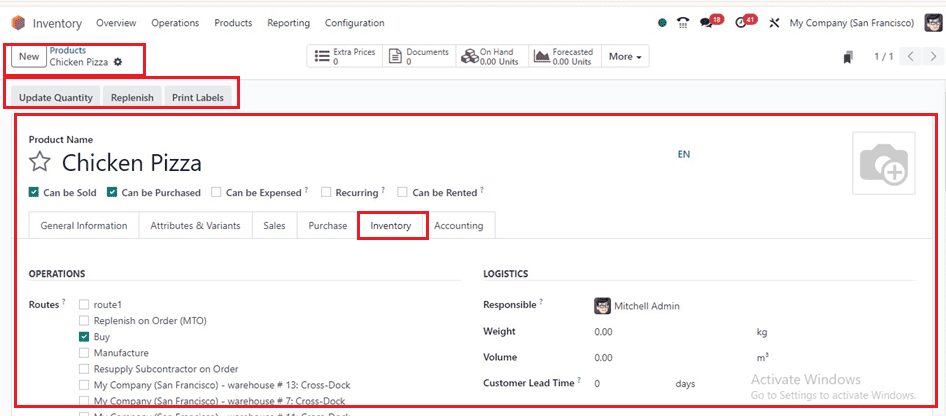
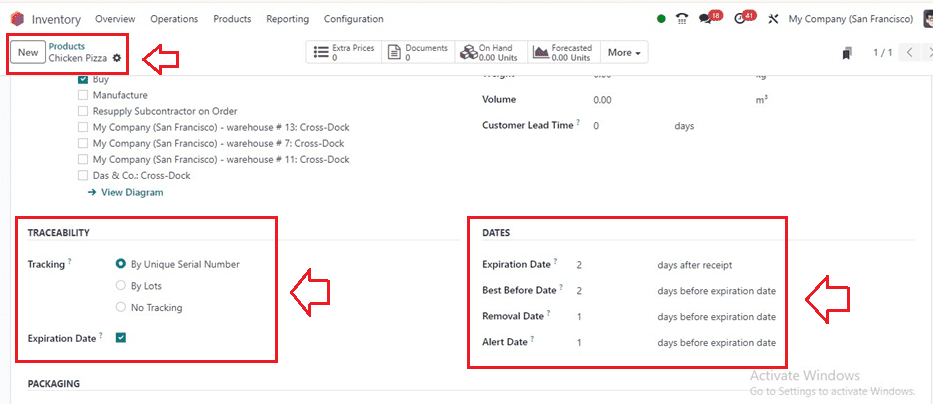
Here, I have simply created a new product named “Chicken Pizza” and provided some basic product details inside each of the form tab sections. To set the product expiration dates, go to the “Inventory” tab of the product’s configuration form and select either “By Unique Serial Number” or “By Lots " as the " Traceability " option. This will display another field named “Expiration.” Activate the option, and you will get some fields to set some types of expiration Dates in the “DATES” section, including “Expiration Date,” “Best Before Date,” “Removal Date,” and “Alert Date,” which make it possible to enable traceability.
DATES
* Expiration Date: The duration between the moment an item is manufactured or received from a seller until it becomes unsafe or unacceptable.
* Best Before Date: The term "Best Before Date" describes the time frame prior to the expiration date when products start to deteriorate, even if there may not be a serious concern.
* Removal Date: The days left until the products are taken out of stock are indicated by the expiration date.
* Alert Date: An alert regarding items in a certain lot or serial number should be sent out a certain number of days prior to the expiration date.
The screenshot below shows the expiration dates that I have provided for this food item product.
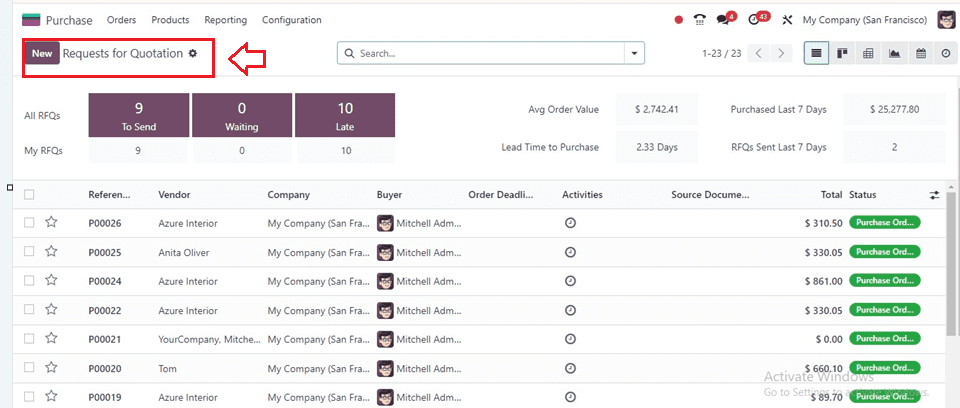
After providing the Dates, save the data, and we can quickly create a new purchase order for this product. So, go to the “Requests for Purchase” section of the Purchase “Order” menu.
You have to edit the order details in the displayed form view, save, and confirm the order.
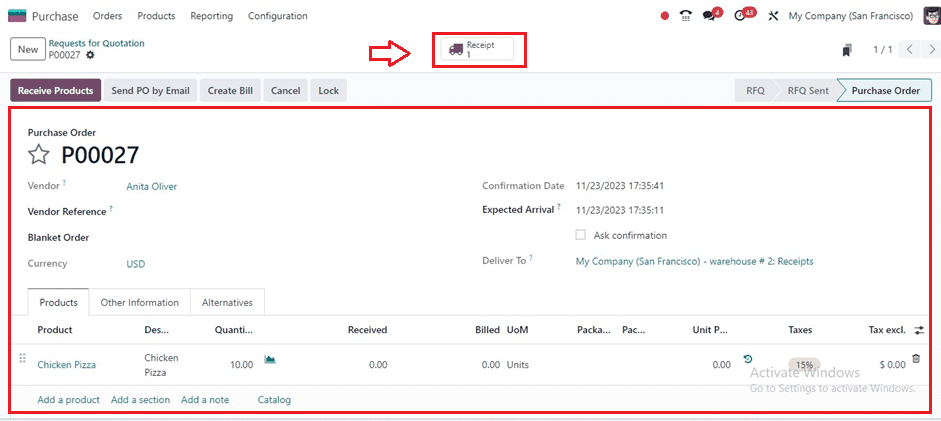
Inside the “Receipts” smartbutton page, you will get the detailed delivery operations details. Click on the menu provided inside the product column of the “Operation” tab.
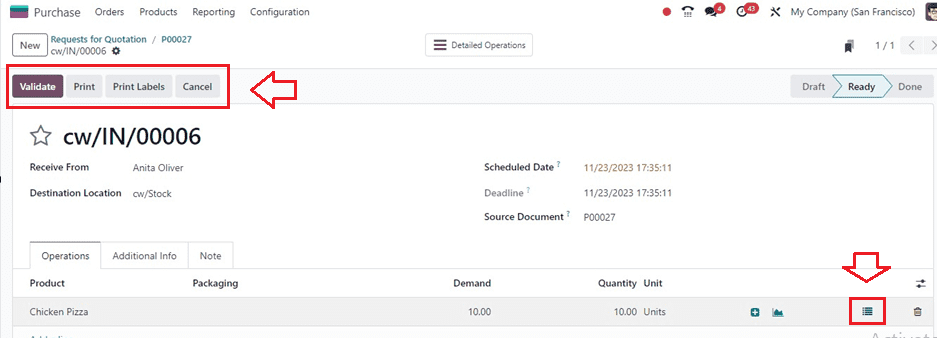
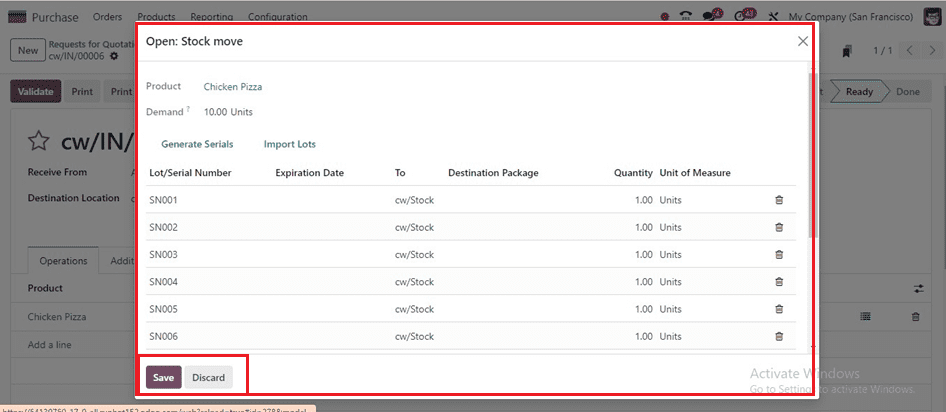
Then, it will open a new popup window with a dashboard containing fields including Lot/Serial Numbers, Expiration Date, To, Destination Package, Quantity, and Unit of Measure. Also, you can configure new product serial or Lot numbers using the “Generate Serials’ and “Import Lots” buttons, as depicted in the screenshot below.
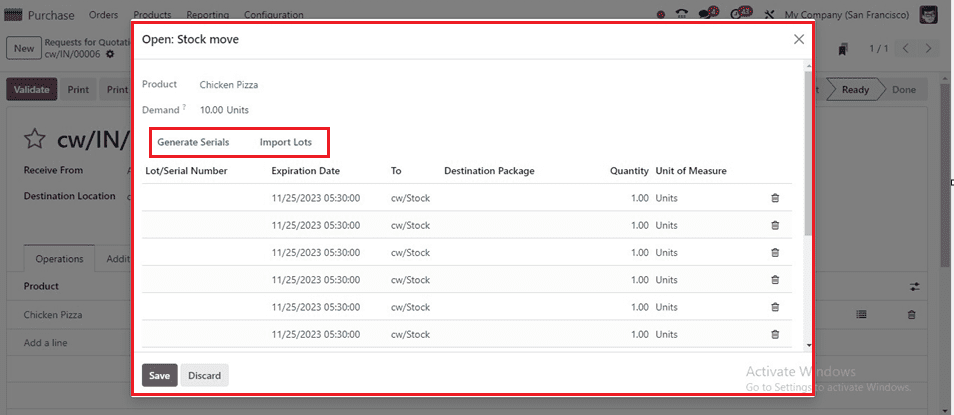
We ca create new Serial Numbers by clicking on the “Generate Serials” button. This will open another wizard that will help you to generate serial numbers. Odoo provides an automatic solution for assigning serial numbers to multiple products. Users can use the "Generate Serials" button to customize serial numbers and the total required number of serial numbers in the “Number of SN” field. We can also customize the product's First Serial Number (SN) before clicking the "Generate" button to generate the necessary serial numbers.
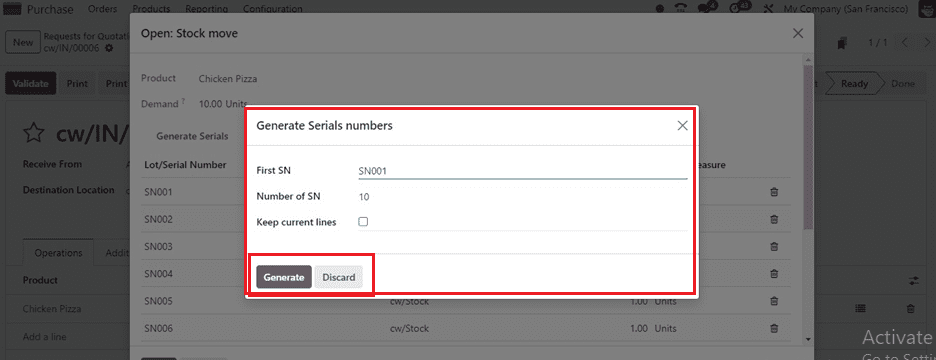
I am giving a sample serial number in the “First SN” field as “SN001” and generating the serials using the “Generate” button.
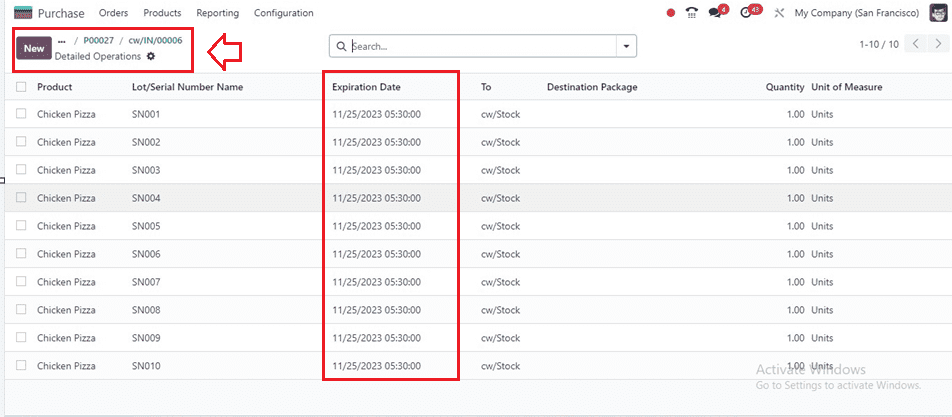
The above screenshot shows our product's newly generated serial numbers. Remember to save the numbers and come back to the purchase order configuration page.
You can view a "Detailed Operations" smart tab that displays a dashboard of products with lot/serial numbers and expiration dates. The two-day expiration date set on the product form is also displayed in the "Expiration Date" section. Here, we have provided the same expiration dates for this package of products, you can also provide different expiration dates for specific lot numbers using the "Lot/Serial Numbers" configuration form in the "Products" menu.
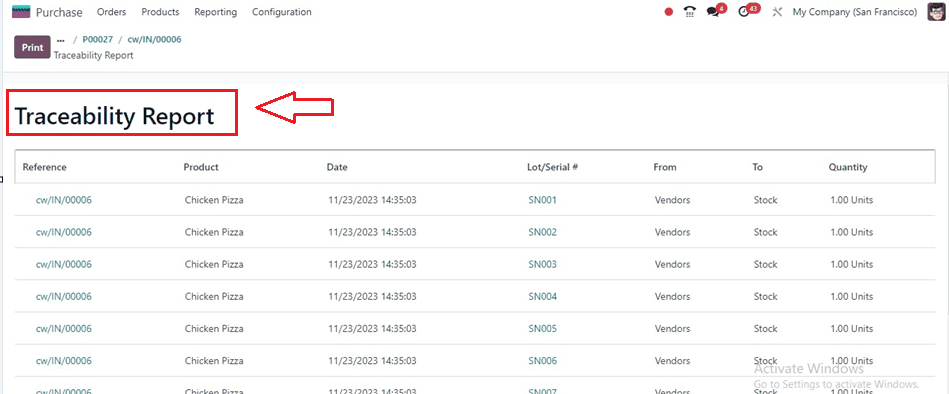
Validating the purchase order will display a “Traceability” smartbutton inside the form view, this smart button will show the Traceability Report as shown below.
Display Expiration Dates on Delivery Slips
To display Expiration Dates on any purchase order delivery slips, we have to configure the functionality from the Inventory Settings window.
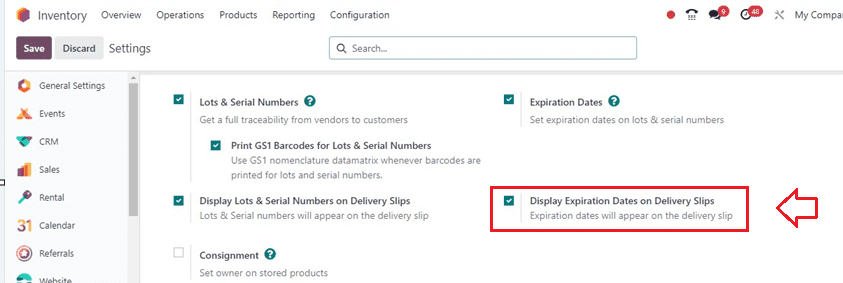
After enabling the ‘Expiration Dates” feature, activate the “Display Expiration Dates on Delivery Slips” option and save the changes.
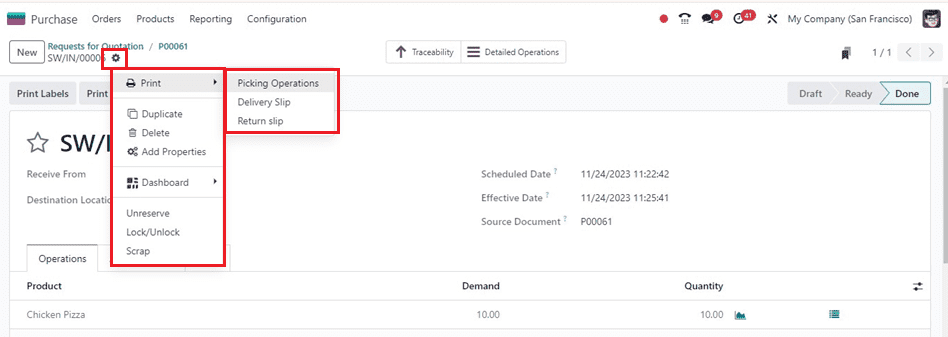
Then, you can print or download the invoices using the “Print” option available in the “Action” menu. You can print invoices, Delivery Slips, and Return Slips using this button. So go to the “Receipts” window and print the Delivery Slip.
After billing the purchase order, you can proceed with the other processes and download the purchase order documents.
Lots/Serial Numbers Menu
The Odoo inventory users can manage and create more Lots and Serial Numbers for their inventory product using the “Lots/Serial Numbers” option available inside the “Products” menu.
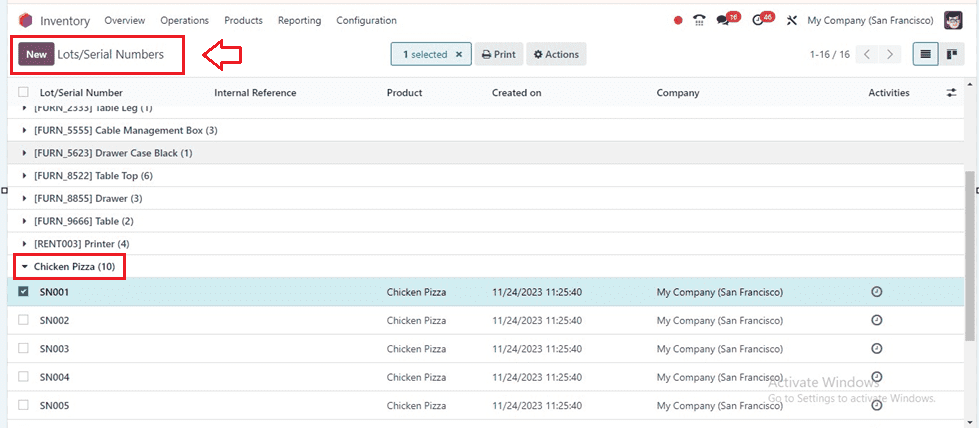
The dashboard will display the list of products with their Lots/Serial Numbers, Internal References, Products Created Date, Companies, and Activities. You can see the total generated Lot/Serial numbers of each product by clicking on the downward arrow symbol. After selecting the numbers, utilize the “Action” menu to Print, Duplicate, and Delete the serial numbers.
These are the functionalities available in the process of setting Expiry Dates for products based on their Lots/Serial Numbers using the Odoo Inventory Module in Odoo 17.