In this blog, we are going to discuss how to use the useRefListener hook in Odoo 19 to make your custom development a quality business solution. This is a powerful yet useful modern solution in Owl technology to manage an event on a ref element in the Odoo Owl template. This hook is very useful for hooks that want to manage event listeners, especially more than one. In this blog, let’s see a real example of how to effectively use the hooks in our custom development to build a quality module.
Let’s create a custom module with a manifest structure like below
{
    'Name': 'Your Module Name',
    'version': '19.0.1.0.0',
    'summary': 'Demonstration of useRefListener hooks in Odoo OWL 19',
    'depends': ['web'],
    'data': [
        'views/your_module_actions.xml',
    ],
    'assets': {
        'web.assets_backend': [
            'Your_module_name/static/src/js/component.xml',
            'Your_module_name/static/src/js/component.js',
        ],
    },
    'application': False,
}
We are going to create a custom component, its UI, a client action, and a menu item to link the created client action to finally view the created view.
Let’s create the custom component by importing the necessary hooks and other required components. Also, create our component.js file inside the static/src/js directory
component.js
import { Component, useRef } from "@odoo/owl";
import { useRefListener } from "@web/core/utils/hooks";
import { registry } from "@web/core/registry";
export class MyCustomComponent extends Component {
    setup() {
        this.root = useRef("root");

        useRefListener(this.root, "mouseenter", (ev) => {
            let targetElement = ev.target;
            if (targetElement) {
                targetElement.style.backgroundColor = "red";
                targetElement.style.color = "white";
            }
        });
        useRefListener(this.root, "mouseleave", (ev) => {
            let targetElement = ev.target;
            if (targetElement) {
                targetElement.style.backgroundColor = "";
                targetElement.style.color = "";
            }
        });
    }
}
MyCustomComponent.template ="your_module_name.MyCustomTemplate";
registry.category("actions").add("my_client_action_tag", MyCustomComponent);
Now, let’s create the component.xml file in the static/src/xml directory
component.xml
<?xml version="1.0" encoding="UTF-8"?>
<templates xml:space="preserve">
   <t t-name="your_custom_module_name.MyCustomTemplate">
       <div class="o_my_client_action"
                style="display: flex; flex-direction: column; justify-content: center;
                align-items: center; height: 100vh; text-align: center;">
           <h1>useRefListener</h1>
           <p>This is a custom OWL component in Odoo 19.</p>
           <!-- Button -->
           <button type="button" class="btn btn-primary" t-ref="root">
               Hover me
           </button>
       </div>
   </t>
</templates>
Let’s create the client action and the menu to view the created custom component.
Create your_module_actions.xml under the view directory in your module and add the XML code in it below.
<?xml version="1.0" encoding="UTF-8"?>
<odoo>
   <!-- Client Action -->
   <record id="action_view_custom_component" model="ir.actions.client">
       <field name="name">View Custom Component</field>
       <field name="tag">my_client_action_tag</field>
   </record>
   <!-- Menu -->
   <menuitem id="menu_my_client_root"
             name="View Hook"
             sequence="10"/>
   <menuitem id="menu_my_client_action"
             name="Open Hook"
             parent="menu_my_client_root"
             action="action_view_custom_component"
             sequence="1"/>
</odoo>
Below is the view of the custom component we created
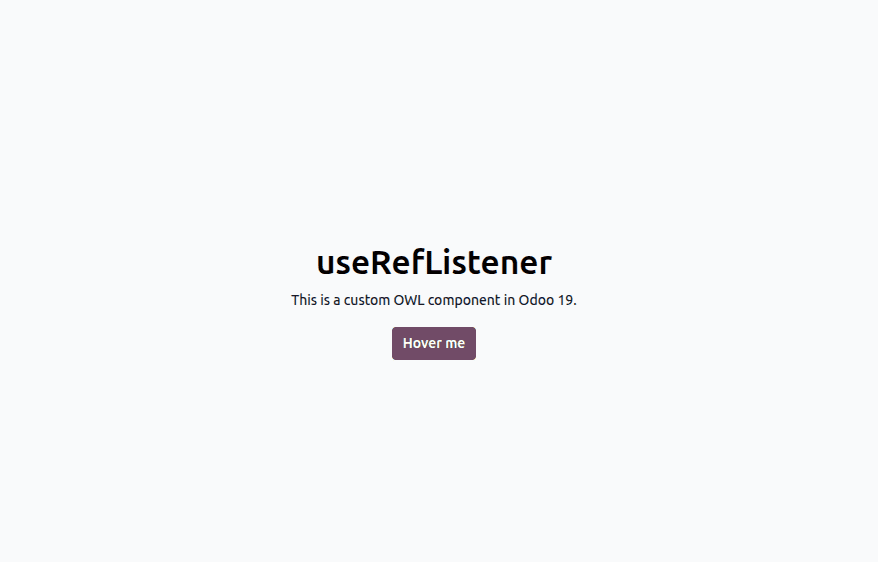
Hover the button on and off to view the magic of the useRefListener in our custom development. In the hook functionality, we defined to change the background color of the button to red on hover and the default on mouse leave from the button.
In this blog, we discussed a practical example of how to use the useRefListener hook effectively in custom development. This is a powerful hook that gives us control over the DOM elements; it removes the eventlistener when the component is destroyed and hence prevents memory leaks and performance halts.
To read more about How to Create Custom Hooks in Odoo 19 OWL, refer to our blog How to Create Custom Hooks in Odoo 19 OWL.