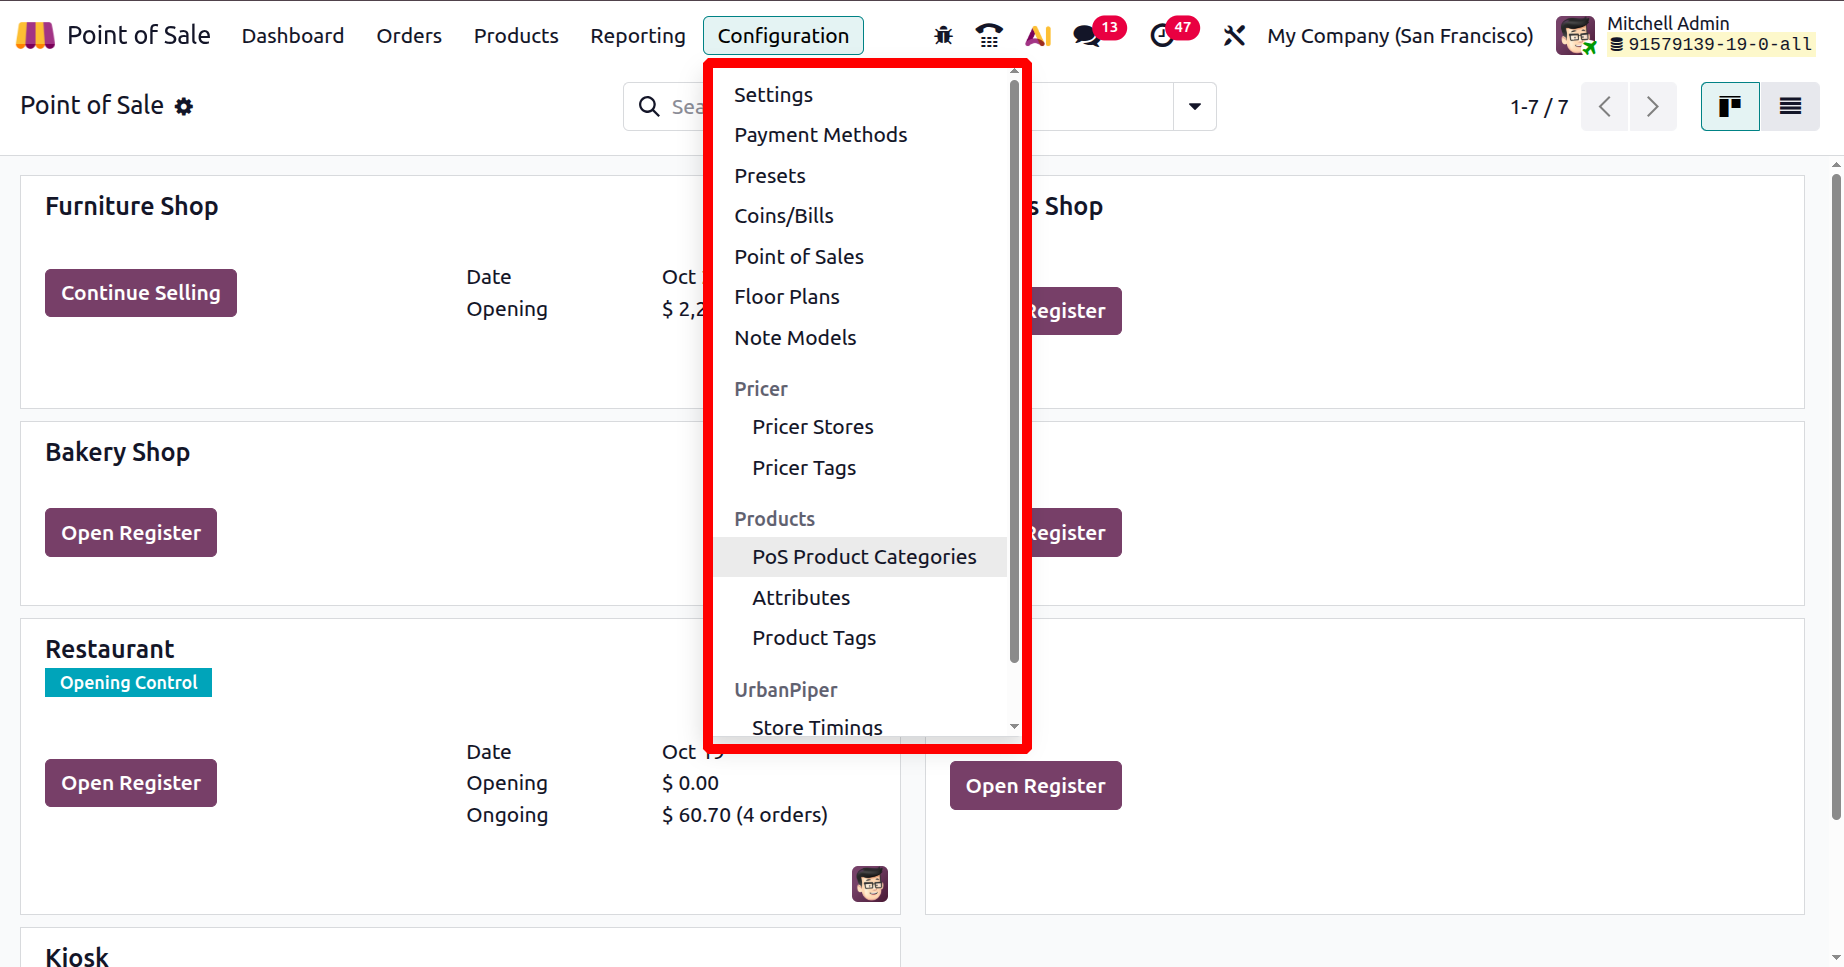
Configuration
The Configuration menu includes various setup options for PoS operations, such as General Settings, Payment Methods, Presets, Coins/Bills, Floor Plans, Note Models, Pricer Stores, Pricer Tags and more.
1.1 Payment Methods
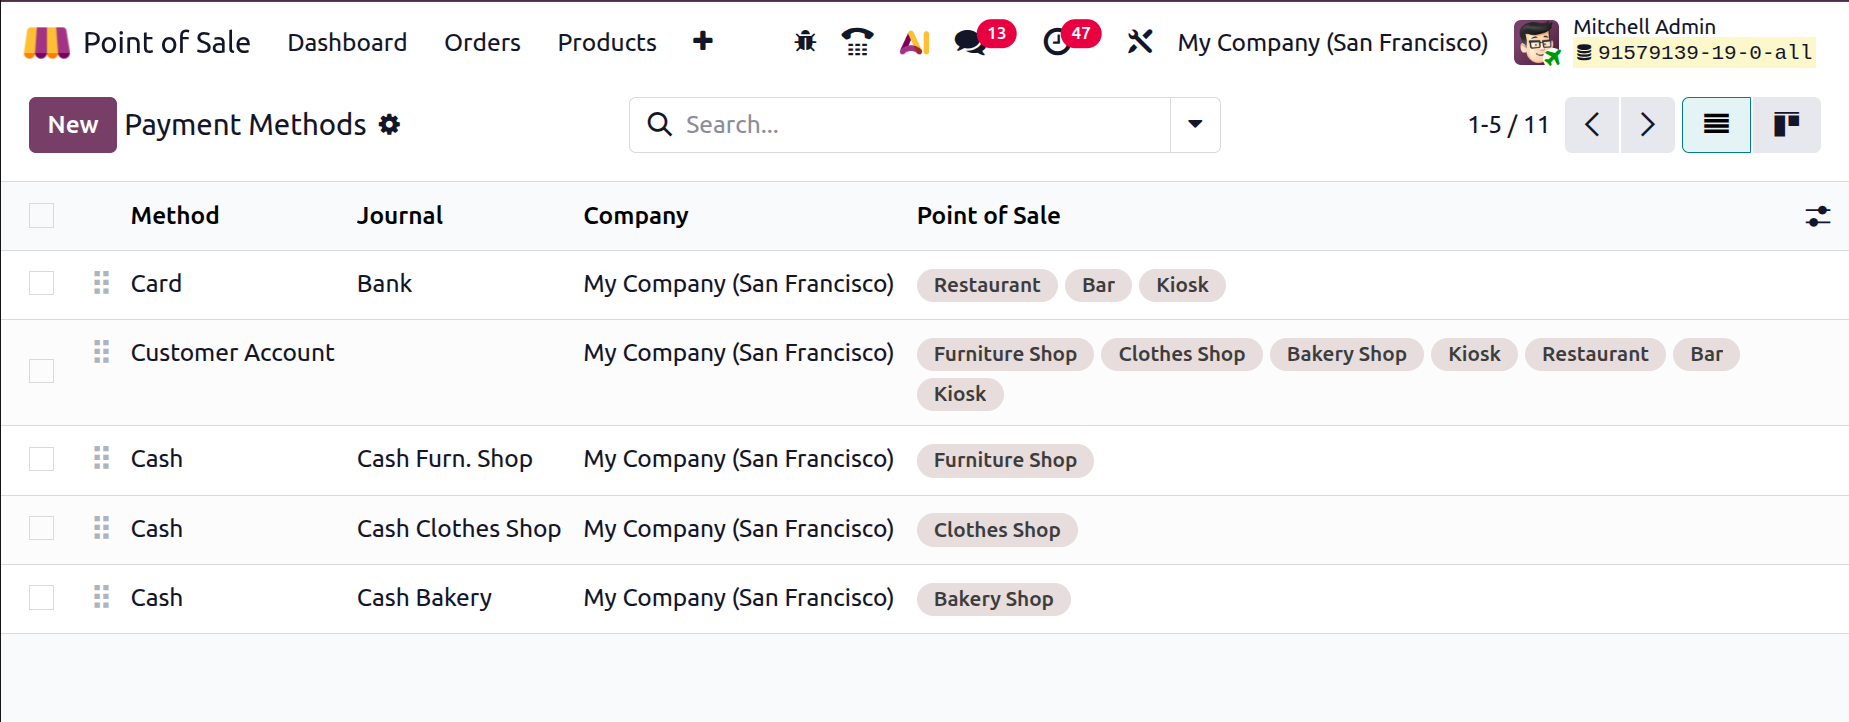
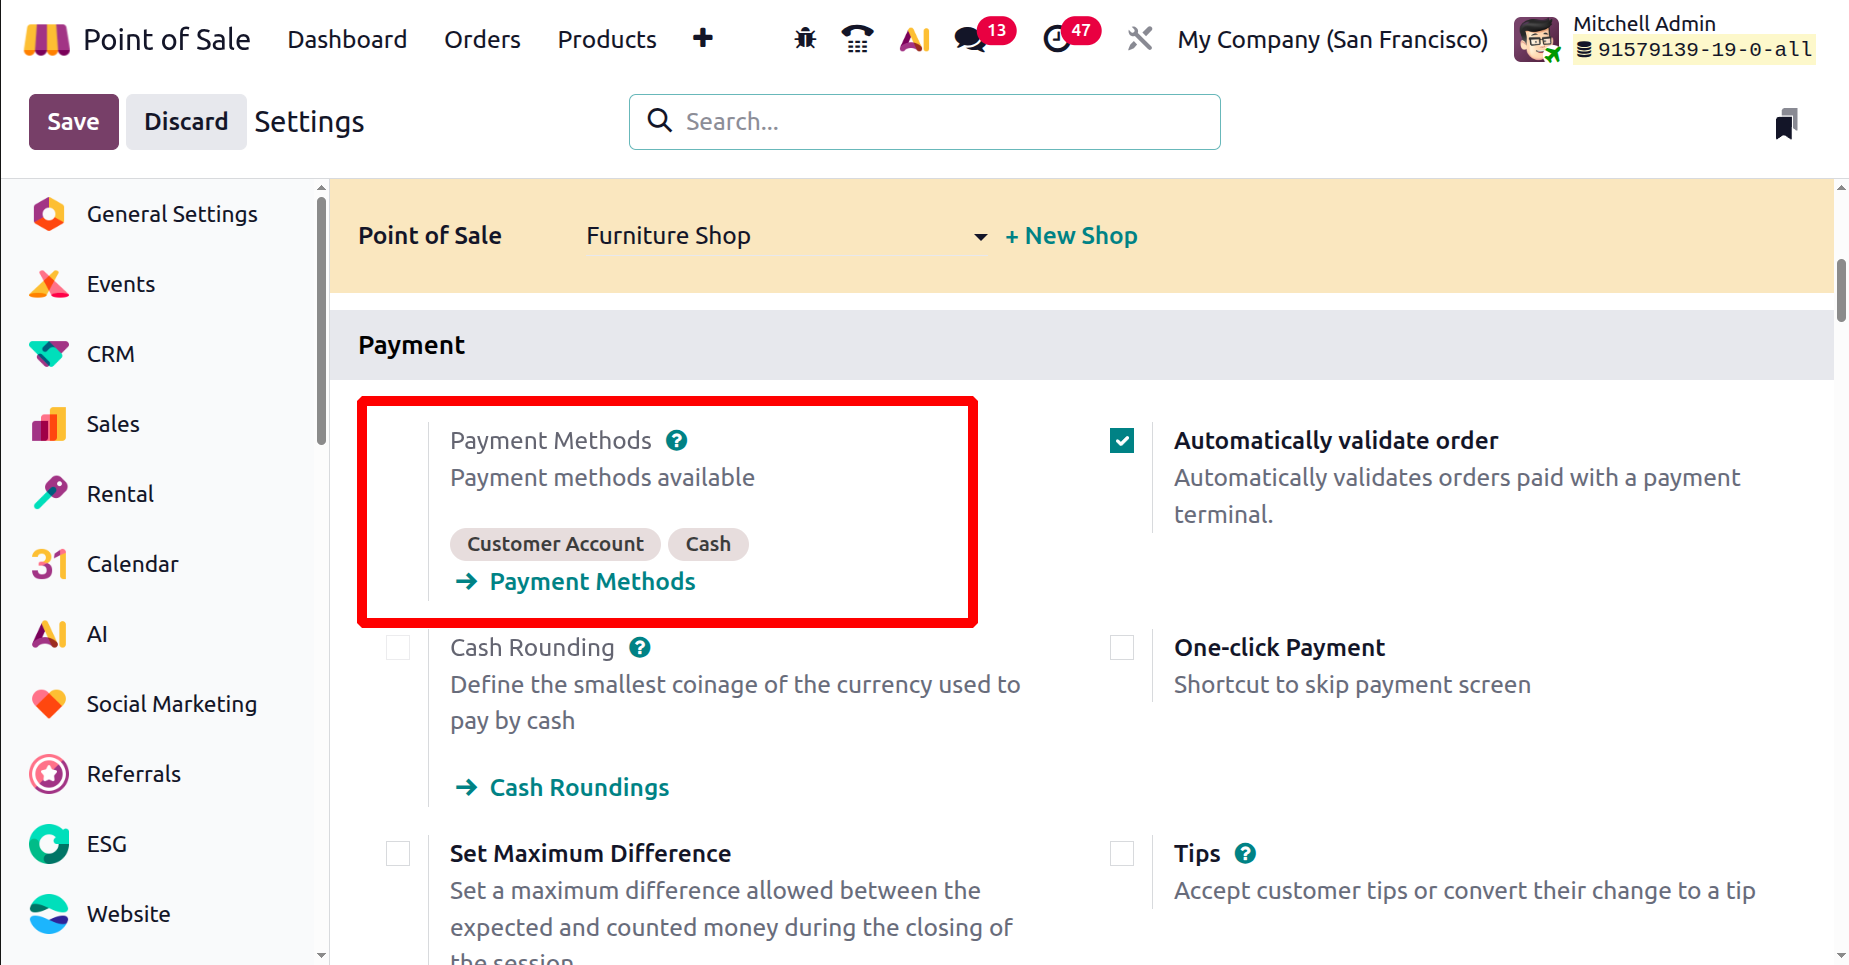
Odoo allows easy configuration of payment methods from the ‘Payment Methods’ tab of the Configuration. By clicking on the “Payment Methods” a list of created ‘Payment Methods’ listed.
The payment methods, along with key details like Name, Journal, Company, and associated PoS sessions. You can also view these in Kanban format and click on a method for more information. Filtering and grouping tools in the advanced search bar area help organize the data by method type, journal, or company.
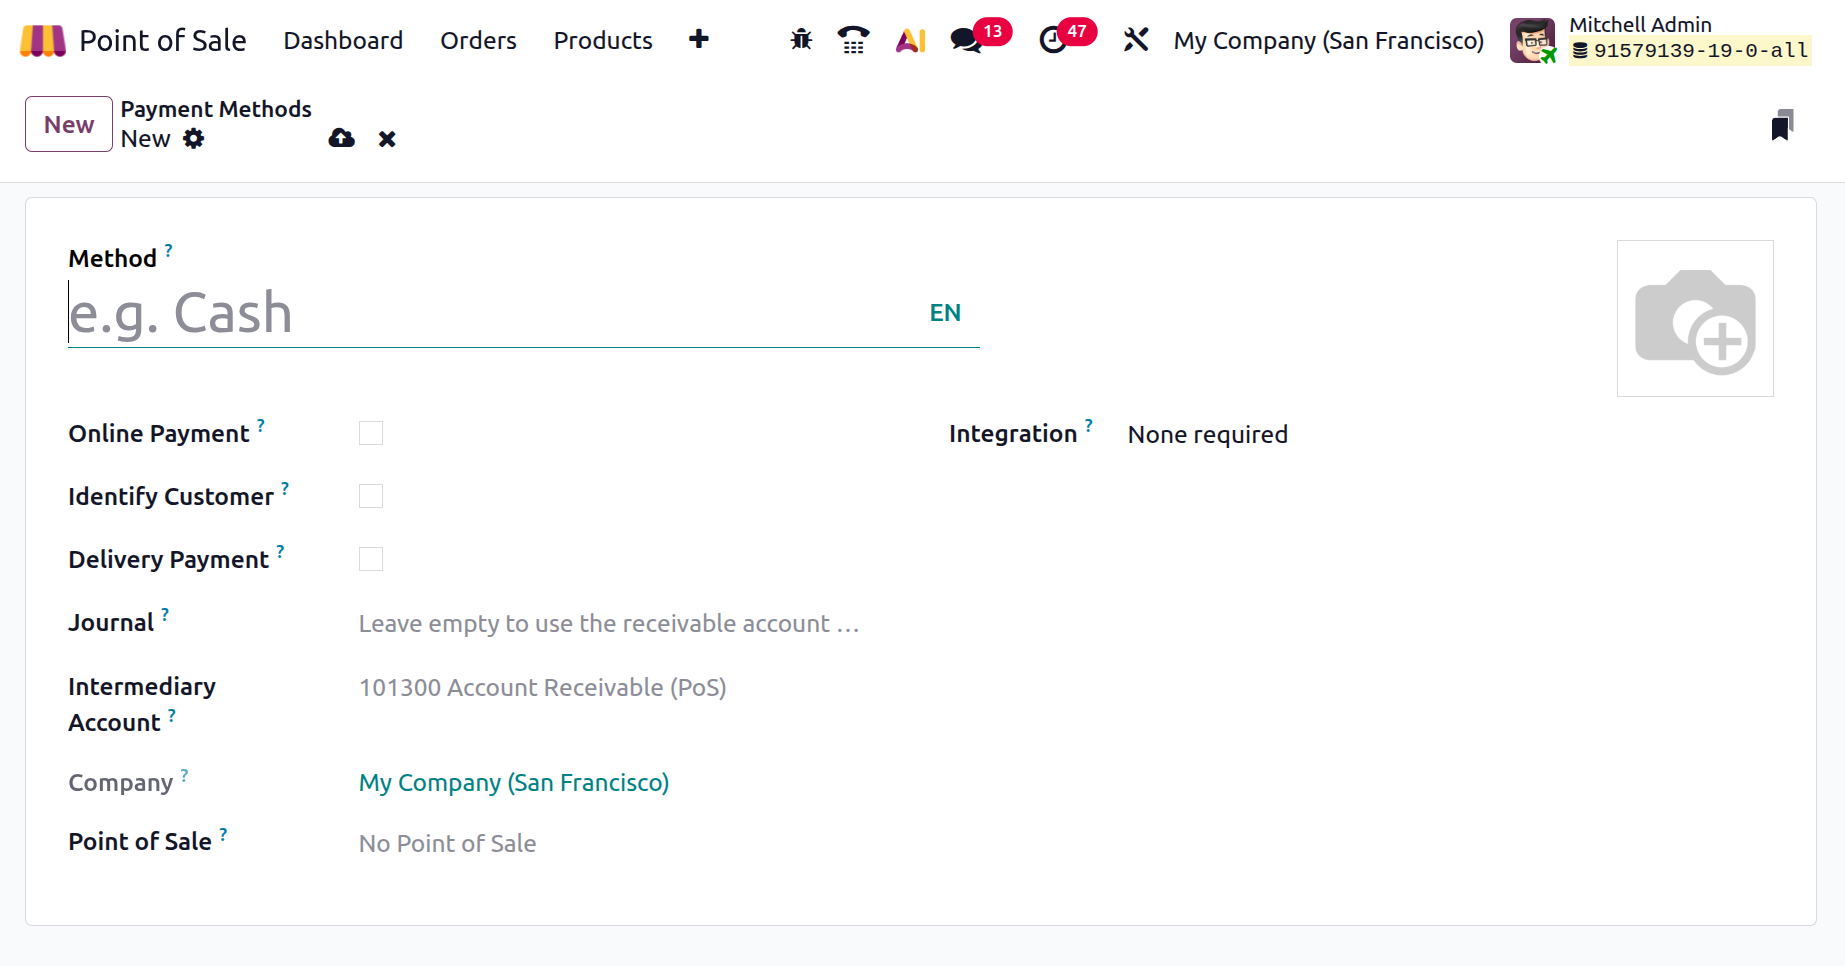
To add a new payment method, click 'New' from the customer identification window. Fill in the name of the ‘Method,’specify if it's an Online Payment.
The Online Payment enables use in eCommerce or portal sales, typically for gateways like Stripe or PayPal. The ‘Identify Customer’ requires selecting a customer before completing payment, useful for credit or invoiced sales. The ‘Delivery Payment’ marks the method for payments collected upon delivery. Then, the ‘Journal’ option links the payment to a specific accounting journal for proper bookkeeping. Also, the ‘Intermediary Account’ acts as a bridge for payments needing reconciliation before reaching the final account. Company assigns the method to a specific company in multi-company setups. Finally, the ‘Point of Sale’ limits where the method is available across PoS terminals. Integration connects the method to external systems or hardware like payment terminals.
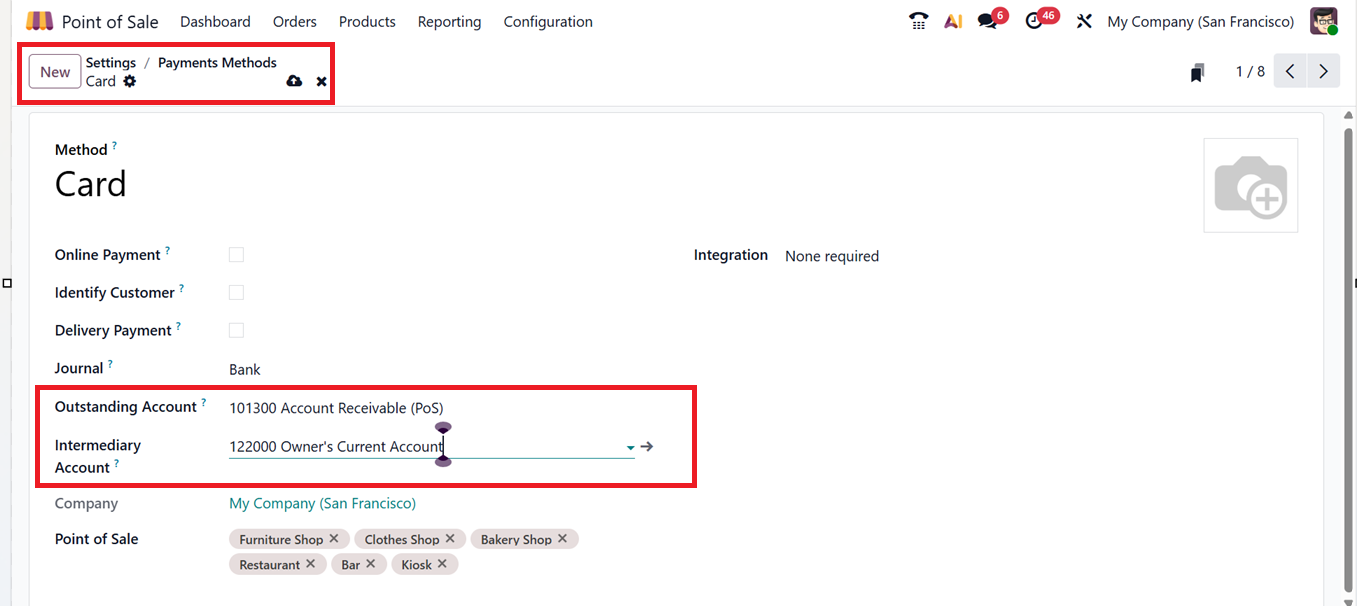
You can also enter details such as the Outstanding Account, Intermediary Account. Also, note that these fields may change depending on the selected payment method, as shown in the screenshot below.
Once completed, save the form to make the method available in PoS. After configuring the payment methods, you can choose the required method for your POS sales session using the ‘Payment Methods’ field found inside the ‘Settings’ window, as depicted in the screenshot below.
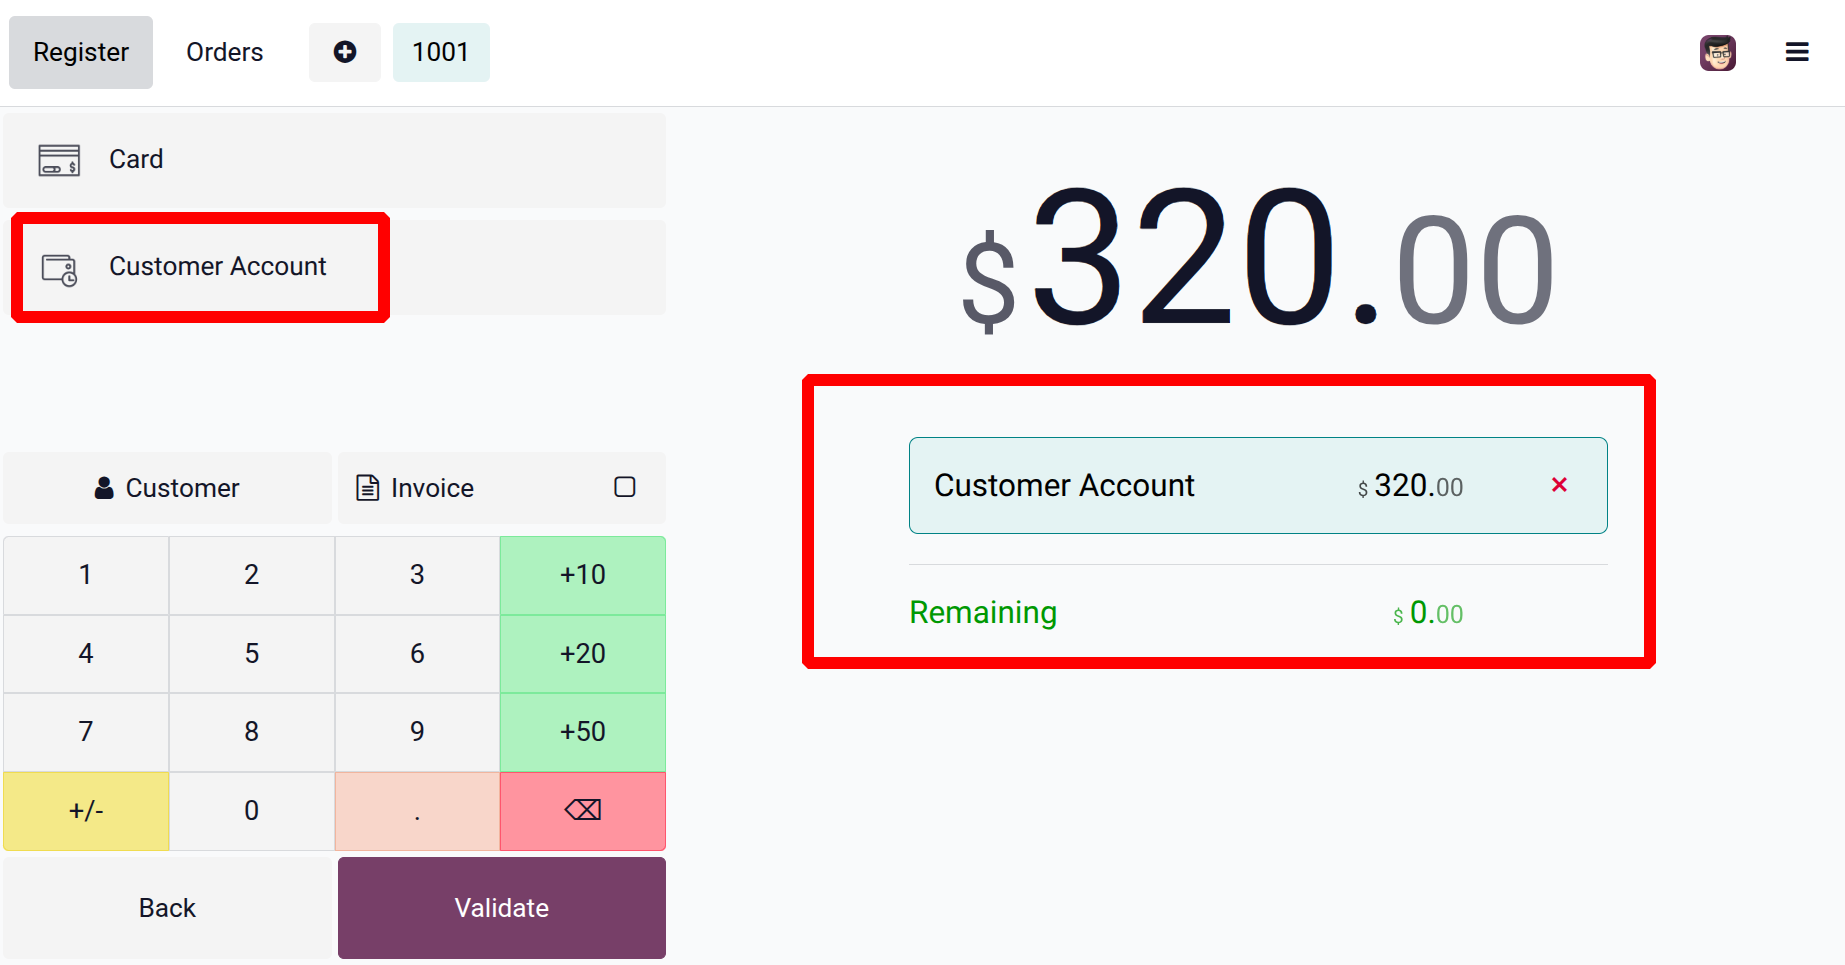
To use the new method, start a PoS session, add products, and click 'Payment' to access the payments screen. Here, users can choose from available options like Cash, Card, or Customer Account from the left side of the screen, as depicted in the screenshot below.

You can use the convenient payment method and validate the payment. So, it will be displayed in the customer bill.
Using the Customer Account payment method allows businesses to handle credit-based transactions and manage customer balances directly within the system. Customers using the Customer Account method can make purchases on credit or prepay for future orders.
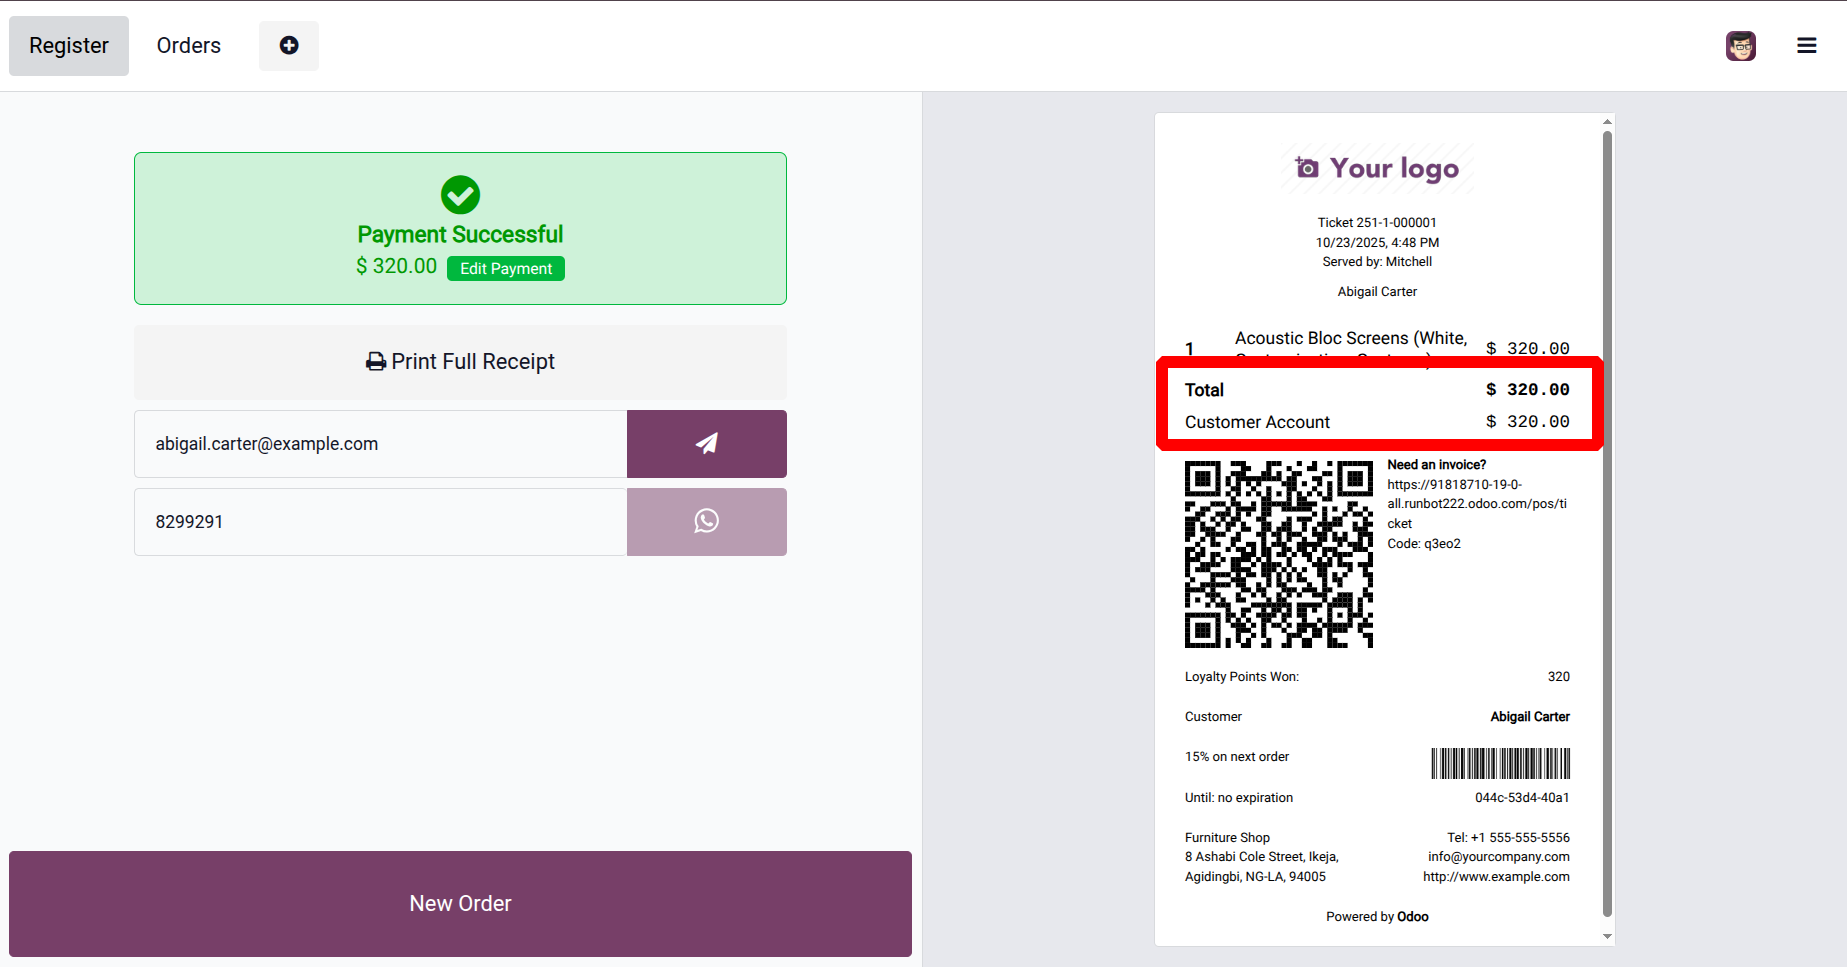
After selecting items, clicking “Order” and then “Validate” completes the transaction and generates an invoice, charging the amount to the customer’s account, as depicted in the screenshot below.
To review account status, click on to the New Orders open the Customers menu, there shows Total due. Then click on the Settle Orders.
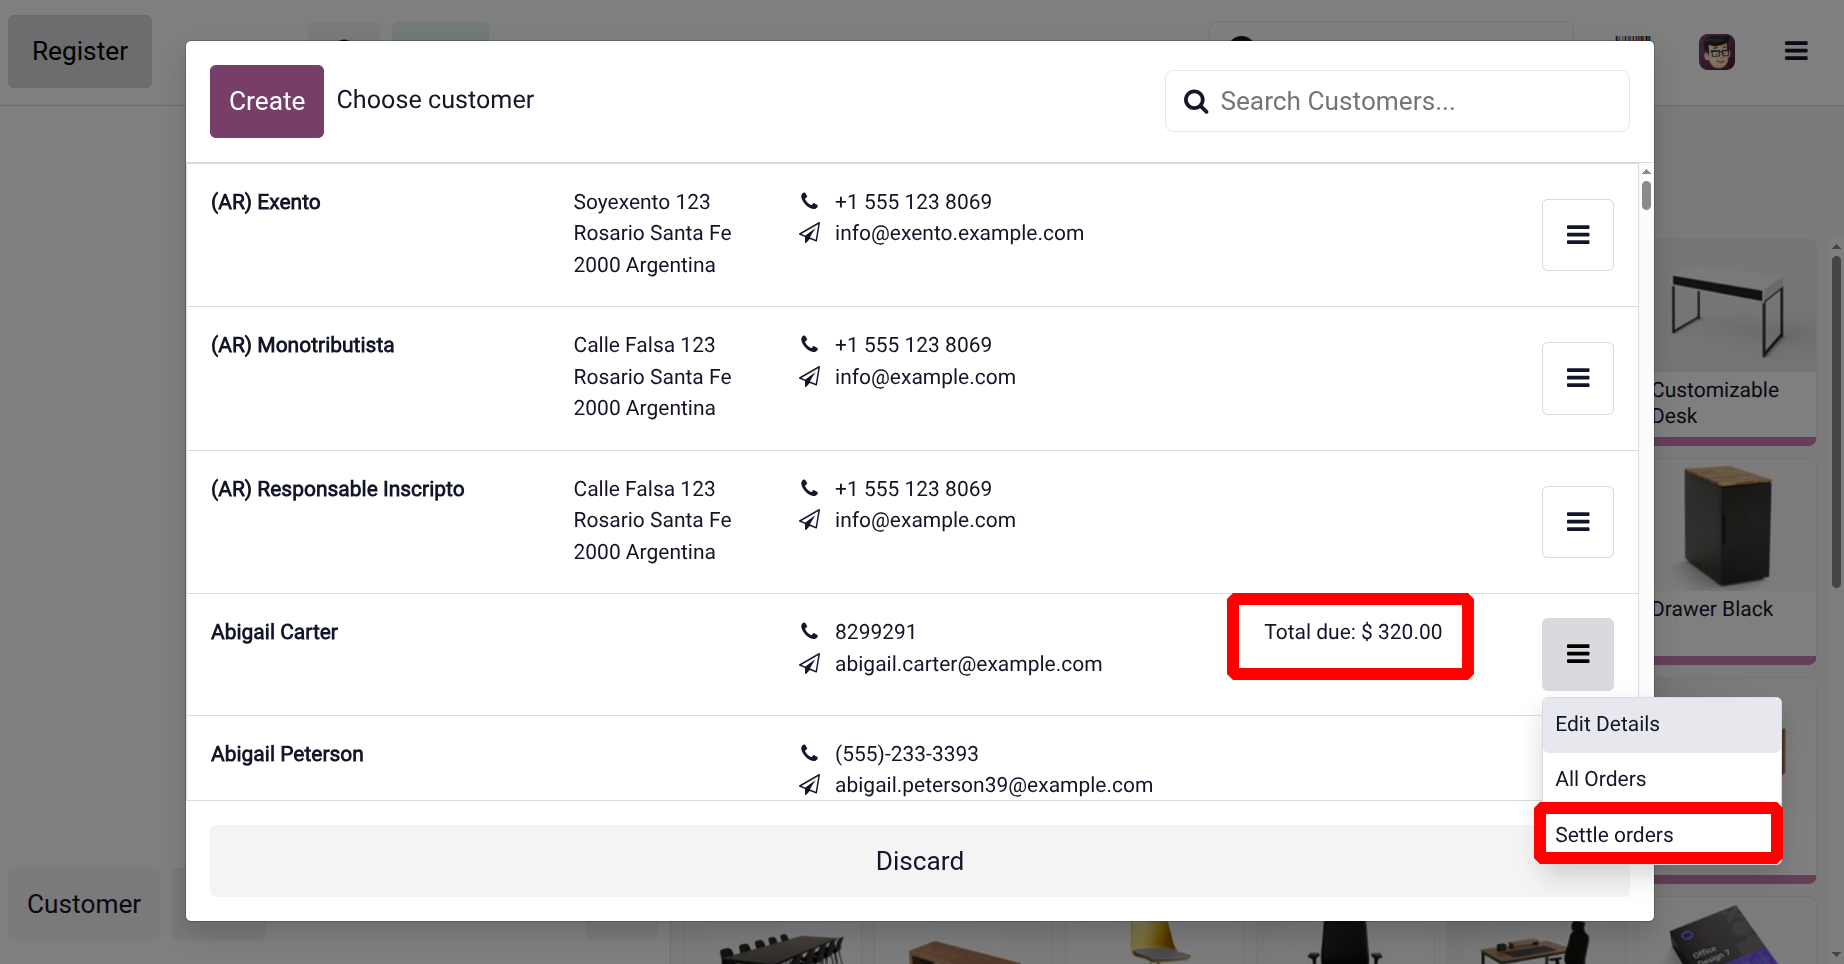
From the very next age, select the orders then click on the Select button. Then go to the payment page and complete the payment.
4.2 Presets
In Odoo 19 Point of Sale (PoS), the ‘Presets’ are pre-established sales modes, such delivery, takeout, or dine-in, that facilitate seamless transitions between various PoS workflows for businesses. Specific options, such as pricing lists, tax regulations, and order kinds, can be added to each preset. For restaurants and other food service enterprises, where operations may differ based on how the order is completed, this capability is quite helpful.
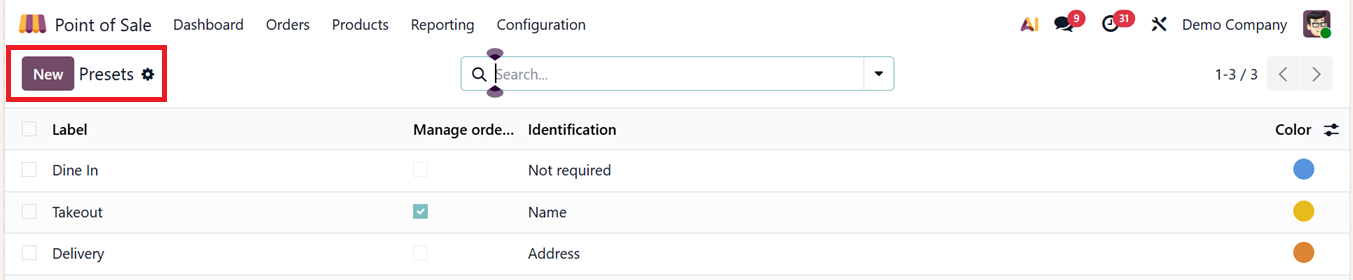
To create or manage the presets, open the ‘Presets’ option from the ‘Configuration’ menu. This will show the list view of the available presets with their Label, Manage orders, Identification and Color specifics, as illustrated in the screenshot below.
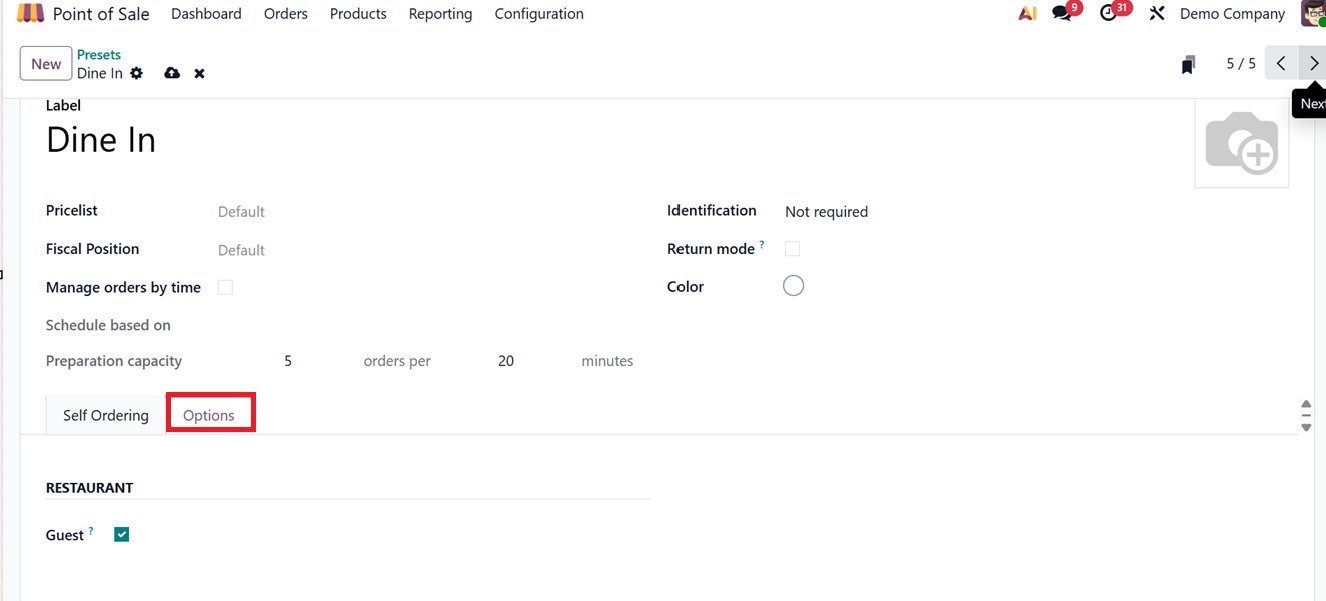
Open a new preset configuration form using the ‘New’ button and start editing the required field data such as, the ‘Label’ names the preset for easy identification within POS settings. The ‘Pricelist’ to determine the pricing scheme applied and the ‘Fiscal Position’ sets the tax and accounting rules based on customer location or requirements. The ‘Identification’ field is used to set a unique code to track and apply the preset within the POS system. You can choose ‘Not Required,’ ‘Address’ or ‘Name’ as the identification options, as illustrated in the screenshot below.

The ‘Manage orders by time’ option helps to schedule an order based on the POS sales session’s working hours or any other time conditions. If this option is enabled, then, you can schedule the order based on different order timings in the ‘Schedule based on’ field.
The ‘Preparation capacity’ field can be used to set the order limit and its preparation timing in minutes. The ‘Return mode’ field can be used to enable or disable the return policy by making the product quantity in negative inside a POS Sales cart. Also, you can add a color code to highlight the preset option in a kitchen/restaurant session.
The form view contains two main tab sections named ‘Self Ordering’ and ‘Options.’ The ‘Self Ordering’ tab can be used to activate or deactivate the self ordering feature using the ‘Activate in self’ option. If it is available, you can mention the service location and mail template in the ‘Service at’ and ‘Email Confirmation’ fields, as depicted in the screenshot below.

Inside the ‘Options’ tab, you can enable the ‘Guest’ option to force Guest selection while clicking on the ‘Order’ button in a POS Restaurant session.
After configuring the required Preset option, you can set the required presets for your restaurant session by activating the ‘Takeout/Delivery/Members’ field provided in the Point of Sale ‘Settings’ window, as shown in the screenshot below.
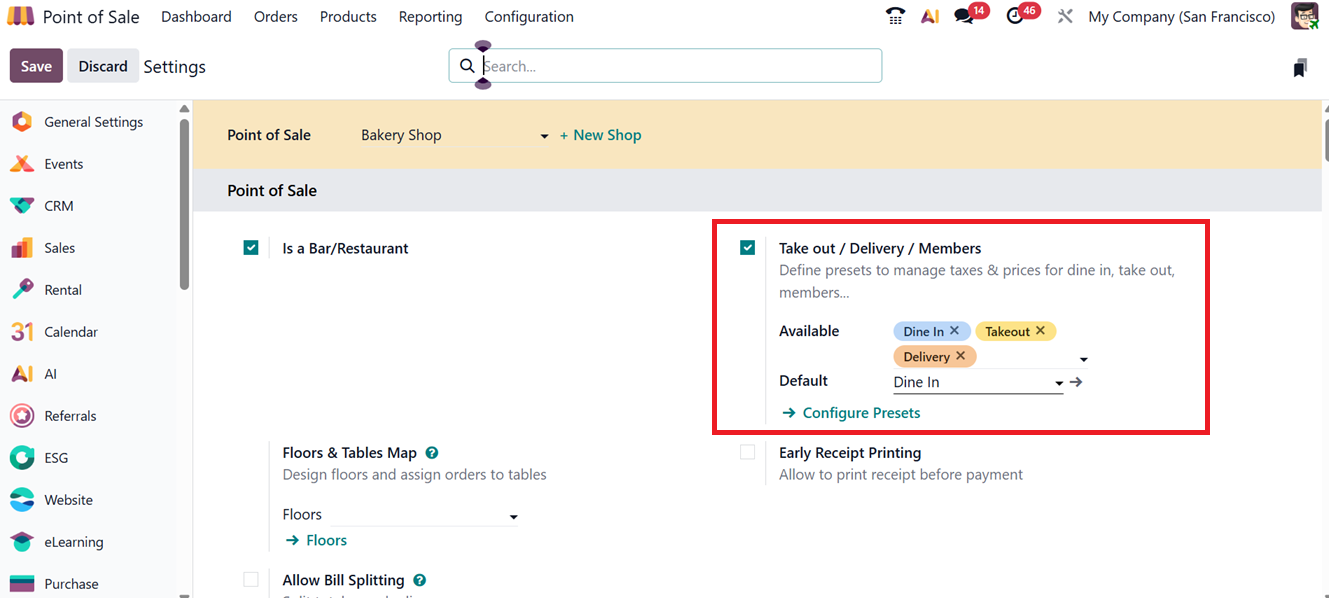
You can set the ‘Available’ as well as the ‘Default’ presets in the designated fields and manage them using the ‘Configure Presets’ link. After configuring the presets, you can view the configured presets inside a POS restaurant interface, as shown in the screenshot below.

You can click on the preset ‘Dine In’ button. This will open a ‘Select preset’ window, from where you can choose the relevant option, as shown below.

While choosing the ‘Takeout’ option, Odoo will add a Time Slot button at the top of the screen. By clicking on the Time Slot button, you can choose the preset you want, along with the preferred booking date and time based on your needs, as depicted in the screenshot below.
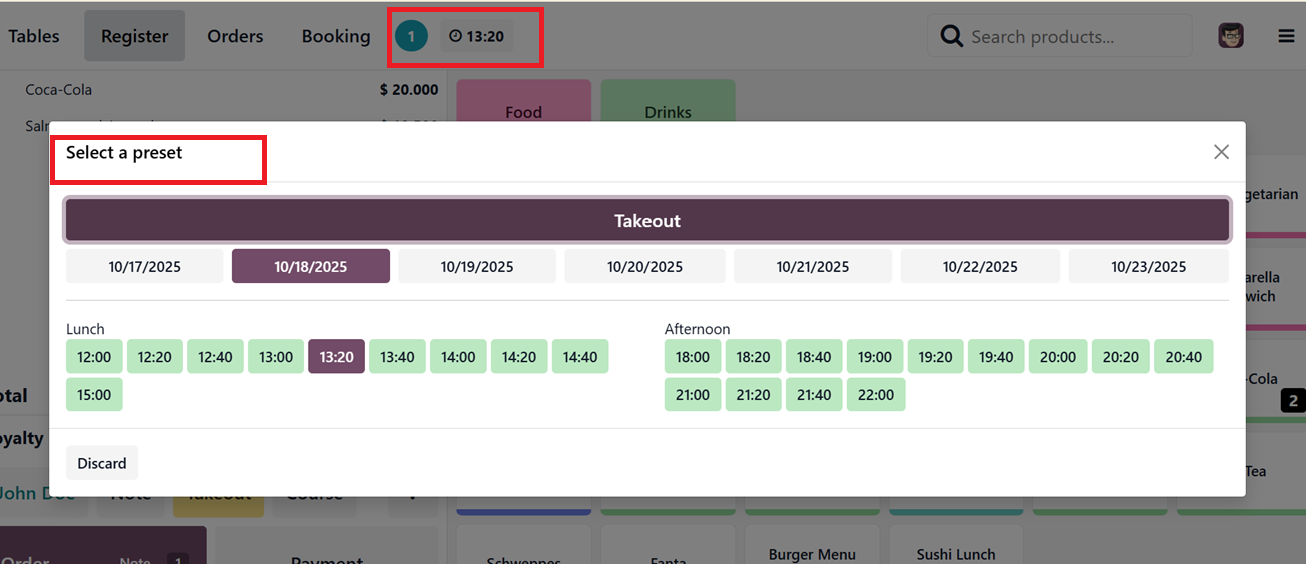
When you select a time slot and preset, any related charges or tax rates will be applied automatically. After that, you can continue with the order and complete the payment through the Point of Sale terminal as usual.
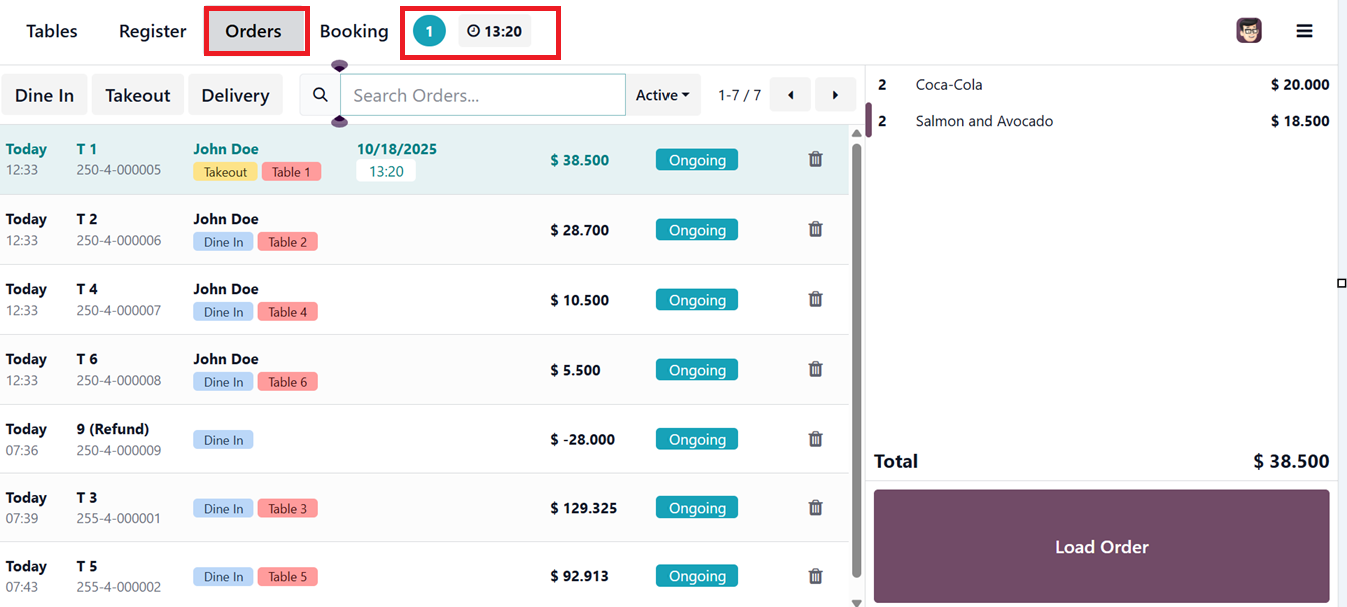
The ‘Orders’ tab of the POS interface will show the details of these Preset orders, so you can manage them inside a POS interface, as depicted in the screenshot below.
1.3 Coins/Bills
The ‘Coins/Bills’ option in the PoS configuration menu enables businesses to define accepted currency denominations. This menu will take you to the dashboard of the available Coins/Bills of your point of sale database, as illustrated in the screenshot below.
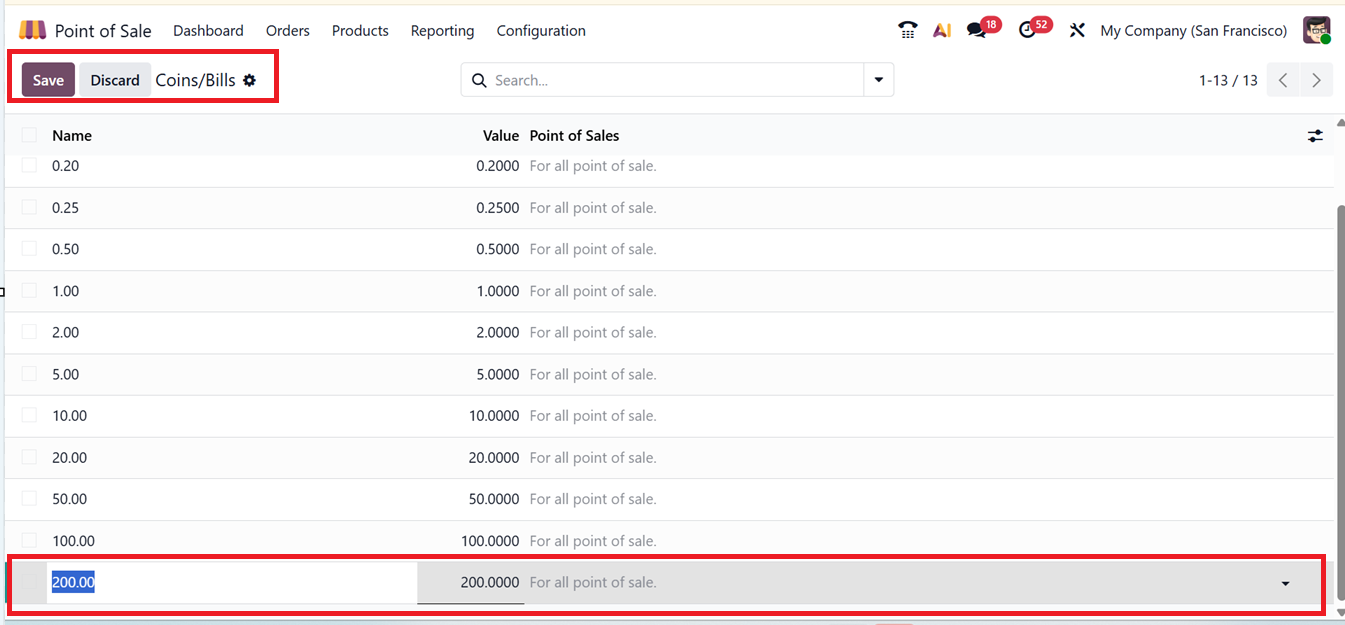
You can add new coin or bill denominations by clicking the ‘New’ button and entering the desired values in the field that appears. After adding the required Coins/Bills to your POS database, you can use these inside a sales session.
When opening or closing the cash register, cashiers can select specific denominations using the Coins/Bills icon to help record payments accurately, as shown in the screenshot below.

Clicking the Coins/Bills icon will display a list of all available coin and note denominations.
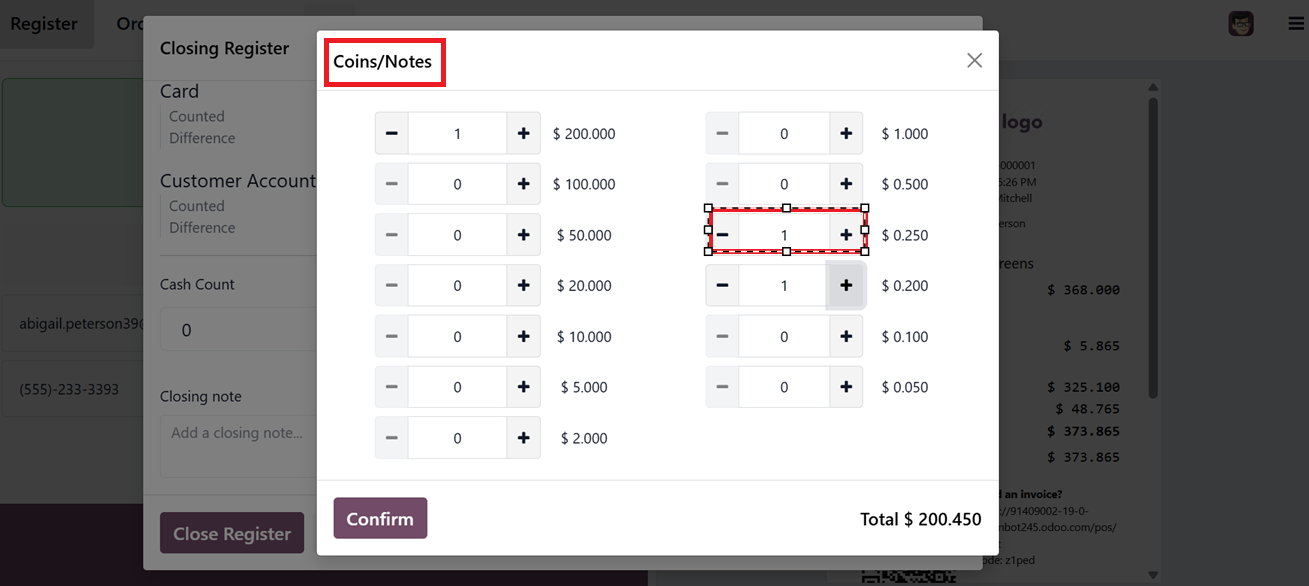
You can set up the coins and bills based on the types of cash payments your business receives. These records are saved in the daily cash register for proper tracking and reconciliation.
1.4 Point of Sale List
Businesses can set up and manage Point of Sale (PoS) sessions directly from the PoS dashboard. You can see the details including the name of the Point of Sale, Company, Closing date, Balance and Status, as shown in the screenshot below.
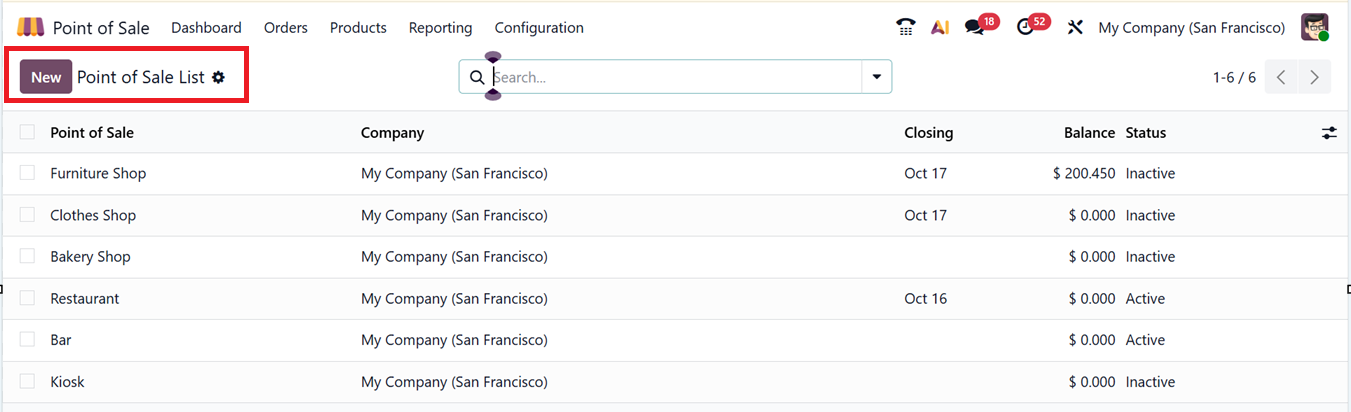
To start a new session for a shop or restaurant, click on the ‘New’ button and configure settings such as employee login, printer connections, and IoT Box integration.
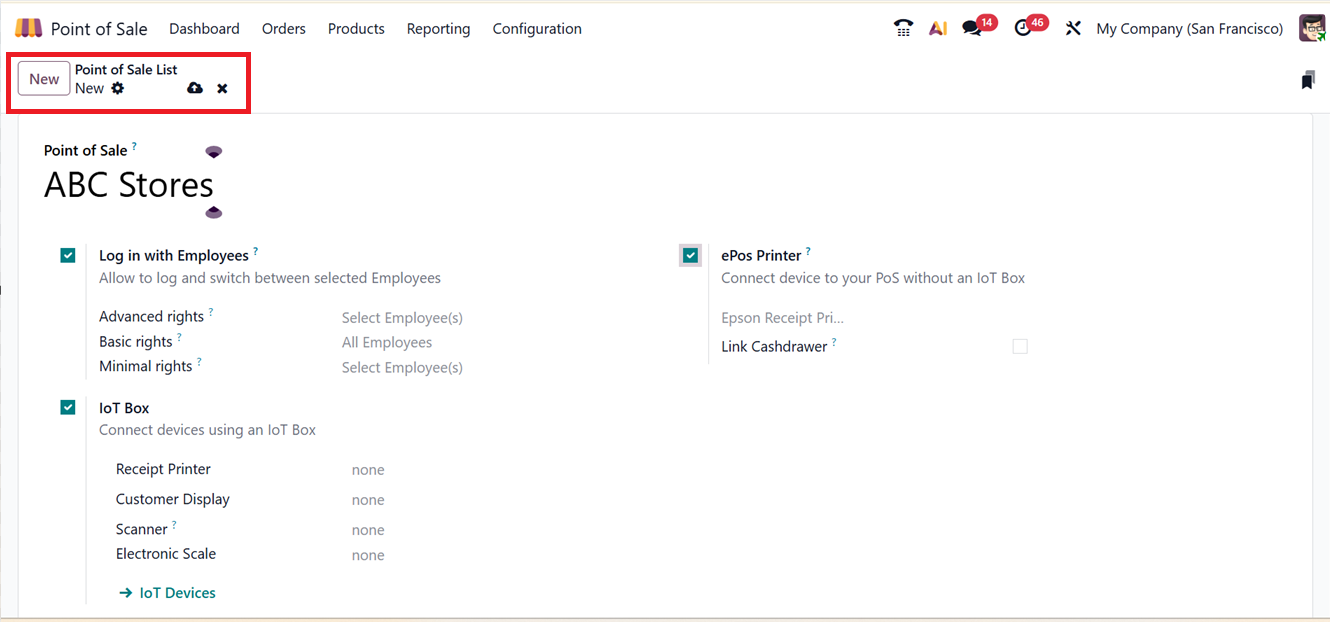
For employee access, the system offers three permission levels:
- Basic Rights, which allow only sales activities.
- Advanced Rights, which give access to management features.
- Minimal Rights, which allow minimal access, limited to basic viewing or login actions without permission to make sales or change settings.
Employees can log in securely using PIN codes, and pincode set inside the Employee module. More details about this setup can be found in the previous section of this guide.
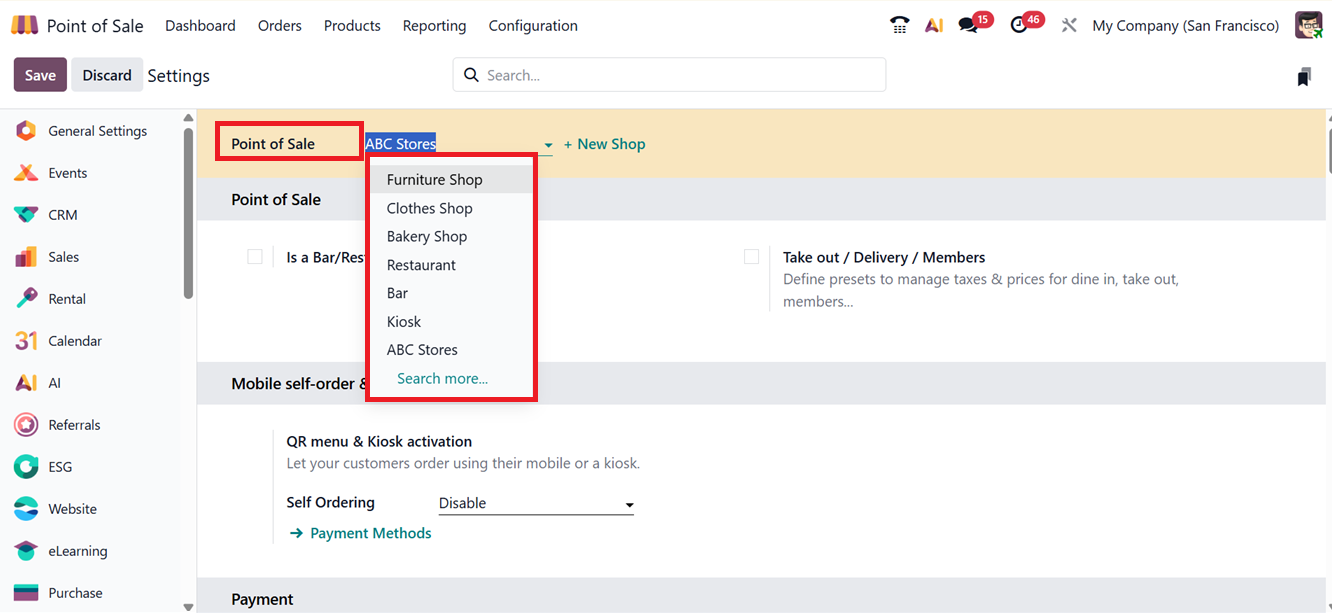
Once you’ve set up a new Point of Sale, you can start using it by going to the Point of Sale Dashboard. From there, you can open the POS for sales operations. If you need to change any settings, just choose the name of the POS shop in the Settings window and configure new settings, as shown in the screenshot below.
1.5 Floor Plans
In Odoo POS Module, you can access the ‘Floor Plans’ feature to design your restaurant layout from the ‘Configurations’ menu. From the ‘Floor Plans’ settings field, click on the Floor Plans’ link to manage or create new plans.
Opening the flor plans option will show a dashboard of all the available floor plans of your POS Restaurant session with their Floor Name and related Point of Sales sessions, as depicted in the screenshot below.

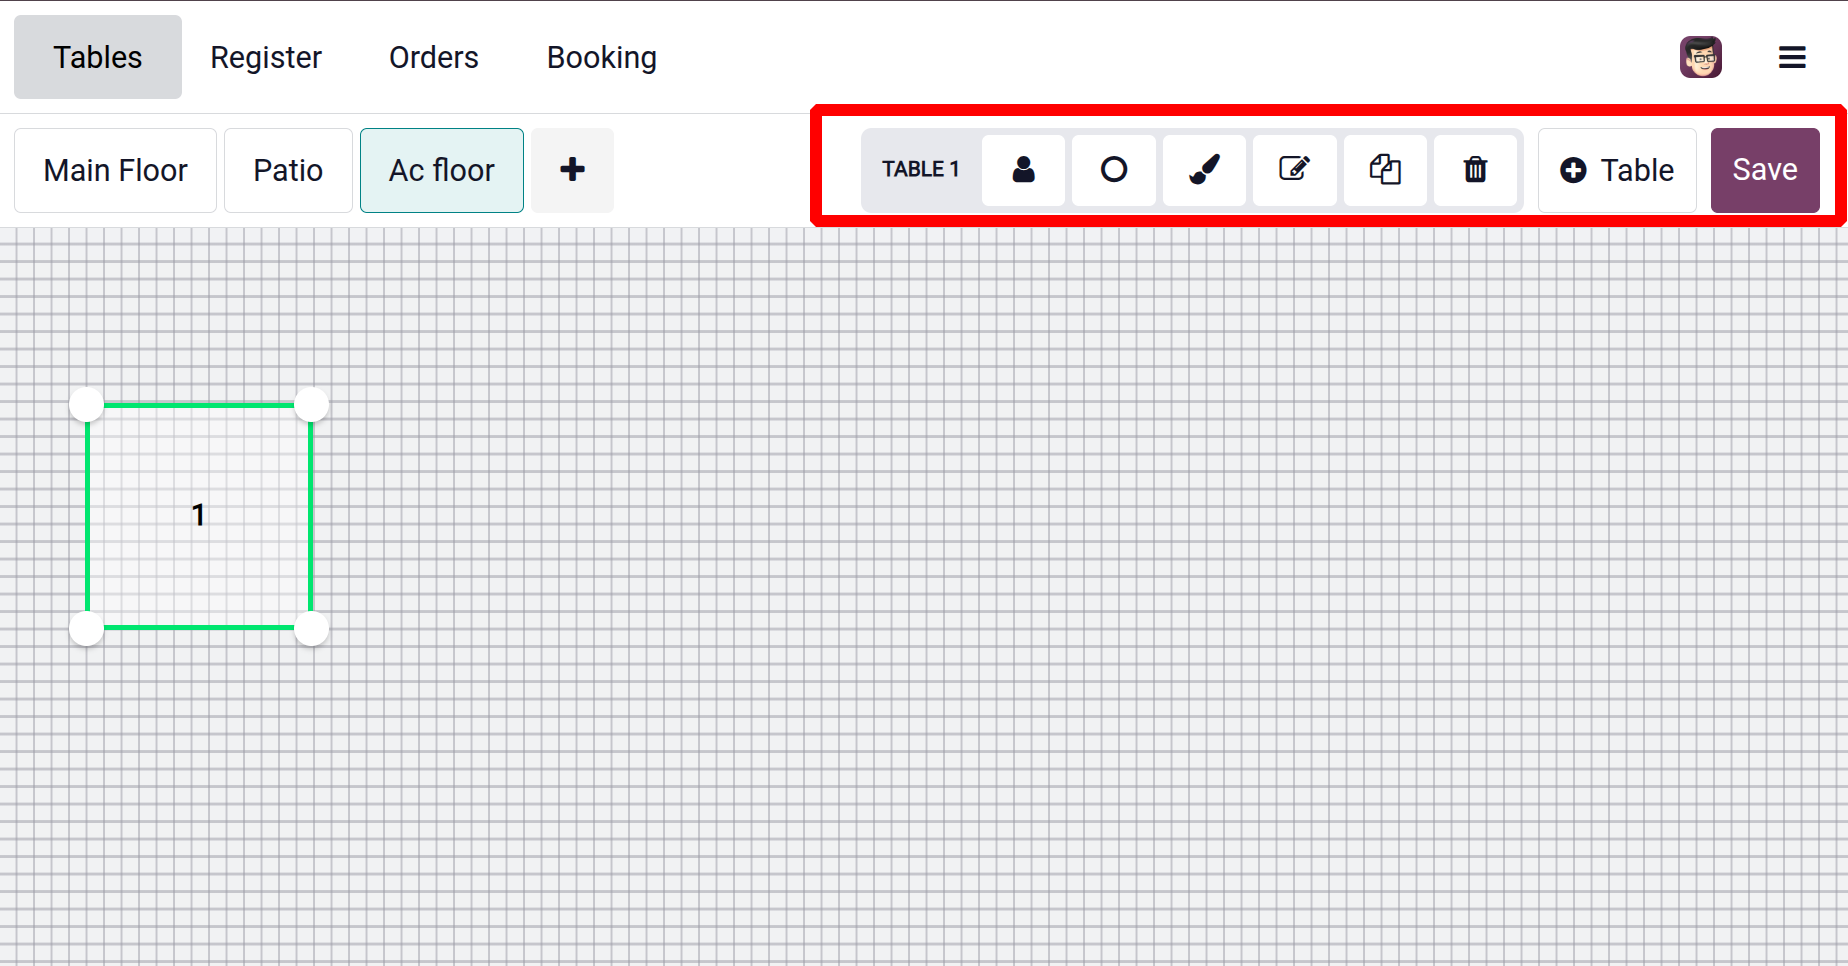
To create a new floor layout in Odoo 19 Point of Sale, click the ‘New’ button to open the floor creation form. In this form, enter a Floor Name to identify the layout and assign it to the appropriate Point of Sale system. Next, add tables by clicking the ‘Add a line’ button to define the table details. For each table, specify the Table Number for easy identification, set the Seats field to indicate the seating capacity, and choose the Shape (such as square or round) to match the physical table design. After adding all required tables and configuring their details, review the layout for accuracy. Once you have completed the process, save the layout, as depicted in the screenshot below.

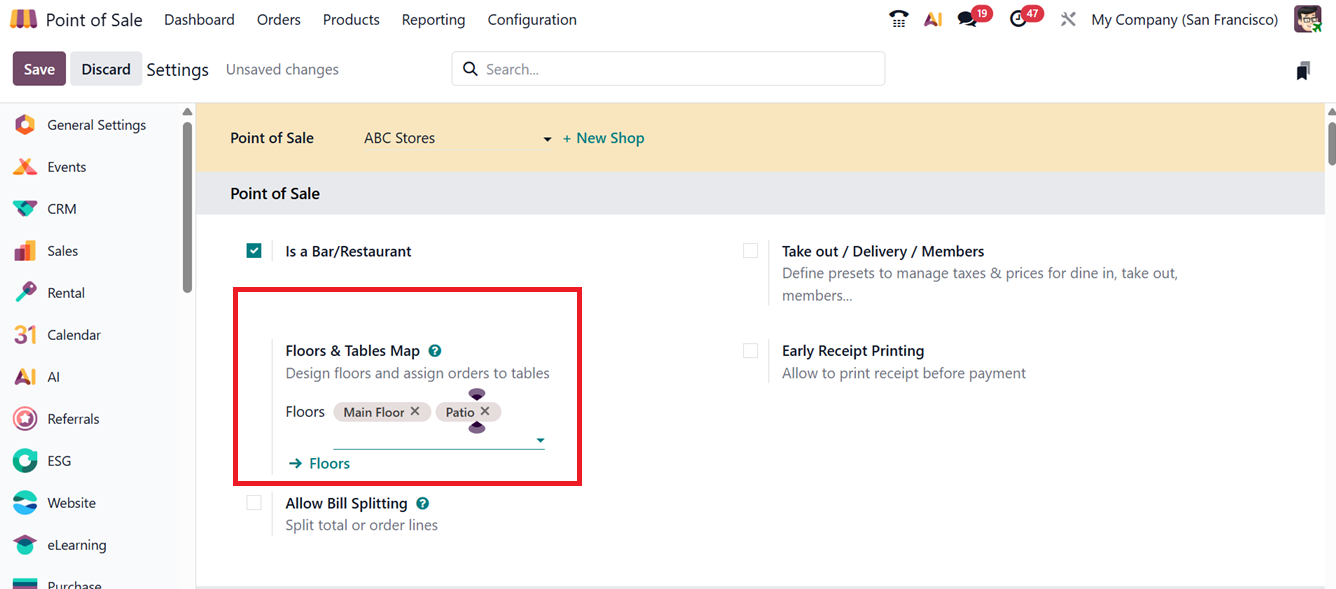
After configuring the Floor and Table setup for your restaurant session, you have to choose the relevant Floor for your Restaurant POS inside the ‘Floors & Tables Map’ field of the ‘Settings’ window, as shown in the screenshot below.
This plan will appear within your PoS restaurant sales interface, allowing table selection during order placement. Then, you can click on the ‘#’ button to enter a table number manually or reserve the tables use the ‘Switch Floor View’ button to toggle between layouts, as depicted in the screenshot below.
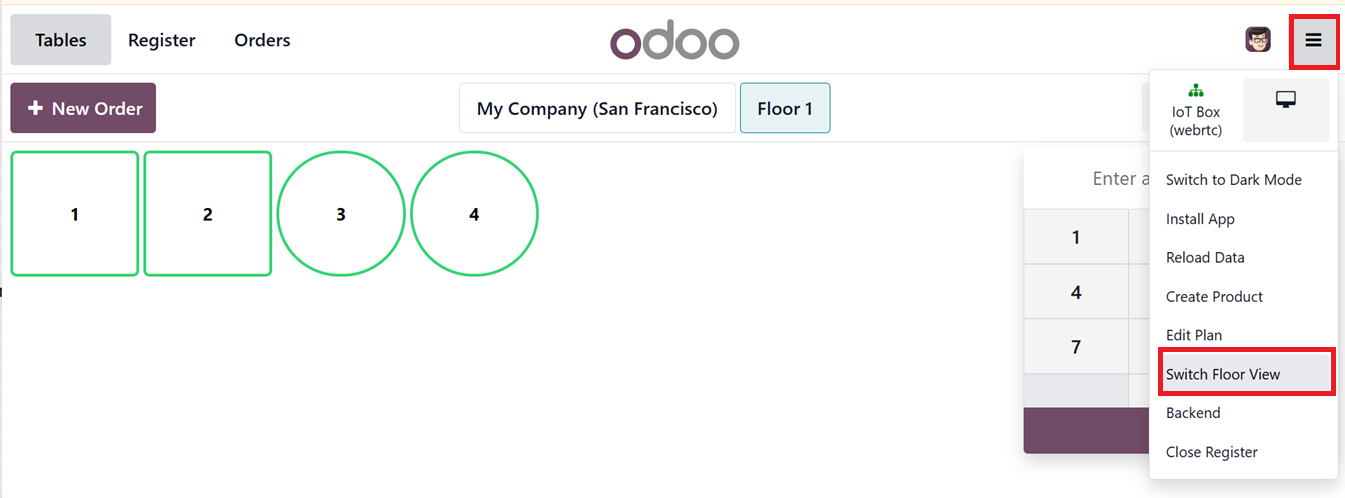
The ‘Edit Plan’ button allows editing the floor view from the session.
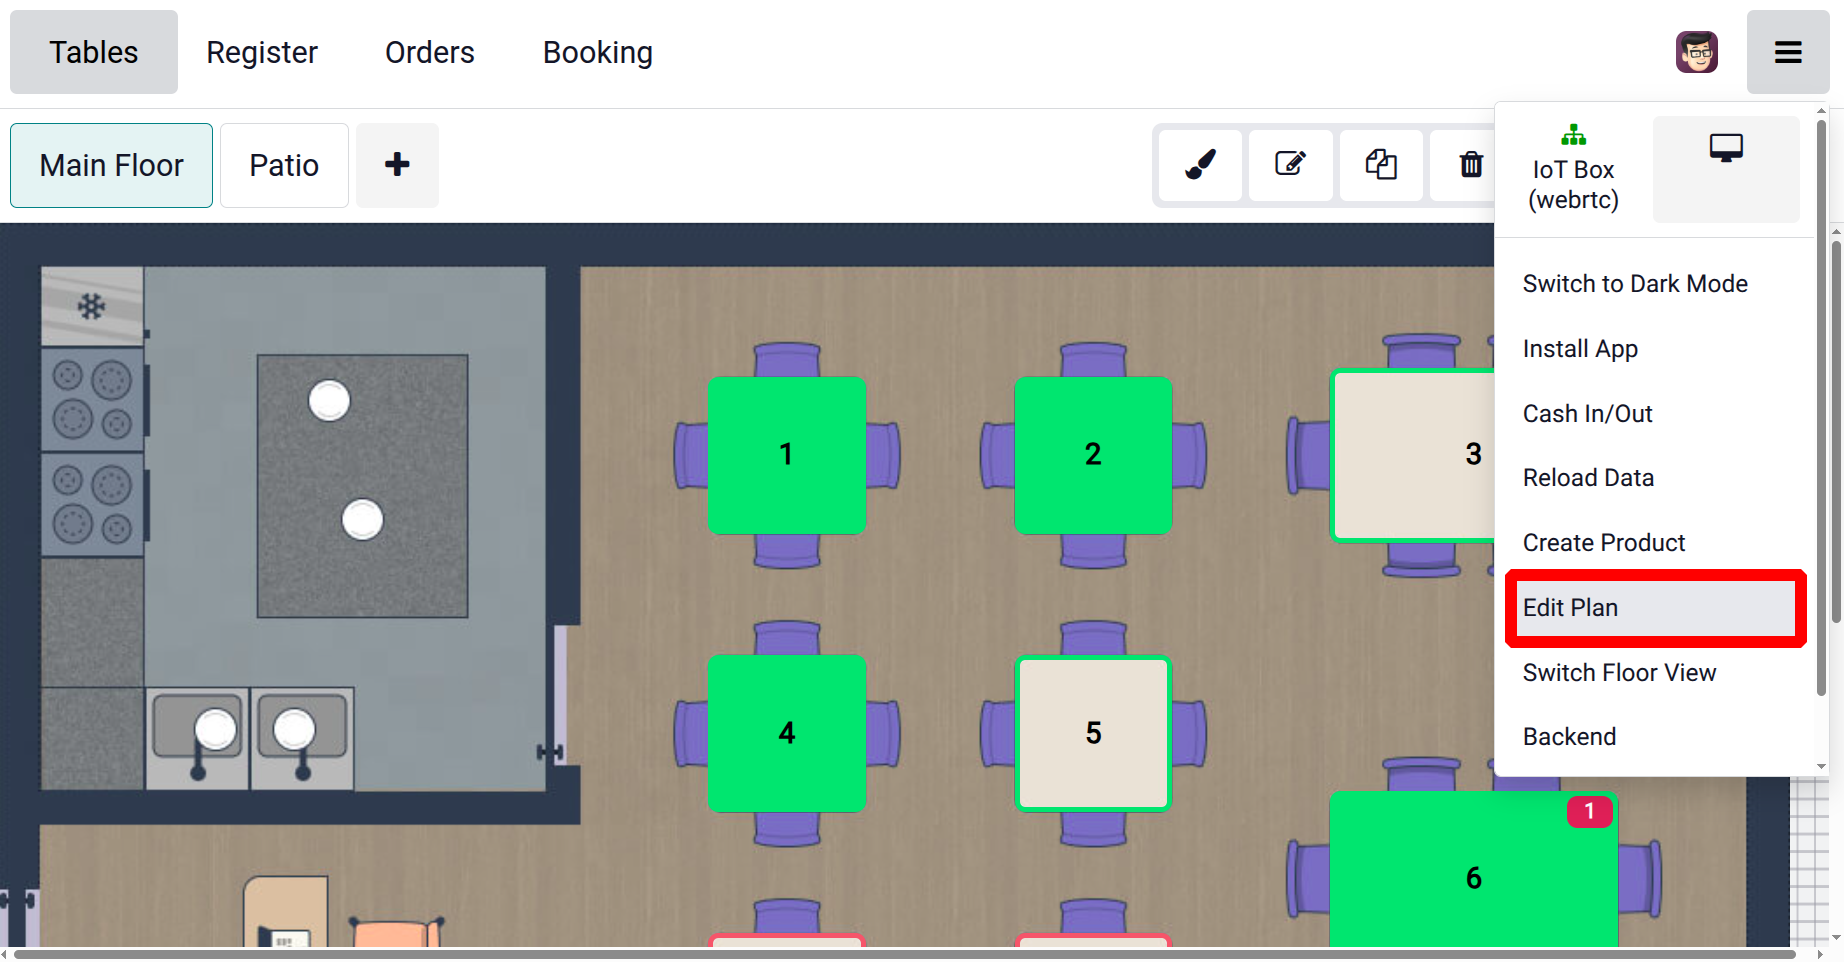
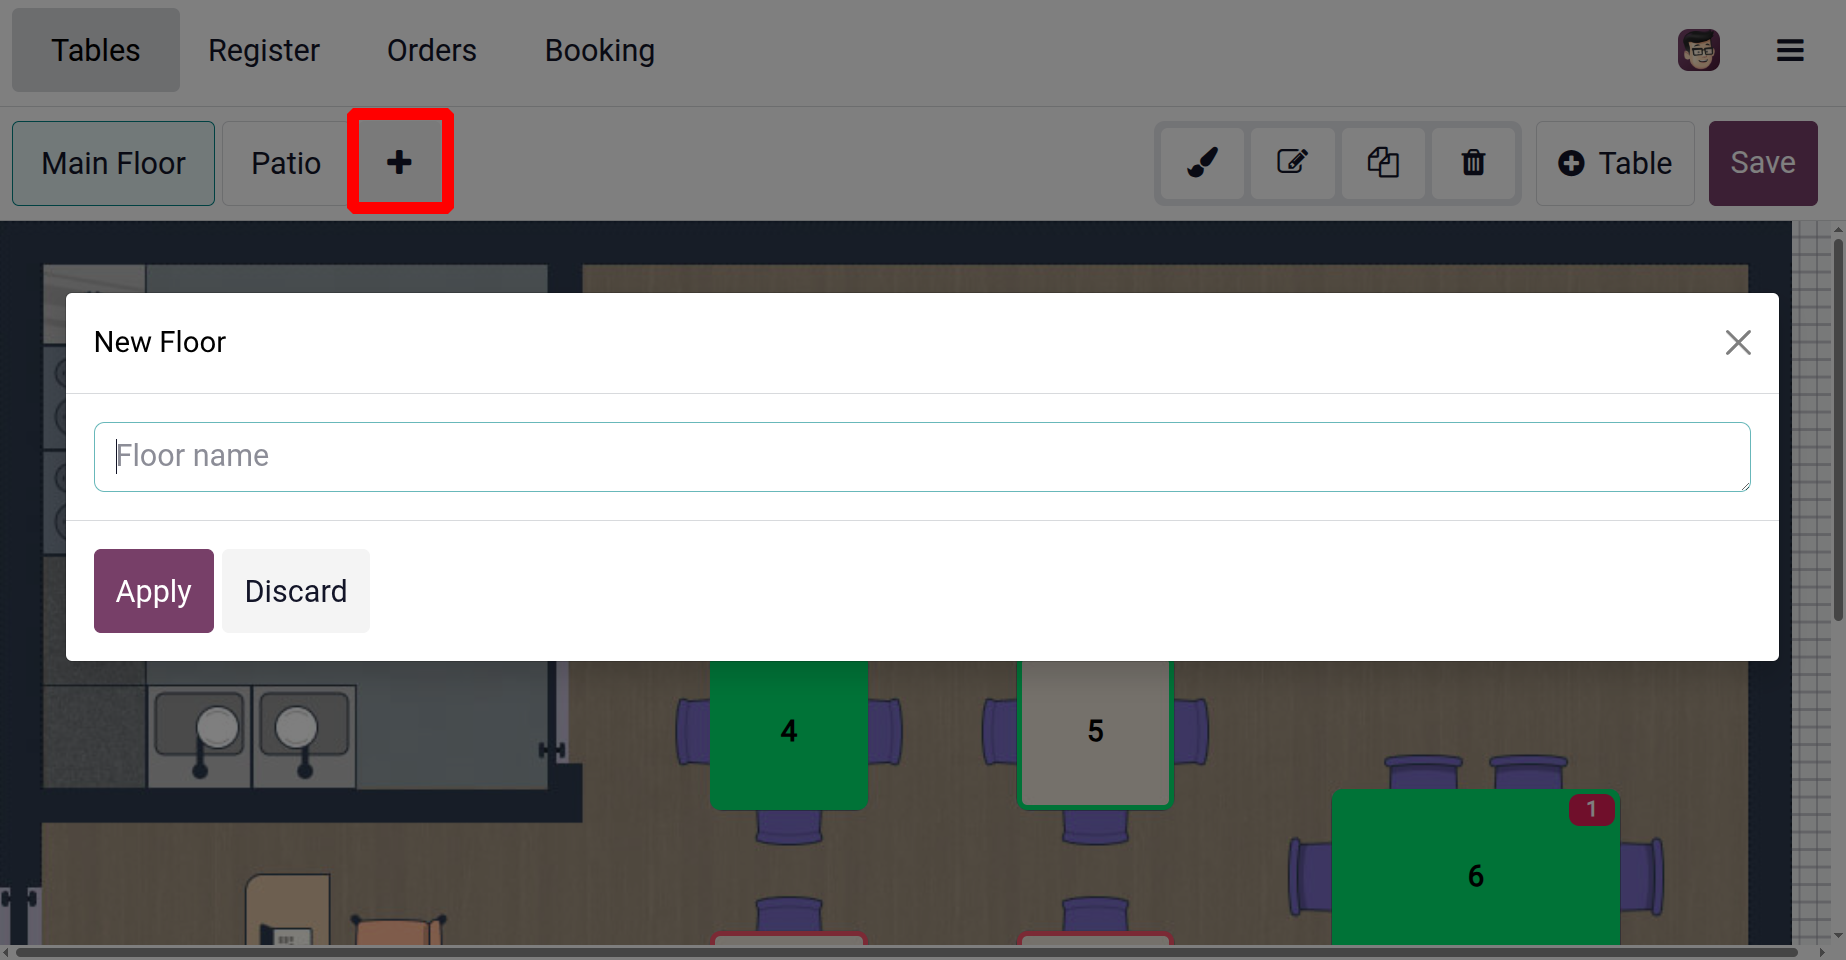
By clicking on the “+” icon users can add new floors.
Can add new Tables by clicking on the ‘+Table’ button, and can customize the table by using the nearby icons. Then click on the ‘Save’ button.
1.6 Note Models
In Odoo 19’s Point of Sale (POS) module, the Note Models feature allows businesses to add extra comments or instructions to products or orders. These notes can include customer requests, special instructions, or any other useful details. Users can see all existing Note Models from the dashboard, create new ones by clicking the ‘New’ button, and save them for future use.

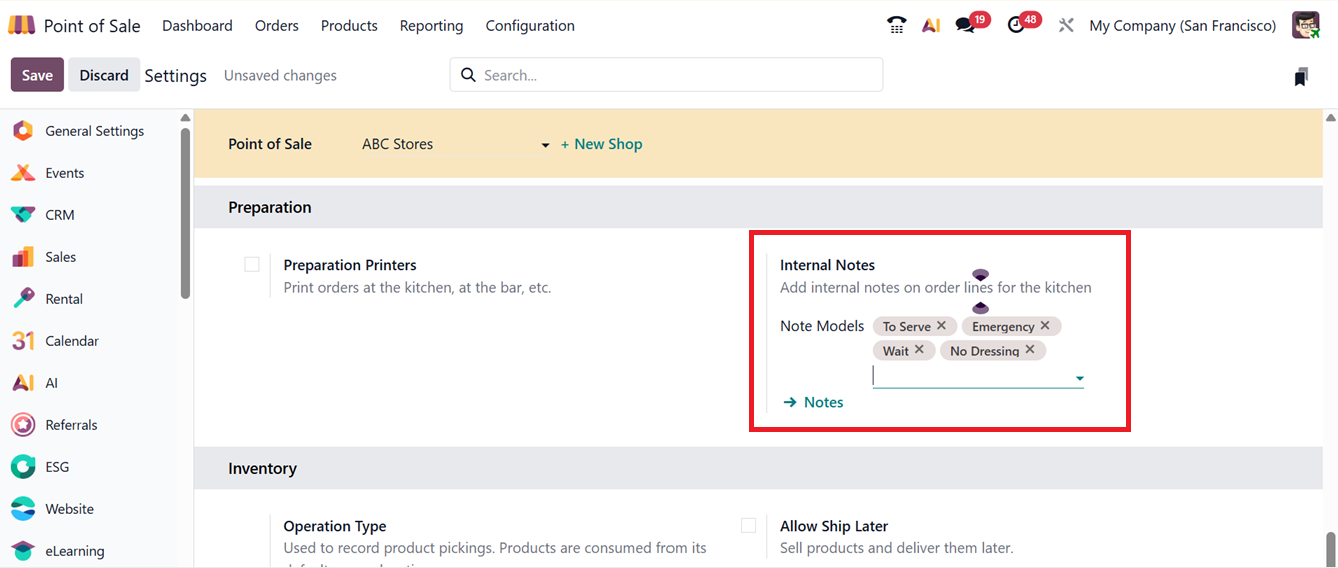
After adding new notes, you can set the ‘Note Models’ for your kitchen order lines in the ‘Internal Notes’ fields of the ‘Settings’ window, as shown in the screenshot below.
After saving the notes, you can use them during a restaurant POS session by clicking the ‘Notes’ button in the order lines section. Then, in the ‘Add Note’ popup, you can choose and apply any note, as shown in the screenshot below.

1.7 Pricer
There are two options under the Pricer, which are Pricer Stores and Pricer Tags. There is a Price option inside the Settings. Enable it first.
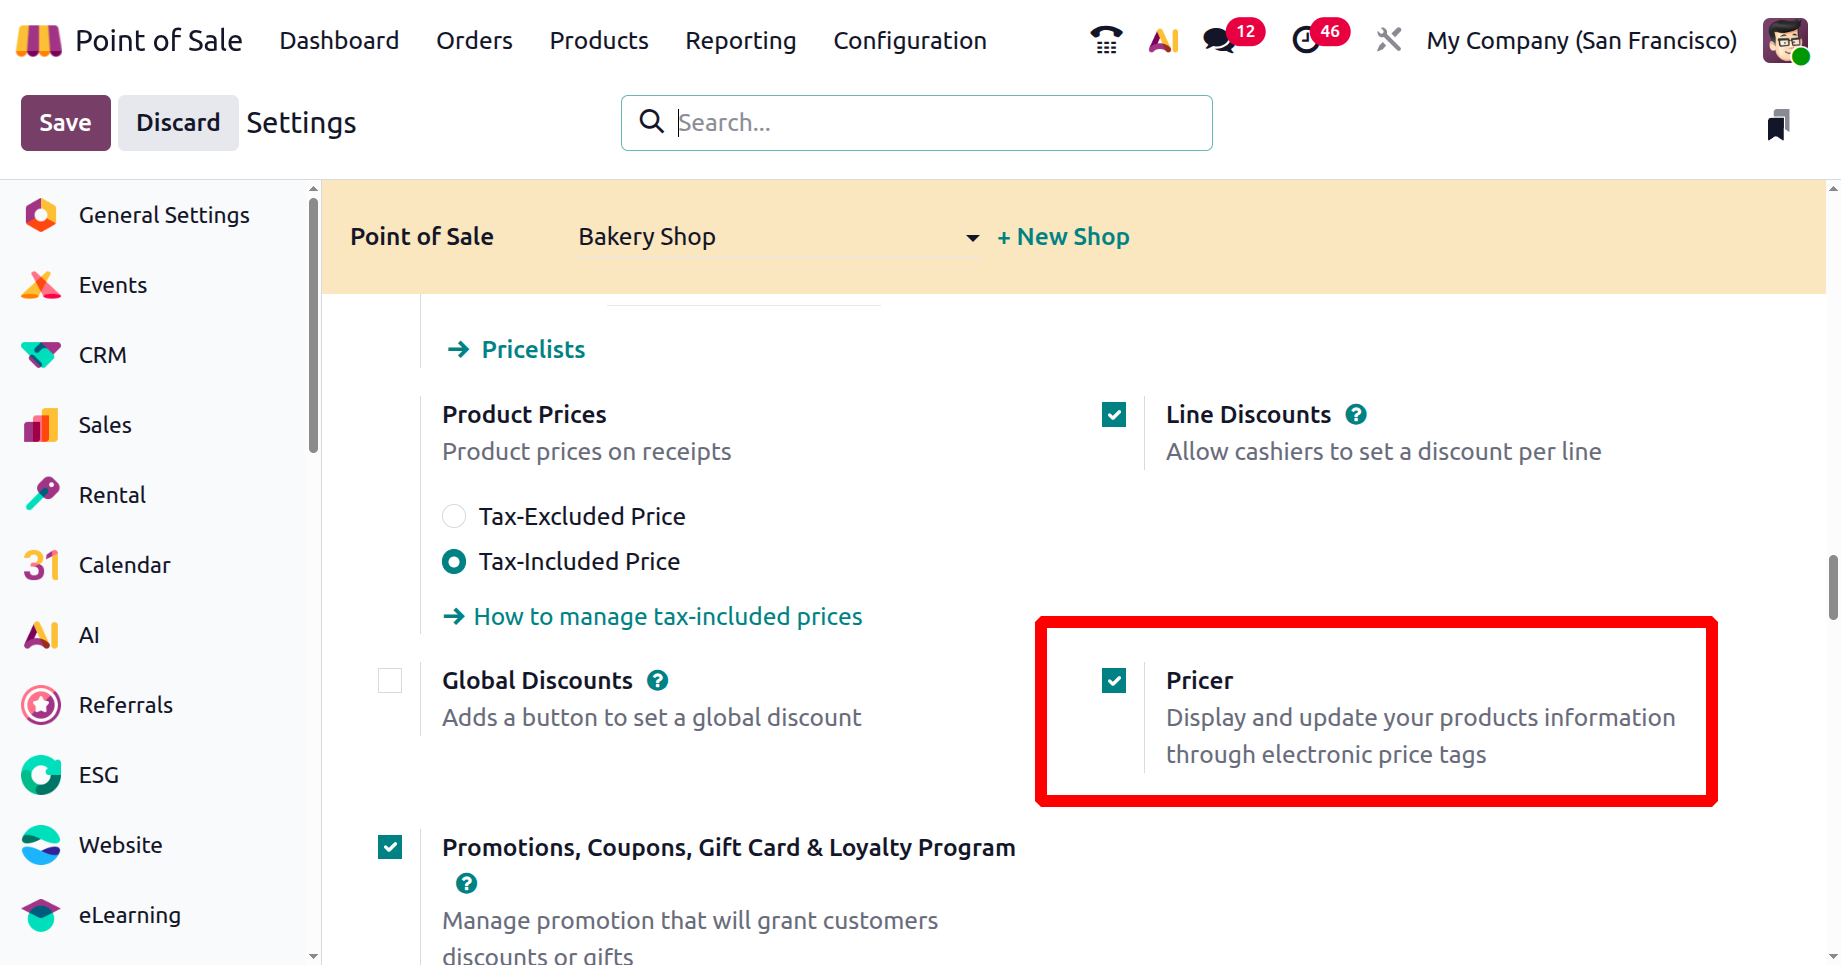
1.8 Pricer Stores
The Pricer Stores configuration in Odoo 19’s Point of Sale module enables real-time synchronization of product pricing and related information with electronic shelf labels (ESLs) in physical stores. Upon accessing the menu, a dashboard displaying all available options is presented, as shown in the screenshot below.

To create a new Pricer Store configuration, open a new form and enter the required details such as the ‘Store Name,’ which identifies the physical or online store, and ‘Pricer Tenant Name,’ the unique account name within the Pricer platform. Then, the ‘Pricer Login’ and ‘Pricer Password’ provide secure access. Then, set the ‘Pricer Store ID’ to uniquely identify the store for integration. Finally, the ‘Product Barcode’ is used for scanning products, and the ‘Pricer Tag Barcode’ can be used to scan the price tag barcode fields, as illustrated in the screenshot below.

Integrating Odoo PoS with Pricer’s ESL system allows businesses to automatically update product information on store displays. This eliminates the need for manual label changes, minimizes pricing errors, and improves overall in-store efficiency.
1.9 Pricer Tags
The Pricer Tags feature in Odoo’s Point of Sale module offers a digital way to display prices by using electronic shelf labels instead of paper ones. These tags can be linked to specific products, allowing updates to prices, product names, or promotions to happen instantly.

To create a new Pricer Tag, click the ‘New’ button from the dashboard. Then, enter the Pricer Tag Barcode ID, select the Associated product, and choose the Associated Pricer Store, as shown in the screenshot above.
This configuration helps keep product information accurate, reduces the need for manual updates, and improves the customer shopping experience.
1.10 PoS Product Categories
When running a product-based business, organizing products into different categories is important for better management and easier access. In Odoo's Point of Sale (PoS) module, setting up product categories is straightforward. You can do this through the ‘PoS Product Category’ option under the Configuration menu. The dashboard shows a list of available product categories used in sales.
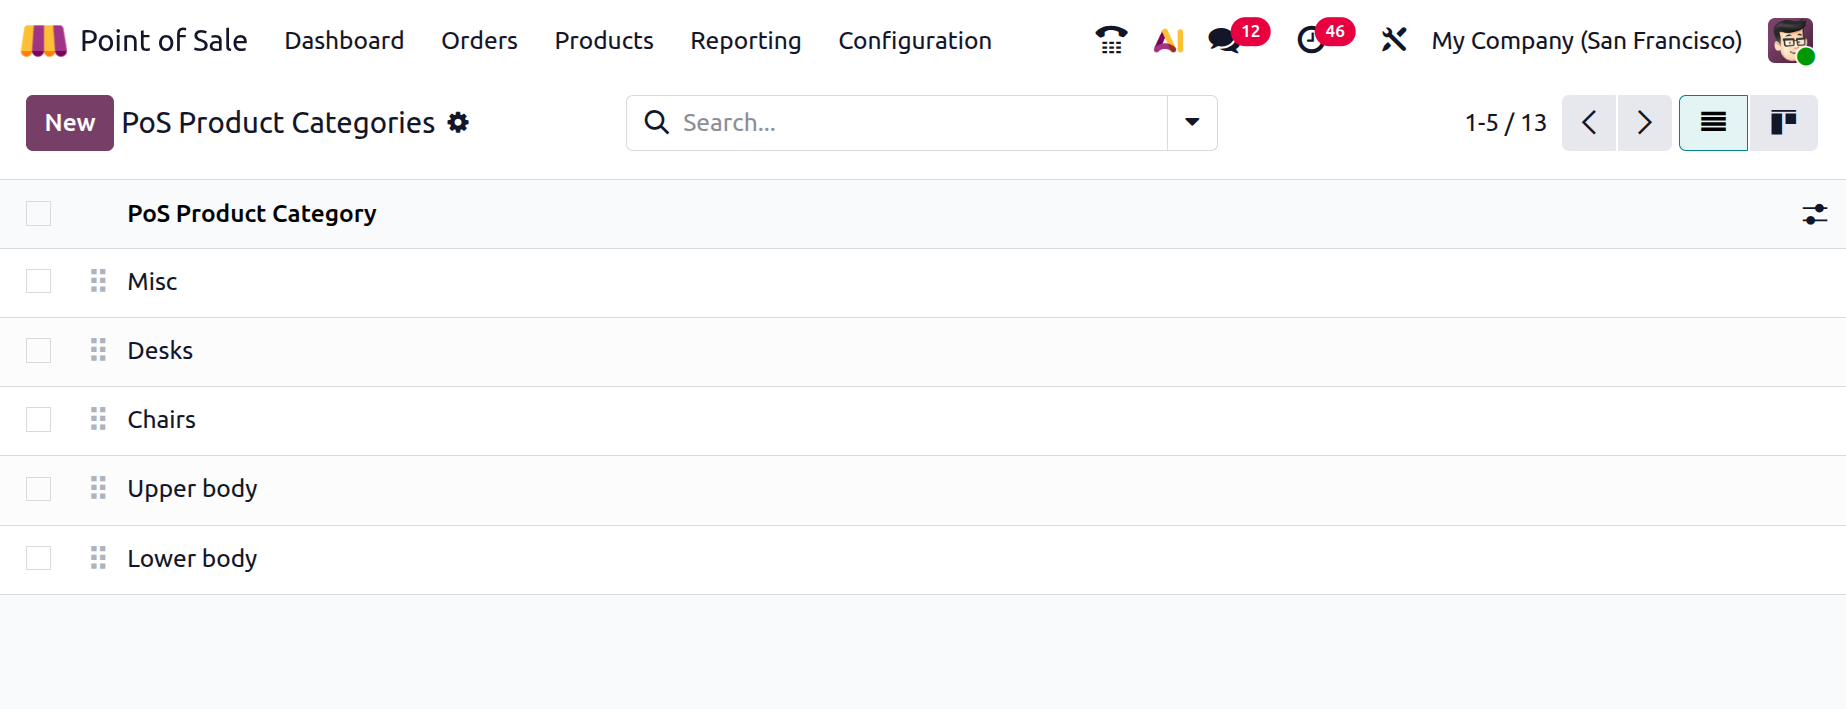
You can also switch the view to Kanban for a more visual layout. The search bar includes options to Filter, Group, and mark Favorites. To create a new category, simply click the ‘New’ button.
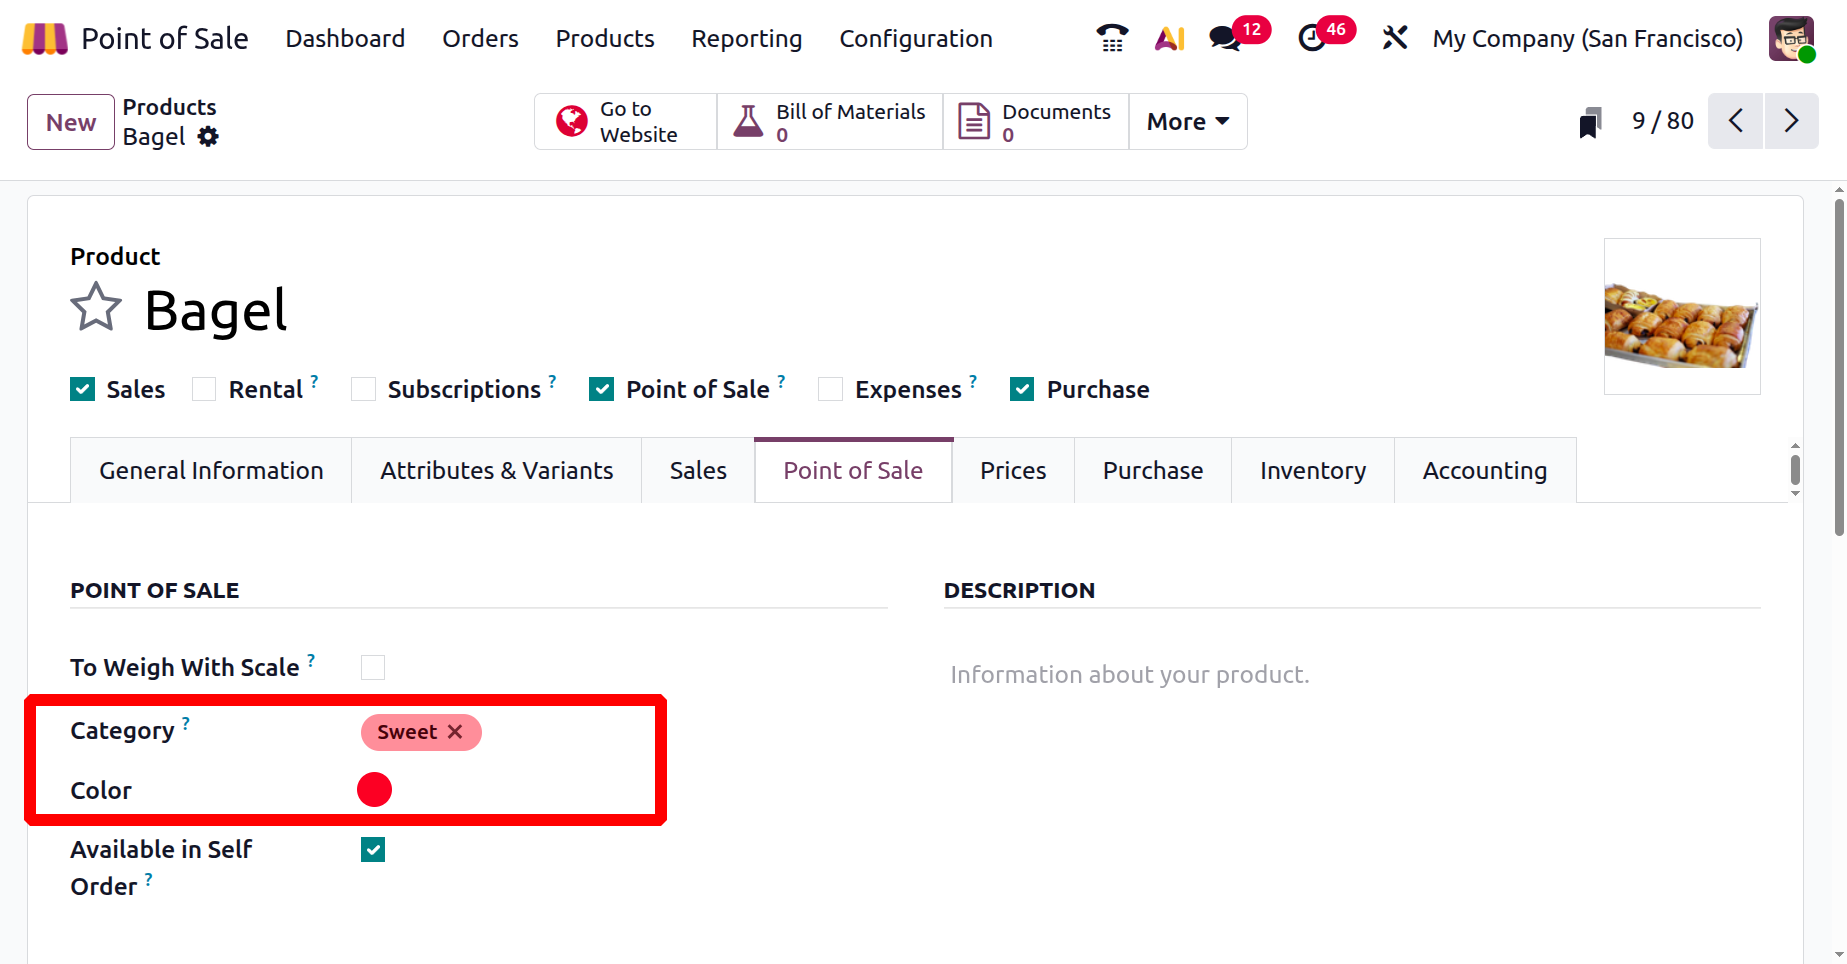
In the displayed form enter the ‘Category Name’ which identifies a product category shown in the POS interface, grouping similar items like Drinks or Snacks for easier navigation. Then mention the ‘Parent Category’ to define the main category a subcategory belongs to, allowing a hierarchical structure (Hot Drinks, Cold Drinks, etc). Then, define the time range during which the category is available in the ‘Available between’ field. You can also choose a color to highlight the category and save the new category, as shown in the screenshot below.

Then this chosen category can be set inside the Product configuration form while creating the product in the ‘Category’ field of the ‘Point of Sales’ tab, as shown in the screenshot below.
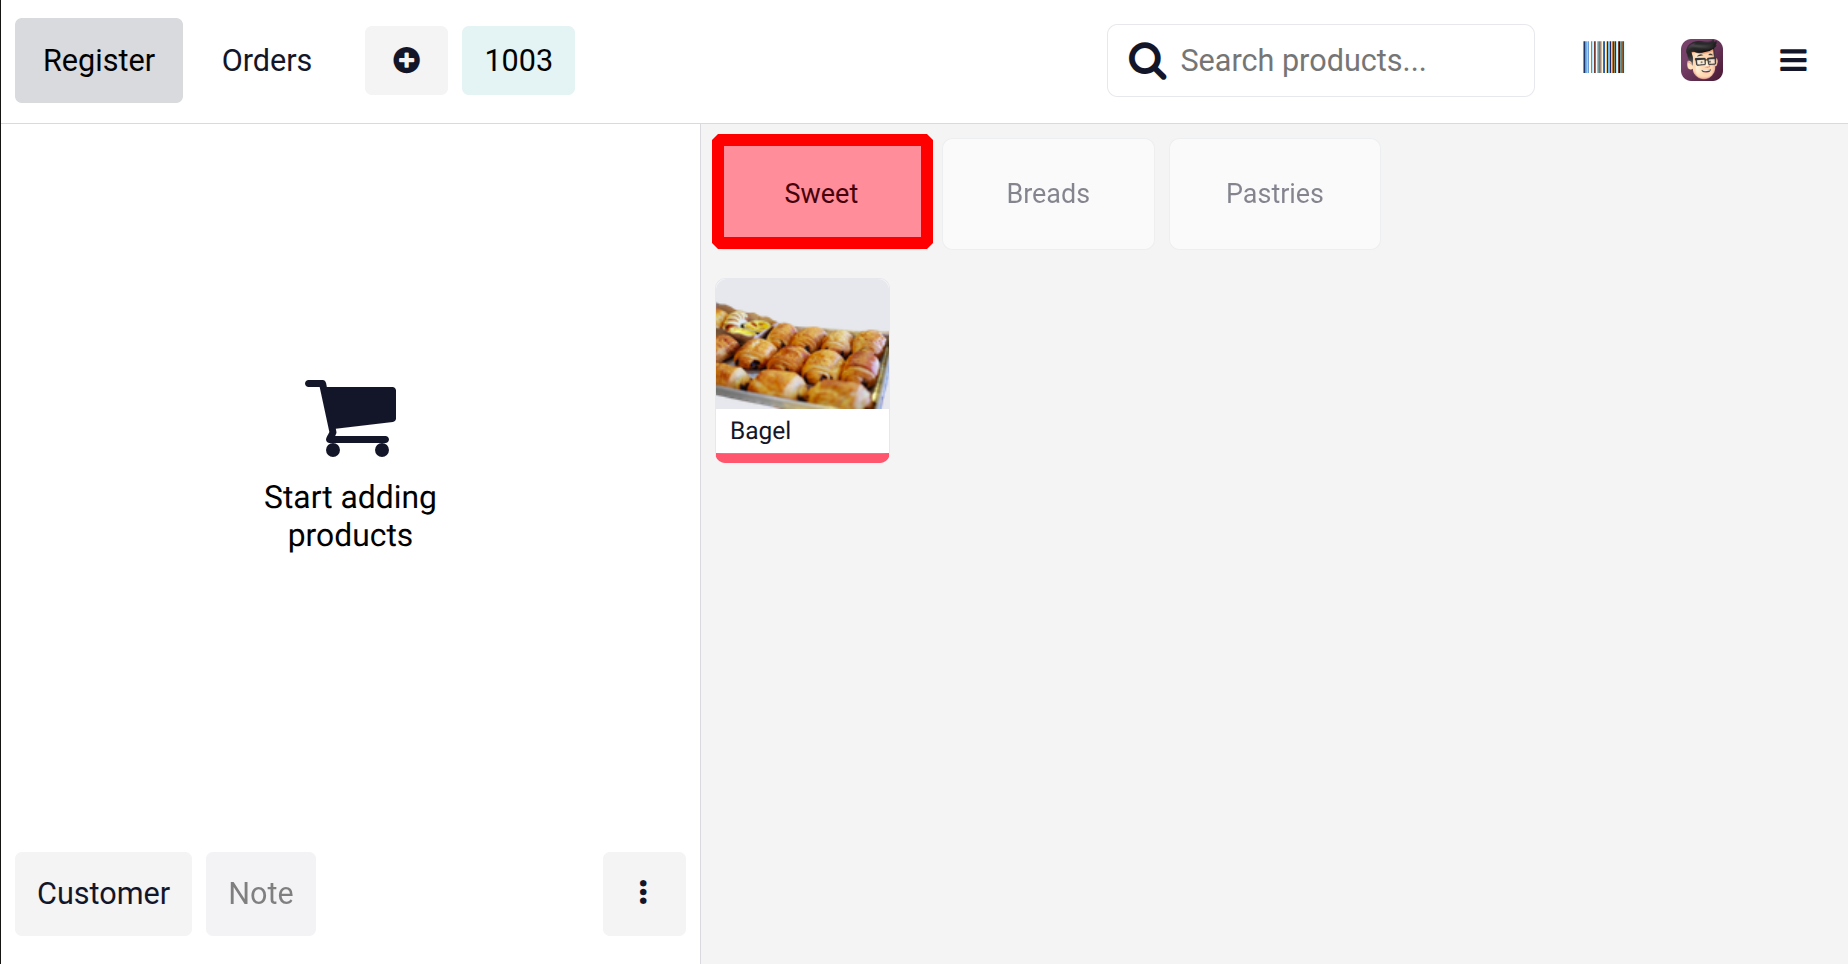
Also, the category will display inside the sales session window, as shown in the screenshot below.
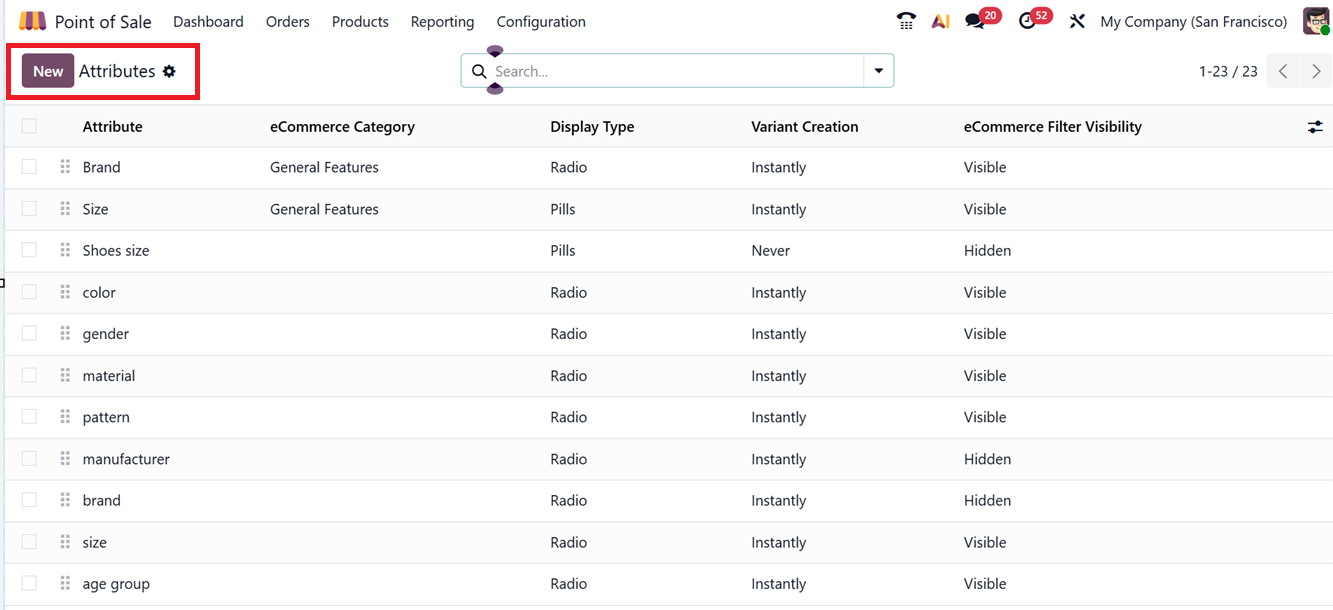
1.11 Attributes
In Odoo, Attributes are used to define different versions of a product, such as size, color, or material. These attributes help manage product variations, inventory, pricing, and sales more effectively. In the PoS module, you can configure product variants using the ‘Attributes’ option under the Configuration menu.
From the attributes dashboard, you can view and manage fields like, eCommerce Category, Display Type, Variant Creation Mode and eCommerce Filter Visibility, as depicted in the screenshot below.
To add a new attribute, click on the ‘New’ button. In the form view, enter the Attribute Name and choose a Display Type used in the product configurator such as Radio, Buttons, Pills, Select, Color, Multi-checkbox and Image, as depicted in the screenshot below.
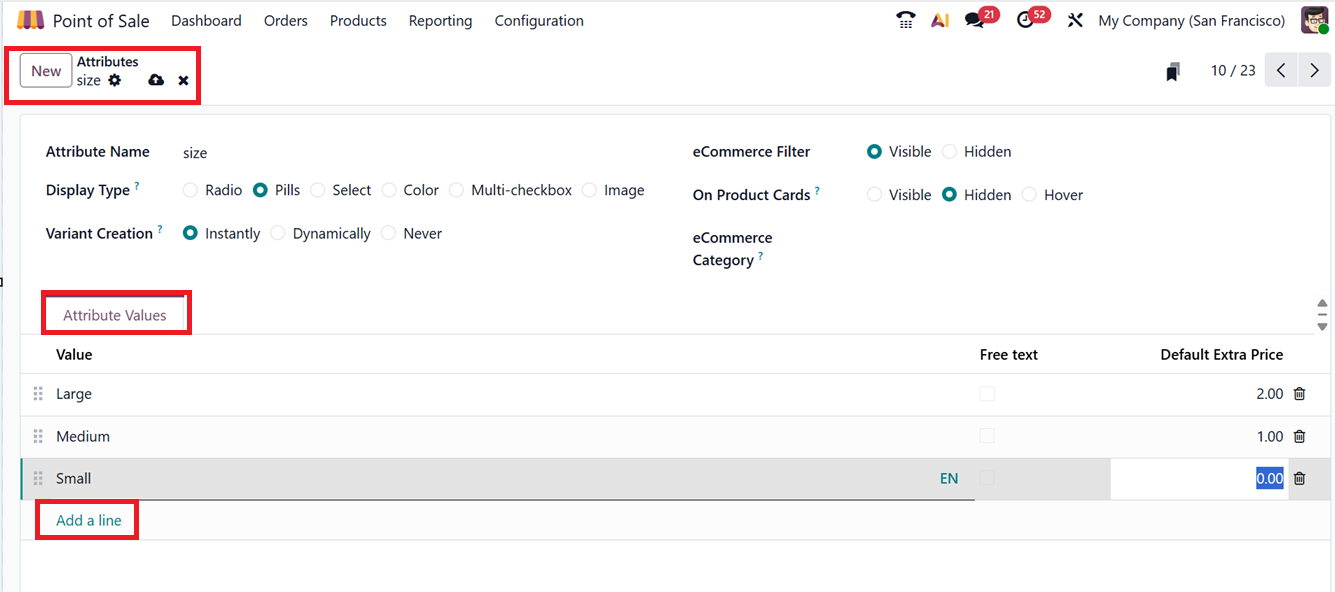
In the Variant Creation field, choose how variants should be created:
- Instantly: Variants are created automatically when values are added.
- Dynamically: Variants are created only when values are selected in any transfer.
- Never: No variants will be created from the attribute.
You can also set whether the attribute should be Visible or Hidden in the online store using the ‘eCommerce Filter’ setting. Also,you can set the visibility of the attributes in product cards using the ‘On Product Cards’ field and assign it to an eCommerce Category which appears in the eCommerce website.
To add specific values for the attribute (like "Medium,” “Small,” "Large" etc), use the ‘Add a line’ option found inside the ‘Attribute Values’ tab section. Once all details are filled in, click on the ‘Save’ icon to apply the changes. While configuring products for your POS inventory, you can assign this attribute value to a product that comes with this property.
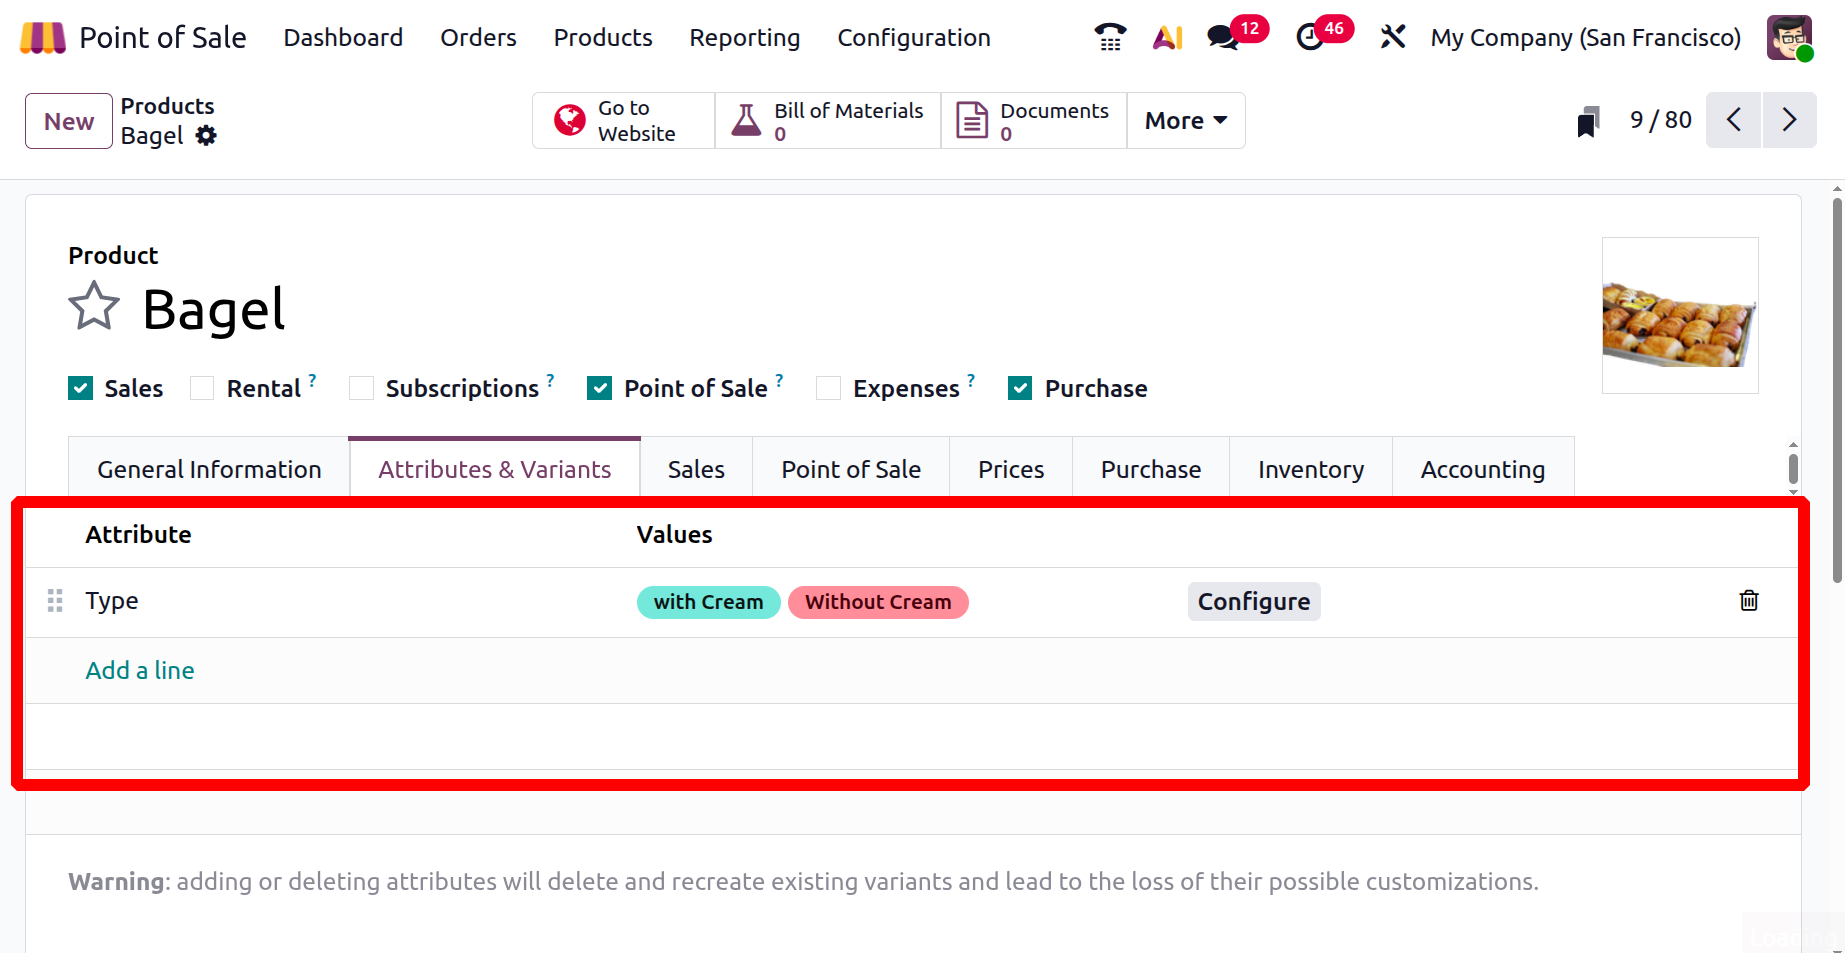
You can create different attributes using the same method. Also, the attributes can be added inside the product as shown in the screenshot below.
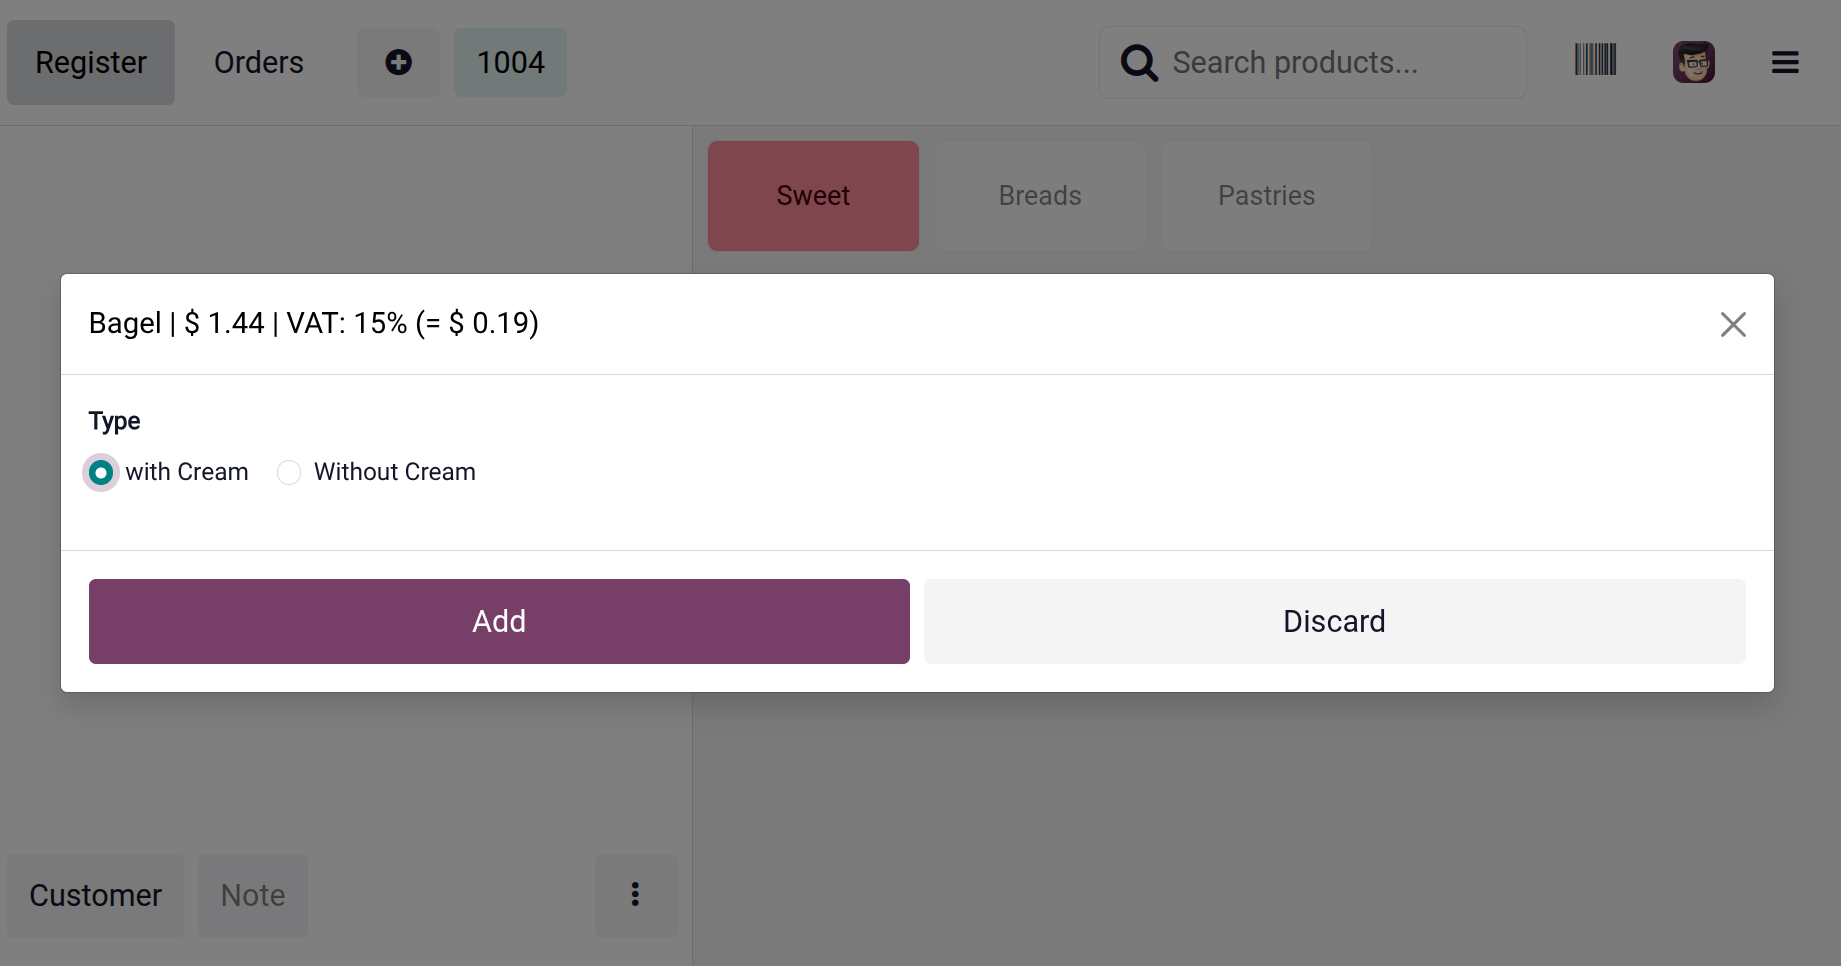
During a sale, the product variant can be chosen from the session as shown in the screenshot below.
1.12 Product Tags
The ‘Product Tags’ in Odoo are keywords or labels like "New Launch" "Summer Collection," or "Bestseller" that can be assigned to products to help organize them beyond standard categories or attributes. In the POS system, these tags make it quicker and easier to search, filter, or sort products without needing to remember exact names or codes.
The Product Tags dashboard from the POS Configuration menu will show the available options with their Name, Visible to customer, Product Template and Product Variant details, as shown in the screenshot below.

You can create new products tags by opening a new configuration form and editing details like, name of the Tag and mention whether the tag is visible to customers using the ‘Visible to customers’ field. Then, set a highlight Color and a Point of sale Description, as shown in the screenshot below.
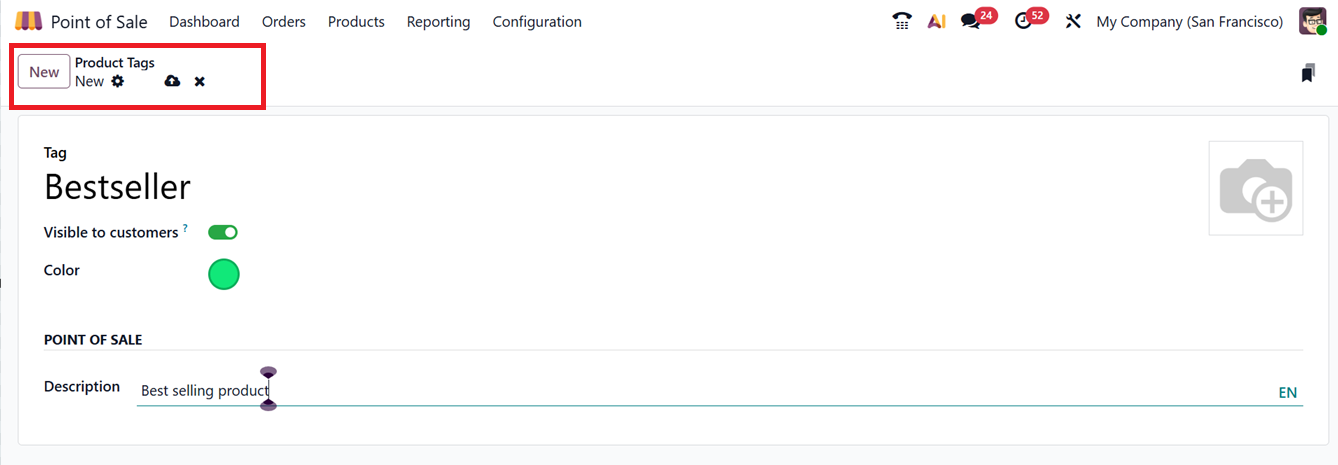
After saving the tag details, you can utilize them while configuring your POS Inventory.
1.13 UrbanPiper Store Timings
The UrbanPiper Store Timings feature in Odoo’s Point of Sale module allows businesses to set and manage their operating hours for food delivery platforms like DoorDash, Just Eat, EatEasy, Swiggy, UberEats and many more.
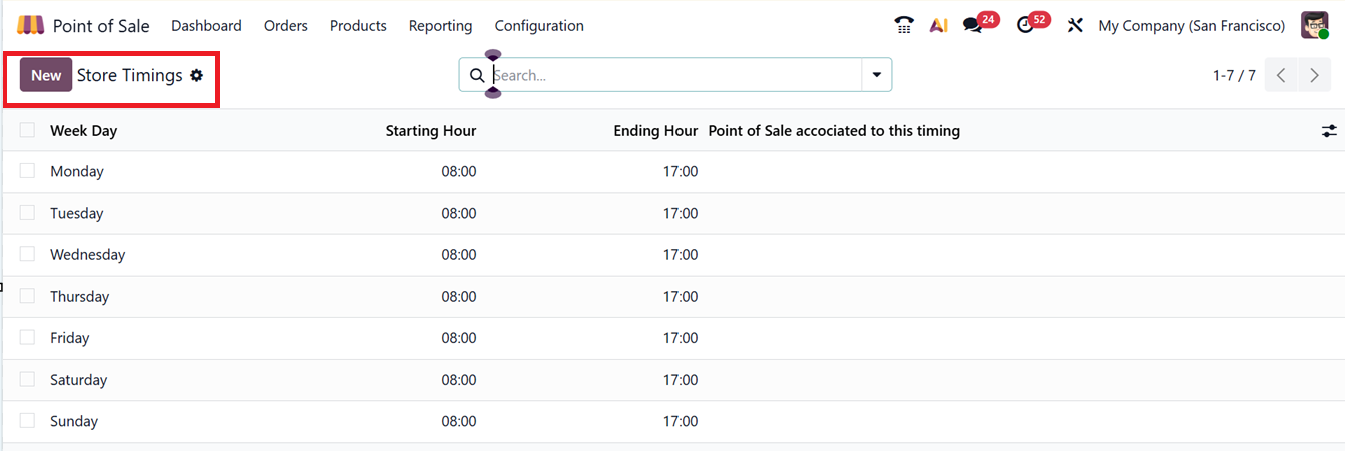
On the dashboard, you can view a list of store timings, which includes the name of the Week Day, Starting Hour, Ending Hour, and the Point of Sale associated with this timing. To add a new timing, click the ‘New’ button and fill in the necessary details, as shown in the screenshot.

By setting these timings, businesses can control when their store is shown as "open" or "closed" on delivery apps. This ensures that customers can only place orders during business hours, helping to keep online and in-store operations aligned.
1.14 Taxes
Tax management is the process of handling a business's tax duties to stay compliant with laws while improving financial efficiency. In POS and Accounting modules, it’s crucial for accurate financial tracking and reporting.
To begin setting up taxes, go to the Configuration menu within the POS module and access the Settings window. In the Accounting section, enable the Flexible Taxes option. This feature allows businesses to handle different tax scenarios based on their needs. Once enabled, you can assign a Default Fiscal Position to be applied automatically for all transactions at a specific POS location. Additional fiscal positions can be added under the Allowed field, offering flexibility in how taxes are applied based on customer location or type, as shown in the screenshot below.
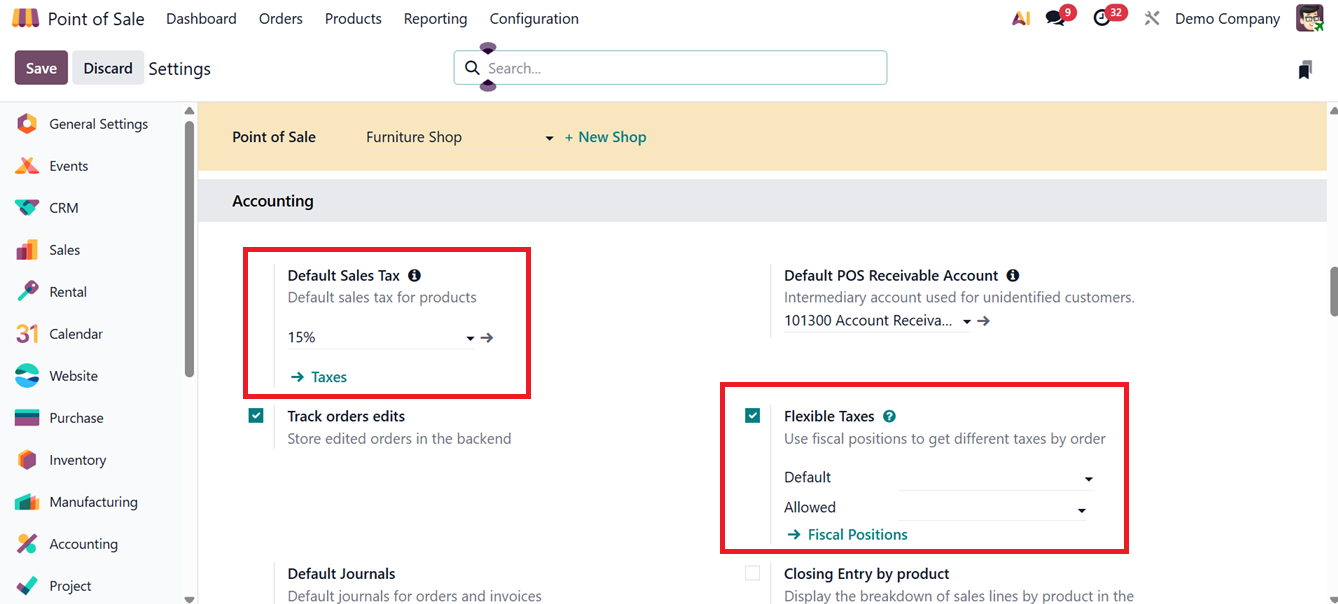
To configure default taxes in Odoo, you can choose a default tax option in the ‘Default Sales Tax” field. This chosen tax will be automatically applied to your POS products and invoices. If new tax rates need to be created, click on the ‘Taxes’ link. This will open a list of the available tax options with their Tax name, Description, Tax Type, Tax Scope, Label on Invoices, Company and Active stage, as shown in the screenshot below.
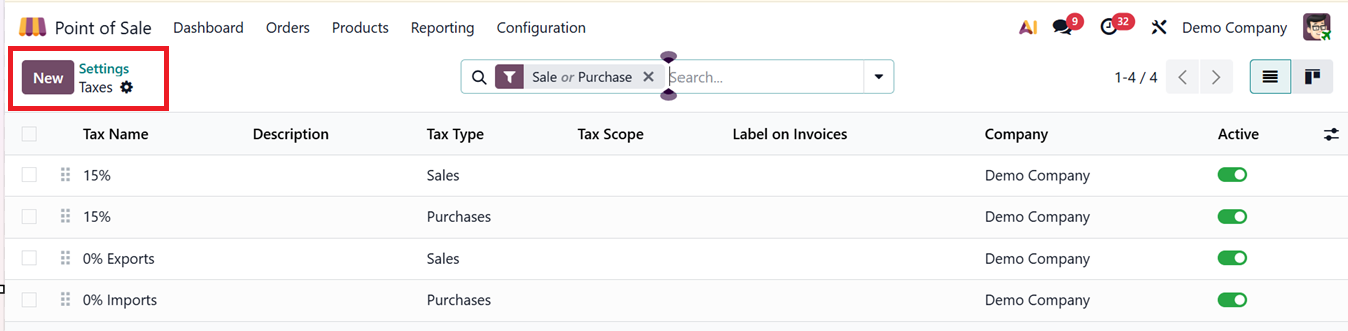
From the tax list view, you can activate or deactivate taxes using the toggle under the Active column. While Odoo includes many pre-configured country-specific taxes, only a few are enabled by default.
To create a new Tax rate, click on the ‘New’ button. When creating or editing a tax, you must provide a Tax Name and a Description. You can also define the Tax Type (Sales, Purchase, or None) and Tax Scope (Goods or Services), depending on the purpose of the tax. The Amount field lets you set the tax percentage that will be applied to products sold in this POS session. After that, you can select the Fiscal Position that includes this tax rate, as shown in the screenshot below.
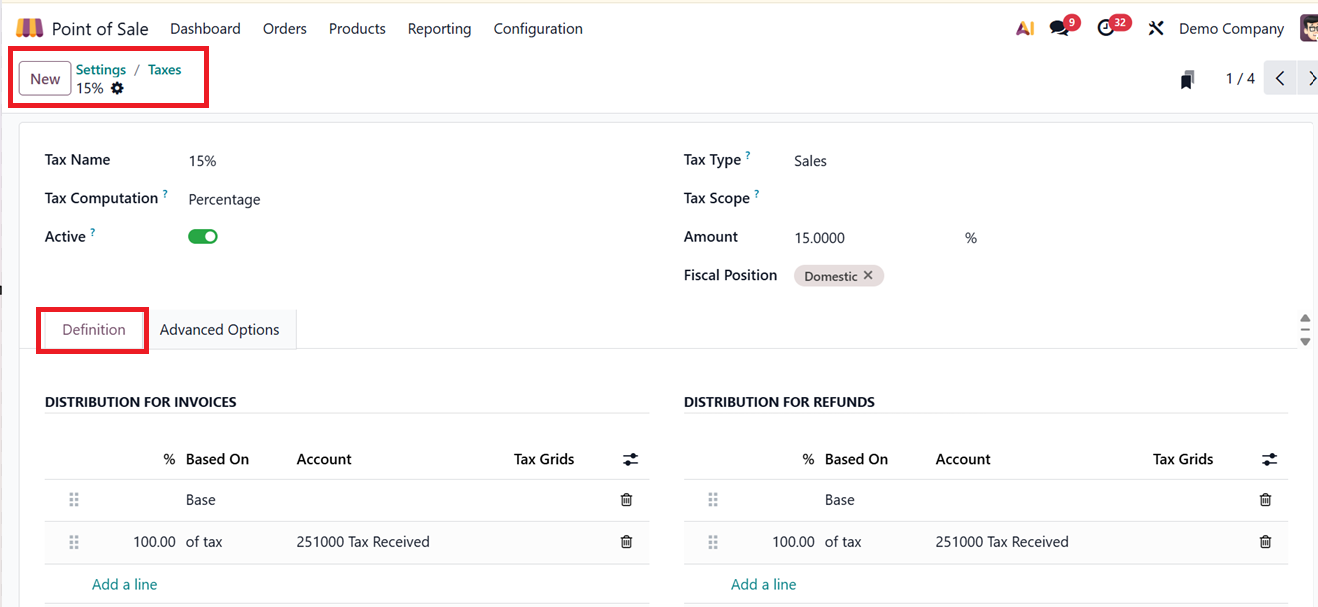
Then, you can enable or disable this tax application using the ‘Active’ toggle button.The Tax Computation field allows you to define how the tax is calculated. This includes:
- Group of Taxes- Combines multiple taxes into a single group (useful for applying layered taxes like VAT and Environmental Tax).
- Fixed Amount – A constant tax in the local currency.
- Percentage – Tax is calculated as a percentage of the product price.
- Percentage Tax Included – A tax based on the overall invoice amount.
Under the Definition tab plays a key role in ensuring accurate tax calculation and reporting. It allows users to define how tax amounts are applied and allocated based on several factors, including the Tax ‘Based On’ in a percentage rate, Designated accounting ‘Accounts’ and associated ‘Tax Grids’ using the ‘Add a line’ button.
You can set these tax calculations for Invoices and Refunds in the ‘DISTRIBUTION FOR INVOICES’ and ‘DISTRIBUTION FOR REFUNDS’ sections.
By configuring these elements you can ensure that taxes are correctly calculated on sales, recorded in the appropriate accounts, and reported properly in compliance with regulatory requirements.
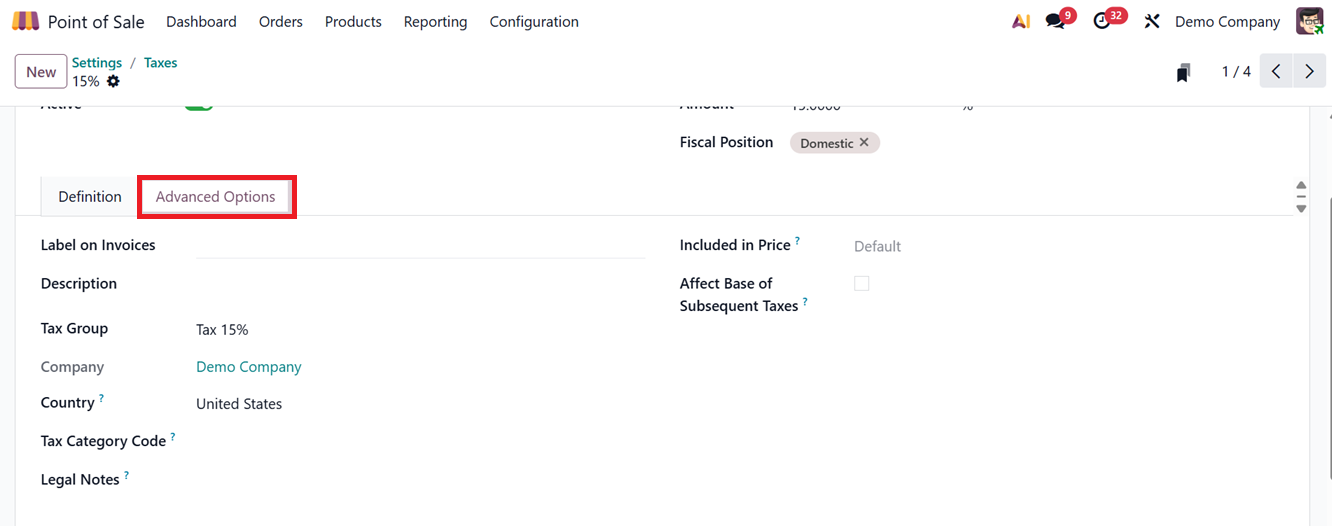
The Advanced Options tab allows you to set extra tax features such as, show tax labels on invoices for better clarity in the ‘Label on Invoices’ field, Assign taxes to specific ‘Tax Groups’. You can also include taxes in the product price if needed using the ‘Included in Price’ field. Then, mention the ‘Country’ in which this tax is applicable and a ‘Tax Category Code’ which is a VAT category code used for electronic invoicing purposes. Finally, you can add any legal notes that need to be printed in invoices in the ‘Legal Notes’ field and activate the ‘Affect Base of Subsequent Taxes’ option to let a tax be affected in the base amount for calculating the taxes with higher sequence than this. It's useful for layered taxes where one tax depends on another.
After finishing the editing and saving the tax specifications, Odoo will automatically apply this tax rates in your POS sales sessions.
Checking Tax Application in POS Orders
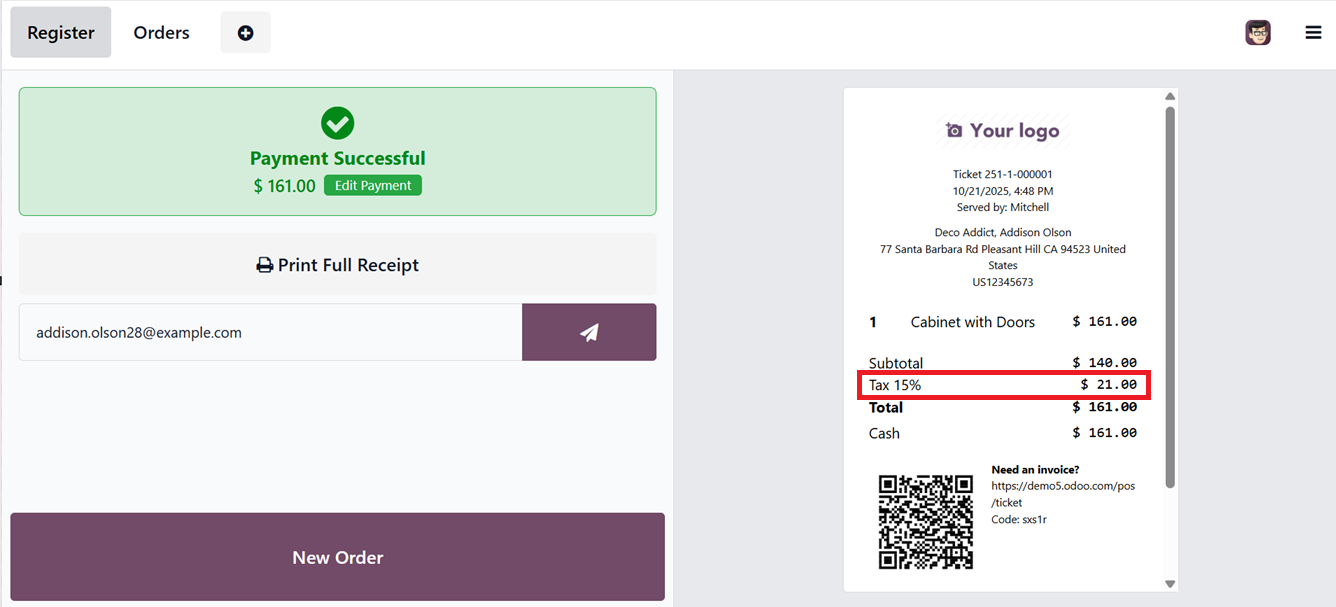
To check how taxes are applied in a sale, start a POS session from the Dashboard and add products to an order. The total, including taxes, will show on the left panel.
After confirming the payment by clicking Validate, the system generates a sales invoice. This invoice will clearly show the applied tax rate, such as a 15% sales tax, along with the calculated tax amount for each product, as depicted in the screenshot below.
1.15 Settings
Users are going to explore the general settings options available in a basic POS session. This can be done via the ‘Settings’ option from the ‘Configuration’ menu, as shown in the screenshot below.
The ‘Settings’ window is categorized into various tab options such as Point of Sale, Mobile self-order & Kiosk, Payment, POS Interface, Product &POS Categories, Accounting, Sales, Pricing, Bills & Receipts, Food Delivery Connector, Payment Terminals, Connected Devices, Preparation and Inventory options.