Configuring a New Point of Sale (PoS) Bar/Restaurant
Odoo 18’s PoS module offers a robust solution for managing restaurants and bars by integrating table service, kitchen coordination, stock management, and customer engagement. With tools like kitchen screens, inventory sync, and CRM integration, the system boosts service speed and customer satisfaction.
Start by creating a flexible menu with ingredient tracking and customization. Use the ‘Products’ menu to define product categories and automate procurement via inventory integration.
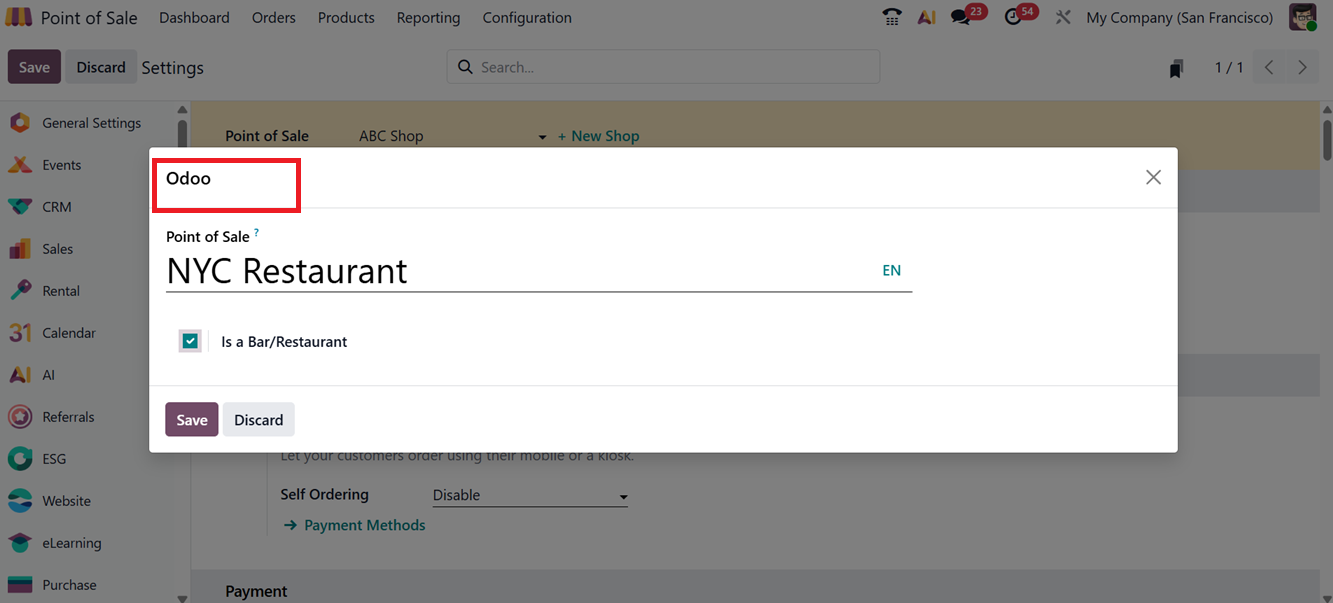
To launch a new restaurant, go to the Settings tab in the Configuration menu. Either select an existing session or click ‘+New Shop’. Enter the restaurant’s name, enable the “Is a Bar/Restaurant” toggle and click on the ‘Save’ button, as depicted in the screenshot below.
Once the restaurant name is saved, some restaurant-specific options will become visible under the settings window. Begin customizing essential restaurant features using the ‘Point of Sale’ as shown in the screenshots below.
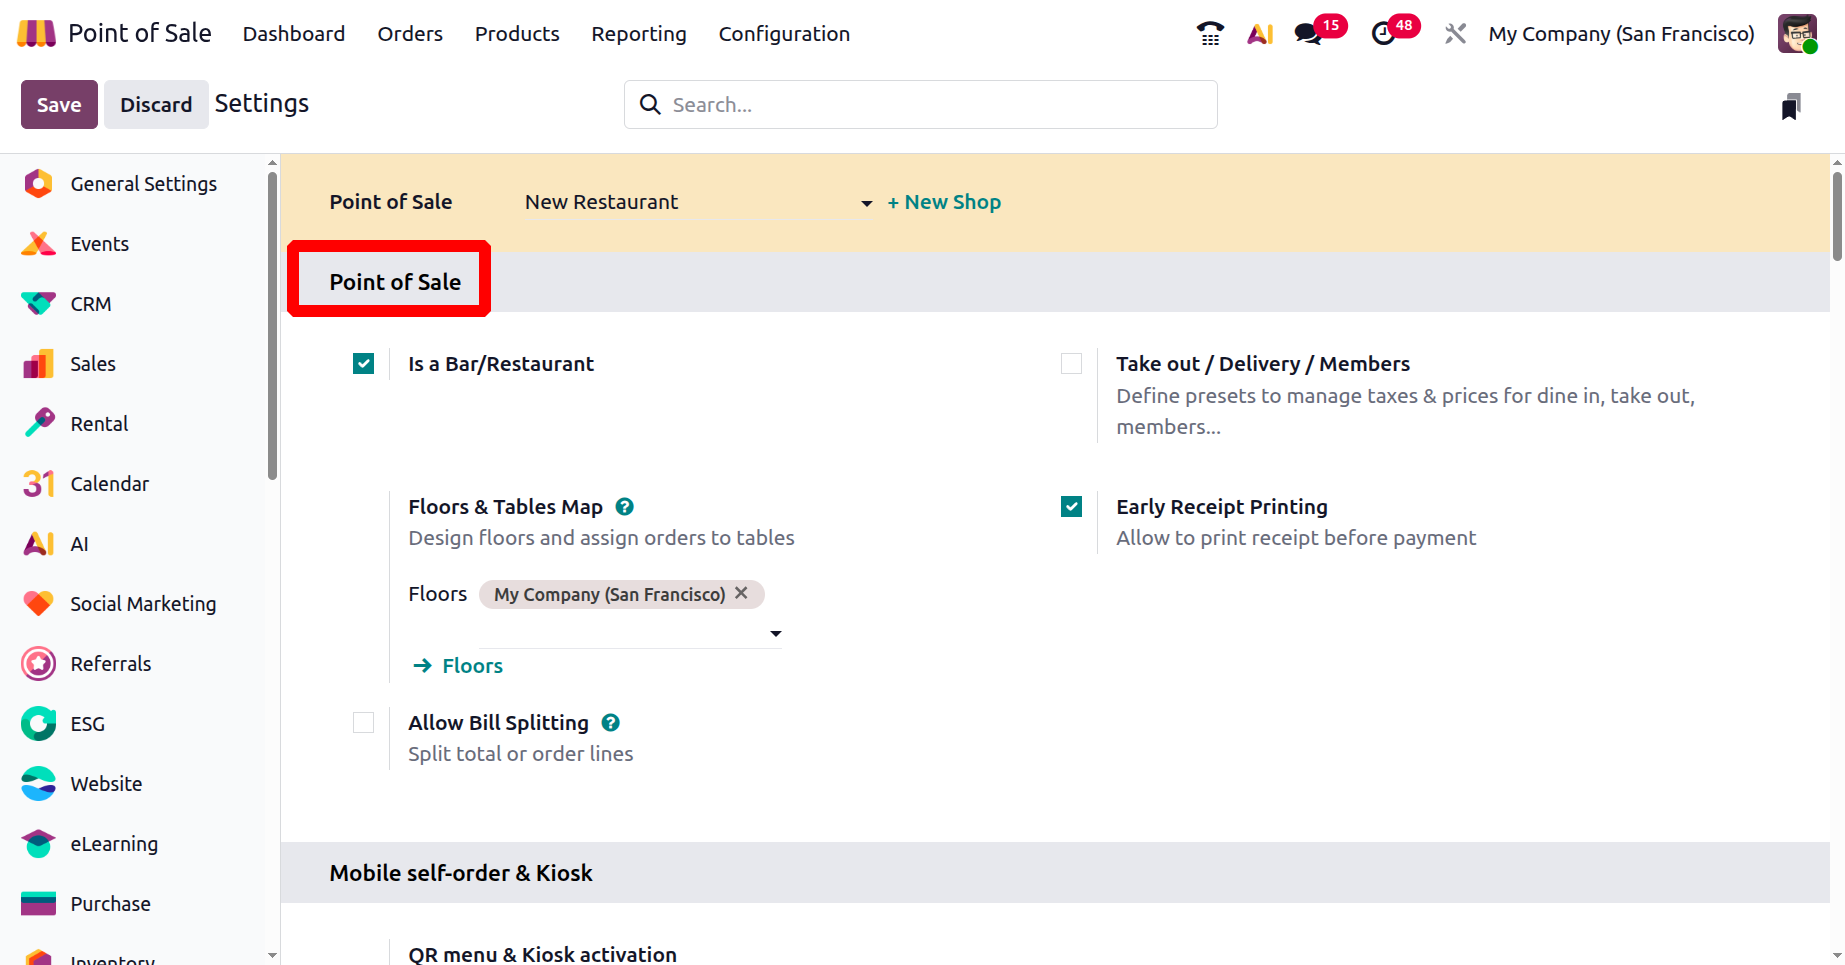
In the Odoo POS module, you can design your restaurant layout using the ‘Floor Plans’ feature under the ‘Configuration’ menu like we have discussed in the previous section of this book.
The Early Receipt Printing option in Odoo’s PoS settings window lets you print the receipt before the payment is made.
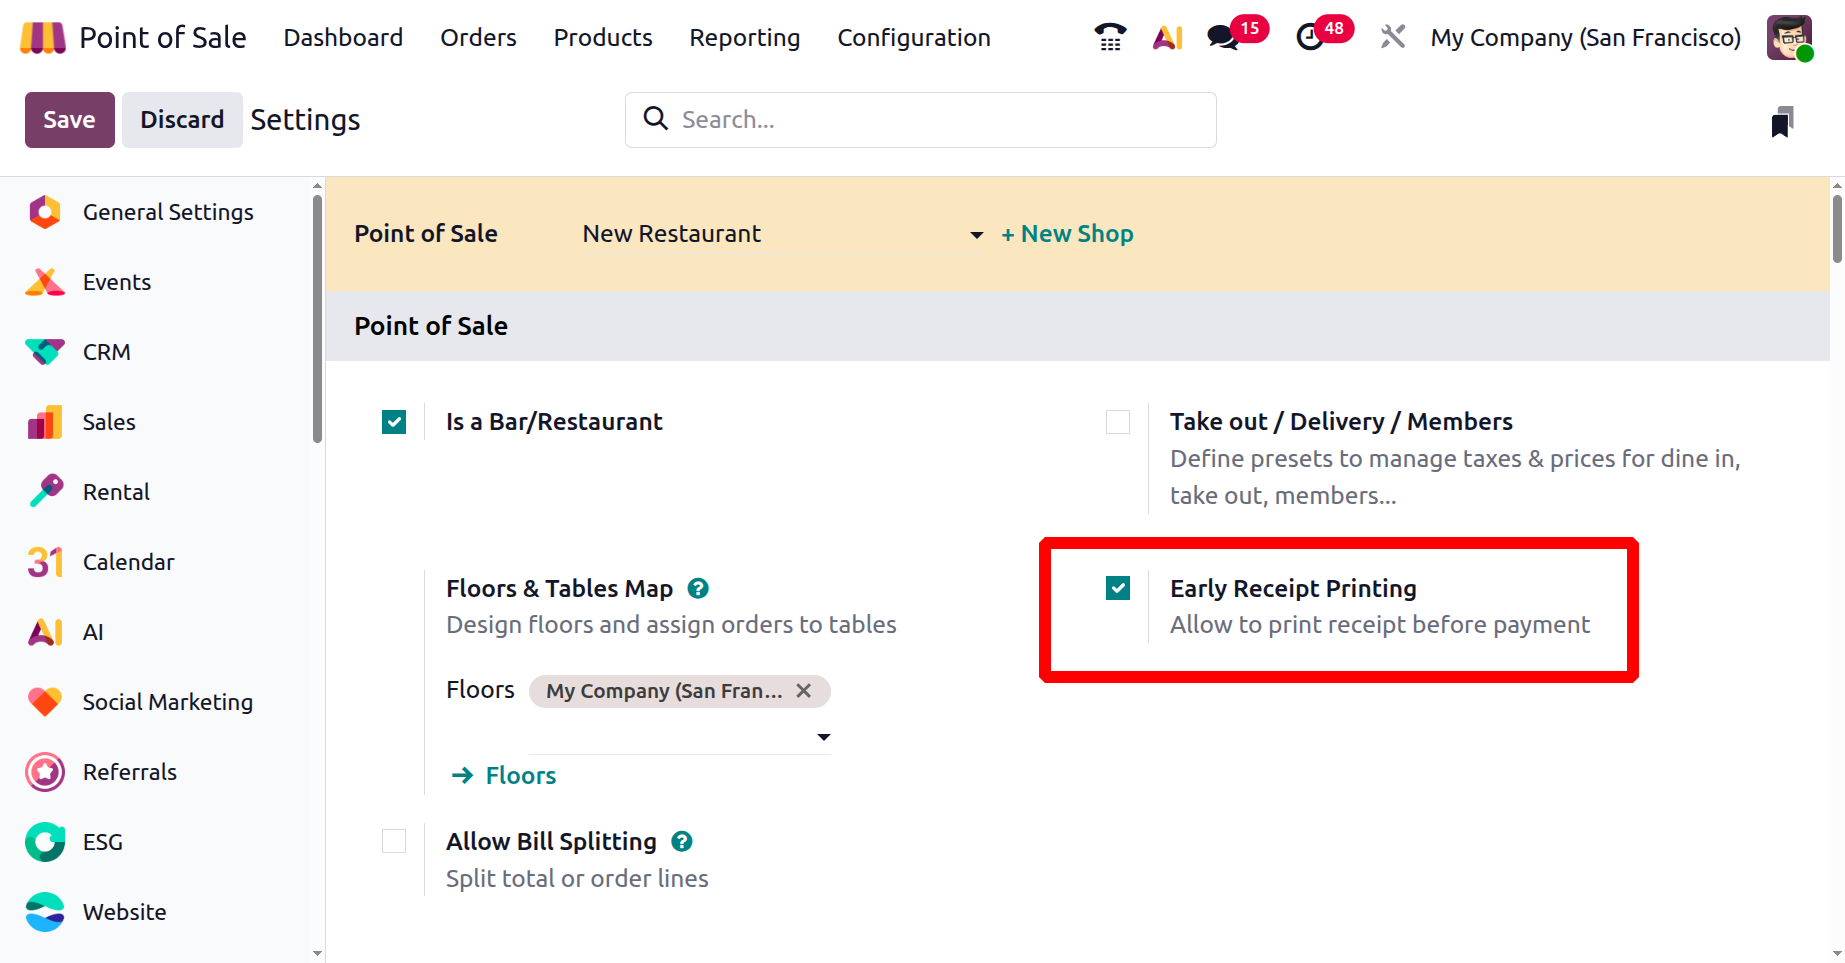
This can speed up service, make the process smoother for customers, and help ensure everything is accurate.
Take-Out/ Delivery/Members
The ‘Take-Out/ Delivery/Members’ feature allows your employees to differentiate between dine-in and takeaway orders. This affects tax calculations, pricing, and reporting. You can easily configure the function by activating the feature from the ‘Point of Sales’ settings tab section. Then, mention the ‘Available’ and ‘Default’ preset options to manage taxes and prices for dine in, takeout or parcel delivery services, as depicted in the screenshot below.
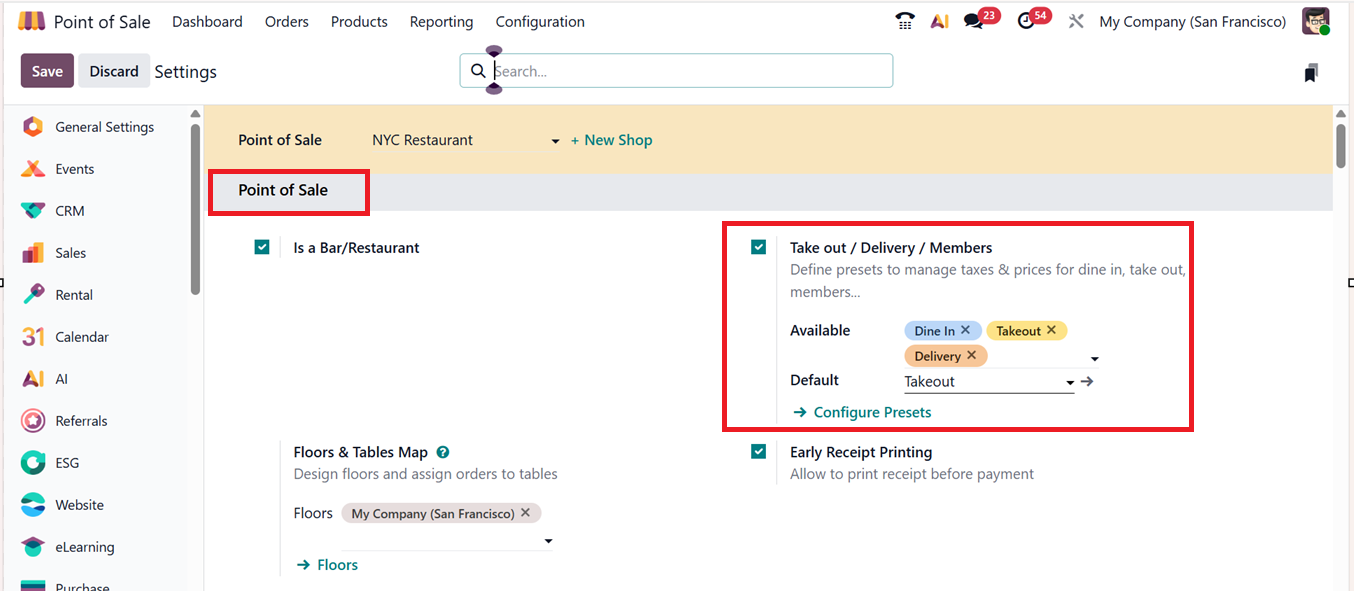
The ‘Configure Presets’ link can be used to manage or create new presets options that we have described in the previous section. Then, you choose this feature during a restaurant session by clicking on the default presets button provided in the POS interface, as highlighted in the screenshot below.
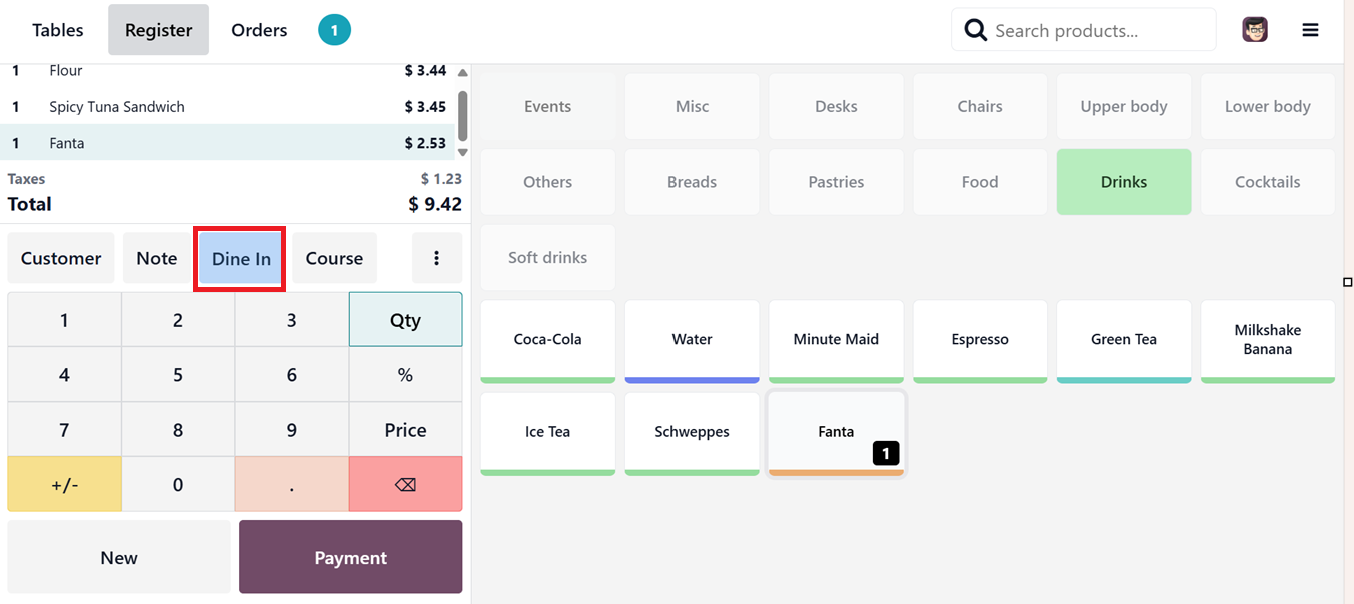
Then, you can choose the relevant option from the ‘Select preset’ dropdown list, as shown in the screenshot below.

Odoo also allows defining fiscal positions based on the order type to automatically apply different taxes for each of these presets.
Take-Out/ Delivery/Members
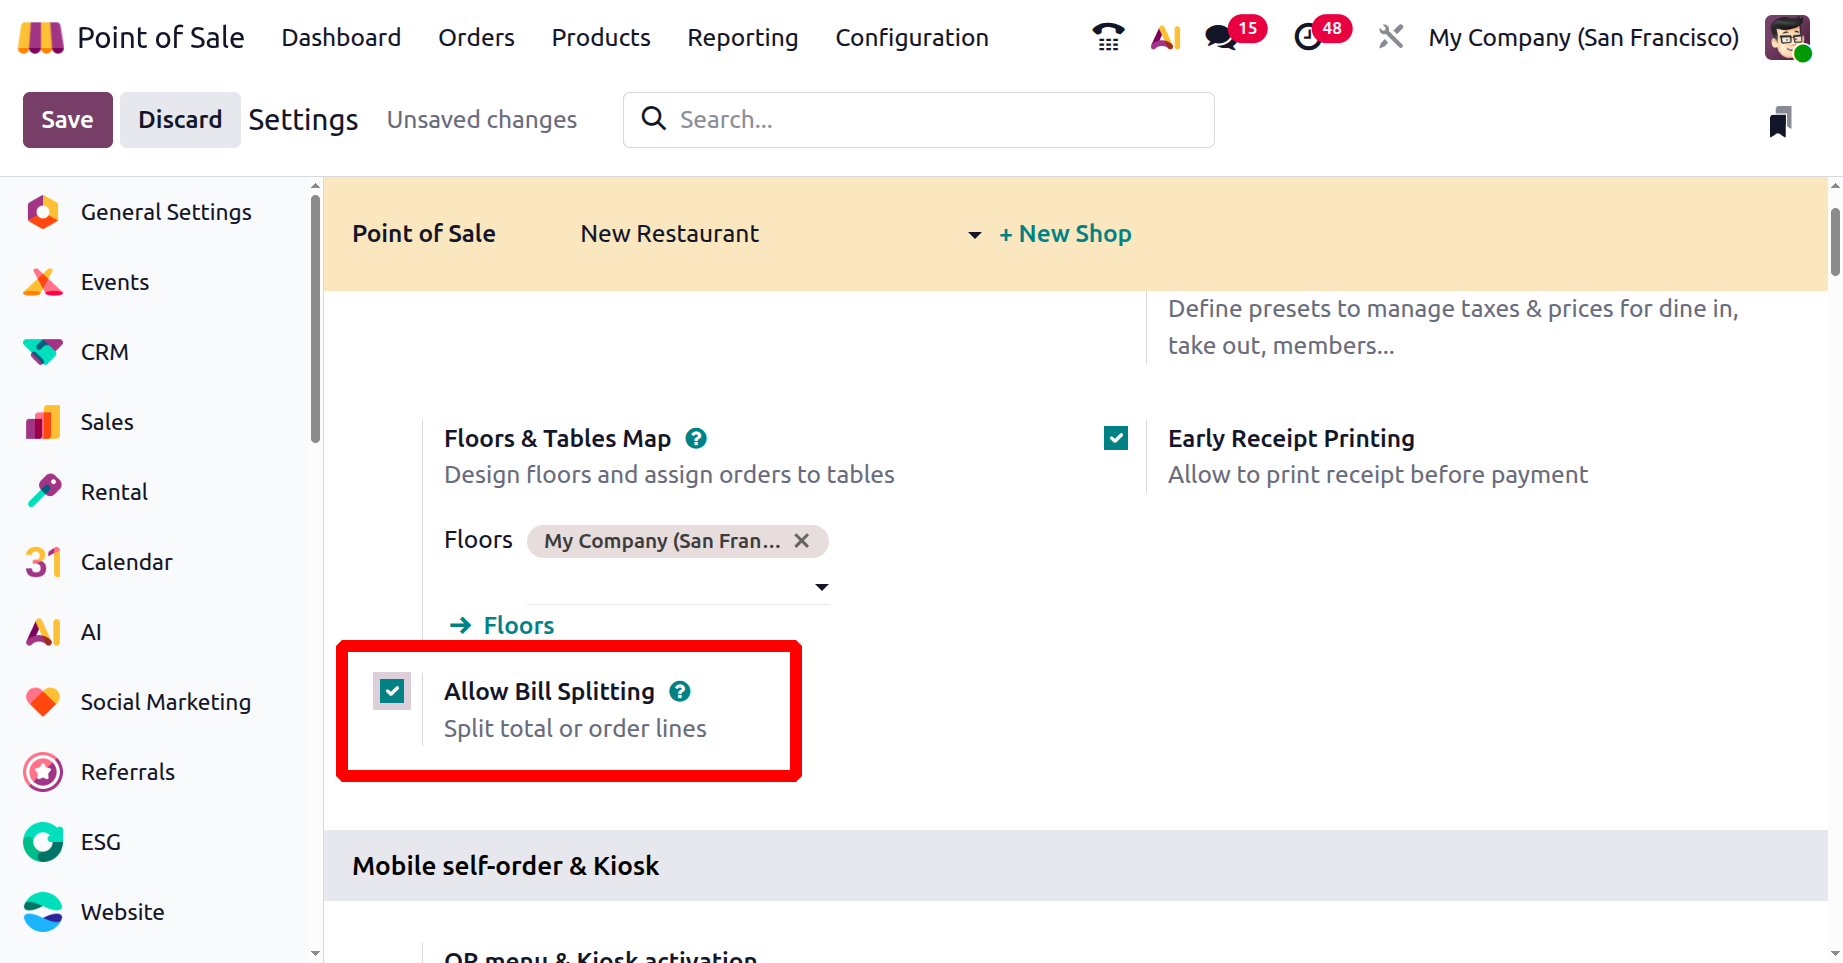
The ‘Allow Bill Splitting’ function in Odoo Point of Sale Module lets users divide the total bill among multiple guests. This can be by item or per person, simplifying group transactions. After activating the feature from the POS Settings window, you can start to utilize the feature for any POS Sales session.
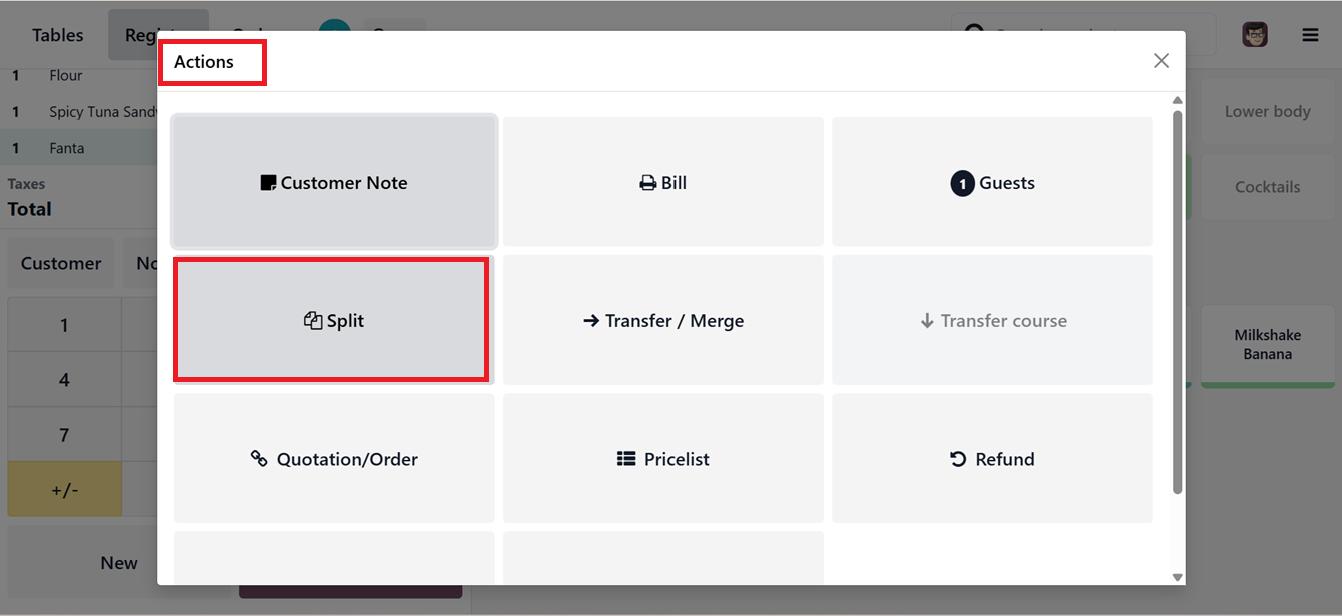
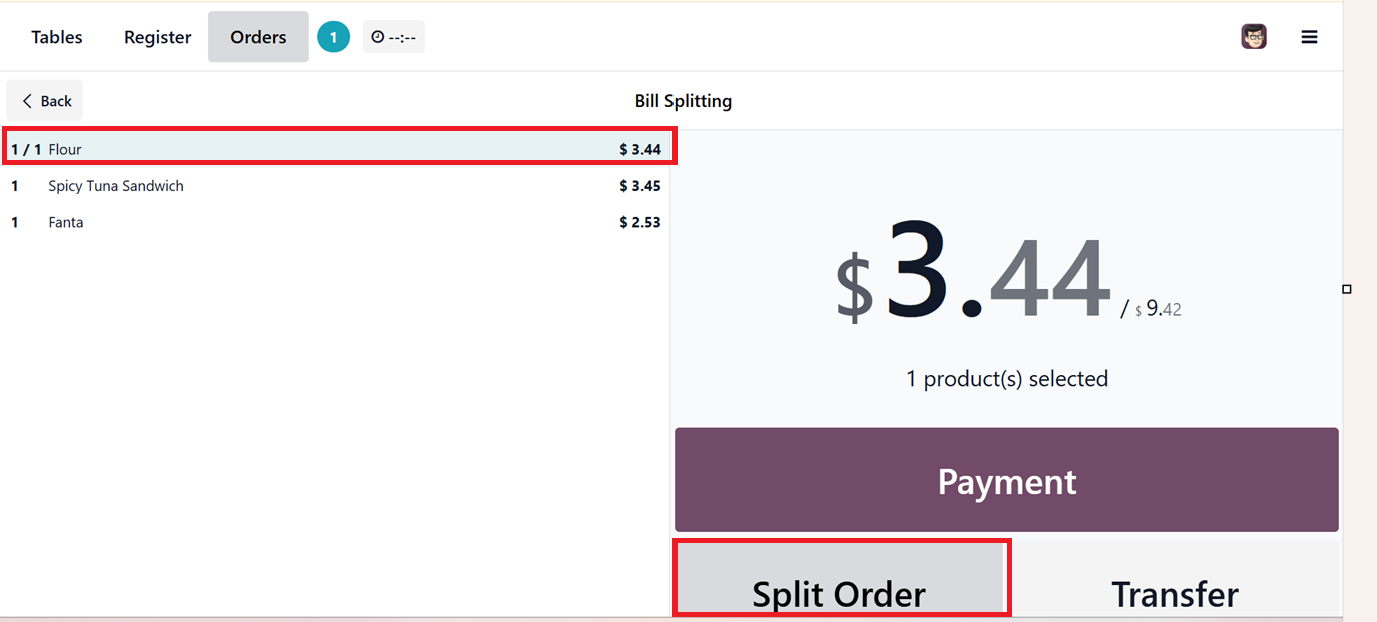
To use this feature, you can start a new restaurant session, select products, and click on the ‘Action’(Three dotted) menu. Then, choose the ‘Split’ option from the list, as depicted in the screenshot below.
In the new window, choose the item(s) and click on the ‘Split Order’ button. Then, assign the split portion to a customer and complete the payment process.
After selecting a product and the related customer, you can create a bill that will be treated as a split bill. In the POS sales screen, each split bill will be shown with labels like 1B, 2B, and so on, depending on how many parts the bill is divided into, as shown in the screenshot below.
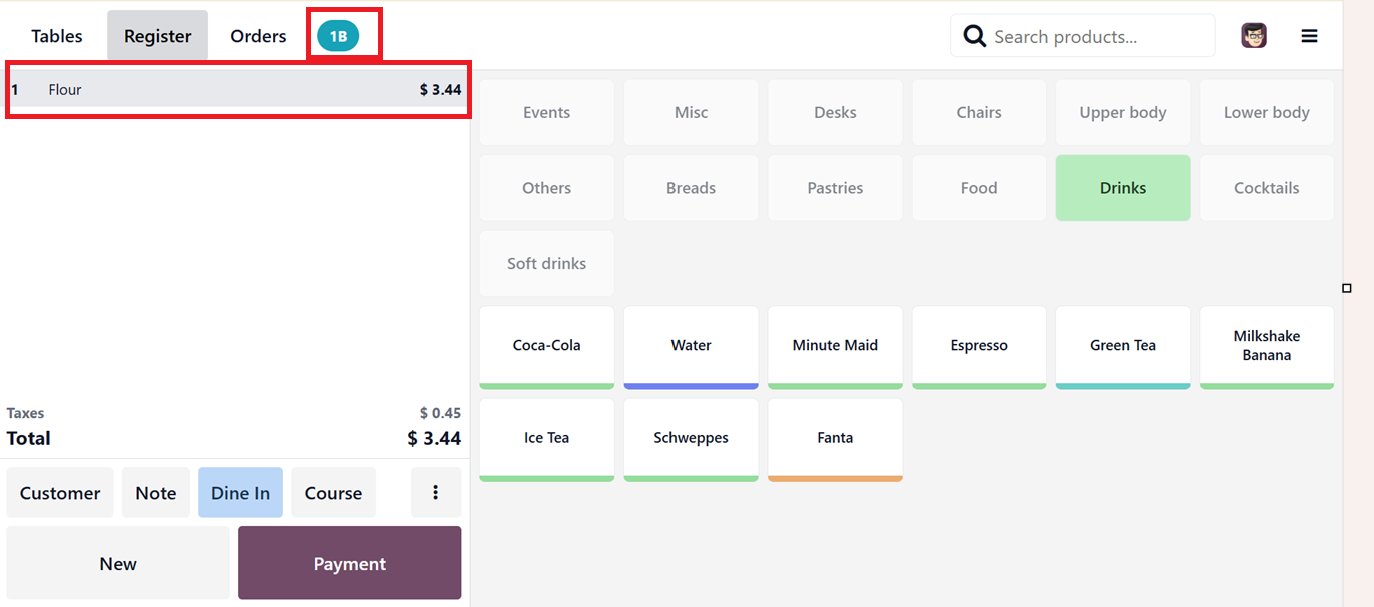
You can continue splitting the bill into the needed amounts, and repeat the process until the full bill has been paid.
Mobile Self-Order & Kiosk System
The Mobile Self-Order & Kiosk System in Odoo 19 POS lets customers browse, order, and pay via their mobile devices or in-store kiosks, reducing staff involvement. It supports QR Menu and Kiosk Mode, with all orders syncing directly to the POS and kitchen systems. This improves efficiency, speeds up service, and ensures order accuracy perfect for restaurants, cafés, and retail.
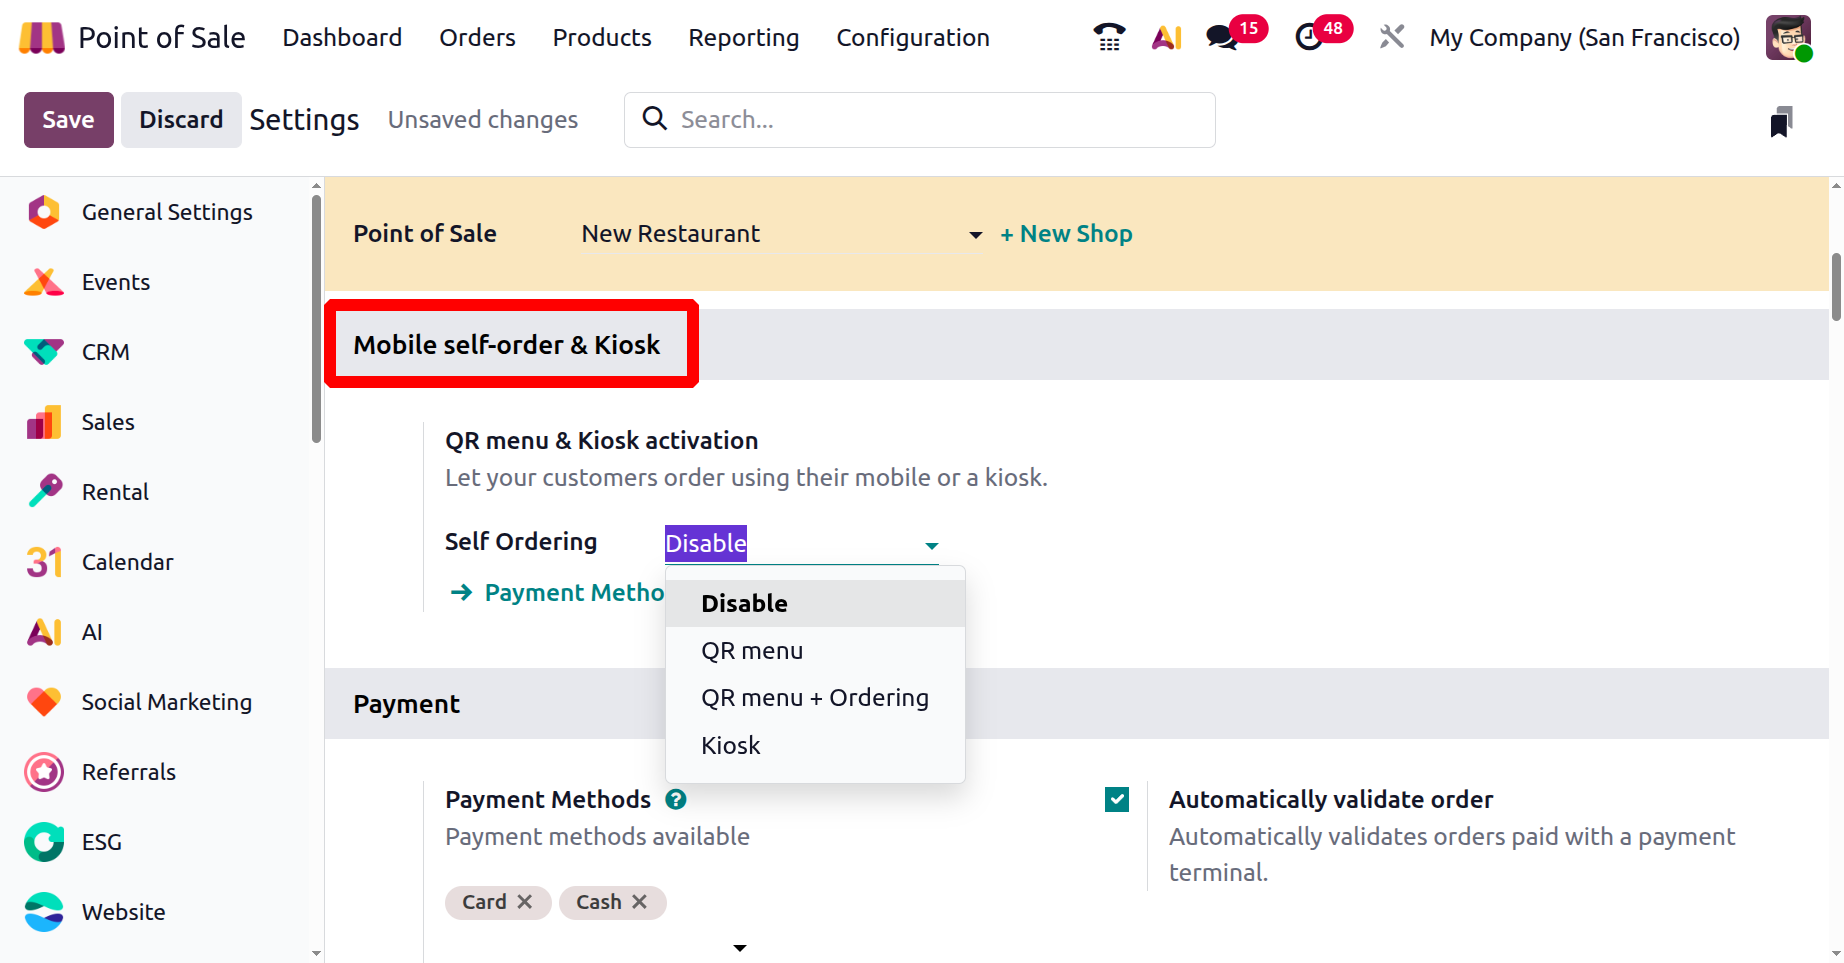
You can configure this feature under the ‘Mobile Self-Order & Kiosk’ tab from the ‘Settings’ window. If you choose the ‘Disable’ option, the self ordering functionality will be disabled in your POS restaurant session. Then, select the ‘Kiosk’ option from the ‘Self Ordering’ field dropdown, as depicted in the screenshot below.
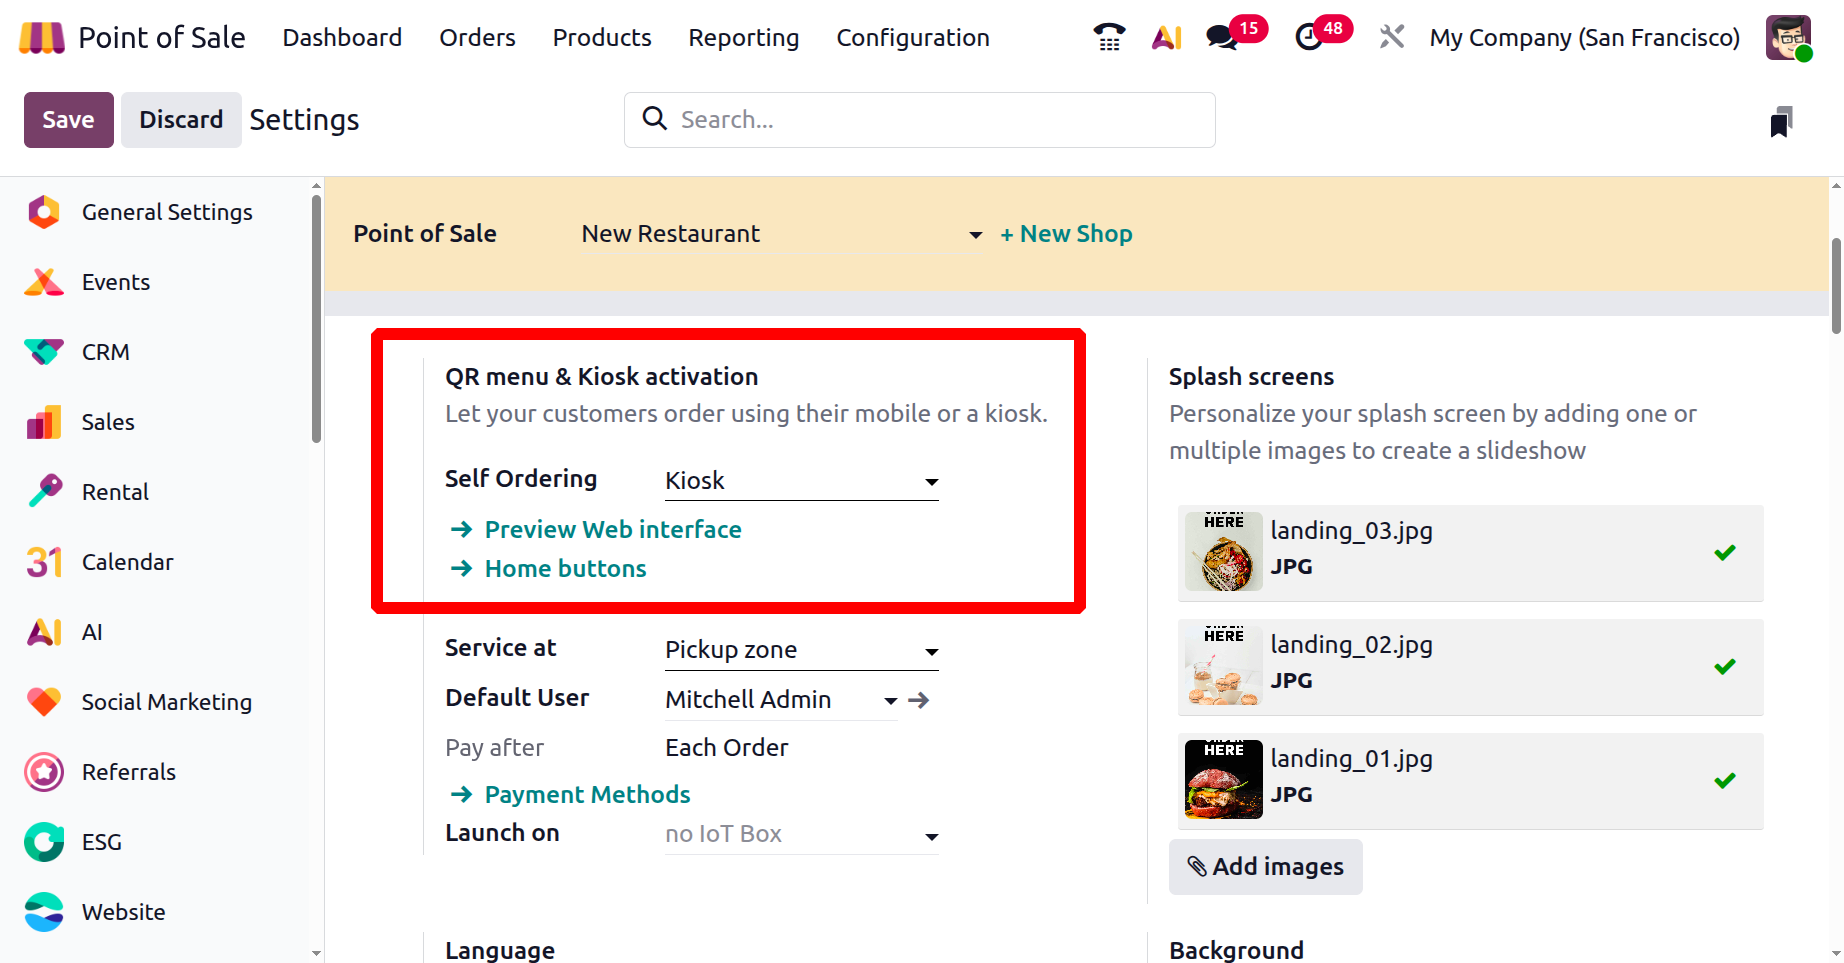
Then, you can click on the ‘Preview Web Interface’ to view the kiosk layout, as shown in the screenshot below.

Then, you can configure home buttons of the Kiosk interface using the ‘Home Buttons’ option. This will open the dashboard of all the available buttons with their Label, url, Point of Sale, Style and Preview, as shown in the screenshot below.
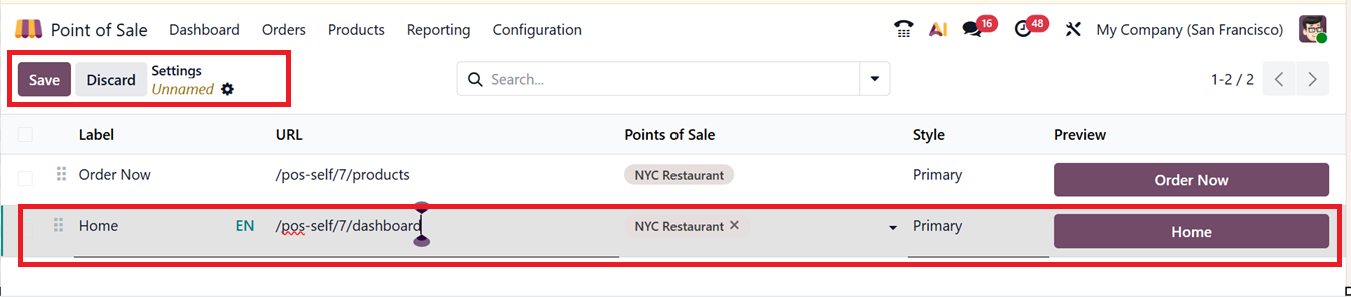
You can click on the ‘New’ button to create a button, define its label, URL, and style, and preview it. Then, to check the Kiosk homepage, click on the ‘Home’ button or choose from the product catalog, press the ‘Order Now’ button. Also, you can customize the buttons as per the requirements.
While opening the kiosk interface, you will see the main page, where you can choose the preset options such as Dine In, Takeout, Delivery etc, as shown in the screenshot below.

After choosing the order method, the product catalog will appear. So you can choose the products and proceed with the next steps.

The ‘Self Ordering at’ option allows you to set a self-ordering location and choose whether customers pay after delivery or after each order. The ‘Launch On’ option can be used to set an IoT device.
Odoo also supports other self-ordering modes including ‘QR Menu’ and ‘QR Menu + Ordering’, accessible under the same settings tab.
The ‘QR Menu’ option is ideal for restaurants seeking to reduce staff interactions. It lets customers view menus and place orders using their phones. You can choose the ‘QR Menu’ as the self-ordering mode. This will generate some configuration links, as depicted in the screenshot below.
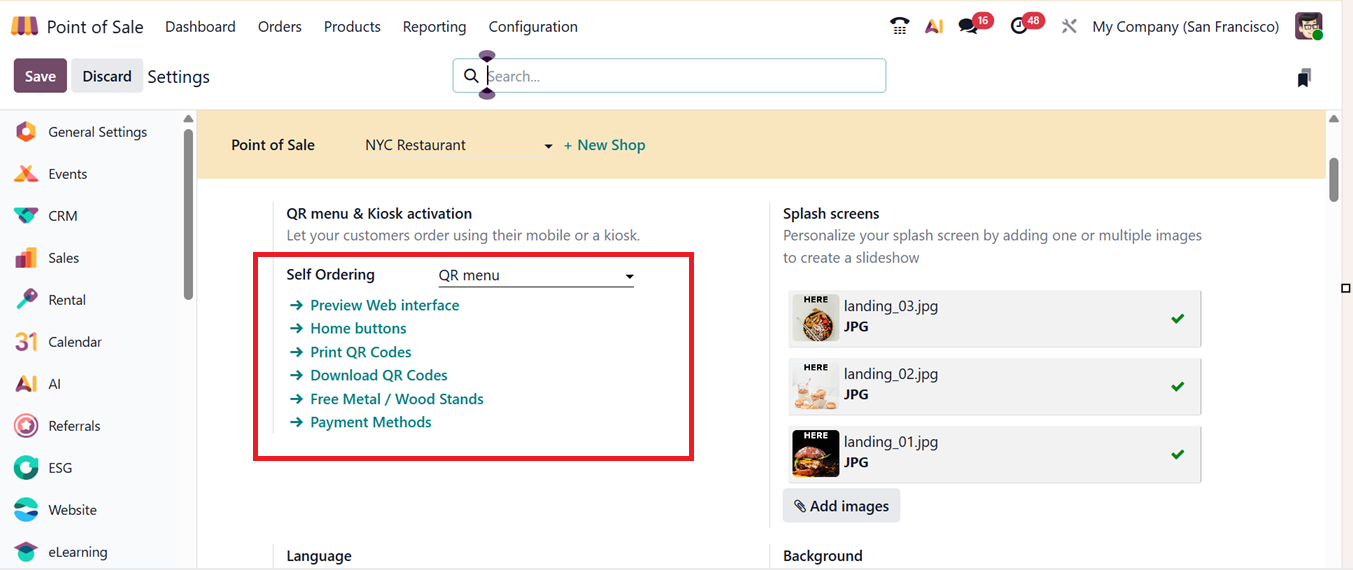
You can use the provided links to Preview Web Interface, Home Buttons, Print QR Codes, Download QR Codes, Free Metal/Wood Stand and set Payment Methods.
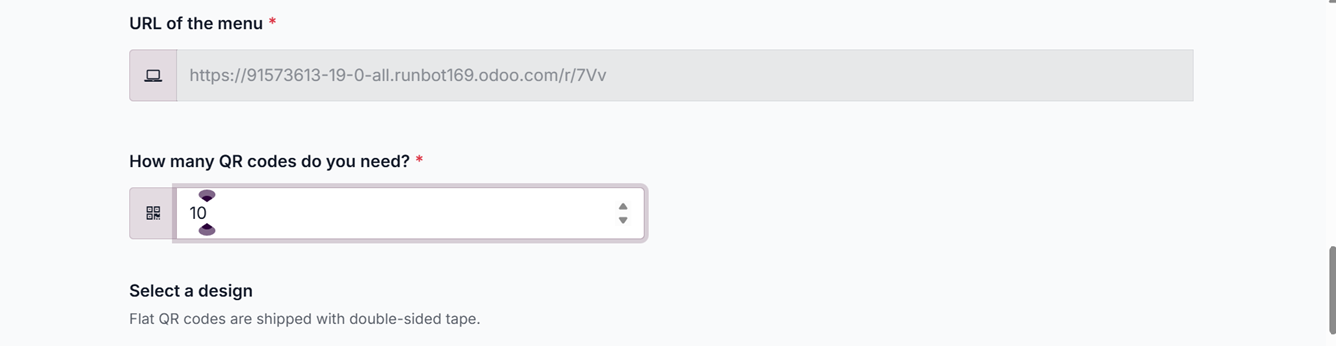
Based on the number of tables and floors in your restaurant, clicking the "Download QR Codes" button will generate and download the right number of QR codes automatically. To print them, select the "Print QR Codes" link Odoo will prepare the codes according to your table setup and download them to your system.
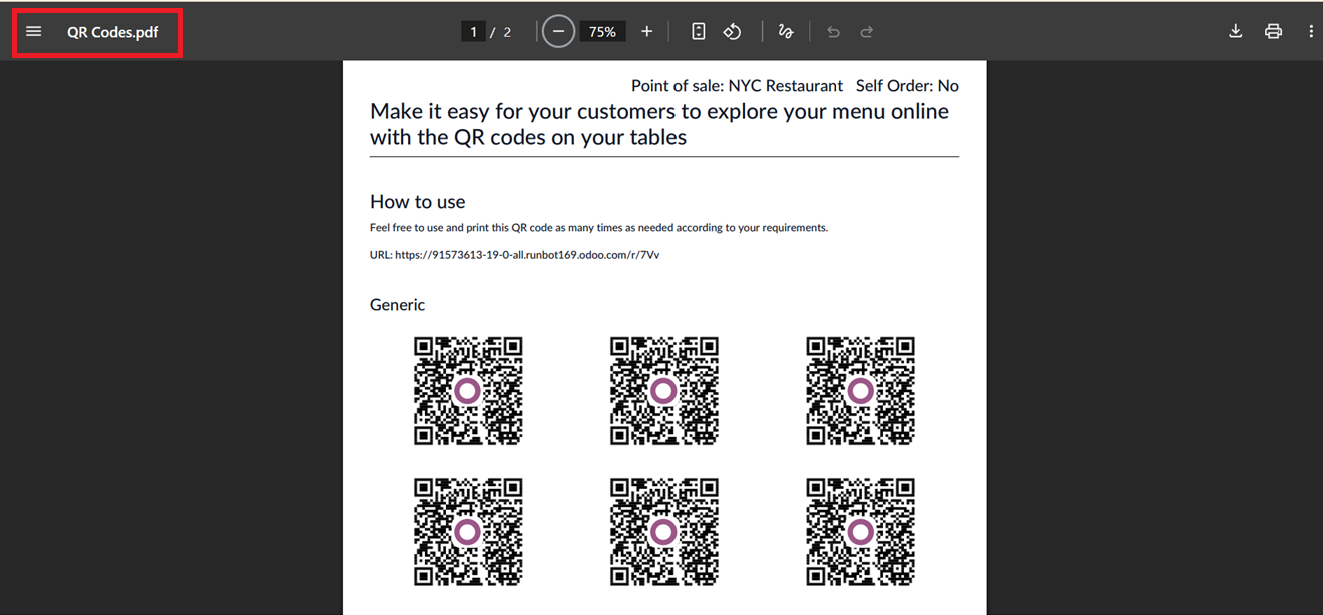
You can then place these QR codes around your restaurant so customers can scan them with their phones. This opens a digital menu where they can view items, customize their order, and place it directly, speeding up service and reducing staff workload.
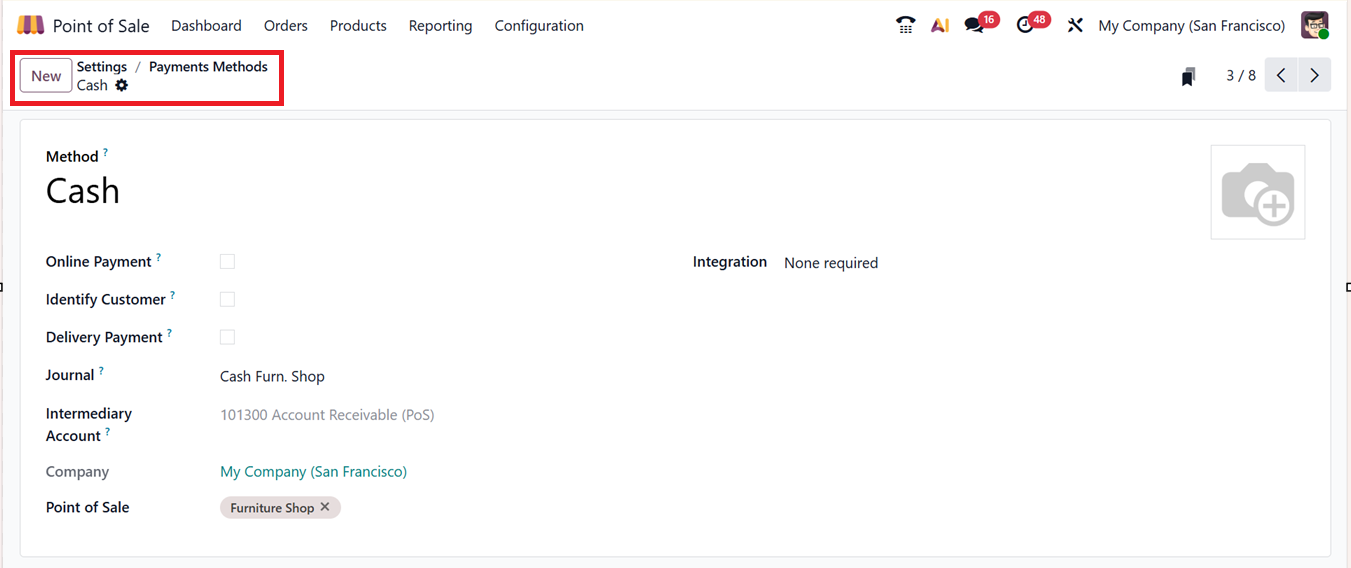
To set up payment options for kiosk orders, click on the "Payment Methods" button. This will open the dashboard of all the available payment methods, as shown in the screenshot below.

From there, you can choose existing options or create a new one by clicking "New", entering a name, and enabling Online Payment and Customer Identification as needed. You can also configure details like the Journal, intermediary accounts, and integration settings, as depicted in the screenshot below.
The full steps for payment method configurations are available in the Point of Sale Settings section.
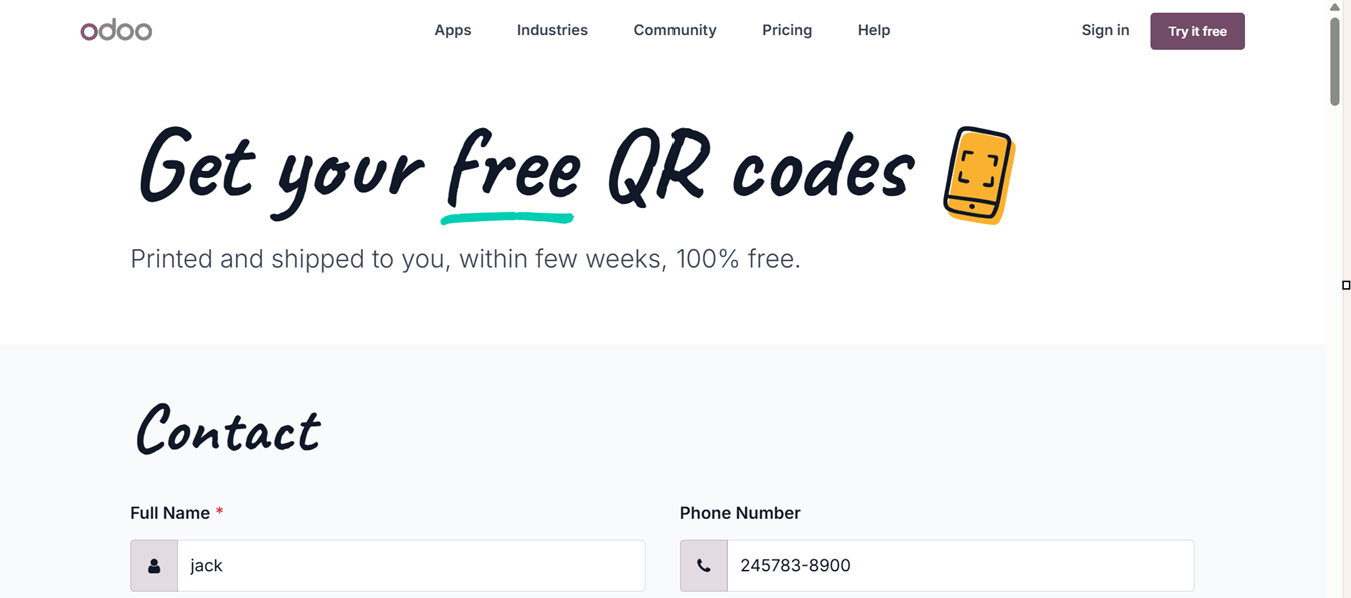
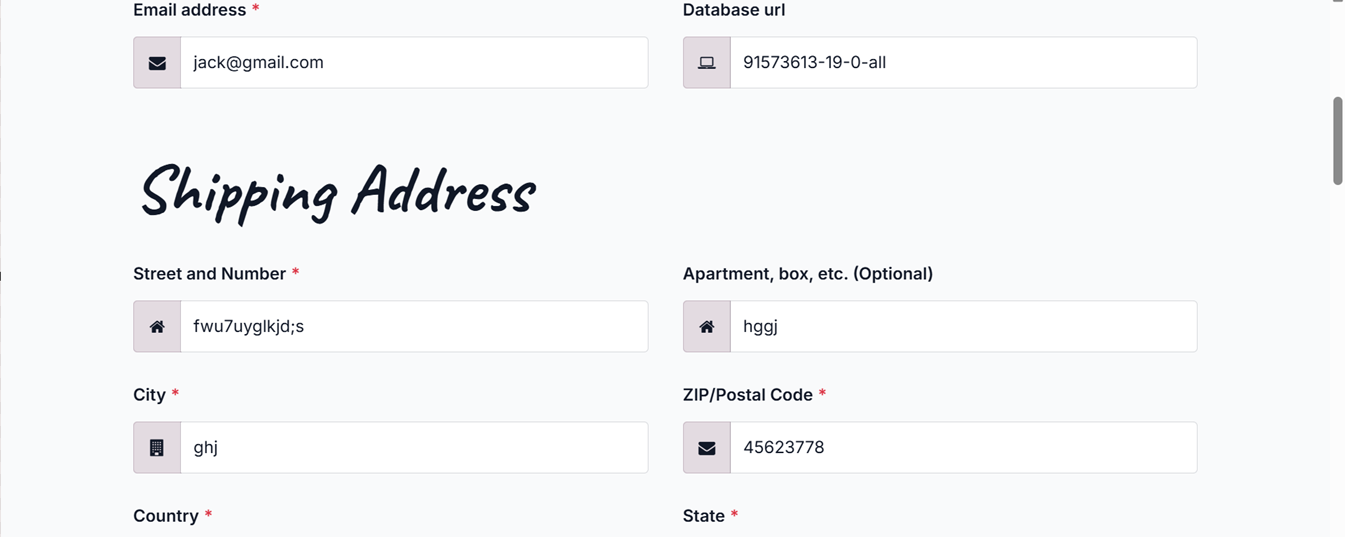
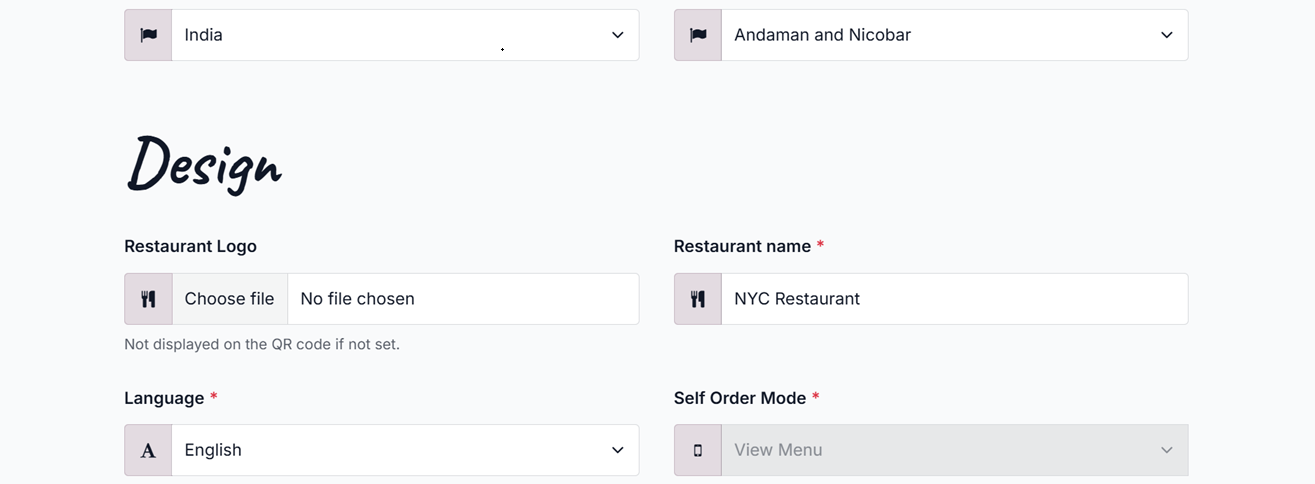
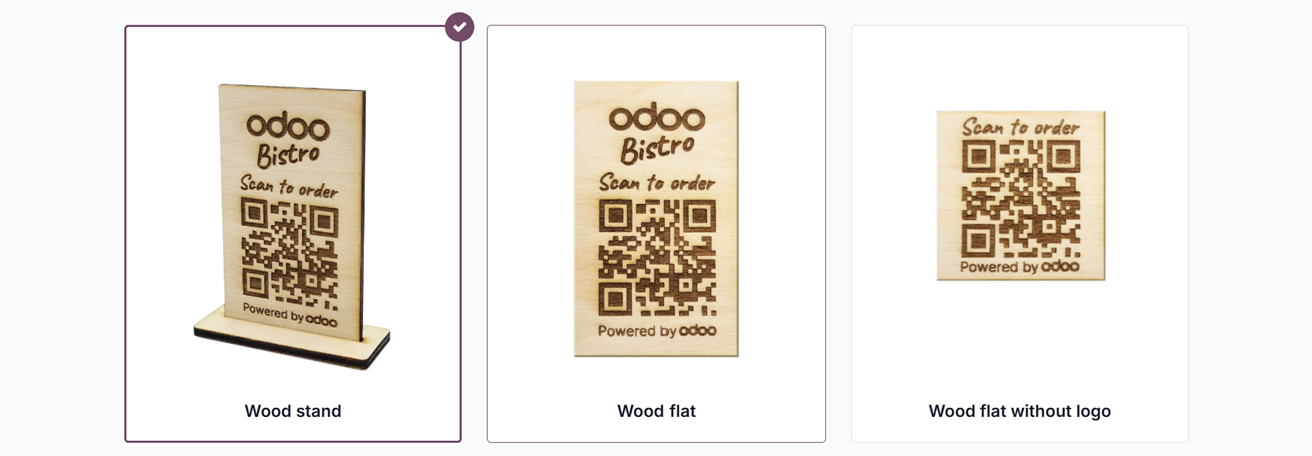
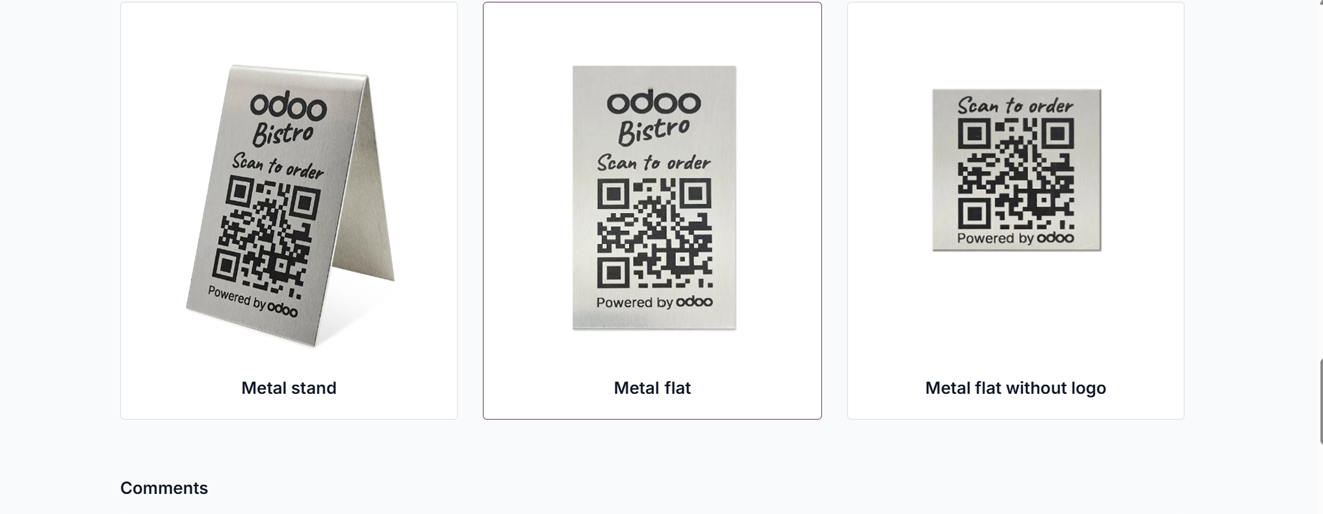
The “Free Metal/Wood Stands” feature in Odoo 19 POS likely refers to printing your restaurant’s QR codes and placing them in metal or wooden stands. These stands can be set on tables, making it easy for customers to scan the QR codes and place orders from their phones.
After clicking on the ‘Free Metal/Wood Stands’ link, it will open a form view where you can fill in the necessary information like Contact, Shipping Address along with Designs for the Wooden and Metal stands, as depicted in the screenshots below.
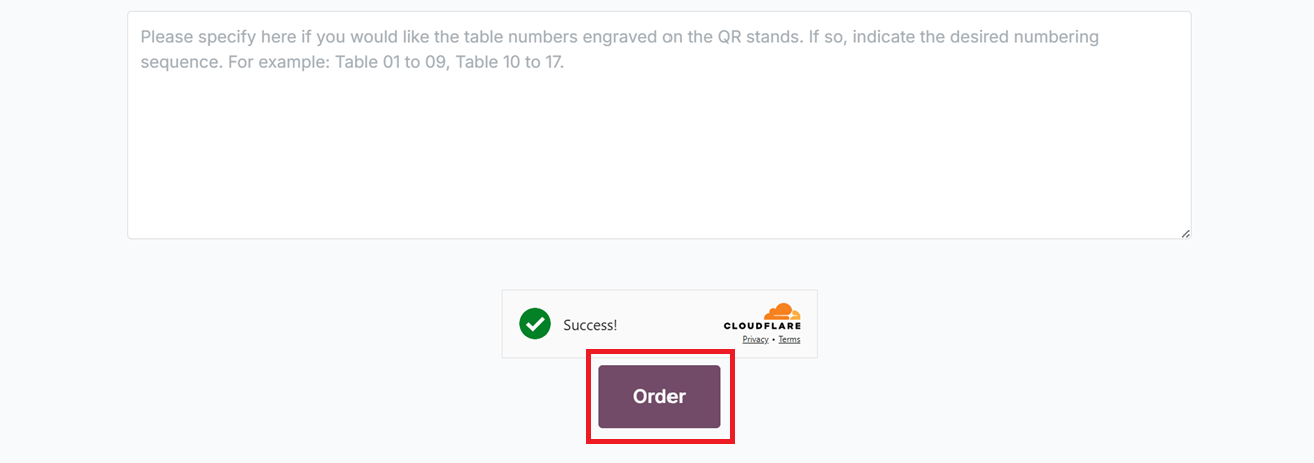
After filling the details, you can order the stands using the ‘Order’ button.
In the Point of Sale (POS) module of Odoo, Splash Screens function as popup messages that deliver key information such as order overviews, promotional offers, payment notices, or customer guidance, thereby enhancing overall communication and operational flow. To personalize the interface, you can incorporate appealing splash screen visuals into the kiosk view by selecting the ‘Add images’ option located beneath the Splash Screen Images section.
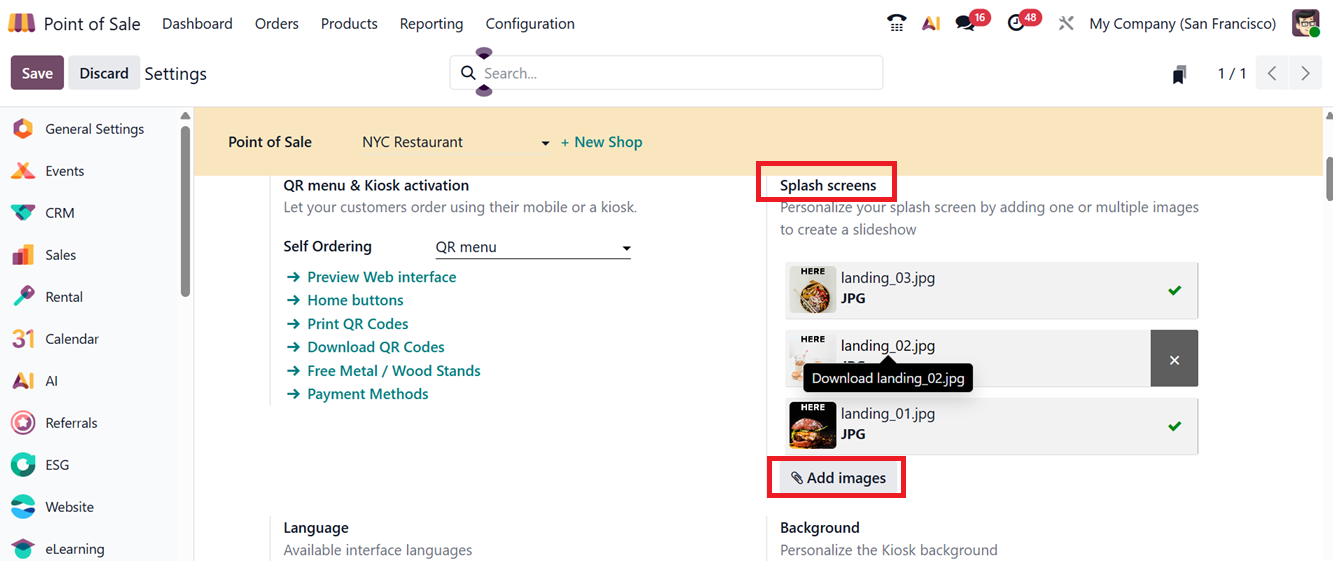
Clicking on this button will open your device’s file manager, allowing you to upload the desired image for display during kiosk usage.
To manage existing splash screen visuals, you can remove previously uploaded images and substitute them with new ones using the same ‘Add images’ button. Additionally, branding for the Kiosk store can be enhanced by uploading a store image through the ‘Set background image’ option found under ‘Background’ field. These images will be displayed while opening the kiosk interface, as shown in the screenshot below.
To enable multilingual content for the kiosk web interface, navigate to the Language settings and configure both Default and Available languages. By using the ‘Add Languages’ option, new languages can be imported from the Odoo database and integrated into the interface. Once language preferences are set, you can view the language choices on upper right side of the interface, as demonstrated in the screenshot below.
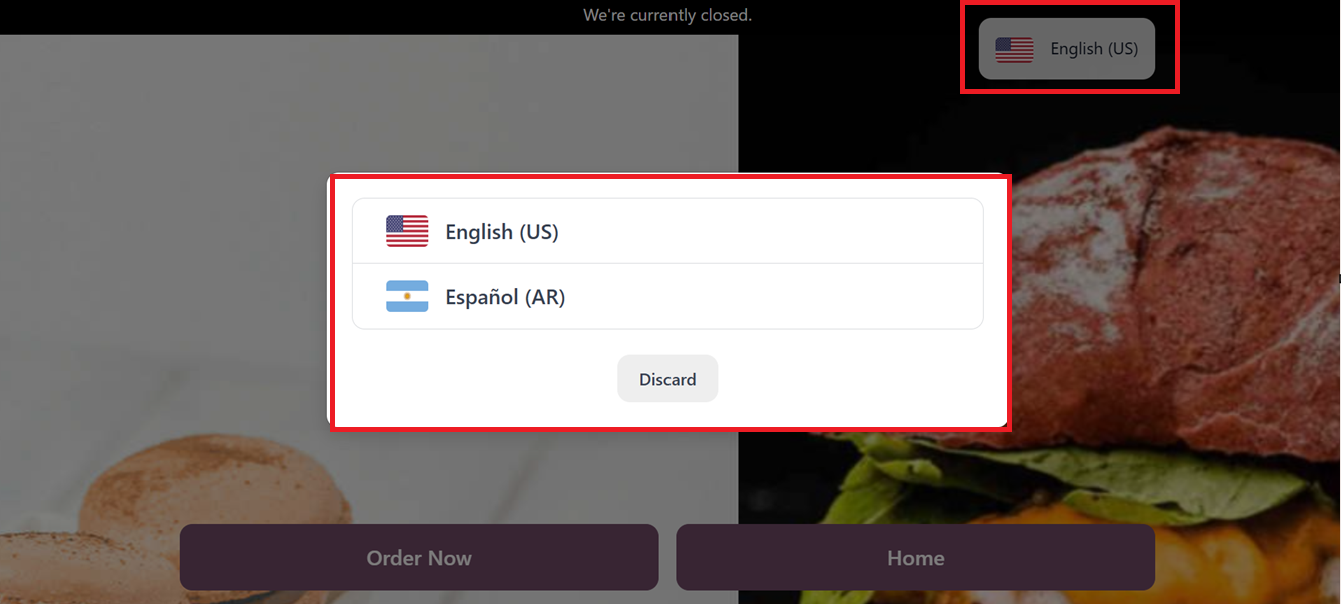
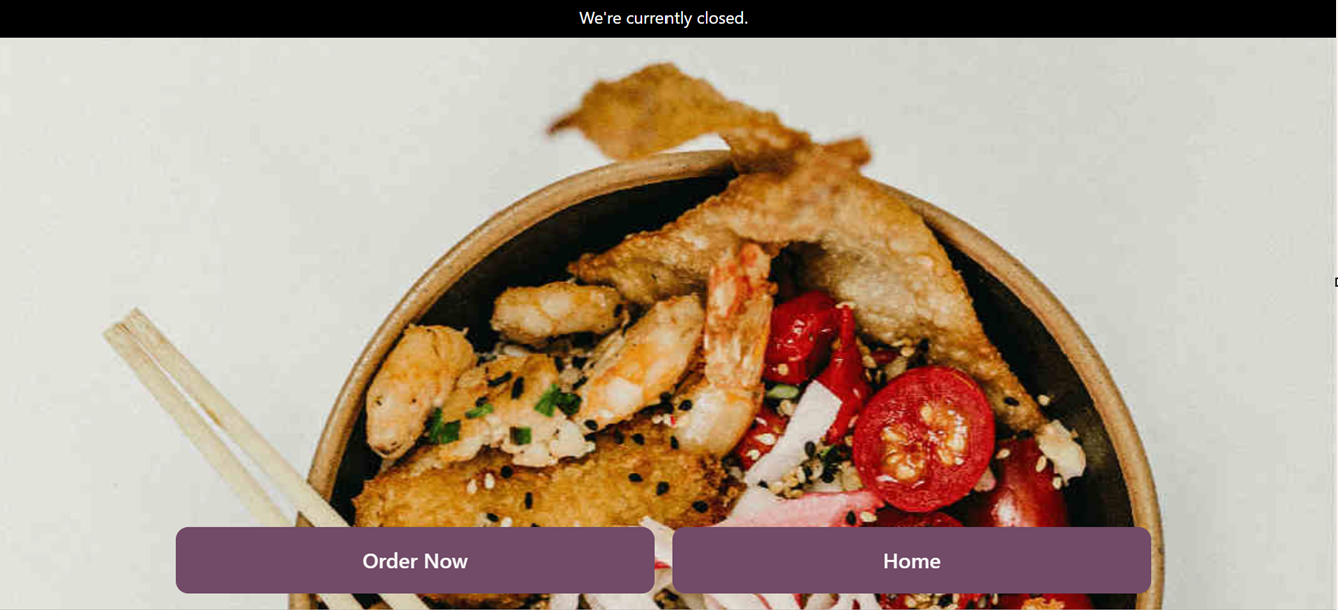
Choose your preferred language from the available ones to improve readability and user interaction. After saving all modifications, customers will be able to place their orders during active POS sessions by browsing through product listings and selecting tables via the "Order Now" button. Orders will then appear under the corresponding live session.
Ordering through a Kiosk Interface
The Kiosk Interface in Odoo’s Point of Sale platform facilitates self-service ordering, significantly easing the workload on staff while improving customer experience through its interactive and intuitive design. To begin a kiosk sales session, go to the POS Dashboard Menu and select Kiosk Session.
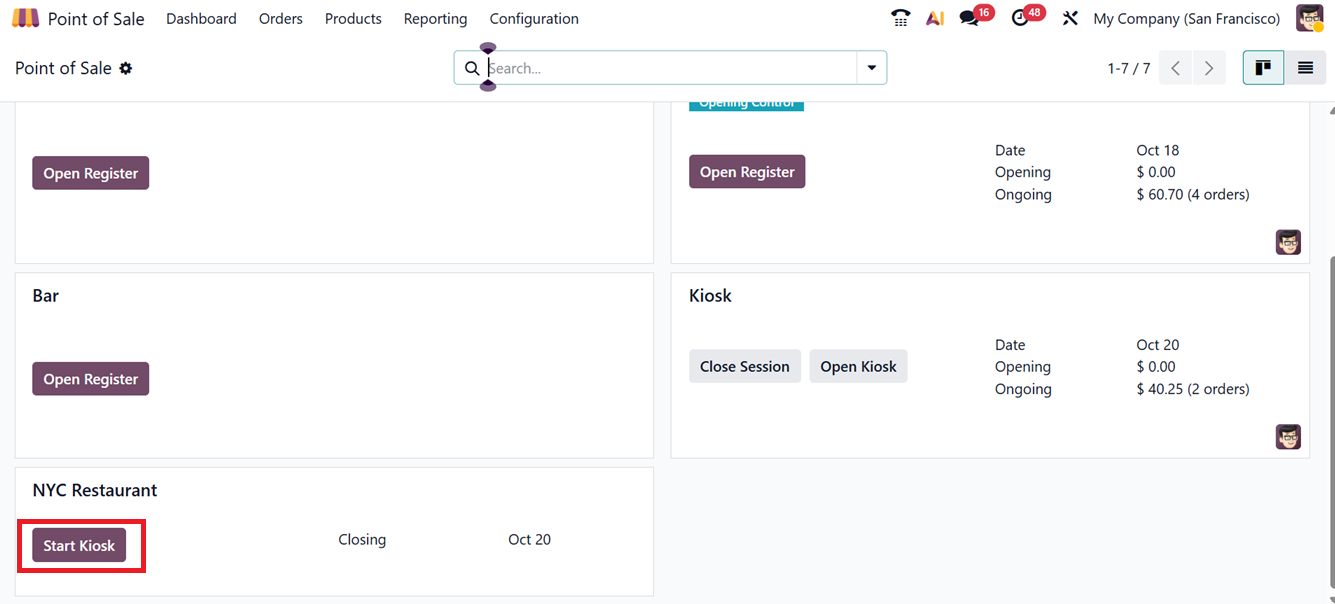
After setup, initiate the session by clicking "Start Kiosk" from the dashboard. This will direct you to the Kiosk interface, as shown in the screenshot below.
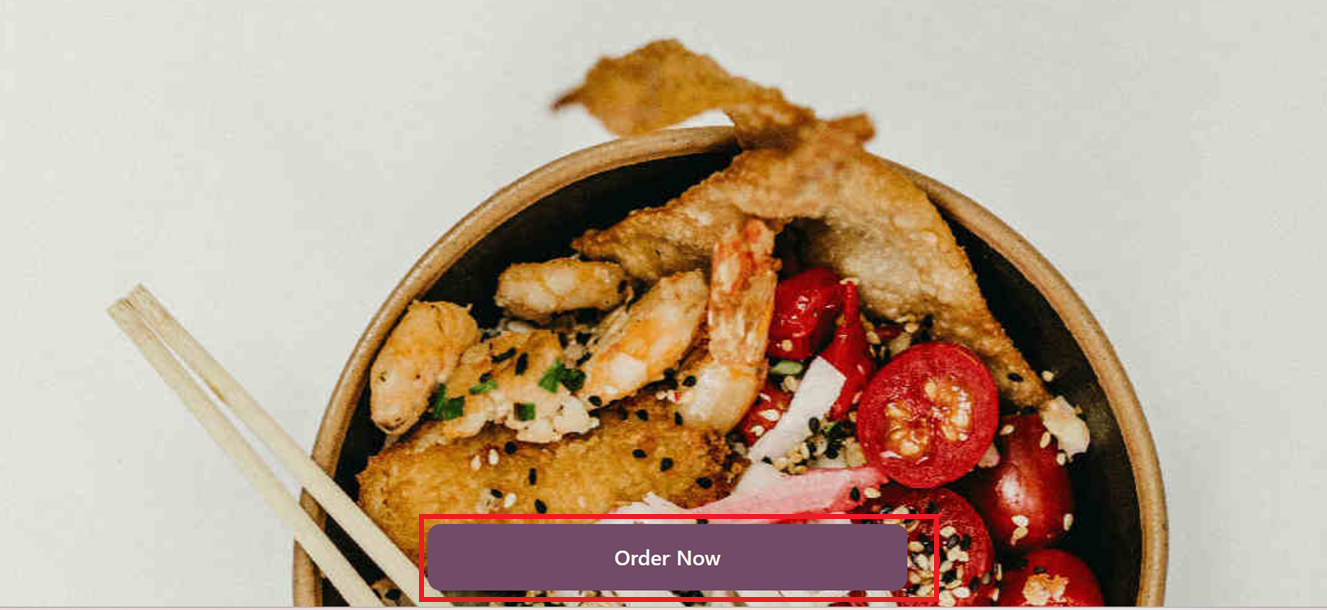
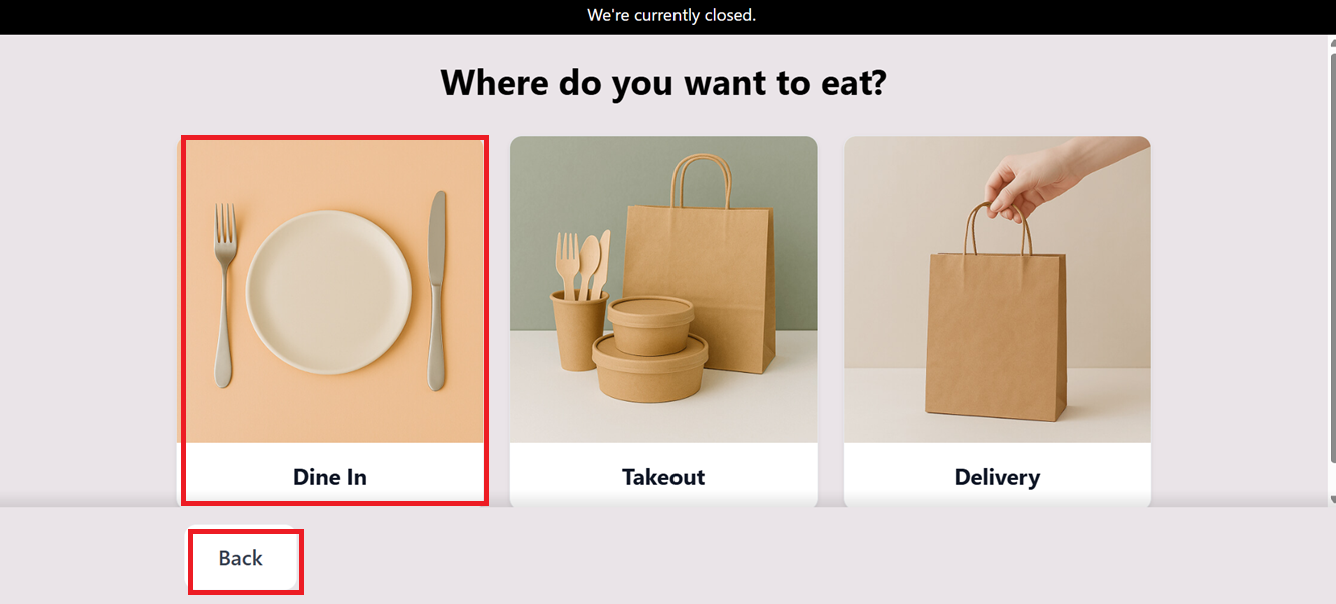
From the homepage, you have to select a preset option, such as Dine In, Takeout, and Delivery options, as shown in the screenshot below.
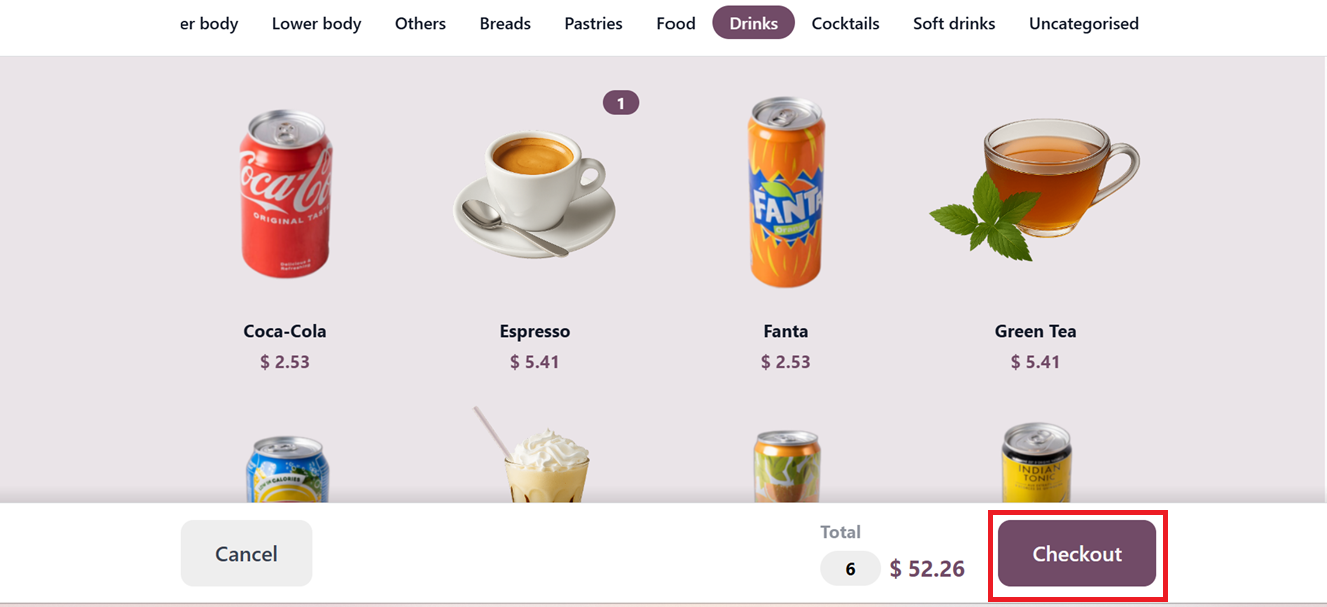
Click the ‘Order Now’ button to start browsing products, then select your items and proceed with ordering by clicking the ‘Checkout button, as depicted in the screenshot below.
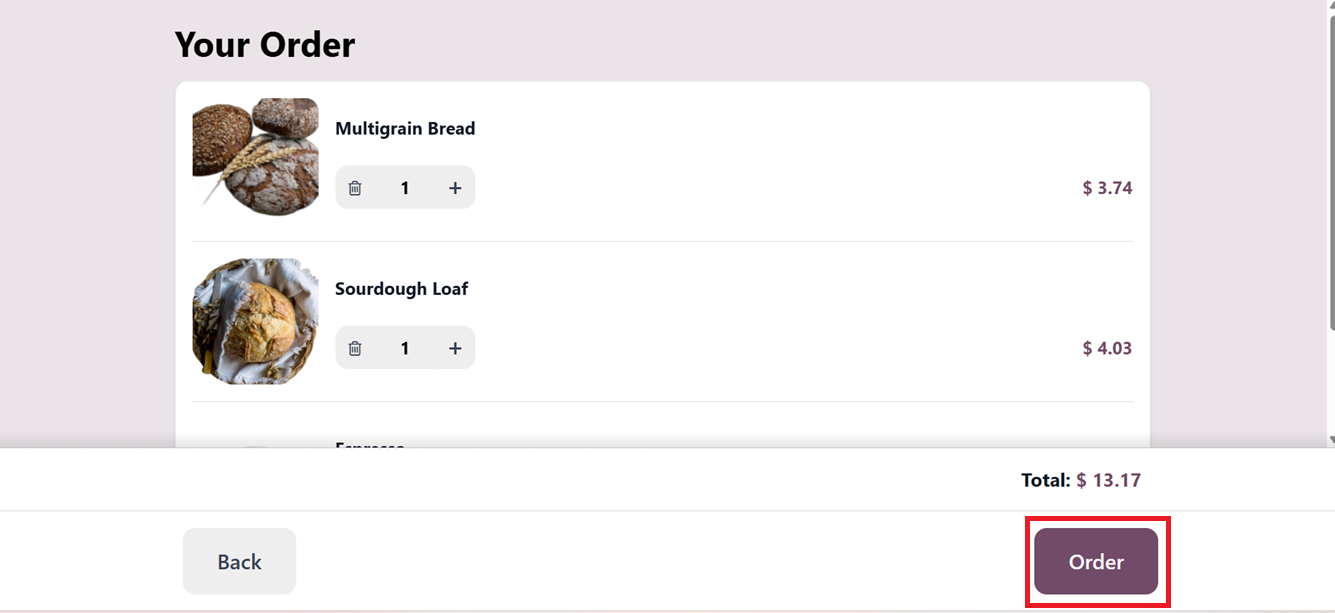
After adding your items to your cart and finalizing the order with the ‘Order’ button, as depicted in the screenshot below.
Then, you have to enter a tracker number in the ‘Enter your tracker number’ field which acts as a unique identifier for each order, session, or receipt.
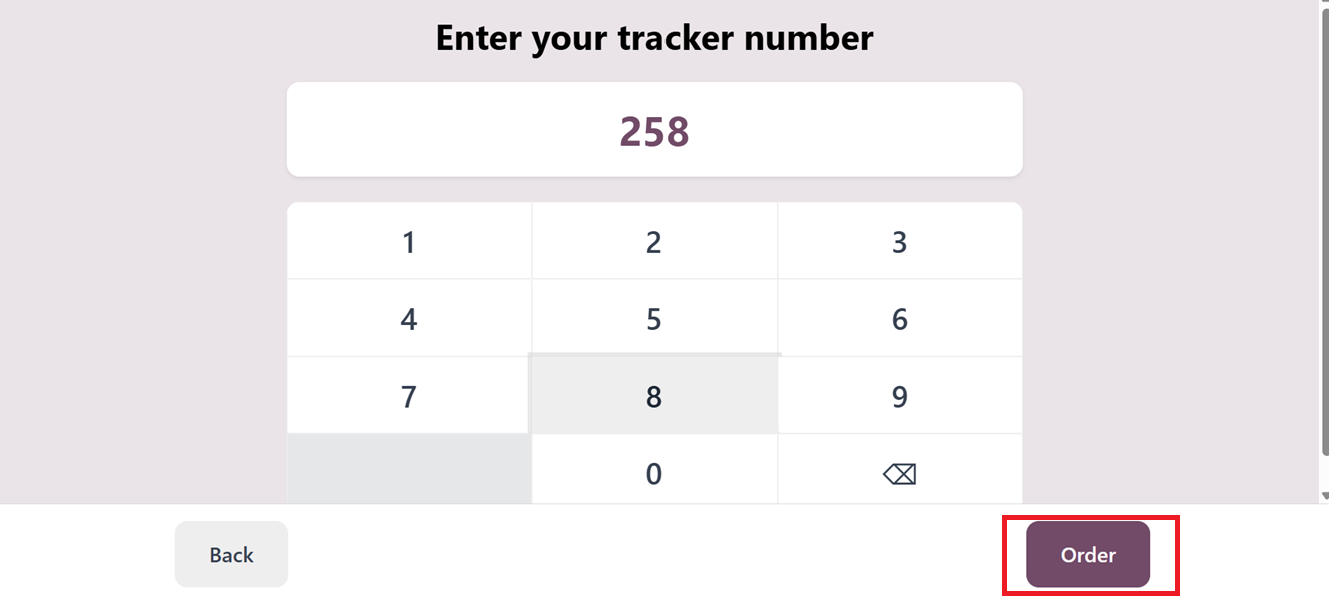
This tracker number helps track orders for accounting, stock, and customer service, supports filtering and reporting, and often appears on receipts for easy reference during returns or inquiries.
Finally, after the order is confirmed using the ‘Order’ button, an Order Number is generated for pickup at the counter, as illustrated in the screenshot below.
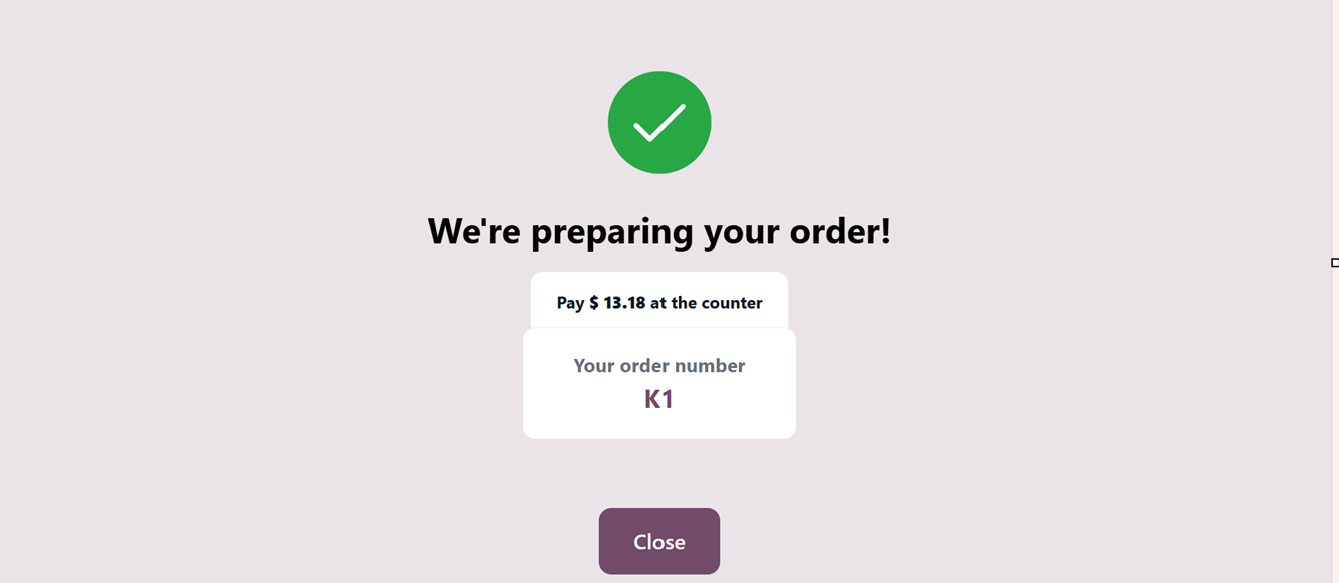
Afterwards, customers can collect their orders and make payments at the shop's front counter.
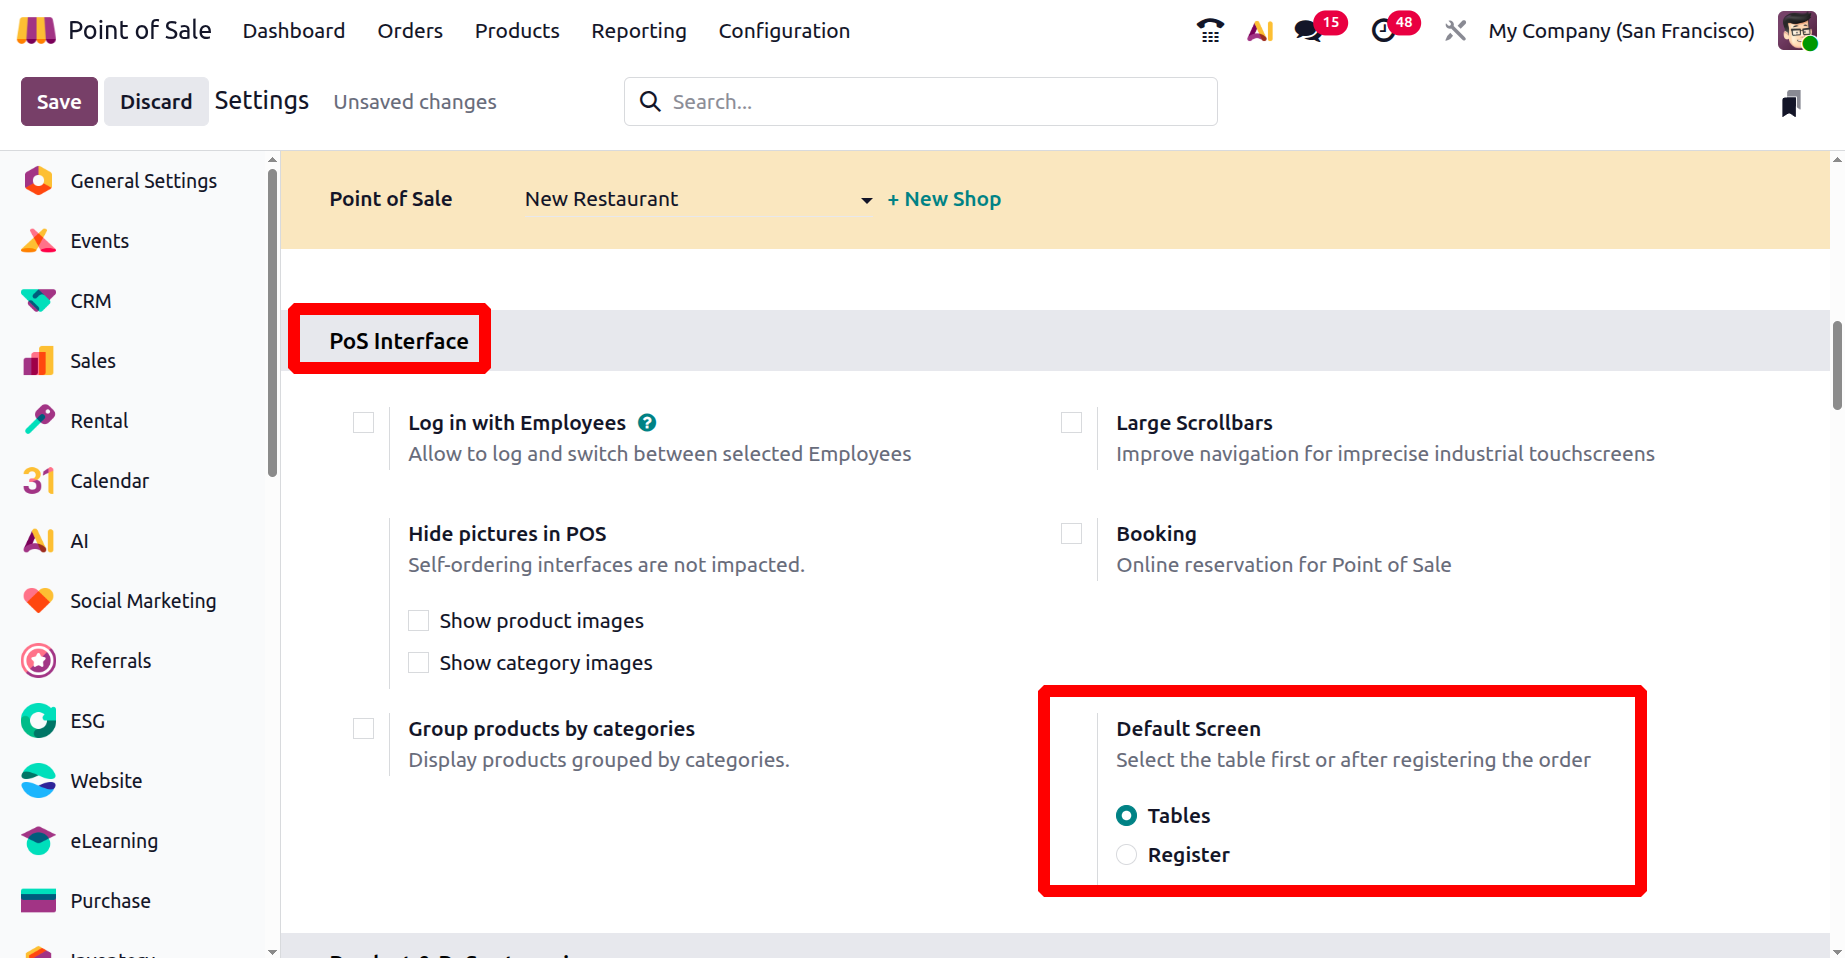
PoS Interface
Then, you can add an additional option inside the Pos Interface, named as the ‘Default Screen.’ feature controls the initial behavior of the POS interface. It allows you to choose whether the system should prompt the cashier to select the ‘Tables’ before taking an order or ‘Register’ the order first and assign a table later, streamlining the workflow based on the restaurant or store’s operational preference.