Configuring a New Point of Sale (PoS) Shop
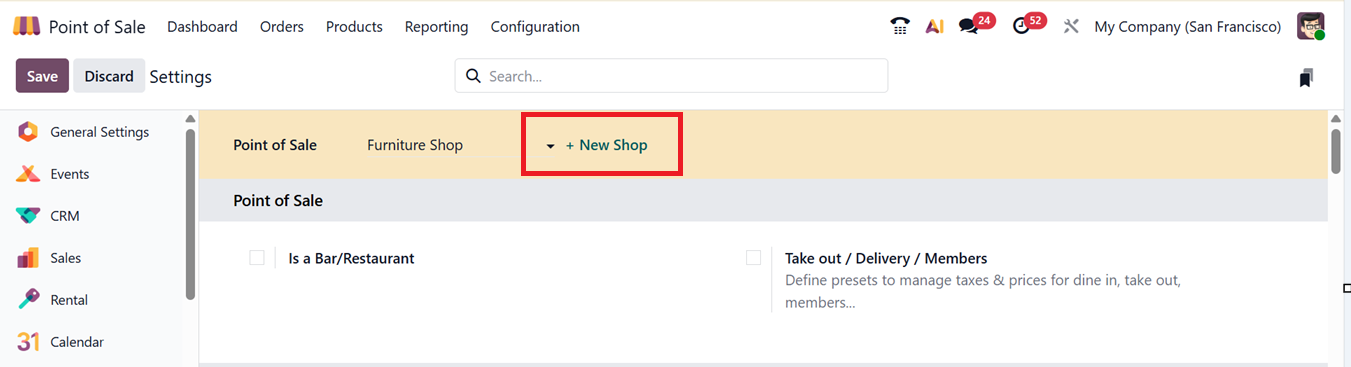
To set up a new Point of Sale (PoS) environment in Odoo, go to the Configuration menu and select Settings. Then, choose the PoS location (shop or restaurant) from the Point of Sale dropdown. To create a new store, click the “+New Shop” button, as illustrated in the screenshot below.
In the shop configuration screen, enter a name for the shop in the Point of Sale field. If it’s a restaurant or bar, turn on the “Is a Bar/Restaurant” option. In this scenario, we'll just focus on setting up a regular retail PoS session.
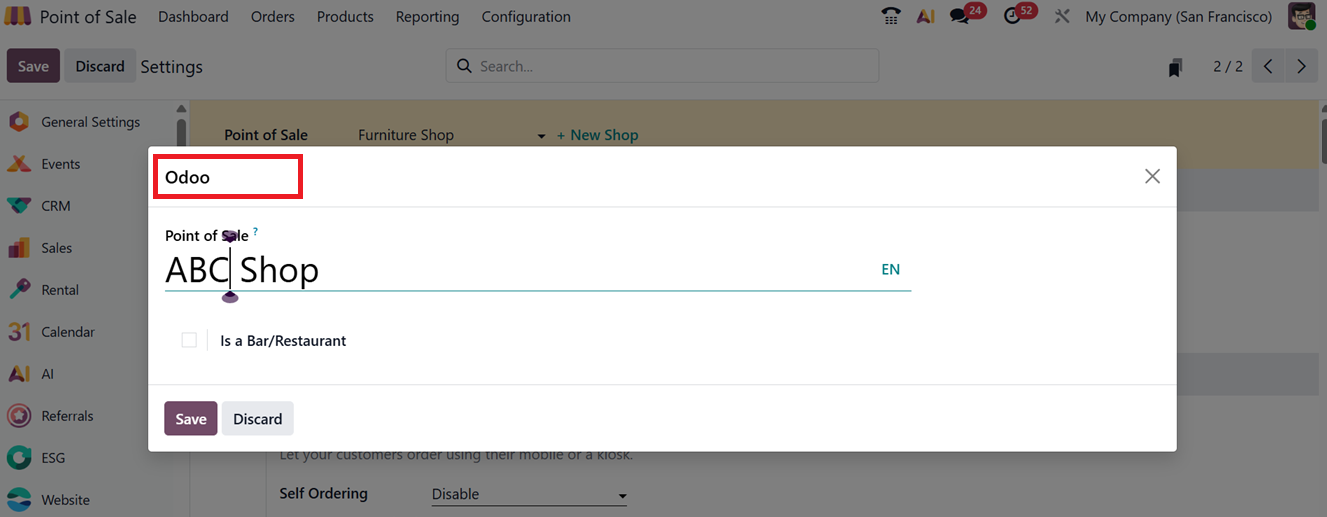
Once you’ve added the basic details, click Save to unlock more settings related to the shop. From here, you can adjust specific configurations to fit your store's needs.
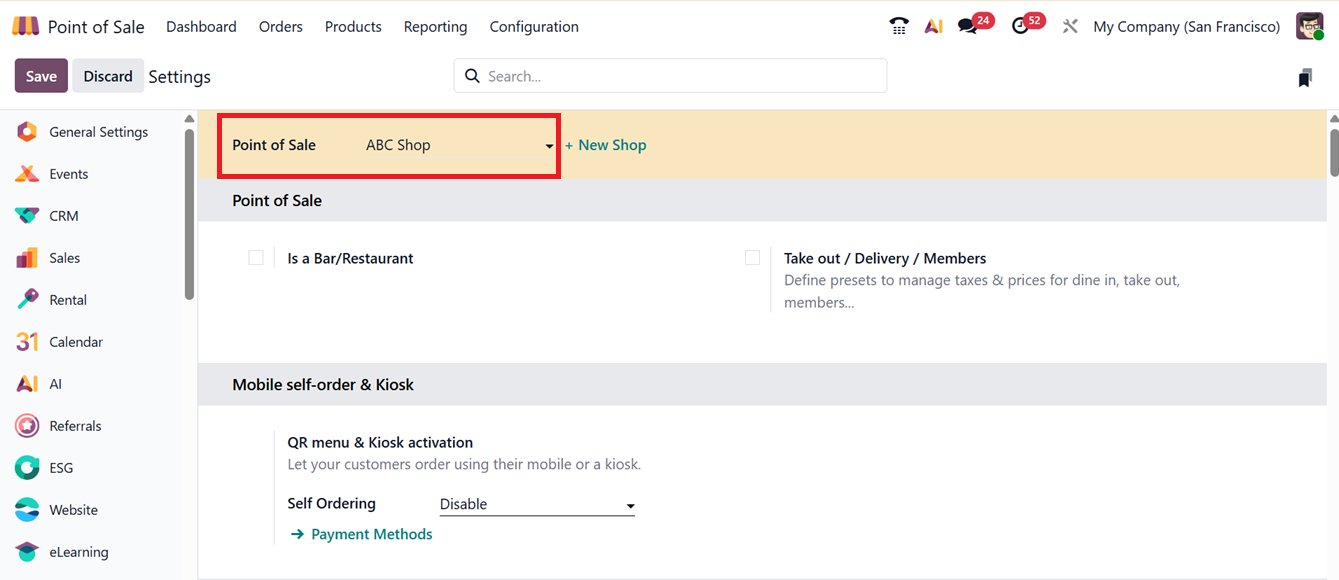
Odoo also supports Mobile Self-Order and Kiosk Mode. These tools let customers place orders through their phones using a QR code, or directly from a self-service terminal. This is useful for reducing wait times and improving accuracy in both shops and restaurants.
Payment
The Payment section inside the Settings contains Payment Methods, Automatically validate order, Cash Rounding, One-click Payment, Set Maximum Difference, and Tips
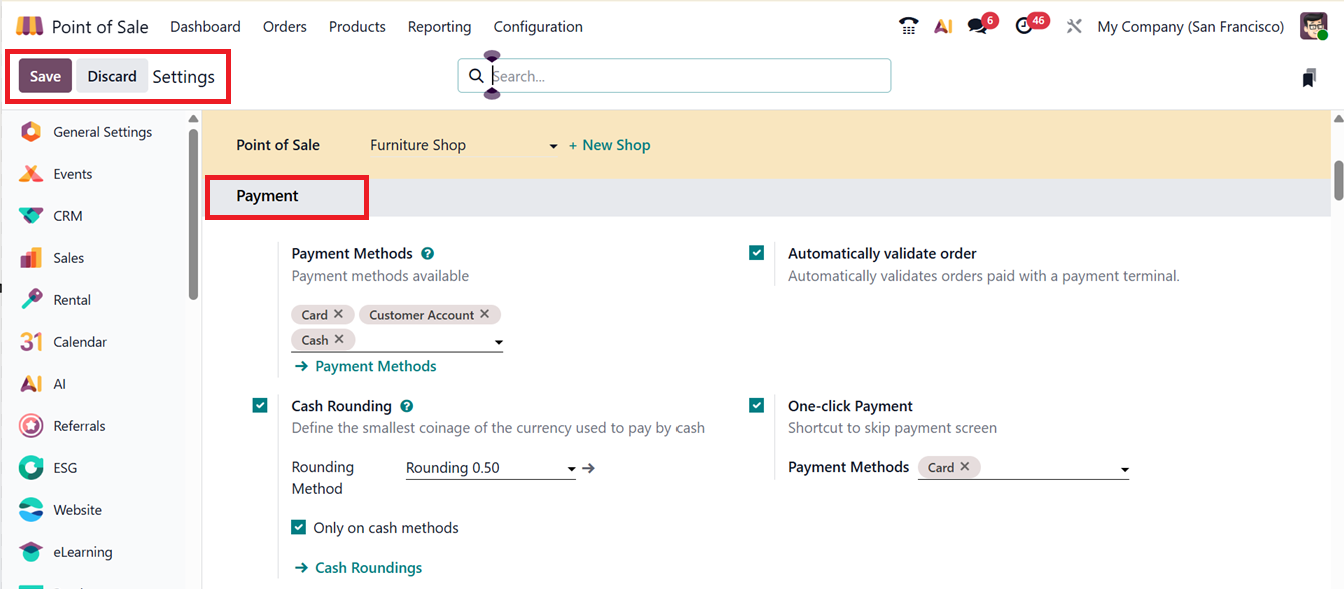
Payment Methods allows adding the used payment methods for this shop. The ‘Automatically Validate Order’ option in the Payment settings tab enables automatic validation of orders when payment is made through a payment terminal.

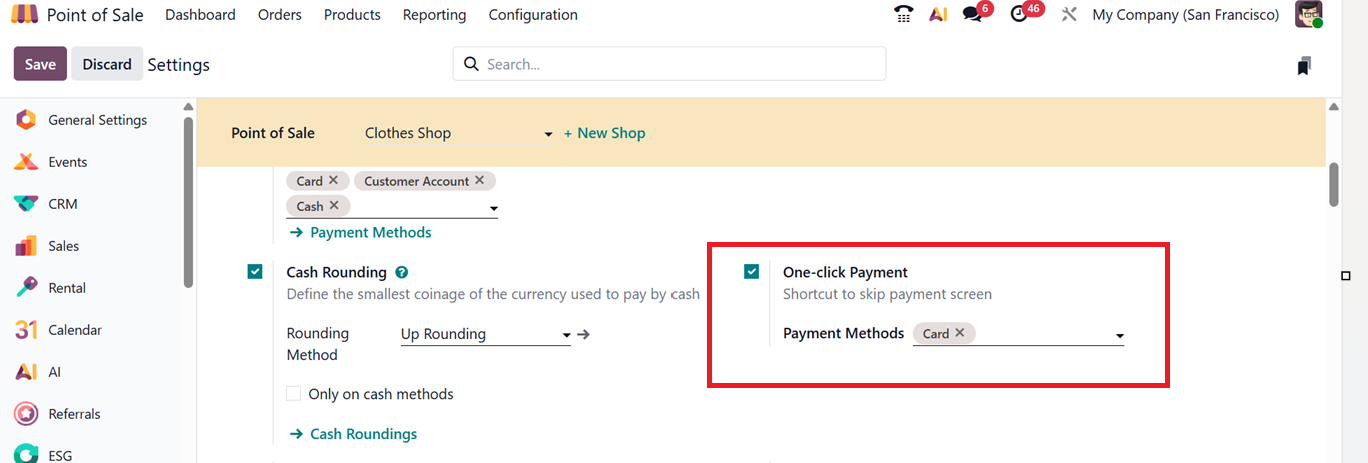
The ‘One Click Payment’ feature in Odoo 19 PoS is a new shortcut that allows users to bypass the manual payment screen. Once enabled, you can specify the Payment Methods where this feature applies. For example, if it's set for the ‘Card’ payment method, PoS orders paid by card will automatically process the payment, allowing users to skip the standard payment steps.
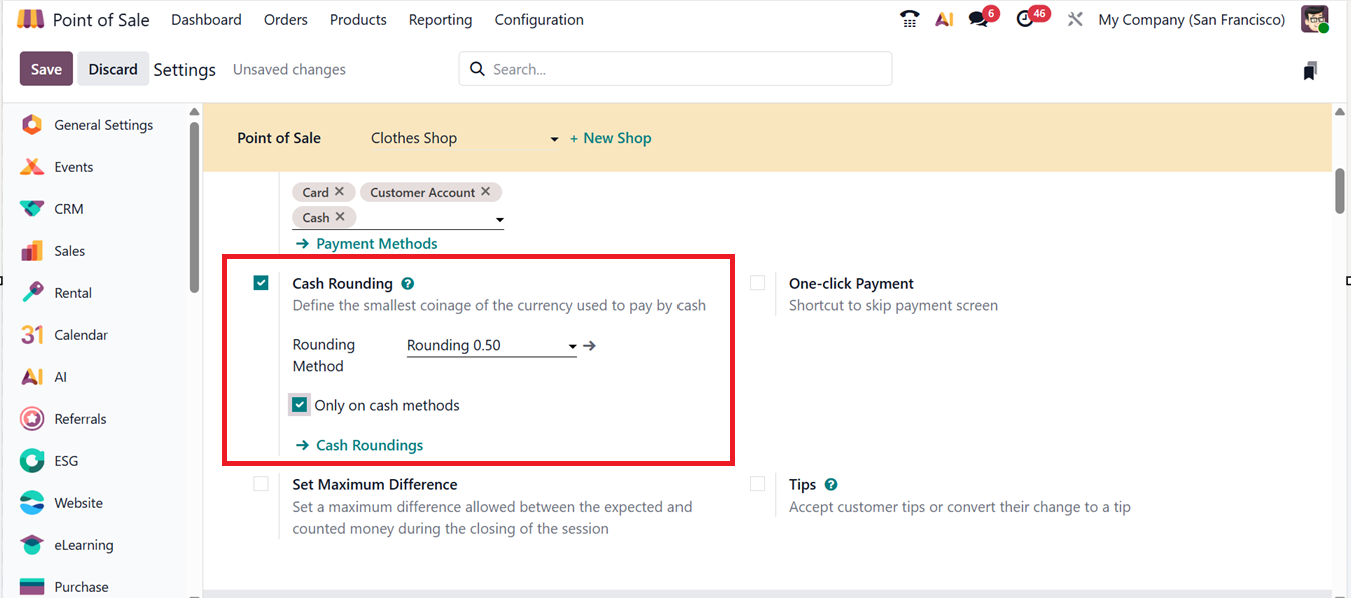
Cash Rounding
Cash rounding ensures payment totals align with legal currency denominations, especially in countries with discontinued small coins.
By enabling the Cash Rounding feature in settings, users can define the smallest coinage of a currency that used to pay in terms of cash. So, enable the feature from the settings window and choose from existing rounding methods or create new ones using the ‘Cash Roundings’ link, as depicted in the screenshot below.
The ‘Cash Roundings’ link will open the dashboard of all the available rounding options in a list view, as shown below.

Creating a new Cash Rounding method can be done by the ‘New’ button and involves steps to provide a rounding Name, Setting a Rounding Precision (e.g., $0.50), and choosing a Rounding Strategy such as ‘Add a rounding line’ to the total sales amount or ‘Modify tax amount.’
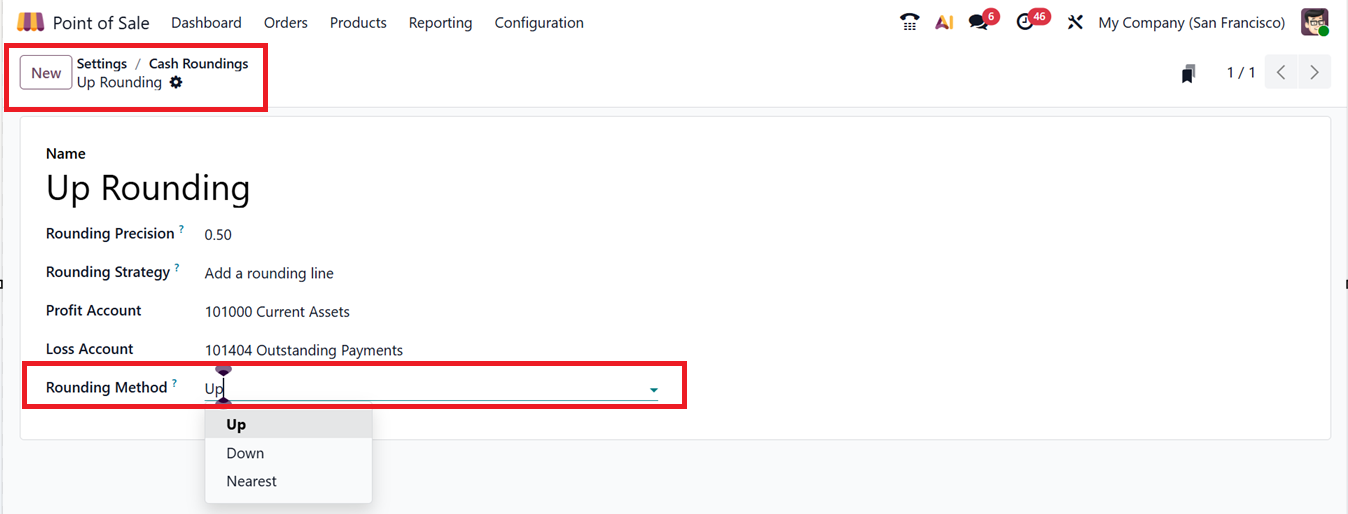
Then, mention the ‘Profit Account’ and ‘Loss Account’ as per the requirement. The 'Rounding Method' field controls how invoice totals are adjusted based on the chosen rounding precision. There are three rounding options available in the dropdown list of this field, such as:
- Up: Rounds the amount up to the nearest value based on the set precision.
- Down:Rounds the amount down according to the defined precision.
- Nearest: Rounds the amount either up or down depending on the decimal value (e.g., below 0.50 rounds down).
After specifying all the data, save the method. Now, you can test the rounding method during a PoS session by adding products and proceeding with payment. The selected rounding rule is applied automatically to the total.
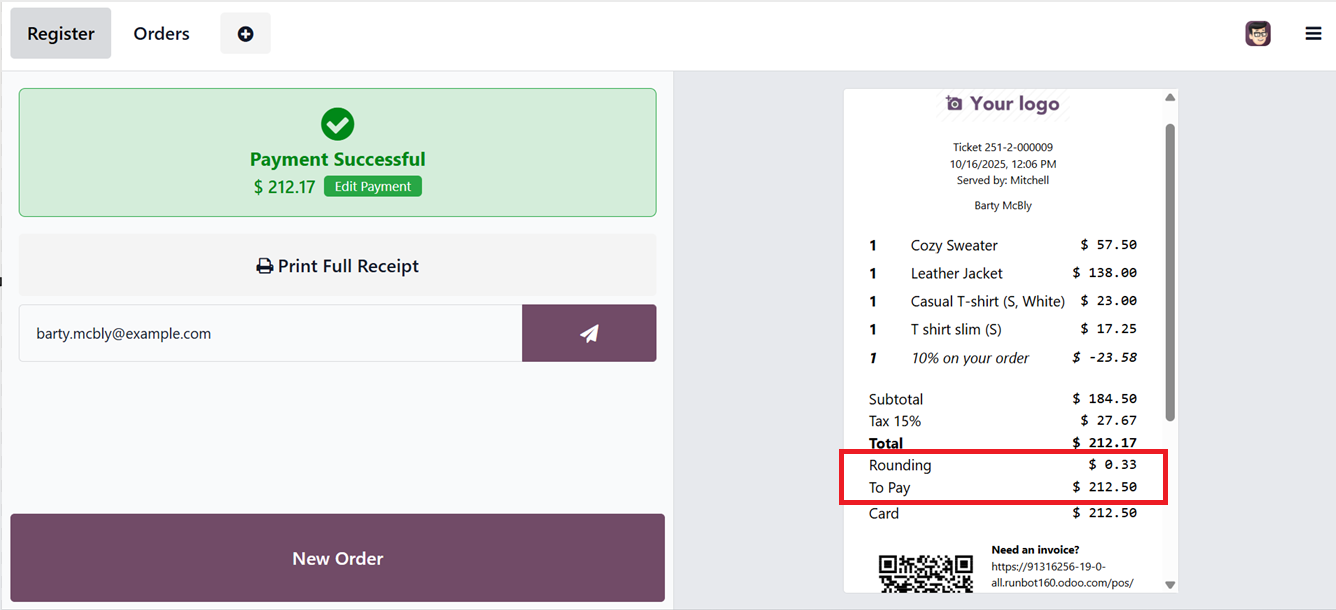
For example, if the 'Up' method is used with a precision of 0.50, the sales totals will round up to the next 0.50 increment (e.g., $212.17 becomes $212.50).
You can check this feature by starting a new POS sales order and confirming the order and initiating the payment process. After choosing a payment method and confirming the transaction, the adjusted total amount will appear in the ‘Total’ section of the sales invoice under the ‘Rounding’ field. So, the customer has to pay the ‘To Pay’ amount which consists of the rounding precision amount, as shown in the screenshot below.
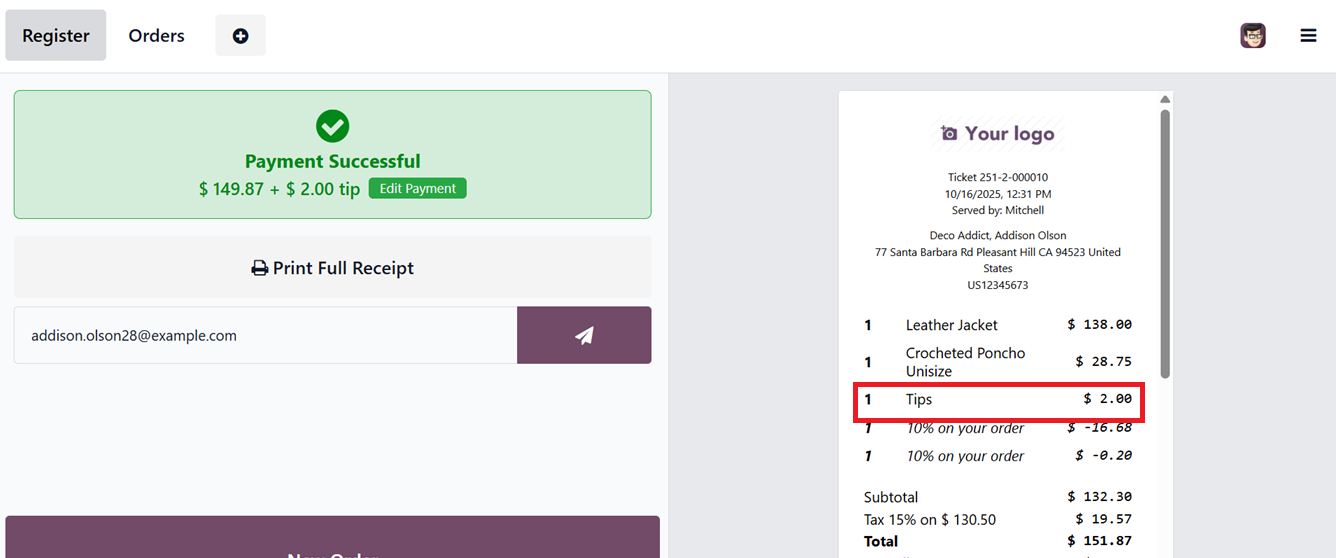
Tips
Businesses can allow customers to leave tips during checkout by enabling the ‘Tips’ feature in the settings window. After enabling the option, you can choose a ‘Tip Product,’ as illustrated in the screenshot below.
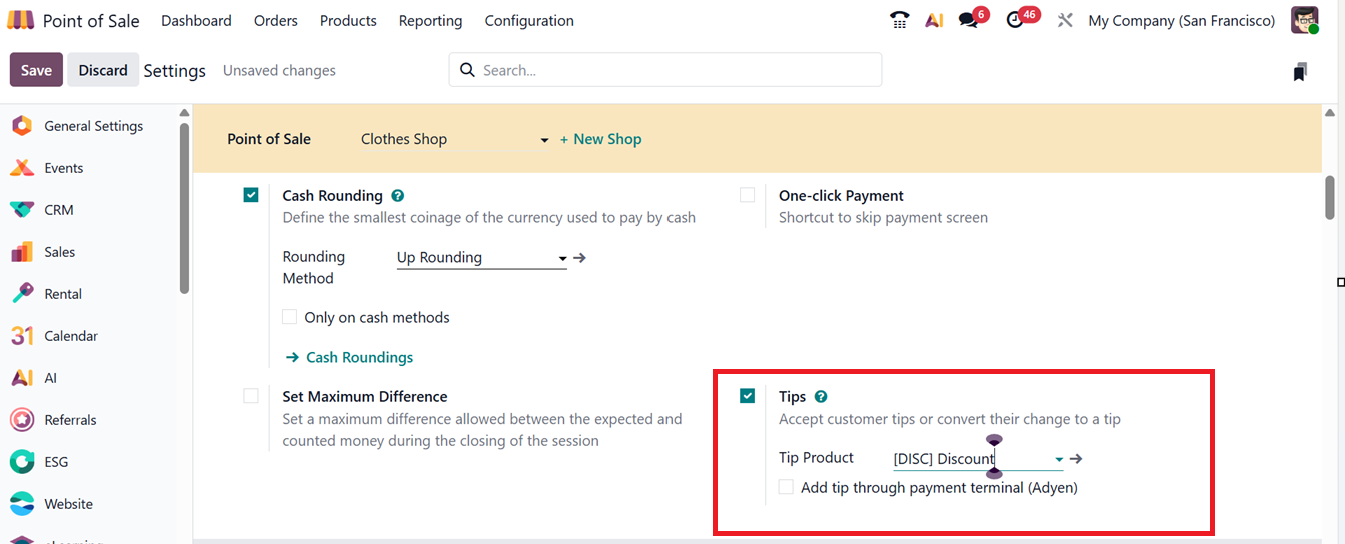
If you're using an Adyen payment terminal, you can also enable the "Add tip through payment terminal (Adyen)"option. This allows customers to enter a tip directly on the terminal before finalizing their payment.
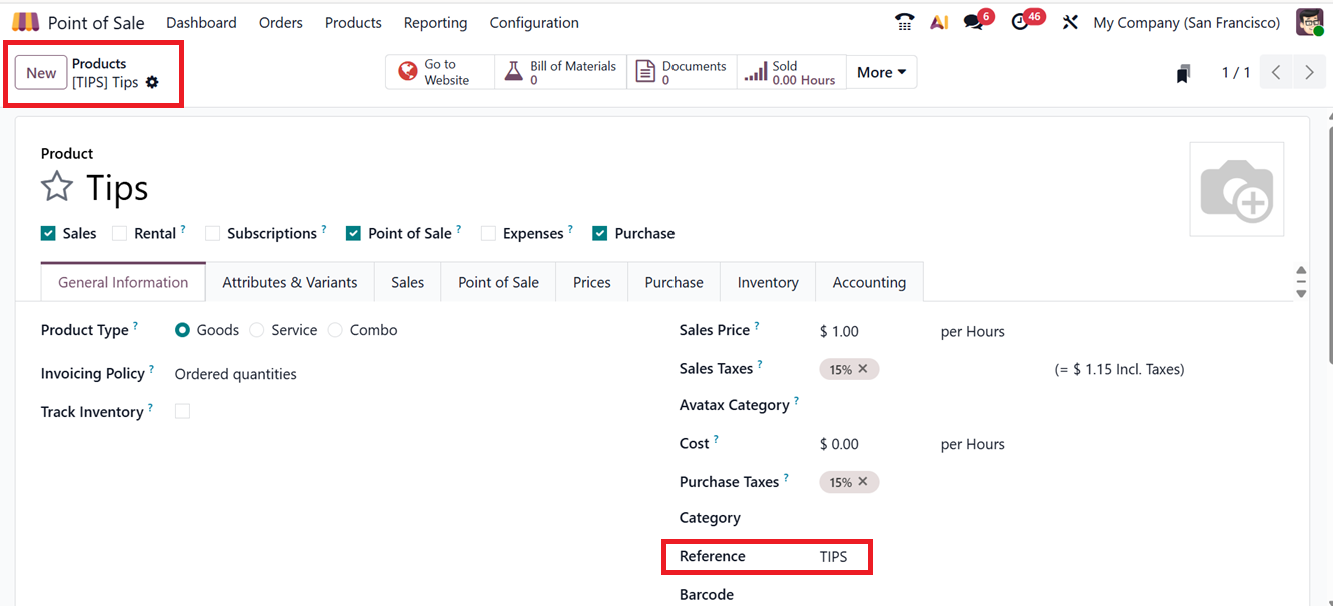
To set up a tip product , you can directly choose any particular inventory products using the dropdown list or create a new tip product in your product catalog. This can be done like creating a new inventory product and mentioning the ‘Reference’ as ‘TIPS,’ as depicted in the screenshot below.
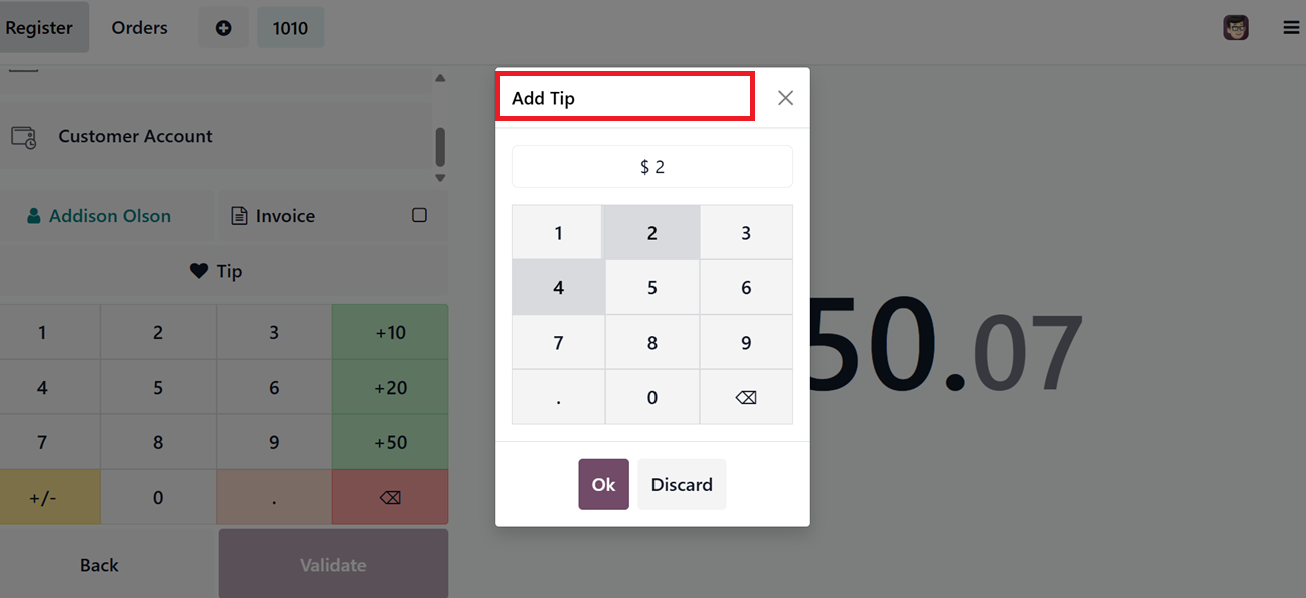
Then select the tip product under the "Tip Product" field in the Tips configuration. This ensures an ‘Tip’ option is available to customers during the checkout process in the PoS session, as shown in the screenshot below.

After pressing the ‘Tip’ option, you can enter the tip amount in the ‘Add Tip’ window and proceed with the ‘Ok’ button.
The added tip will be reflected in the customer invoice, as shown in the screenshot below.
Set Maximum Difference
The 'Set Maximum Difference' field in the ‘Payment’ settings tab sets the allowed variance between the expected and actual cash amounts. To use this feature, Start a PoS session, Process a sale, Validate the payment and Close the sales register.
If there's a difference in any specifics of the closing register, it will appear in the ‘Difference’ field of the ‘Closing Register’ window in red highlights. For example, the screenshot below shows a mismatch between the recorded ‘Card’ payment amount and the manually entered ‘Card Count’ balance.

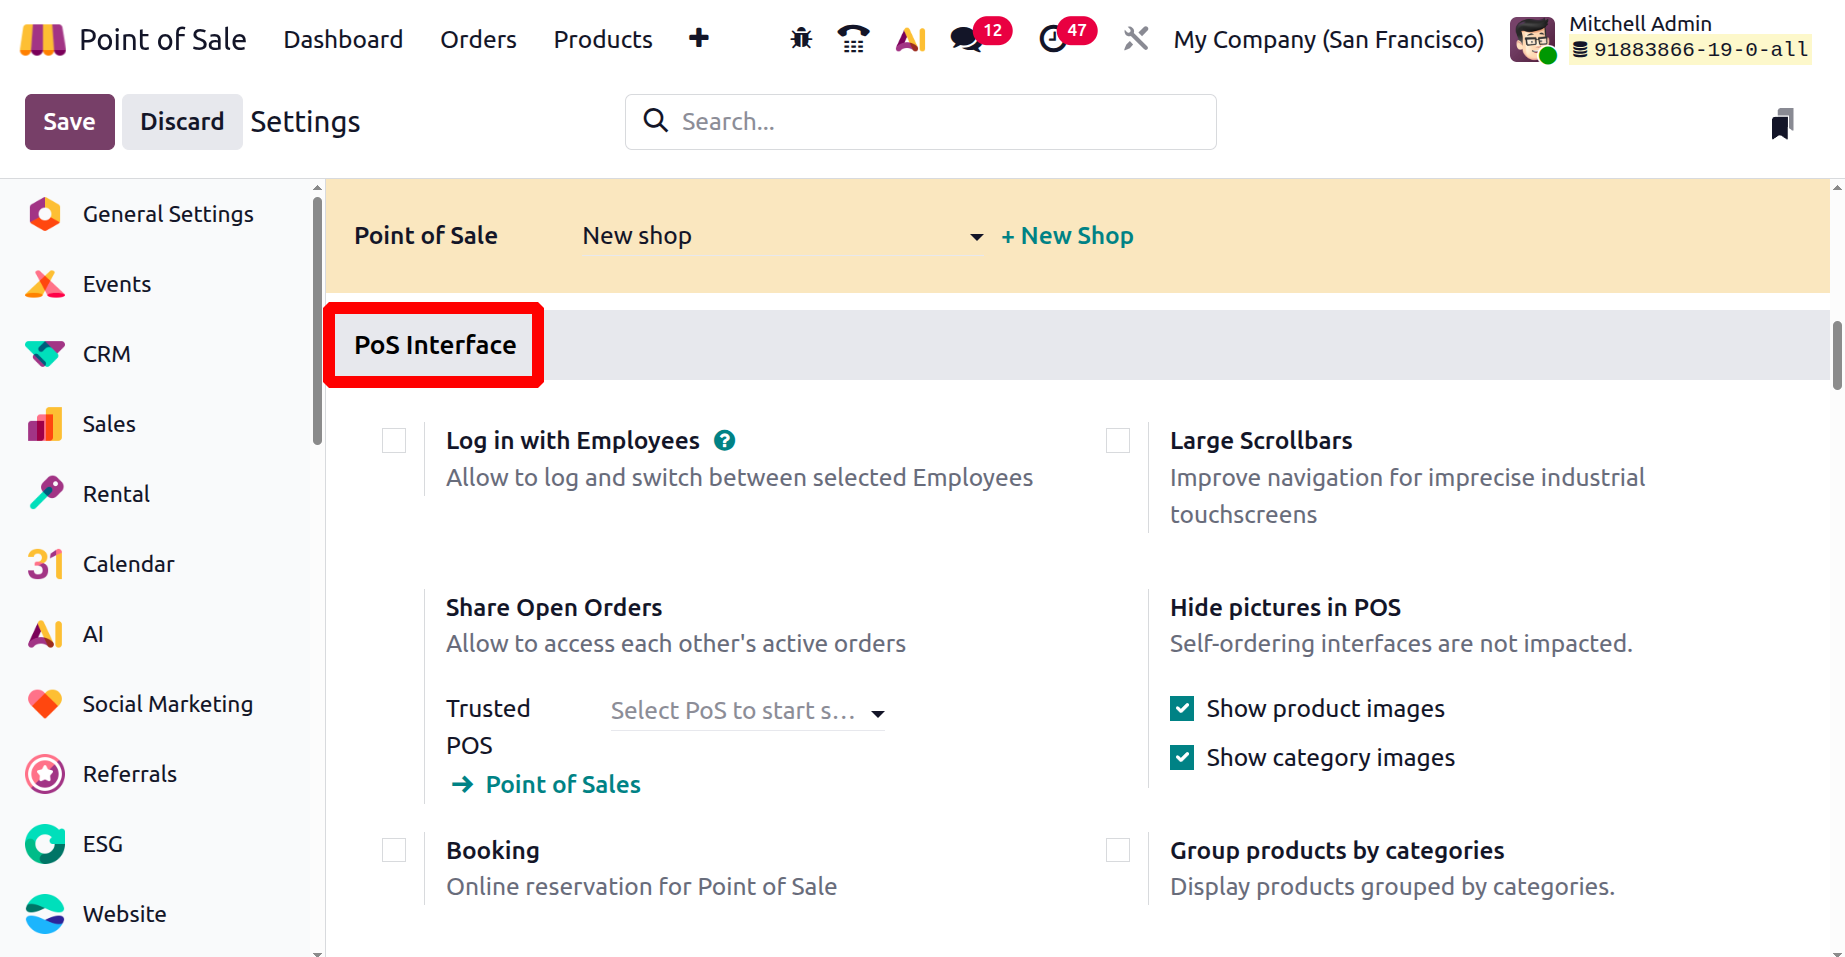
PoS Interface
The Point of Sale interface can be customized for better usability and control. Here the options included are Log in with Employees, Large Scrollbars, Share Open Orders, Hide pictures in POS, Booking and Group products by categories
Log in with Employees
Log in with Employees features allowing multiple employees in a session, requiring login via Badge ID or PIN for security, sharing open orders across terminals, and showing or hiding product images.
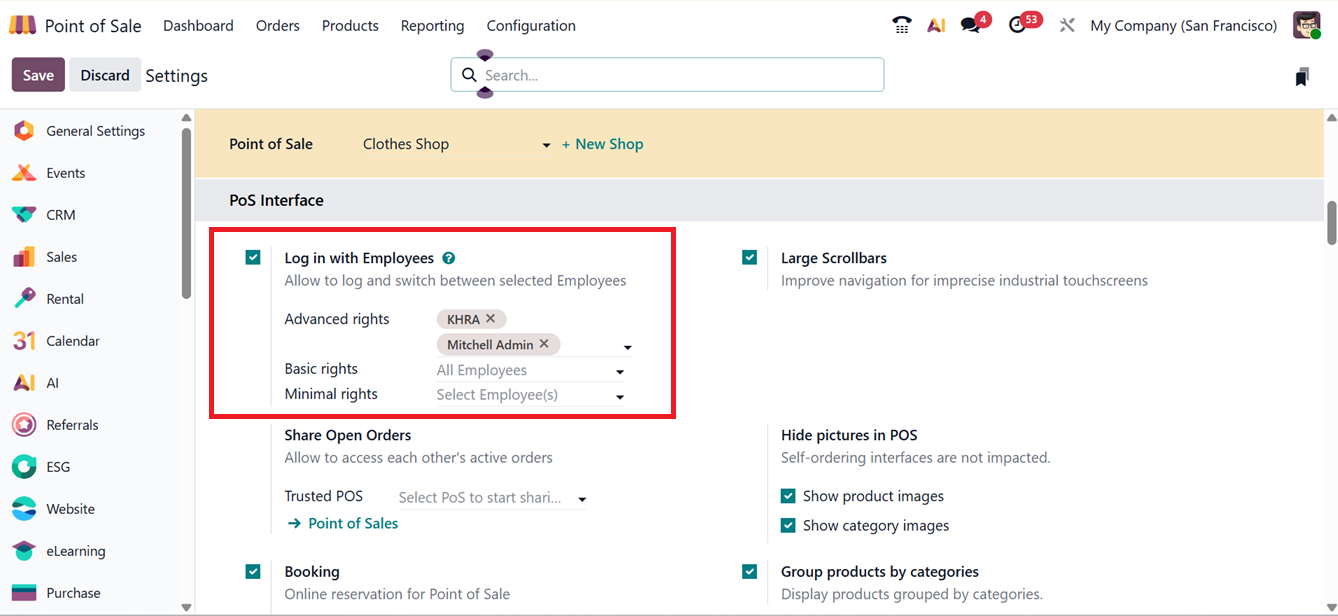
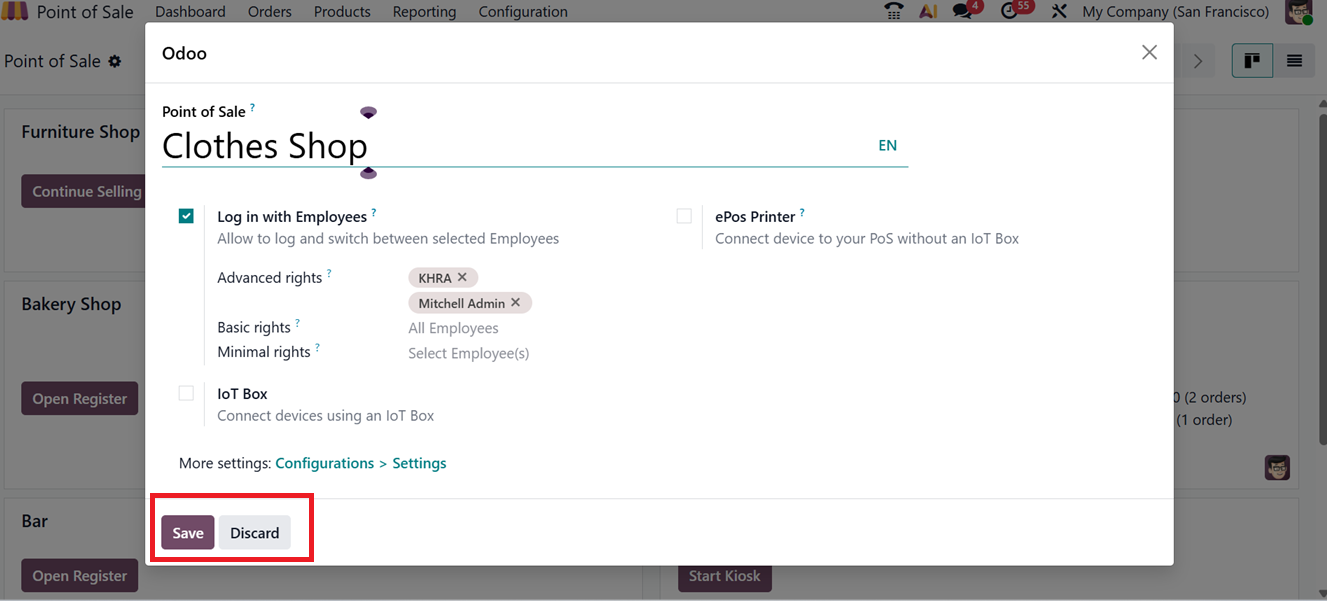
Enabling the “Login with Employees” ensures only authorized staff can access the system. Here you can set the access levels to Advanced rights, Basic rights and Minimal rights. Employee login credentials PIN or Badge are configured in the HR module.
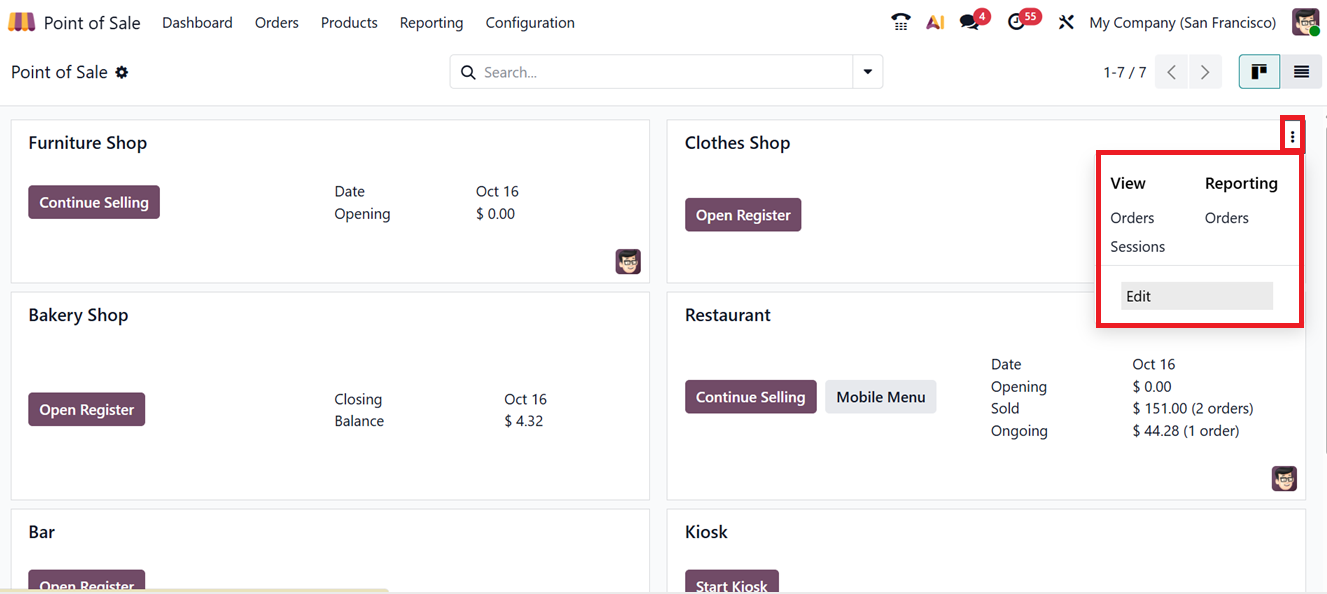
To enable this setting for an existing PoS session, go to the dashboard, open the three-dot menu on the store card, and click “Edit” to update session preferences, as shown in the screenshot below.
In the settings window, you can add authorized employees with relevant access rights and save the changes, as depicted in the screenshot below.
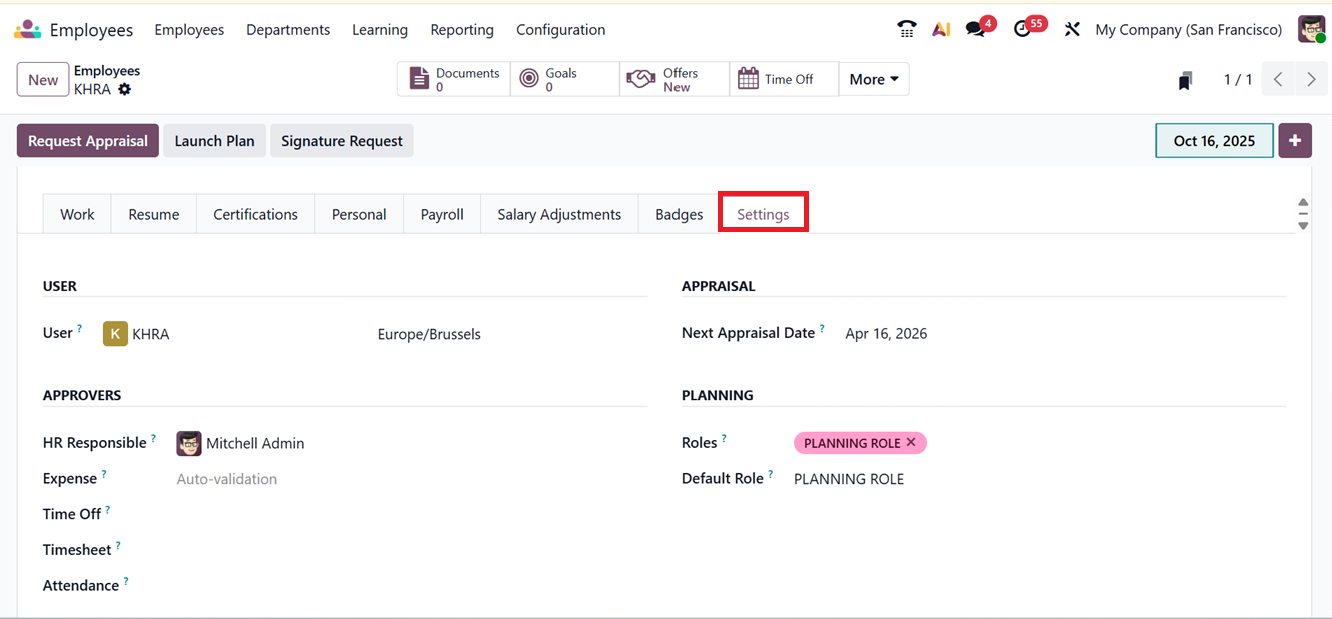
To access a PoS session, employees either select their name from the list or enter a PIN. Those with Advanced access rights may log in without additional authentication. This helps prevent unauthorized use and ensures accurate tracking of sales activity. Employees can set their own PIN Code or RFID/Badge ID in the Employees module under the Settings tab of the employee configuration form, ensuring reliable and secure login for each transaction, as depicted in the screenshot below. For example PIN Code 112203 and RFID/Badge Number as 041023379316, as depicted in the screenshot below.

After setting the PIN/Badge Numbers, Let’s open a new POS session to test the feature. Here, you will see the "Open Register" button to initiate the shop session. Clicking on the ‘Open Register’ button will prompt a screen that requests the employee’s PIN code.you have to enter the PIN, as shown in the screenshot below.
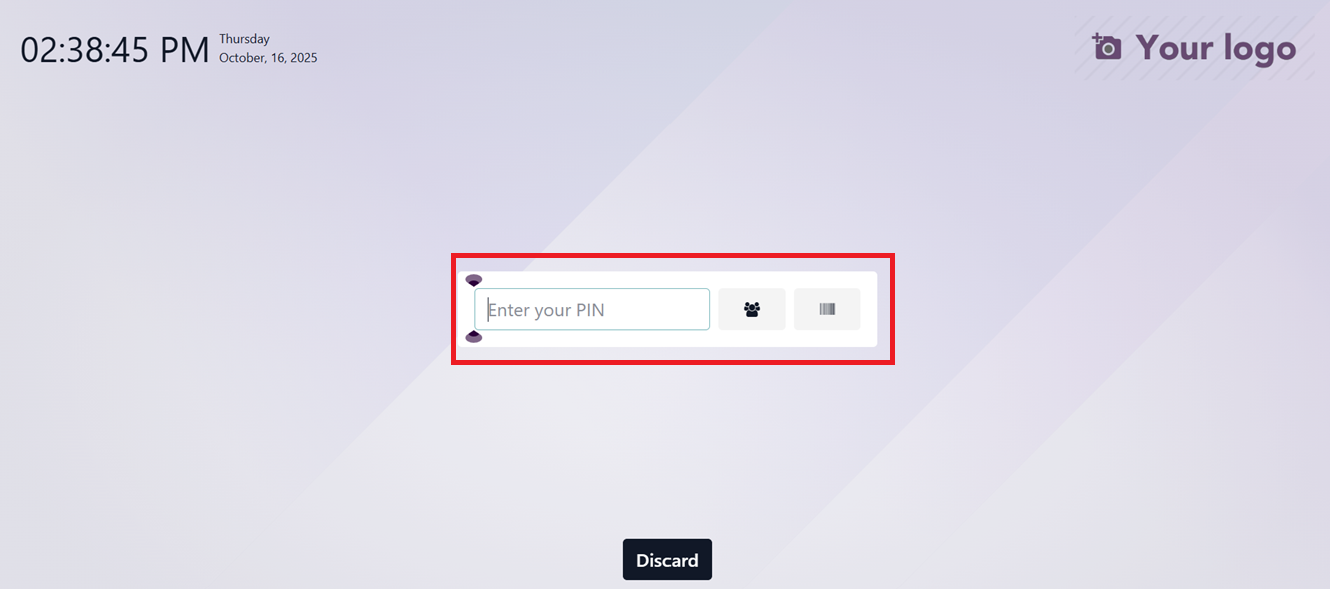
This login feature allows employees to access Point of Sale (PoS) sessions by either selecting their names from an authorized list or entering a unique PIN code.
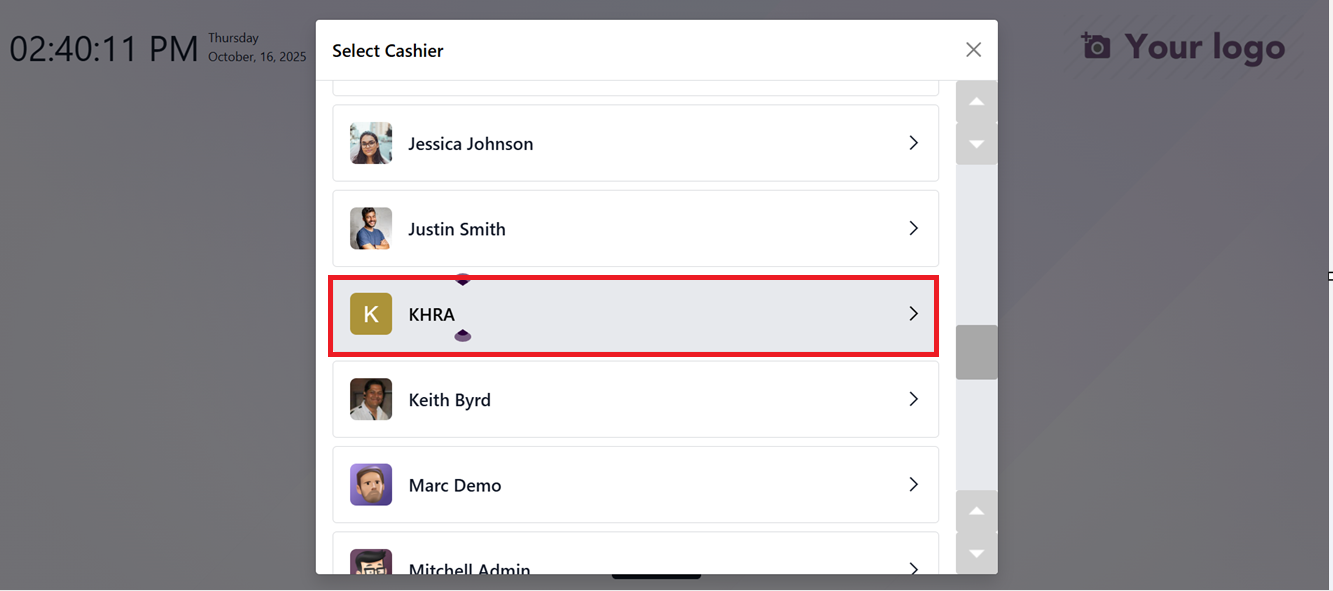
The user can select their profile from an icon list or scan their badge using a barcode scanner. Once the correct PIN is entered and confirmed by clicking “OK”, the employee gains access to the session.
Providing the PIN will be directed to the Opening Control panel, where you can input the starting balance and relevant notes before beginning sales operations.

Employees with advanced rights can log in without security prompts, allowing for faster transitions between cashier roles. Each cashier can sign in and out using their unique credentials, ensuring seamless role switching without disrupting active sales.
Share Open Orders
The “Share Open Orders” feature allows multiple users within the same session to view and manage open orders across terminals. Paired with the “Trusted PoS” shop session, you can transfer in-progress sales from one PoS terminal to another. This is particularly useful in high-traffic environments like restaurants or large retail stores, where the staff may need to access or complete orders from different stations.

When the Trusted PoS feature is configured, sales orders can be created and managed simultaneously across multiple sessions. For instance, a product can be added to a cart from the Bakery shop session, while another item is added from the Clothing store session. Both transactions are saved and accessible from the Orders section in the PoS terminal.
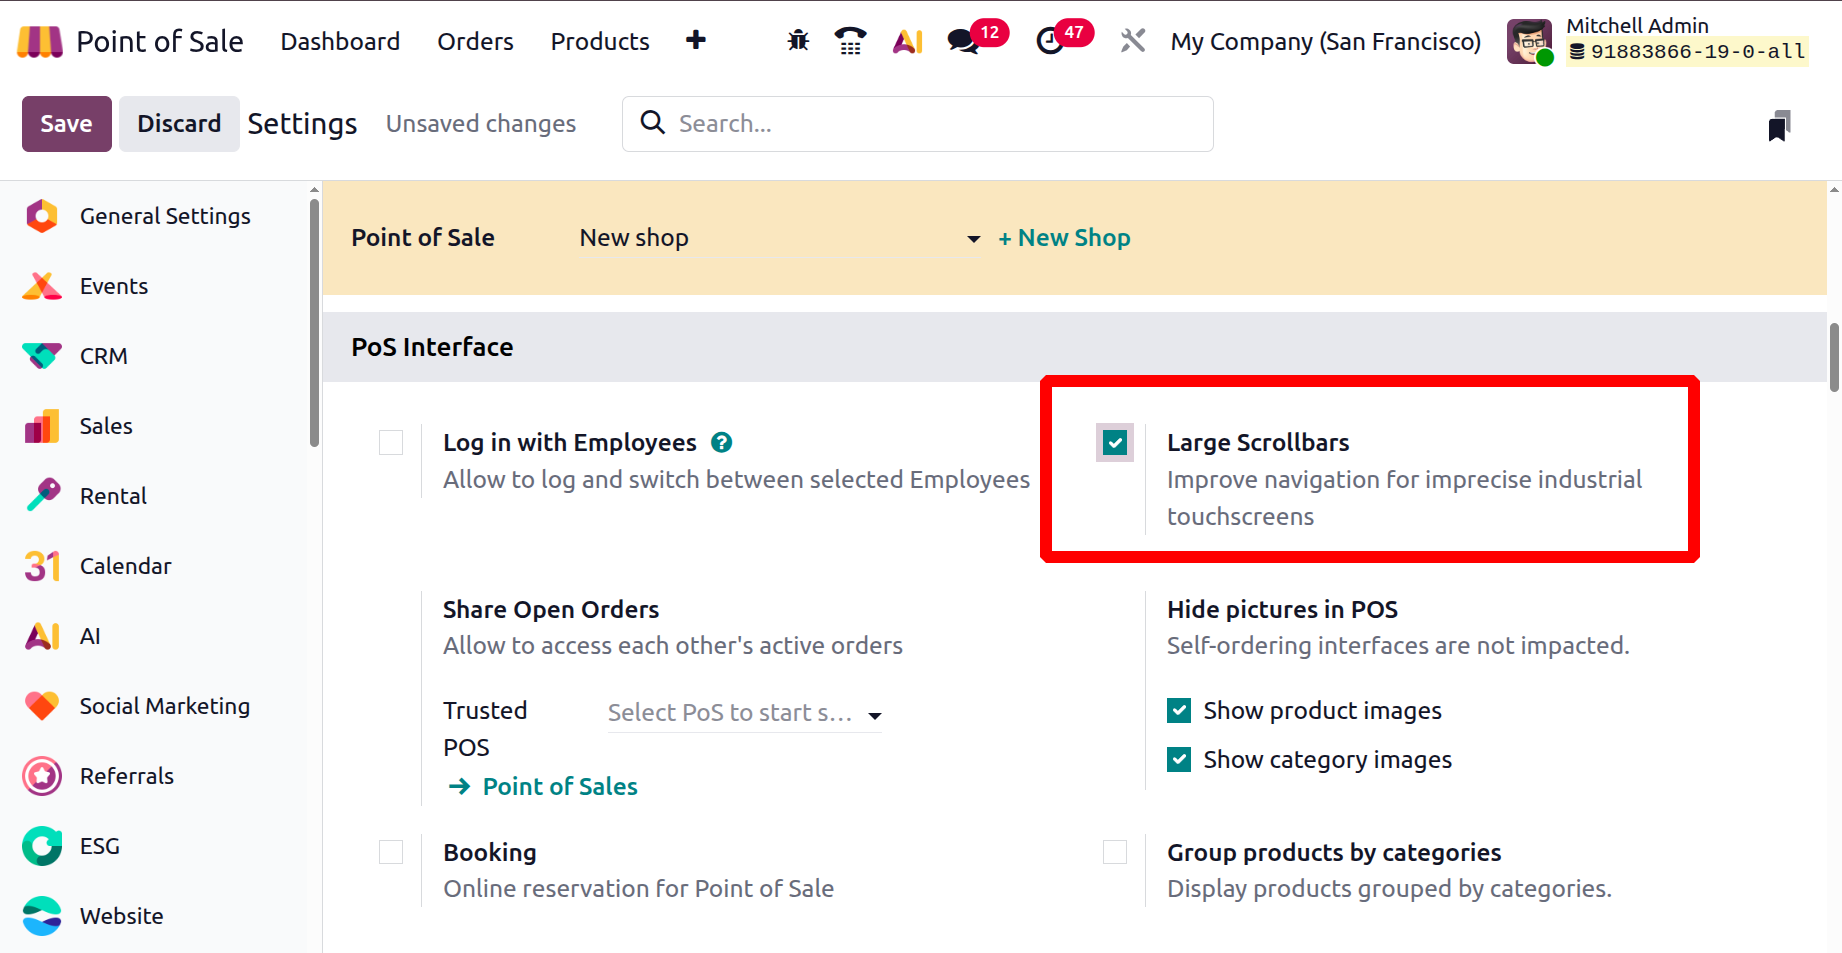
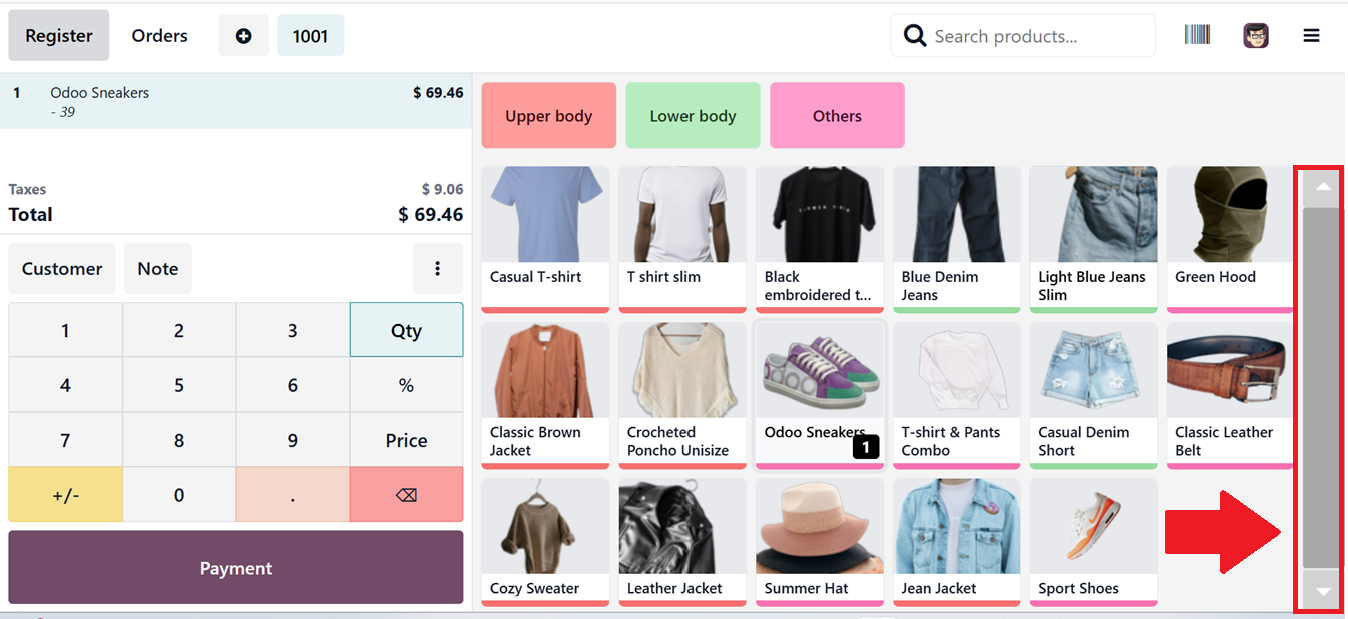
For improved usability on mobile devices and touchscreen terminals, enabling the “Large Scrollbars” setting in the PoS interface improves accessibility and navigation, especially in fast-paced environments.
The scroll bars shown inside the session, as shown below.
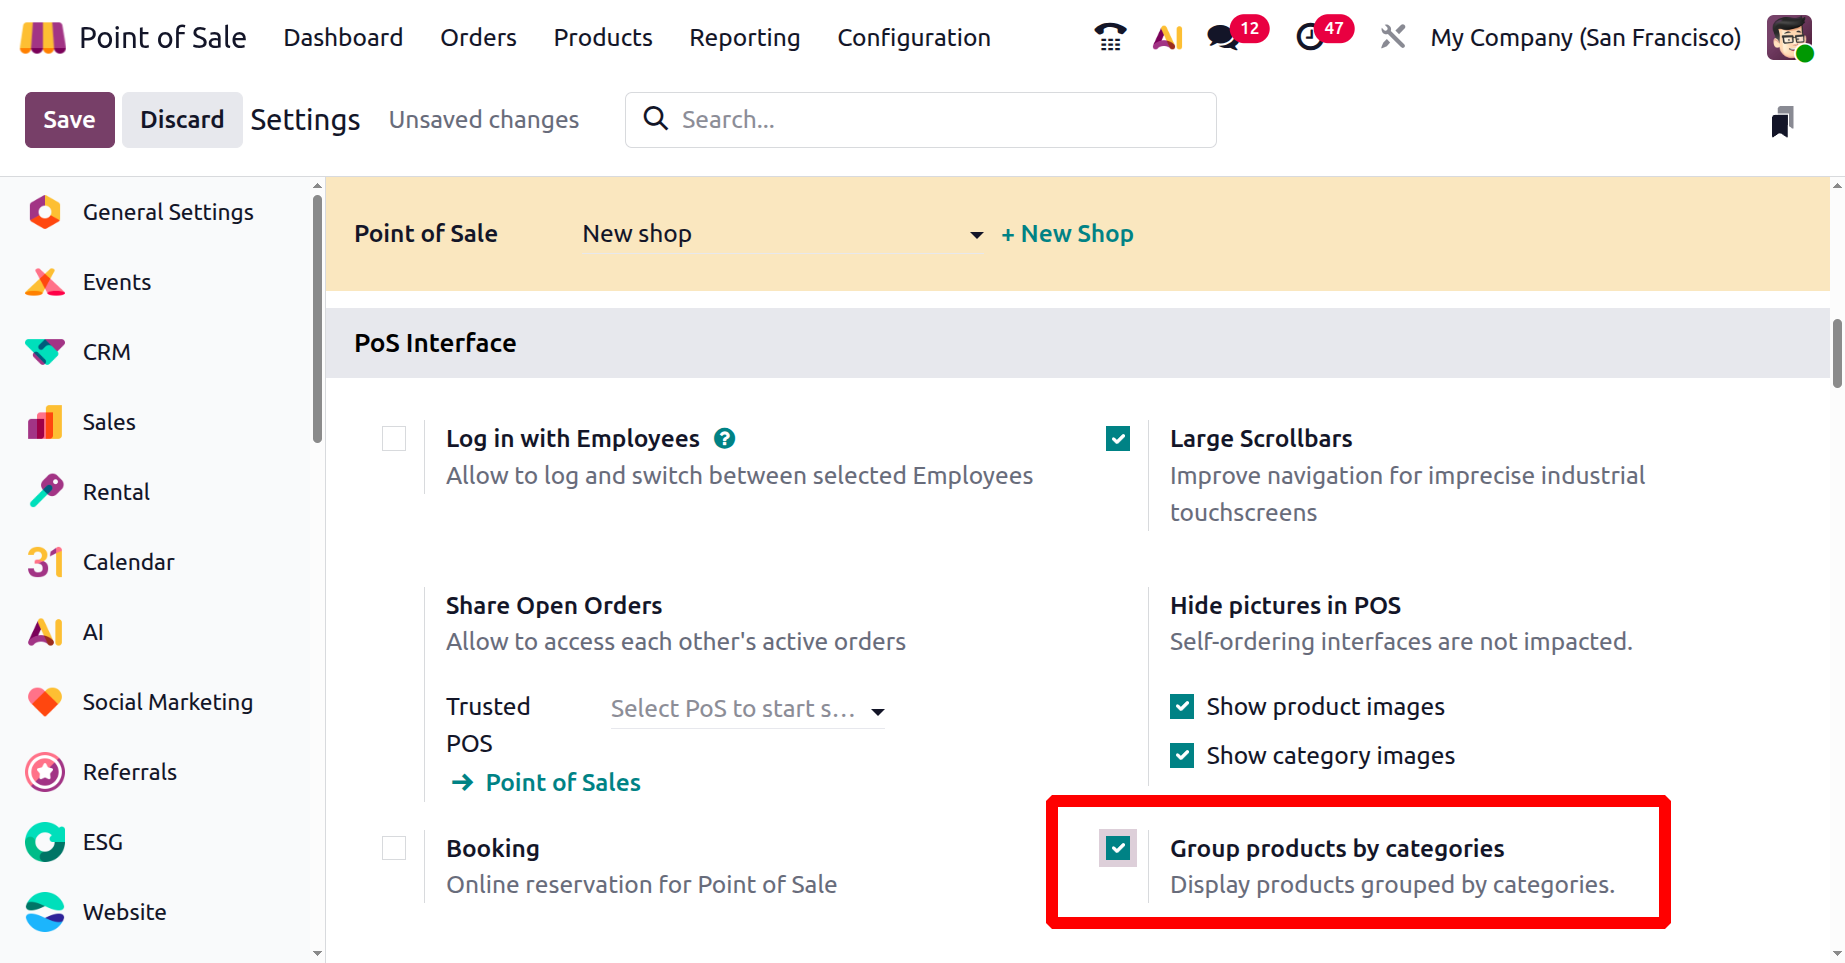
Meanwhile, the “Hide Pictures in POS” option allows businesses to Show product images and Show category images in a point of sale interface, offering a cleaner display and faster load times.
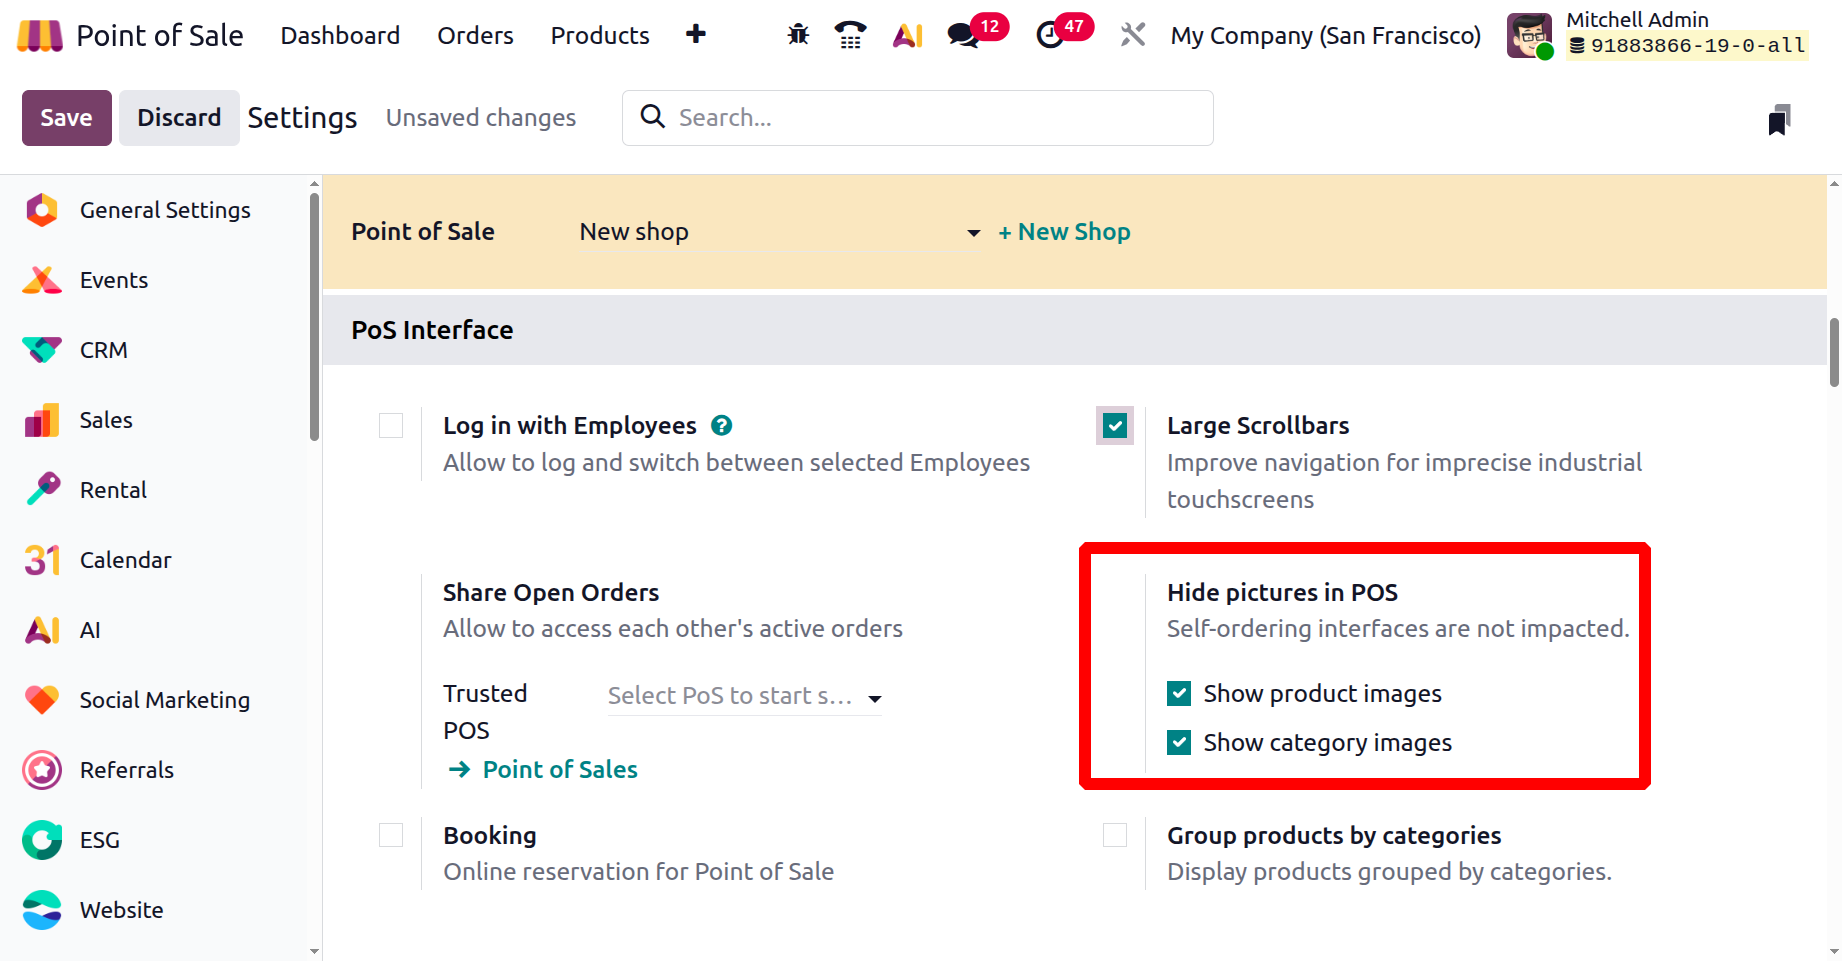
If enabled, this option hides visuals in the product catalog, relying solely on names and categories for selection, as depicted in the screenshot below.
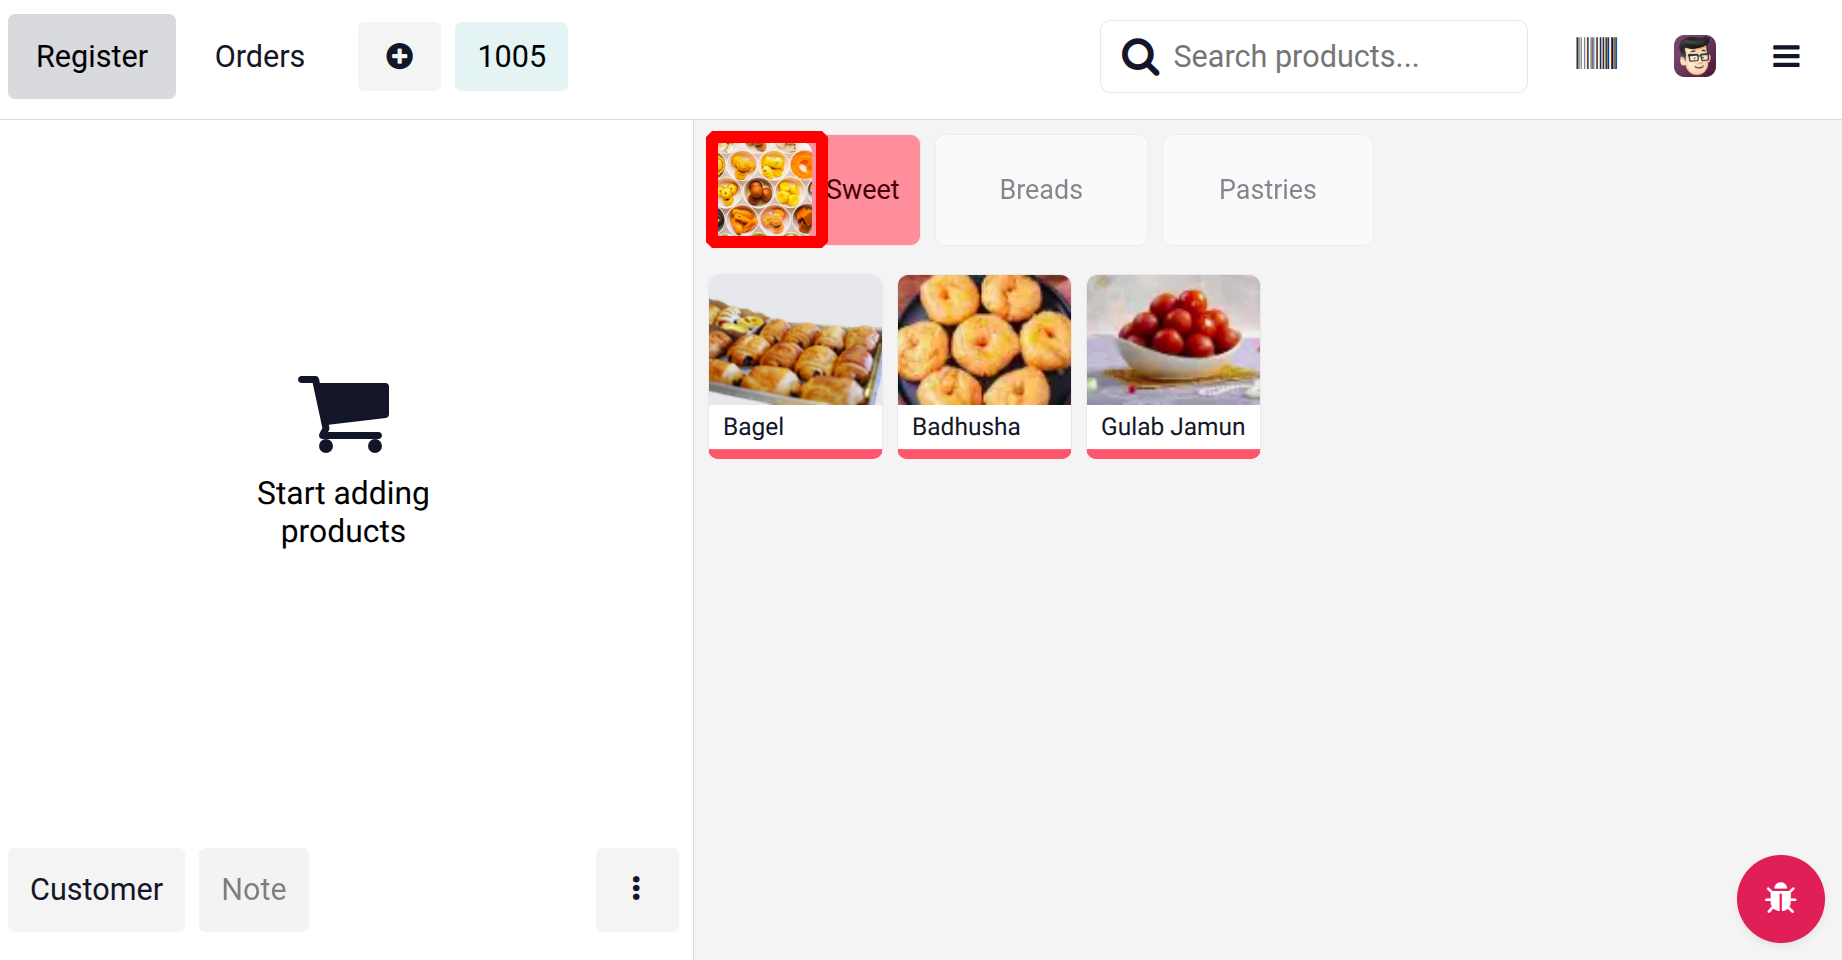
The ‘Group product by categories’ feature helps to arrange products according to their categories.
As shown in the screenshot below, products are arranged based on the Category.

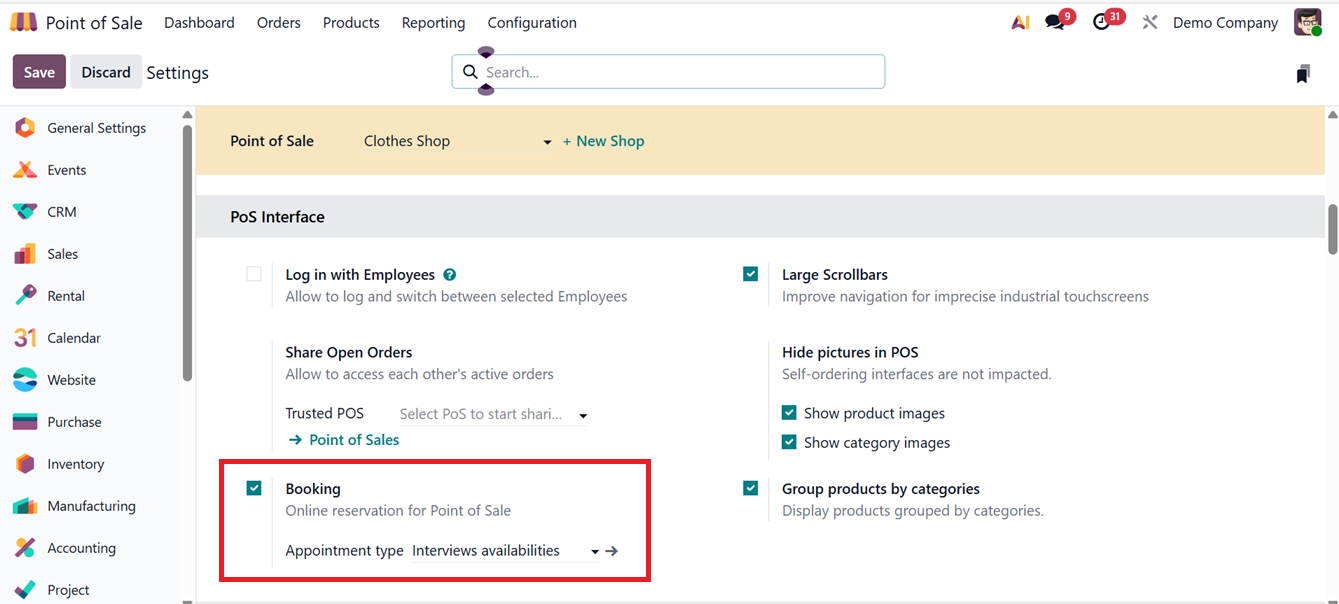
Booking
The ‘Booking’ feature in Odoo 19 PoS lets businesses take orders or reservations in advance. It helps link bookings to customers, allows partial or full payments, and saves the products in stock for later. When the customer comes in, the booking can be quickly turned into a sale. This makes service faster and helps avoid overbooking or running out of items.
This feature is particularly useful for pre booking/reserving a table or a floor in a restaurant session. So, after activating the feature, you can mention an ‘Appointment type’ in the relevant field, as depicted in the screenshot below.
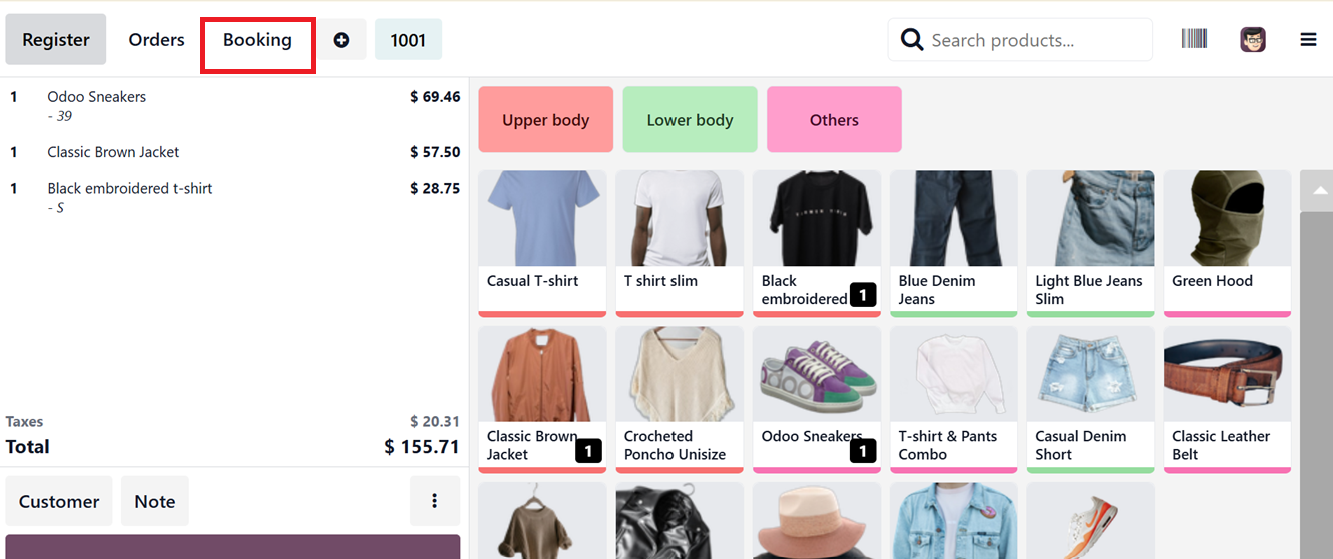
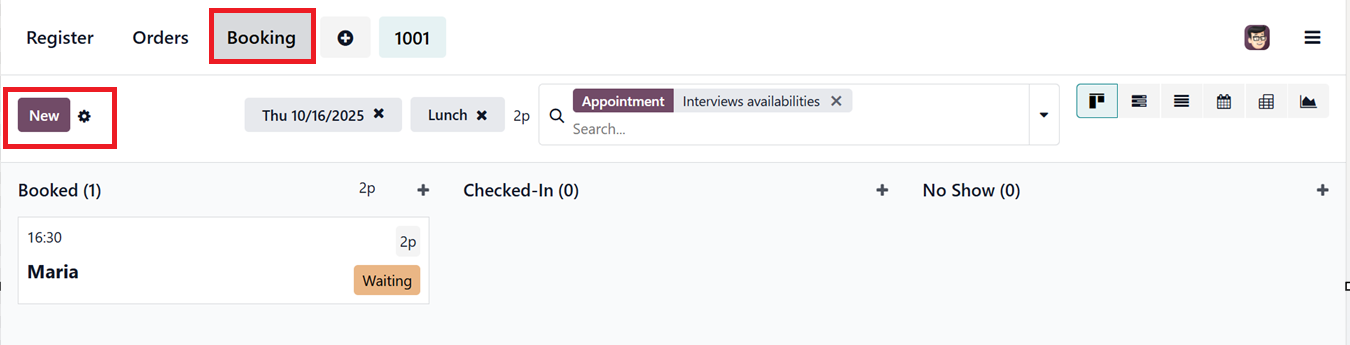
After setting the booking feature, you can see an ‘Booking’ tab inside a Point of sales interface, as shown in the screenshot below.
You can open the ‘Booking’ tab and see the details of all your online reservations based on their current status such as, Booked, Checked-In, No Show,etc, as depicted in the screenshot below.
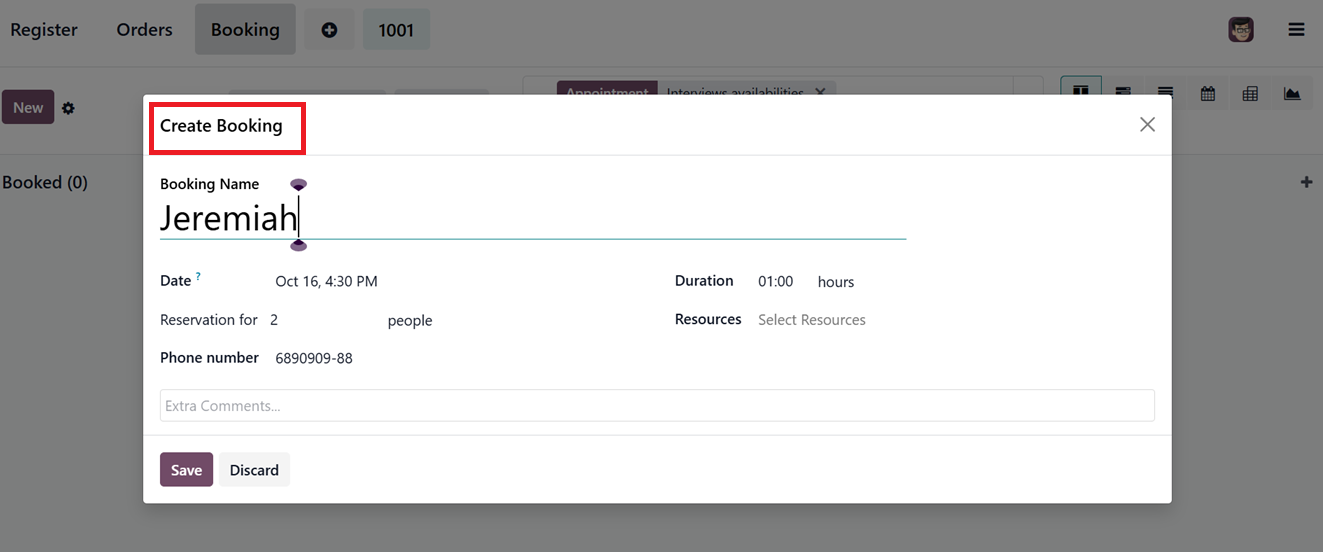
Click on the ‘New’ button to create a new booking and edit the details including Booking Name, Date, Reservation Quantities, Phone Number, Duration and any other notes regarding the appointment, as shown in the screenshot below.
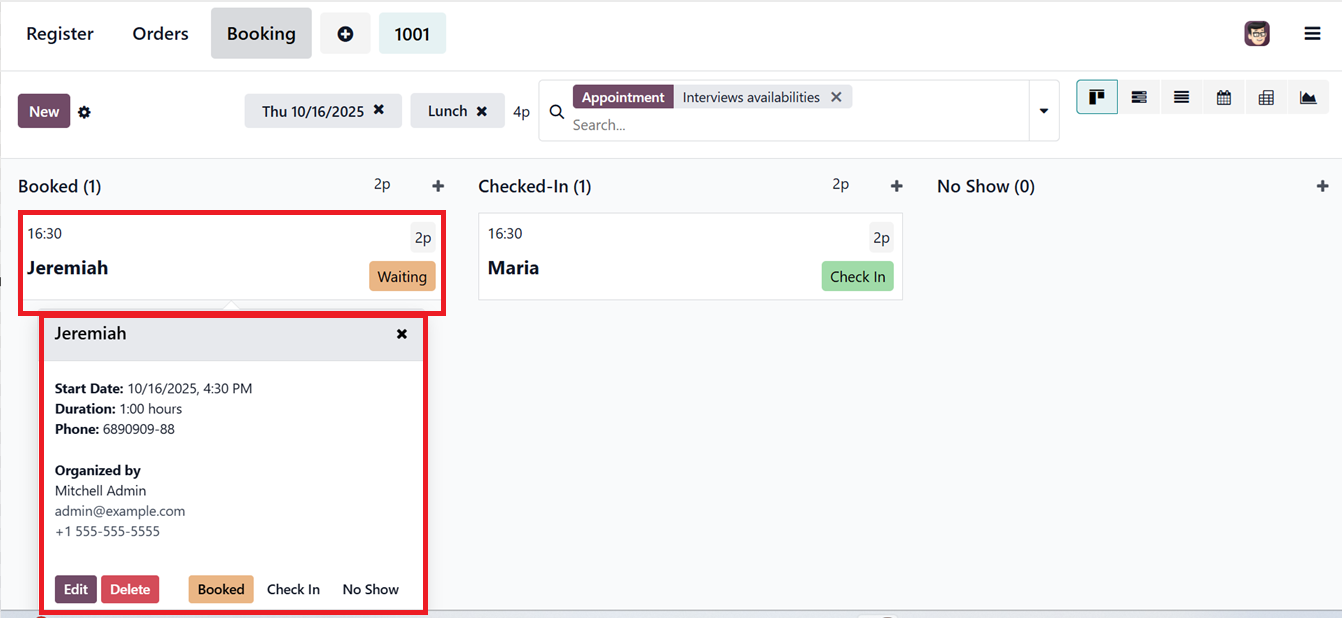
After saving the booking specifics, you can manage the appointments by simply clicking on the kanban view of the booking card. This allows you to Edit, Delete and Move to the next stages.
Product &PoS Categories
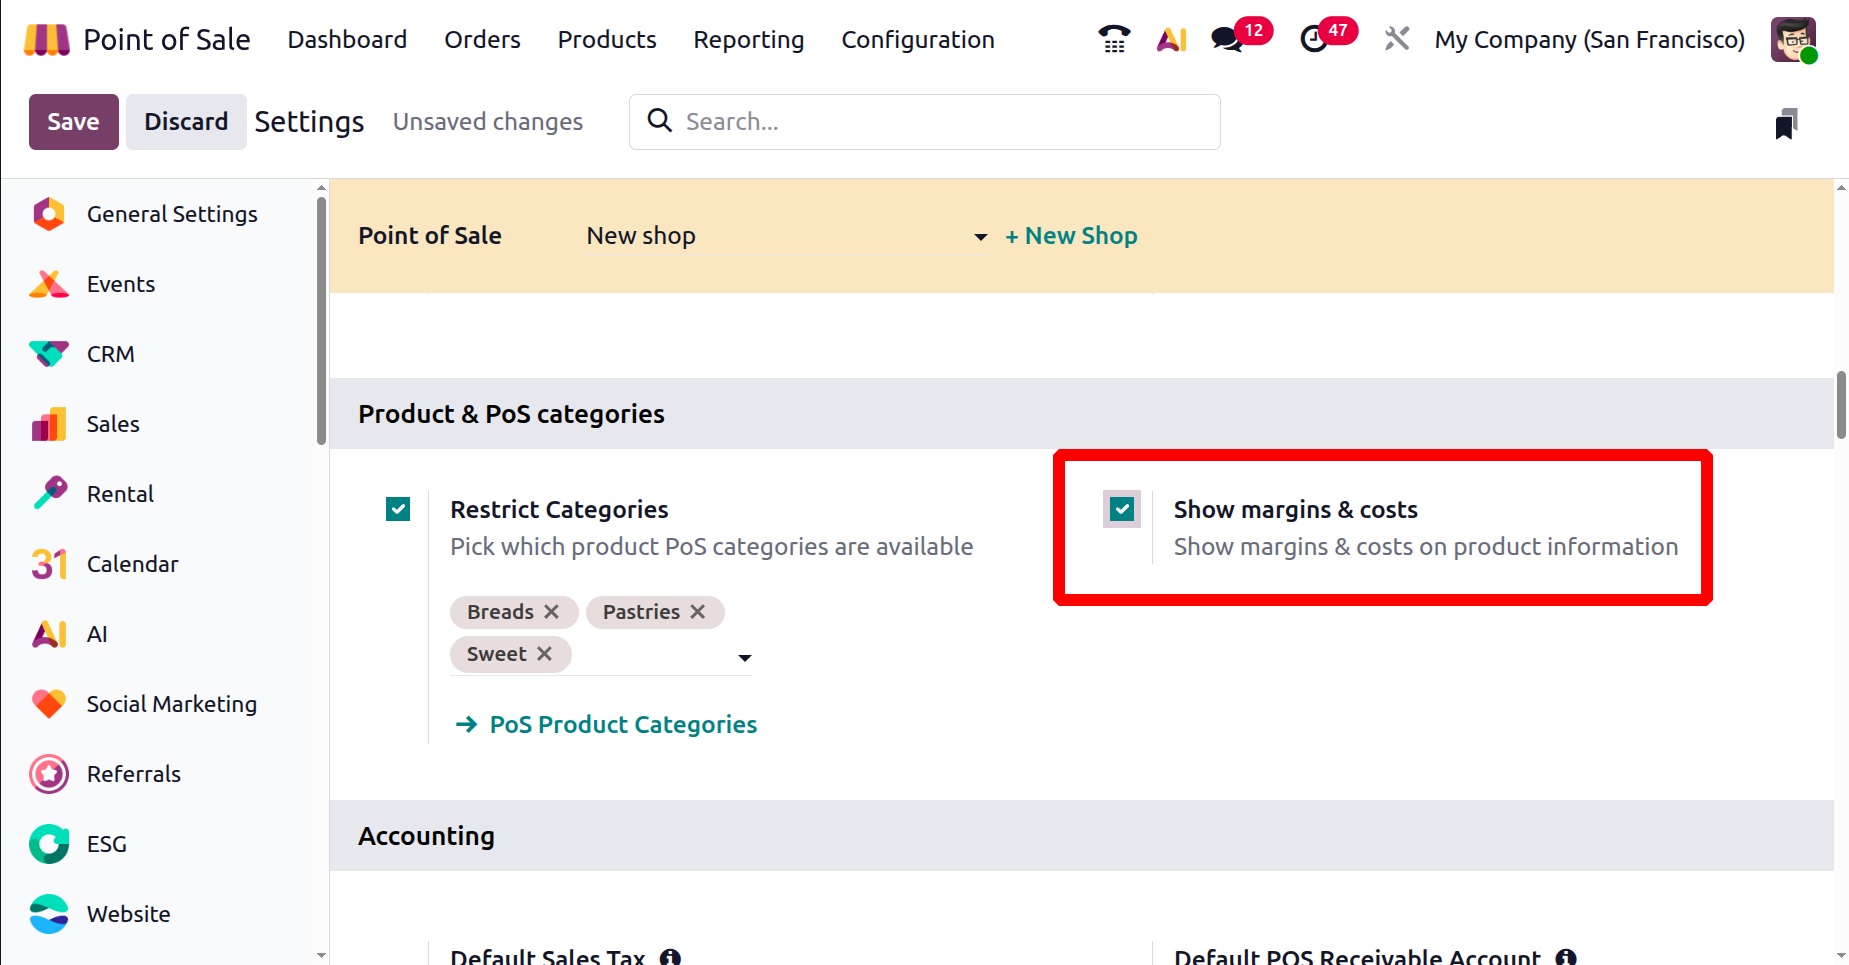
The Product & PoS Categories section provides tools for managing what product categories appear in a specific PoS session and show margins &costs on a product information page.
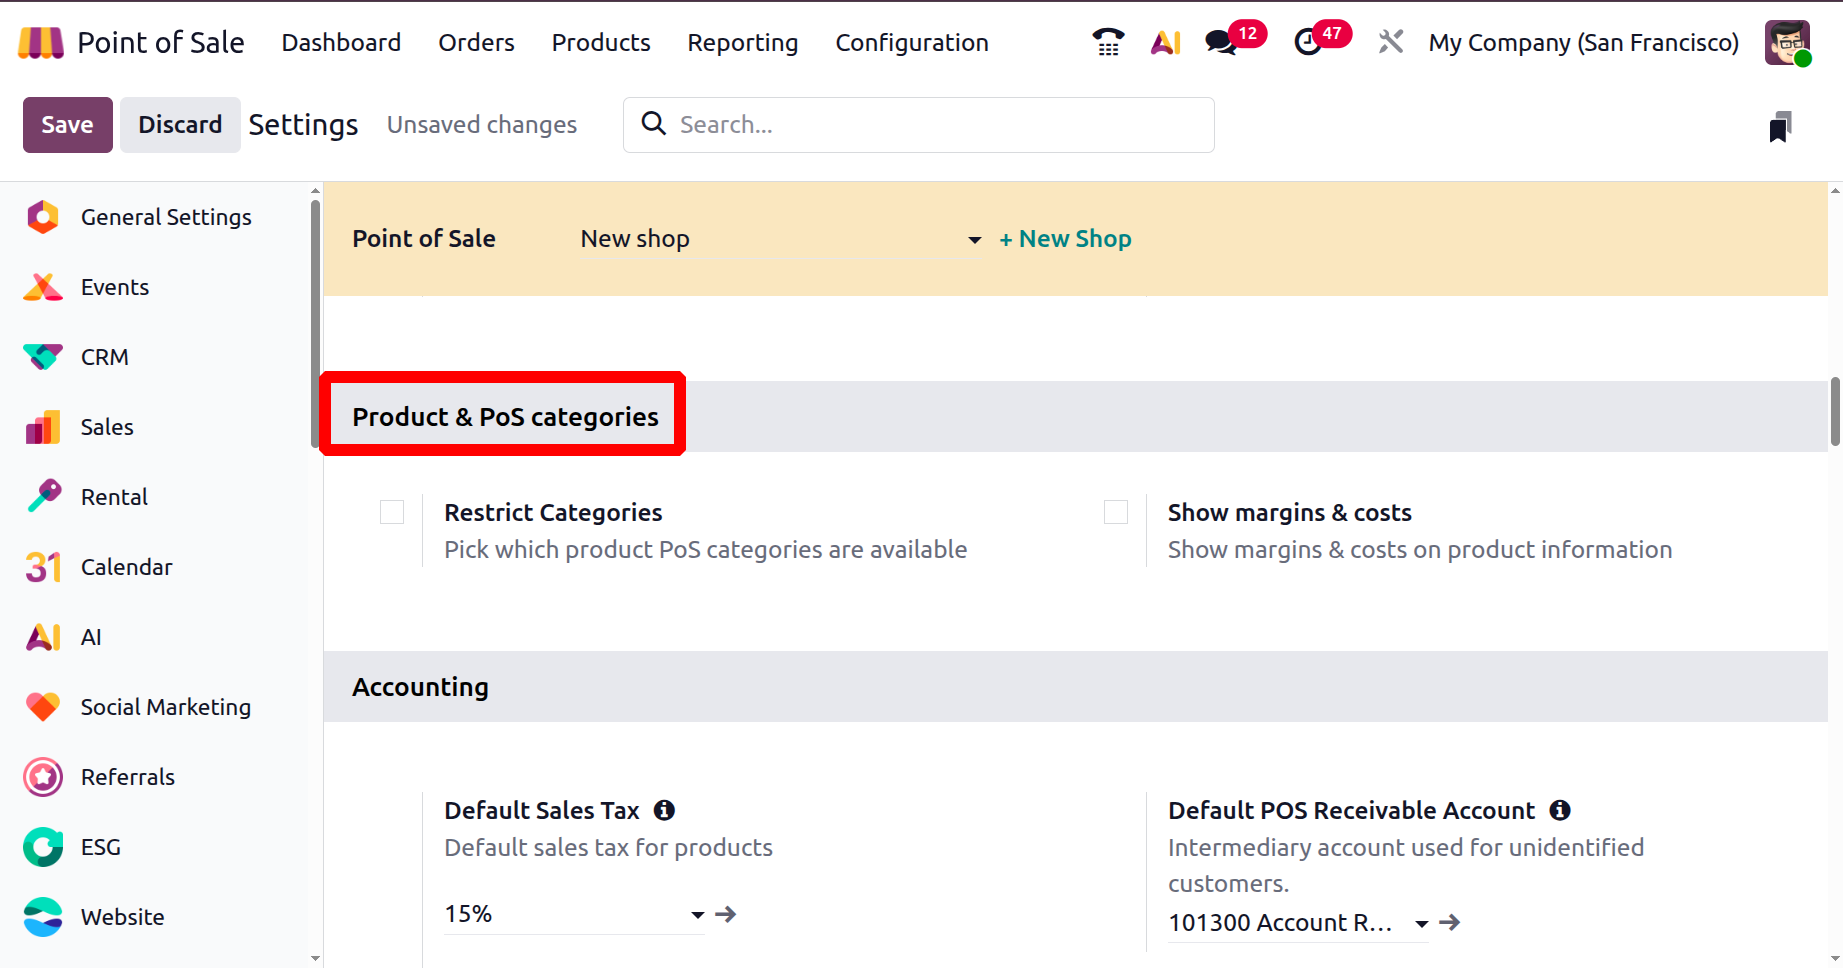
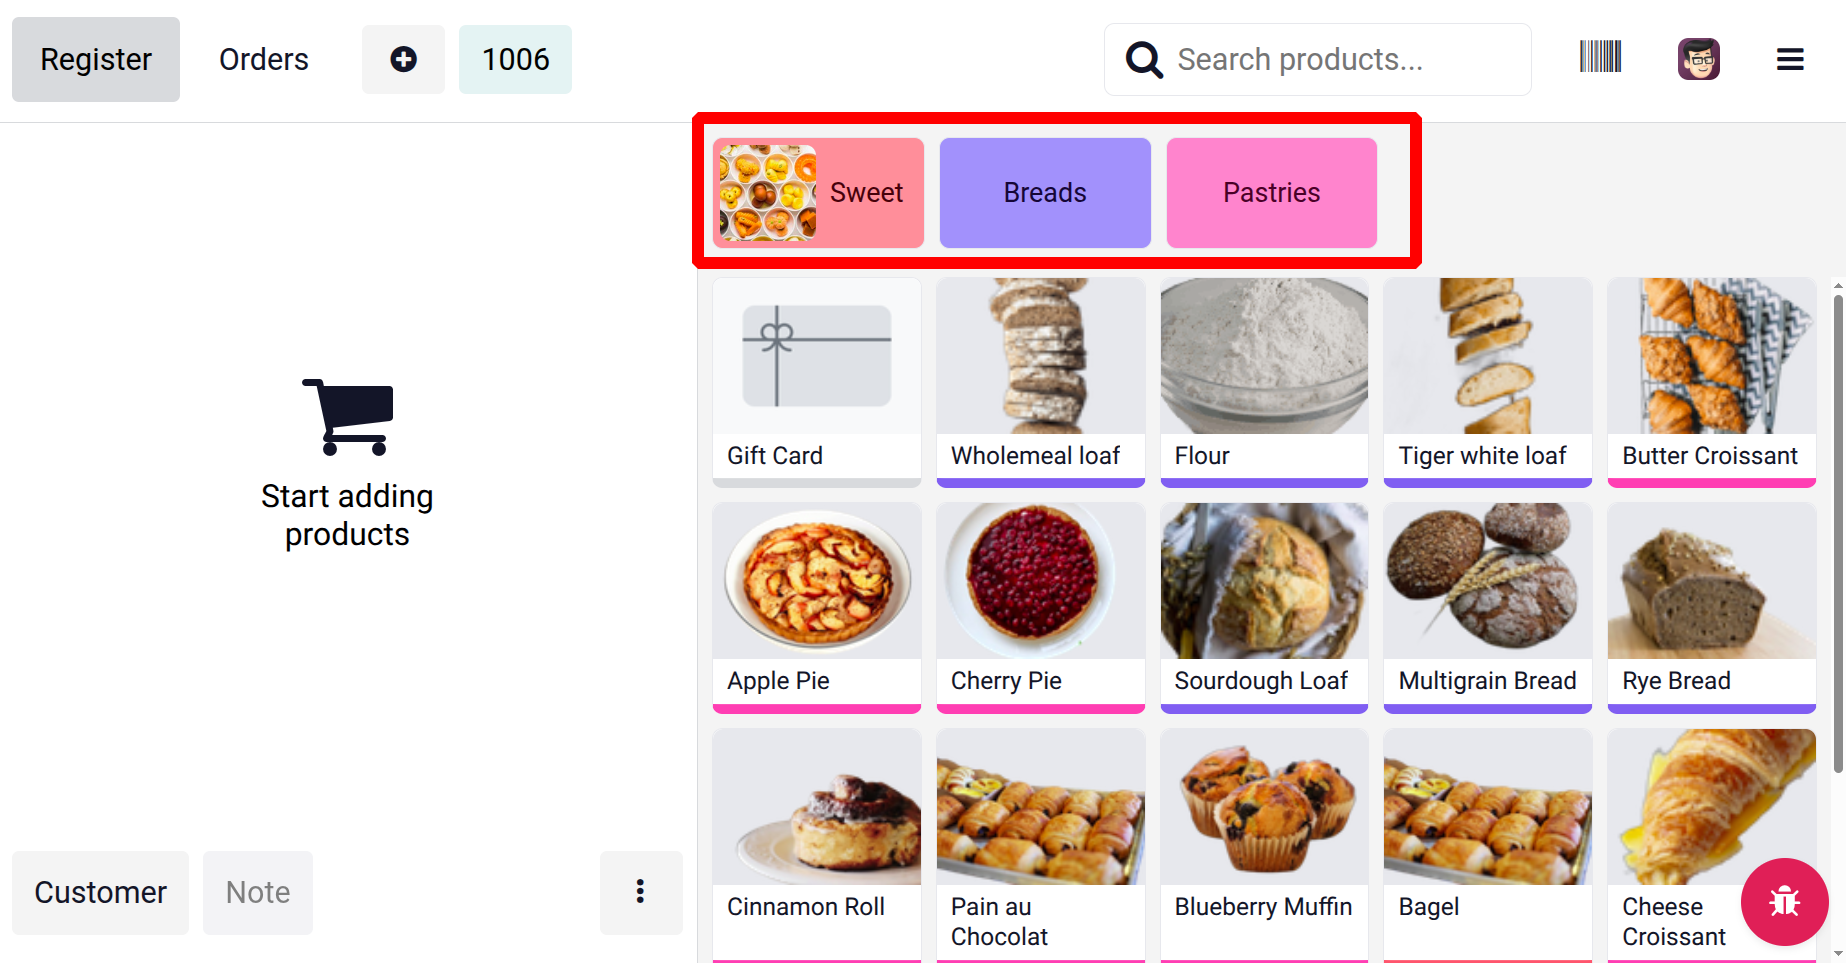
Activating the “Restrict Categories” limits which groups of items are available for selection, helping tailor the product list to each store or terminal. You can choose the categories from the dropdown list or create required categories using the ‘PoS Product Categories’ link provided under this settings option, as depicted in the screenshot below.
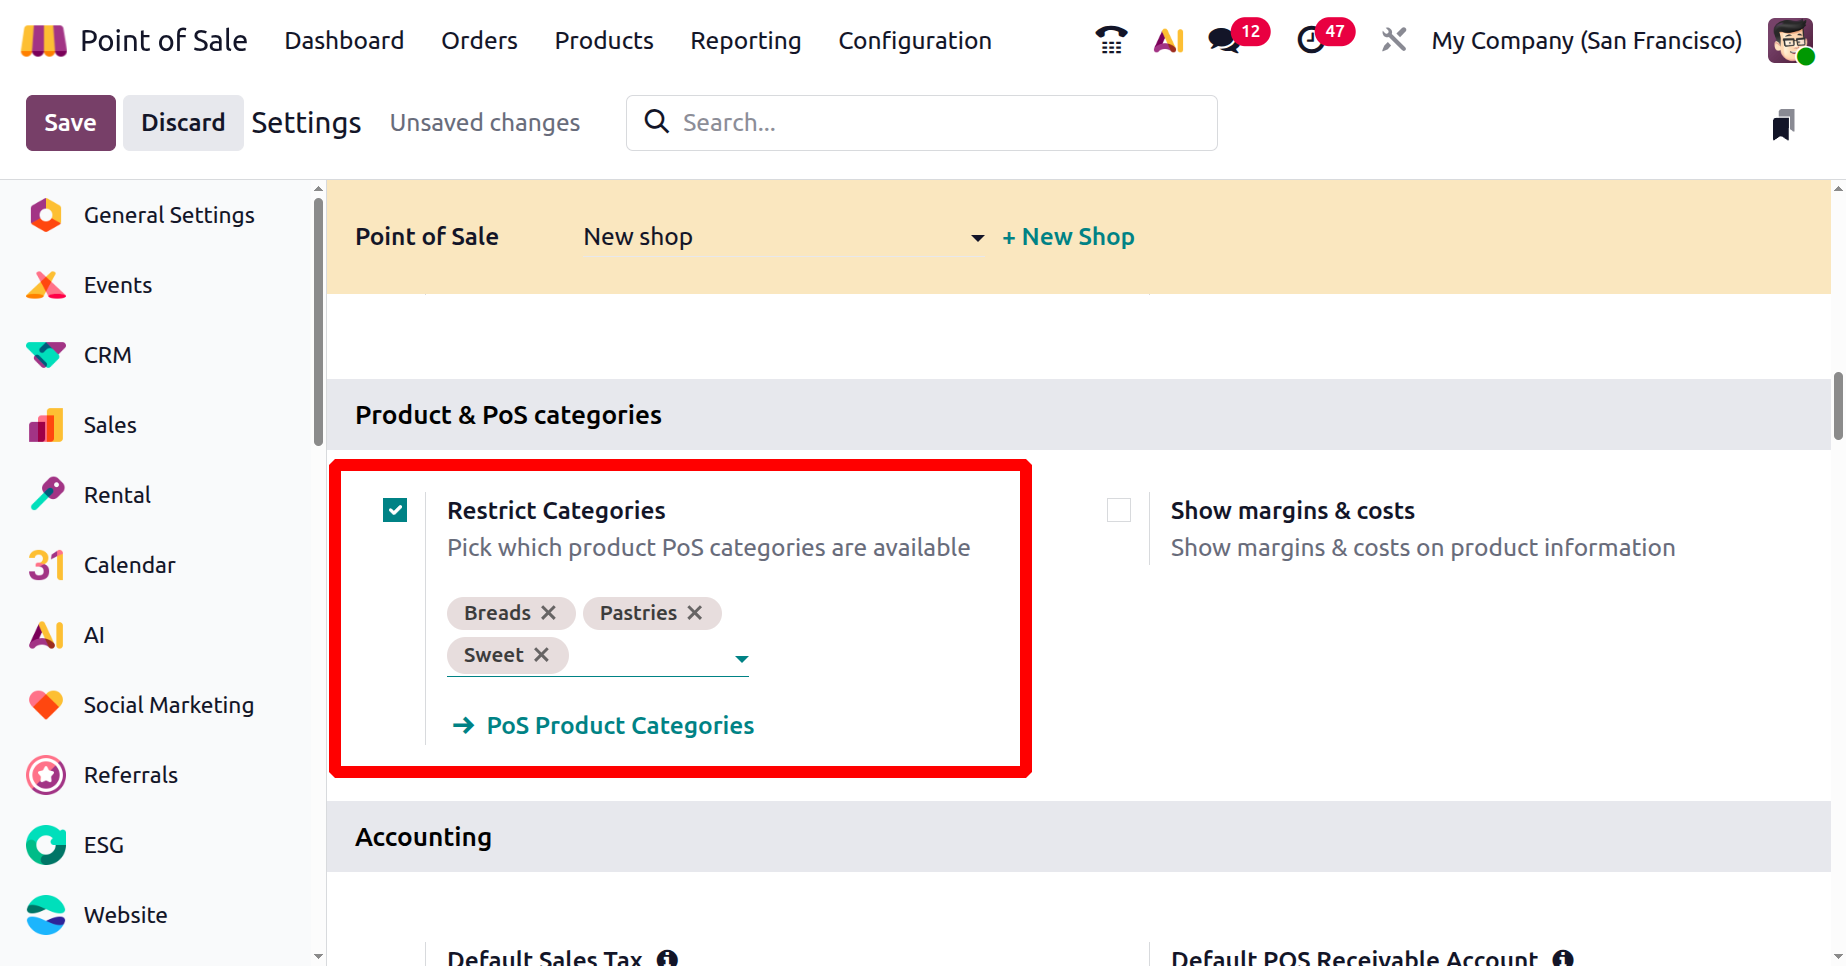
These categories are displayed at the top of the PoS interface, with the “Sort by Category” setting further organizing products in the shopping cart to facilitate smoother order processing.
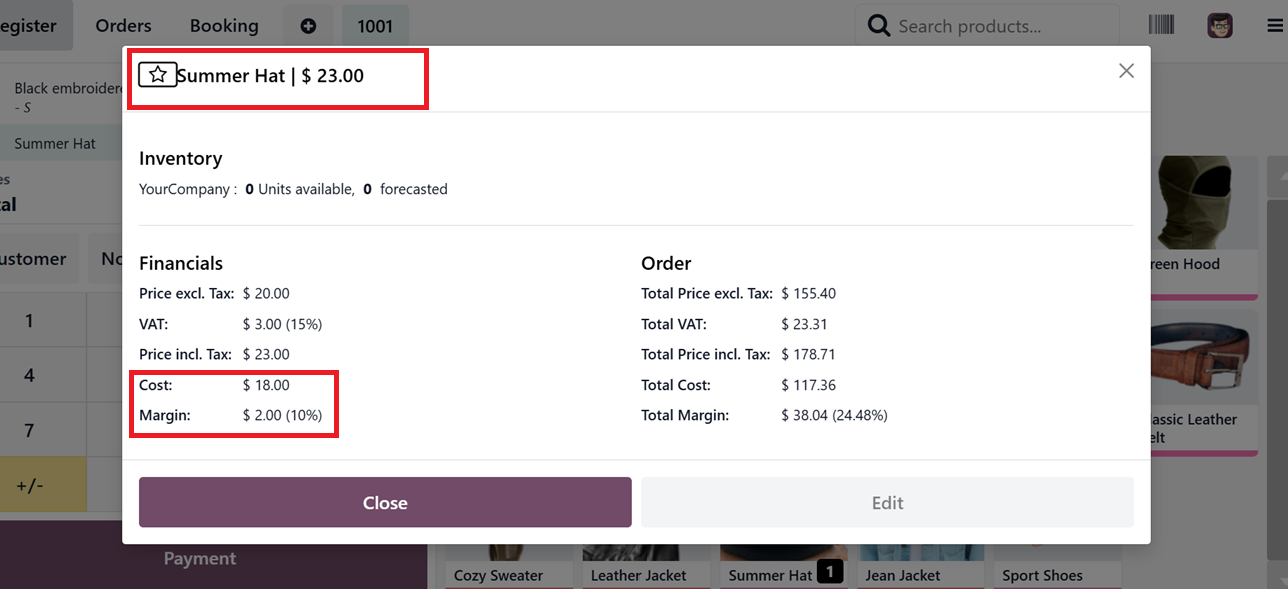
The ‘Show Margins & Costs’ feature helps users to get the Marginal costs and other information regarding the selected product.
After enabling the feature, you can choose a product from the PoS session and click on the ‘Action’ (Three dotted) menu from the interface. Then, choose the ‘Info’ button to view the marginal and other costs of the product.

The ‘Info’ button will show the Cost and Margin of the product along with other information, as depicted in the screenshot below.
Accounting
The accounting configurations in Odoo PoS enable businesses to tailor tax settings based on location, customer, and regulatory requirements. From the Accounting tab, users can define Default tax rates for products, assign journals for transactions and invoices, and use Flexible Taxes to handle multiple tax structures.
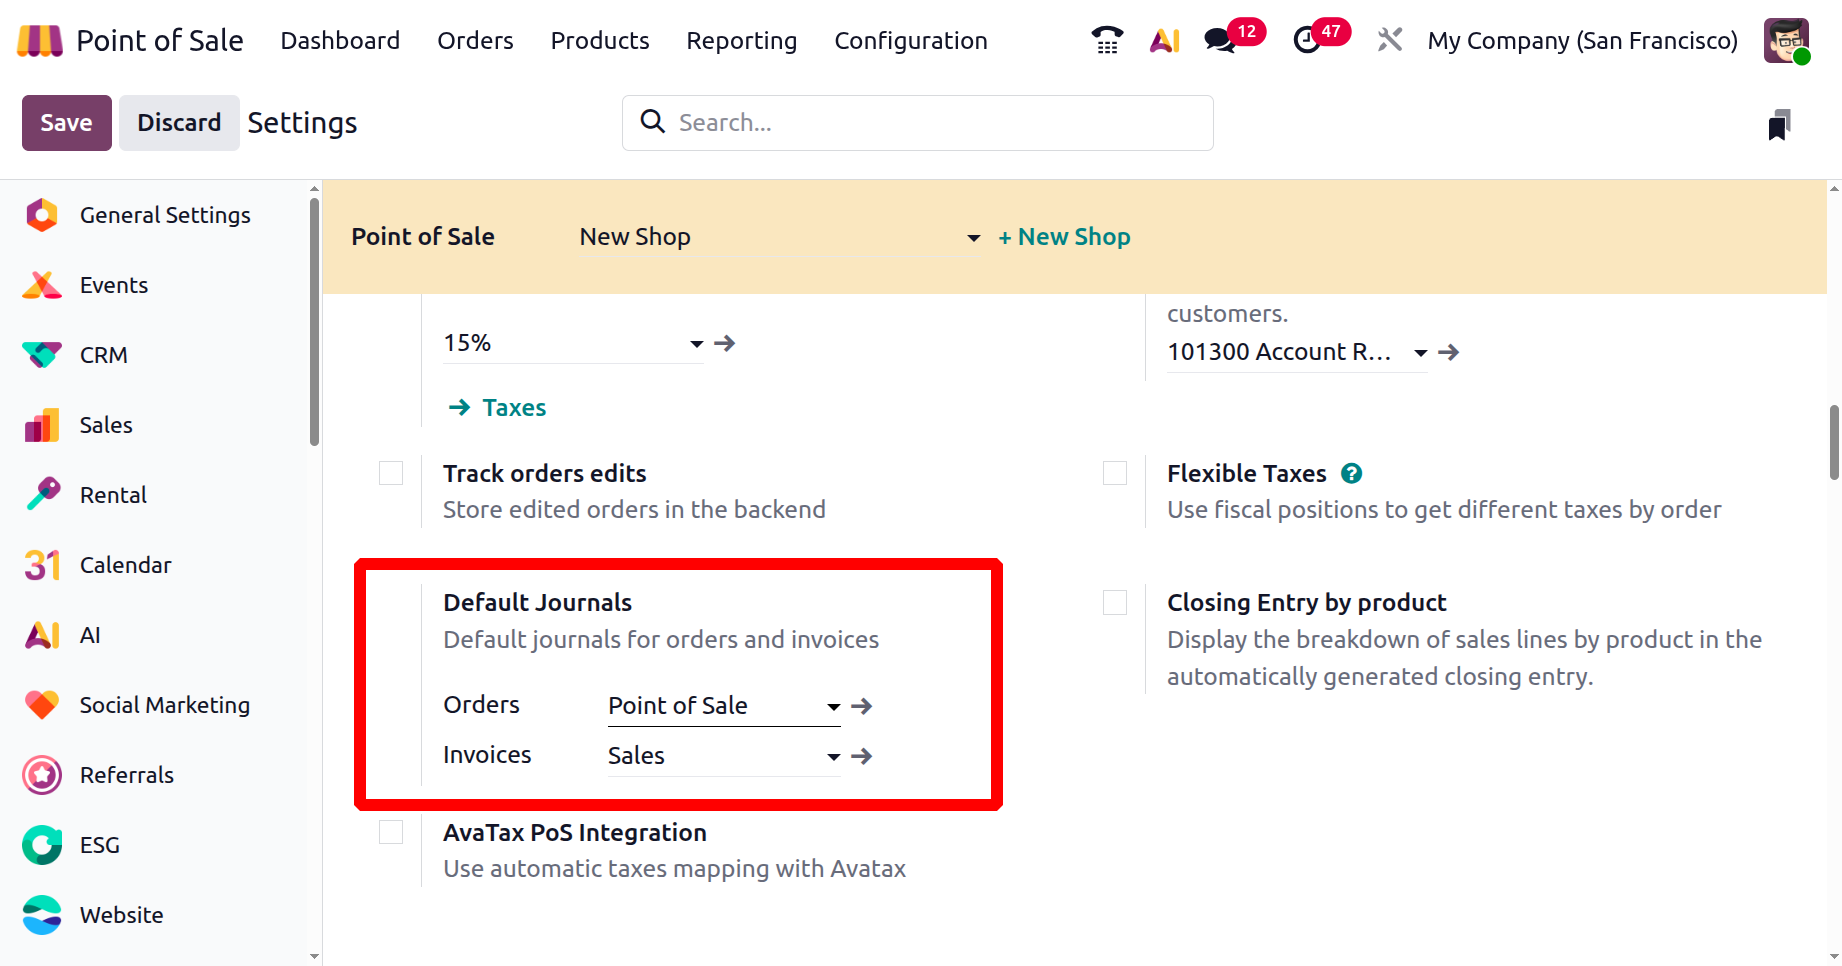
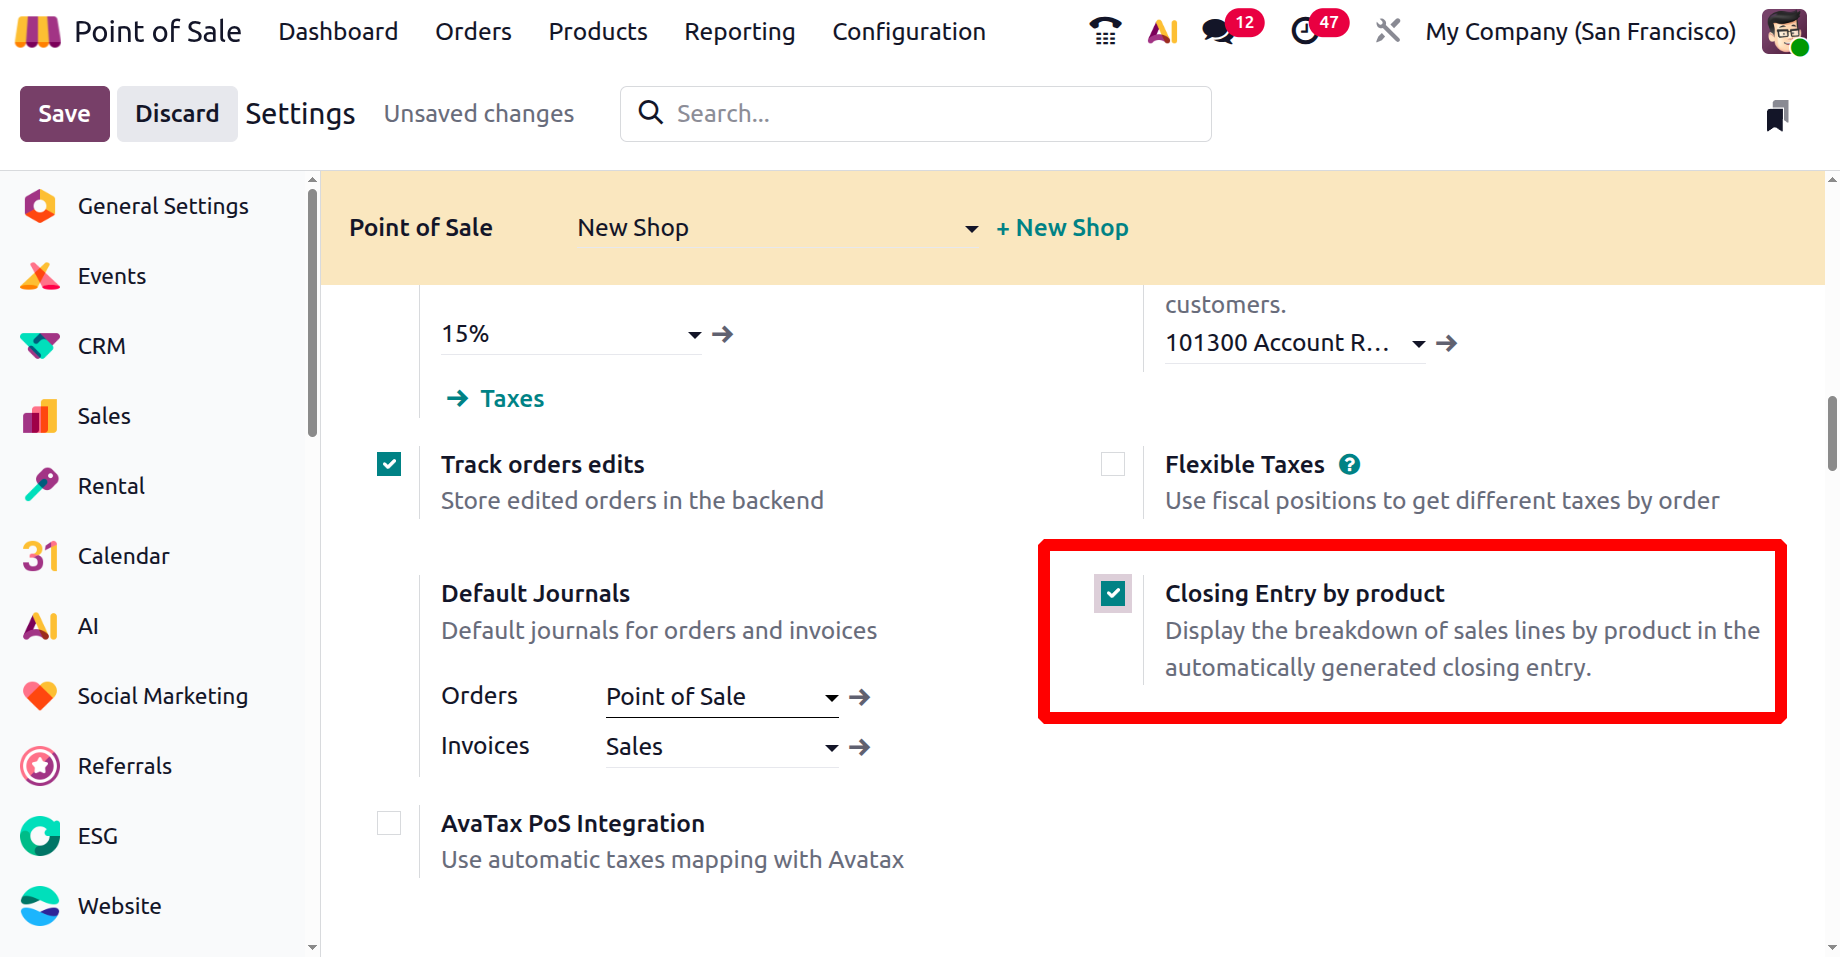
This section includes Default Sales Tax, Default POS Receivable Account, Track orders edits, Flexible Taxes, Default Journals, Closing Entry by product and AvaTax PoS Integration.
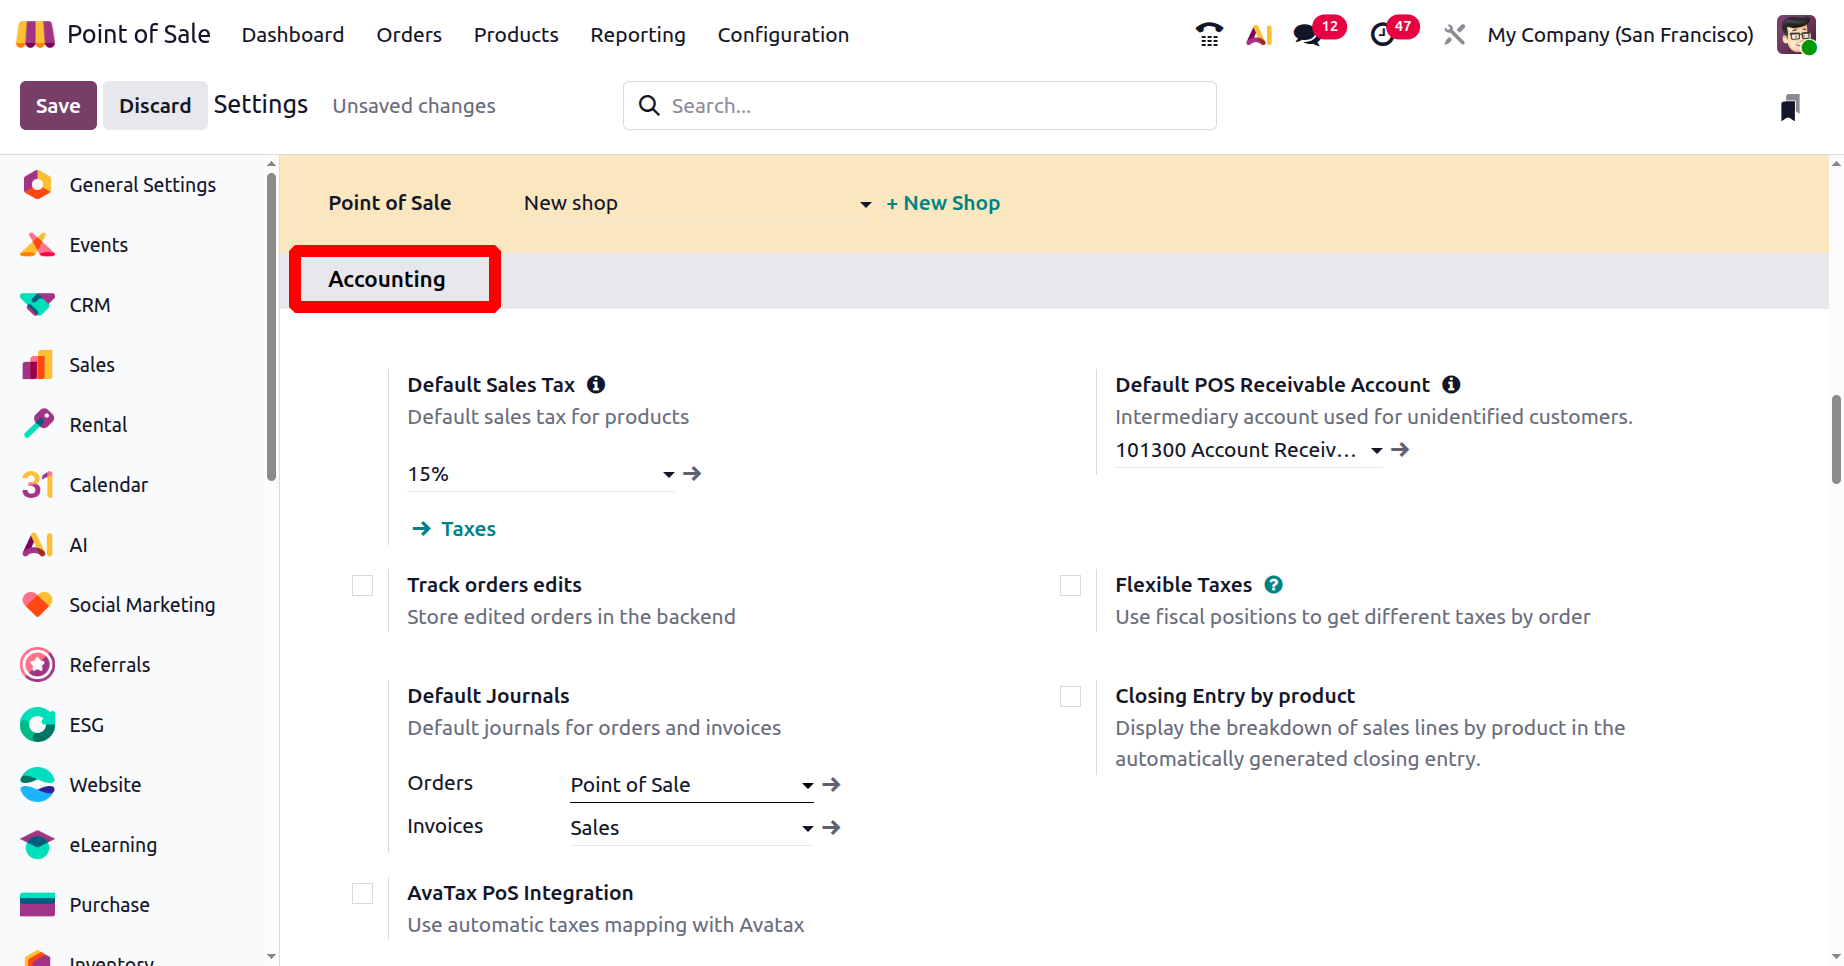
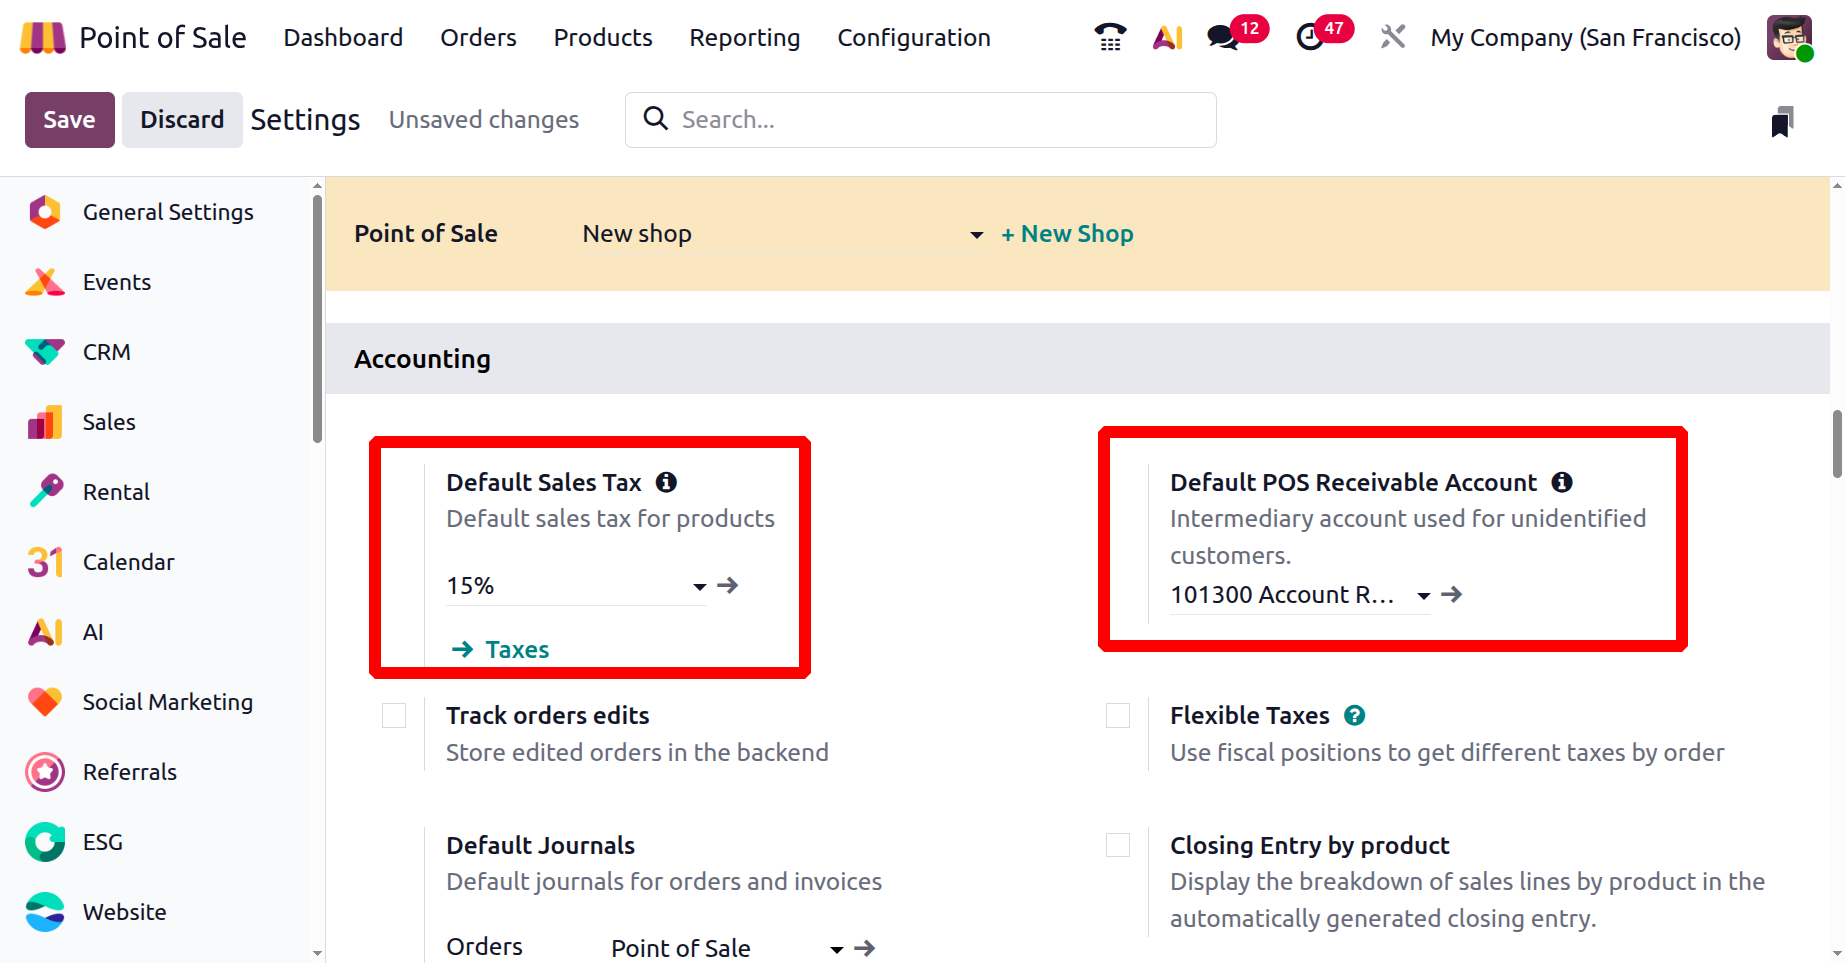
The Default Sales Tax field applies a standard tax rate across all PoS transactions. You can create or manage your company tax rates using the ‘Taxes’ link provided under the ‘Default Sales Tax’ field. The Default POS Receivable Account is used to log transactions from unidentified customers.
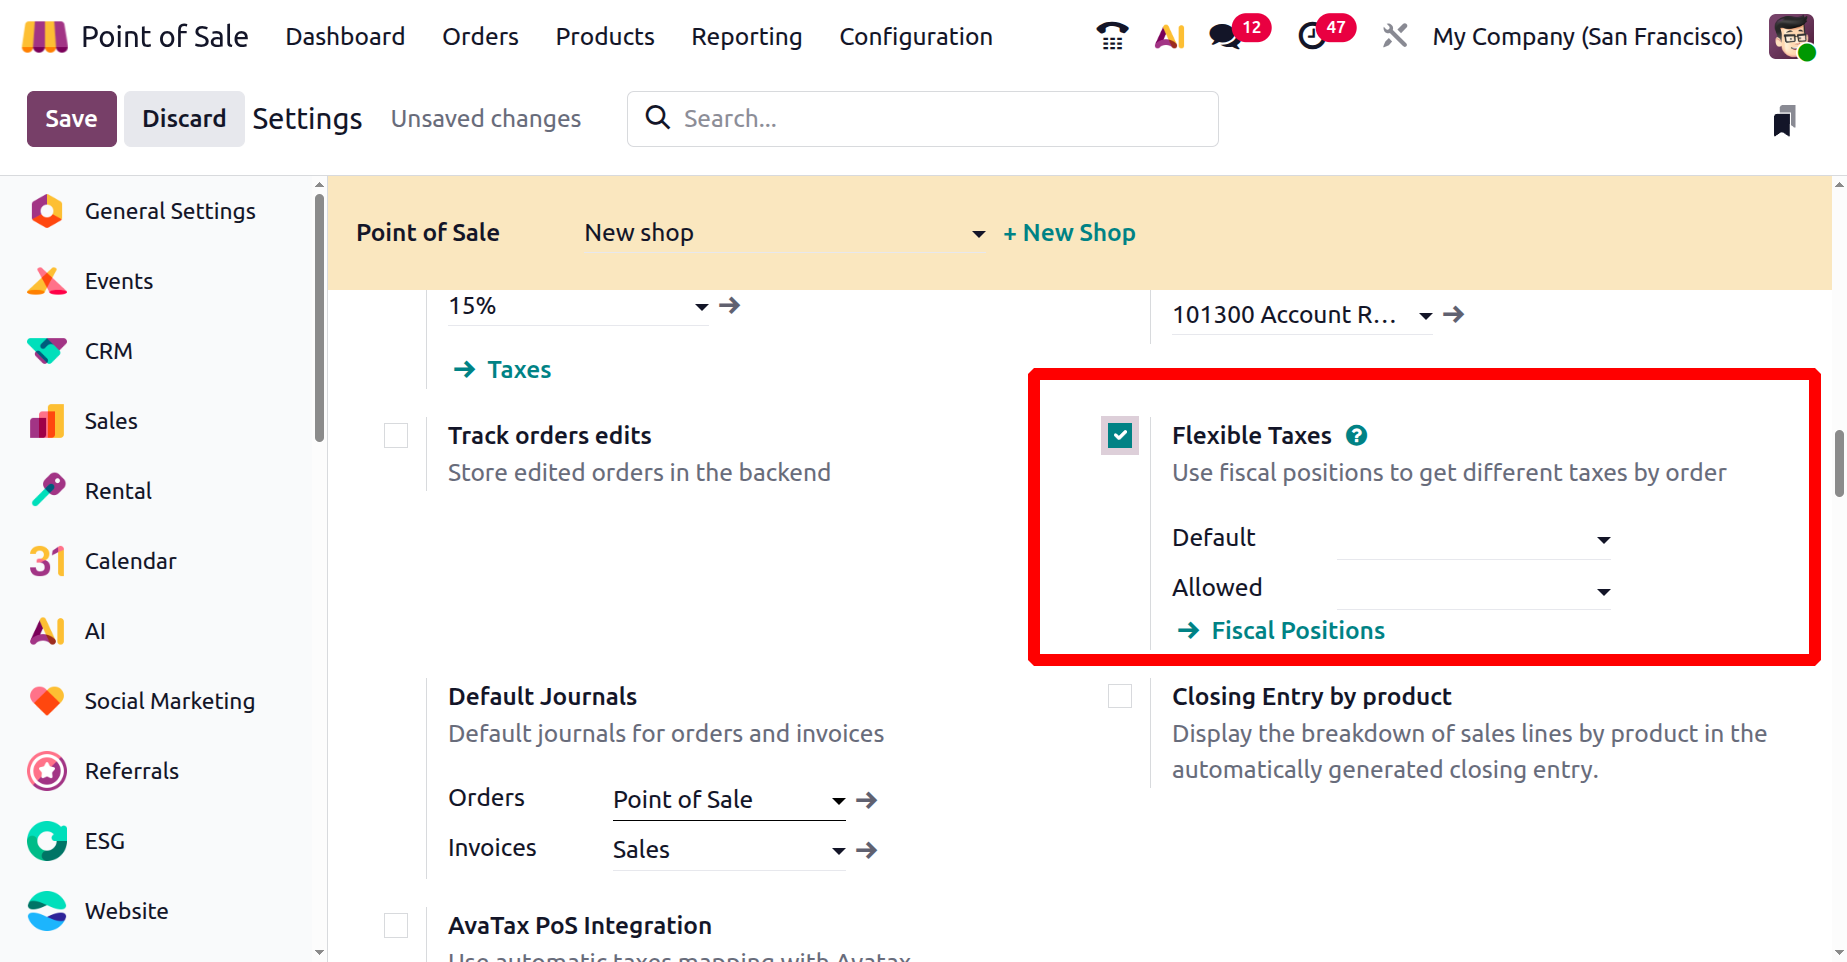
Flexible Taxes
By enabling Flexible Taxes, users can assign both a default and a list of allowed taxes to be used depending on the context.
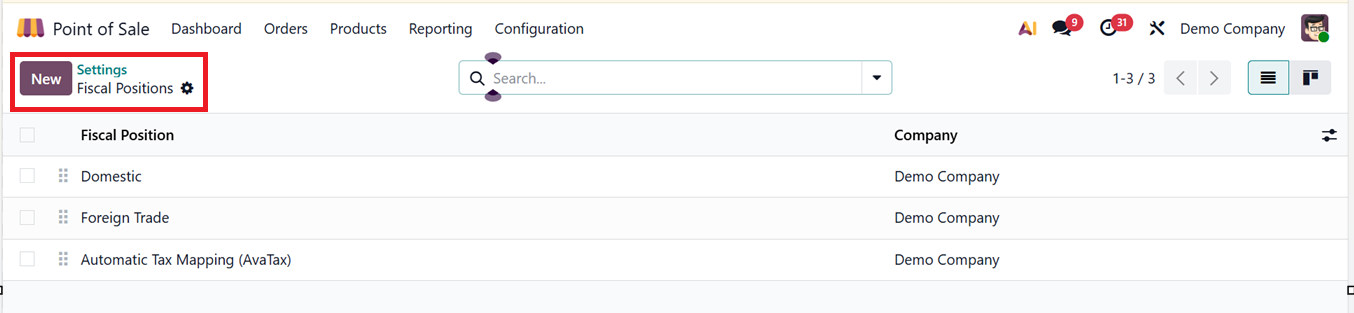
When configuring a Fiscal Position, you can click the “Fiscal Position” link, which brings up a dashboard of existing fiscal options, as shown in the screenshot below.
Creating a new fiscal position involves providing a name for the Fiscal Position, assigning it to a Company, and specifying applicable conditions.
By selecting the “Detect Automatically” option, Odoo can assign a fiscal position based on the customer’s location. This enables fields like “Country Group” and “VAT Required” to appear, ensuring accurate tax mapping for specific regions. The Foreign Tax ID field allows for manual entry of external tax numbers, and enabling the “Use AvaTax API” option activates automatic tax calculation via AvaTax, ensuring compliance across jurisdictions, as shown in the screenshot below.

Now, you can specify detailed tax replacements using the Account Mapping tab selecting which ‘Account on Product’ and ‘Account to Use Instead’ mentioning the accounts that applies to a product and what it should be replaced with depending on the fiscal position.

Inside the ‘Avatax’ tab, you can mention a ‘Avatax Invoice Account’ and a ‘Avatax Refund Account.’ These accounts will be used for taxes for invoices. Finally, you can provide any legal notes in the editing field.

Once these settings are saved, they can be accessed and managed through the Flexible Taxes settings area. Creation of Fiscal position is added in detail inside the Accounting module.
The Default Journals feature allows businesses to assign specific journals for all PoS ‘Orders’ and ‘Invoices.’ This ensures that accounting entries follow internal policies.
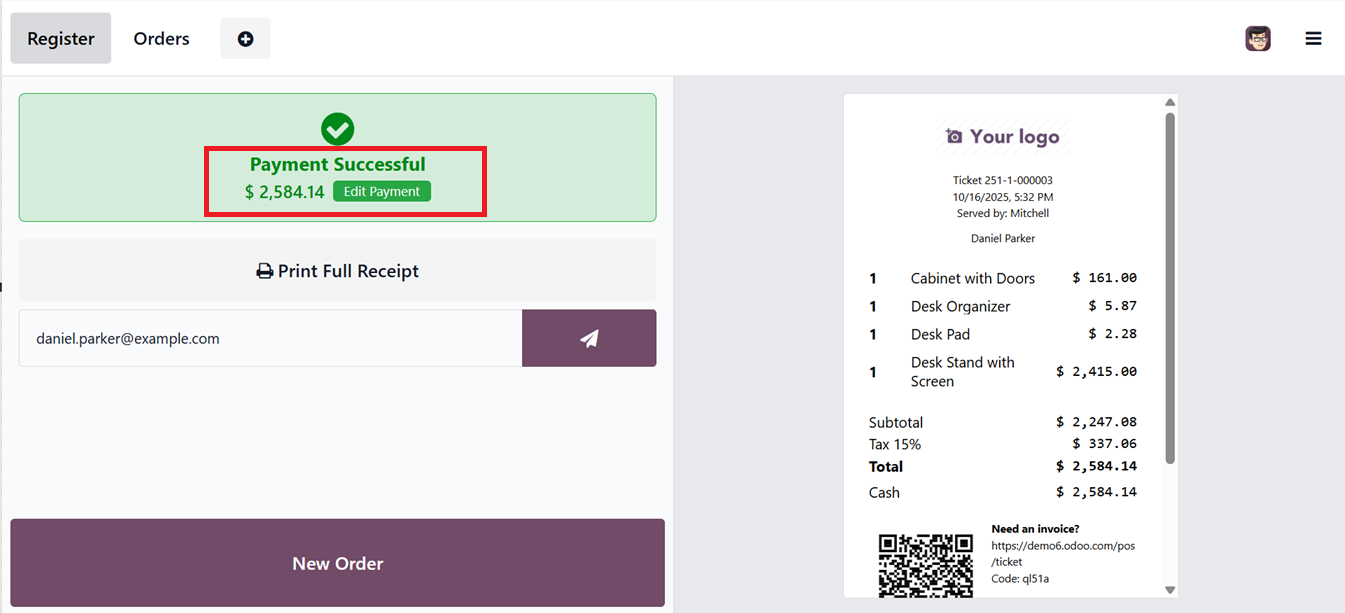
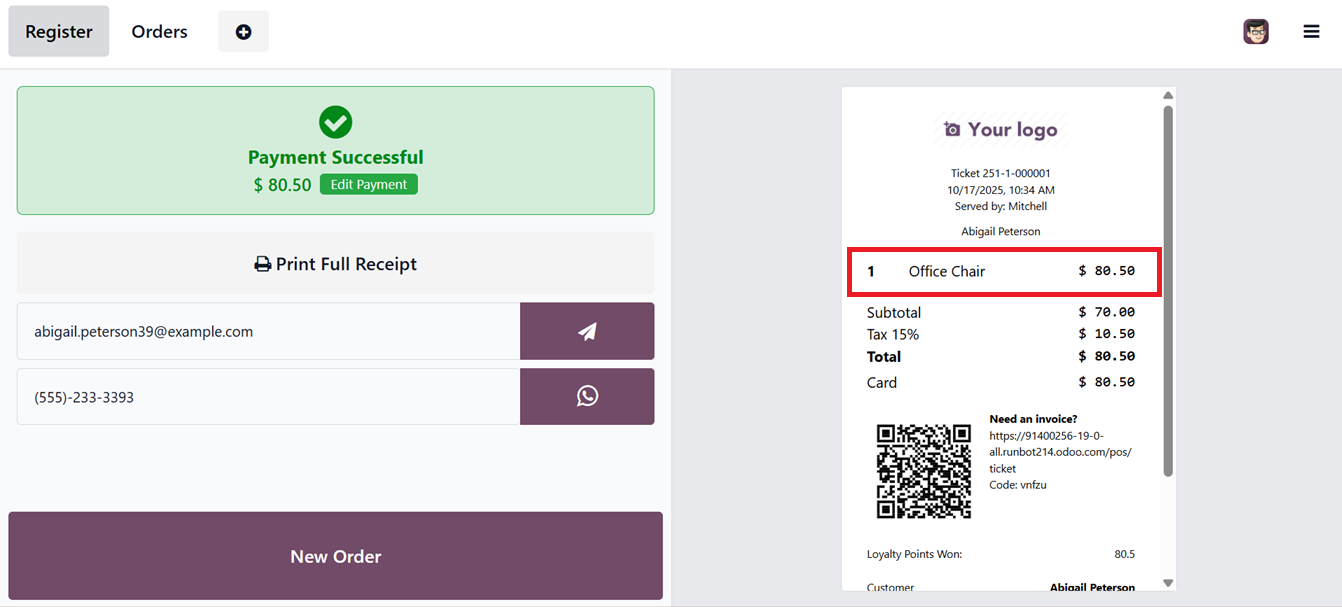
To track changes more accurately, enabling Track Orders Edit allows users to revise previously completed orders when necessary. For example, if you want to change any customer data or payment methods after an order is finalized, the cashier can reopen the order and change the specific data or any other required option using this feature.

To check this feature, let’s create a new POS Order and order the products. Then, proceed with payment by selecting the appropriate method and clicking the “Validate” button.
Once confirmed, complete the transaction. After completing the steps, the invoice or receipt will be generated. If Track Orders Edit is active, the system will display an “Edit Payment” option in the payment success window. This allows post-payment adjustments as per your required, as highlighted in the screenshot below.
This feature enhances transparency and enables better audit tracking for modified transactions. This ‘Edit Payment’ function allows users to modify an already completed transaction. Selecting this option will redirect to the Odoo backend's order editing window in the PoS section. Through this interface, you can alter any details such as the payment method, Customer name, Amount etc, as depicted in the screenshot below.

Once required fields are updated, the PoS terminal reflects the new payment method, and the amended receipt displays the changes accordingly. This editing feature is especially useful for correcting errors during payment validation. Furthermore, the updated transaction data can be accessed from the 'Orders' menu within the PoS module.
When the “Closing Entry by Product” setting is enabled, the closing record at the end of a session provides a breakdown of sales by product line, enhancing accountability and reporting accuracy.
Integration with Avalara’s AvaTax system is available through the AvaTax PoS Integration, which automates tax calculations in compliance with local and international tax rules.

The “AvaTax PoS Integration” feature seamlessly connects Odoo’s PoS system with Avalara's tax automation service. This enables businesses to compute region-specific taxes in real time, covering even complex scenarios like cross-border transactions and jurisdictions under United Nations charters. It also ensures compliance with ever-changing tax regulations by automatically updating tax rules and rates.
Sales
Odoo's Point of Sale configuration allows businesses to associate sales activities with specific Sales Teams. Through the configuration settings panel, you can set a particular ‘Sales Team’ by choosing the relevant team. You can access the existing list of sales teams or add new ones as per the requirements.
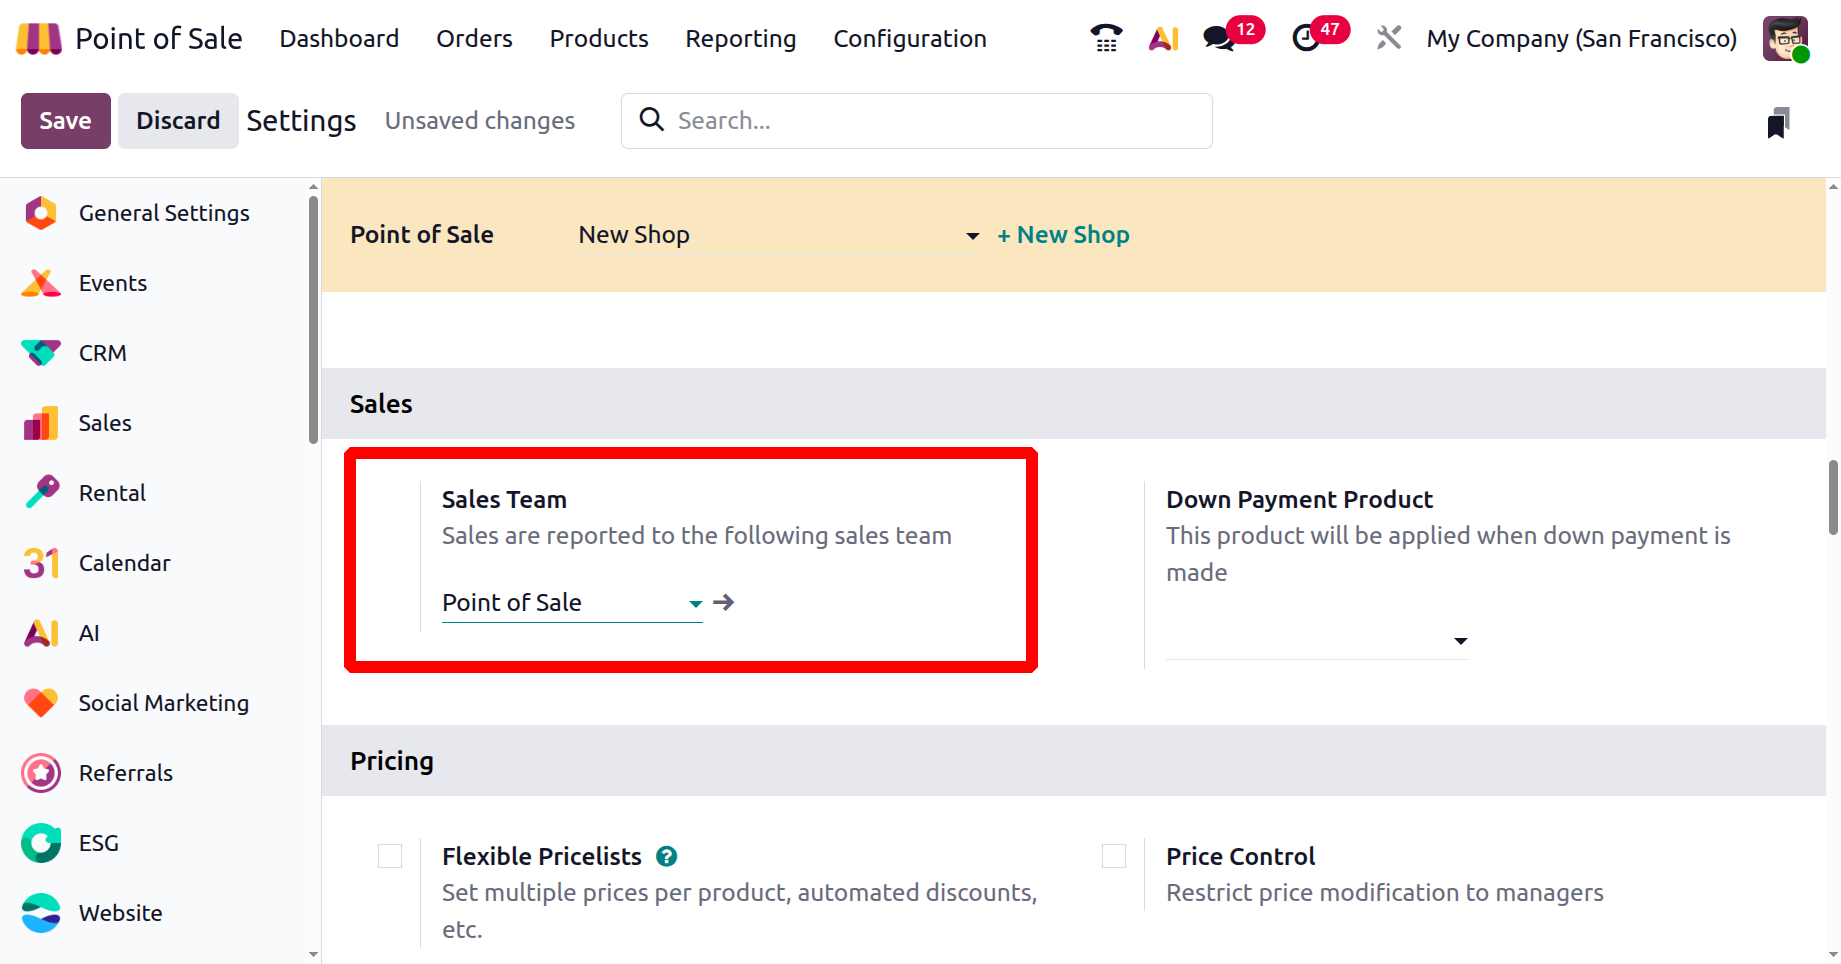
After mentioning a sales team, you can click on the interlink provided at the side of the team to open its form view and add or manage any team members. The form view allows for detailed team management, including adding members or modifying responsibilities, as depicted in the screenshot below.

Businesses can also assign sales teams to manage PoS operations directly from the ‘Sales Team’ settings window from the Sales Module.
In the Point of Sale's Sales Team settings, the 'Down Payment Product' option allows businesses to manage partial payments from customers before finalizing a sale.

This feature lets a customer select a specific product from a dropdown list to apply as a down payment on a sales order. This particular product used for the down payment can be set up and customized through the product configuration form.
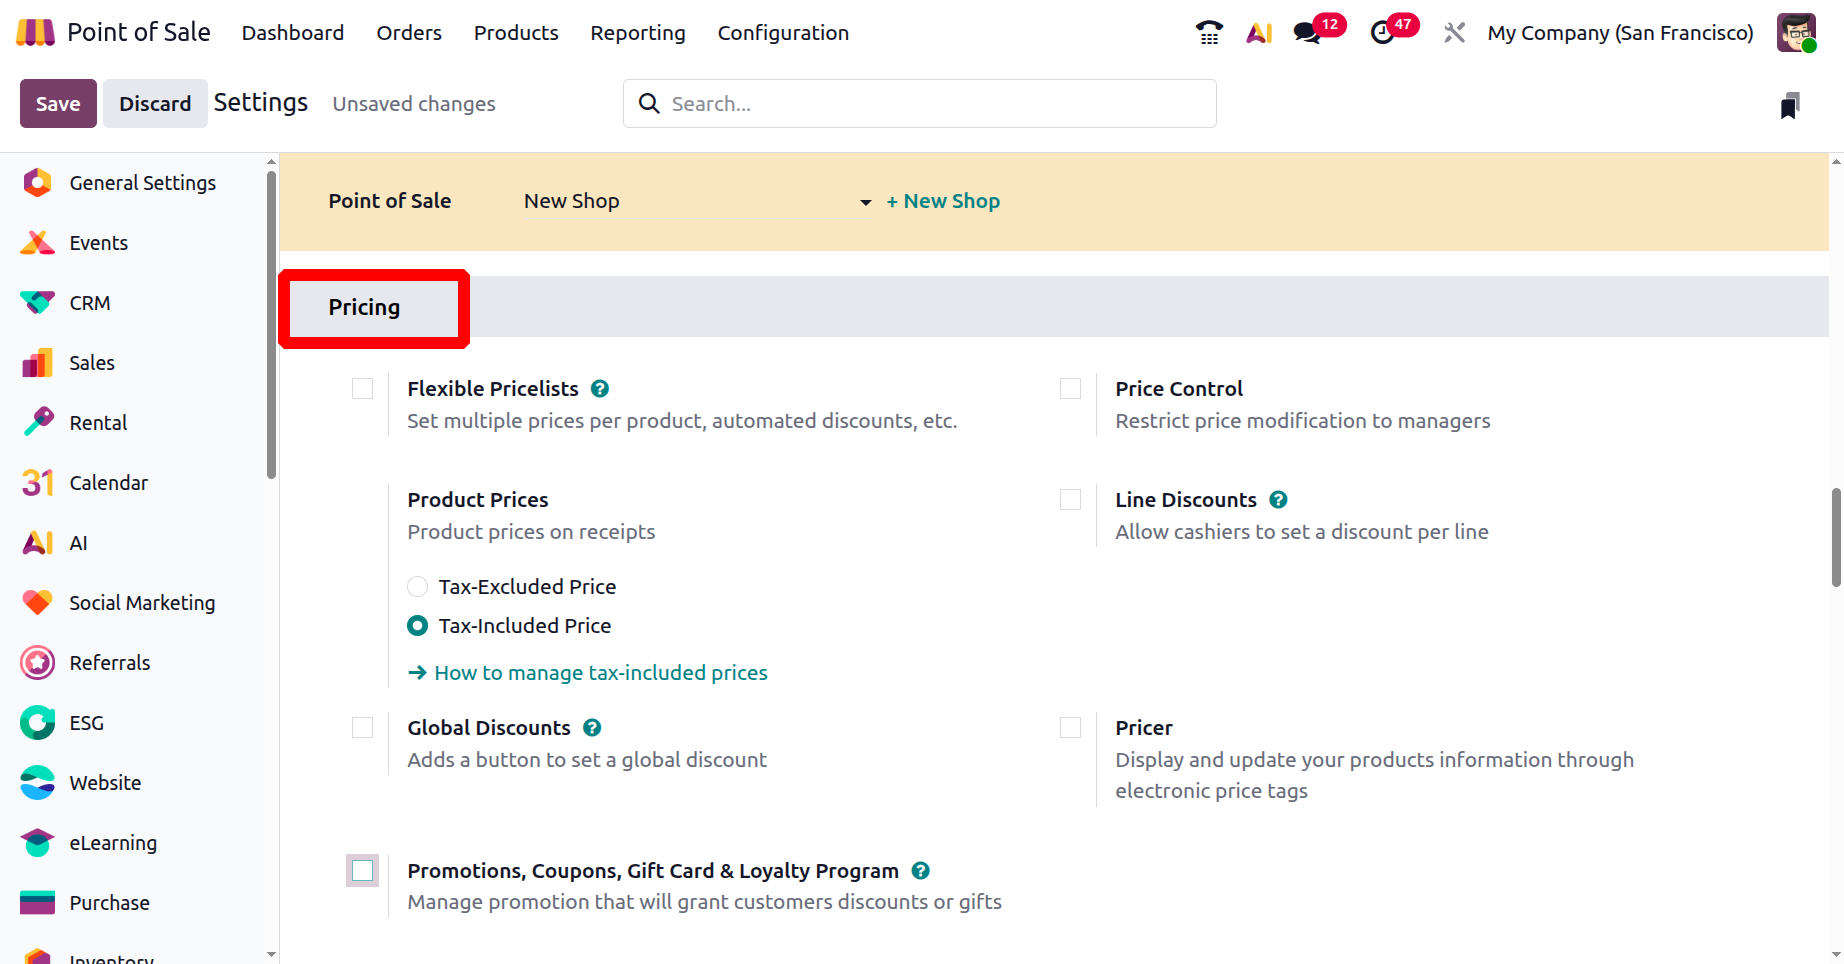
Pricing
In Odoo 19, the PoS module includes robust ‘Pricing’ configuration tools in its settings window. These settings allow businesses to apply tailored pricing strategies depending on customer type, promotional campaigns, or tax structures.
Businesses can assign various Flexible price lists,Product Prices, Price Control options, Line Discounts, Global Discounts, Pricer options, Promotions Coupons, Gift Card & Loyalty Program along with Tax-Included or Tax-Excluded Prices, as shown in the screenshot below.
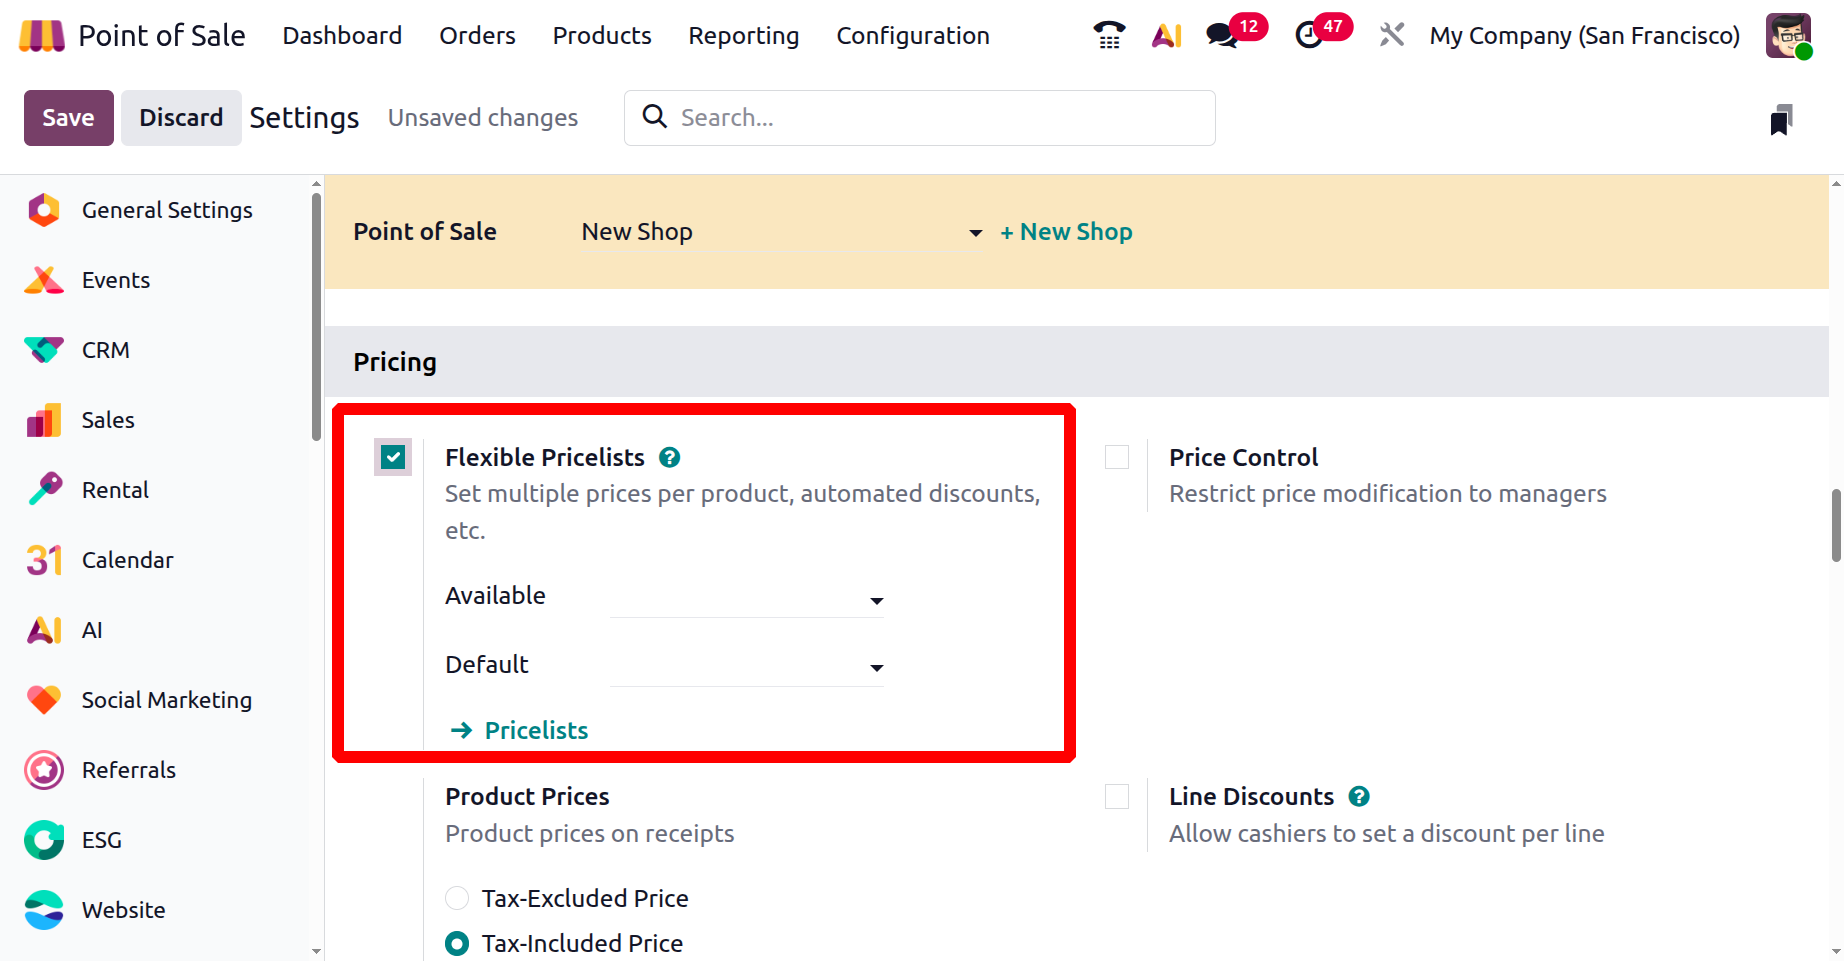
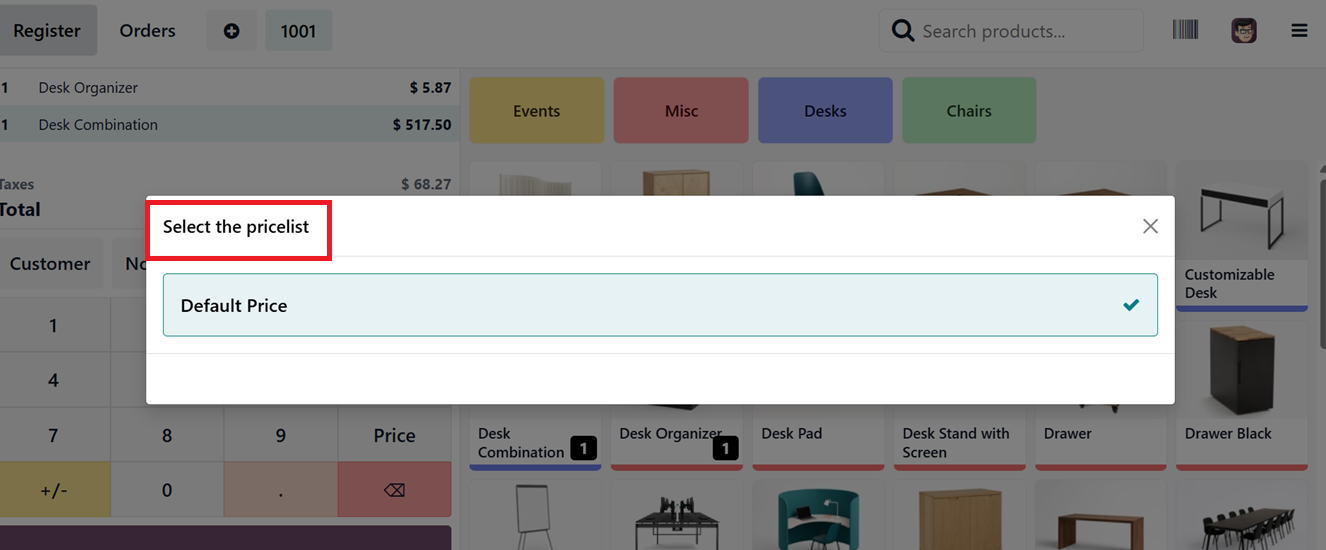
With the “Flexible Price Lists” feature, multiple pricing structures can be defined for individual products.
To check this feature, you can activate a PoS session and add products to the cart. Then, choose a relevant price list using the ‘Pricelist’ option under the ‘Actions’ button.
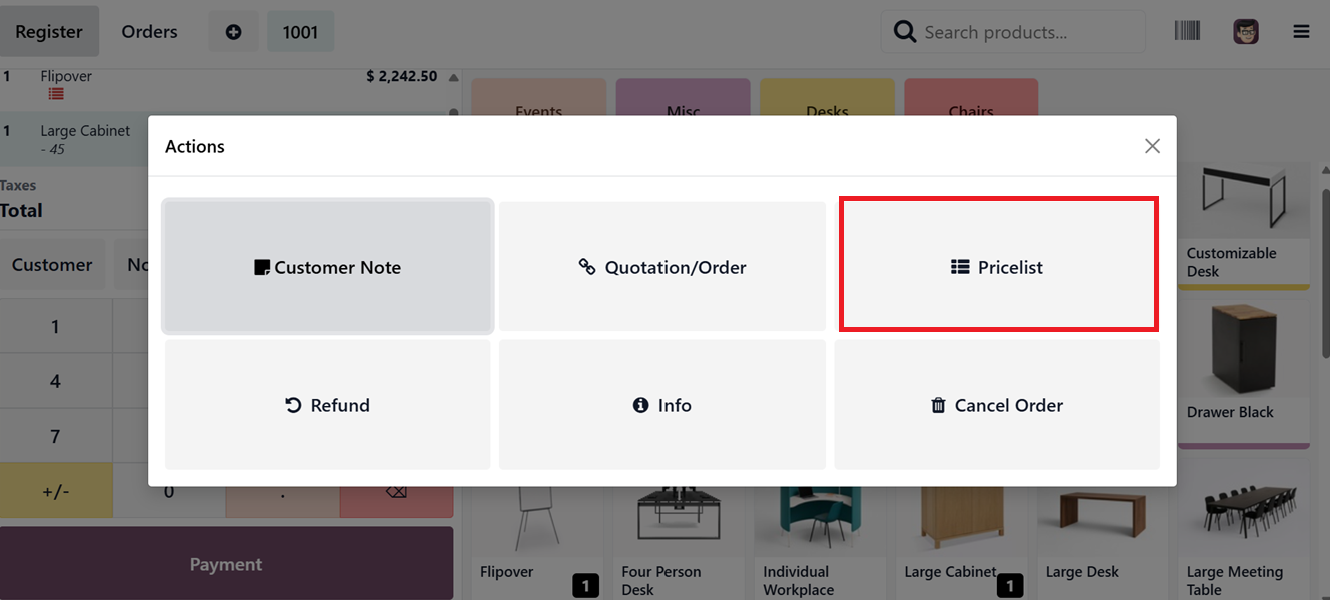
This will open the list of available pricelist options from where you can select the convenient option., as depicted in the screenshot below. So the pricing rules of the selected pricelist will be applied to the ongoing transaction.
Product Pricing
The ‘Product Pricing’ settings include two options ‘Tax-Included’ and ‘Tax-Excluded.’ Here, you can control how product prices are displayed on receipts after payment. This allows customers to choose their preferred pricing format.
- Tax-Included Price: Shows the final amount payable, with tax already factored in. This format is ideal for retail businesses where customers expect to see the total cost upfront.
- Tax-Excluded Price:Displays the product’s base cost before tax, with the applicable tax added during checkout. This method is commonly used in B2B environments.
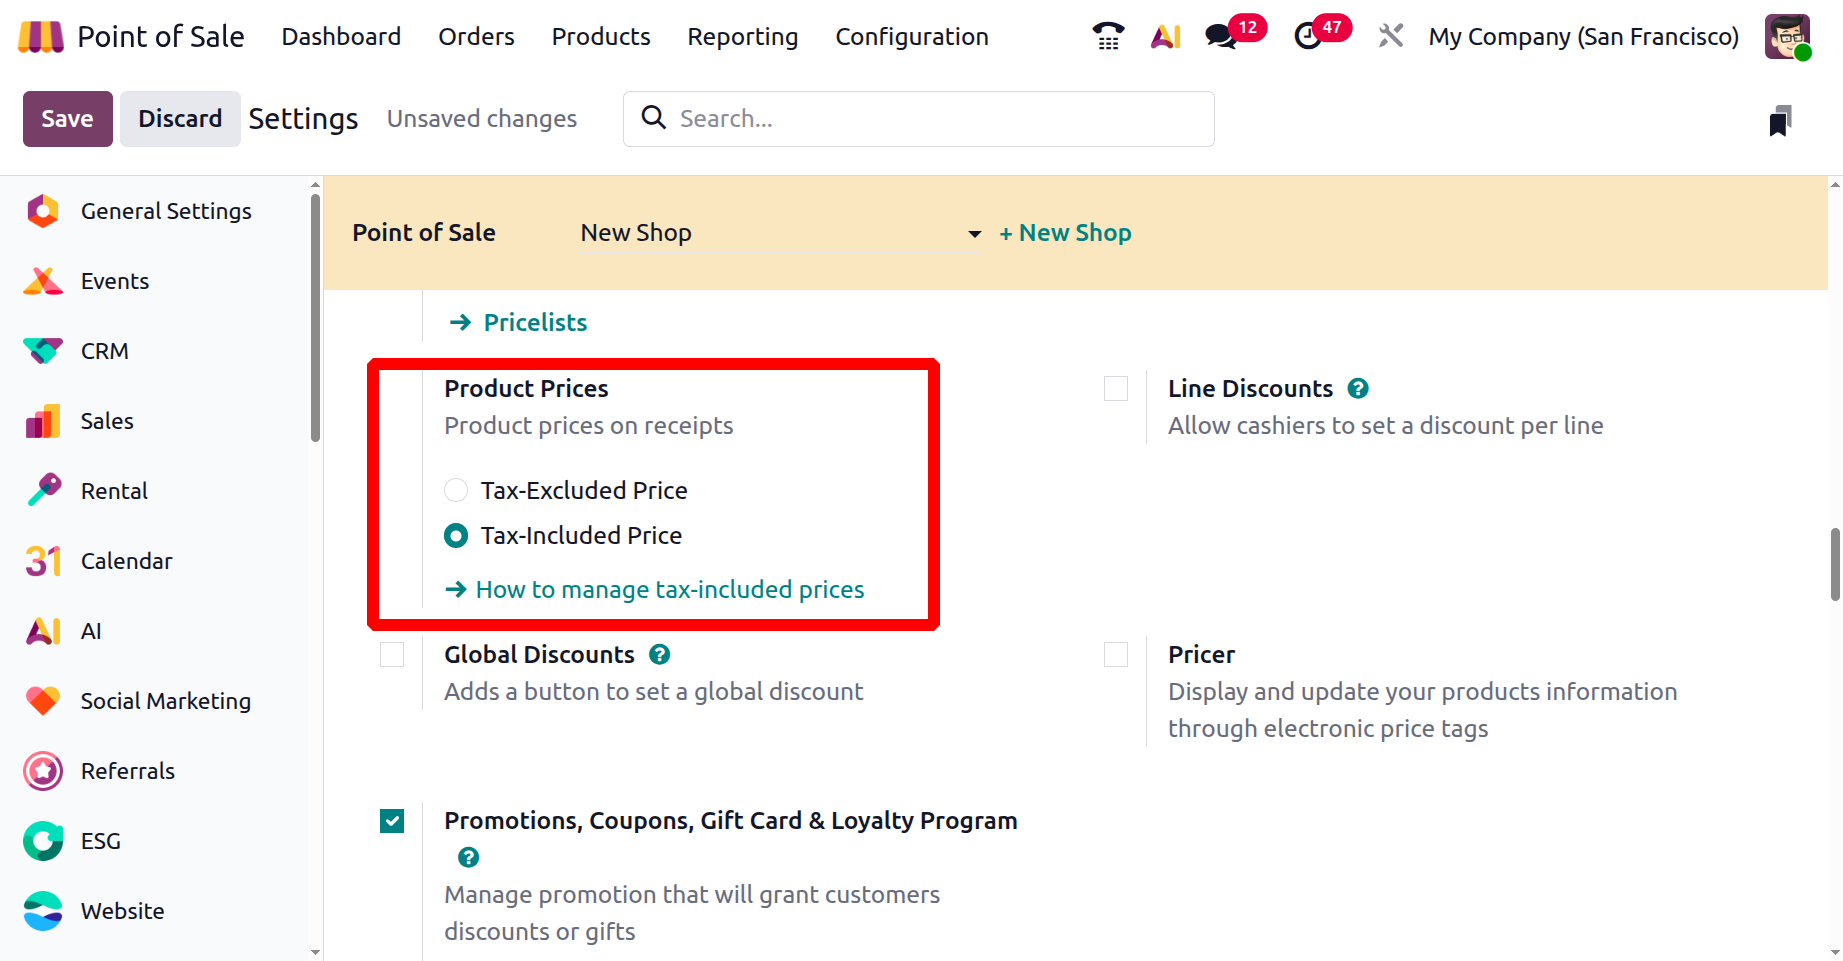
These pricing options provide flexibility to suit various business types and comply with local tax regulations, while also promoting transparency and regulatory adherence.
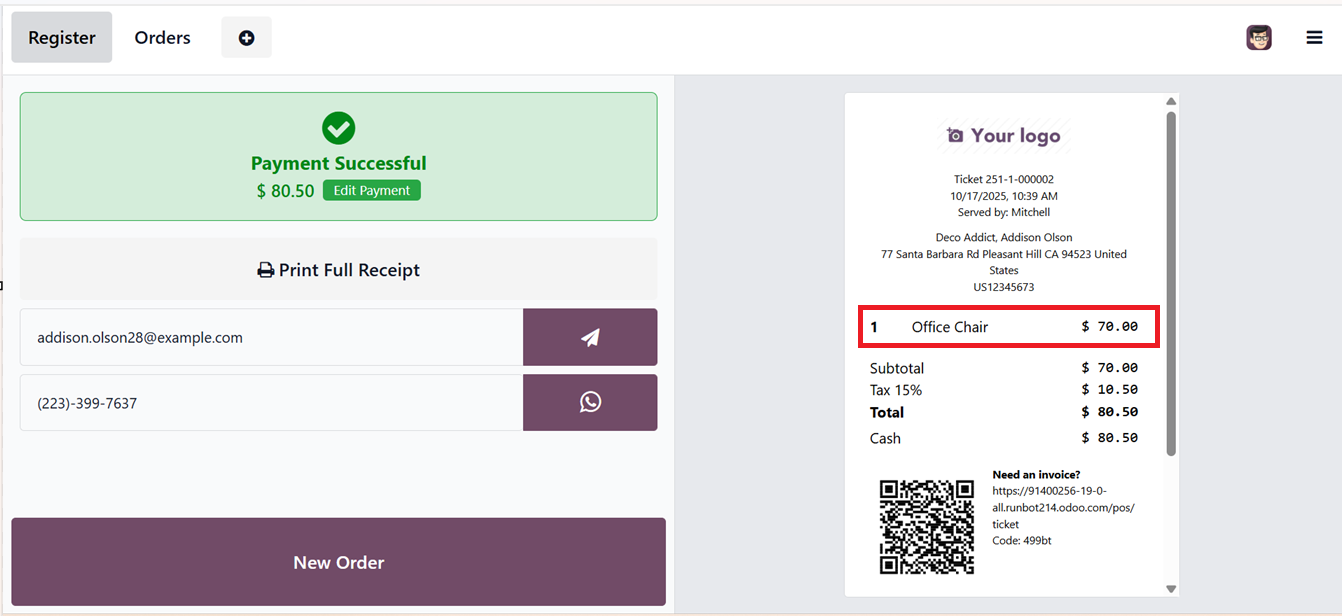
To illustrate how this feature works, you can open a product's settings form and input a Tax-Excluded Price. For example, setting a product's base price at $70 with a 15% tax rate will result in a Tax-Included Price of $80.50.
After adjusting the Point of Sale (PoS) settings to use ‘Tax-Excluded’ pricing and initiating a new transaction, the product lines will show the pre-tax price of $70. The tax will then be calculated and added separately in the "Total" section on the PoS screen, as shown in the following screenshot.

Once the payment is confirmed, the customer receipt will also display the tax-excluded price. However, the subtotal will reflect the total amount including the applicable tax, as shown in the screenshot below.
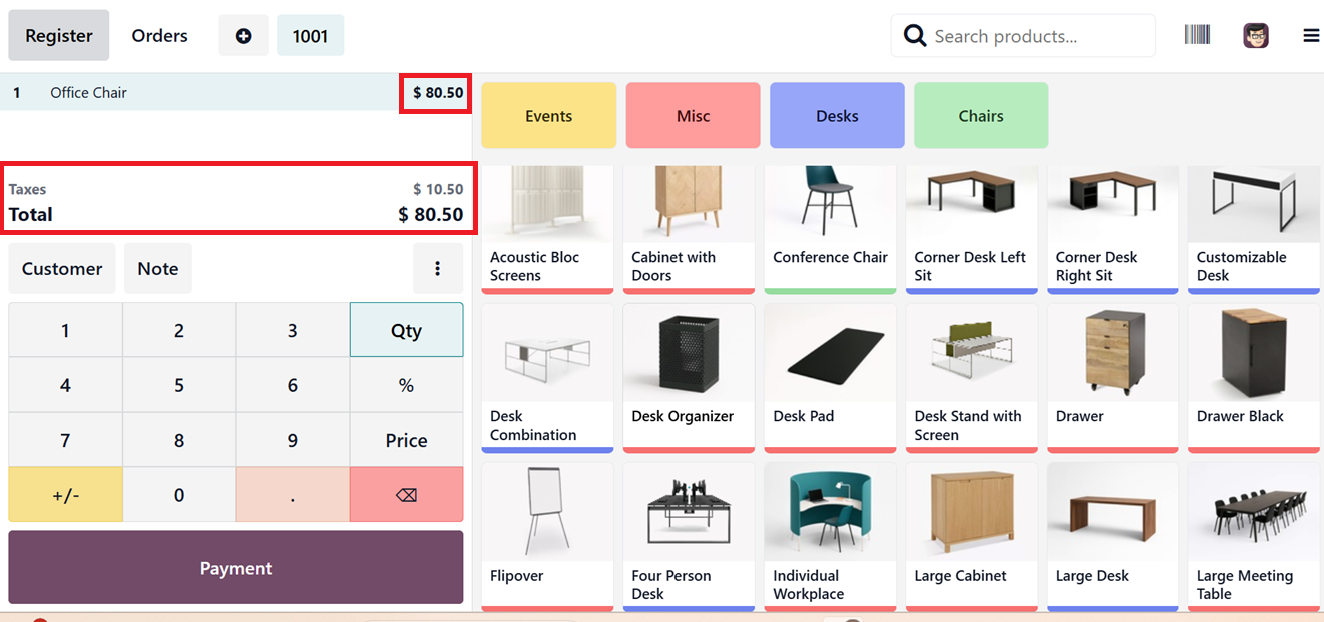
In the ‘Tax-Included’ scenario, the product lines will show the tax-included total amount in a POS sales interface. But the ‘Total’ amount will be affected by the tax rate, as shown in the screenshot below.
After validating the payment, the customer invoice will also show the difference of tax included rate of the product with the tax rates, as depicted in the screenshot below.
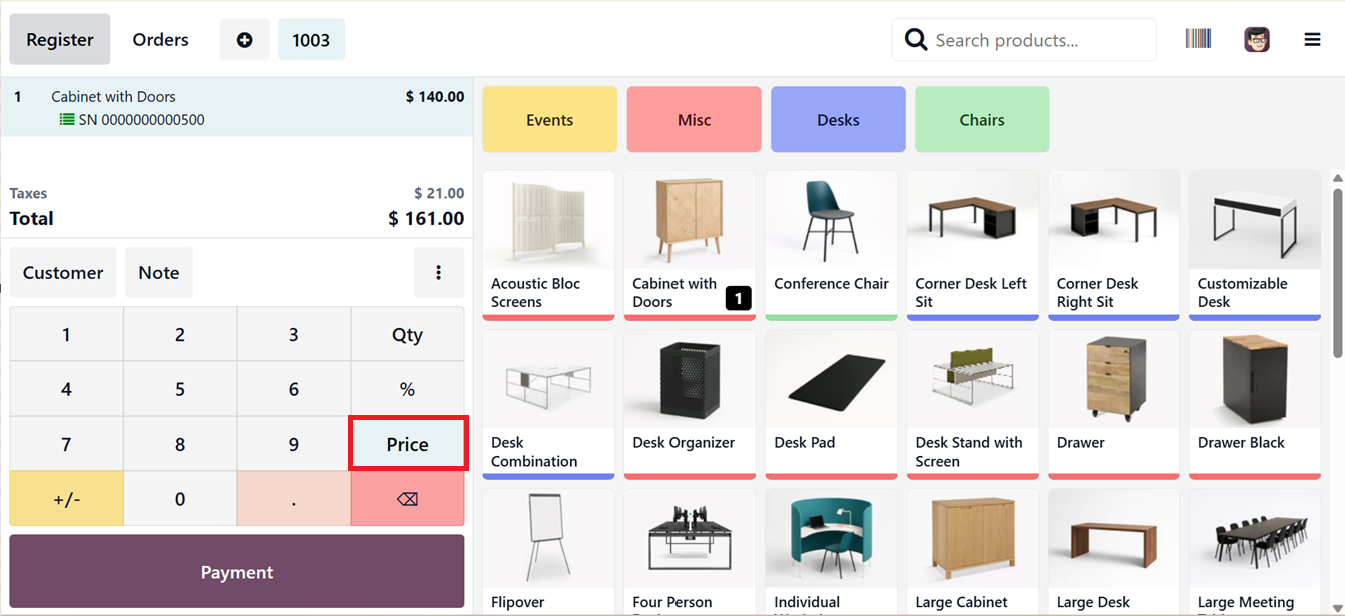
The ‘Price Control’ feature limits the ability to modify product prices during a PoS session to authorized managers only.
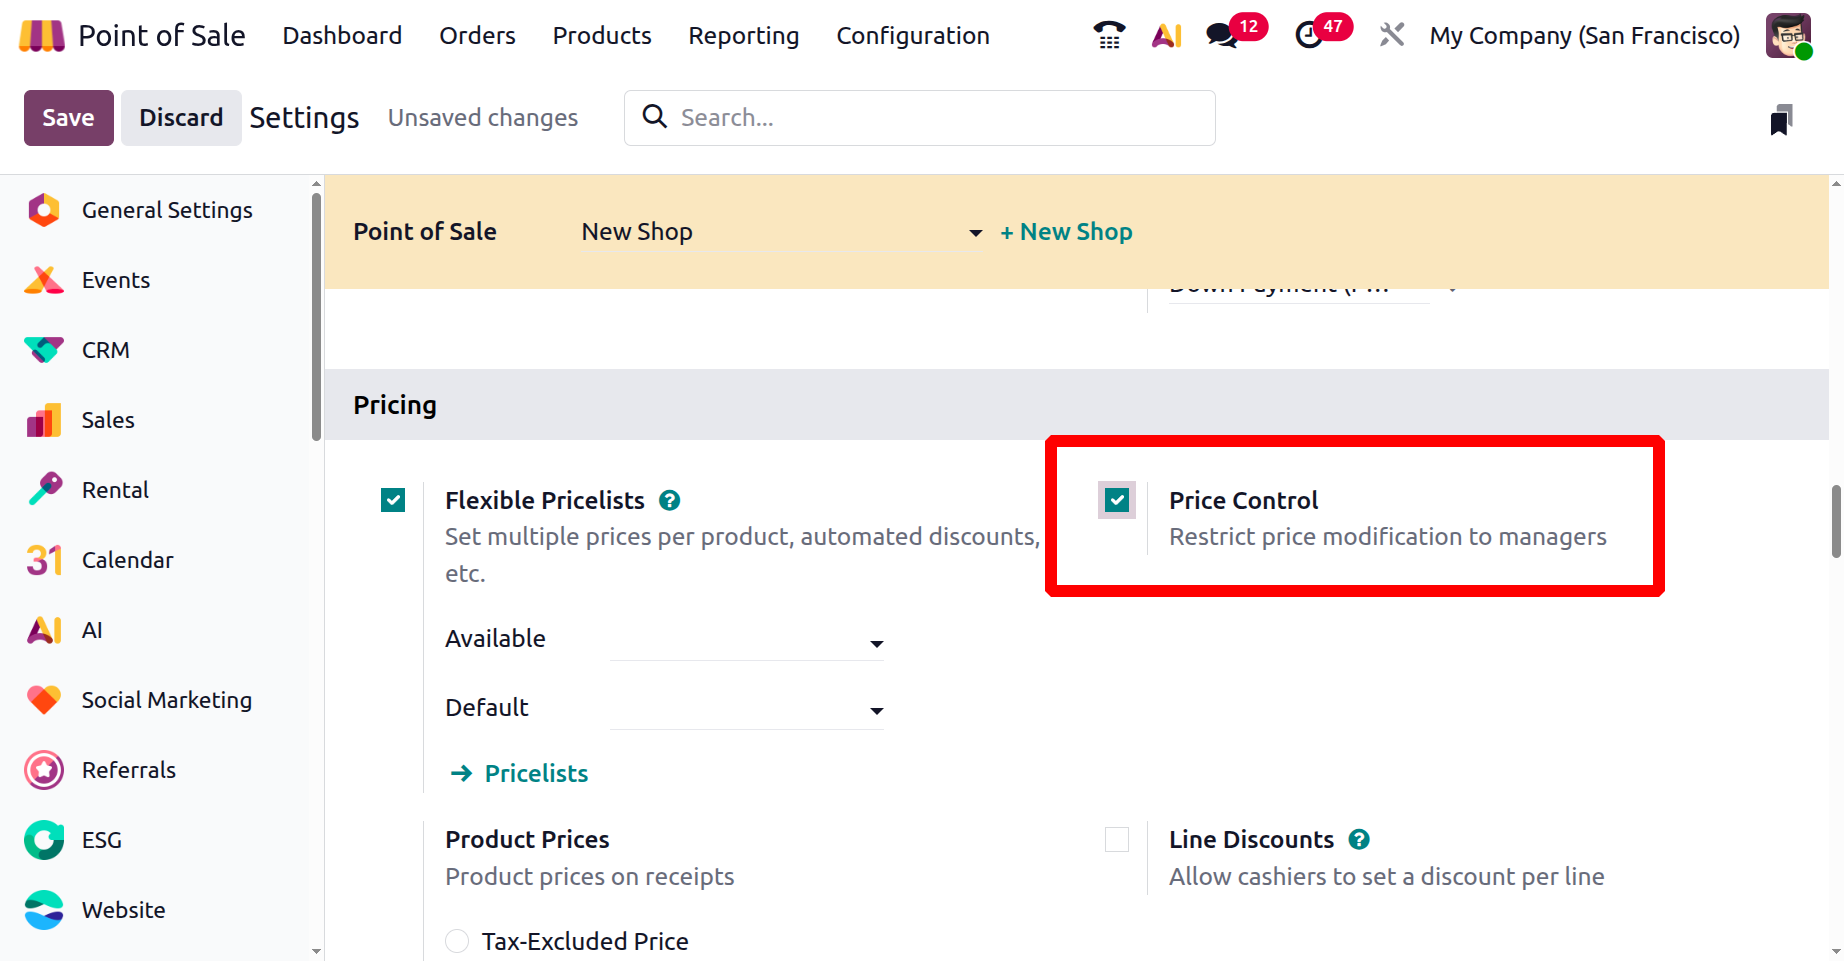
Once this option is activated, users with the appropriate permissions can edit new discount prices by clicking on the ‘Price’ button during a sales transaction, as depicted in the screenshot below.
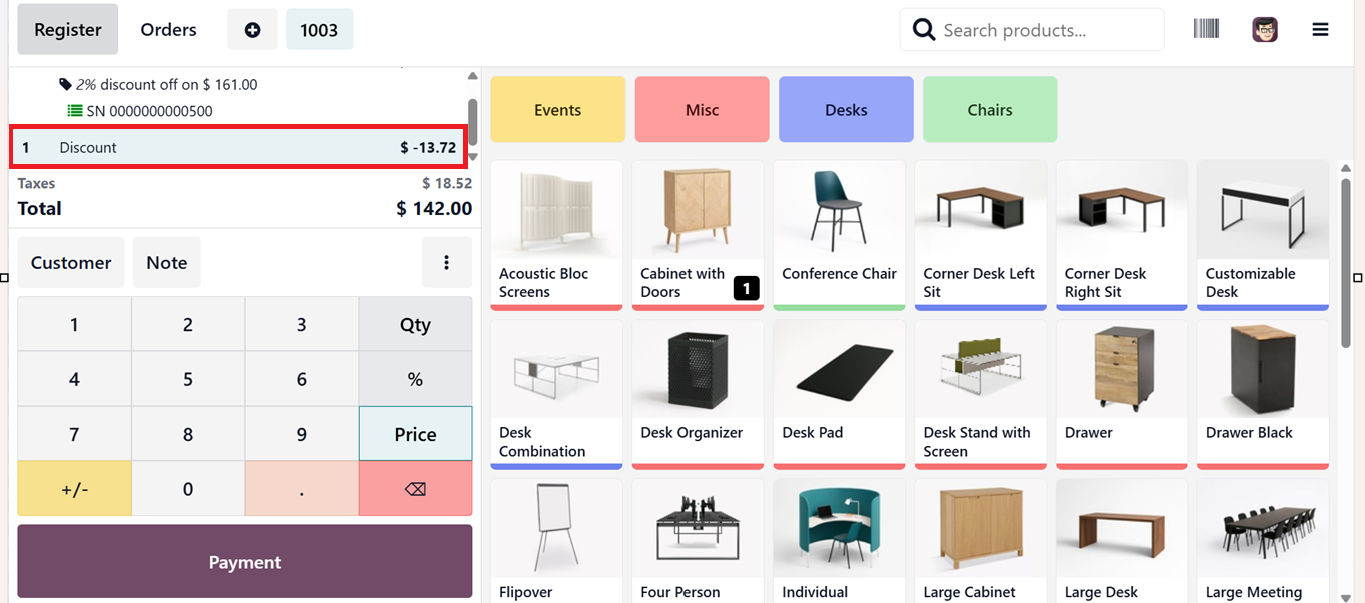
Activating the ‘Global Discounts’ feature allows businesses to define a default discount percentage and assign a specific ‘Discount Product’ applicable to all customers.
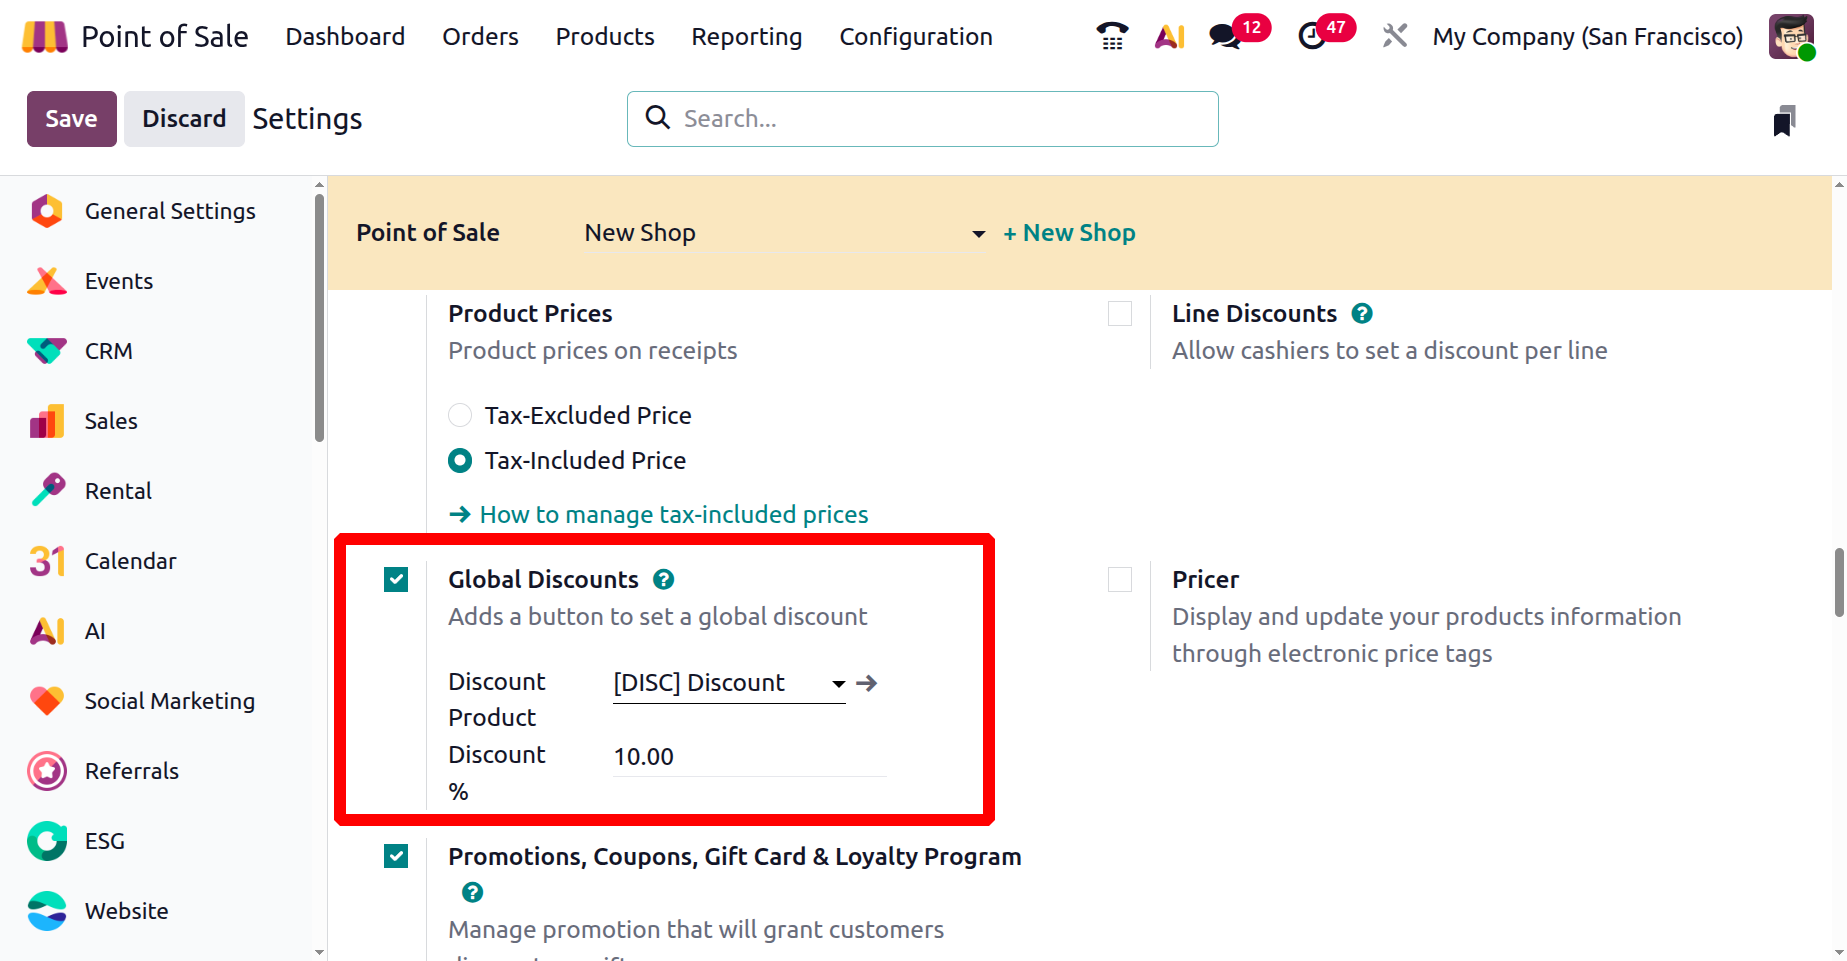
Within the Products menu, discounted items can be created and managed just like any regular sales product. To apply a discount, you can open a PoS order, select the desired items, and apply the discount by choosing the ‘Discount’ option from the ‘Actions’ menu.
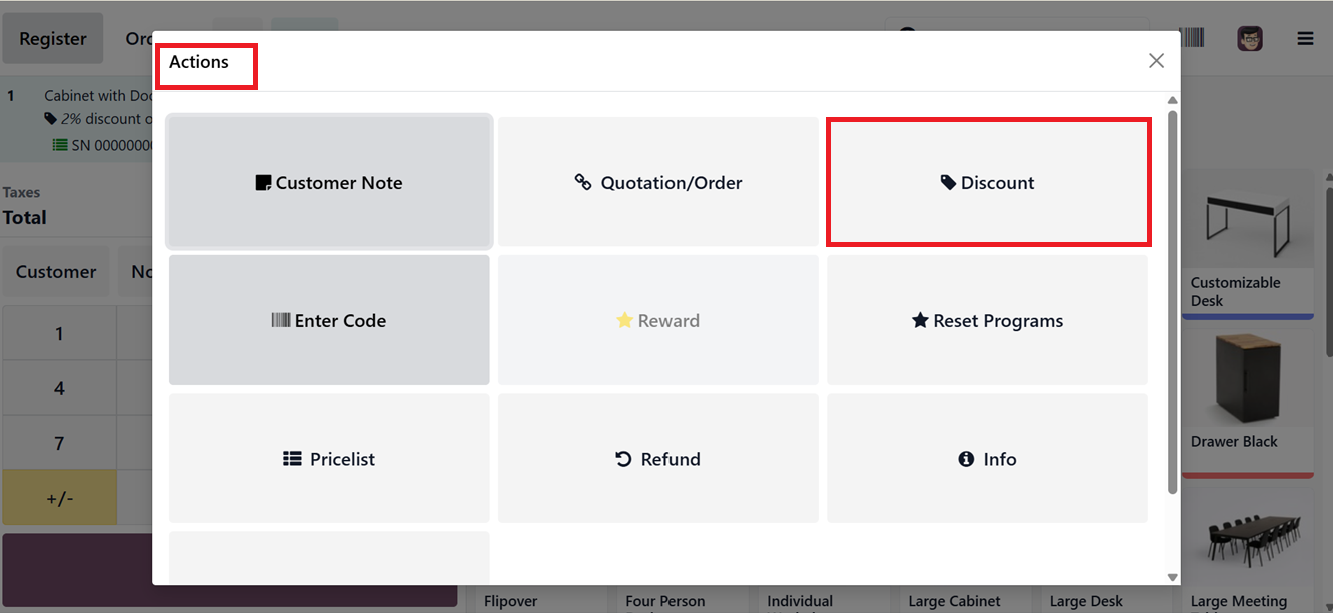
You can specify and adjust the discount rate using the ‘Discount Percentage’ field. After setting the discount percentage, click on the ‘Ok’ button, as depicted in the screenshot below.

After setting the discount, it will display the product line of the POS sales interface as well as in the customer receipt.
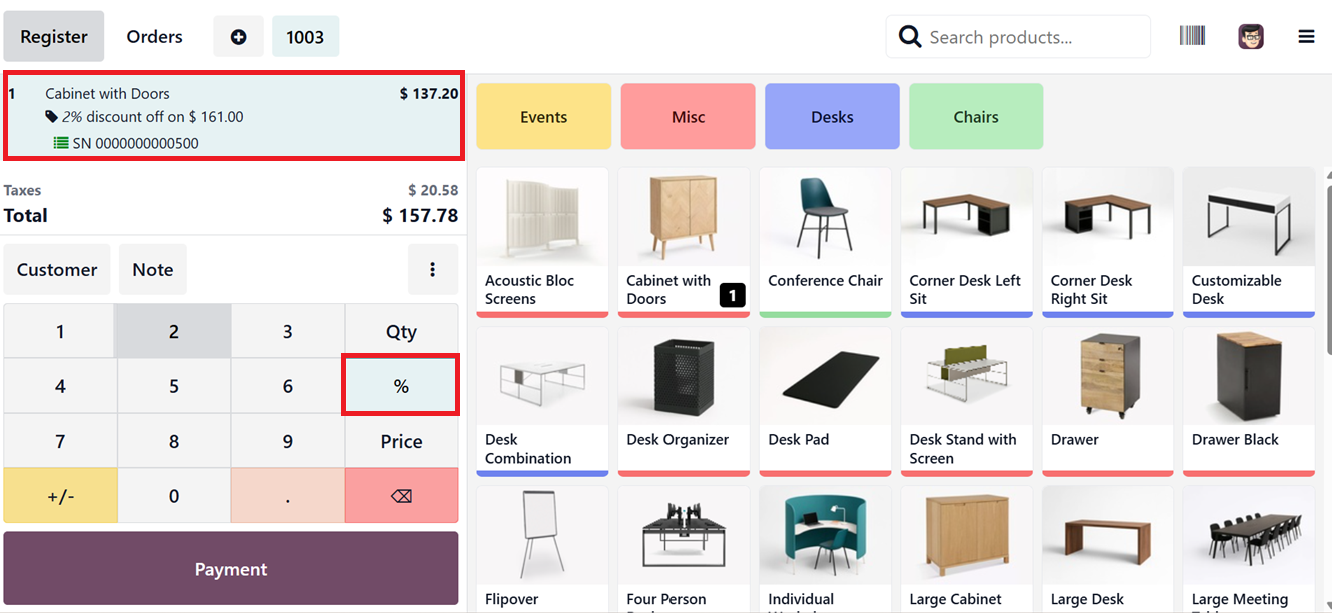
Alternatively, the 'Line Discounts' feature allows cashiers to apply discounts to individual product lines.

Employees can select a product, click the discount icon (%), and enter a percentage (e.g., 2%) to apply to that item alone. This offers more precise control for targeted promotions or negotiated pricing, as shown in the screenshot below.
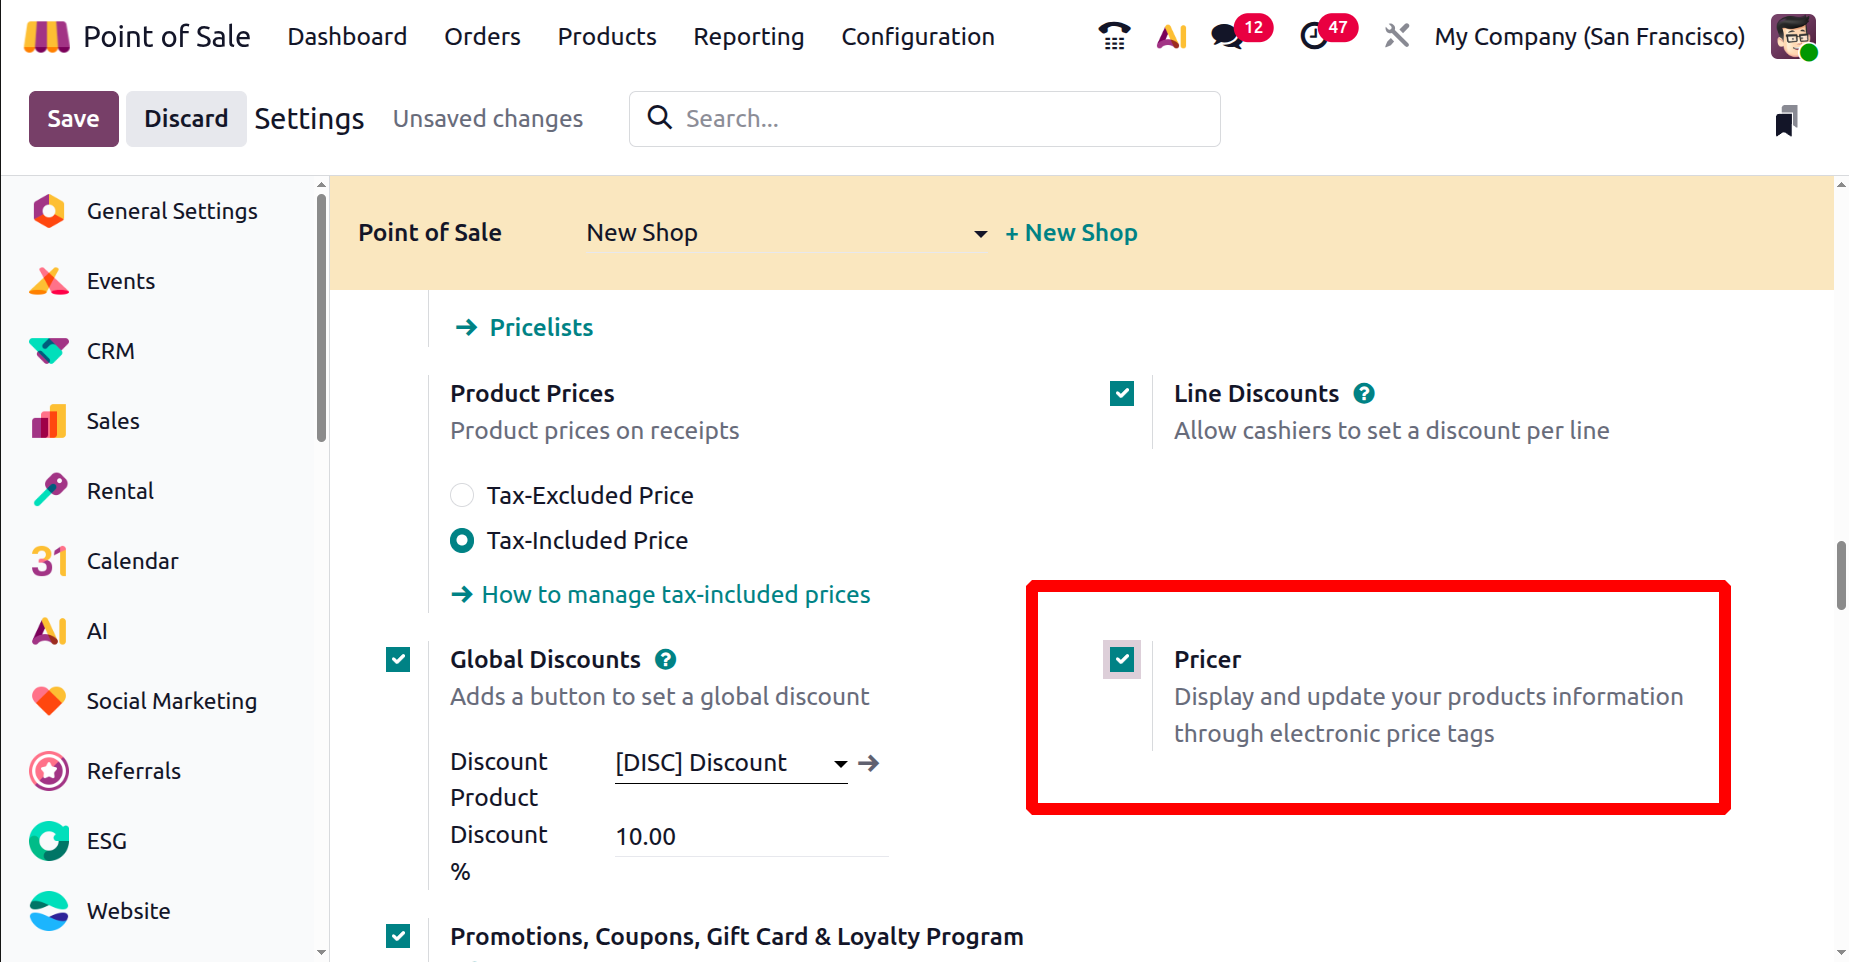
The ‘Pricer’ Settings feature enables the use of electronic price tags, allowing product data such as prices, names, and inventory levels to sync automatically with electronic shelf labels. This real-time synchronization ensures pricing accuracy on shelves, reduces manual errors, and improves operational efficiency in-store.
Finally, the ‘Promotions, Coupons, Gift Card & Loyalty Program’ feature allows you to set up different promotional offers and discount programs.

This feature was explained in the previous chapter, so please refer to it for more details.
Bills & Receipts
The “Bills & Receipts” tab of the Settings window provides tools for customizing sales documents. Businesses can customize various customer bills & receipt aspects to speed up checkout.
Available settings options include “Custom Header & Footer,’ ‘Automatic Receipt Printing,’ ‘SMS Enabled,’ ‘Self-service invoicing,’ ‘Basic Receipt' and ‘WhatsApp Enabled’ features, as depicted in the screenshot below.

The ‘Custom Header & Footer’ option lets businesses add personalized messages to the top and bottom of invoices and receipts, as shown in the screenshot below.

Once set up, these messages will appear on printed receipts, as shown in the screenshots below.


When ‘Automatic Receipt Printing’ is enabled, the receipt is printed as soon as the payment is completed. So, the usual payment confirmation or receipt preview screen will be skipped.

Instead, the receipt is generated instantly, allowing you to print it right away. The amount paid will still be visible on the screen, as shown in the screenshot below.

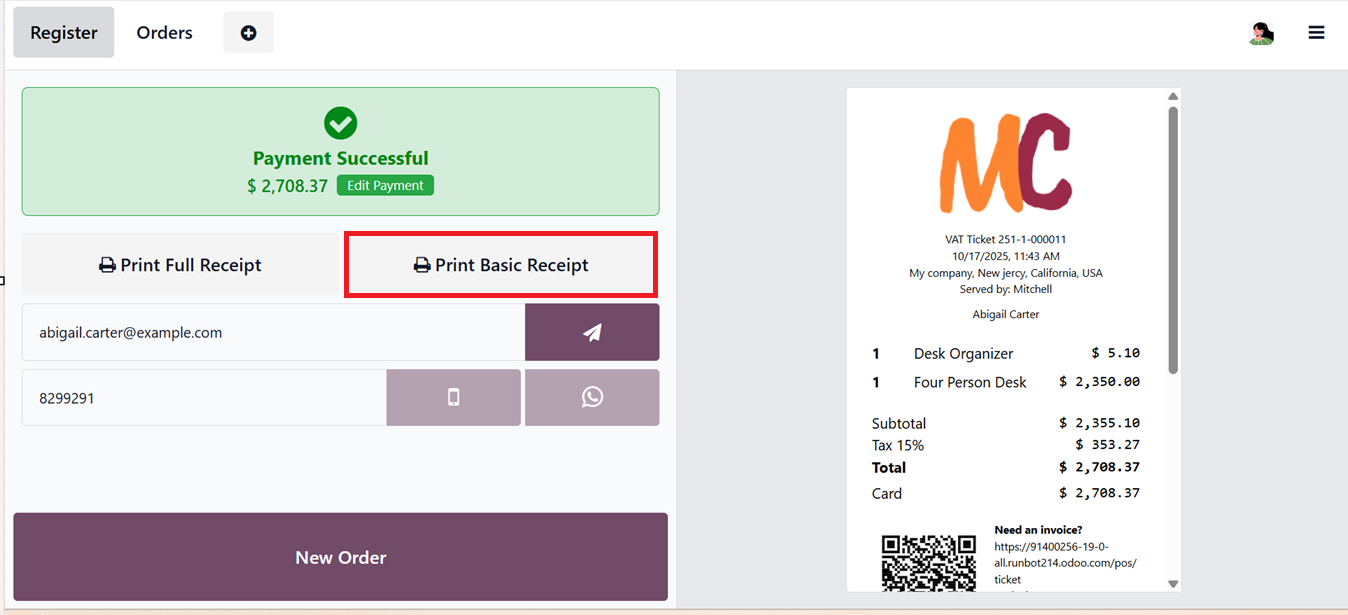
If you prefer a simplified version without price details, you can enable the ‘Basic Receipt’ option.
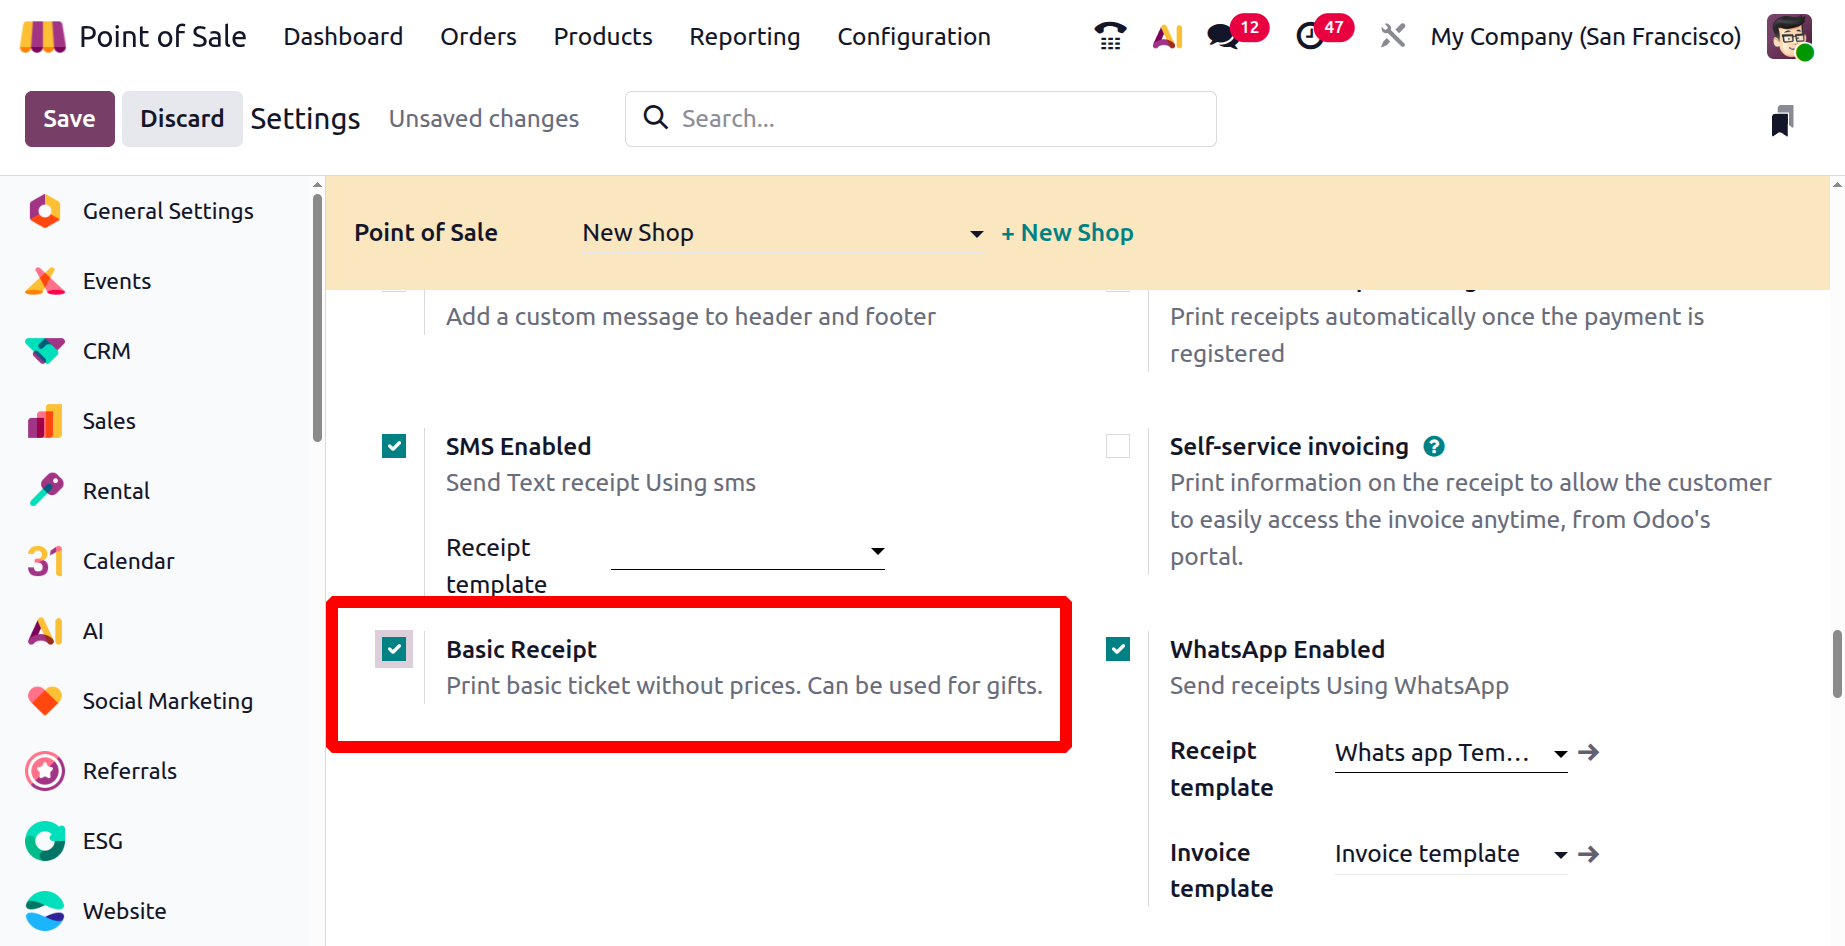
Use the ‘Print basic receipt’ button to print the receipt after completing a POS order, as shown in the screenshot below.
The ‘SMS Enabled’ feature lets you send receipts to customers through text messages. Likewise, the ‘WhatsApp Enabled’ feature allows you to send receipts via WhatsApp.
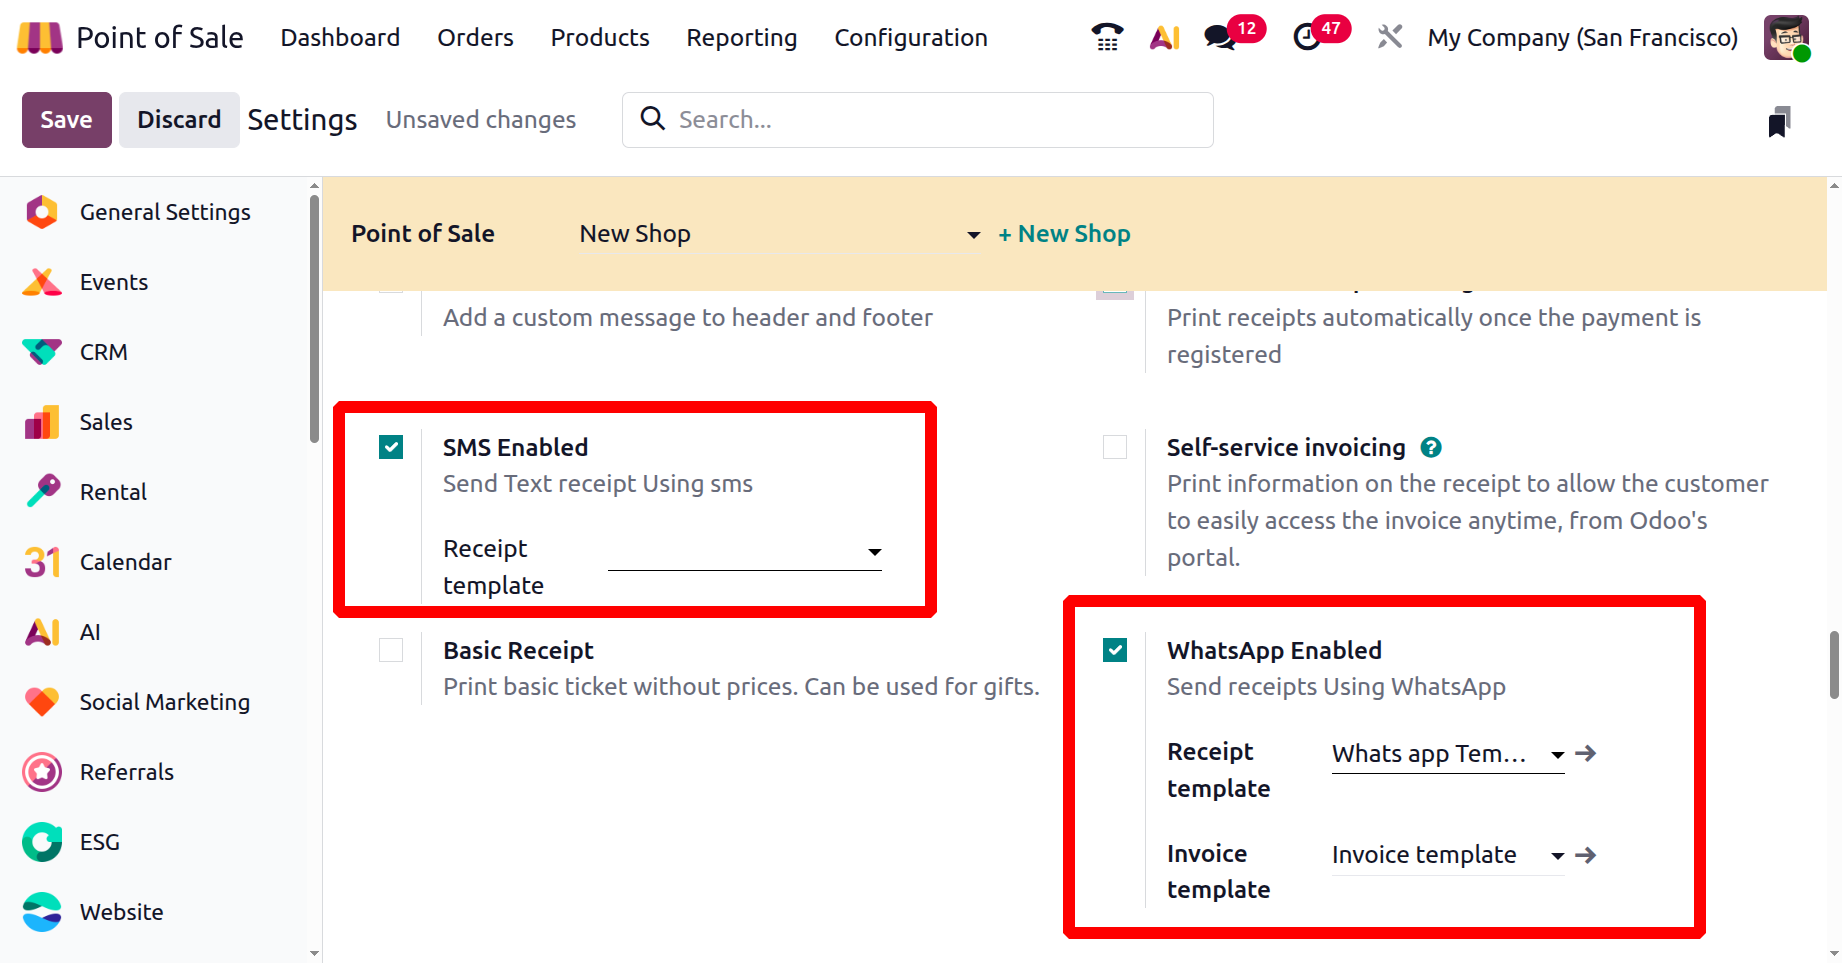
After a payment is completed, you will see both options as a phone icon and a WhatsApp icon on the payment successful screen, as shown in the screenshot below.

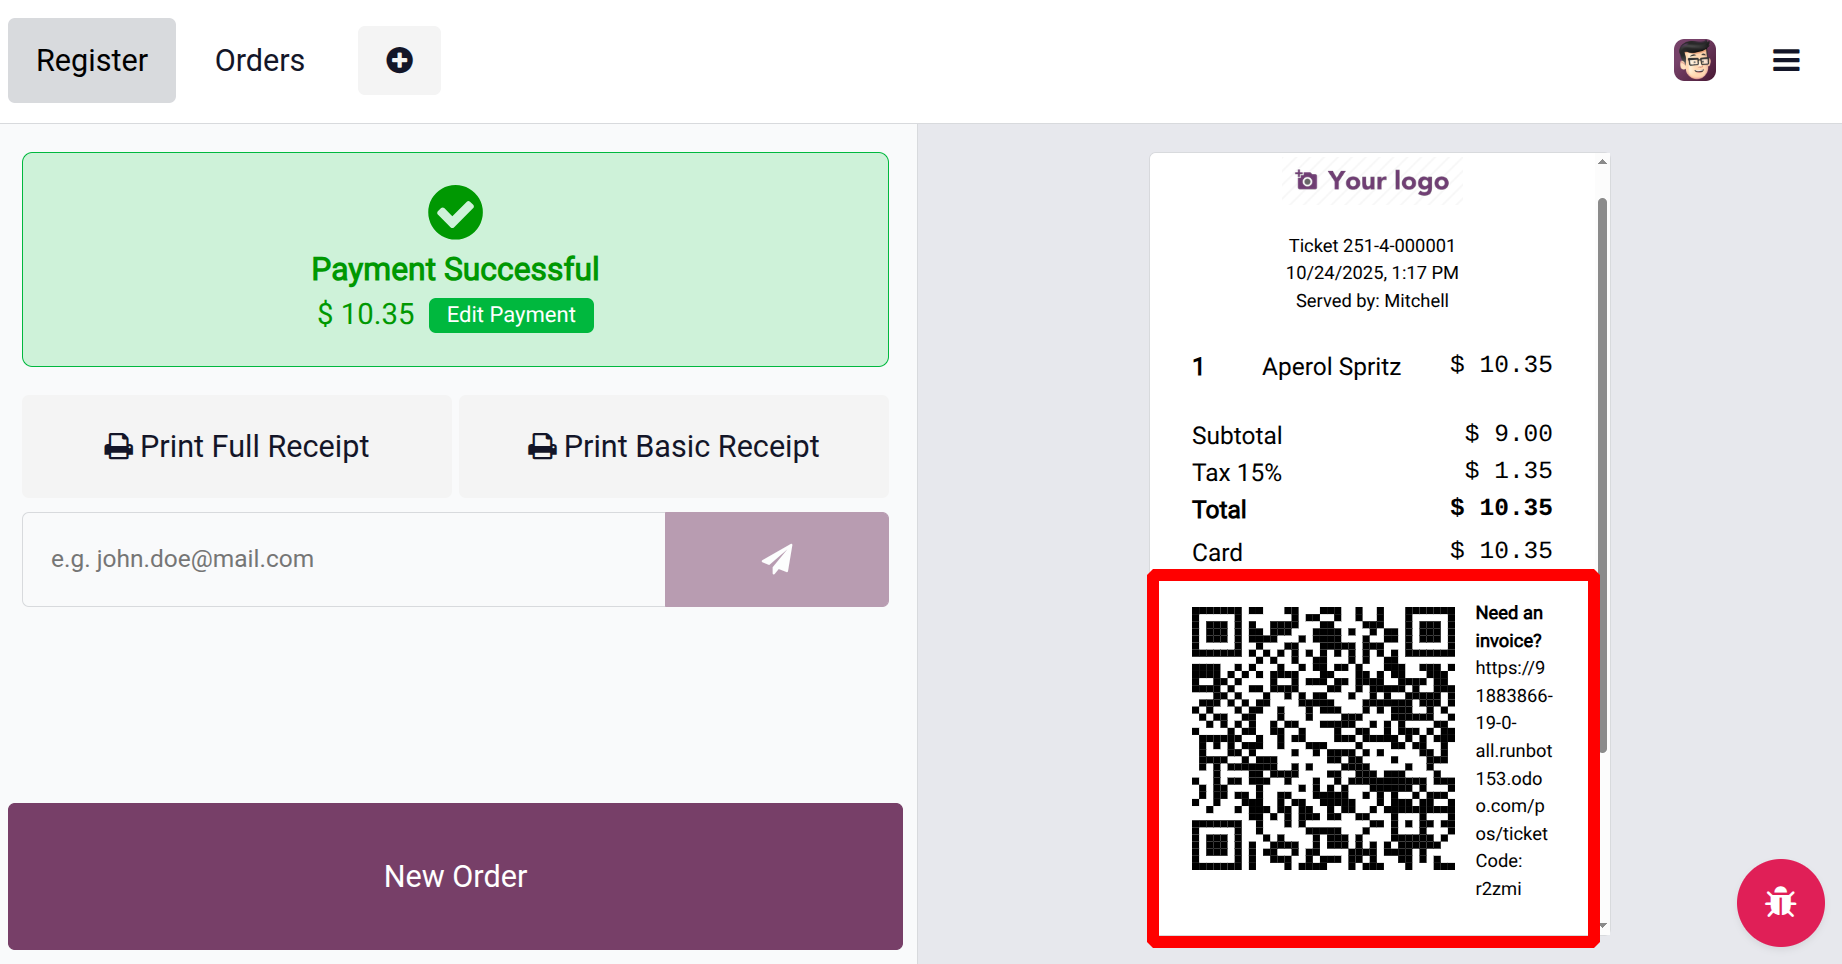
Lastly, with the ‘Self-Service Invoicing’ feature, customers can scan the QR code on their receipt to easily request an invoice.
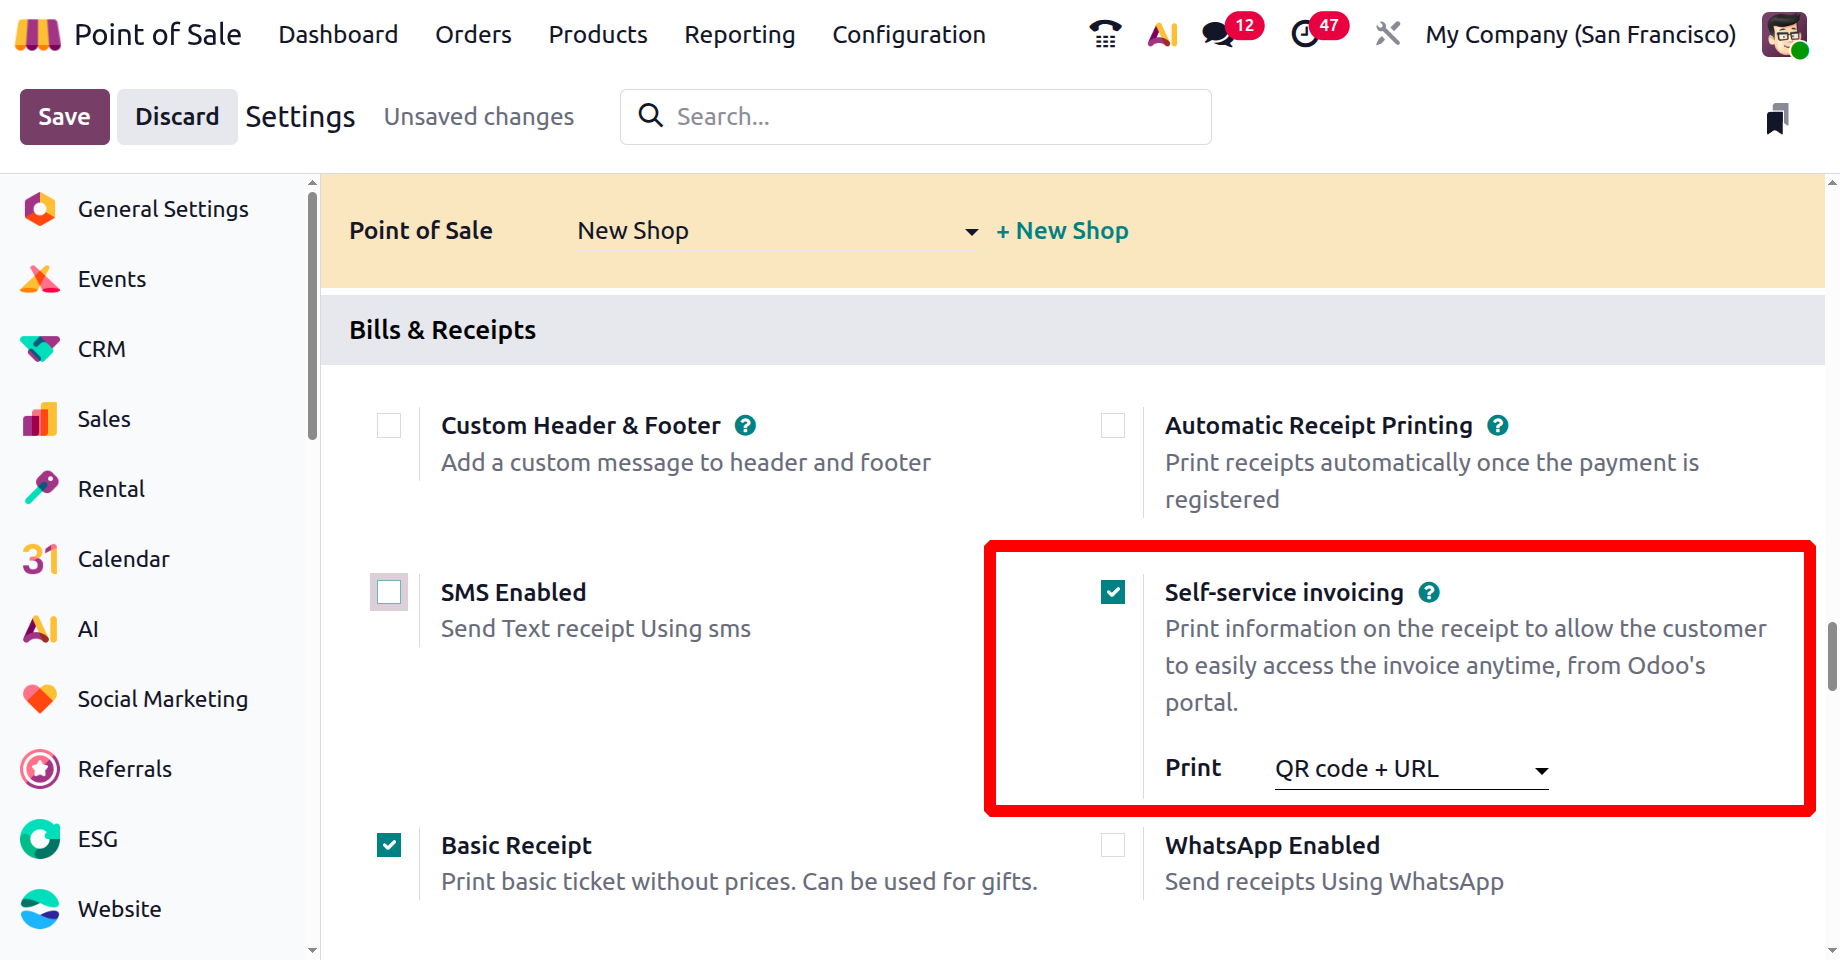
If this option is enabled the customer gets a QR Code and URL to easily access the invoice as shown below.
Food Delivery Integration
In Odoo 19’s Point of Sale module, the Food Delivery Connector allows you to connect with third-party food delivery services. This means that customer orders can be sent directly to delivery platforms without manual entry, helping to manage both in-store and delivery orders more efficiently and with fewer mistakes.
You can manage your online orders by setting a Username, APi Key, POS ID, Food Delivery Platforms, Pricelist, Preparation Time settings as well as setting your personal Food delivery store using the ‘Create Store’ button, as depicted in the screenshot below.

The UrbanPiper settings in the PoS module support integration with popular delivery apps like DoorDash, Just Eat, EatEasy, Zomato, Swiggy and so on. This feature updates real-time orders, stock levels, and payments. Also improves order processing, reduces manual work, and helps provide a better experience for both employees and customers.
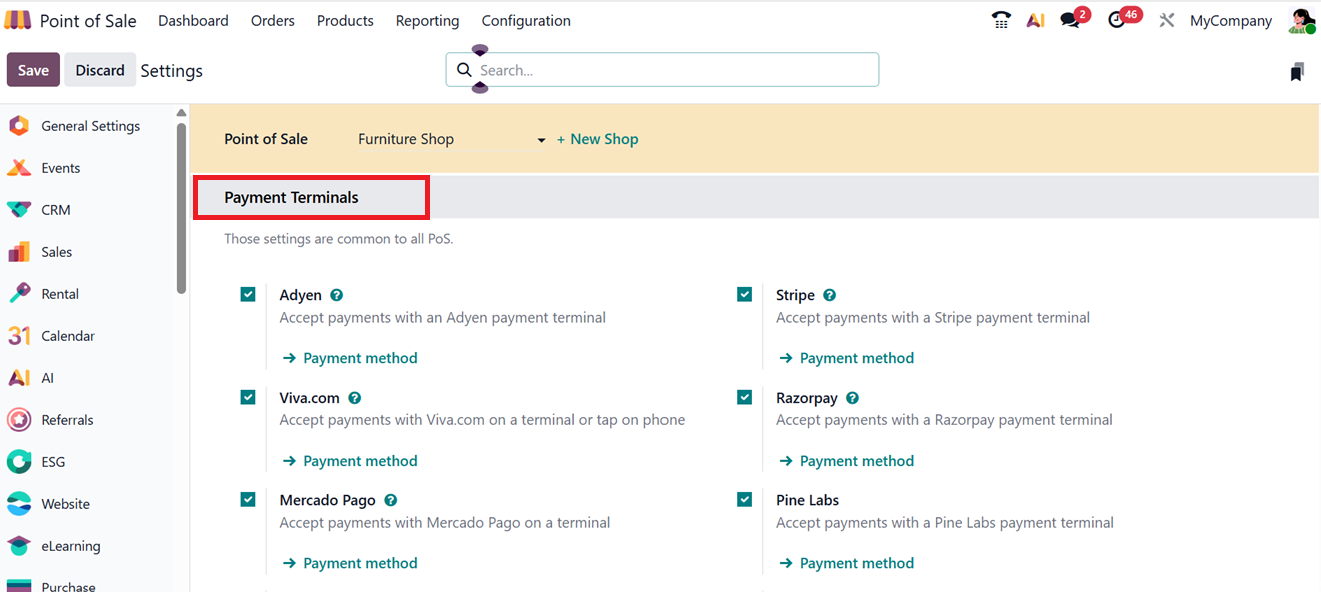
Payment Terminals
The PoS module supports integration with various payment terminals such as Adyen, Razorpay, Stripe, Paytm, Viva, Pine Labs and many more. You can configure the convenient terminals based on your business requirements from the settings menu, as depicted in the screenshot below.
Using the ‘Payment method’ link provided under each payment terminal, you can configure its specifics. Clicking on the same link will open a detailed form view of the respective payment terminal, as shown in the screenshot below.

You can mention it as an Online Payment, Identify Customer and Delivery Payment. Then, mention the Journal, Outstanding Account, Intermediary Account and the Point of Sale options as per your business requirements.
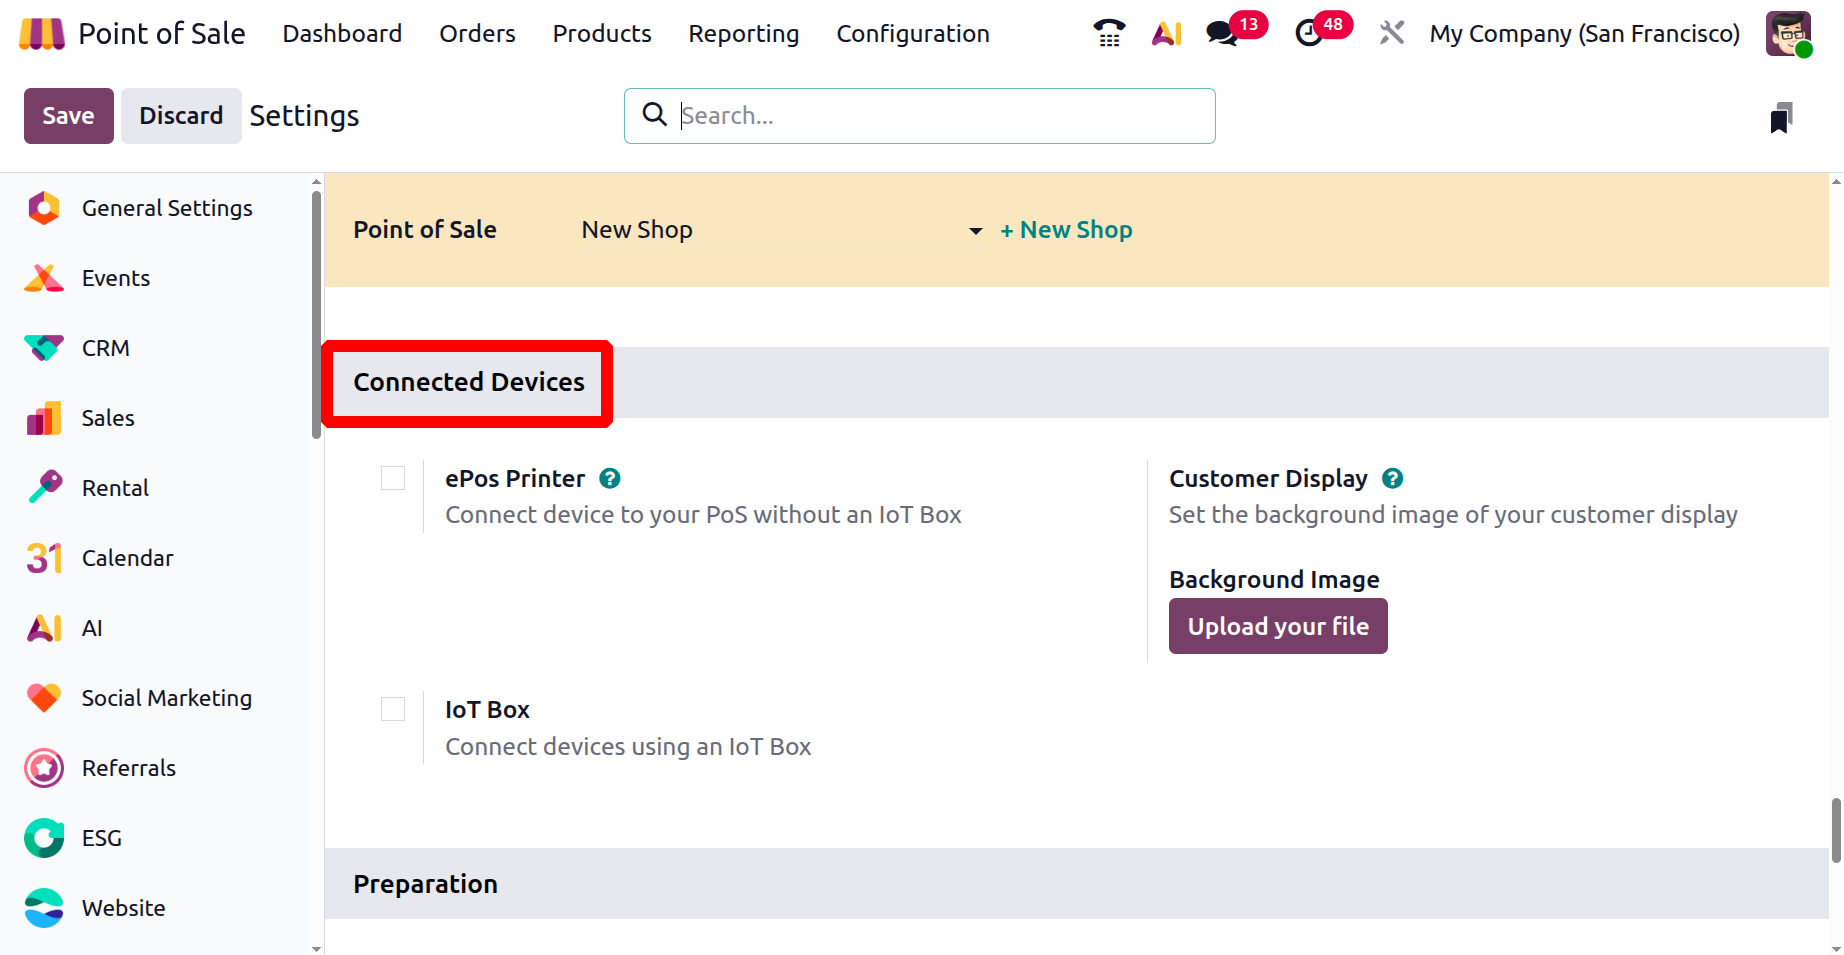
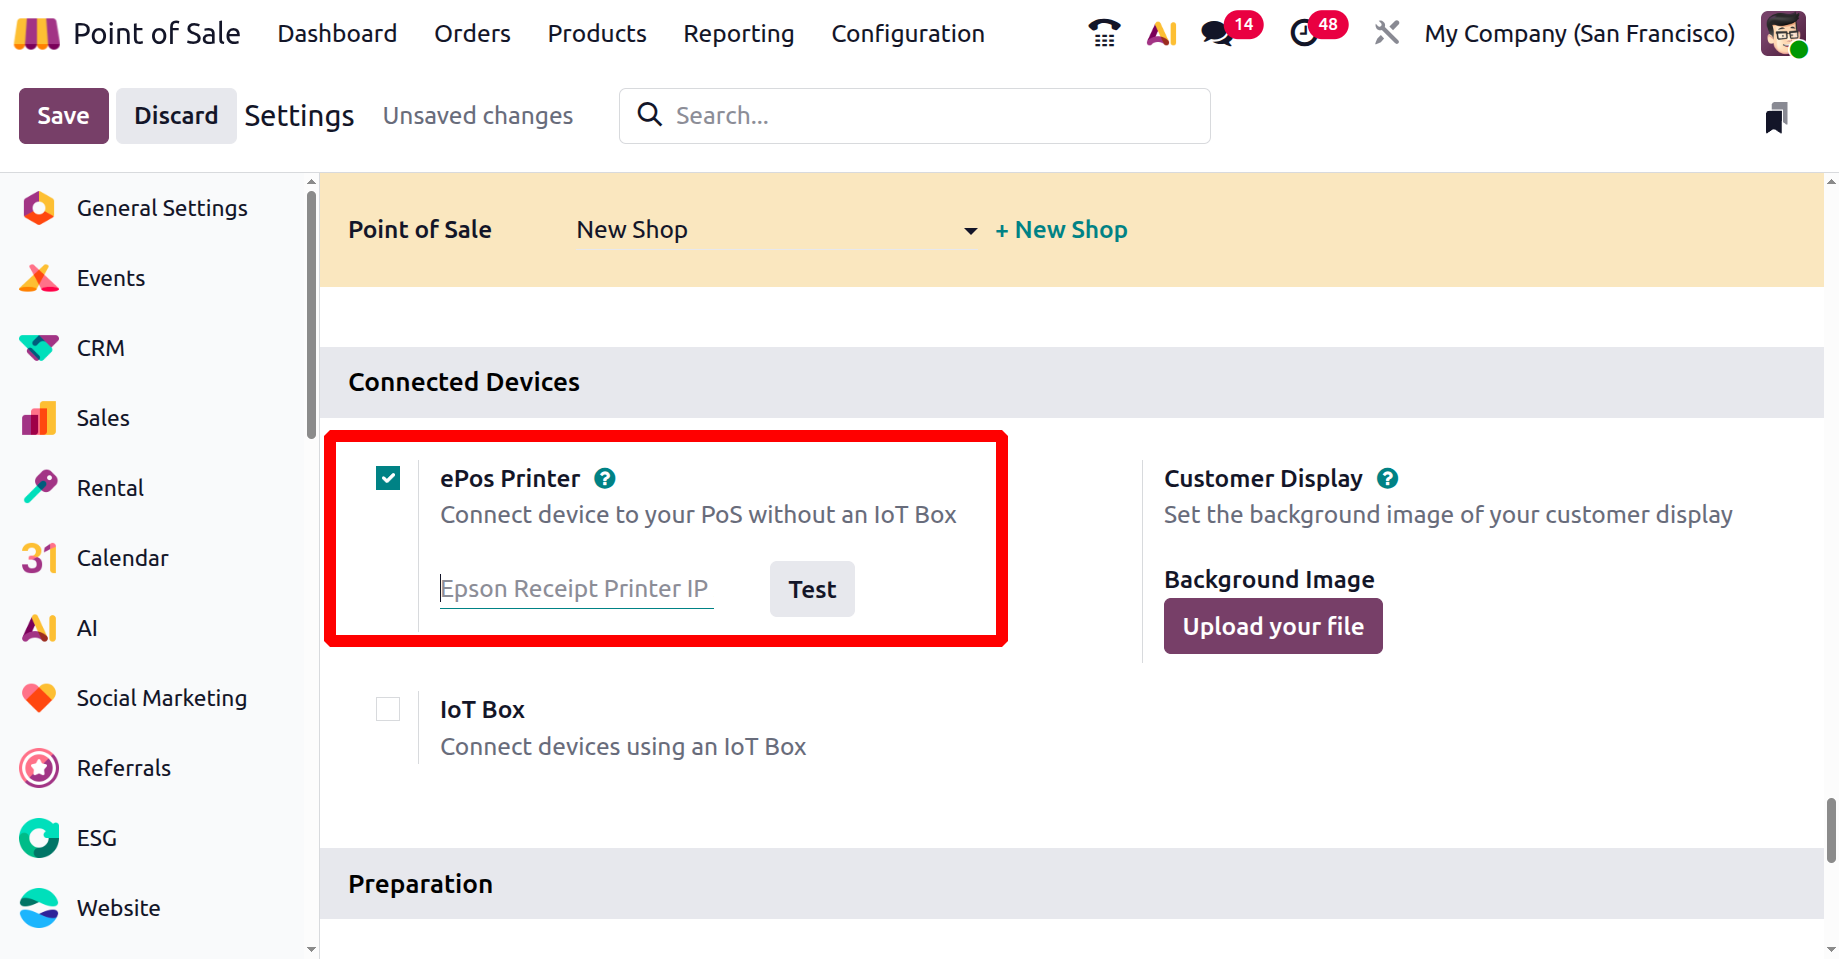
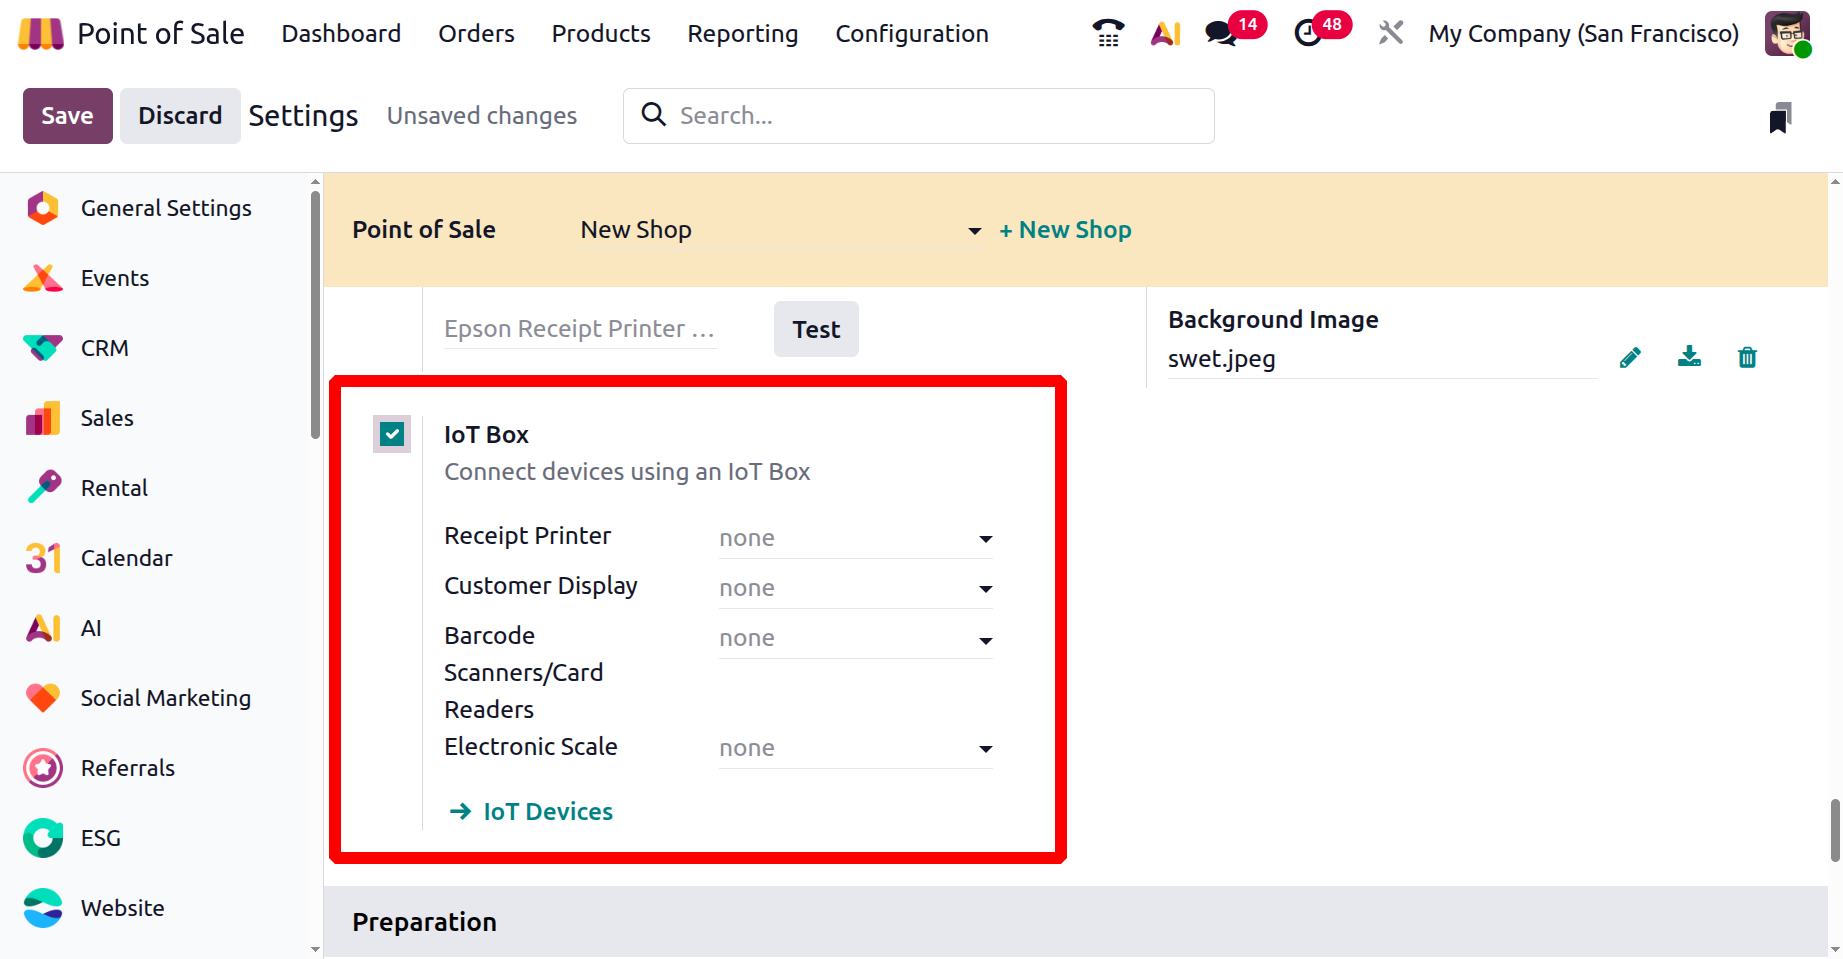
Connected Devices
Odoo allows devices to connect directly without needing an IoT Box using the ‘Connected Devices’ tab of the ‘Settings’ window. The features included in this tab are; ePos Printer, Customer Display and IoT Box, as shown in the screenshot below.
You can turn on ePOS Printers to print receipts without an IoT Box and enter the IP Address of the device.
The Customer Display feature helps to show the checkout process on a second screen. So, you can set an attractive ‘Background Image’ for the customer display using the ‘Upload your file’ button.

Also, the ‘IoT Box’ feature helps you to connect Receipt Printer, Customer Display, Barcode Scanners, Card Readers, and Electronic Scale.
Preparation
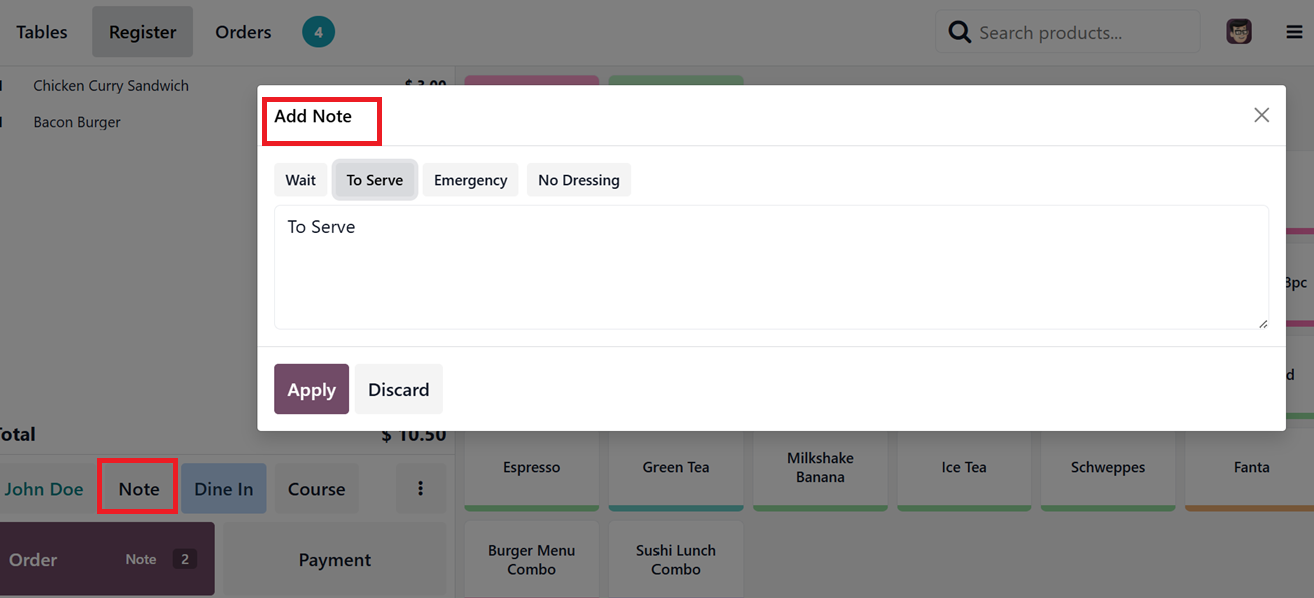
For restaurants and bars, the PoS system supports order preparation workflows in the ‘Preparation’ tab of the ‘Settings’ menu. Configuration fields like 'Preparation Printers' and 'Internal Notes' help kitchen staff manage incoming orders.

You can add or manage the preparation printers using the ‘Add Printer’ and ‘Manage Printers’ links. The ‘Notes’ link in the Internal Notes field can be used to add any notes on order lines for the kitchen.
So, you can click on the ‘Note’ button from a POS Restaurant session. Here, you can add any notes or choose from the preconfigured note inside the ‘Add Note’ window, as depicted in the screenshot below.
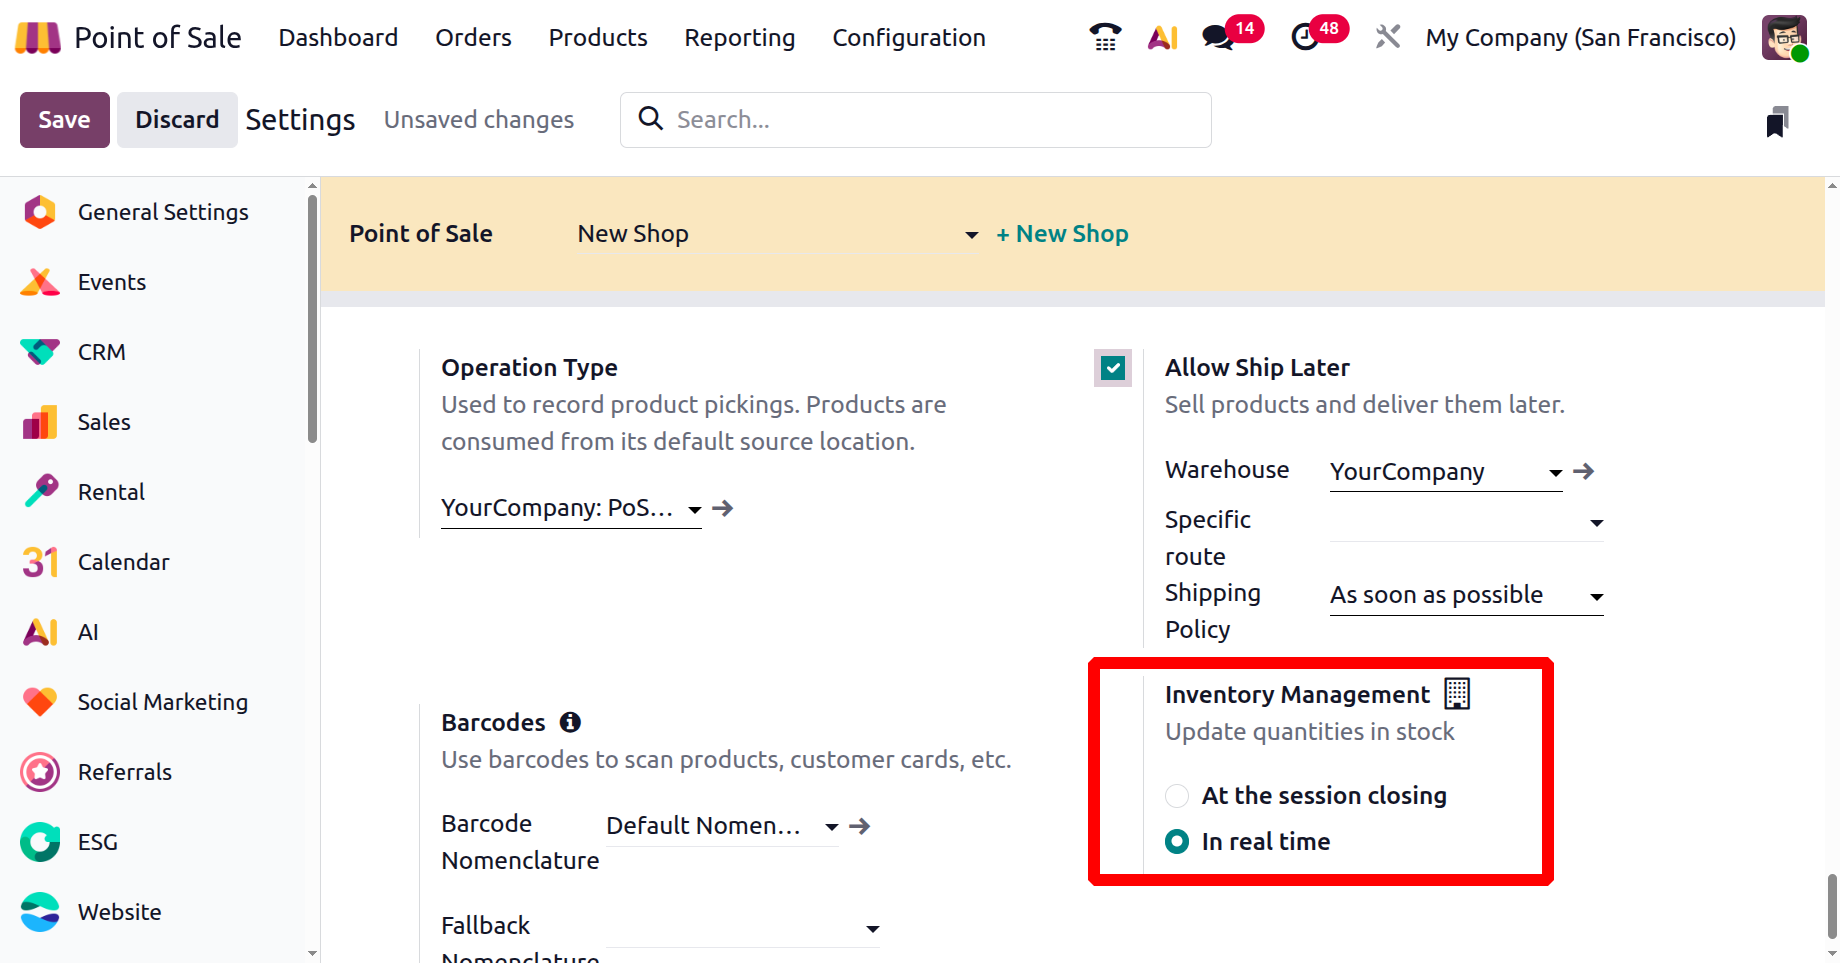
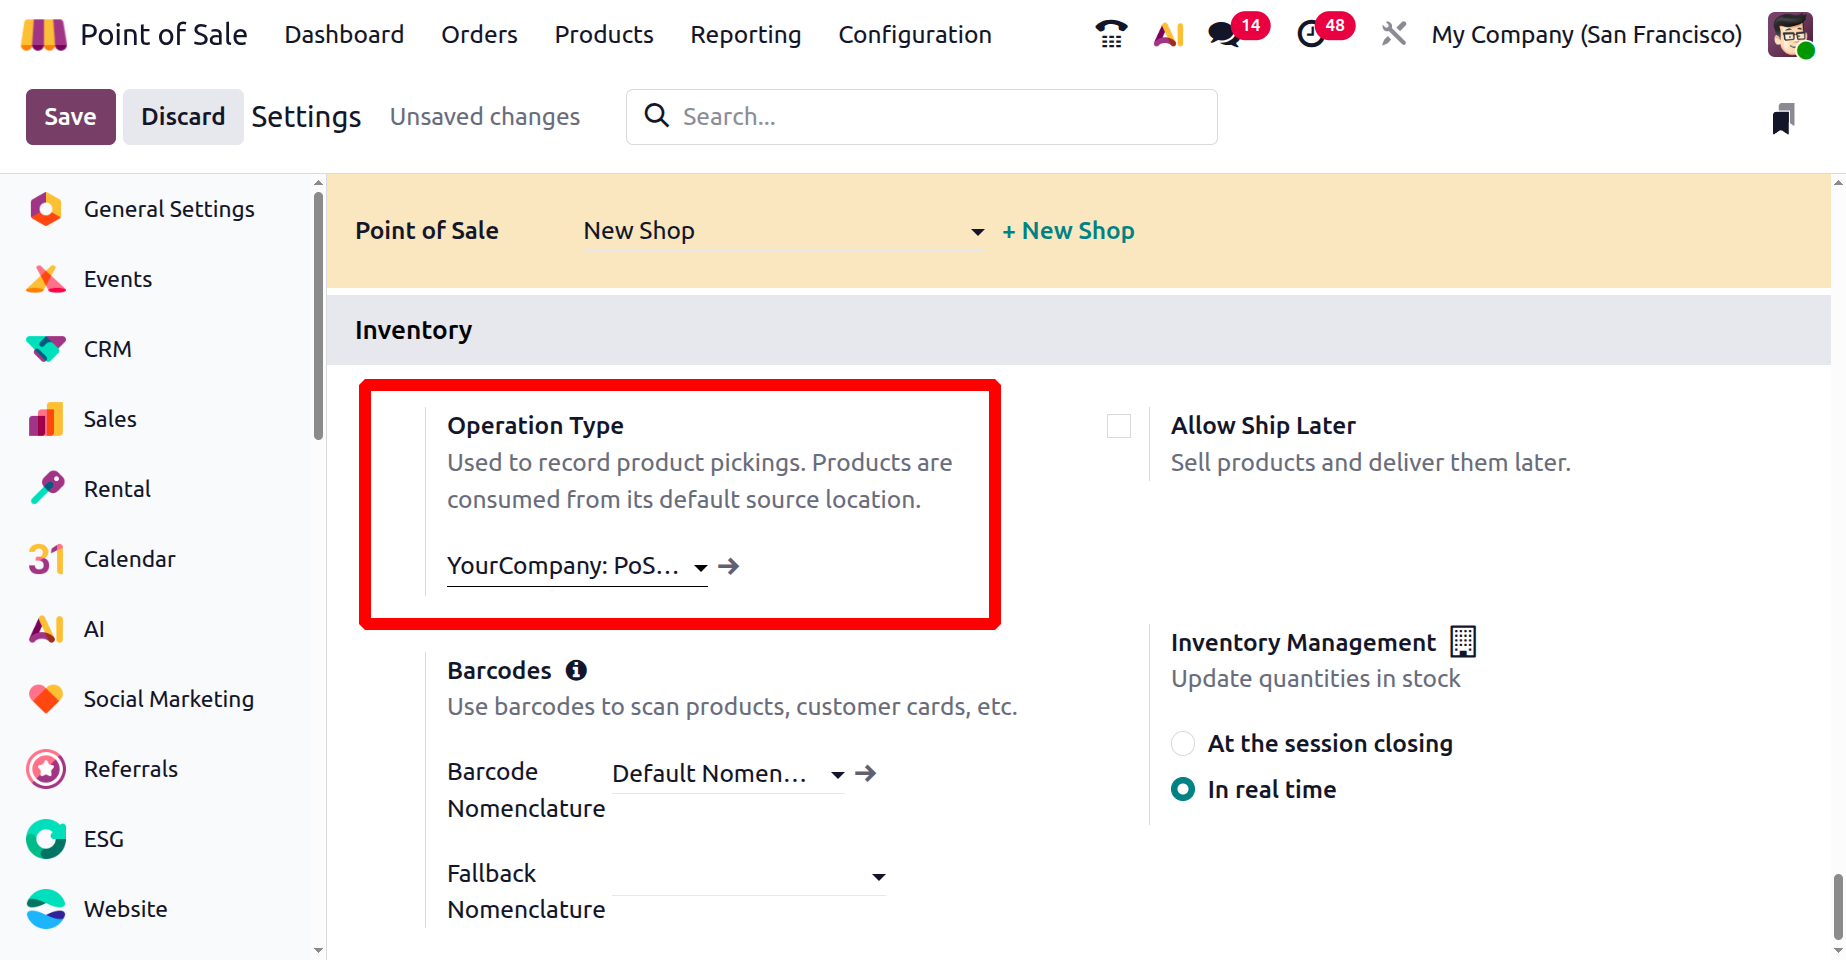
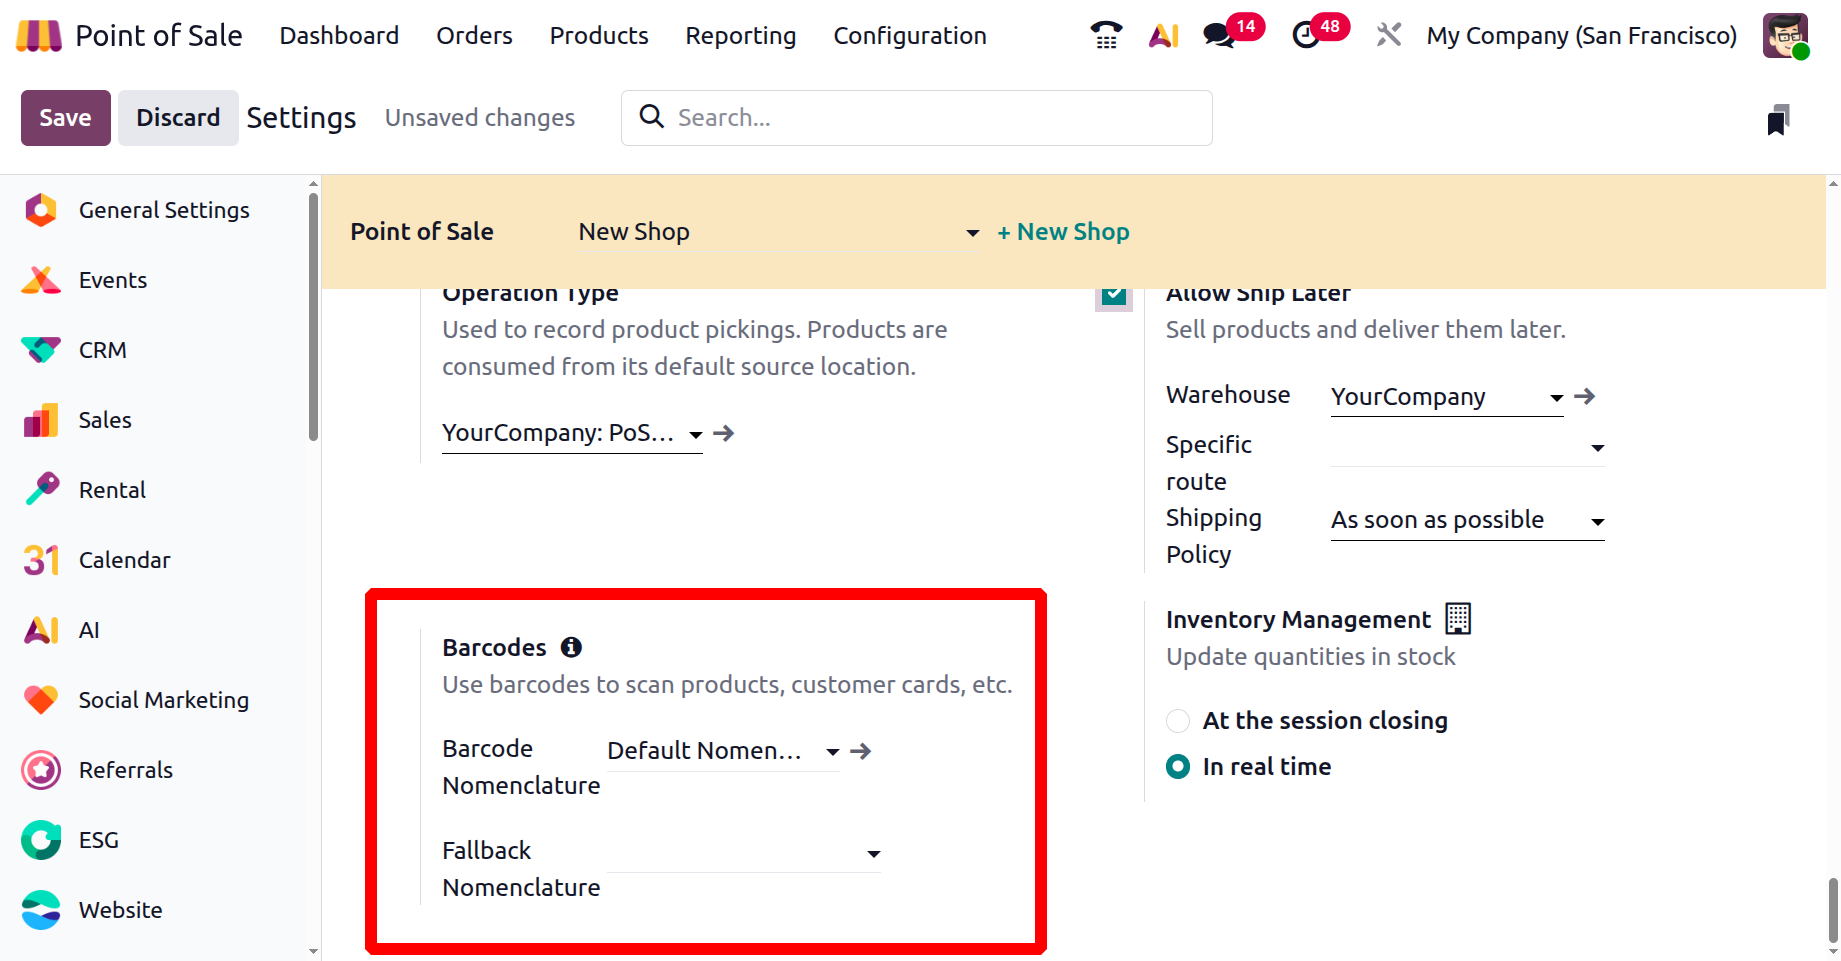
Inventory
The ‘Inventory’ settings tab section helps to configure your POS Sales inventory options such as, Operation Type, Allow Ship Later and Barcodes.
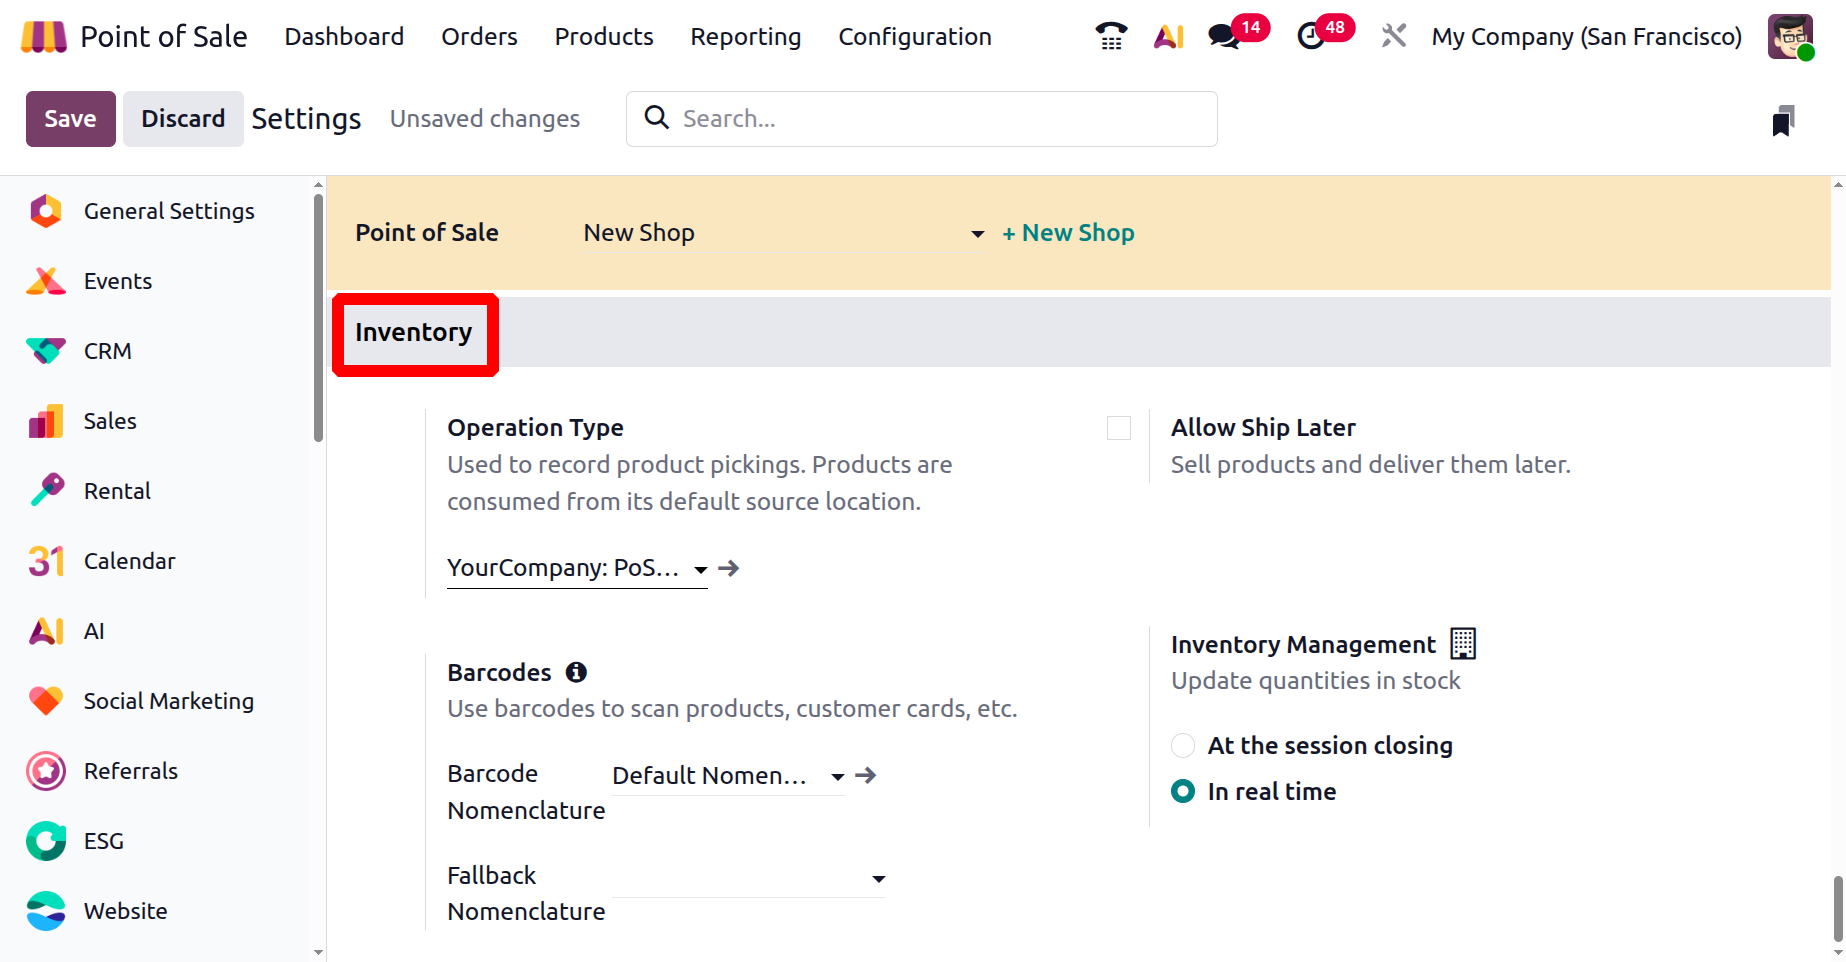
In Odoo’s Point of Sale module, the ‘Operation Type’ feature allows you to choose where products are taken from during a sale either from a specific location or directly from available stock. This helps ensure that inventory levels stay accurate. For example, to make sure products are taken from a certain location during PoS sales, you can set the source location to 'YourCompany: PoS Order,' as depicted in the screenshot below.
The ‘Allow Ship Later’ feature lets customers buy products and have them delivered at a later date.
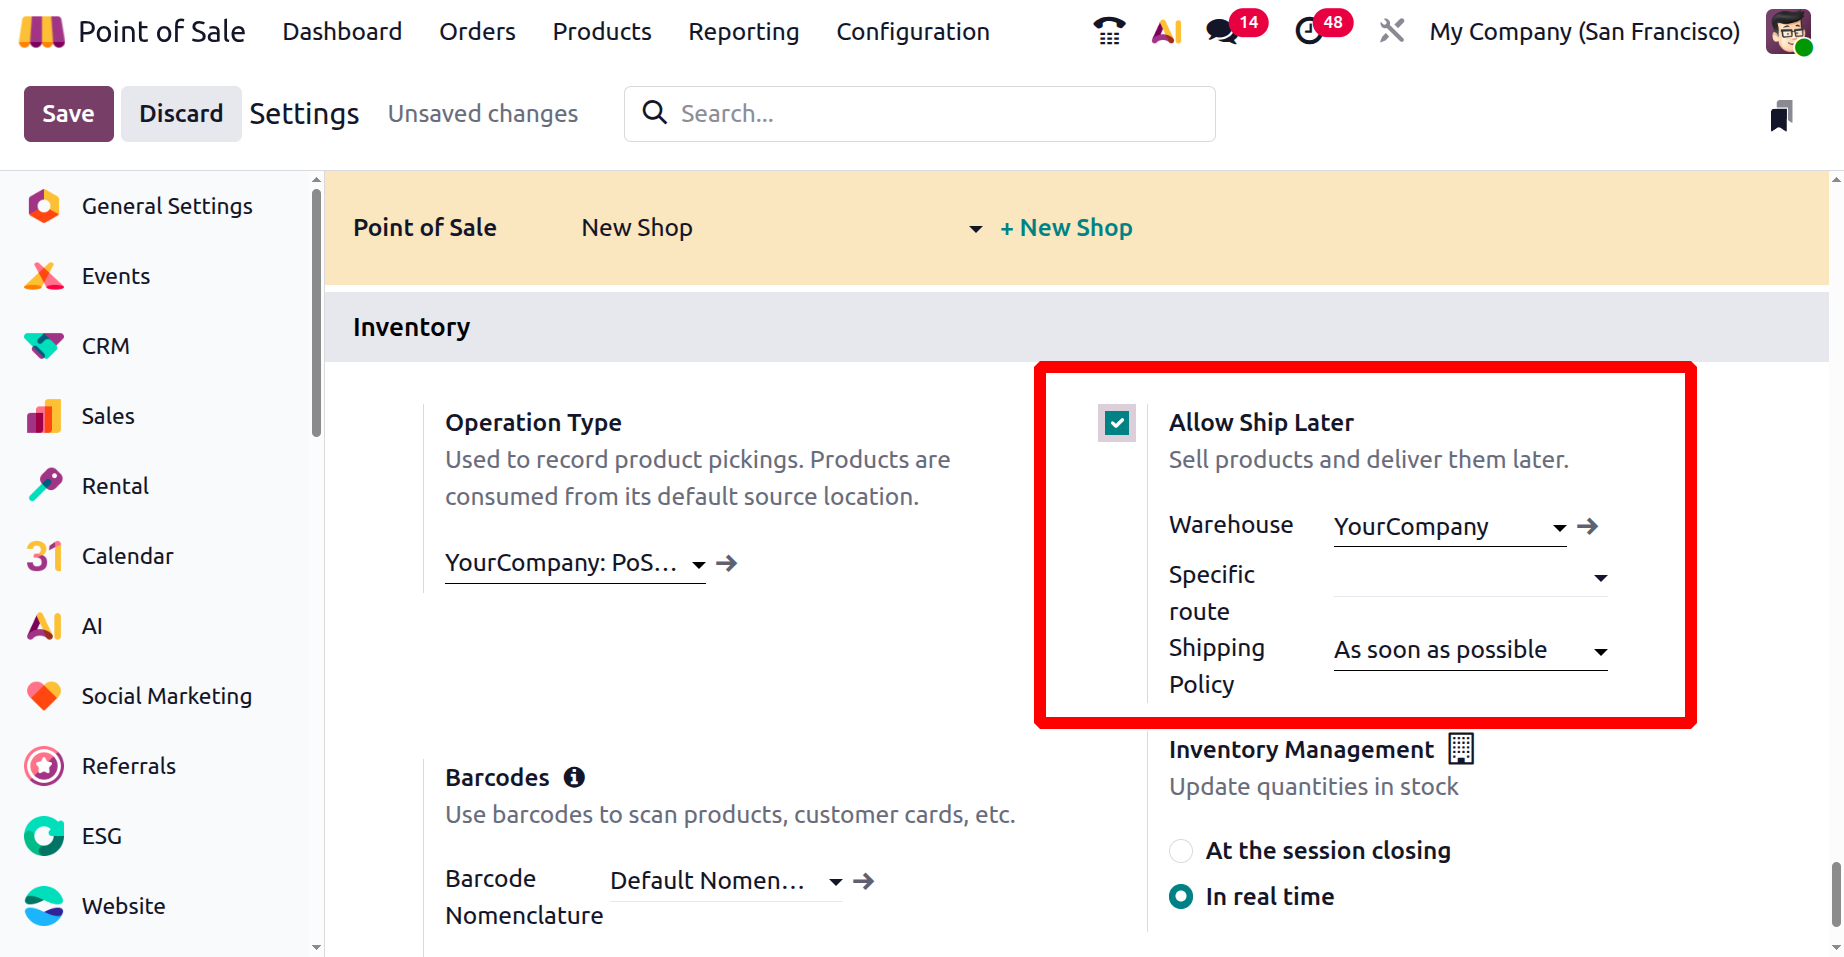
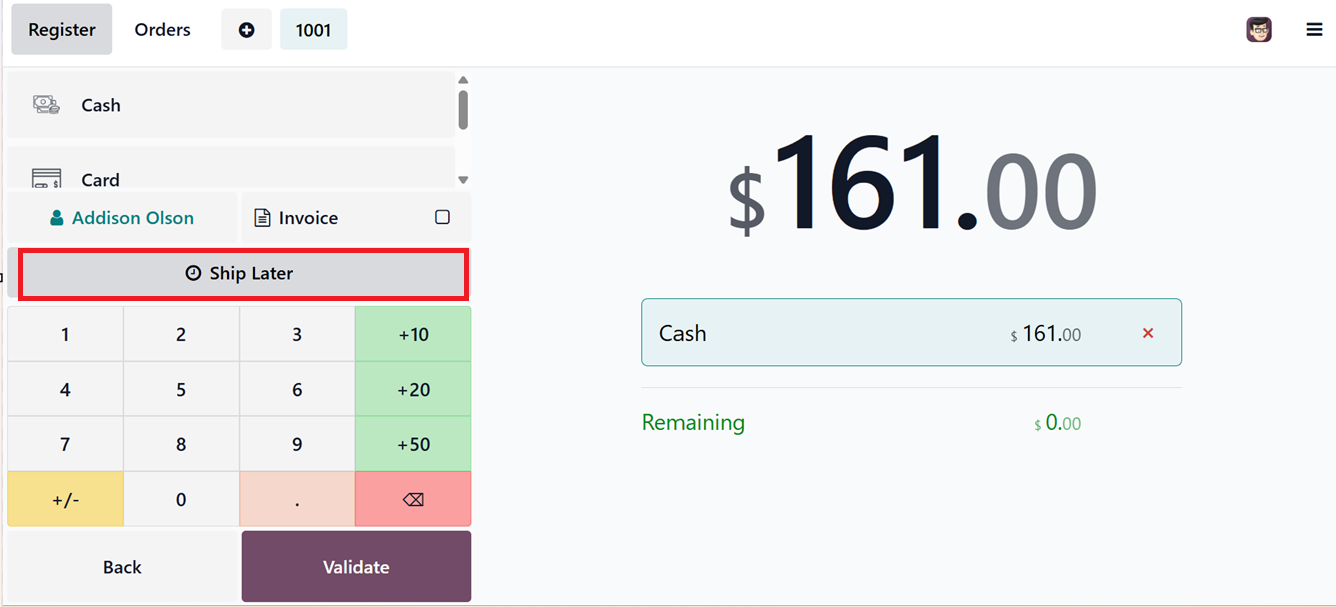
When this option is turned on, a ‘Ship Later’ button will appear on the PoS screen before completing the payment, as shown in the screenshot below.
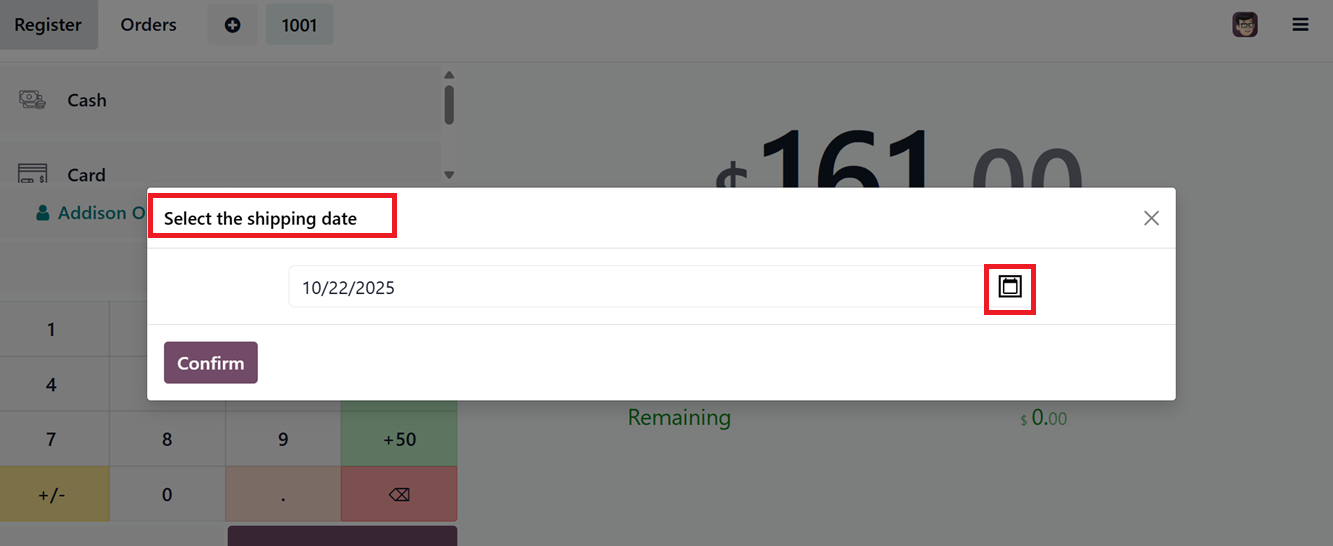
After clicking on the ‘Ship Later’ button, you can choose a convenient delivery date from the calendar option in the pop up window. Finally, confirm the date using the ‘Confirm’ button, as depicted in the screenshot below.
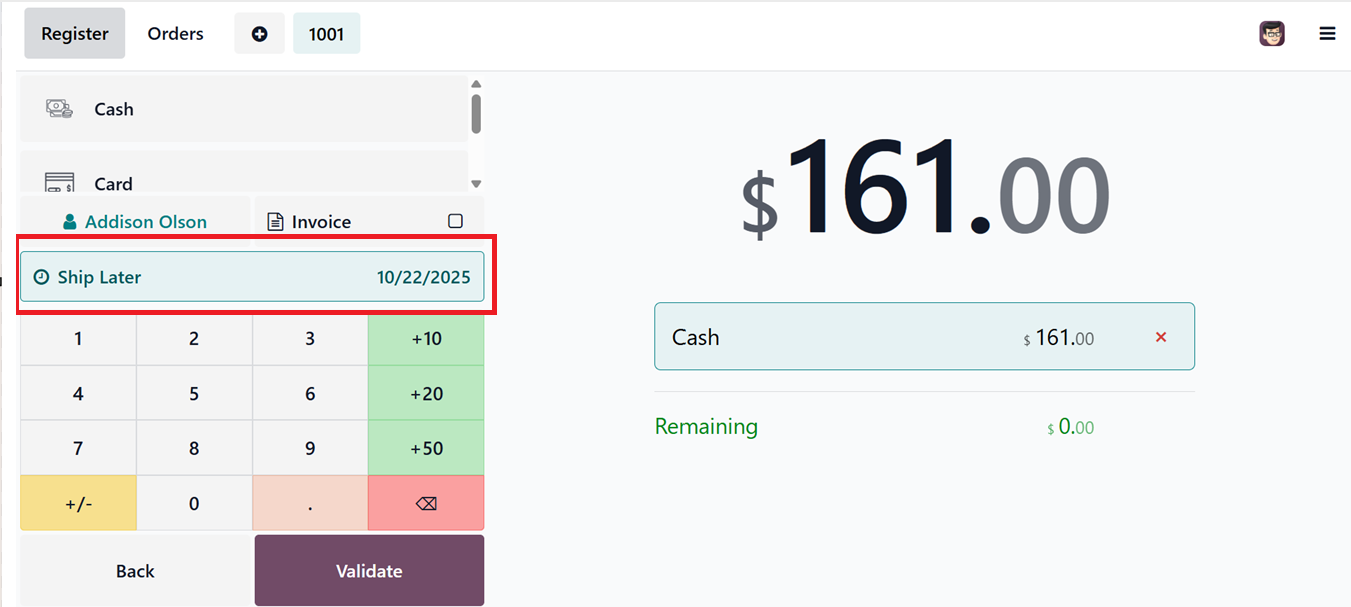
The new shipping date will be saved in the ‘Ship Later’ field and you can proceed with the next payment procedures with the ‘Validate’ button, as shown in the screenshots.
Odoo also supports barcode scanning through the ‘Barcodes’ feature. This allows users to scan products and customer cards during checkout. You can set up barcode rules in the Inventory module and assign barcodes to products for fast and easy scanning during sales.
In the ‘Inventory Management’ settings control how product stock is tracked and updated during sales. They keep the inventory and sales data in sync. Odoo offers two ways to update stock levels either ‘At the session closing’ or ‘In real time’ as sales are made.
- At the Session Closing: Stock is updated only after the POS session ends, allowing businesses to review transactions before adjusting inventory.
- In Real Time: Stock is updated instantly with each sale, keeping inventory levels accurate at all times.