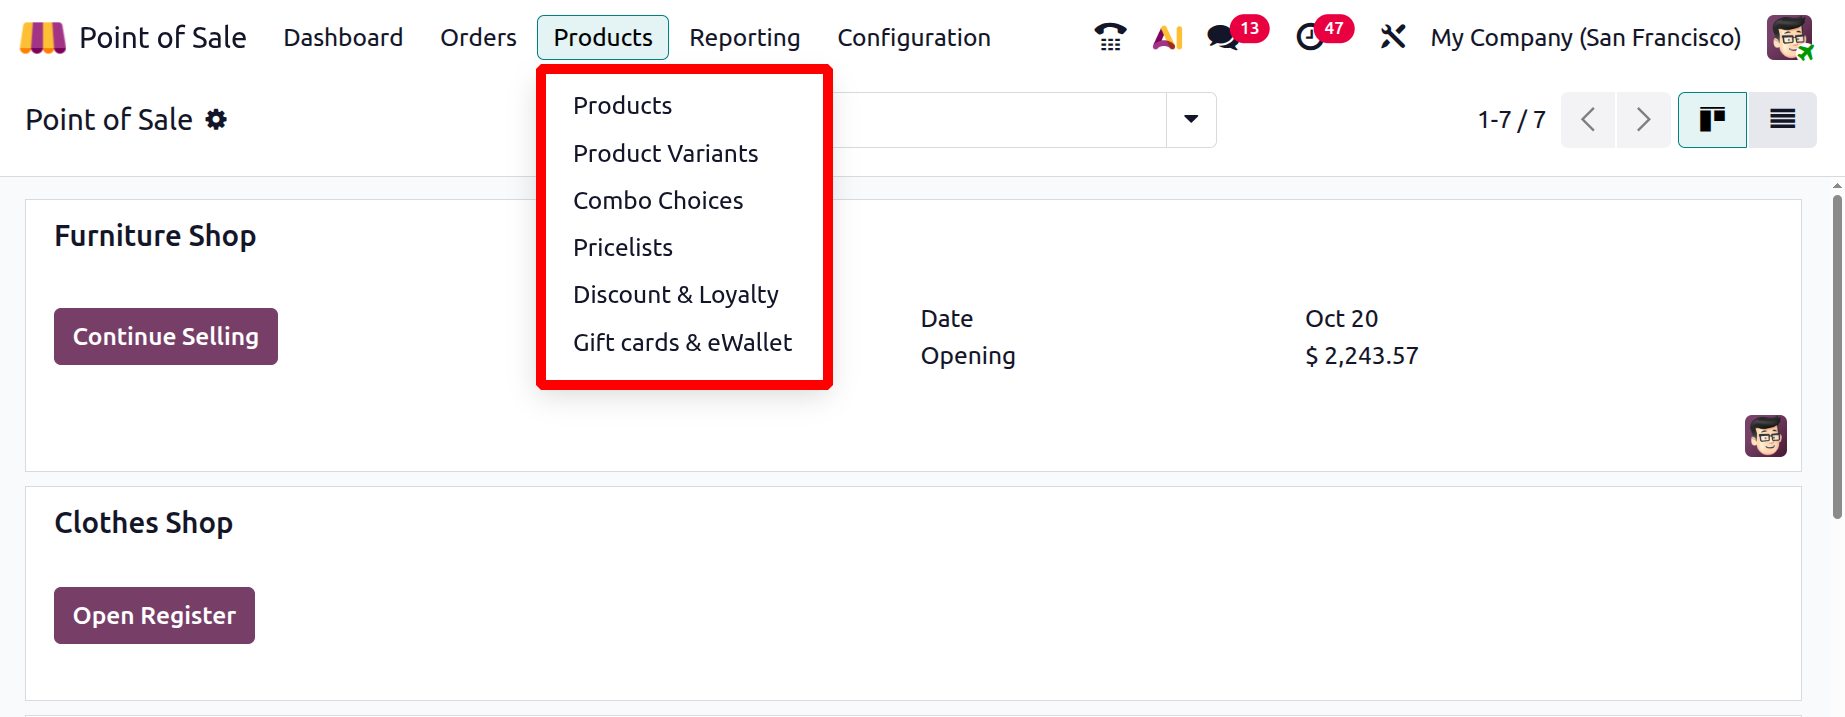
Products Menu
The products menu in Odoo 19 Point of sale contains options like Products, Product Variants, Combo Choices, Pricelists, Discount & Loyalty and Gift Card & eWallts.
1.1 Products
The Products menu provides an overview of all retail items available within your company’s PoS system. Displayed in Kanban view, each product card shows its Reference Code, Price, and Available Stock. You can switch to List view or click on a product for a more detailed form view that includes all specifications.
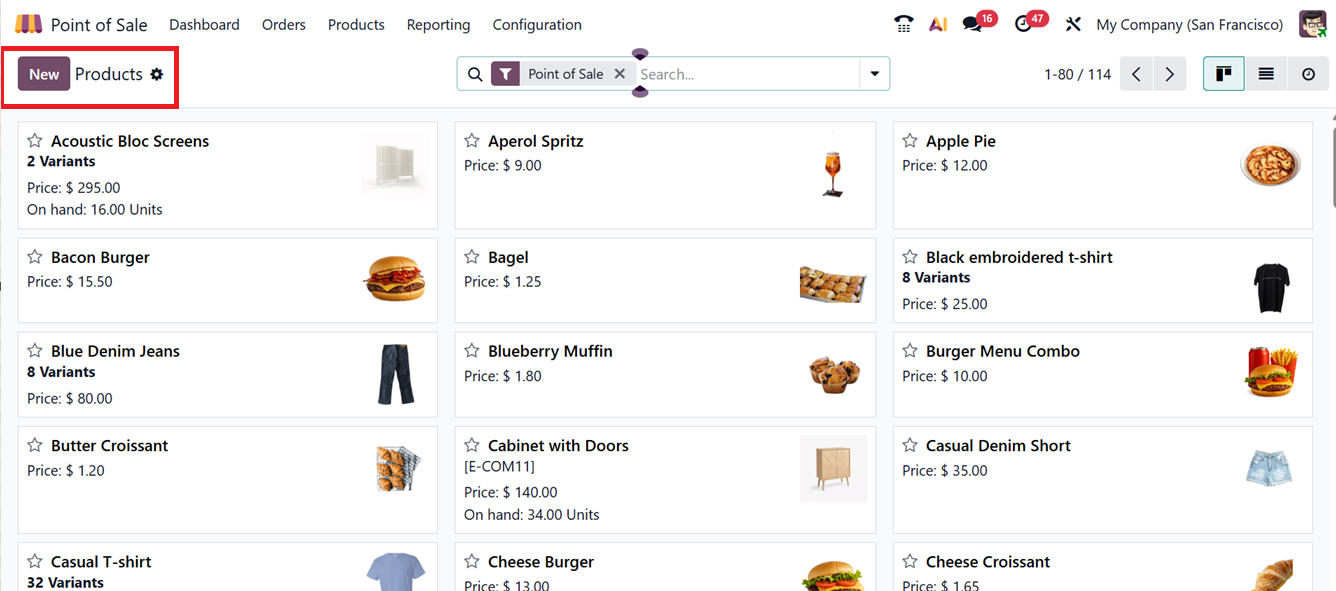
To create a new product, click ‘New’, enter the Product Name, and upload an image. A product available on Point of Sale only after enabling the Checkbox Point of Sale as shown below.
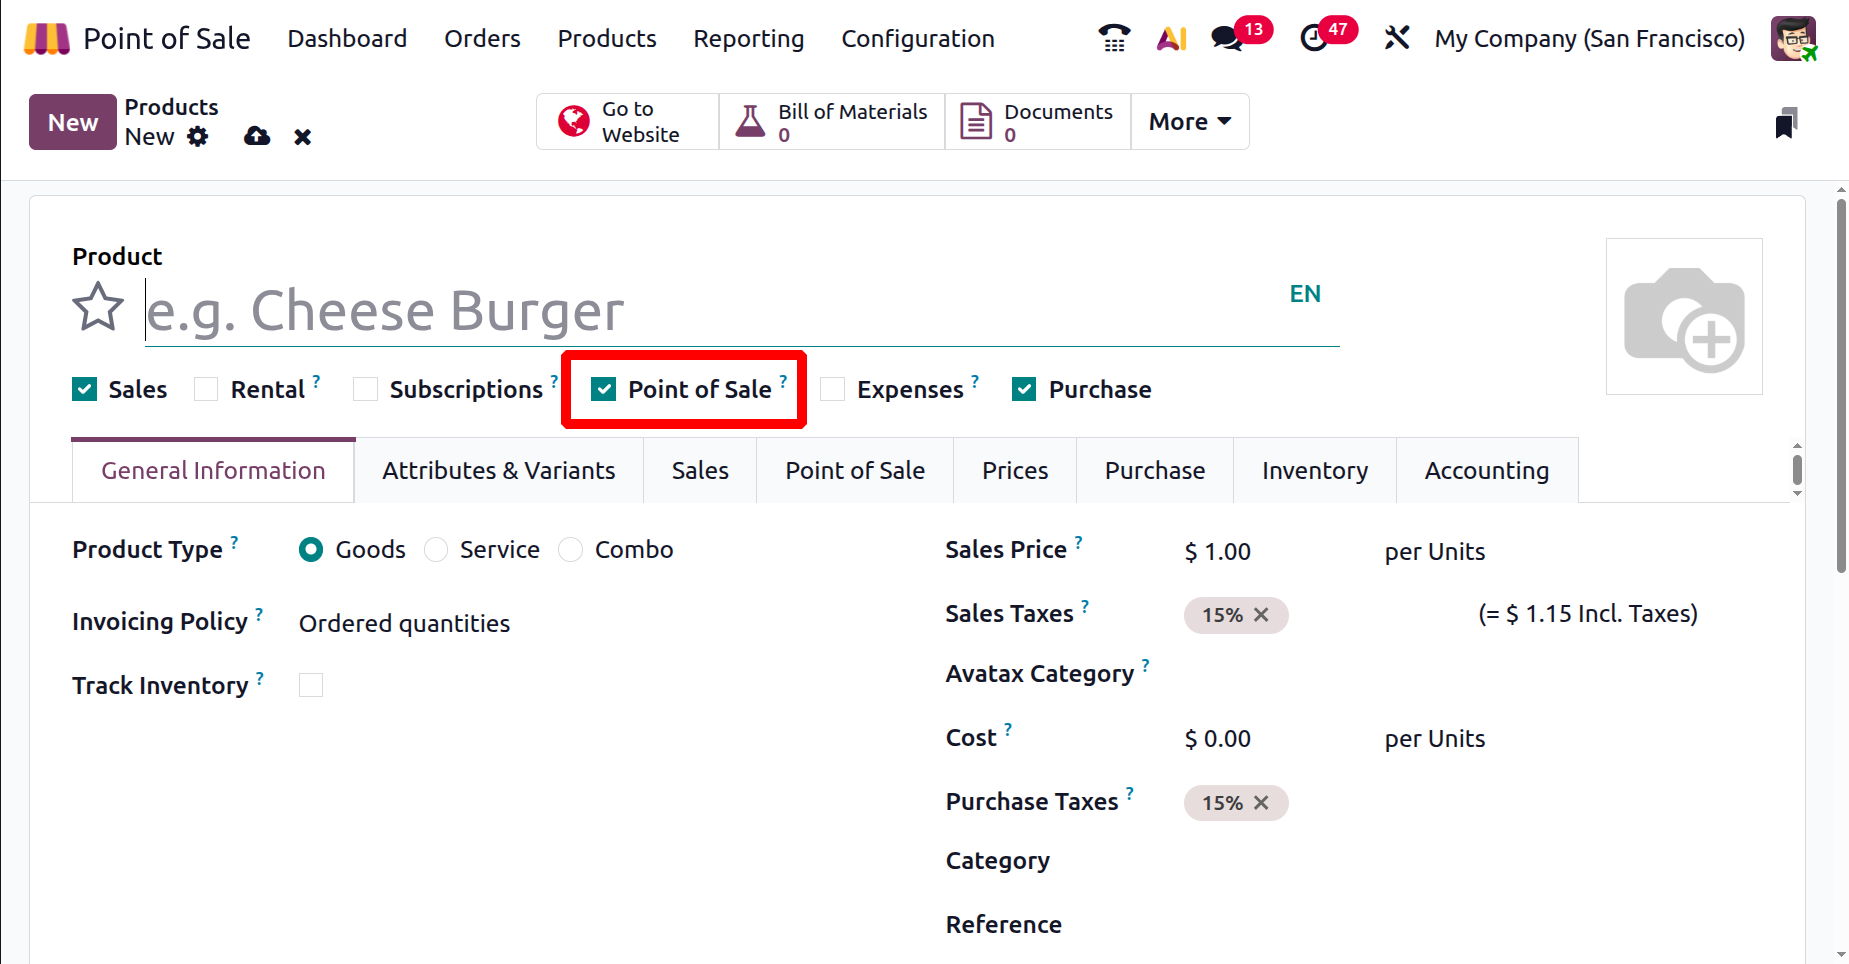
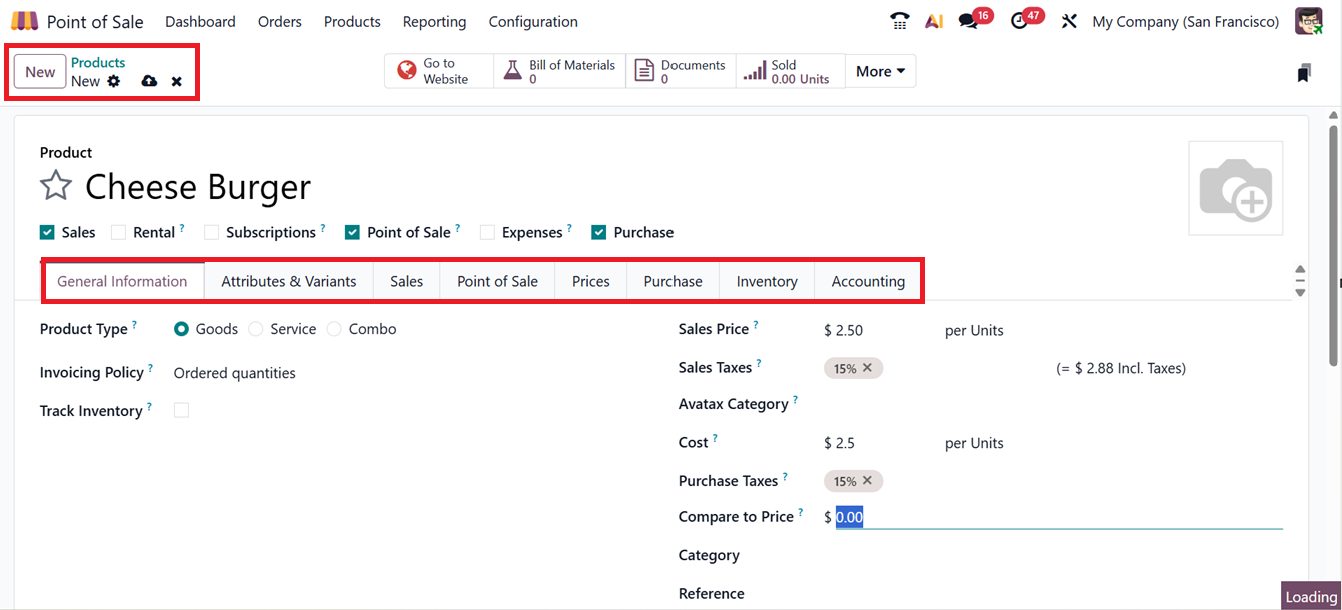
In the General Information tab, specify attributes like Product Type, Price, Tax Settings, and Barcode. Other settings include Units of Measure, Product Category, and Associated Company.
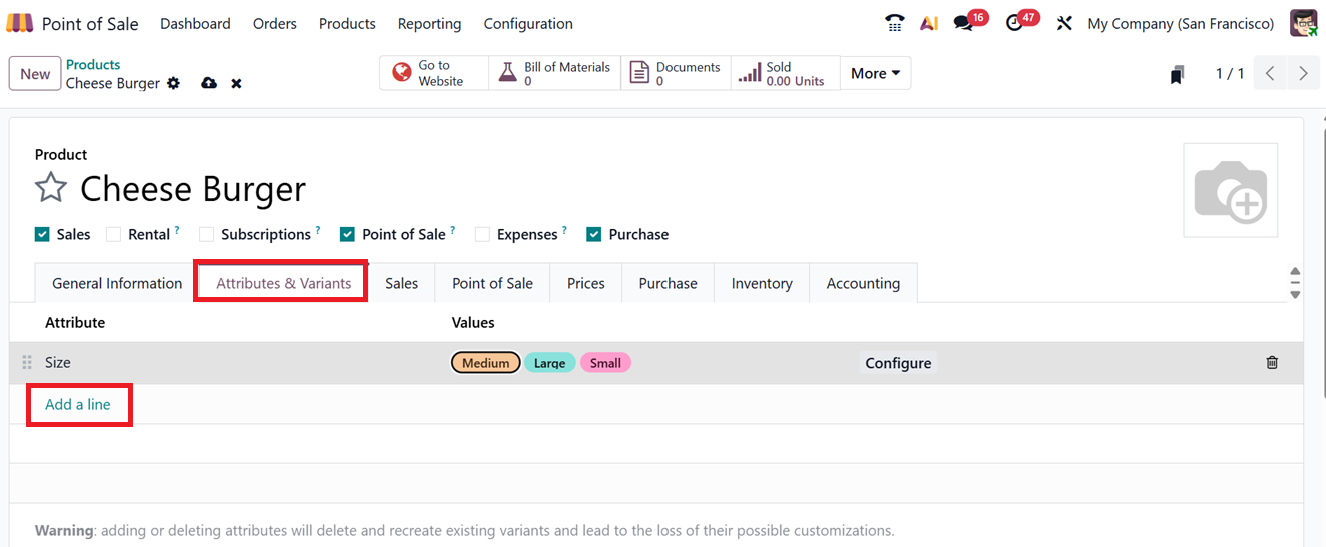
Use the Attributes & Variants tab to add multiple versions of a product using the ‘Add a line’ option.
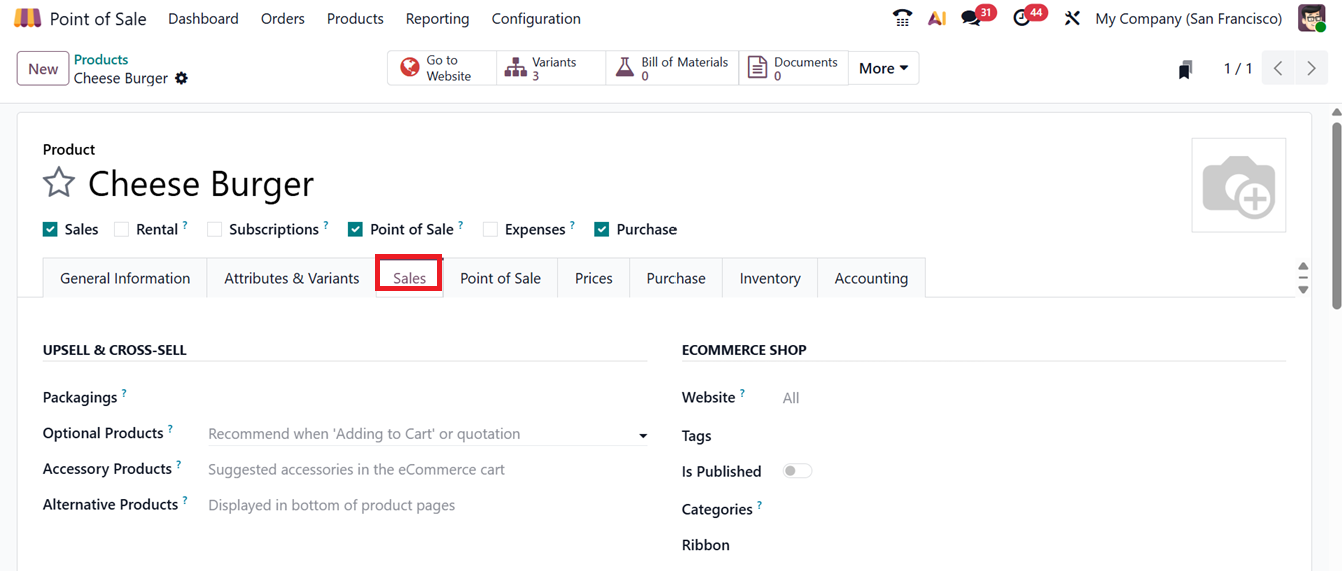
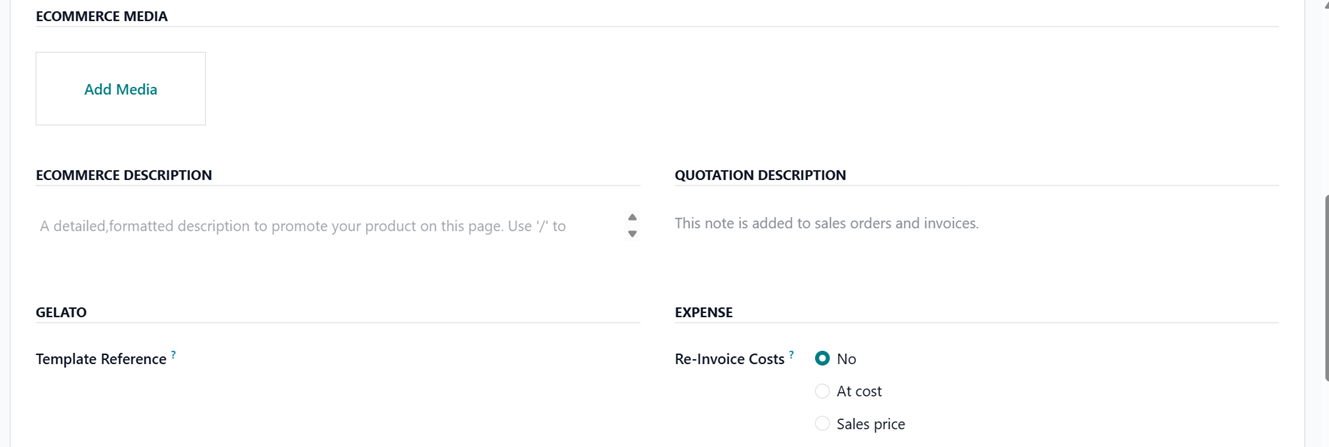
Under the Sales tab, you can configure Upselling/cross-selling options, Ecommerce Shop specifics, Ecommerce Media,Ecommerce and Quotation Descriptions, and define Gelato and Expense settings, as you can see from the screenshot below.
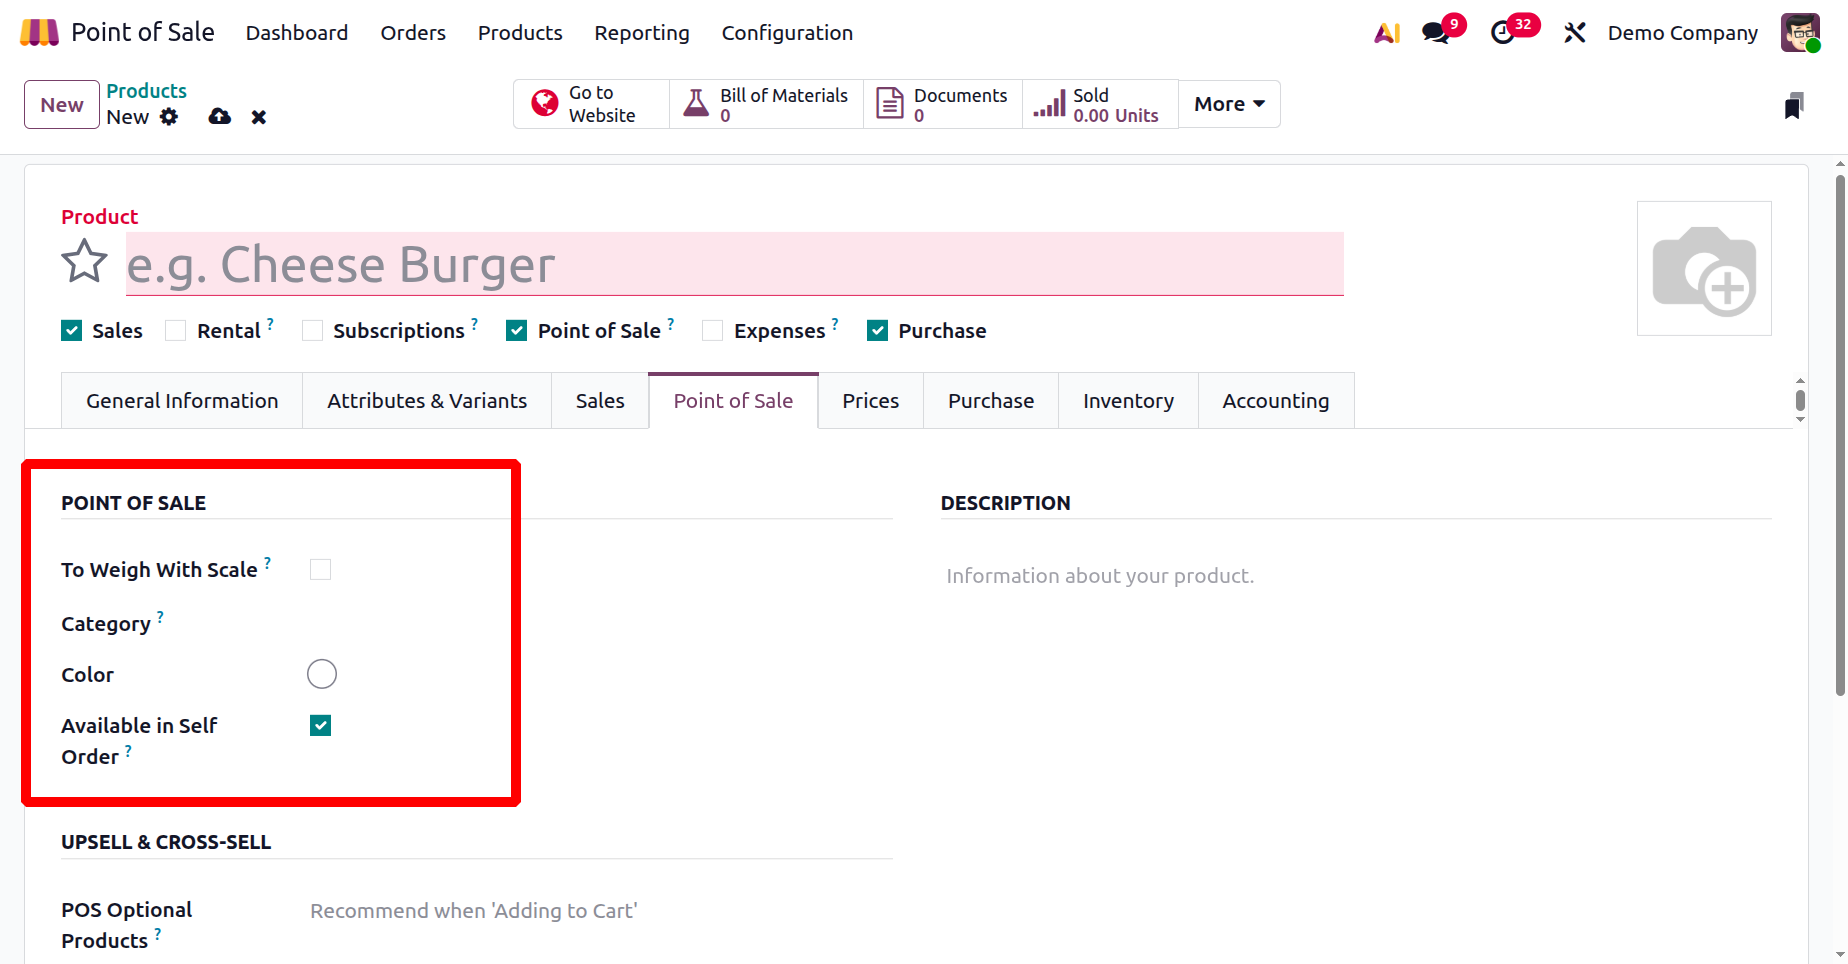
The Point of Sale tab allows for advanced control such as marking products for self-order, enabling weight-based pricing, assigning PoS categories, and tagging product colors in its POINT OF SALE section.
The ‘To Weigh With Scale’ option enables weighing products with a hardware scale like fruits or vegetables during checkout. While the ‘Category’ can be set as the product’s category displayed in a Point of sale interface. The ‘Color’ helps organize and visually distinguish items in the POS interface. Then, the ‘Available in Self Order’ allows customers to order the item via self-service kiosks.
It also includes fields for the product’s public DESCRIPTION and food delivery options under the ‘URBAN PIPER’ section.
The ‘DESCRIPTION’ field can be used to add extra details for receipts or listings. The ‘URBAN PIPER’ integration connects products to external delivery platforms such as Justeat, Doordash, EatEasy etc,. So, with the ‘Available on Food Delivery’ field, specify whether the item is listed online. The ‘Meal Type’ field can be used to categorize items by Veg, Non-Veg, Eggetarian etc, as shown in the screenshot below.
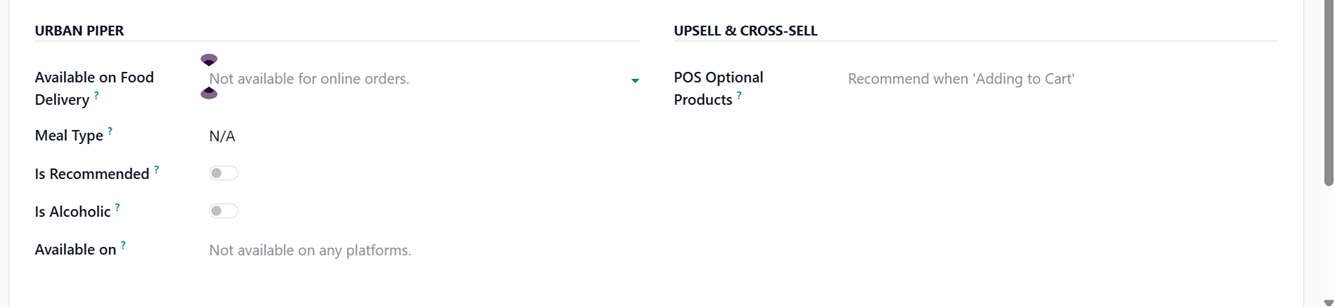
The ‘Is Recommended’ field highlights if it is a mostly recommended product by the customers on food platforms. Finally, the ‘Is Alcoholic’ flags items containing alcohol. The ‘Available on’ field defines where the product is sold such as POS, website, or delivery apps. Together, these settings streamline product management, visibility, and integration across all sales channels.
Finally, you can add the POS Optional Products under the ‘UPSELL & CROSS-SELL’ section to place some recommended products when customers add certain products to their cart.
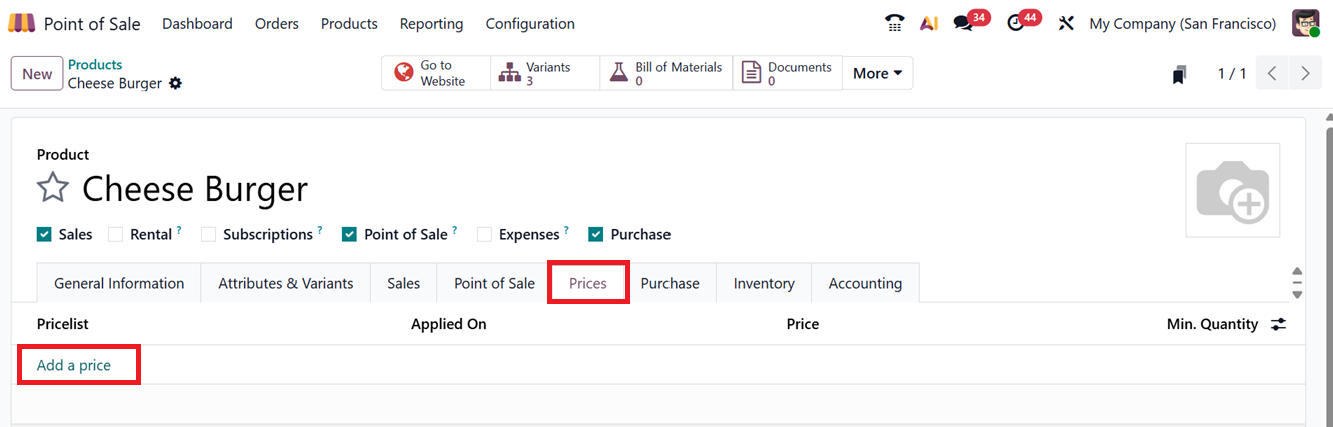
The ‘Prices’ tab can be used to add multiple prices for a particular product based on various conditions using the ‘Add a price’ button, as depicted in the screenshot below.
The 'Add a price’ button will open a pop-up window that can be used to create pricelist rules including the Product, Variant, Price Type, Fixed Price, Minimum Quantity, Validity Period and Pricelist, as depicted in the screenshot below.
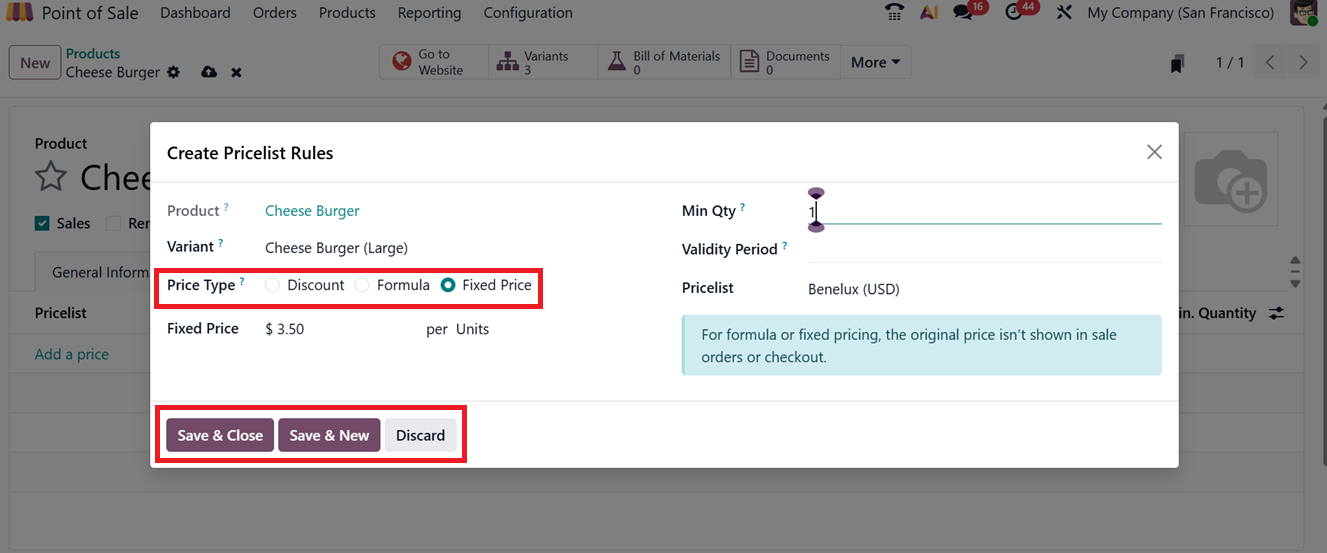
You can set different prices for a product based on the product variant using this pricelist feature. After editing the details, save the details using the ‘Save & Close’ button.
In the Purchase tab, you can add vendors, set pricing in different currencies, and manage lead times by clicking on the ‘Add a line’ button, as depicted in the screenshot below.
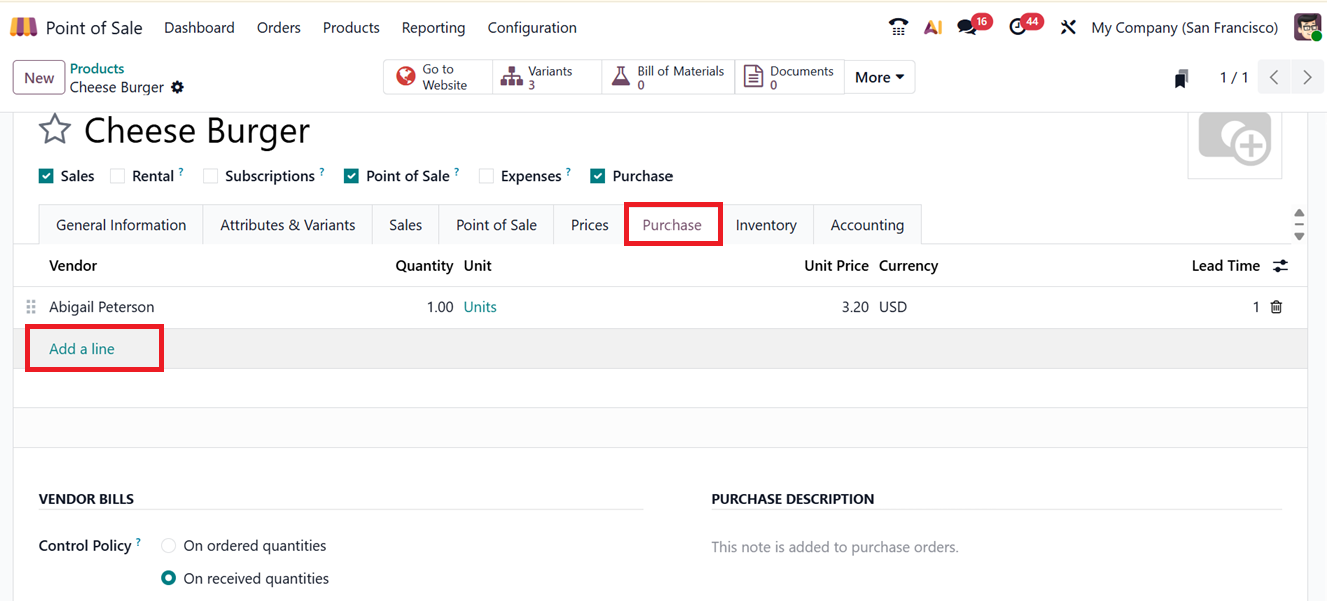
You can also set an ‘Control Policy’ for the Vendor bills based on ordered quantities or received quantities. Also, you can mention an ‘PURCHASE DESCRIPTION’ inside the ‘Purchase’ tab.
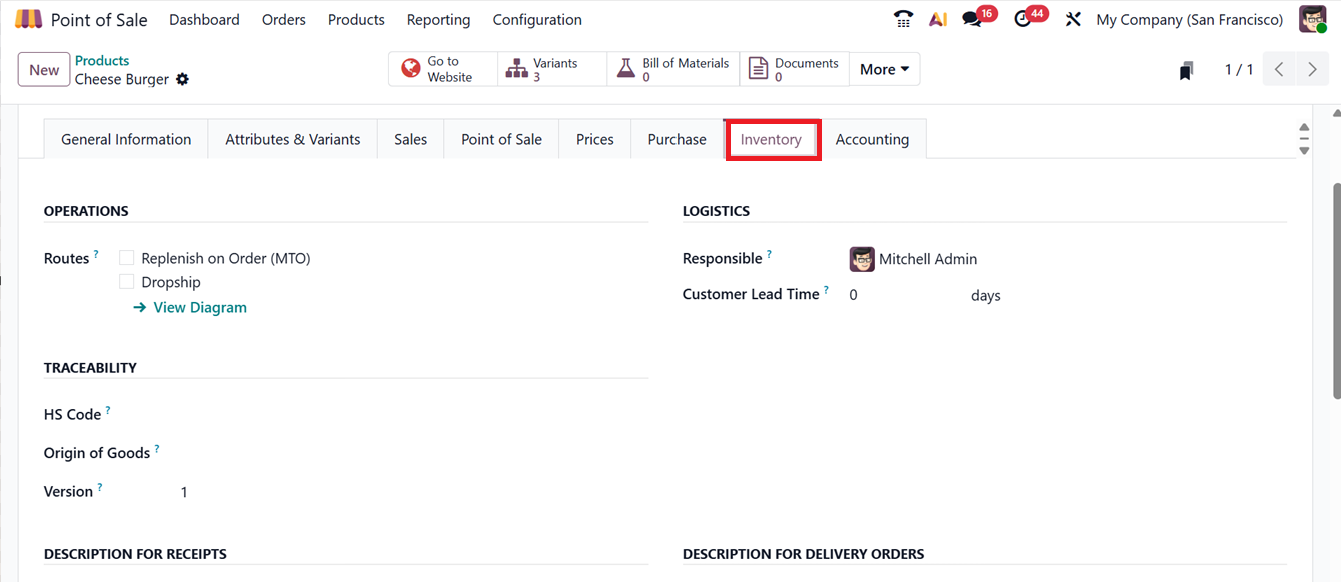
The Inventory tab helps you define the routes for OPERATIONS, LOGISTICS, TRACEABILITY features, DESCRIPTIONS FOR RECEIPTS, DELIVERY ORDERS and INTERNAL TRANSFERS, as depicted in the screenshot below.

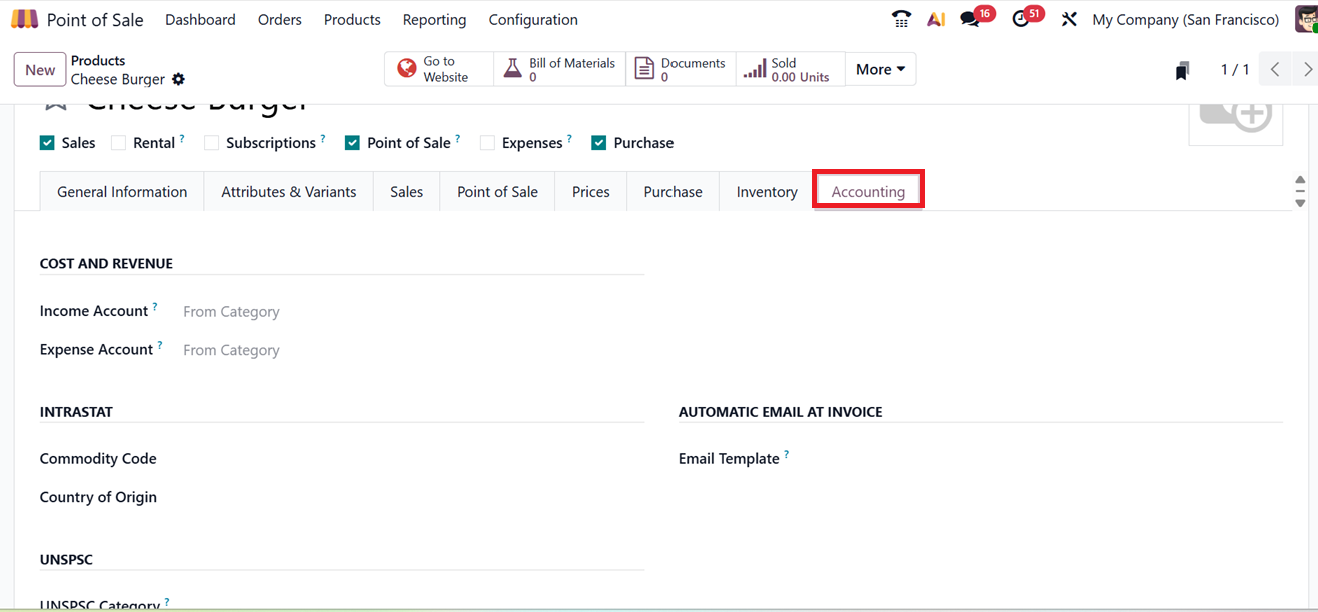
The Accounting tab allows for choosing a relevant ‘Income Account’ that records POS sales revenue and an ‘Expense Account’ to track related costs like discounts or commissions. Setting them up ensures smooth sales-accounting integration and accurate profit reporting, as depicted in the screenshot below.
After saving all the product details, it is available for sale in any PoS session. Then you can make further configurations or check various product operations via smart buttons like Bill of Materials, Documents, Go to Website, Sold, Purchased and On/Out.
1.2 Product Variants
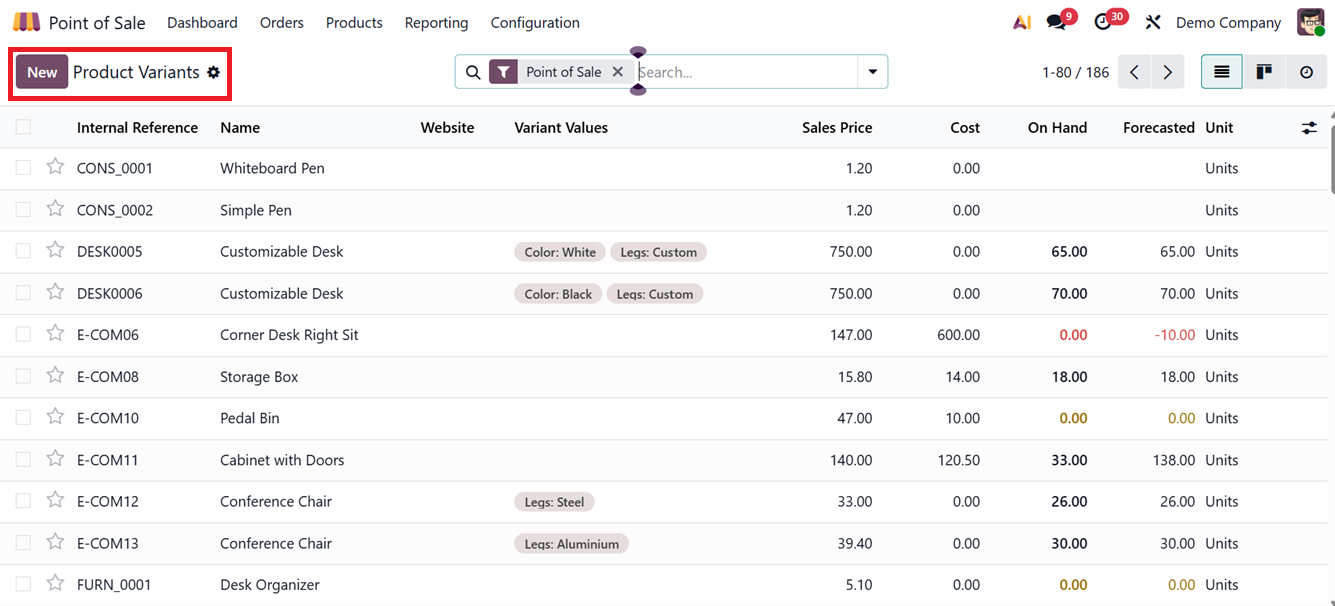
Under the ‘Product Variants’ section, Odoo allows users to manage various versions of the same product. This includes different sizes, colors, or features. You’ll find a list with columns for Internal Reference, Name, Website, Variant Values, Sales Price, Cost, On Hand Quantity and Forecasted Unit, as shown in the screenshot below.
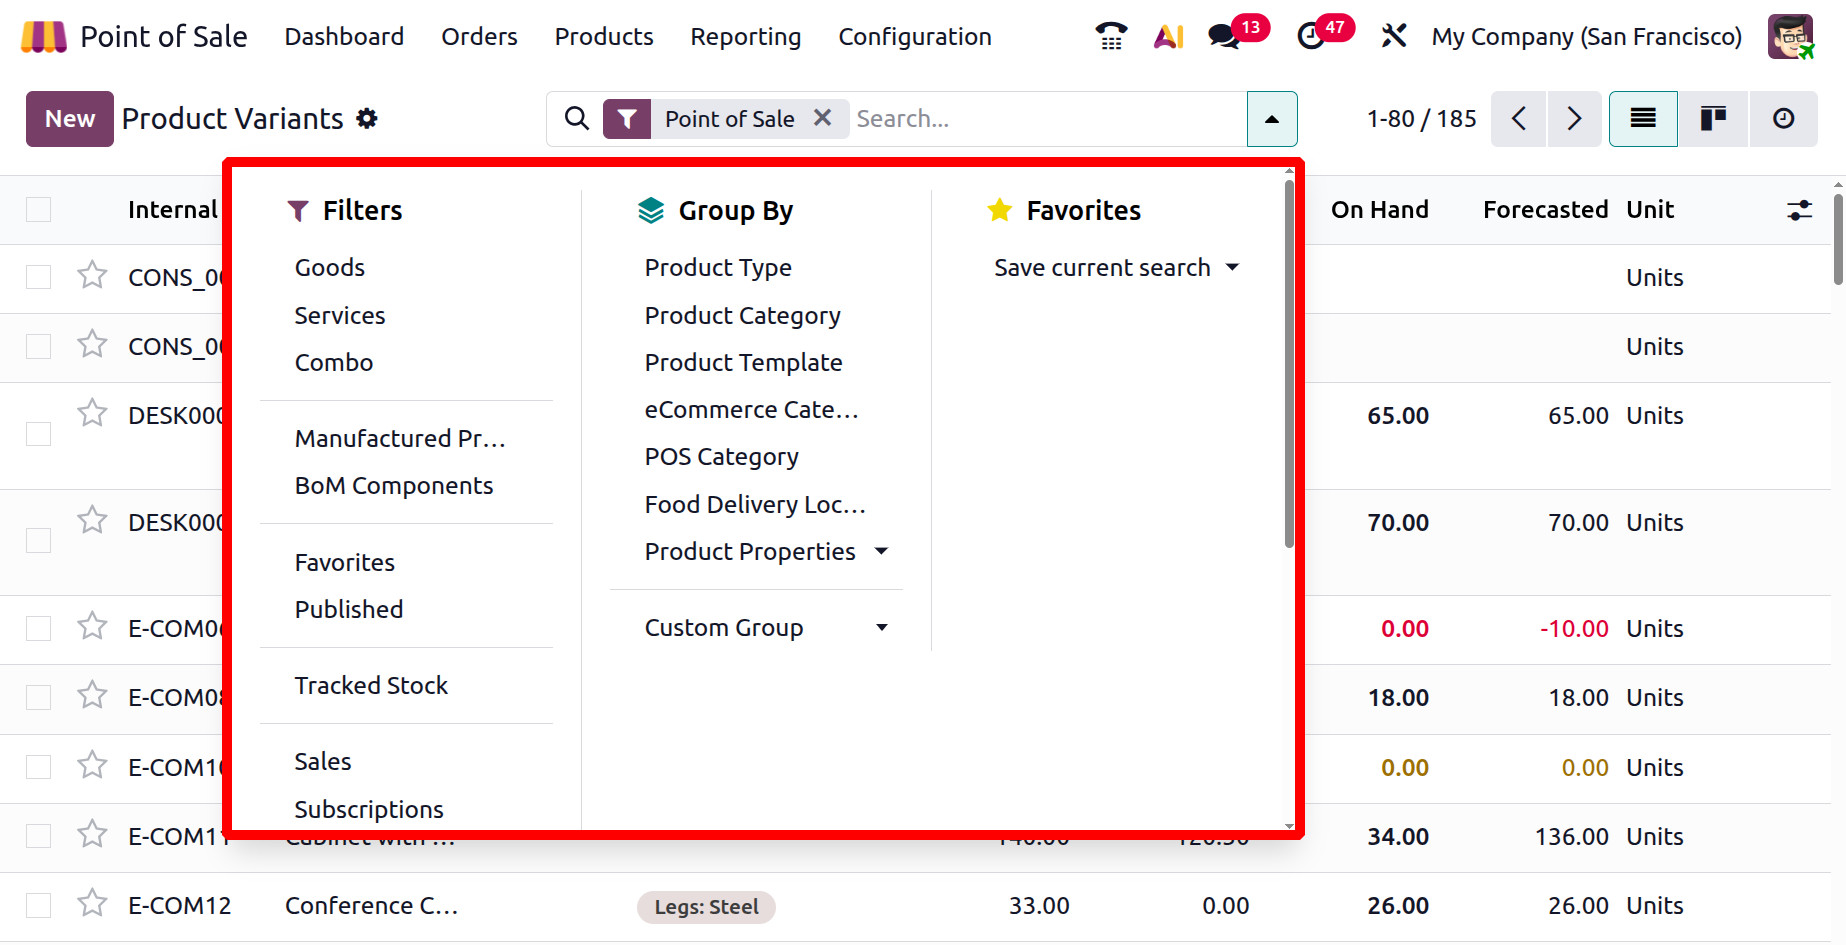
For example, a product may come in a variety of colors and sizes. This section provides a handy grouping of these variations, and users can effectively sort and arrange the data by applying "Group By"and Filters available in the search bar area.
So, Odoo will show an attribute selection window automatically when a product with several variants is selected while a PoS session is running. This guarantees proper order processing by enabling the salesperson to select the desired attributes like color or size before the item is added to the shopping cart.
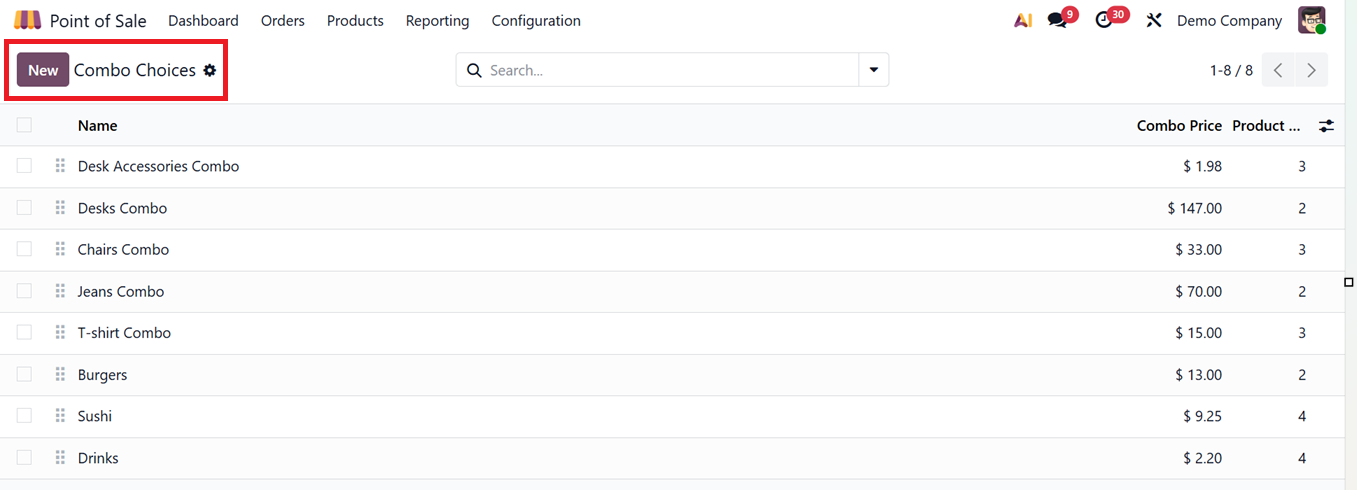
1.3 Combo Choices
The Combo Choices feature helps businesses bundle multiple items into a single product offering. From the Products menu, go to Combo Choices to view existing bundles, which show Combo Name, Combo Price, and Included Products, as shown in the screenshot below.
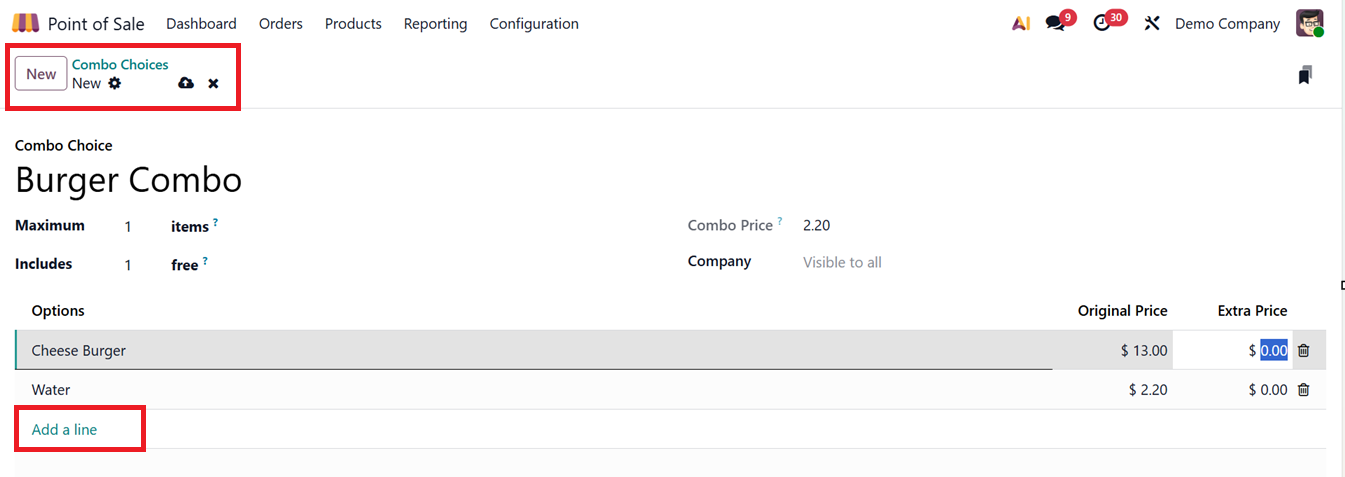
To create a new combo, click on the ‘New’ button. Then, create product combinations like meal deals using the Combo Choice Name field. And set the maximum number of items to select in the combo in the ‘ Maximum Items’ field. Then, set how many free items are included in this combo using the ‘Included Free Items’ field. The Combo Price can be used to set the total cost, and the Company field links it to a specific company. Products can be added with the ‘Add a line’ button. Original Price is the actual sales price of the products. Finally, you can assign an Extra Price to items based on their variant, size, color etc. This setup makes it easy to manage and sell customizable bundles at the point of sale, as depicted in the screenshot below.
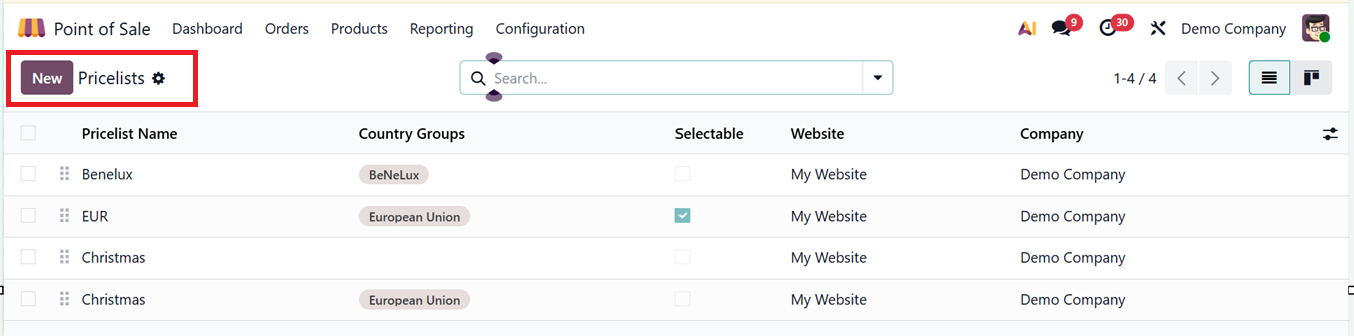
1.4 Pricelists
In Odoo, the ‘Pricelists’ feature allows businesses to set different prices for different scenarios like regions, customer groups, or promotional periods. You can configure different pricelists using the ‘Pricelist’ window from the ‘Products’ menu. This window contains the list view of all the available pricelists with their Pricelist Name, Country Groups, Selectable, Website and Company details, as shown in the screenshot below.
Then, click on the ‘New’ button. Now, input the Name and applicable Country Groups. This field lets you target specific regions by grouping countries. A price list linked to a country group only applies to customers from countries within that group.
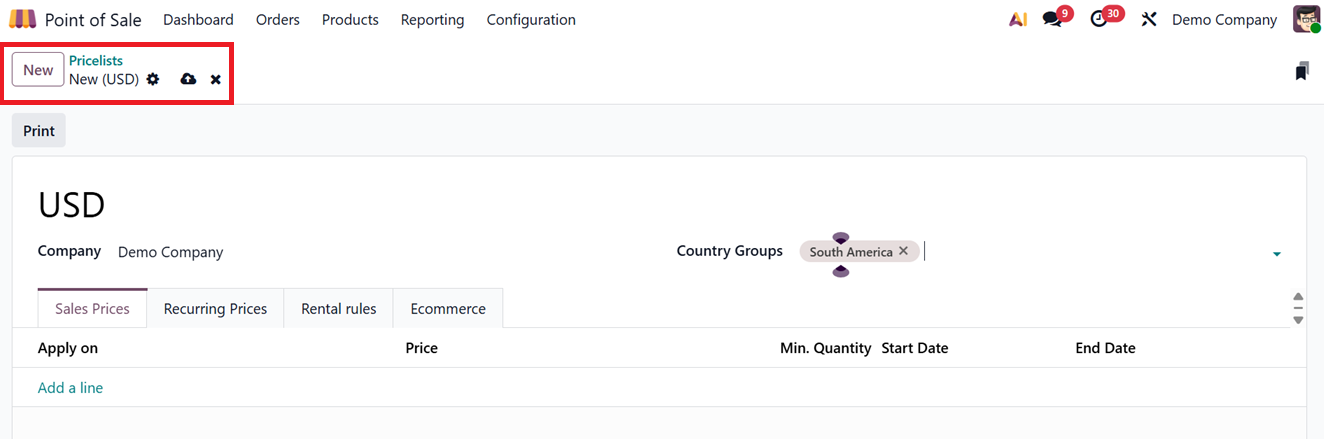
To establish pricing rules on the Sales Prices tab, click on the "Add a line" button to bring up a configuration box.
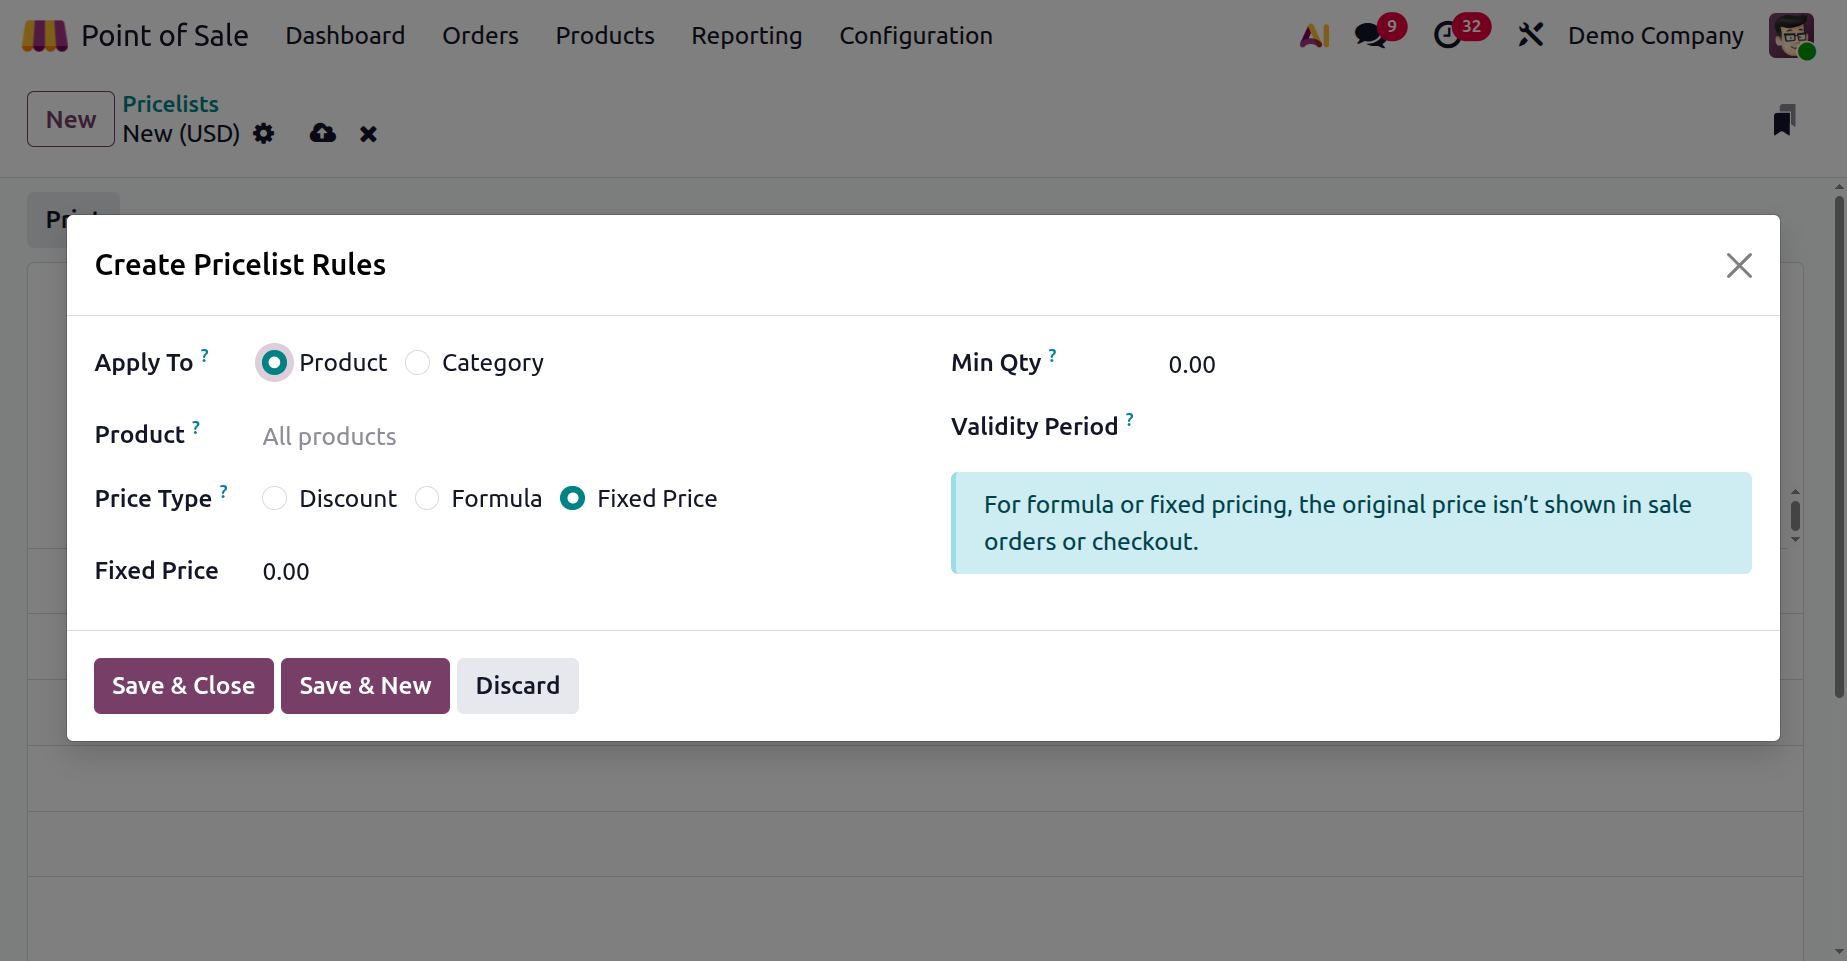
Then, choose the ‘Apply To’ option to mention the pricelist rule on a Category or Product. Then, choose which products are affected. Along with ‘Price Type’ which determines the base price used for calculations. Here, Odoo 19 provide three price type options including;
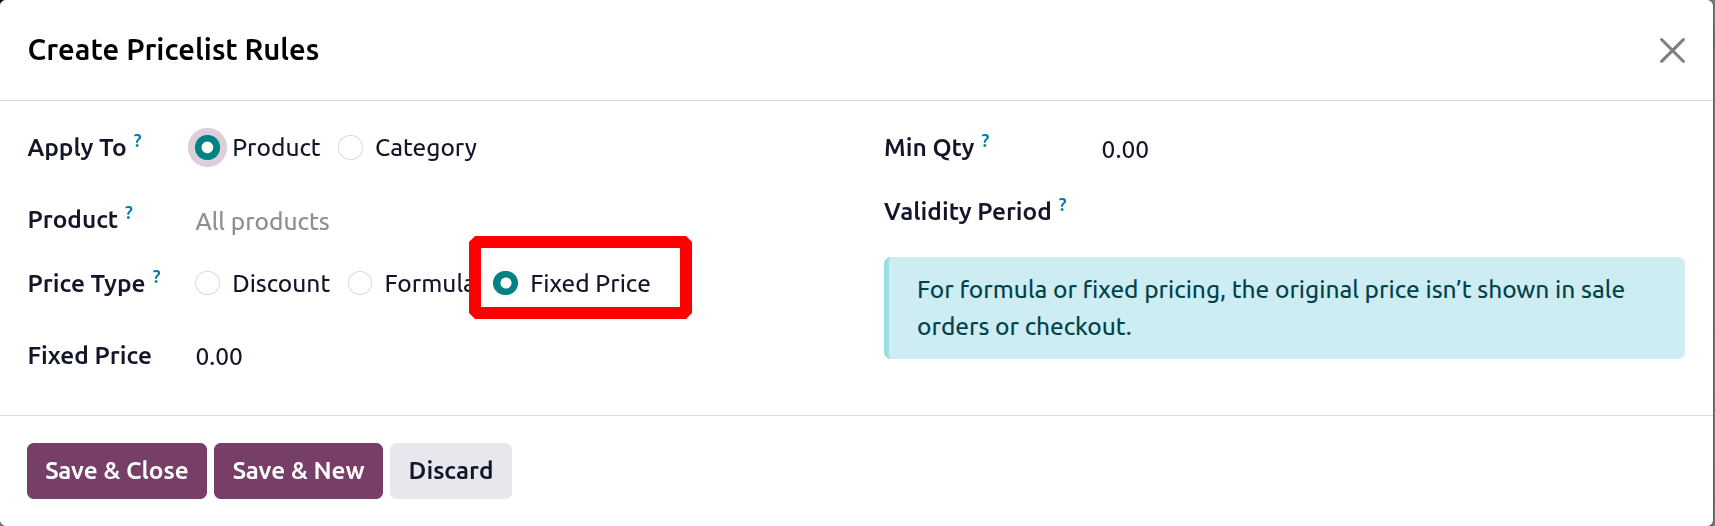
- Fixed Price: Sets a fixed price, ignoring the original sales price (for flat deals like “$10 each”)
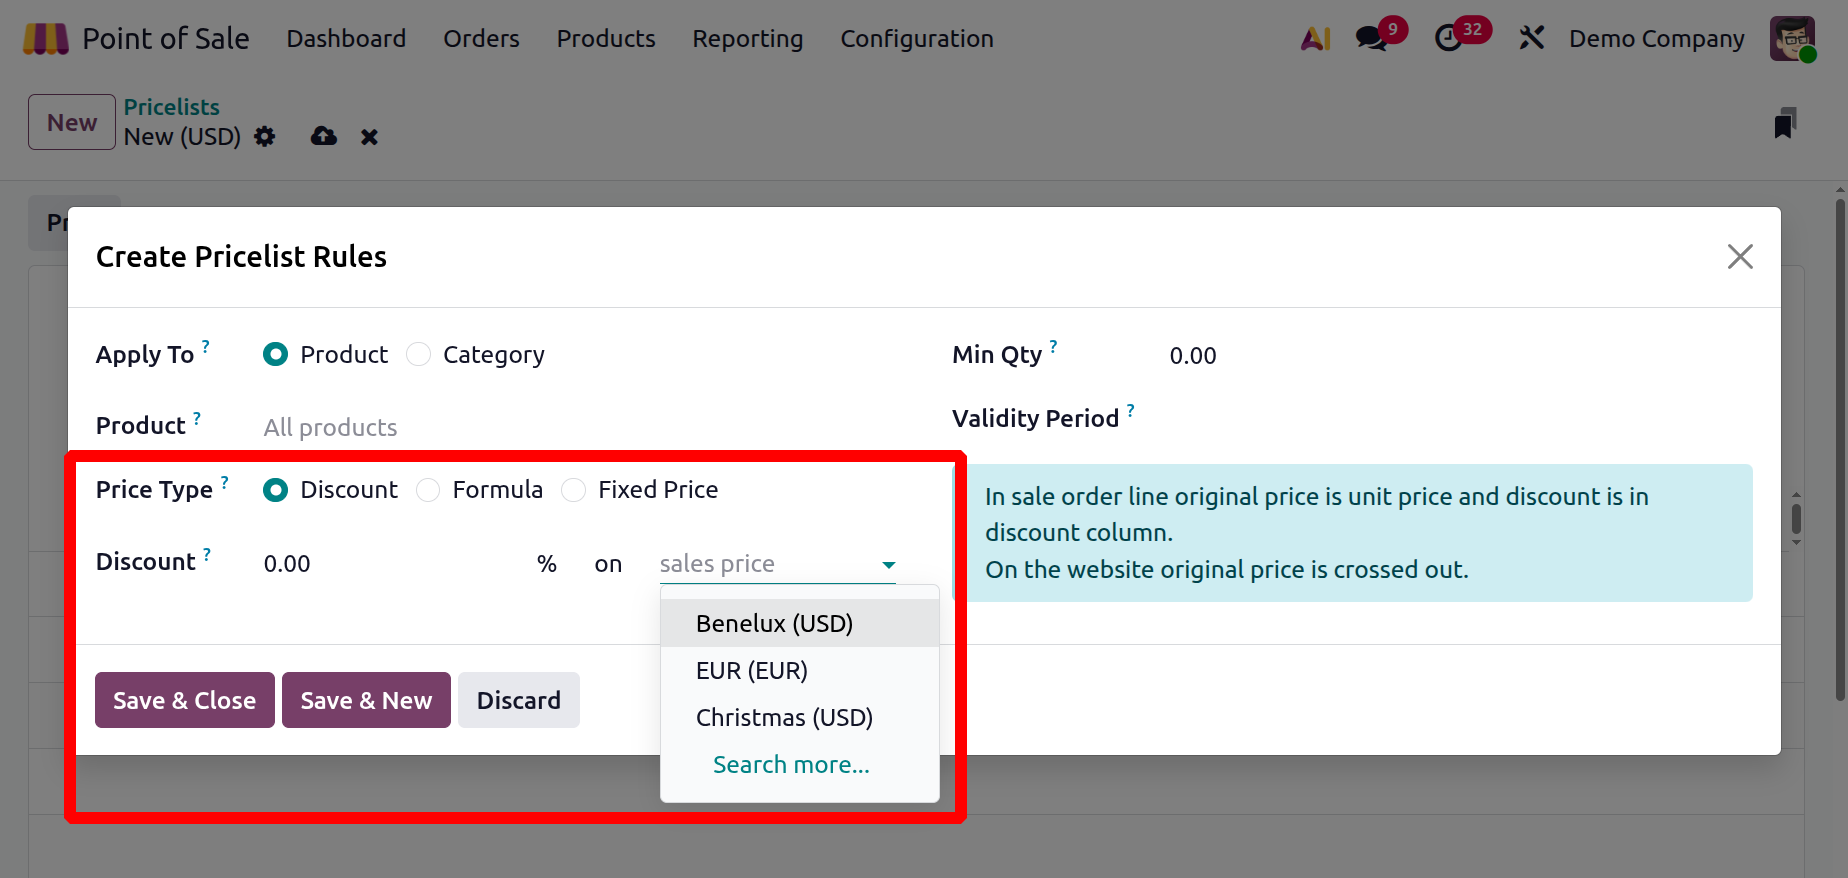
- Discount:Applies a percentage off the sales price (for promos like “10% off”).
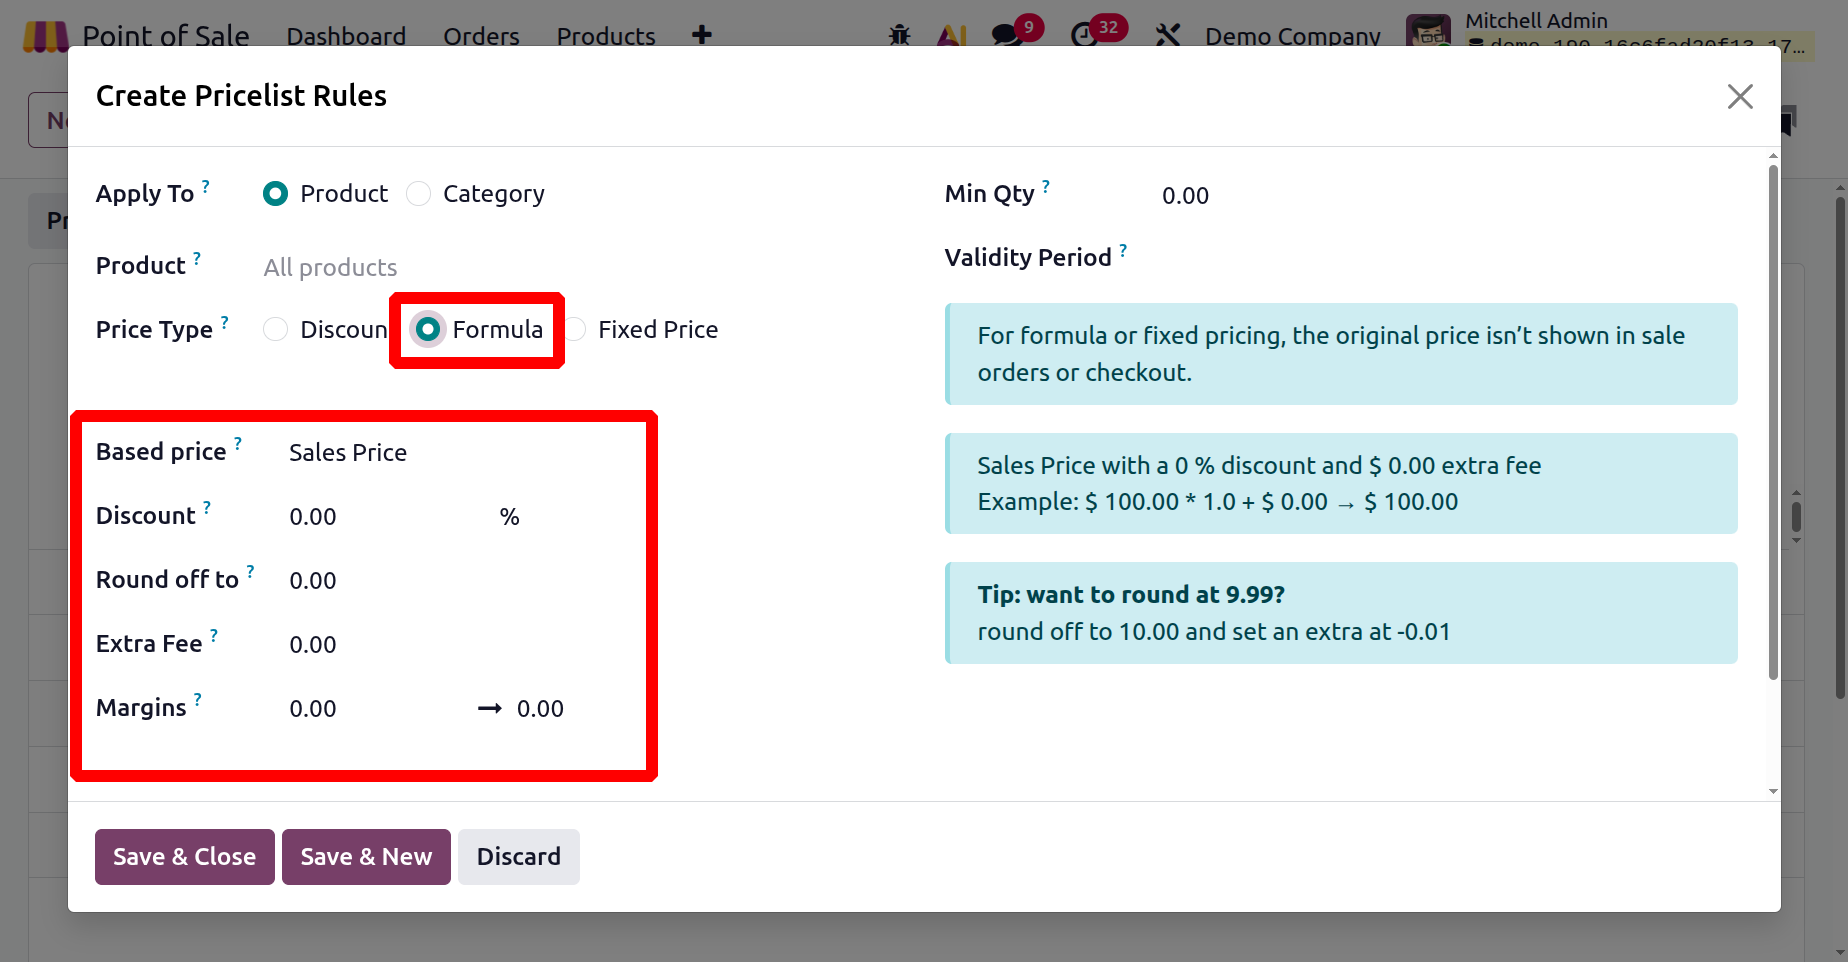
- Formula: Calculates price using a base (cost, sales price), plus discounts, markups, rounding, and surcharges. Ideal for complex pricing.
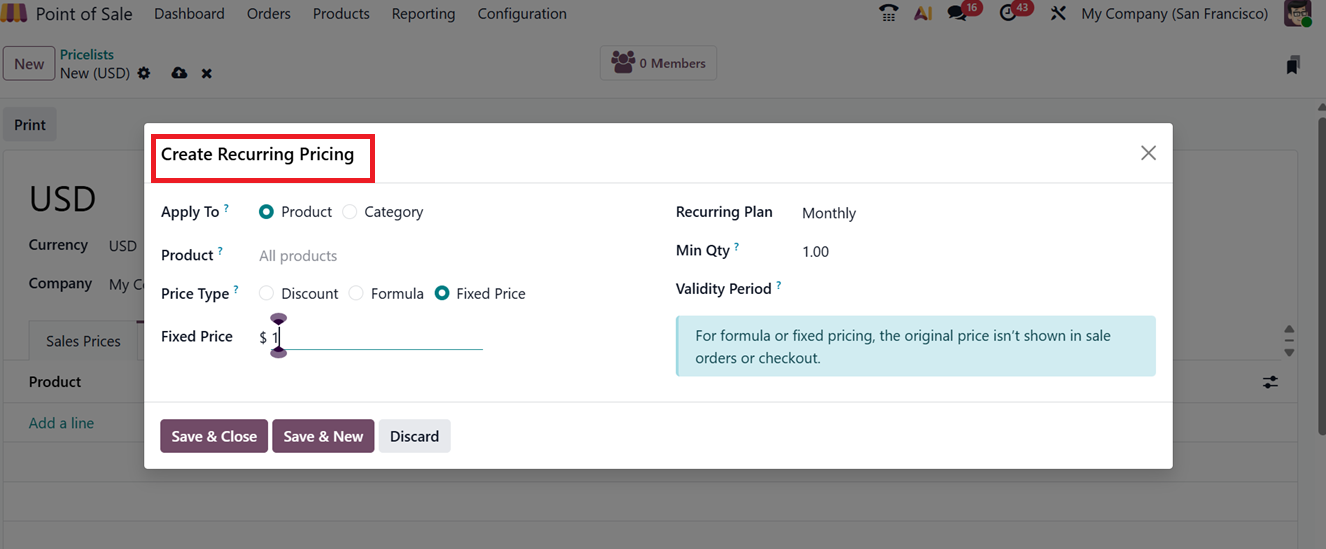
Then, the ‘Fixed Price’ field allows you to set a specific price that overrides the standard price, ideal for fixed-price promotions. Then, set a ‘Minimum Quantities’ to define the least number of units a customer must purchase for the rule to apply, commonly used for bulk discounts and ‘Validity Periods’ like a date range during which the rule is active, useful for managing time-based offers or seasonal pricing, as depicted in the screenshot below.
- Discount: When creating a price list using the ‘Discount’ price type, the sale order line displays the original price as the unit price, with the reduction shown in the discount column. In the shop, the original price appears crossed out, highlighting the discounted price to customers. The discount can be calculated either on the basis of sales price, or based on other price lists.
- Formula: In Odoo 19, when using formula or fixed pricing as the ‘Price Type’ in a price list, the system displays only the final calculated price in sale orders and at checkout, hiding the original product price from the customer. Then, choose where to apply the pricing rule for ‘All Products’ or you can choose a particular product from the drop down menu.
- Based Price: Define what the price calculation is based on : (Sales Price, Cost, or Other Price.)
- Discount: Apply a percentage discount or markup to adjust the price.
- Extra Fee: Add or subtract an Extra Fee (e.g., +$5.00 or -$5.00).
- Round off to: Set a Rounding Method to make the final price a multiple of a chosen value. Example: To make the final price end with .99, set the rounding to 1.00 and the extra fee to -0.01.
- Margins: Specify minimum and maximum profit margins for computations based on Cost (e.g., min $20.00, max $50.00).
For instance, applying a 20% discount plus a $5.00 extra fee on a $100 item results in a final price of $85.00 (i.e., $100 × 0.8 + $5). If you want to present more attractive prices, such as $9.99, you can round the price to $10.00 and then apply an ‘Extra Fee’ of -$0.01 to reach the desired amount. This technique allows for cleaner and more marketing-friendly pricing, as shown in the screenshot below.
You can save the pricelist rules and create multiple rules as per the business requirement. You can attach a recurring pricing rule to a particular product variant's recurring plan and price by selecting the "Recurring Prices" tab option.
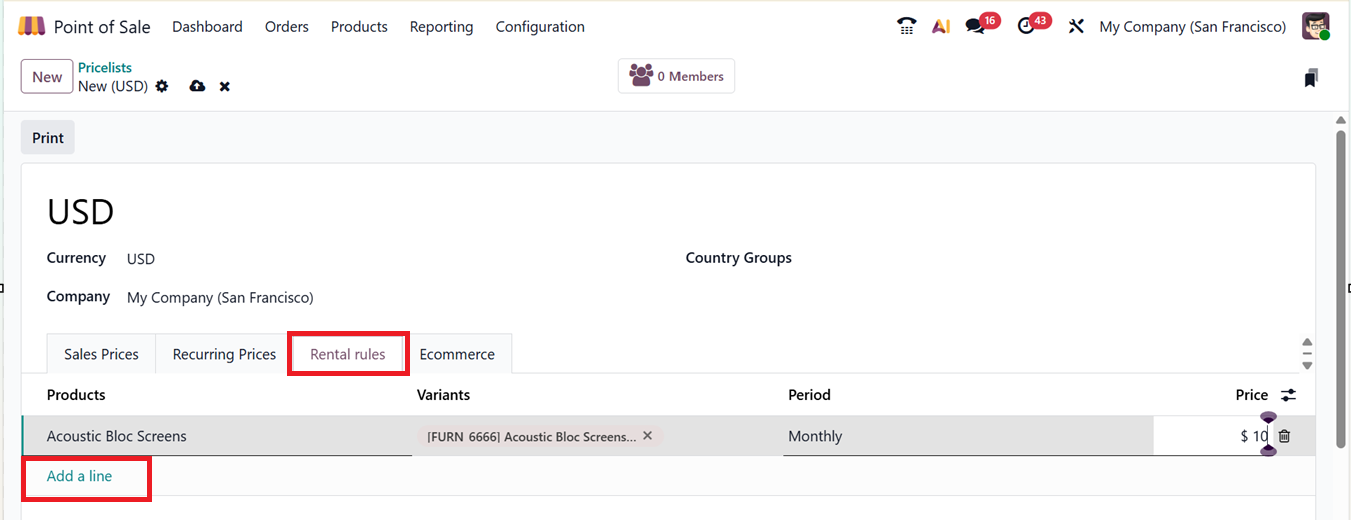
A product's rental rules can then be added using the "Rental rules" tab, depending on the product's version and rental duration. So, you can mention the Products, Variants, Period and recurring Price using the ‘Add a line’ button.
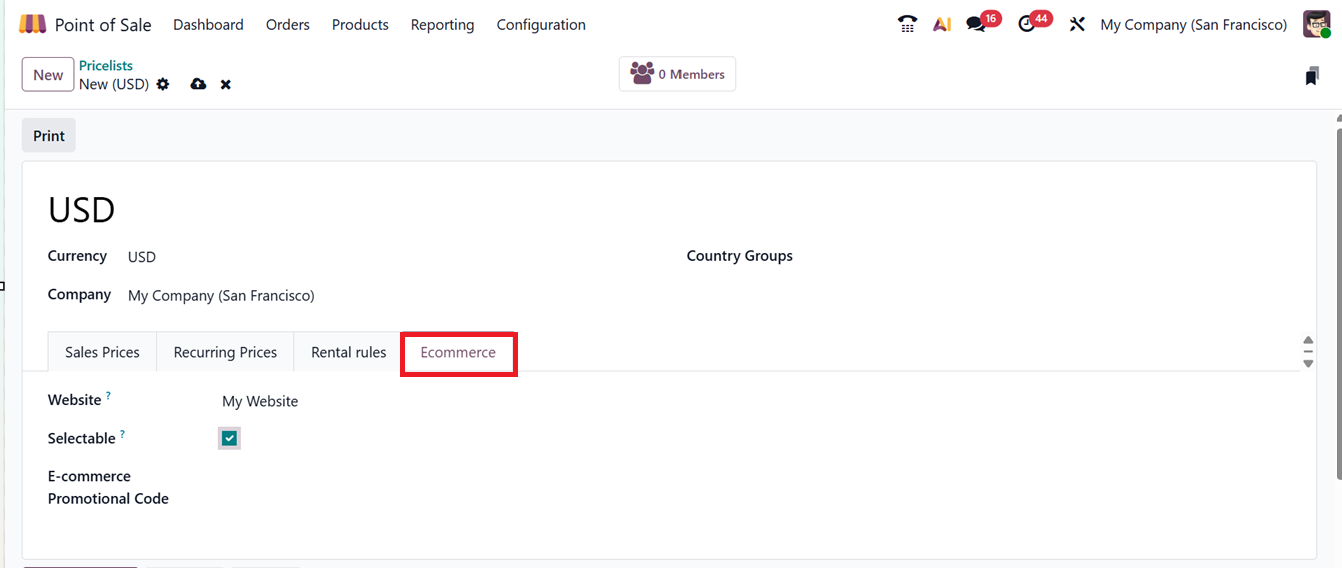
Lastly, the ‘E-commerce’ tab will let you specify which website the pricing list applies to. Furthermore, the "E-commerce Promotional Code" field allows the setup of discount codes for online transactions, and the "Selectable" option allows users to manually choose a pricing list.
Users can set the created pricelist during the configuration of Shop, for that, go to PoS Configuration Settings and enable Flexible Pricelists. Once enabled, go to the Pricelists section to create or manage pricing rules.

Available and Default Pricelists
- Available Pricelists: These are editable lists of prices that apply to particular clients or circumstances. They let companies set rates according to things like regional pricing, time-sensitive promotions, discounts, and consumer segmentation.
- Default Pricelist: Unless a different price list is chosen, this is the basic pricing reference for all products.
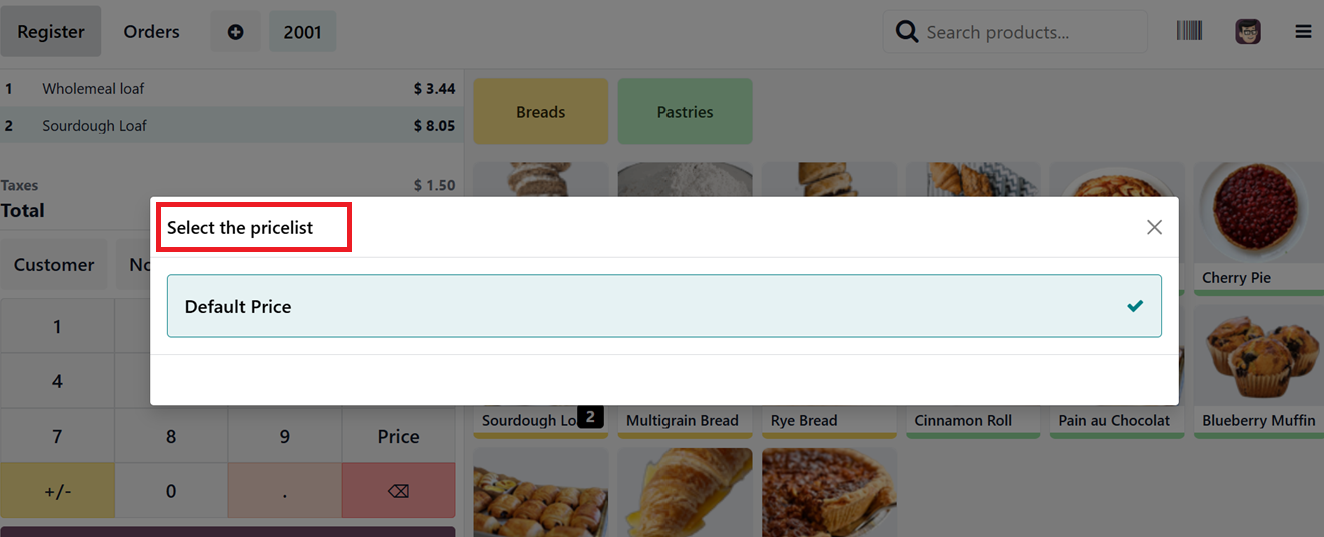
To complete the price list, you can use the "Save" icon after adjusting the required parameters. Once saved, these pricelists can be used in PoS sessions by selecting them via the Pricelist menu provided inside the Actions button of the POS sales interface, as depicted in the screenshot below.
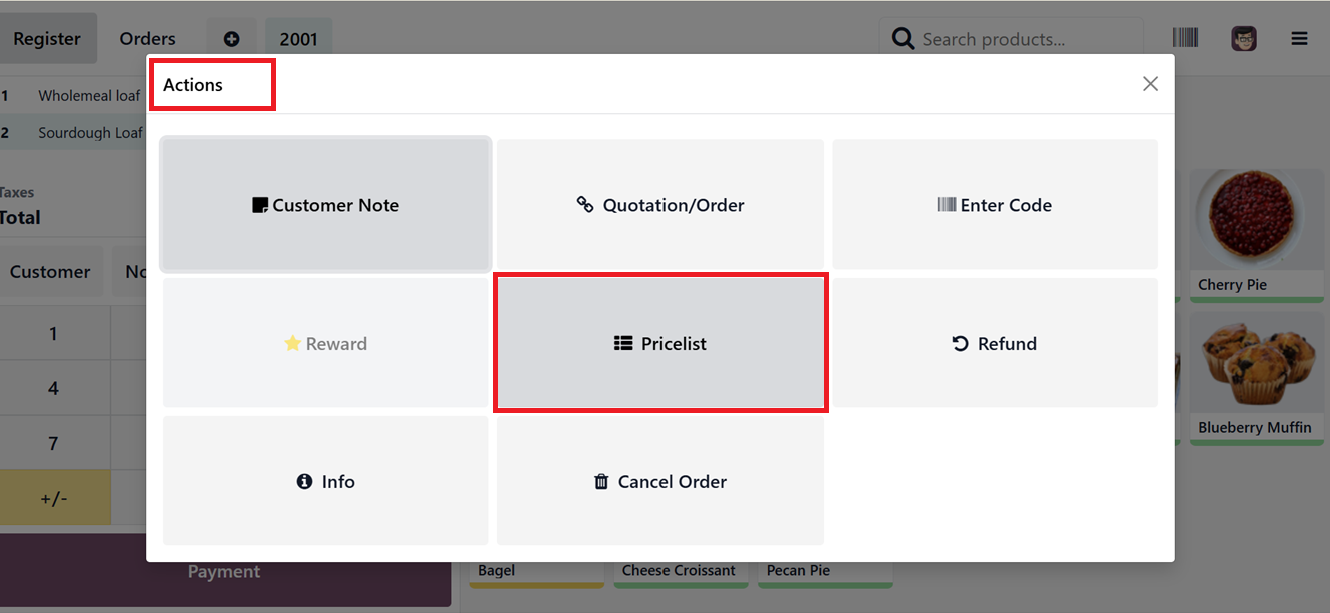
The "Pricelist" option allows customers to apply a personalized price list to a particular product. The Point of Sale system will handle the transaction in accordance with the selected pricing list. Here, you can choose the Default Pricelist and any specified price lists show up in a selection window, as depicted in the screenshot below.
1.5 Discounts & Loyalty Programs
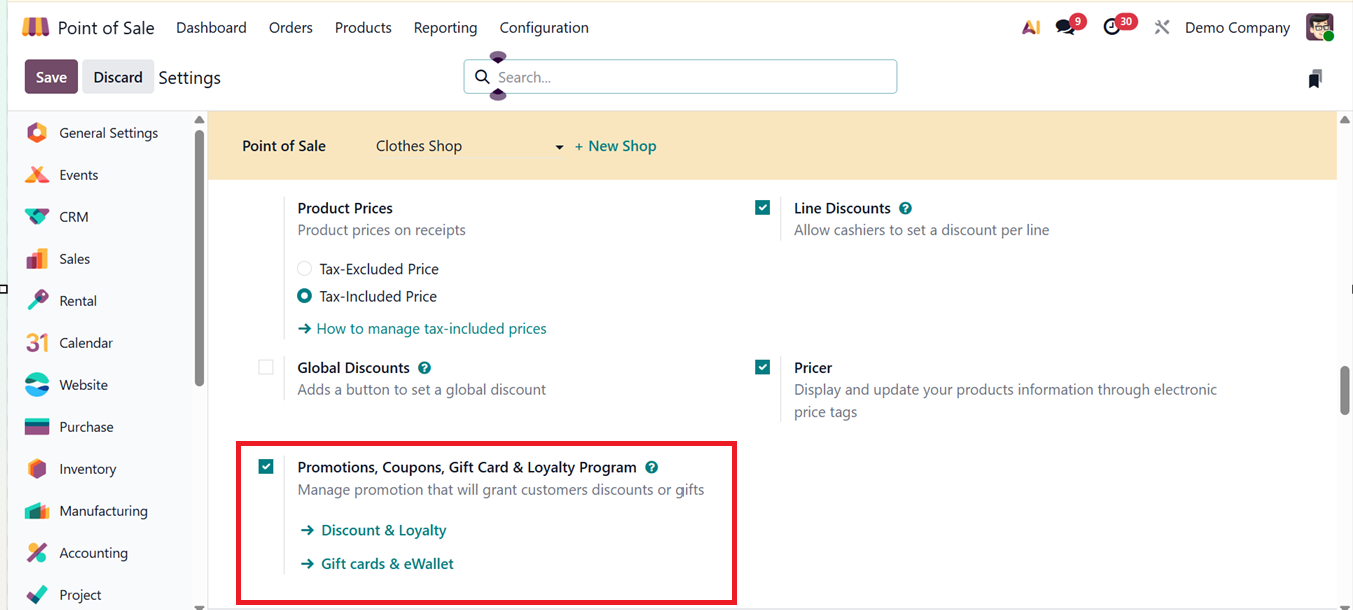
To enable discounts and loyalty programs, activate the "Promotions, Coupons, Gift Cards & Loyalty Program" feature under the PoS pricing settings tab, as shown in the screenshot below.
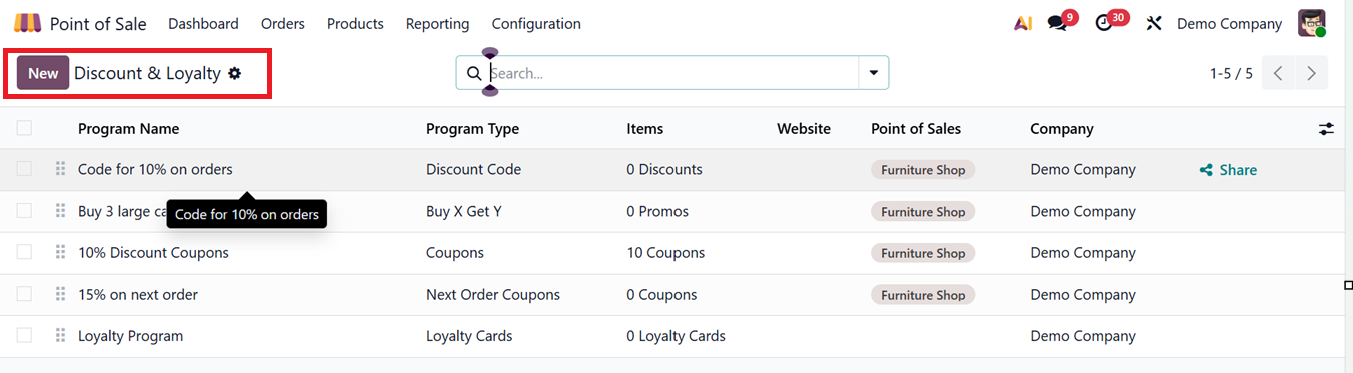
Then, choose the "Discount and Loyalty" option from the "Products" menu to create a new Discount or Loyalty program. This section gives you a list of all the existing discount and loyalty programs with details like Program Name, Type, Applicable Products, PoS Availability, Website, and Company, as depicted in the screenshot below.
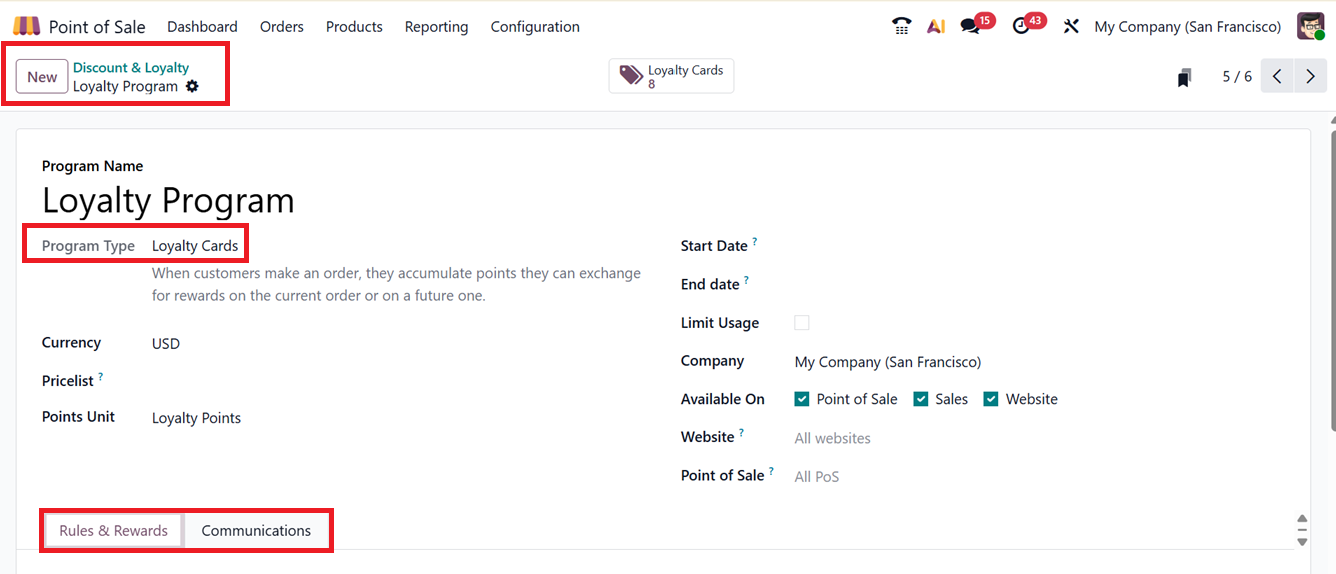
To create a new promotional program in Odoo, start by clicking the "New" button and assign a relevant ‘Program Name.’ You'll begin by selecting the Program Type options including;
- Coupon –Gives customers a unique code for discounts or rewards. Example: “Get a $10 coupon for your purchase.” Redeemable in PoS or online.
- Loyalty Cards – Reward repeat customers with points. Example: “Earn 1 point per $1, get a free item after 50 points.” Points can be redeemed for rewards.
- Promotions – Automatically apply discounts when conditions are met, like “10% off drinks” or “Buy 2 get 1 free.”
- Discount Code – Customers enter a code, e.g., “SAVE10,” to get a discount during checkout.
- Buy X Get Y – Offer free or discounted items, e.g., “Buy 2 coffees, get 1 free.” Triggered automatically when conditions are met.
- Next Order Coupons – Generate a coupon after purchase for future use, e.g., “Spend $50, get $5 off your next visit.”
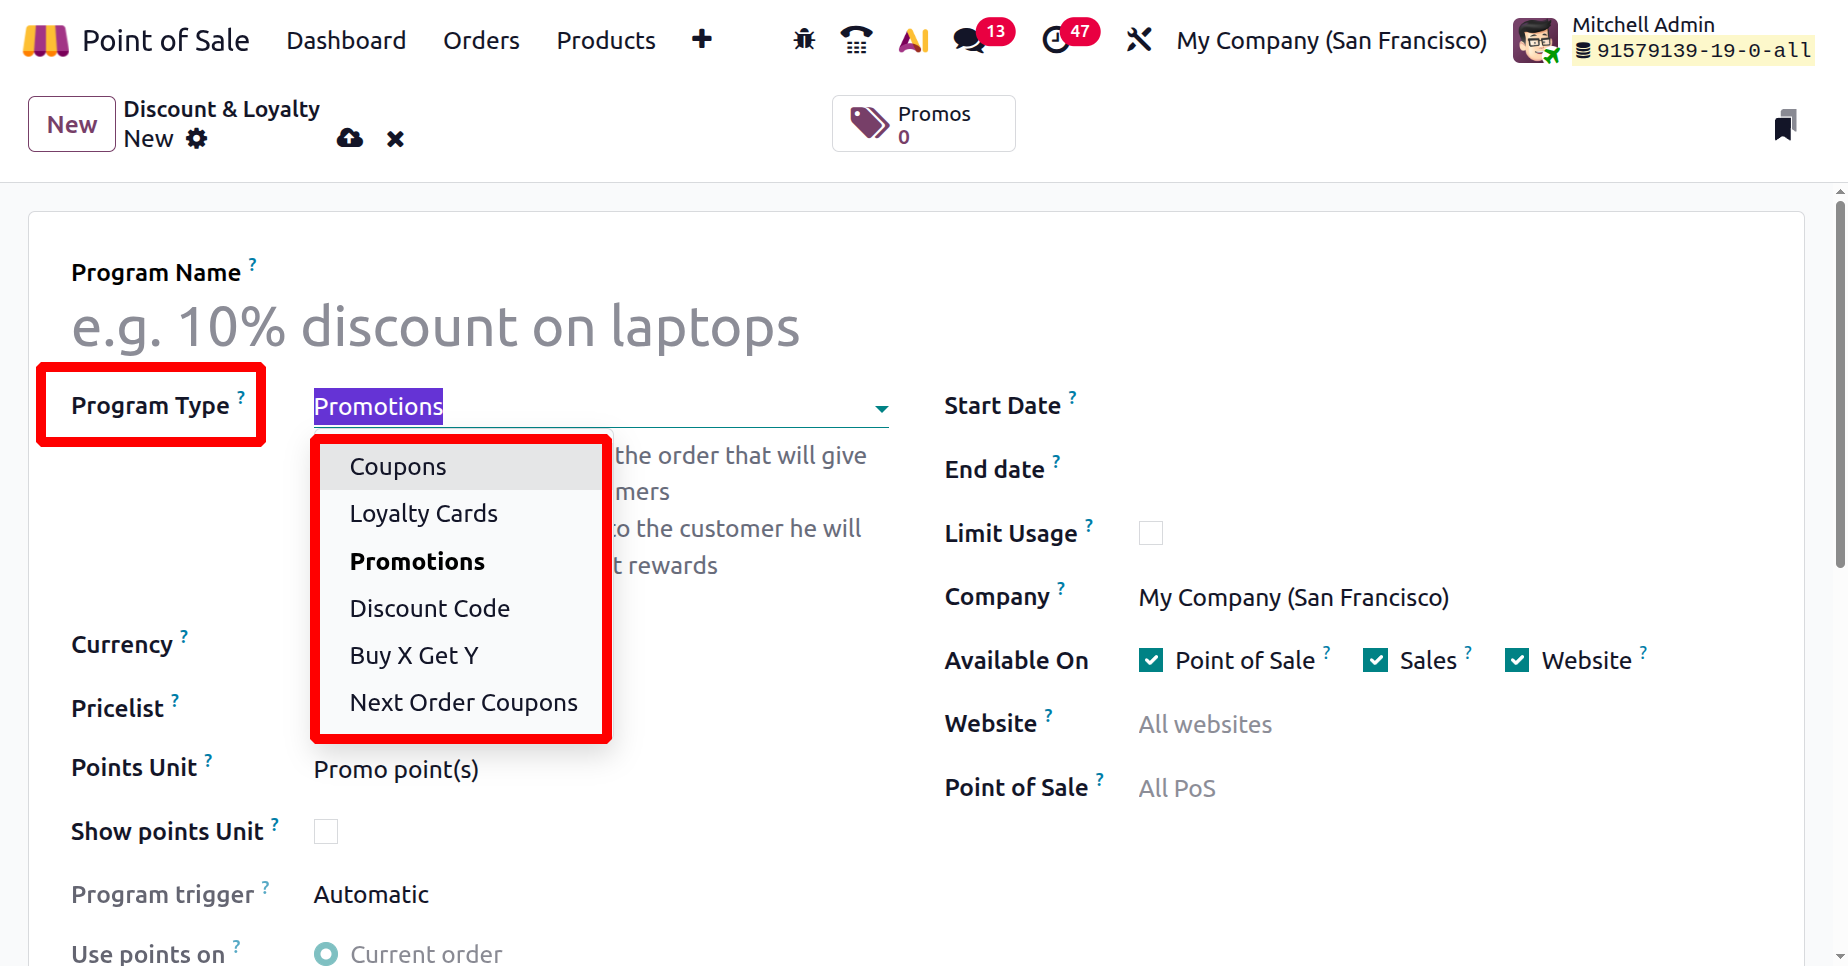
Next, select the desired currency for the discount program and, if necessary, configure a related price list. Define the program’s active period by setting the Start Date and End Date. You can enable the Available on Point of Sale option to make the program usable in the PoS system and specify the Website where the offer should appear. To control how often or by whom the offer can be used, apply rules under the Limit Usage field. Finally, indicate where the discount program should be applied whether in Point of Sale, Sales sessions, or on your eCommerce Website. You can also mention the respective Point of Sales and Website name in the relevant fields, if it is chosen in the ‘Available On’ field.
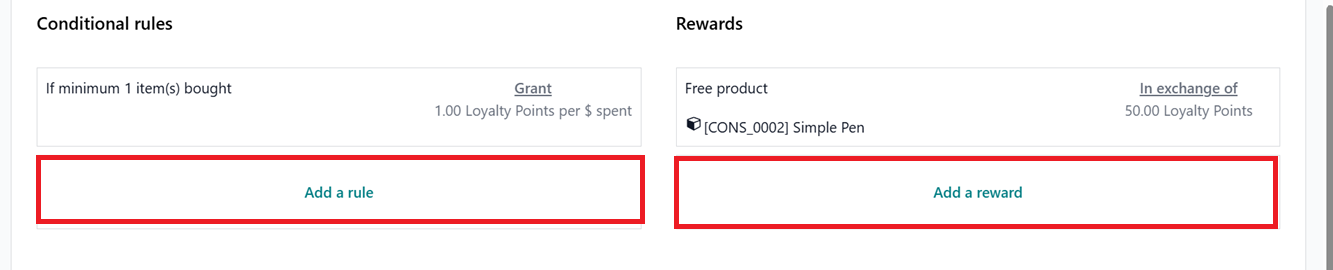
To set up a discount rule, navigate to the “Rules & Rewards” tab and click on the “Add a rule” button.
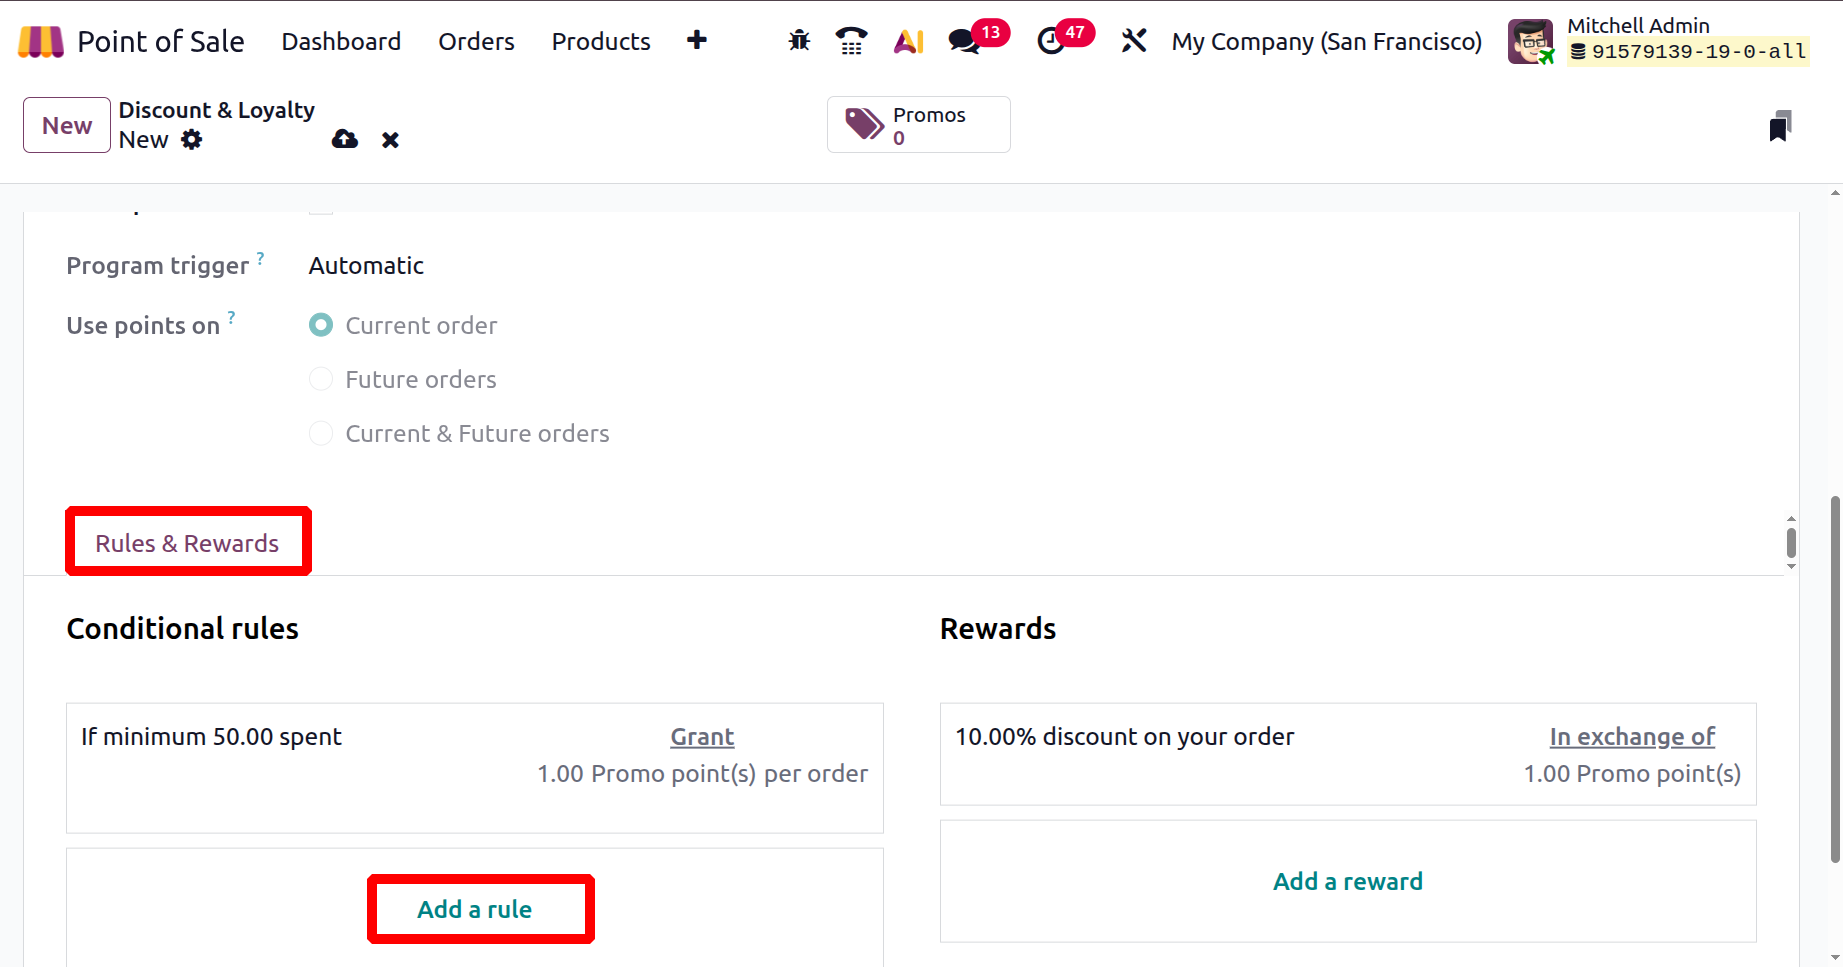
A form will appear where you can define the discount code rules in the ‘CONDITIONS’ area that includes the ‘Minimum Quantity’ field which activates the rule based on the number of items purchased and the Minimum Purchase field to trigger the rule according to the total value of the order.
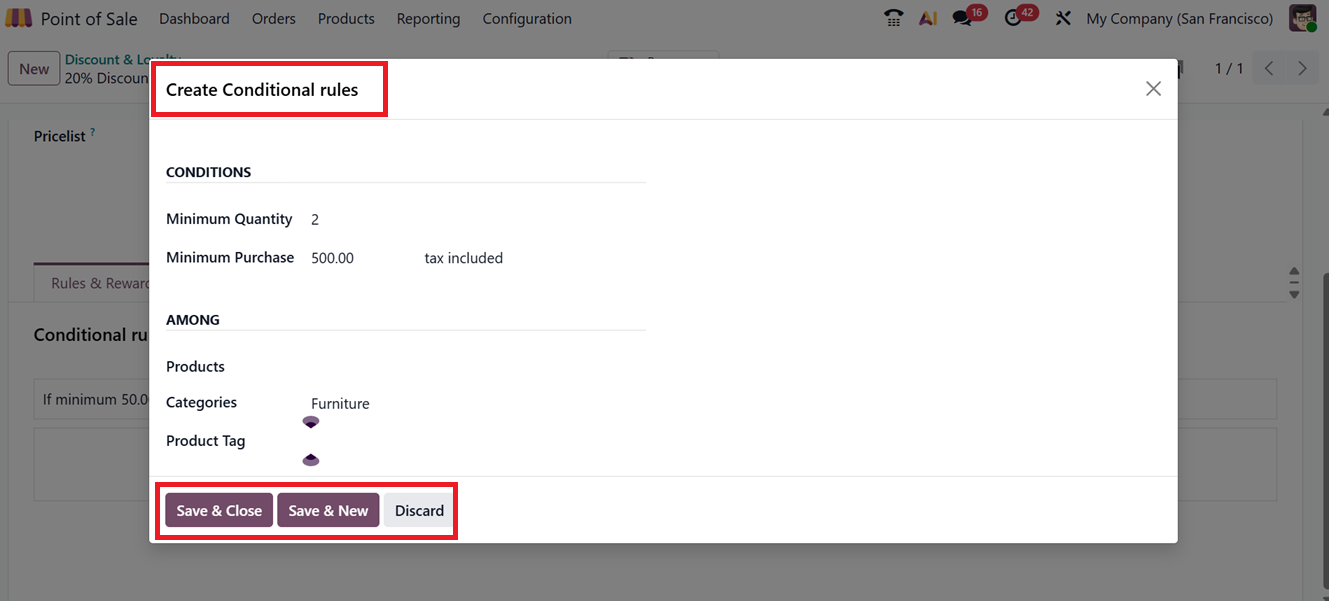
Then, using the ‘AMONG’ tab, select which Products, Categories, or Product Tags. The ‘Products’ field is used to apply a rule to specific individual items, while the ‘Categories’ field applies it to all products within a chosen category. The ‘Product Tags’ field, on the other hand, applies the rule to any items that share the same tag, even if they belong to different categories, as shown in the screenshot below.
In the Rewards section, click on the “Add a reward” button to set the reward. Here, Odoo provides three Reward types including;
- Free Product: Customers get a free item when they buy a certain amount or spend a certain money.
- Discount: Customers get a lower price, either a percentage off or a fixed amount off, on some products or orders.
- Free Shipping: Customers don’t have to pay for shipping if they meet the reward conditions.
Also you can add a short ‘Description on order.’
- Discount: choose the reward type as Discount, and set the ‘Discount’ as a percentage on an ‘Order,’ ‘Cheapest Product’ or ‘Specific Product.’
- Order:Discount applies to the whole order.
- Cheapest Product: Discount applies to the lowest-priced item.
- Specific Product: Discount applies to a chosen product only.
You can also set the ‘Maximum Discount’, which defines the highest discount allowed under the program. Leave the field blank if you don’t want to set a limit. Then, use the ‘Discount’ field to specify where the discount applies on an Order, the Cheapest Product, or Specific Products. Once all fields are filled out, click "Save" to finalize your discount program setup. Here, you can see the reward creation for the ‘Discount’ reward type, as shown in the screenshot below.

When you pick a different Reward Type while setting up a reward, the form will show different fields depending on the type you choose. Let’s look at the fields for each type.
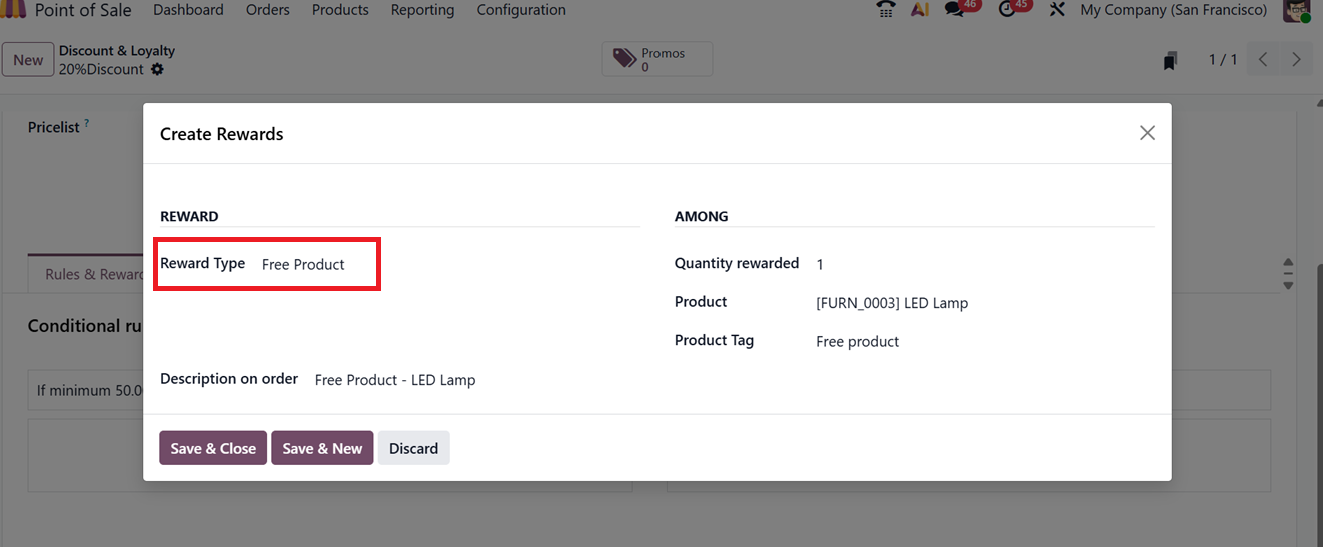
- Free Product: If you choose ‘Free Product’ as the Reward Type, the form will show different fields for that type. You need to enter how many free products will be given in the ‘Quantity rewarded’ field. Then, select which product will be free in the ‘Product’ field and add a ‘Product Tag’ to highlight it in the sales order. Finally, you can write a short note about the free product in the ‘Description on order’ field, which will appear on invoices, receipts, or order lines, as shown in the screenshot below.
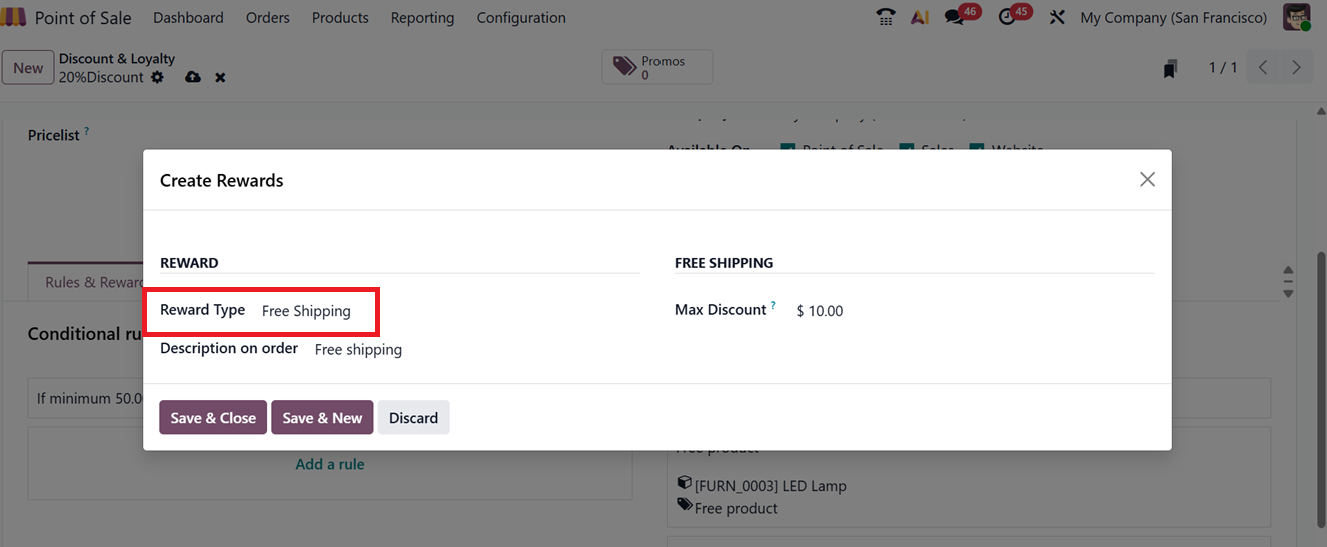
- Free Shipping: If you select ‘Free Shipping’ as the Reward Type, you need to enter the maximum discount amount allowed for this reward in the ‘Max Discount’ field under the ‘FREE SHIPPING’ tab. Then, add a description of the reward in the ‘Description on order’ field, as shown in the screenshot below.
All the configured reward rules will be listed under the “Rules & Rewards” tab. Then, you can generate discount coupons directly by clicking on the “Promos” smart button.
In Odoo 19 Point of Sale, the smart tab name changes based on the selected ‘Program Type,’ in the main configuration for, it will show different fields and options specific to that discount or promotion program. This helps users easily set up the right settings for coupons, loyalty cards, discounts, and more.
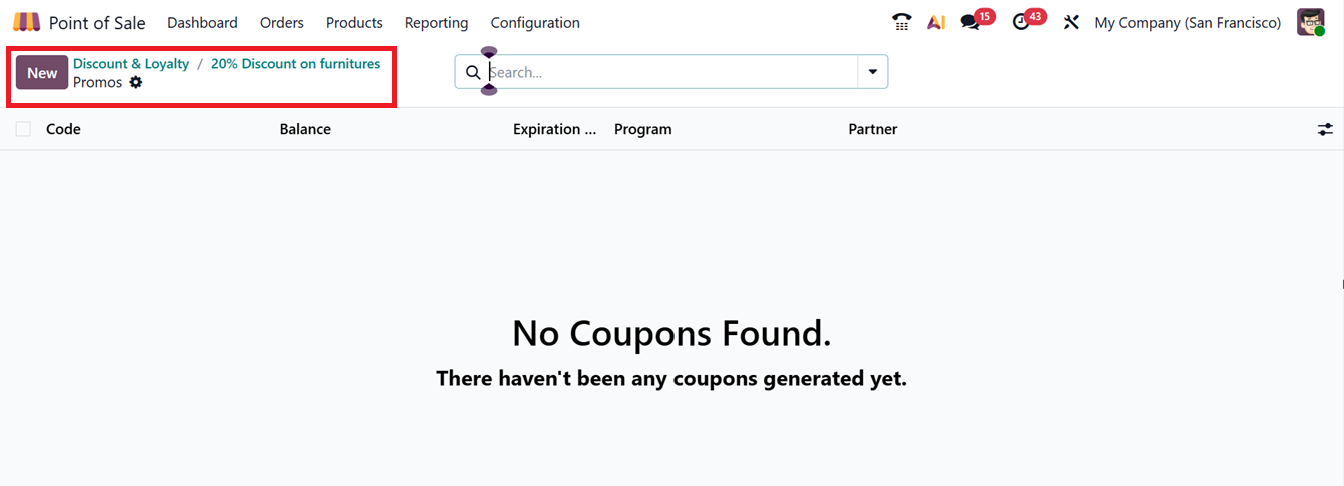
Here, after configuring a reward type as ‘Discounts’ and saving the configurations, you can check the ‘Promos’ smart button to manage the reward coupons. This includes details like the coupon Code, Balance, Expiration Date, associated Program, and the Partner information, as shown in the screenshot below.
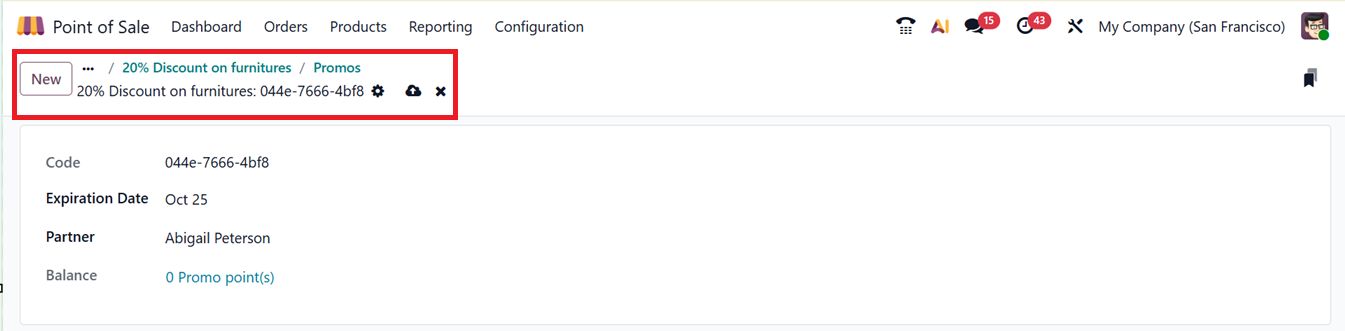
To generate new discount coupons, you can simply click on the ‘New’ button. So, the new discount code will be automatically generated by Odoo. Then, you can mention the ‘Expiry Date and the Partner/Customer in the coupon generation form, as shown in the screenshot below.
When setting up a Loyalty program, the steps are similar. The main difference is that you’ll select “Loyalty Cards” as the ‘Program Type’. All the other form fields are the same as the Discount program feature. But the Loyalty Card configuration form contains an extra form tab named ‘Communications.’
This lets businesses automate when and how messages are sent to customers in the loyalty program using the ‘Add a line’ button. Here, you can set the communication ‘When Reaching’ or ‘At Creation’ in the ‘When’ column. Also you can set the ‘Limit,’ ‘Email Template,’ as depicted in the screenshot below.

Coupon management is handled through the "Loyalty Cards" smart tab, where you’ll find a list of all active discount coupons. From this interface, you can use the “Send” and “Share” buttons to distribute coupons to customers.
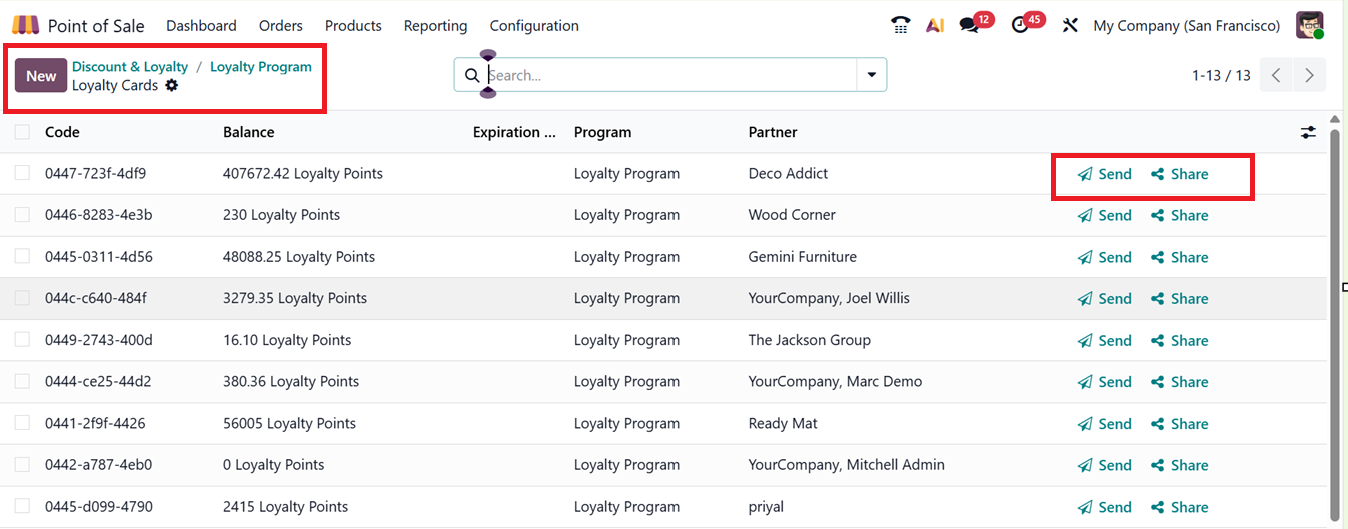
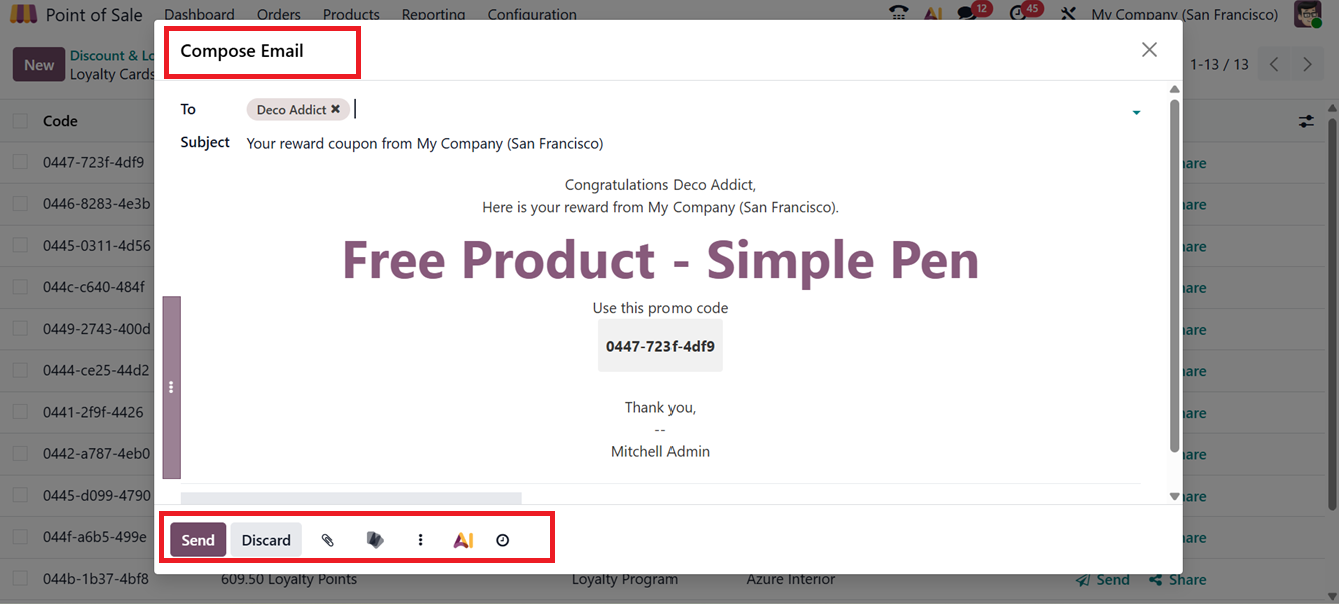
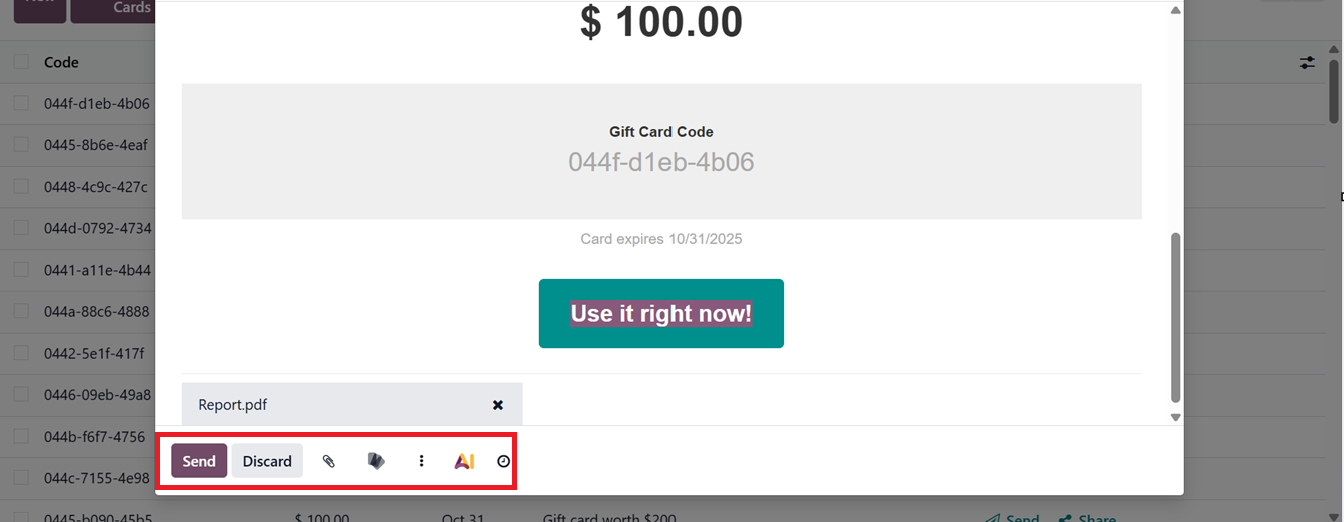
To send the discount or Loyalty cards, click on the ‘Send’ button. So, this will open an email composing window. In the window, you can set the mail address and subject. Also, it is possible to attach any document, add templates, ask AI and schedule mail, as shown below.
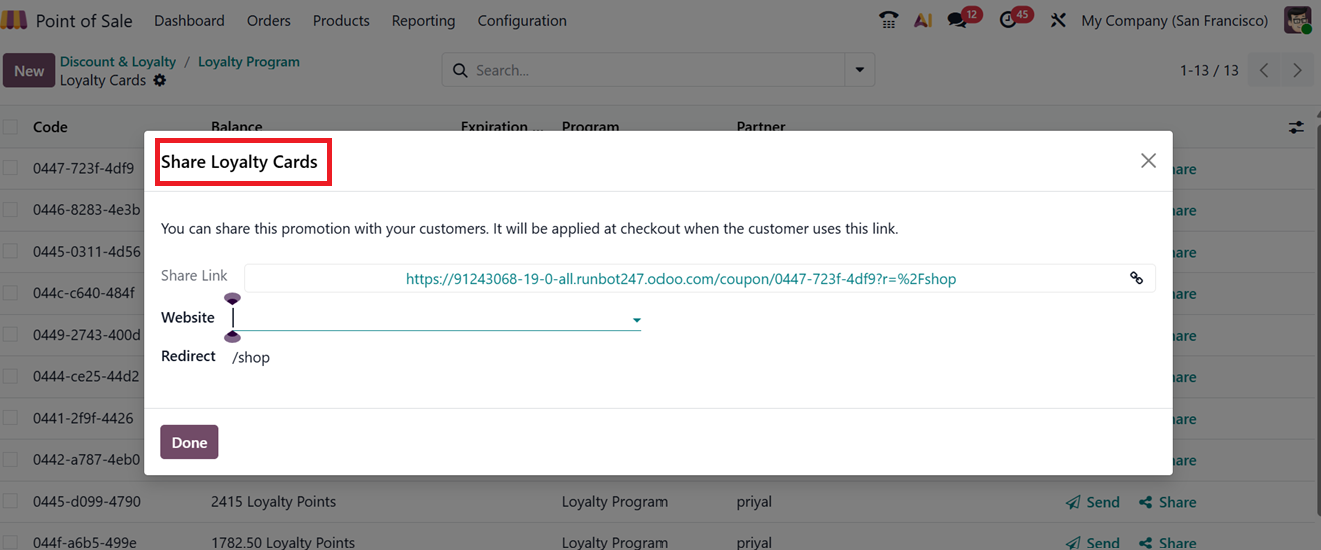
To share Loyalty Cards in Odoo 19, click the ‘Share’ button from the Loyalty Cards dashboard. A window will appear where you can copy the card's URL and specify the Website where the link should be added.
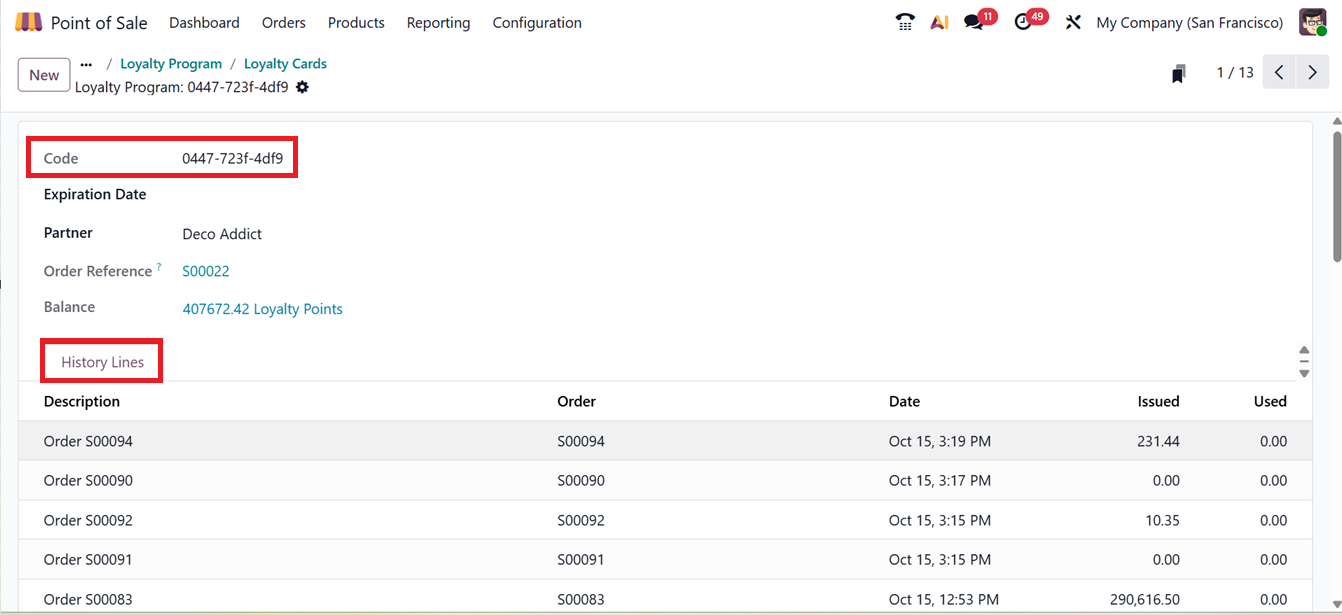
Managing points balance for loyalty programs is just as straightforward. Go to the “Balance” field and enter the new balance in the pop-up window. Here, you can add the New Balance in the ‘Update Balance’ form, as illustrated in the screenshot below.
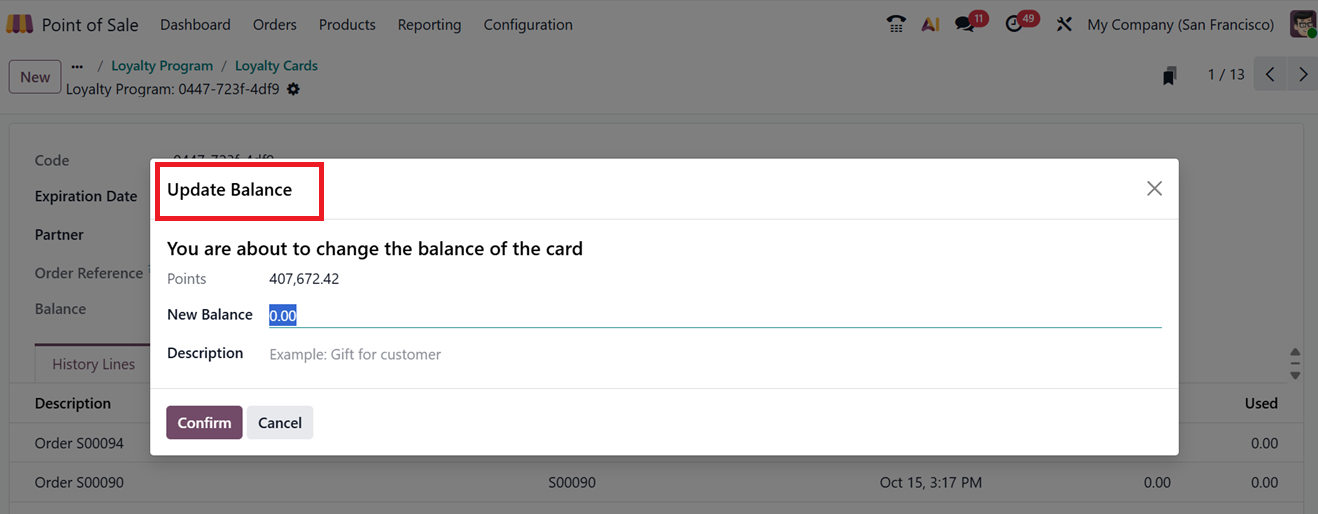
Once saved, this transaction will be recorded under the “History Lines” tab of the loyalty card generation form, as highlighted in the screenshot below. After the update, the customer can begin redeeming their points or discounts during Point of Sale transactions.
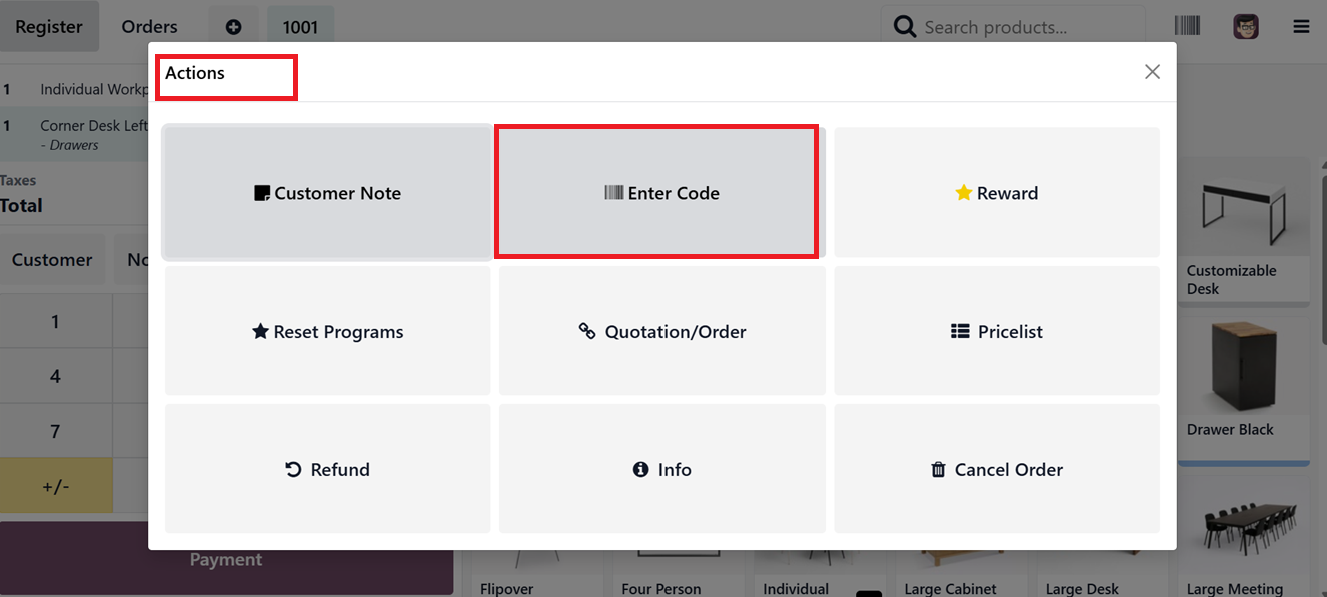
During a Point of Sale (PoS) session in Odoo 19, you can apply discount codes by clicking the "Actions" button (Three dotted menu) placed at the left side of the POS Sales interface and selecting the "Enter Code" button, as depicted in the screenshot below.
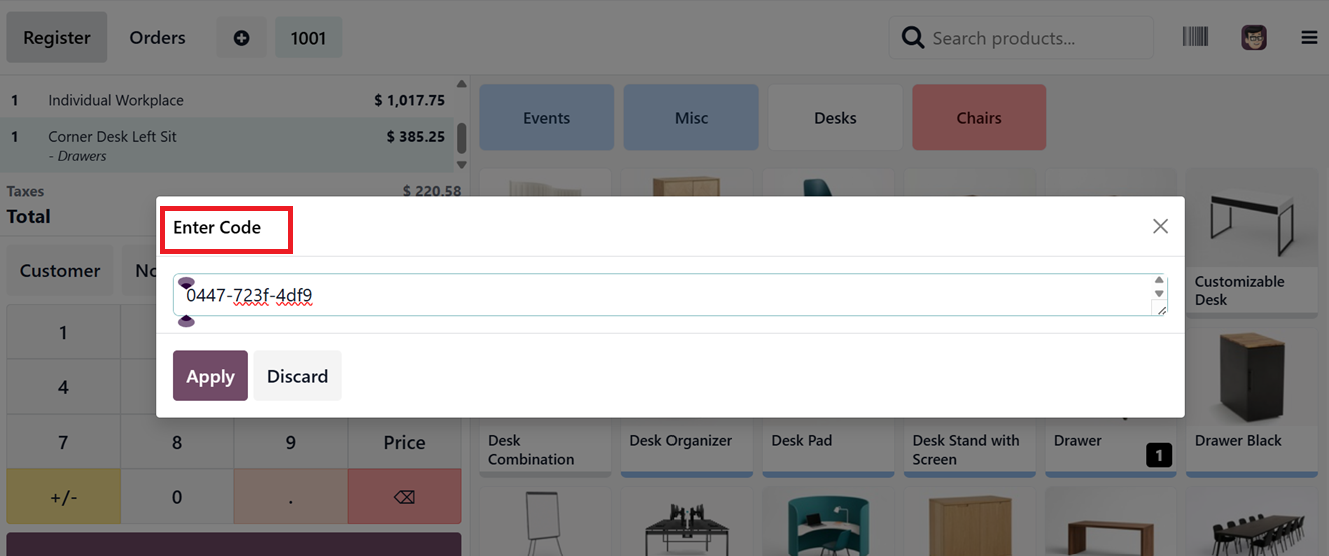
This opens a pop-up ‘Enter Code’ window where you can input or modify the discount code/ gift coupon code. Once you click "Apply", the discount is automatically reflected in the invoice and adjusts the total price of the selected items.
You can also apply promotional offers using the "Rewards" option. After selecting your products, go to the "Actions" menu and choose "Rewards". A pop-up will display the available reward programs, as shown in the screenshot below.
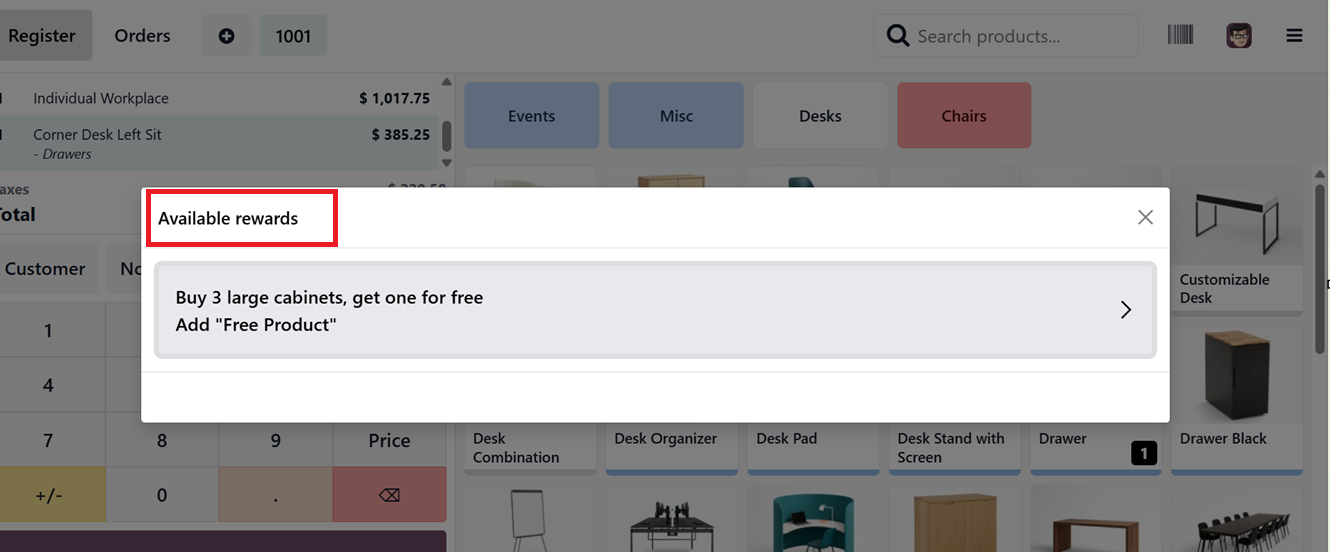
Once you select a reward, the associated benefit is applied to the POS order. This discount will reduce the total amount, while free gift items are added directly to the cart.
1.6 Gift Cards & eWallets
Gift cards and digital wallets can be managed under the ‘Gift Cards & eWallets’ section of the ‘Products’ menu. This section shows active programs with information like Program Name, Program Type, Items, Website, Company and Point Of Sales Sales channels, as depicted in the screenshot below. To make a new gift card/eWallet, click "New".
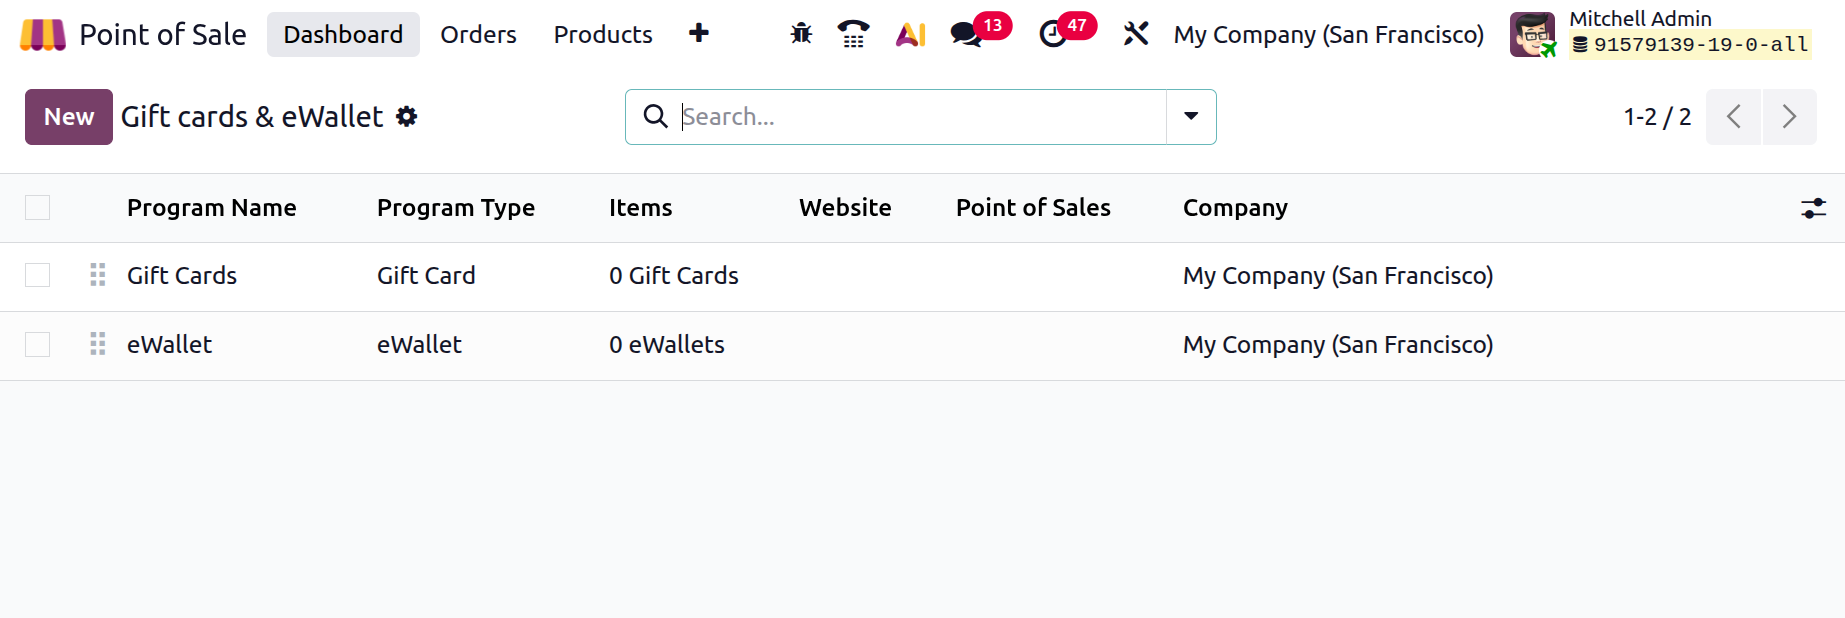
Creating Gift Card
Enter a Program Name, choose a Program Type, and select the products that the gift card will be linked to in the ‘Gift Card Products’ field. Then, fill in extra details like the ‘Currency’ field sets the currency for the gift card’s value, ensuring accurate transactions. Print Report Options let you choose the receipt or report format printed when issuing the gift card, providing clear documentation. The Email Template allows automatic, professional emailing of gift card details to customers using a pre-designed template.
You can also choose where the card can be used like at the Point of Sale (PoS), in Sales, or Website in the ‘Available On’ field. Also, you can mention your exclusive Point of Sale session or Website in the relevant fields, as depicted in the screenshot below.
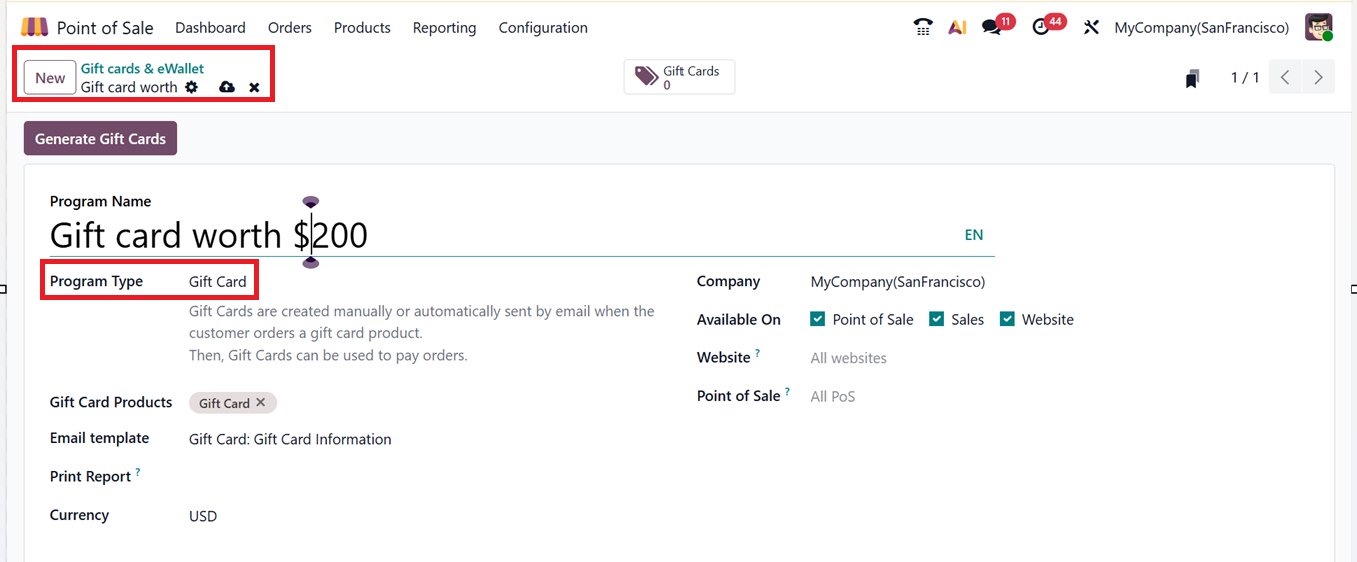
When you're done with all the configurations, click on the "Save" button and select "Generate Gift Cards"to generate new gift cards.
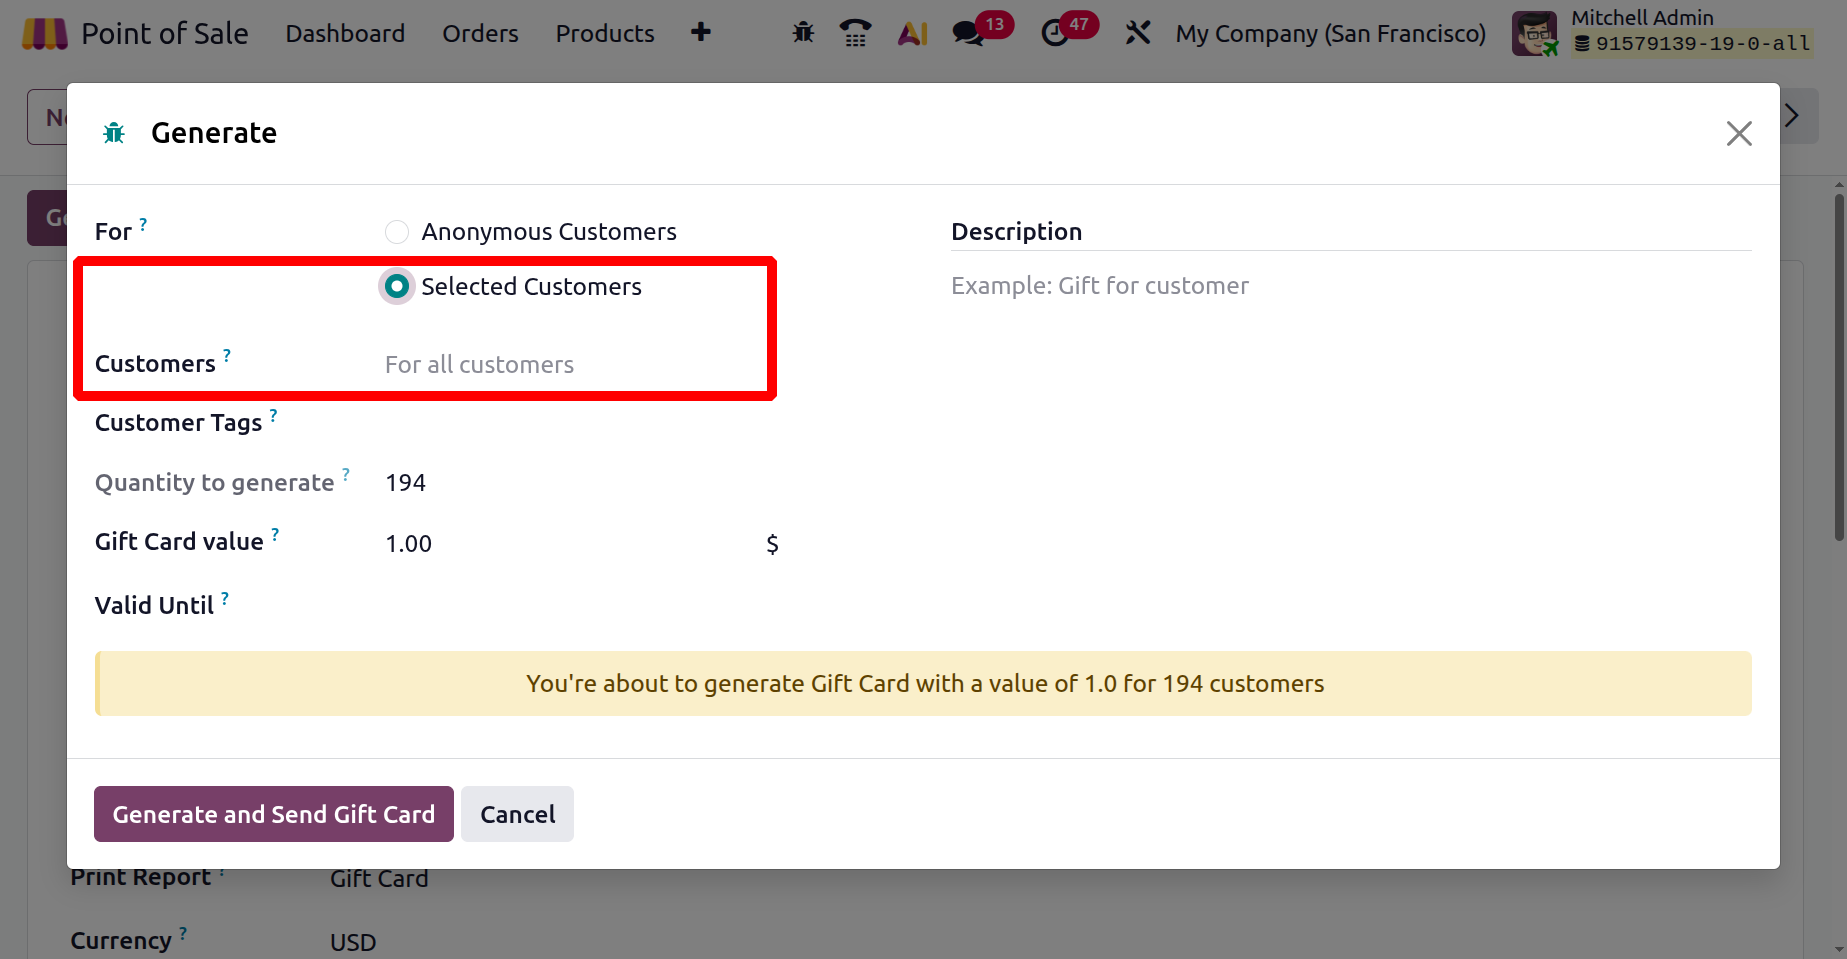
A window will pop up where you can enter whether the gift card is for the ‘Anonymous Customers’ which lets anyone use the card or for the ‘Selected Customers’ which limits its use to specific customers you choose, as depicted in the screenshot below.
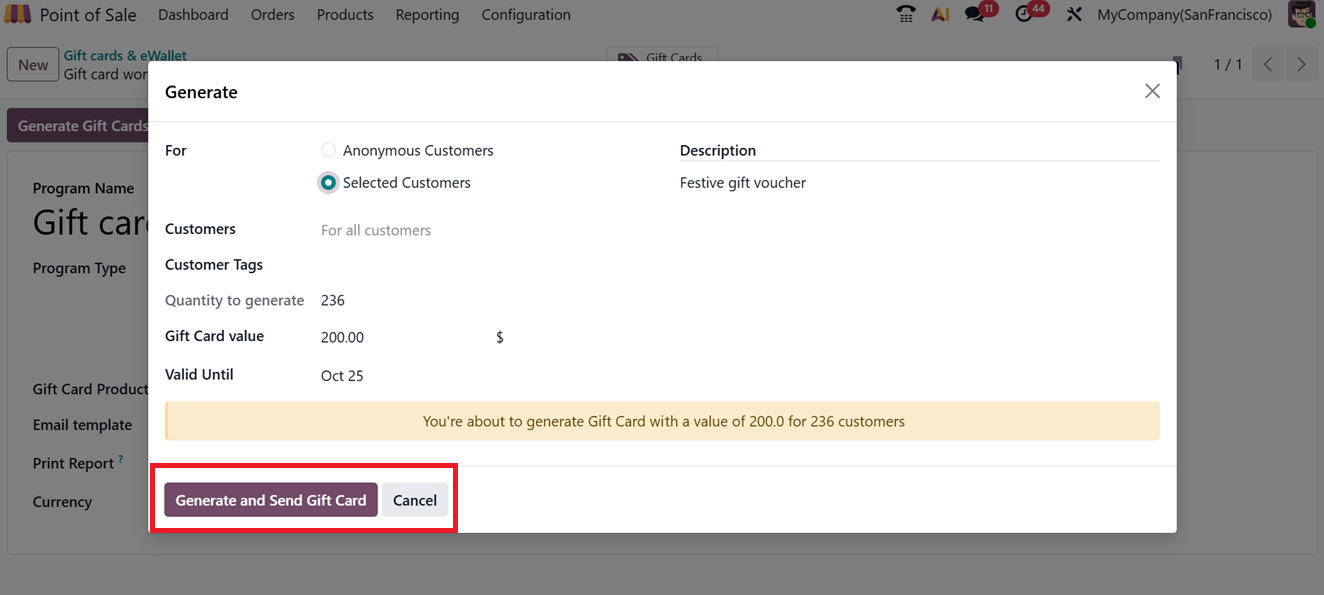
Then, choosing selected customers from the ‘Customers’ field lets you select the recipient, linking the card to their record for tracking and personalized service. The ‘Customer Tags’ allow you to categorize customers (e.g., VIP, Frequent Buyer) for better segmentation, marketing, and reporting. The ‘Gift Card Value’ sets the monetary amount loaded onto the card, reflecting what the customer can spend at your POS. Then, the ‘Quantity to Generate’ specifies how many gift cards of that value you want to create, making bulk creation quick and easy.
Additionally, you choose the ‘Valid Until’ period to determine how long the card remains active before expiring, and add a brief ‘Description’ to note any relevant details or promotions.
Then, click on the "Generate and Send Gift Card", and the system will create the cards. All created gift cards will be shown in the Gift Cards tab. From there, you can easily send or share them. If you need more, you can generate new ones anytime.
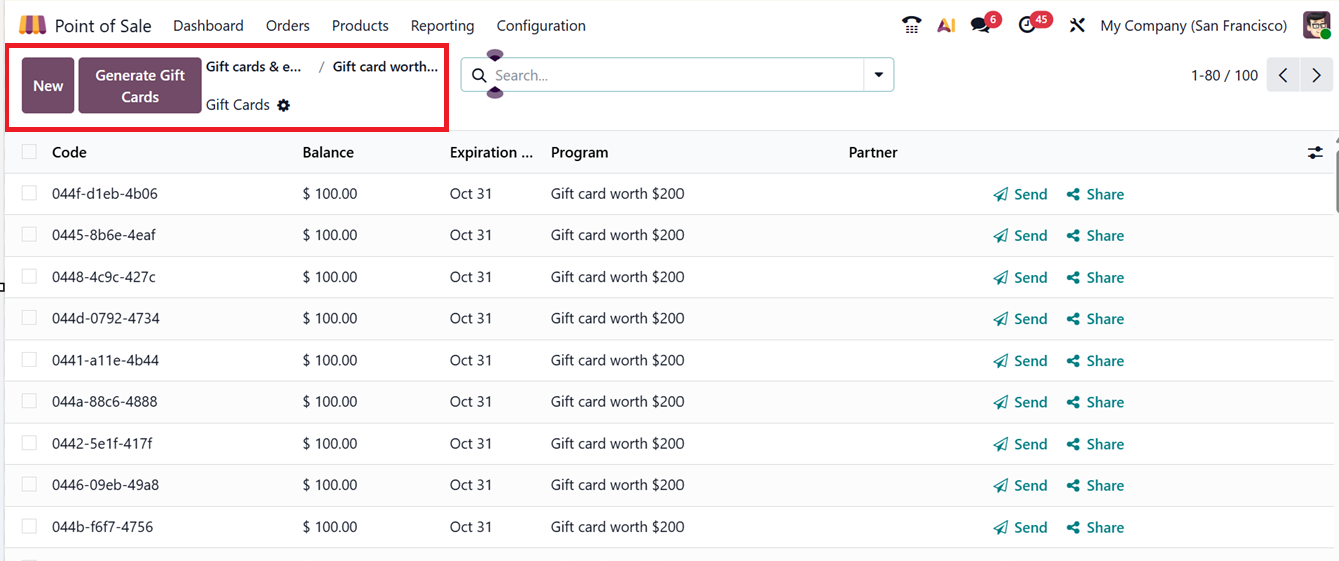
Sending a Gift Card
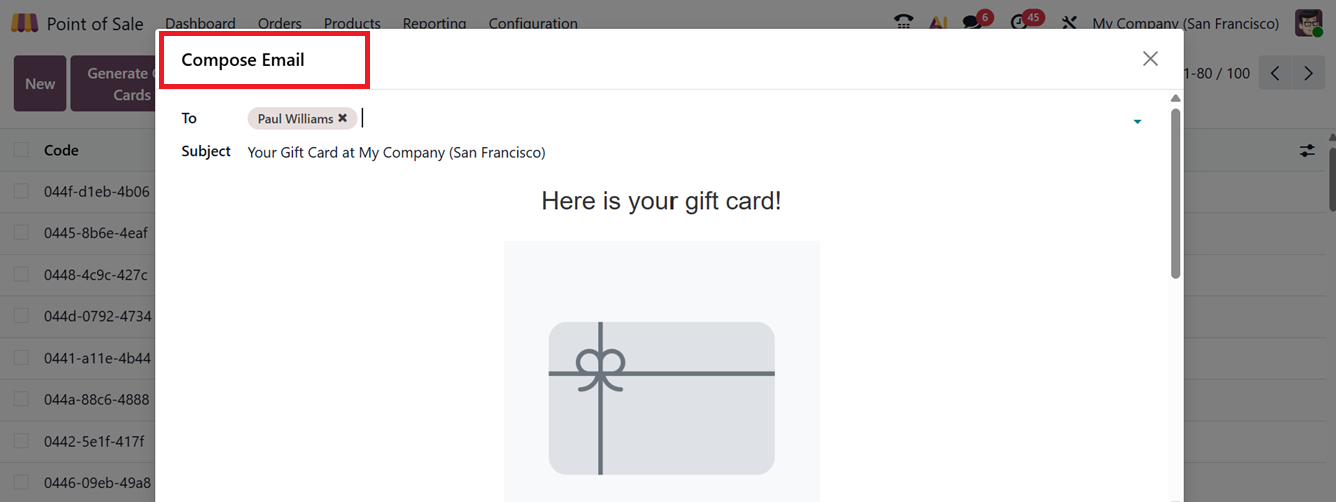
To send a card, click the "Send" button next to the particular gift card column from the dashboard. A mail window will open showing the gift card code, expiry date, and value. Just add the recipient’s email address and a subject, then click "Send". The customer will receive an email with the code and a link to redeem it.
Sharing a Gift Card Link
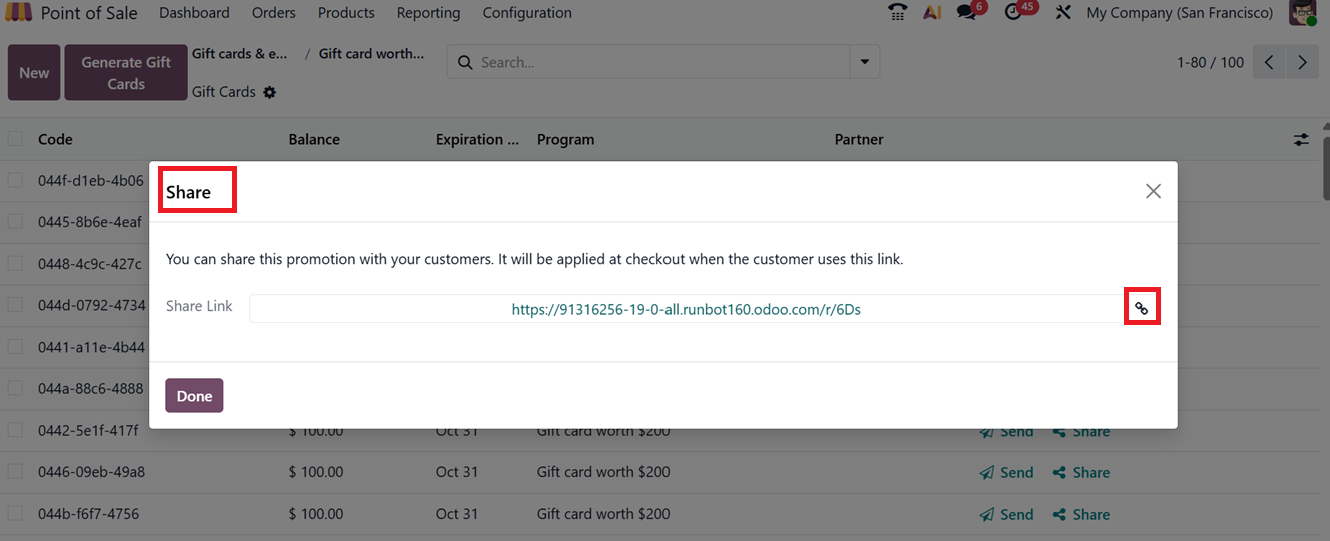
To share the card through a link, click on the "Share" button. This will open a pop-up with a gift card URL, as depicted in the screenshot below.
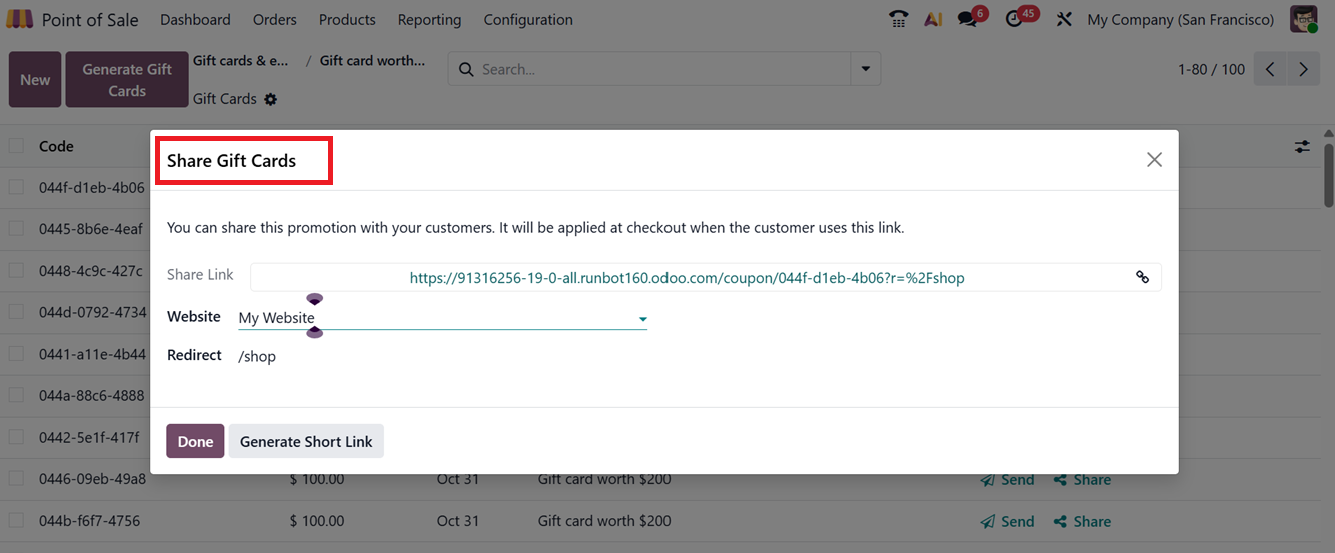
You can copy this link to send to the customer, or use the "Generate Short Link" option to make a shorter version of the shared link. If you want to copy a code yourself, go to the Gift Cards list and click on the one you need. A detailed page will open where you can copy the code directly.
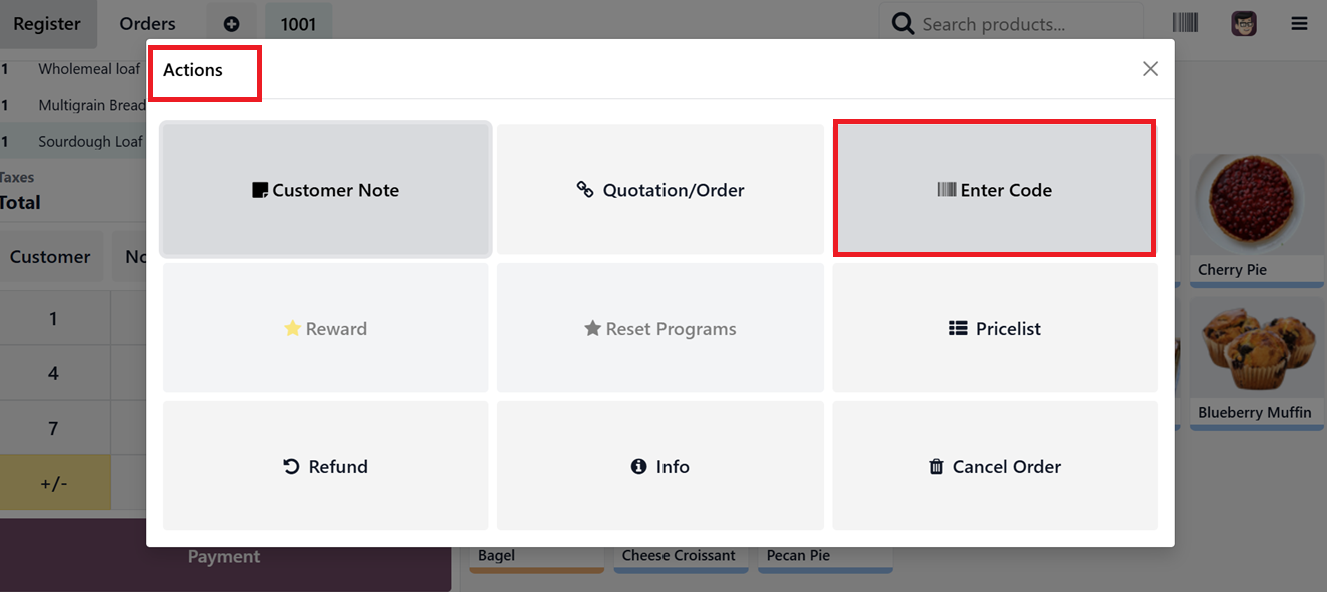
To redeem a gift card during the checkout process, begin by launching a Point of Sale (PoS) session and adding the desired products to the cart. Click on the three dotted menu( “Actions” ) button and choose the “Enter Code” option from the POS Sales interface.
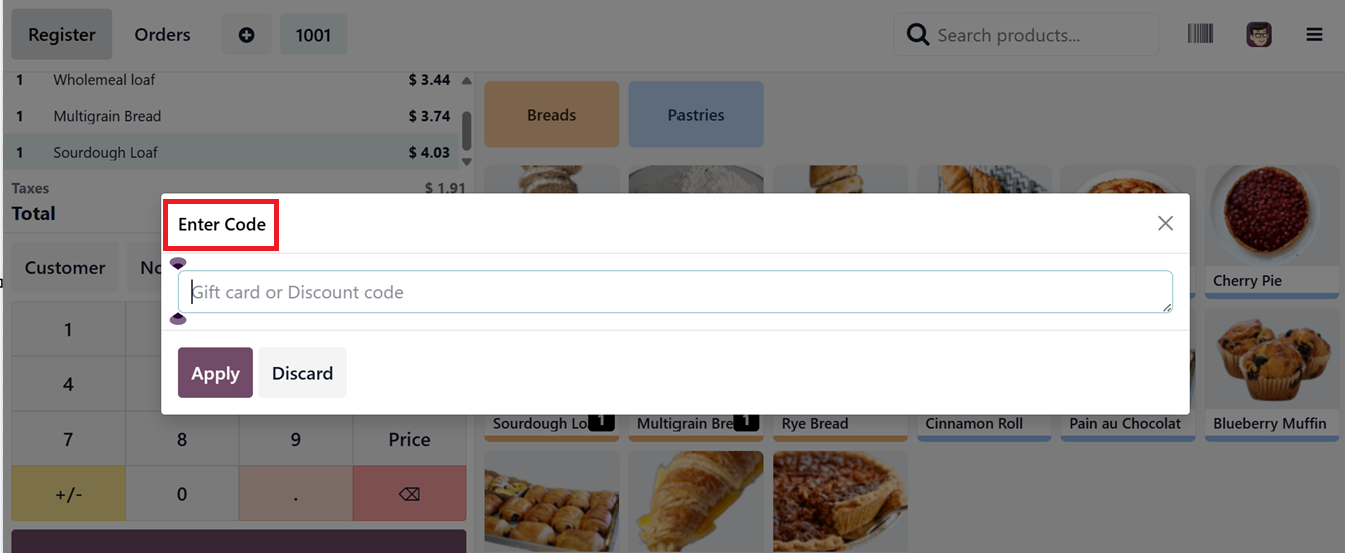
In the new Enter code window, paste the Gift card/Discount code and click on the“Apply” button, as shown below.
After applying the code, you’ll need to confirm the transaction again to complete the purchase, as shown in the screenshot below.
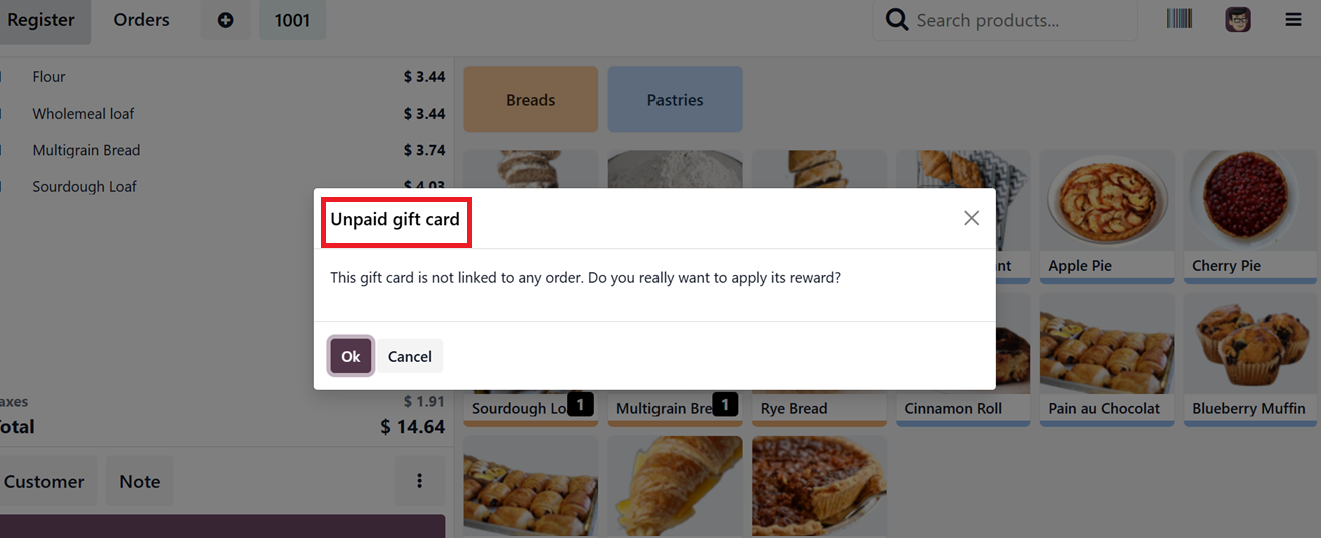
The gift card amount will be deducted from the total bill, and any remaining balance can be paid using the ‘Payment’ button.
Creating eWallets
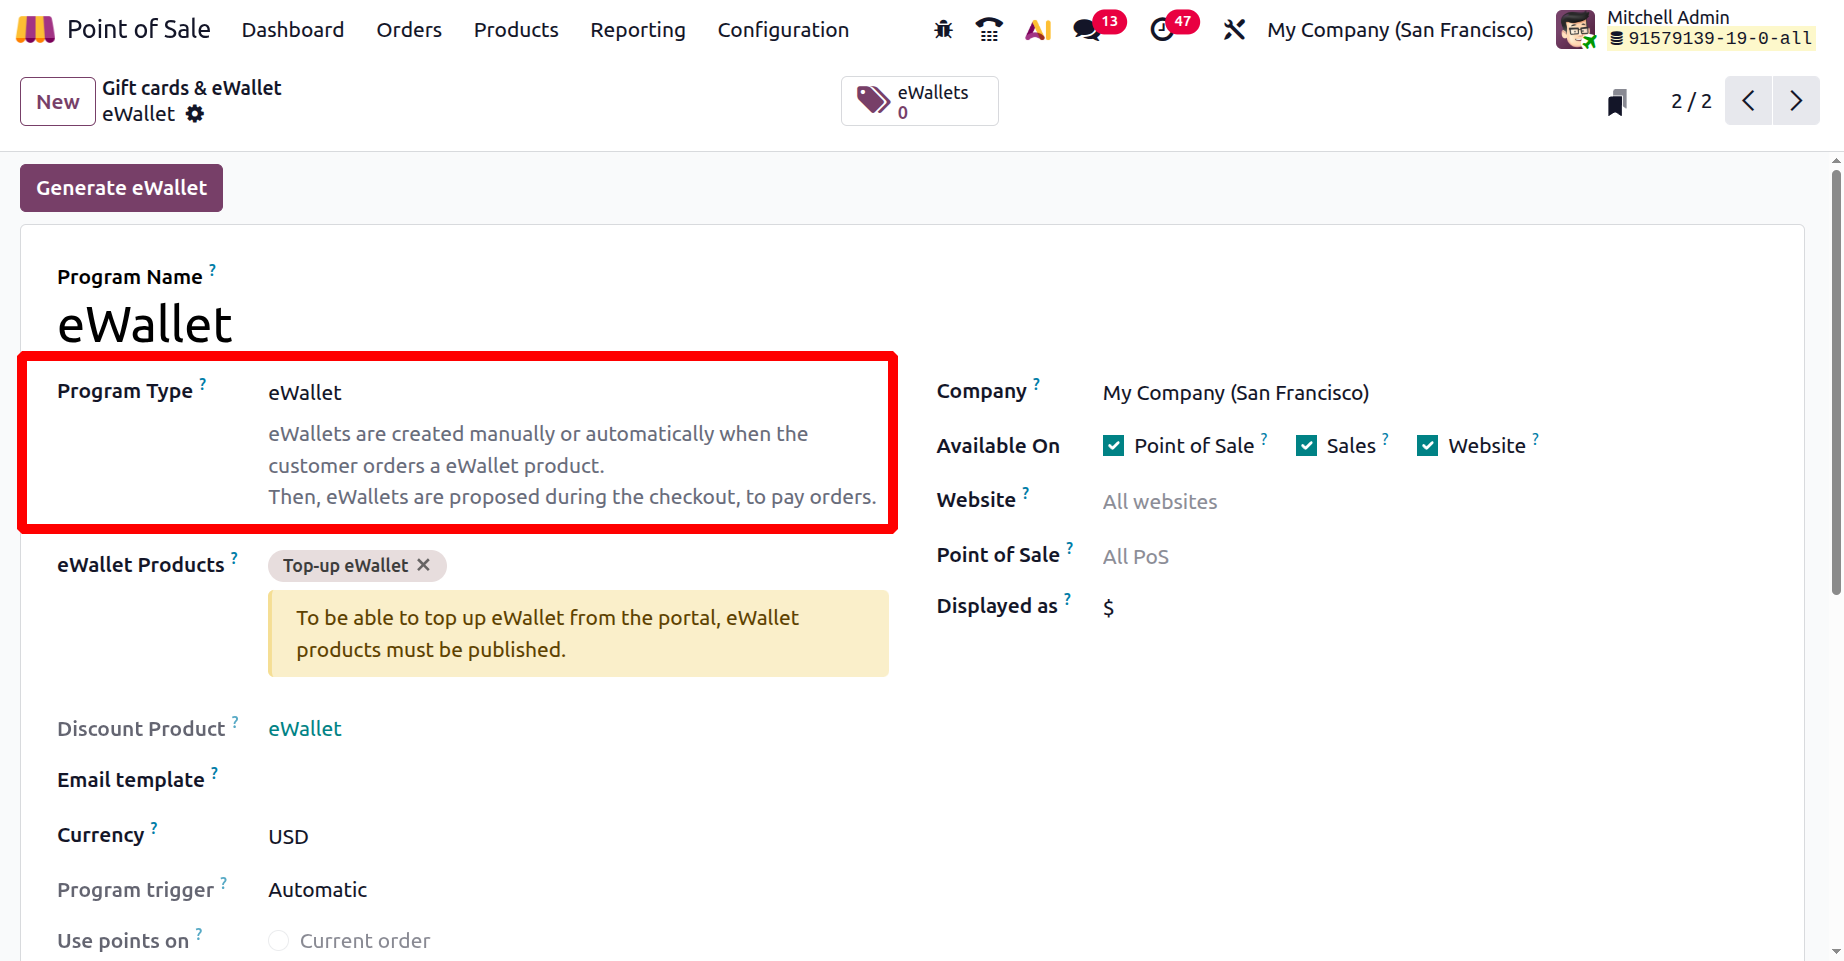
Creating eWallets follows a process similar to gift cards, with one key difference. So, you can select “eWallets” as the ‘Program Type.’ These eWallets are created manually or automatically when a customer buys an eWallet product and can be used for payment at checkout.
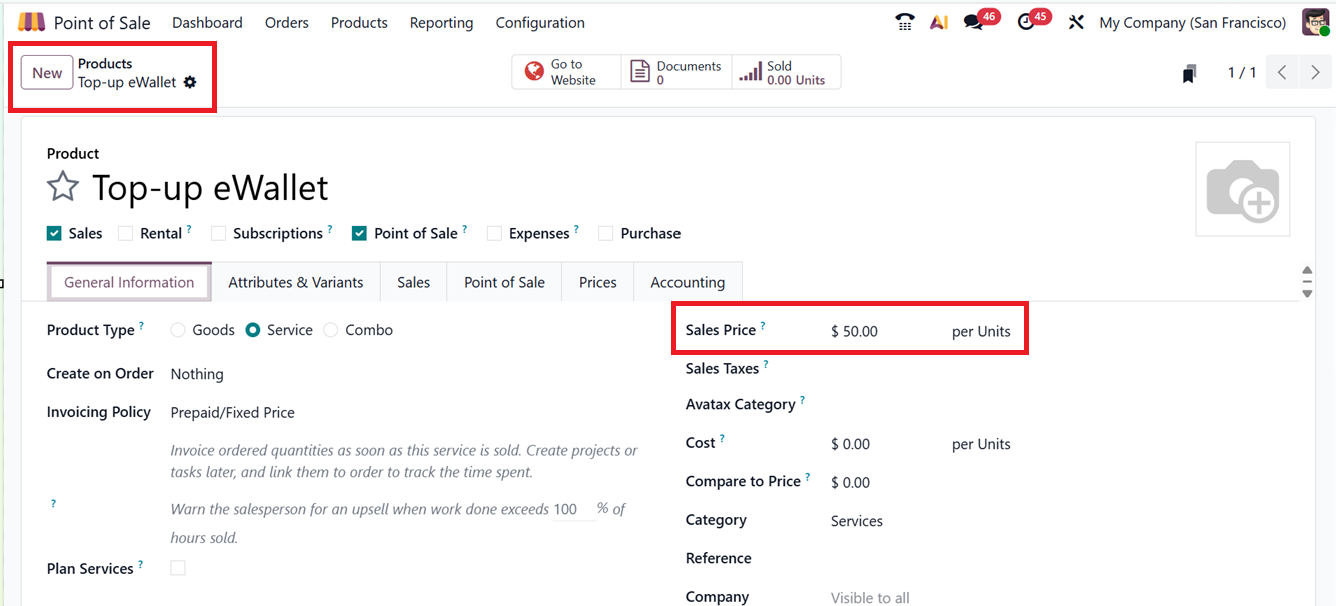
In Odoo 19 POS, top-up eWallet products let customers add funds to their eWallet by purchasing prepaid recharge options. Offering different prices provides flexible amounts, making it easy for customers to recharge and pay quickly and cashlessly at checkout. This simplifies wallet management and encourages repeat use. You can create and publish the eWallet top up product like a normal product, as shown in the screenshot below.
Then, set the key fields such as eWallet Products, where you select recharge options customers can buy; Discount Product, linking discounts for eWallet use; and Email Template, for sending notifications about eWallet activity. You also set the Currency and Company for correct financial and organizational management. The Available On, Website, and Point of Sale fields control where the eWallet products appear, while Displayed As determines how they show up to customers, as depicted in the screenshot below.
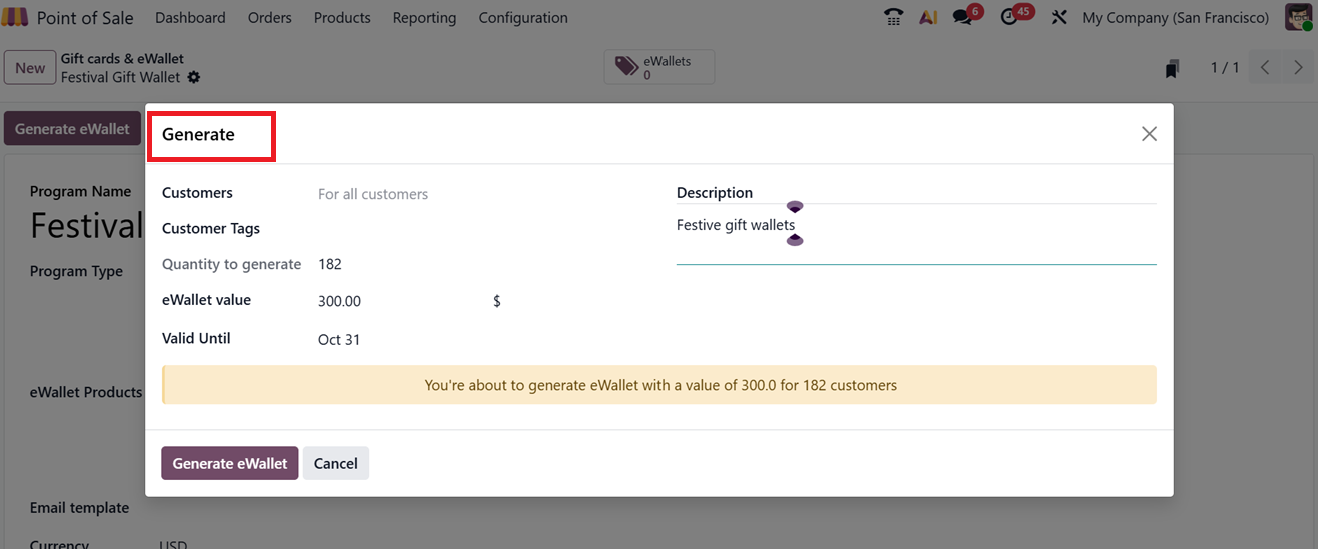
After configuration, click on the “Generate eWallet” button, this will open a pop-up where you can input Customer details, Customer Tags, eWallet value, Quantity to generate, Valid Until period, and a short Description if needed. Once complete, click “Generate eWallet” to issue the wallets.
All created eWallets are available in the “eWallets” smart tab in the wallet configuration form. From this section, users can monitor balances and issue new eWallets when required. The eWallet smart tab will show the dashboard of all the generated eWallets with their Code, Balance, Expiration Date, Program, Partner with the Send and Share buttons, as depicted in the screenshot below.
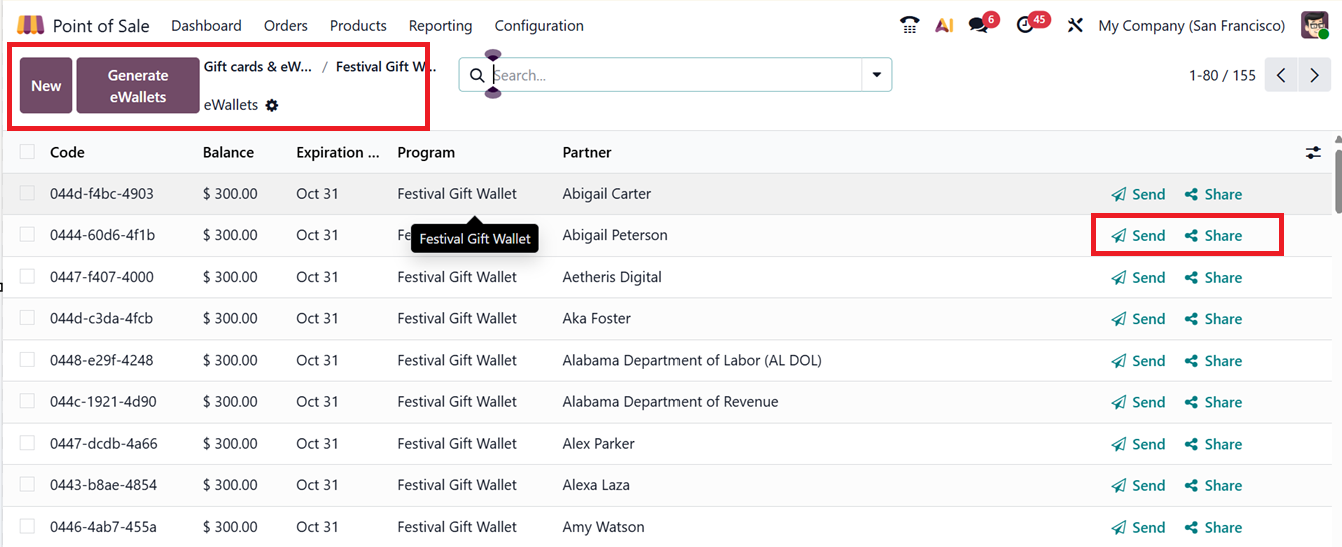
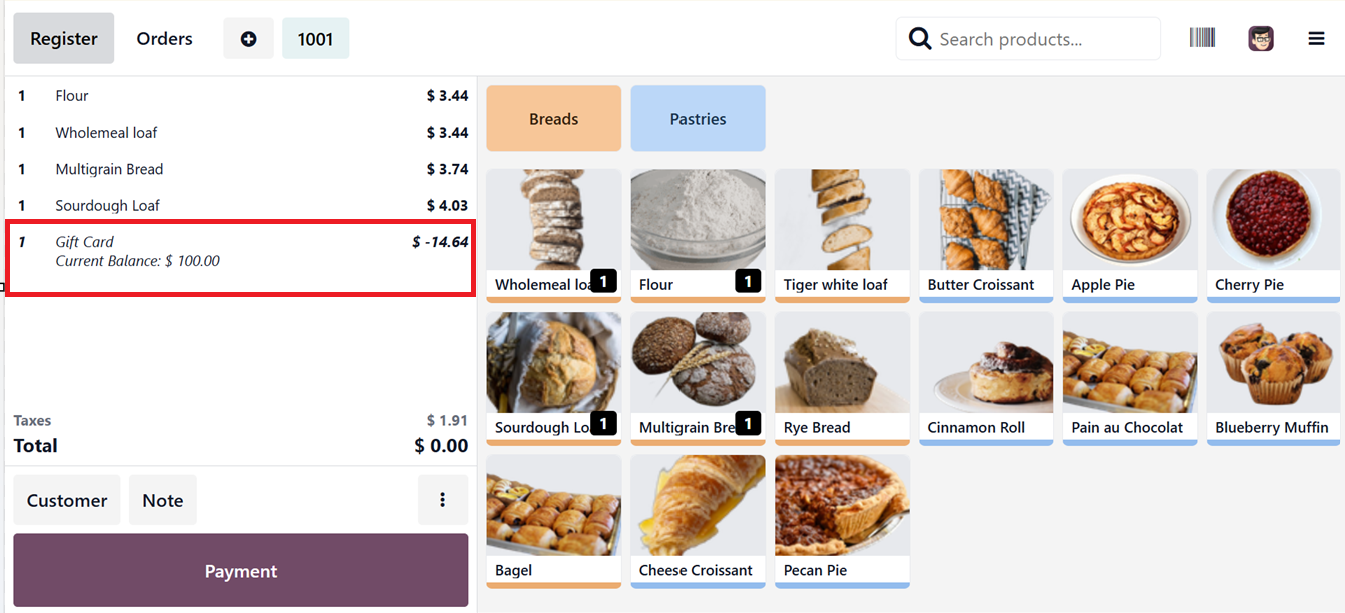
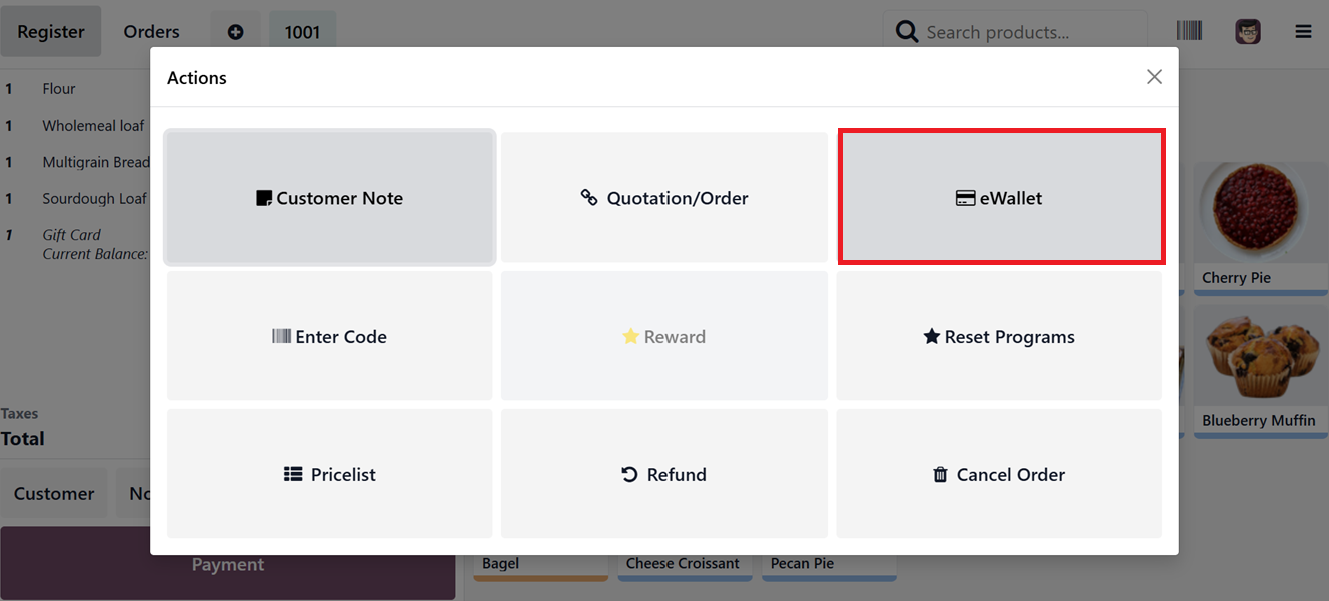
You can send and share the eWallet codes to the targeted users using the same method as we discussed in the giftcard session above. To apply an eWallet during a PoS transaction, use the “eWallet” option under the “Actions” menu in the PoS window.
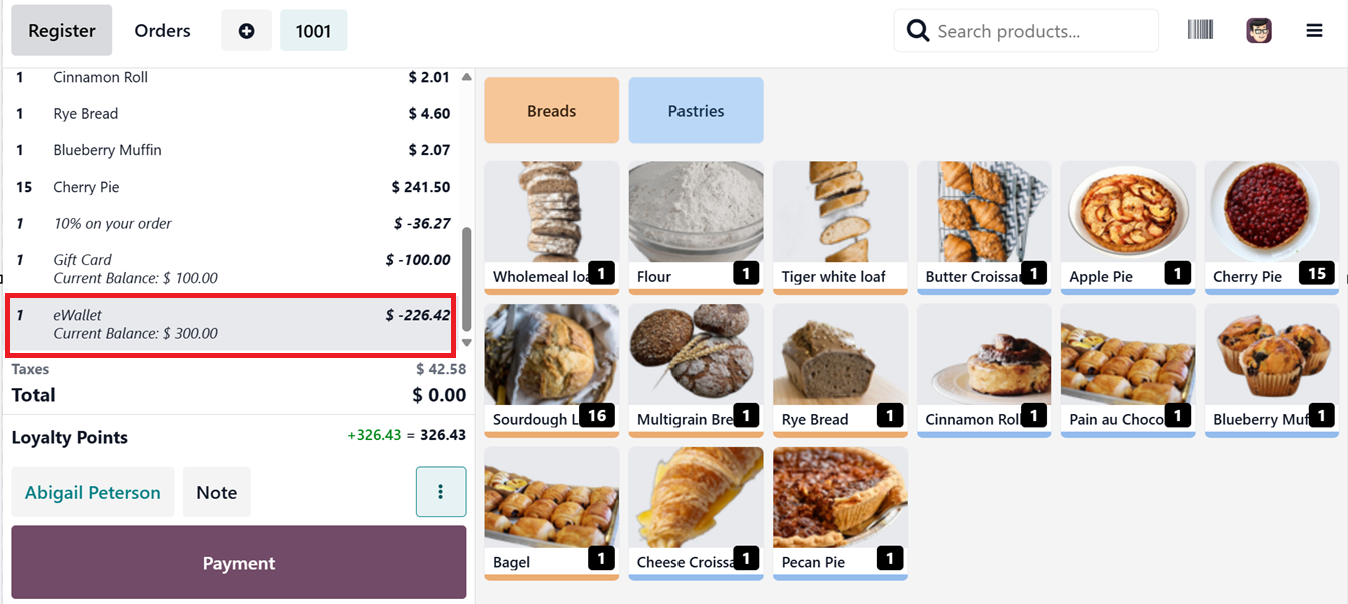
After applying the eWallet option for the selected customer, you can pay the order with the eWalletPay option. So the ewallet will apply to the total amount of the POS order, as depicted in the screenshot below.
Integrating gift cards, eWallets, and loyalty programs can significantly enhance customer engagement and streamline the checkout experience.