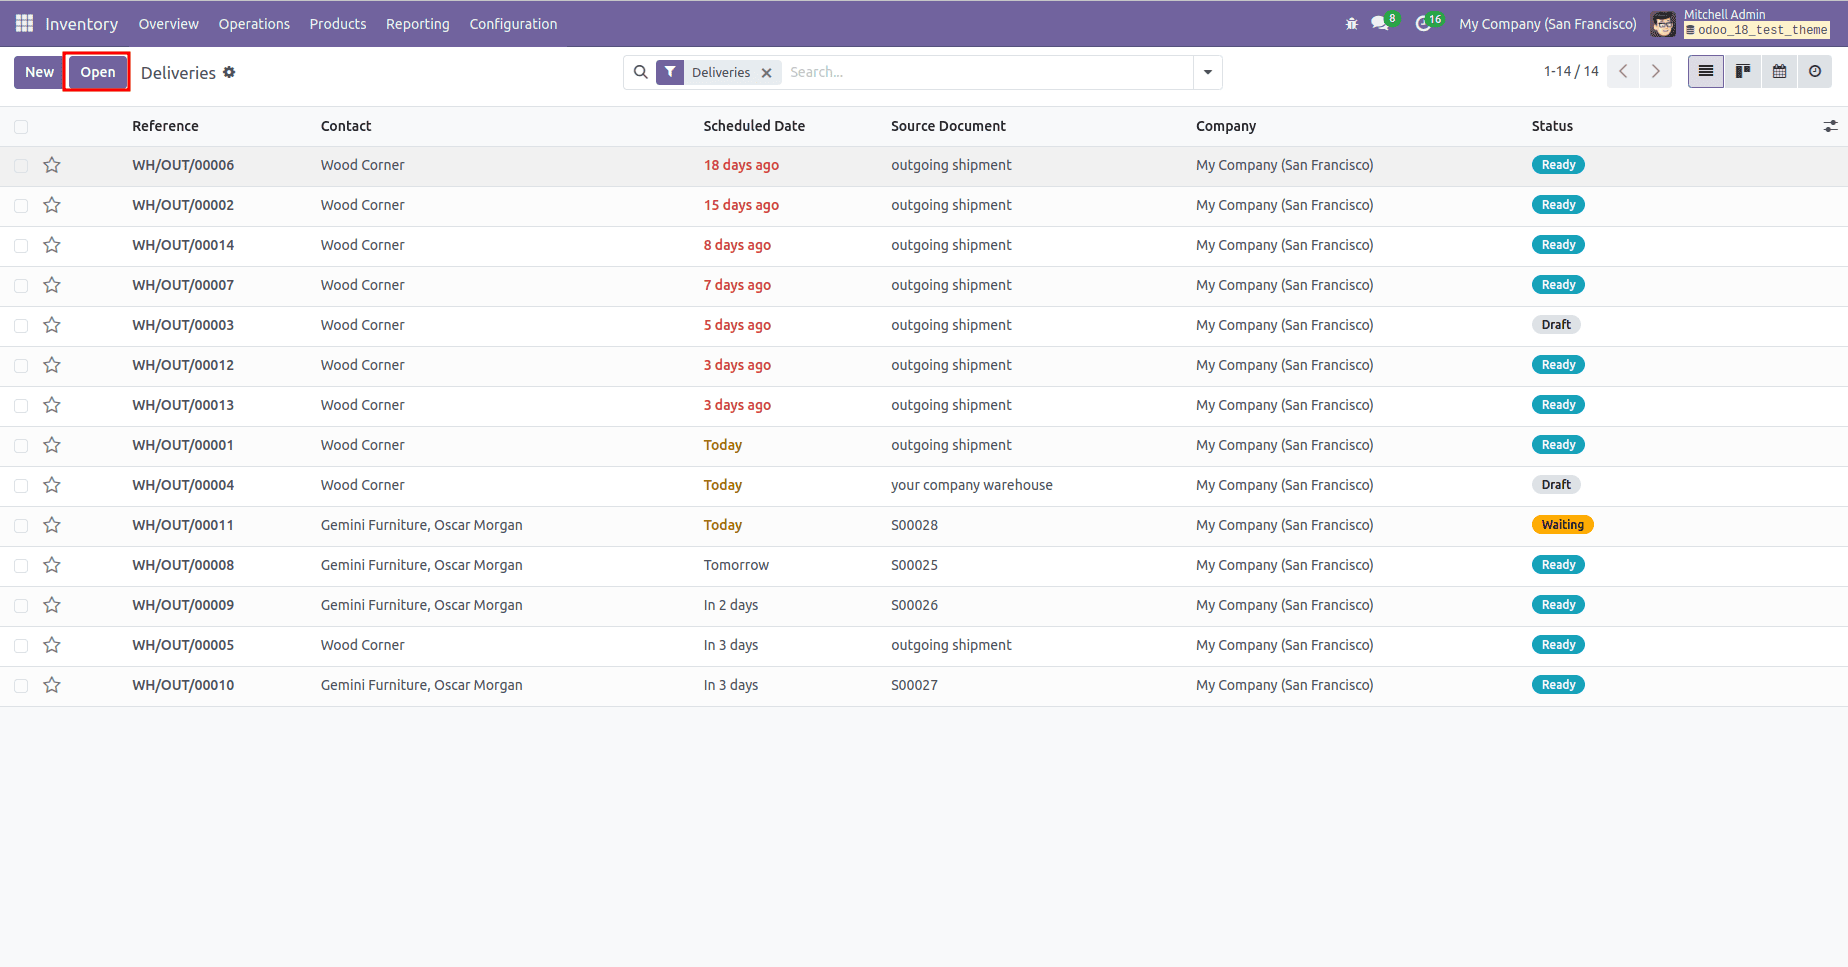
Our goal is to enhance the user interface by adding a custom button to the header section of either the tree or kanban view. This button will serve as a trigger to launch a pop-up wizard when clicked, allowing users to perform specific actions or input data without navigating away from the current view. To implement this functionality, we will extend the existing view by modifying the XML definition, where we’ll define the new button and link it to the corresponding action that opens the wizard.
Tree view:
Create a new XML file in the path- static/src/xml/stock_list_button.xml
<?xml version="1.0" encoding="UTF-8"?>
<templates id="template" xml:space="preserve">
  <t t-name="module.stock.ListView.Buttons" t-inherit="web.ListView">
       <xpath expr="//Layout/t[@t-set-slot='control-panel-create-button']" position="inside">
          <button type="button" class="btn btn-primary" style="margin-right: 10px;" t-on-click="OnTestClick">
              Open
          </button>
      </xpath>
  </t>
</templates>
In the XML code above, we extend the web.ListView and insert a custom button positioned right after the 'New' button in the tree view. To ensure the template is loaded properly, make sure to include the file path in the web.assets_backend bundle.
__manifest__.py:
'data': [ 'views/Stock_picking_views.xml' ],
'assets': {
   'web.assets_backend': [
       '/button_test_controller/static/src/js/stock_list_button.js',
       '/button_test_controller/static/src/js/stock_kanban_button.js',
       '/button_test_controller/static/src/xml/stock_list_button.xml',
       '/button_test_controller/static/src/xml/stock_kanban_button.xml'
   ]
},
Next, we'll create a JavaScript file to define the functionality of the custom button. Place this file at static/src/js/stock_list_button.js, and don't forget to include it in the web.assets_backend bundle to ensure it's loaded properly.
/** @odoo-module */
import { ListController } from "@web/views/list/list_controller";
import { registry } from '@web/core/registry';
import { listView } from '@web/views/list/list_view';
export class StockListController extends ListController {
setup() {
super.setup();
}
OnTestClick() {
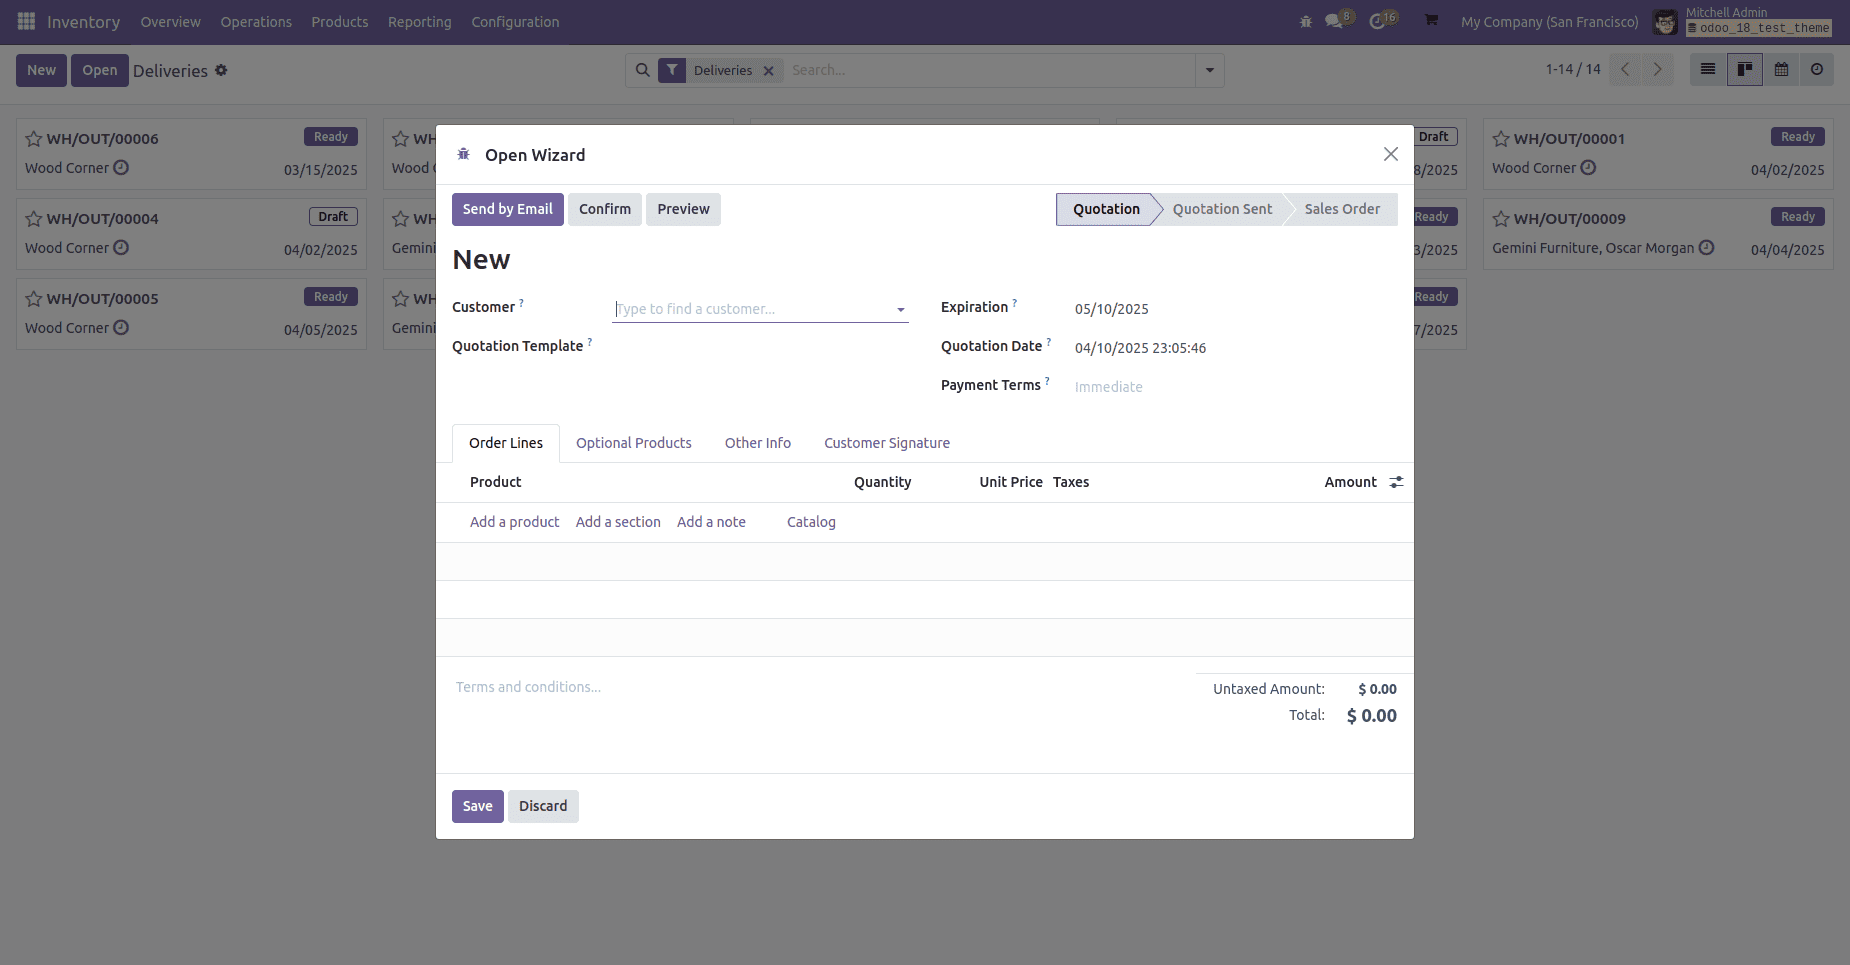
this.actionService.doAction({
type: 'ir.actions.act_window',
res_model: 'sale.order',
name:'Open Wizard',
view_mode: 'form',
view_type: 'form',
views: [[false, 'form']],
target: 'new',
res_id: false,
});
}
}
StockListController.template = "module.stock.ListView.Buttons";
export const customStockListController = {
...listView,
Controller: StockListController,
};
registry.category("views").add("button_in_list", customStockListController);
In this JavaScript file, we create a new class called StockListController by extending the ListController. We also introduce the t-on-click directive to handle click events.
onTestClick Function:
This function is triggered when the associated button is clicked. It defines the behavior or actions that should take place in response to the click event.
do_action Method:
This method is used to launch a specific action window in Odoo, such as opening a form, tree, or kanban view. It allows you to programmatically control navigation and display the desired interface.
Next, we register the view by providing the controller, the button template, and specifying the associated JavaScript class.
StockListController.template – This property is used to define the t-name of the template that the controller will render. It links the controller to the corresponding XML template used in the view.
Controller - We refer to a custom class that extends Odoo's built-in ListController. By inheriting from ListController, we can customize or enhance the behavior of list views, such as adding new button actions, event handlers, or modifying existing functionalities.
To display the new button in a specific tree view of the stock.picking model, you need to reference the custom JavaScript class in that view. This is done by adding the js_class attribute to the <list> tag in the view definition.
Stock_picking_views.xml:
<?xml version="1.0" encoding="UTF-8" ?>
<odoo>
<record id="vpicktree" model="ir.ui.view">
	<field name="name">stock.picking.tree</field>
	<field name="model">stock.picking</field>
	<field name="inherit_id" ref="stock.vpicktree"/>
	<field name="arch" type="xml">
	    <xpath expr="//list" position="attributes">
		      <attribute      name="js_class">button_in_list</attribute>
	    </xpath>
	</field>
</record>
</odoo>
Don't forget to include this JavaScript file in the views section of the manifest.
Now, the button will be visible in the specific tree view of the stock.picking model.
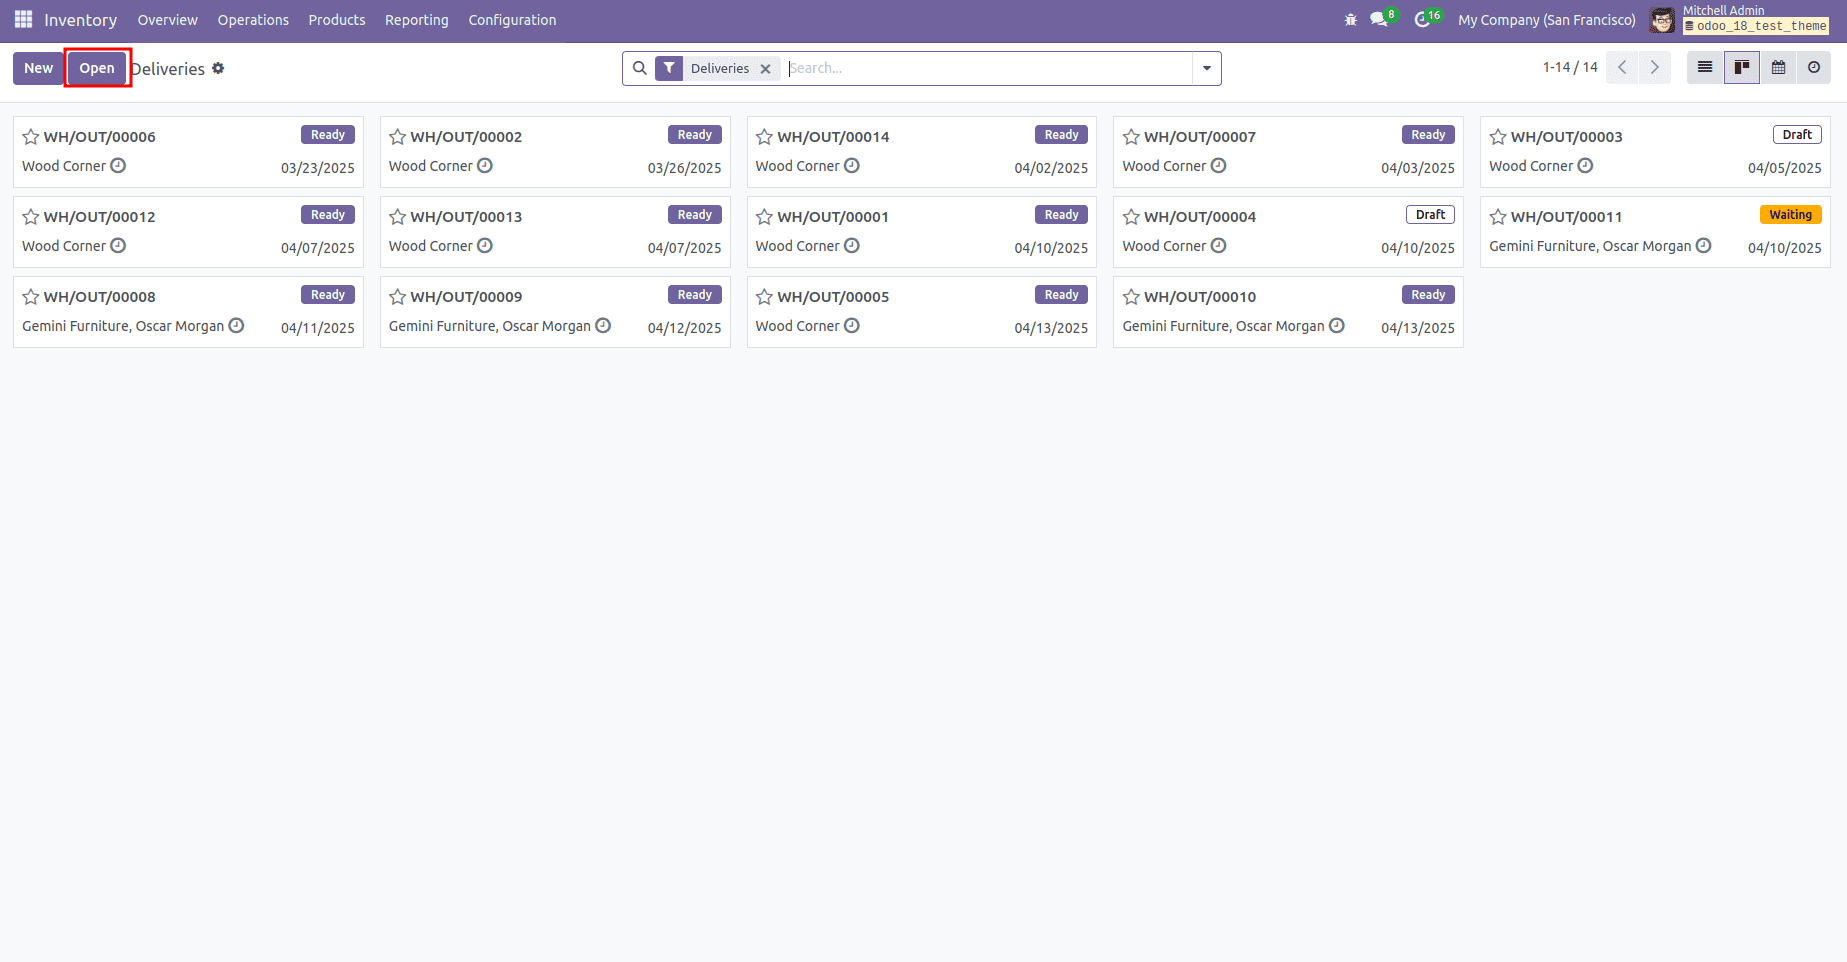
Kanban View:
In this part, we are extending the Kanban view by adding a new custom button. When the button is clicked, it triggers a redirection to a wizard, allowing the user to perform a specific action or input additional information.
The process is somewhat similar to what we have done for adding buttons in the list view.
First, create the xml file inside static/src/xml/stock_kanban_button.xml
<?xml version="1.0" encoding="UTF-8"?>
<templates id="template" xml:space="preserve">
   <t t-name="module.kanban.Buttons"    t-inherit="web.KanbanView">
        <xpath expr="//Layout/t[@t-set-slot='control-panel-create-button']" position="inside">
           <button type="button" class="btn btn-primary" t-on-click="() => this.OnTestClick()">
                Open
            </button>
       </xpath>
   </t>
</templates>
Add it in ‘web.assets_backend’.
Now let’s create the js file
/** @odoo-module */
import { registry } from '@web/core/registry';
import { kanbanView } from "@web/views/kanban/kanban_view";
import { KanbanController } from "@web/views/kanban/kanban_controller";
export class StockKanbanController extends KanbanController {
   setup() {
       super.setup();
   }
   OnTestClick() {
       this.actionService.doAction({
          type: 'ir.actions.act_window',
          res_model: 'sale.order',
          name:'Open Wizard',
          view_mode: 'form',
          view_type: 'form',
          views: [[false, 'form']],
          target: 'new',
          res_id: false,
      });
   }
}
StockKanbanController.template = "module.kanban.Buttons";
export const customStockKanbanController = {
    ...kanbanView,
    Controller: StockKanbanController,
};
registry.category("views").add("button_in_kanban", customStockKanbanController);
Add the JS file path in ‘web.assets_backend’
It has the same structure as the js file we used for the list view button creation.
Now, create an XML file inheriting the Kanban view of model stock.picking and add the code below to it.
<?xml version="1.0" encoding="UTF-8"?>
<odoo>
    <record id="stock_picking_kanban" model="ir.ui.view">
        <field name="name">stock.picking.view.kanban.stock.barcode</field>
        <field name="model">stock.picking</field>
        <field name="inherit_id" ref="stock.stock_picking_kanban"/>
        <field name="arch" type="xml">
            <xpath expr="//kanban" position="attributes">
                <attribute name="js_class">button_in_kanban</attribute>
            </xpath>
        </field>
    </record>
</odoo>
Here we are extending the KanbanController and KanbanView.
Now the button can be seen in stock.picking kanban view.
Clicking the 'New' button from either view will trigger the wizard defined in the doAction function.
Conclusion
In this blog, we explored how to extend both the ListController and KanbanController in Odoo to add a custom button right after the standard "New" button in each view. This customization allows for enhanced user interaction and provides flexibility to trigger specific actions directly from the interface. By leveraging Odoo’s powerful web client architecture, we demonstrated how easily the UI can be tailored to fit unique business workflows.
To read more about how to add a New Button Near the Create Button in Tree & Form View in Odoo 17, refer to our blog How to Add a New Button Near the Create Button in Tree & Form View in Odoo 17.