The Partner Ledger report is one of the most important financial reports in an ERP system. This report provides complete details about each transaction made by any customer or vendor. This keeps the accounting users in touch with customers/vendors on payments for invoices, bills, etc. It helps to track the outstanding entries of each partner.
Although the standard Partner Ledger report includes the essential accounting information like invoice number, journal, invoice date, matching number, debit, credit, balance, etc. Some businesses often require additional information to meet their specific needs. For example, some companies need to show any type of custom field or any existing fields, or to make the report more user-friendly and more informative.
In this blog, we try to add a custom field from the invoice/bill to the standard partner ledger report in Odoo, while keeping the standard partner ledger report as such. In this first step, we add a custom field named Partner Reference on the invoice/bill form. And then we will load this field into the standard partner ledger report.
Let's go through the implementation step by step to understand how this customization can be achieved.
In Odoo, the data for financial reports is fetched from the Journal Items (account.move.line). So first we need to add the field in the ‘account.move.line’ model. For more convenience, we add the Partner Reference field in the Invoice/Bill (account.move), and then we propagate this field into the Journal Items. This approach keeps the field easily accessible on the invoice or bill while making it available for reporting.
The first step is to inherit the ‘account.move’ model for adding the custom field.
class AccountMove(models.Model):
   _inherit = 'account.move'
   partner_reference = fields.Char(string='Partner Reference',
                                   help='Partner Reference')
Next, add the same field to the account.move.line model as a related field. By defining it as a stored related field, the value entered on the invoice or bill is automatically synchronized to the corresponding journal items and can be used efficiently in reports and search operations.
class AccountMoveLine(models.Model):
   _inherit = 'account.move.line'
   partner_reference = fields.Char(string='Partner Reference',
                                   related='move_id.partner_reference',
                                   store=True,readonly=True,
                                   help='Partner Reference')
The next step is to add this custom field to the Invoice/Bill form view. For this, inherit the ‘account.move’ form view and add the custom field in the desired position.
<record id="view_move_form" model="ir.ui.view">
   <field name="name">account.move.form.account.extend</field>
   <field name="model">account.move</field>
   <field name="inherit_id" ref="account.view_move_form"/>
   <field name="arch" type="xml">
       <xpath expr="//field[@name='invoice_vendor_bill_id']" position="after">
           <field name="partner_reference"/>
       </xpath>
       <xpath expr="//field[@name='tax_ids']" position="after">
           <field name="partner_reference" optional="hide"/>
       </xpath>
   </field>
</record>
This will result in the following.
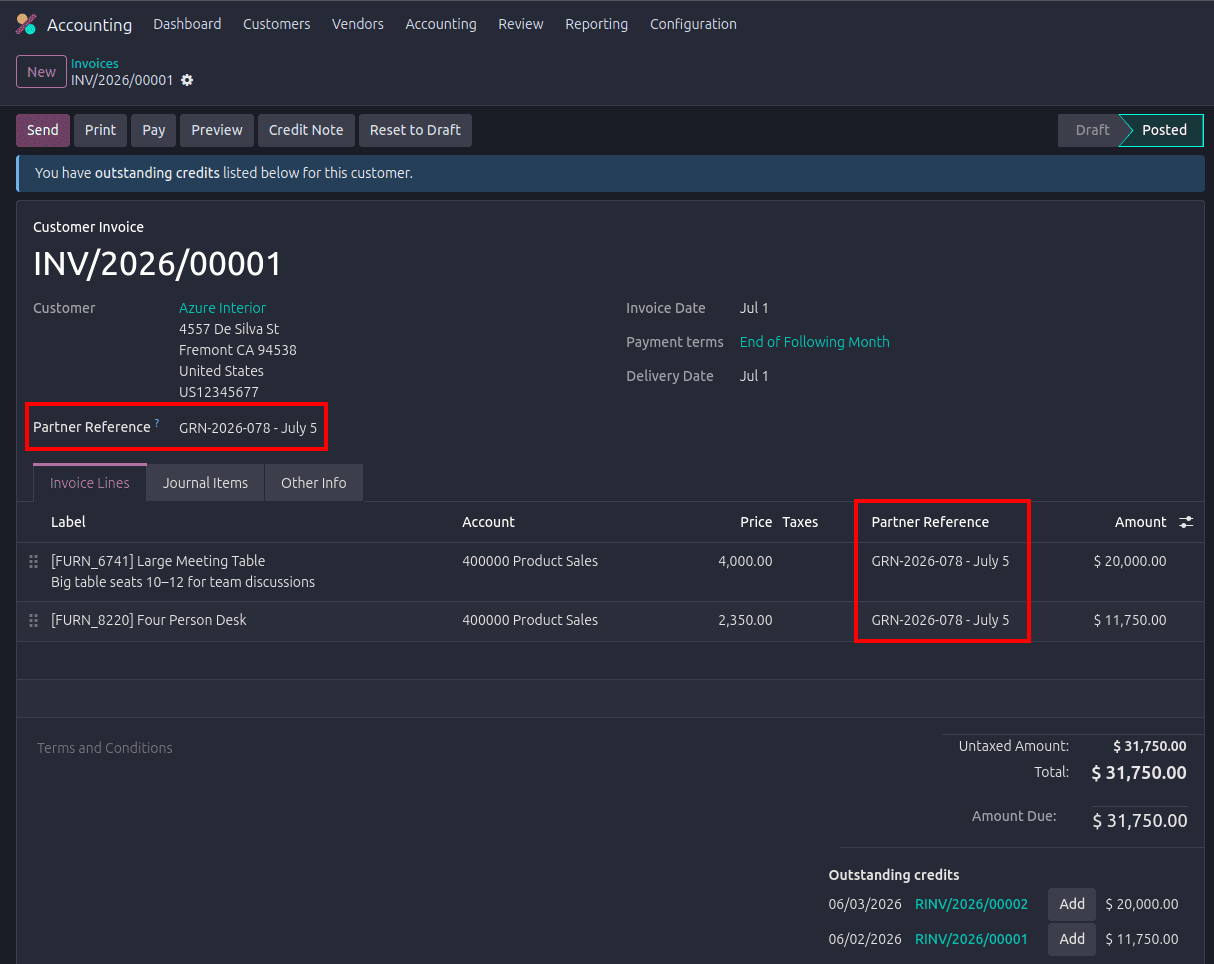
After adding the custom field to the Invoice/Bill form, the next step is to display it in the Partner Ledger report. To do this, we first need to add a new column to the Partner Ledger report by creating a data file and defining the report column, as shown below.
<data>
        <record id="account_reports.partner_ledger_report" model="account.report">
            <field name="column_ids">
                <record id="aged_receivable_report_partner_reference" model="account.report.column">
                    <field name="name">Partner Reference</field>
                    <field name="expression_label">partner_reference</field>
                    <field name="figure_type">string</field>
                </record>
            </field>
        </record>
    </data>
The above data file creates a new column named ‘Partner Reference’ in the standard Partner Ledger report. The expression_label value, partner_reference, acts as a unique identifier that links this report column to the value returned by the report handler. Since the field contains text, the figure_type is set to string, ensuring that the report displays the value correctly.
The final step is to extend the account.partner.ledger.report.handler model to pass the custom field value to the newly created Partner Reference column in the Partner Ledger report. This is achieved by inheriting the _get_additional_column_aml_values() method and including the partner_reference field from the account.move.line model in the SQL query. The alias partner_reference must match the expression_label defined for the report column, allowing Odoo to populate the corresponding column with the correct value.
class AccountPartnerLedgerReportHandler(models.AbstractModel):
   _inherit = 'account.partner.ledger.report.handler'
   def _get_additional_column_aml_values(self):
       additional_columns = super()._get_additional_column_aml_values()
       return SQL(""" %s
           account_move_line.partner_reference AS partner_reference,
           """,additional_columns,)
This will add the value from the Partner Reference field into the partner ledger report.
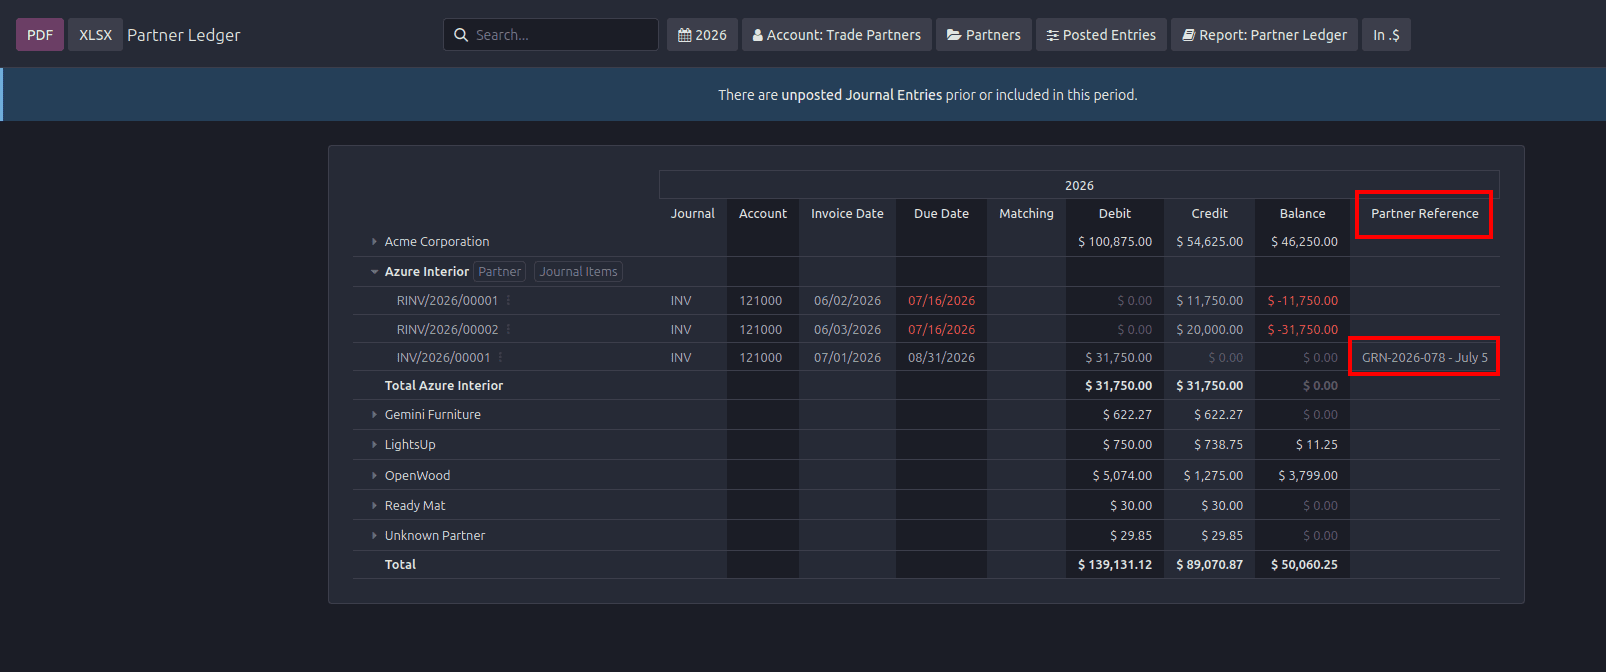
The Partner Ledger is one of the most important accounting reports in Odoo, and adding business-specific information to it can make financial analysis more meaningful and efficient. In this blog, we added a custom Partner Reference field to invoices and vendor bills, propagated it to the corresponding journal items, and displayed it in the standard Partner Ledger report by extending the report configuration and handler.
To read more about Overview of Partner Ledger Report in Odoo 19 Accounting, refer to our blog Overview of Partner Ledger Report in Odoo 19 Accounting.