Configuration settings are an essential part of making Odoo flexible and adaptable to real-world business requirements. With Odoo 19, the Settings module is a centralized location where administrators can manage system behavior without modifying core logic.
The usage of custom fields in configuration settings becomes very important in such cases. Using configuration models provided by Odoo, it is possible to add new settings, which will be easy to manage, safe, and work properly with custom features. Custom fields provide flexibility in configuring modules right from the Settings menu.
In this article, we will discuss how custom fields can be added to Odoo configuration settings and what should be considered when developing such features.
Understanding Configuration Settings in Odoo 19
Odoo uses the res.config.settings transient model to manage configuration values. Key points to understand:
- res.config.settings is a TransientModel
- Configuration settings are not stored in this model
- Configuration settings are stored using:
- Fields that reference res.company
Odoo provides two approaches to handle this:
- Using config_parameter (modern and recommended)
- Using get_values() and set_values() (manual and flexible)
Method 1: Using config_parameter
This is the simplest and most commonly used method in Odoo 19
Step 1: Create a Custom Module
If you don’t already have a module, create one.
Update the manifest file:
# __manifest__.py
{
   'name': 'Sales Custom Settings',
   'version': '1.0',
   'depends': ['base',’sale’],
   'data': [
       'views/res_config_settings_views.xml',
   ],
   'installable': True,
}
Step 2: Add Fields to res.config.settings
Create a Python file inside your module (models/res_config_settings.py):
from odoo import models, fields
class ResConfigSettings(models.TransientModel):
   _inherit = 'res.config.settings'
   sale_filter_state = fields.Selection(
       [
           ('draft', 'Quotation'),
           ('sent', 'Quotation Sent'),
           ('sale', 'Sales Order'),
           ('done', 'Locked'),
           ('cancel', 'Cancelled')
       ],
       string="Sale Order Status for Filter",
       config_parameter='testing_settings.sale_filter_state'
   )
- config_parameter automatically stores the value in ir.config_parameter
- No need to write extra methods
Step 3: Create a Custom View
After defining the custom field in the settings model, the next step is to display it in the user interface. In Odoo 19, configuration settings are structured in a modular way, so we need to extend the existing settings view using XML.
Odoo allows you to use the concept of inheritance and extension in order to avoid changes to the existing forms. This ensures your customisation remains stable and upgrade-safe.
In this case, we will inherit the Sales Settings form and insert our custom field (sale_filter_state) inside the Sales section.
Create an XML file such as:
<!--module_name/views/res_config_settings_views.xml-->
<?xml version="1.0" encoding="utf-8"?>
<odoo>
   <!-- Sale Config Settings Inherit -->
   <record id="res_config_settings_view_form_inherit_sale_testing" model="ir.ui.view">
       <field name="name">res.config.settings.view.form.inherit.sale.testing</field>
       <field name="model">res.config.settings</field>
       <field name="inherit_id" ref="sale.res_config_settings_view_form"/>
       <field name="arch" type="xml">
           <xpath expr="//app[@name='sale_management']" position="inside">
               <block title="Sales Custom Testing Settings">
                   <setting string="Sale Order Status for Filter" help="Select a status to filter (Stored via config_parameter)">
                       <field name="sale_filter_state"/>
                   </setting>
               </block>
           </xpath>
       </field>
   </record>
</odoo>
In the above code:
- We inherit the existing Sales Settings view using inherit_id.
- The xpath expression targets the Sales configuration section (sale_management).
- A new block is added to group our custom settings logically.
- Inside the block, we define a setting that includes our custom field.
- The help attribute provides a clear explanation to the user about what the setting does.
This approach ensures that your custom field appears seamlessly within the Settings menu, maintaining consistency with Odoo’s UI structure.
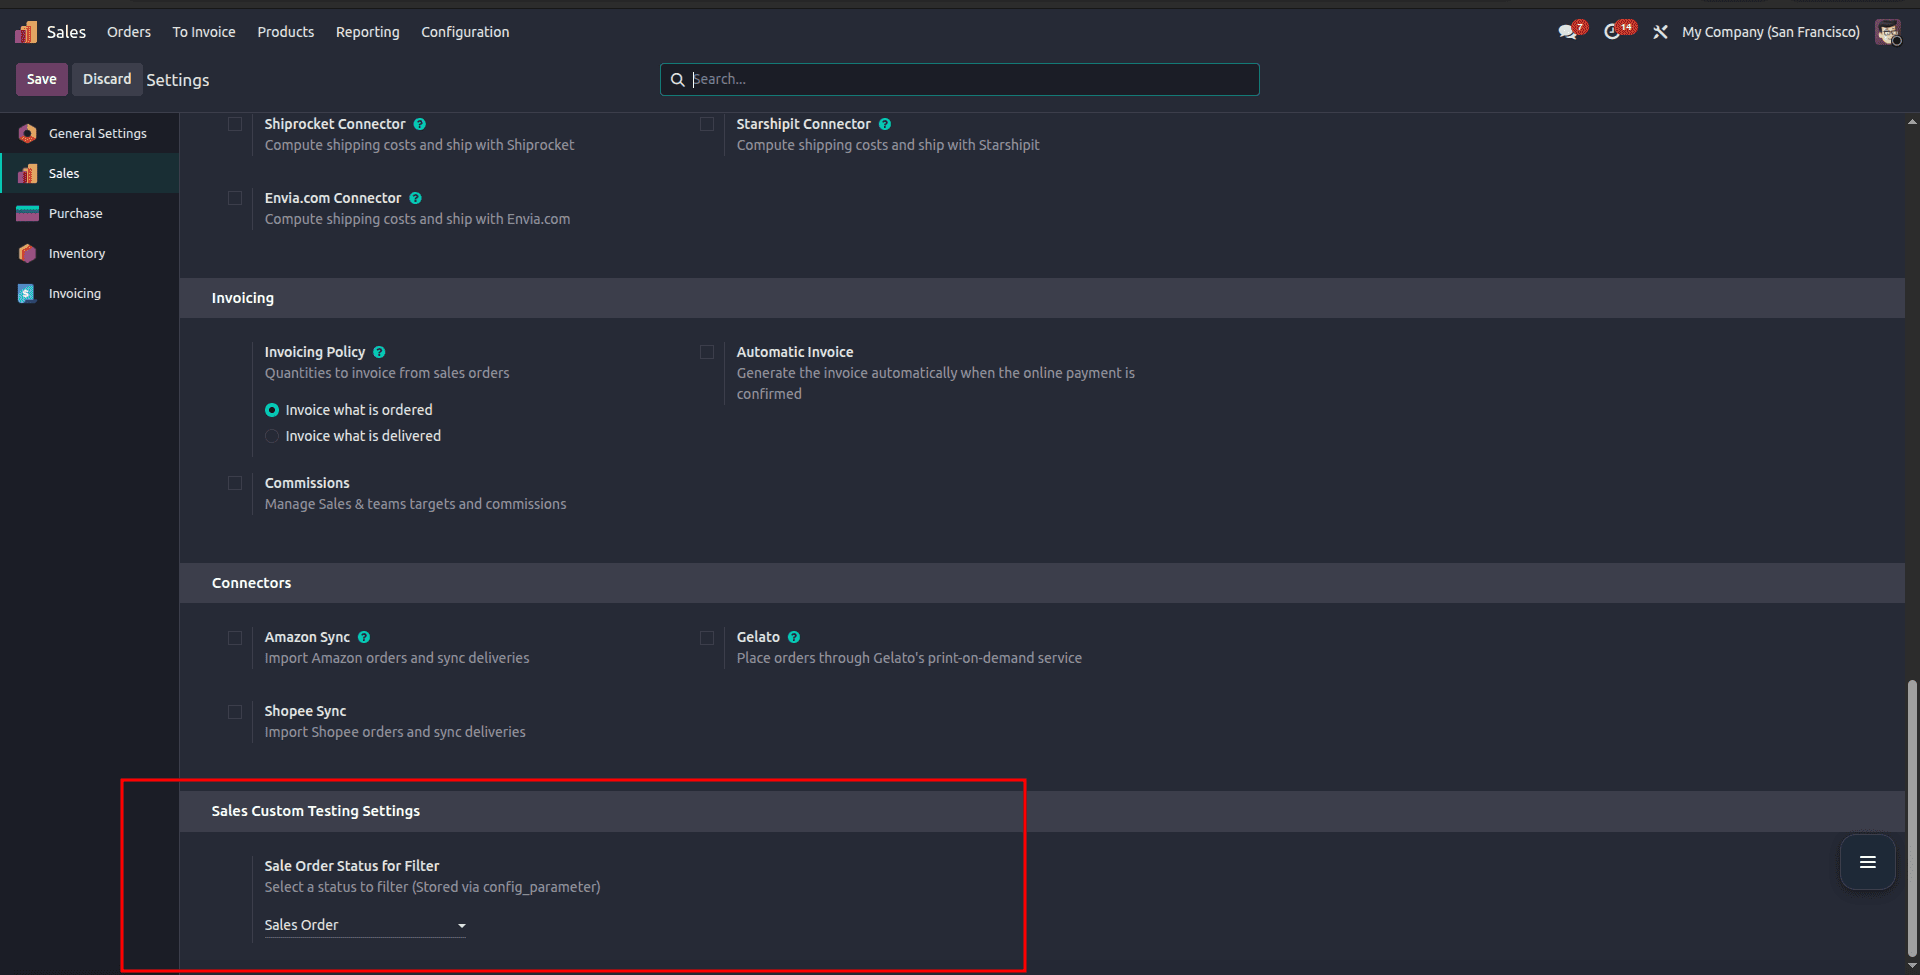
After completing the development, install or upgrade your module to see the result. Go to Sales > Configuration > Settings, where you will find a new section “Sales Custom Testing Settings” with the field “Sale Order Status for Filter.”
This shows how easily you can add custom fields to the Settings view in Odoo.
Step 4: Access and Use the Configuration Value in Code
Once the custom field is added to the settings and saved, the next step is to use that value in your business logic. In Odoo, fields defined with the config_parameter attribute are stored in the ir.config_parameter model. This means you won’t access them directly from res.config.settings, but instead retrieve them from system parameters.
To access the stored value, you can use the get_param() method:
param = self.env['ir.config_parameter'].sudo()
state = param.get_param('testing_settings.sale_filter_state')
Here, the key 'testing_settings.sale_filter_state' must match the config_parameter defined in your field.
Once retrieved, this value can be used anywhere in your code. For example, if you want to filter Sale Orders based on the selected state:
orders = self.env['sale.order'].search([
   ('state', '=', state)
])
Selecting a value in the settings does not automatically trigger any action. It simply stores the configuration. You need to explicitly use this value in your Python logic, such as filtering records, controlling workflows, or applying conditions in your custom features.
When to Use This Method
Use config_parameter when:
- You are storing simple values
- No processing is required
- The setting is global
Method 2: Using get_values() and set_values()
This method gives full control over how values are saved and retrieved.
As mentioned in Method 1, you first need to create a custom module. Once the module is set up, proceed with the following steps.
Step 2: Add Fields to res.config.settings without config_parameter
Create a Python file inside your module (models/res_config_settings.py):
from odoo import models, fields
class ResConfigSettings(models.TransientModel):
   _inherit = 'res.config.settings'
   purchase_filter_state = fields.Selection(
  	 [
      		('draft', 'RFQ'),
      	 	('sent', 'RFQ Sent'),
       	('to_approve', 'To Approve'),
       	('purchase', 'Purchase Order'),
       	('done', 'Locked'),
       	('cancel', 'Cancelled')
   	],
   	string="Purchase Order Status for Filter"
)
Step 3: Implement set_values() and get_values()
In some cases, using config_parameter is not enough—especially when you need more control over how values are stored or retrieved. This is where the set_values() and get_values() methods come into play in Odoo.
These methods are used to manually save and load configuration values from the ir.config_parameter model.
Why Use These Methods?
- To handle complex logic while saving settings
- To store multiple values together
- To control how data is written or read
- Useful when not using config_parameter directly in the field
def set_values(self):
   super(ResConfigSettings, self).set_values()
   self.env['ir.config_parameter'].sudo().set_param(
       'testing_settings.purchase_filter_state',
       self.purchase_filter_state
   )
def get_values(self):
   res = super(ResConfigSettings, self).get_values()
   value = self.env['ir.config_parameter'].sudo().get_param(
       'testing_settings.purchase_filter_state'
   )
   res.update(purchase_filter_state=value)
   return res
How It Works
- When the user clicks Save, set_values() stores the value in ir.config_parameter
- When the Settings page loads, get_values() retrieves the value and displays it
- This ensures the field retains its value across sessions
The addition of custom fields within the Sales Settings is considered an important aspect in Odoo development. This gives developers more freedom when designing modules because users can define the behavior of the application using the Settings screen without any changes in the code.
Knowing how data storage and retrieval occur is important for creating quality solutions. In most cases, config_parameter is an elegant solution that works efficiently without adding any extra code. But, in some situations, extra processing, validation, or manipulation of data may be necessary; here, you will need other techniques, including get_values() and set_values(). In most cases, config_parameter handles most cases, especially for newcomers in the field. But, as you gain experience, it becomes easy to shift to other options.
To read more about How to Add Custom Fields to Configuration Settings in Odoo 18, refer to our blog How to Add Custom Fields to Configuration Settings in Odoo 18.