In Odoo 19, OWL (Odoo Web Library) is the modern JavaScript framework used to build dynamic and reactive user interfaces inside Odoo. While OWL powers the standard Odoo web client, developers can also use it to create standalone applications that run independently from the main backend interface.
A standalone OWL application is useful when you want to build:
- A public-facing web app
- A kiosk or self-service screen
- A custom dashboard
Instead of loading inside the regular Odoo backend layout, a standalone OWL app is mounted on its own page and served through an Odoo controller, while still having access to Odoo’s backend services and session.
In this blog, we’ll see how to create a simple standalone OWL application in Odoo 19 and understand the basic structure required to make it work.
1. Create a new model StudentClass
class StudentClass(models.Model):
   _name = 'student.class'
   _description = 'Sample Model'
   _inherit = ['mail.thread', 'mail.activity.mixin']
   name = fields.Char(string='Student Name', required=True)
   description = fields.Text(string='Information')
   date = fields.Date(string='Start Date')
   active = fields.Boolean(string='Available', default=True)
   state = fields.Selection([
       ('draft', 'Draft'),
       ('confirmed', 'Confirmed'),
       ('done', 'Done')
   ], string='Status', default='draft', tracking=True)
2. Create the Root OWL Component
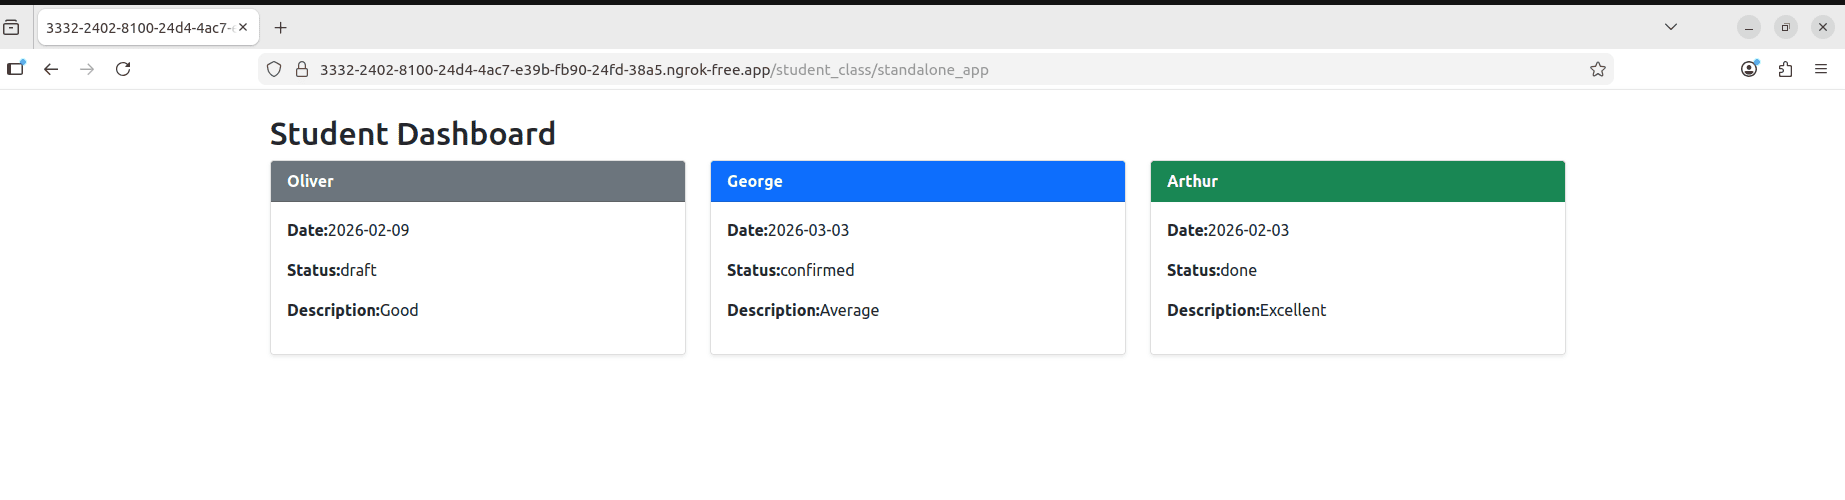
Create an XML template for your root UI in the student_class/static/src/standalone_app/root.xml path. In this file, create a new dashboard to display student details.
<?xml version="1.0" encoding="UTF-8"?>
<templates id="template" xml:space="preserve">
   <t t-name="student_class.StudentClassDashboard">
       <div class="container mt-4">
           <h2>Student Dashboard</h2>
           <div class="row">
               <t t-foreach="state.students" t-as="student" t-key="student.id">
                   <div class="col-md-4 mb-3">
                       <div class="card shadow-sm">
                           <div t-att-class="'card-header text-white ' + getStateColor(student.state)">
  <strong><t t-esc="student.name"/></strong>
</div>
 <div class="card-body">
  <p><strong>Date:</strong><t t-esc="student.date"/></p>
  <p><strong>Status:</strong><t t-esc="student.state"/></p>
  <p><strong>Description:</strong>
     <t t-esc="student.description"/></p>
          </div>
         </div>
        </div>
       </t>
      </div>
     </div>
   </t>
</templates>
Now create the JavaScript component that will render this template:
student_class/static/src/standalone_app/root.js
In this, we are accessing the global Odoo object. If students data exists, it is assigned to the component’s state
/** @odoo-module */
import { Component, onWillStart, useState } from "@odoo/owl";
import { useService } from "@web/core/utils/hooks";
export class StudentClassDashboard extends Component {
   setup() {
       this.state = useState({
           students: [],
       });
      onWillStart(async () => {
             if (odoo.students) {
                 this.state.students = odoo.students
             }
       });
   }
   getStateColor(state) {
       switch (state) {
           case "draft":
               return "bg-secondary";
           case "confirmed":
               return "bg-primary";
           case "done":
               return "bg-success";
           default:
               return "bg-light";
       }
   }
}
StudentClassDashboard.template = "student_class.StudentClassDashboard";
3. Mount the OWL App
OWL apps need startup code to mount them into the page.
student_class/static/src/standalone_app/app.js
/** @odoo-module */
import { whenReady } from "@odoo/owl";
import { mountComponent } from "@web/env";
import {StudentClassDashboard} from "./root.js";
whenReady(() => mountComponent(StudentClassDashboard, document.body));
This waits until Odoo’s environment is ready, then mounts your component into <body>.
4. Define Your Assets Bundle
In your module’s __manifest__.py, add an assets bundle including OWL and your JS files:
"assets": {
   'student_class.assets_standalone_app': [
       ('include', 'web._assets_helpers'),
       'web/static/src/scss/pre_variables.scss',
       'web/static/lib/bootstrap/scss/_variables.scss',
       ('include', 'web._assets_bootstrap'),
       ('include', 'web._assets_core'),
       'student_class/static/src/standalone_app/**/*',
   ],
},
This bundle ensures OWL, Bootstrap styles, and your scripts are bundled correctly.
5. Create a QWeb Template to Load the Bundle
You need an HTML page that includes your assets:
student_class/views/standalone_app.xml
<?xml version="1.0" encoding="UTF-8" ?>
<odoo>
   <template id="student_class.standalone_app">
       <html>
           <head>
               <script type="text/javascript">
                   var odoo = {
                   csrf_token: "<t t-nocache="The csrf token must always be up to date."  t-esc="request.csrf_token(None)"/>",
                   debug: "<t t-esc="debug"/>",
                   __session_info__:<t t-esc="json.dumps(session_info)"/>,
                   students:<t t-raw="students"/>,
                   };
               </script>
               <t t-call-assets="student_class.assets_standalone_app"/>
           </head>
           <body/>
       </html>
   </template>
</odoo>
This loads your assets bundle and ensures Odoo’s global odoo variable is initialized (needed for controllers and CSRF).
6. Create the HTTP Controller
Finally, create a Python controller to serve the page:
student_class/controllers/main.py
import json
from odoo.http import request, route, Controller
class StudentController(Controller):
   @route("/student_class/standalone_app", auth="public", type="http")
   def standalone_app(self):
       students = request.env['student.class'].search_read([],  ["name", "date", "state", "description"])
       return request.render(
           'student_class.standalone_app',
           {
               'session_info': request.env['ir.http'].get_frontend_session_info(),
               'students': json.dumps(students, default=str),
           }
       )
If we want to fetch data from the backend, we need to grant read access to the Public user for the respective model.
Then anybody can visit:
/student_class/standalone_app route
If you want to test your standalone OWL application from outside your local machine (for example, on a mobile device or for a client demo), you can use ngrok to expose your local Odoo server to the internet.
Add the following db_filter parameter to Odoo.conf file.
db_filter = ^your_database_name$
Building a standalone OWL application in Odoo allows you to create modern, dynamic interfaces outside the standard backend layout while still leveraging Odoo’s powerful backend services. By setting up a proper XML template, initializing the global Odoo object, loading the required asset bundle, and mounting your OWL component, you can create a fully functional custom dashboard or public-facing application, like kiosks, portals, and lightweight frontend applications.
To read more about An Overview of Advanced OWL Components In Odoo 19, refer to our blog Overview of Advanced OWL Components In Odoo 19.