In Odoo 18, customizing accounting reports is essential for businesses that need tailored financial insights. One of the most powerful customizations you can make is to add filters to accounting reports, allowing users to narrow down results based on specific criteria like accounts, dates, or other custom filters.
In this blog, we’ll guide you through the process of adding a customizable filter to accounting reports in Odoo 18, specifically the Account filter, which helps users filter reports by specific accounts.
In this blog, we will guide you through adding a custom account filter to accounting reports in Odoo. By configuring filter options for each report, you can make these filters easy to use directly within the Odoo reporting interface.
The first step in adding a custom filter is to modify the model. In this case, we will be adding a field to the account.report model, which is responsible for defining the accounting reports in Odoo. This field will serve as the custom filter, allowing users to select specific accounts when generating financial reports.
We need to add a Boolean field to the account.report model. This field will control whether the Account filter is applied to the report. Create a file named account_report.py inside your models folder. In this file, we need to inherit the account.report model and add the filter_account field.
from odoo import api, fields, models

class AccountReport(models.Model):
   _inherit = 'account.report'
filter_account = fields.Boolean(
   string="Accounts",
   compute=lambda x: x._compute_report_option_filter('filter_account'),
   readonly=False, store=True,
   depends=['root_report_id', 'section_main_report_ids'],
)
The filter_account field is a Boolean that determines whether the account filter is applied to the report. The compute property makes sure that this field is calculated automatically using the method _compute_report_option_filter('filter_account'), which checks if the filter should be active. The depends property ensures that the field is recalculated whenever related fields like root_report_id or section_main_report_ids change.
To ensure that the changes we made to the model are recognized by Odoo, we need to import our account_report.py file in the __init__.py file. The __init__.py file is used to initialize the Python modules in your custom module.
In the models folder, there is another __init__.py file. You need to import your model file (like account_report.py) into this file.
from . import account_report
In the root of your module, there is also an __init__.py file. You need to import the models folder in this file so that all models are loaded together.
from . import models
After adding the filter_account field to the model, the next step is to make this field visible and usable in the Odoo user interface. We do this by modifying the XML views.
We need to create or modify an XML file that defines how the filter_account field will appear in the user interface. In this case, we'll add it to the accounting report form view. We need to create a xml like account_report_views.xml in the views directory.
Here’s how to add it in the XML view:
<?xml version="1.0" encoding="utf-8"?>
<odoo>
   <record id="account_report_form" model="ir.ui.view">
       <field name="name">account.report.form.view.inherit.account.filter</field>
       <field name="inherit_id" ref="account_reports.account_report_form"/>
       <field name="model">account.report</field>
       <field name="arch" type="xml">
           <xpath expr="//field[@name='filter_partner']" position="after">
               <field name="filter_account"/>
           </xpath>
       </field>
   </record>
</odoo>
After placing the view file in the correct folder, we need to tell Odoo to load it by adding it to the data section of the manifest.py file.
'data':[
   'views/account_report_views.xml',
],
This is the first step in configuring the Account filter option within the accounting reports. By adding the filter_account field to the account.report model, we have successfully introduced the option for the Account filter in each accounting report.
Now, users will be able to see and configure the Account filter option directly within the report interface. This allows for greater flexibility, as the filter can be customized based on the specific accounts they want to include in their reports.
After adding the field for the filter in the model, the next step is to define the logic for how the filter options are initialized and handled. This is achieved through two important methods: _init_options_account and _get_options_domain. It sets up the logic for managing and applying the account filter based on the user’s selection. So we need a python function to manage and apply the selected accounts in the reports in the account.report model.
def _init_options_account(self, options, previous_options):
   if not self.filter_account:
       return
   options['account'] = True
   previous_account_ids = previous_options.get('account_ids') or []
   selected_account_ids = [int(partner) for partner in previous_account_ids]
   # search instead of browse so that record rules apply and filter out the ones the user does not have access to
   selected_accounts = selected_account_ids and self.env['account.account'].with_context(active_test=False).search([('id', 'in', selected_account_ids)]) or self.env['account.account']
   options['selected_account_ids'] = selected_accounts.mapped('name')
   options['account_ids'] = selected_accounts.ids
The _init_options_account method is responsible for setting up the filter options based on the user's selection. This method checks whether the filter is enabled and then retrieves the selected accounts, applying any necessary access restrictions.
Once we have initialized the options for the account filter in the report with the _init_options_account method, the next step is to build the domain that will be applied to filter the report data based on the selected accounts. This is where the _get_options_accounts_domain method comes into play.
@api.model
def _get_options_accounts_domain(self, options):
   domain = []
   if options.get('account_ids'):
       account_ids = [int(account) for account in options['account_ids']]
       domain.append(('account_id', 'in', account_ids))
   return domain
The _get_options_accounts_domain method is responsible for creating a domain to filter the report data based on the selected accounts. It first checks if any account IDs are present in the filter options. If accounts are selected, it converts them into integers and creates a condition to filter the report data by those account IDs. This ensures that the report will only show data for the accounts chosen by the user. Finally, the method returns the domain, which will be applied when fetching the data for the report.
After creating the account filter domain using the _get_options_accounts_domain method, the next step is to merge this domain with the existing report filters. For that, we define a function called _get_options_domain.
def _get_options_domain(self, options, date_scope):
   self.ensure_one()
   domain = super()._get_options_domain(options, date_scope)
   domain += self._get_options_accounts_domain(options)
   return domain
This function is used to extend the default domain applied to the report data. It first calls the base method (using super()) to get the standard domain, which may include filters like date range, journal, or partner. Then, it appends the account filter domain we created earlier to this list.
By combining these two sets of filters, we ensure that the report will only show data that matches both the default criteria and the specific accounts selected by the user.
Now that we’ve completed the backend logic for the account filter, the next step is to make the filter available in the report's user interface. For this, we use a QWeb template to define how the account filter will appear and function in the UI.
The goal here is to extend the existing filter section of the accounting reports and insert our custom account filter dropdown. We achieve this by inheriting and extending an existing template that controls the filters in the report UI.
Following is the code that we’ll use to achieve this:
<?xml version="1.0" encoding="UTF-8" ?>
<templates>
   <t t-name="account_filter.accountingReportAccountFilter"
          t-inherit="account_reports.AccountReportFiltersCustomizable"
      t-inherit-mode="extension">
       <xpath expr="//t[@t-if='controller.filters.show_period_comparison']"
              position="after">
           <t t-if="'account' in controller.options">
               <div id="filter_account" class="filter_account">
                   <t t-call="account_reports.AccountReportFilterAccounts"/>
               </div>
           </t>
       </xpath>
   </t>
</templates>
The purpose of this code is to add a custom account filter to the accounting report's user interface. It inherits the existing report filter template and inserts the new account filter in the UI using an XPath expression. The code ensures that the filter appears only if it’s enabled on the backend. It also displays a dropdown menu where users can select accounts to filter the report. The dropdown is rendered by calling another template that defines how the accounts are displayed and selected. The purpose of calling
<t t-call="account_reports.AccountReportFilterAccounts"/> is to render the custom account filter dropdown in the report’s user interface. This tag references another template, account_reports.AccountReportFilterAccounts, which we define separately.
<?xml version="1.0" encoding="UTF-8" ?>
<templates>
   <t t-name="account_reports.AccountReportFilterAccounts">
       <Dropdown
           menuClass="'account_report_filter account'">
           <button class="btn btn-secondary">
               <i class="fa fa-folder-open me-1"/>Accounts
           </button>
           <t t-set-slot="content">
               <div class="dropdown-item gap-2 align-items-center">
                   <label>Accounts</label>
                   <MultiRecordSelector t-props="getMultiRecordSelectorProps('account.account', 'account_ids')"/>
               </div>
           </t>
       </Dropdown>
   </t>
</templates>
This template contains the structure for the dropdown menu, allowing users to select one or more accounts for filtering the report. The template uses Odoo's Dropdown component and a MultiRecordSelector to let users choose accounts easily. By calling this template in the main view, we make the account filter interactive and visible in the report interface, enabling users to filter the report based on selected accounts.
Now that we have defined the necessary views and templates for the account filter, the next step is to make sure these files are loaded properly in Odoo. To do that, we need to include them in the __manifest__.py file of our custom module.
The structure of manifest file is as follows:
{
'name': 'Account filter in Financial report',
'version': '18.0.1.0.0',
'depends': ['account', 'account_reports'],
'data': [
'views/account_report_views.xml',
],
'assets': {
'web.assets_backend': [
'account_filter/static/src/components/**/*',
],
},
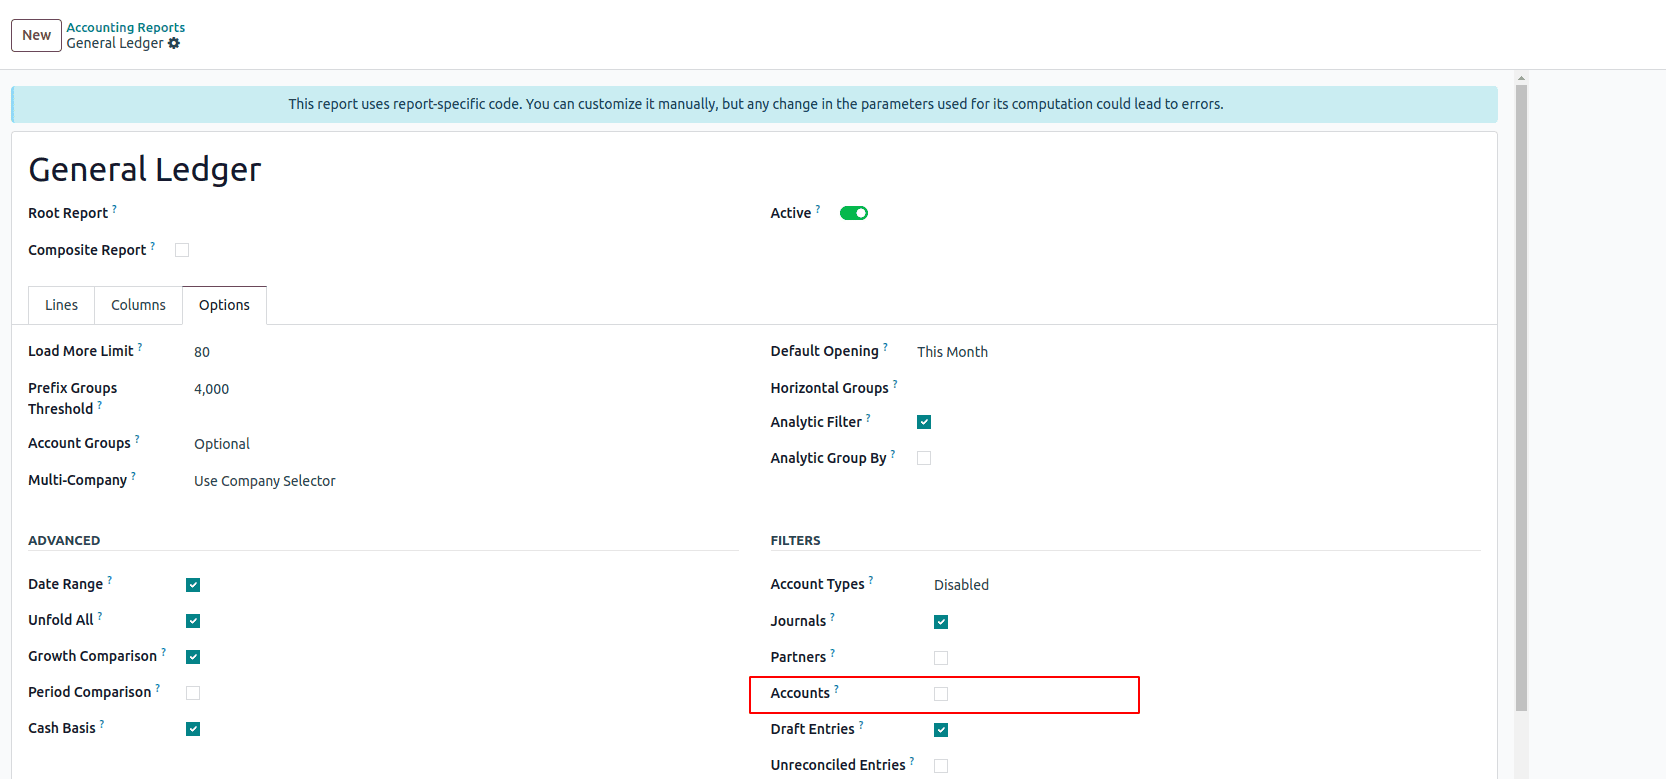
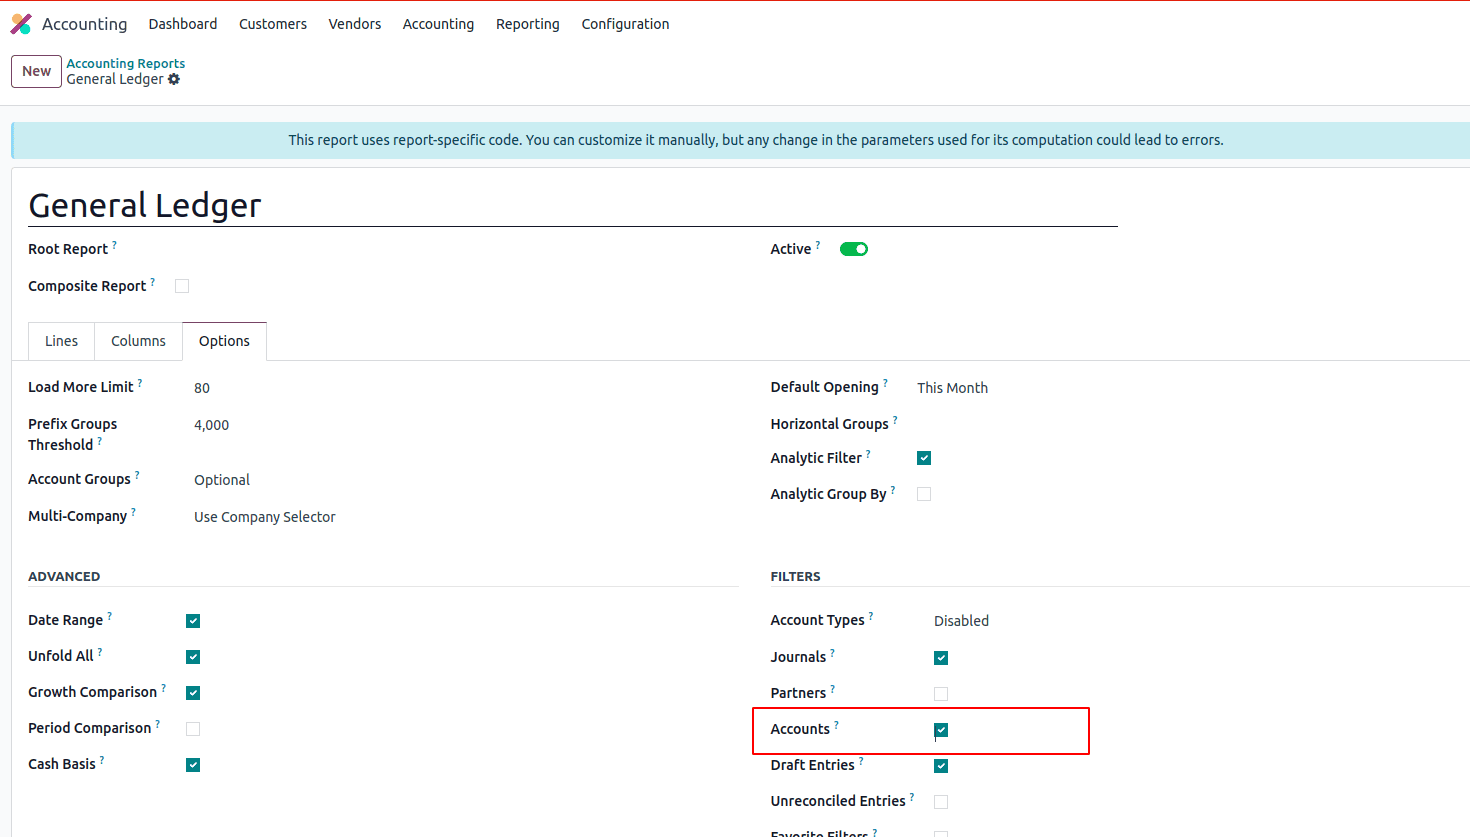
}After successfully installing the module, you will see an option to enable the Account Filter in each accounting report. This allows you to filter reports by accounts directly from the report interface.
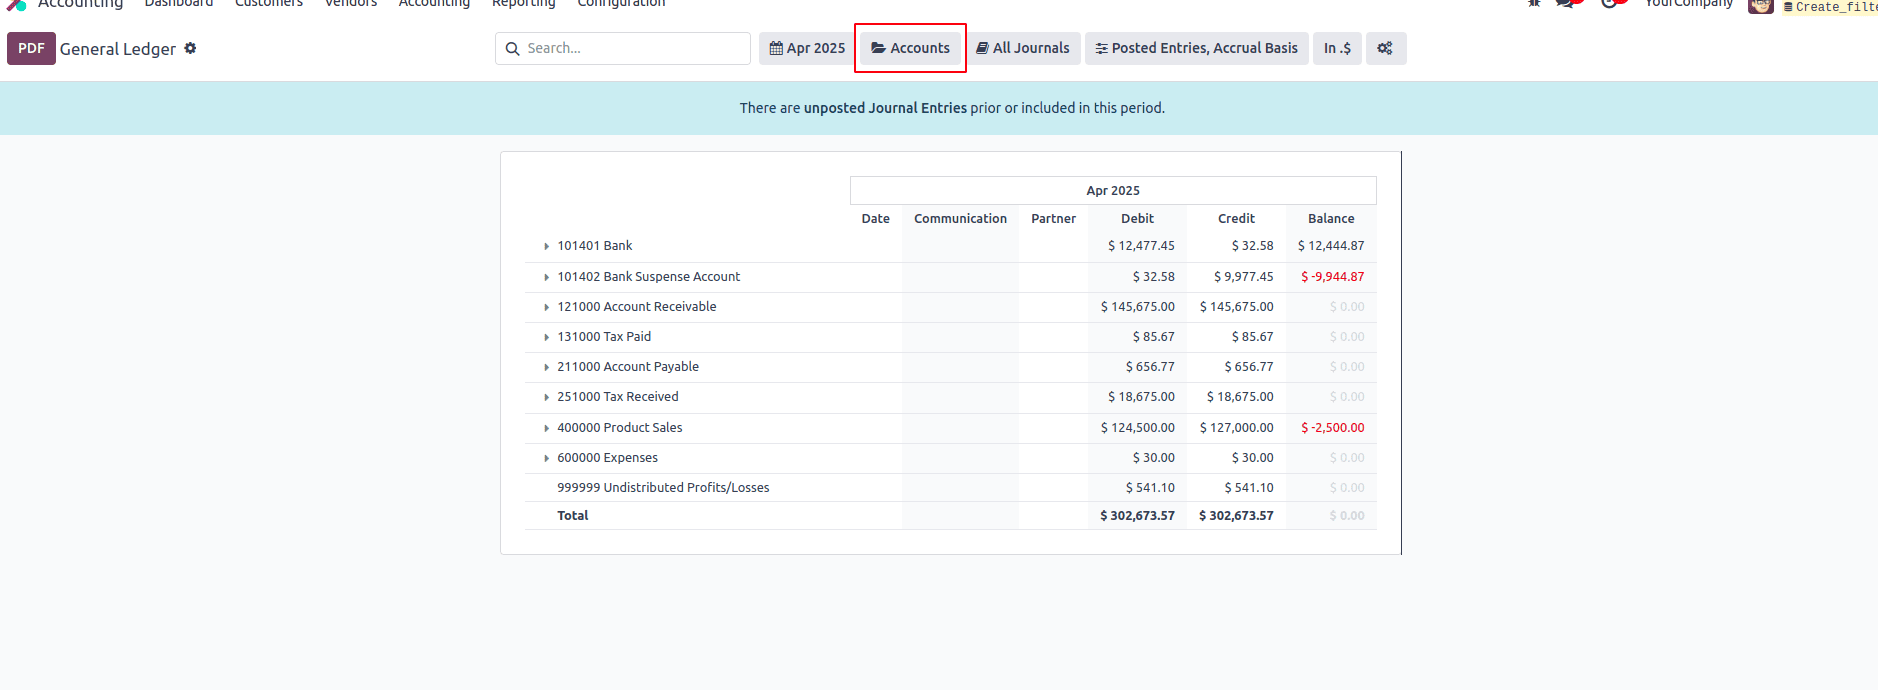
Once you enable the Account Filter option, you will see the filter appear directly in the corresponding accounting report.
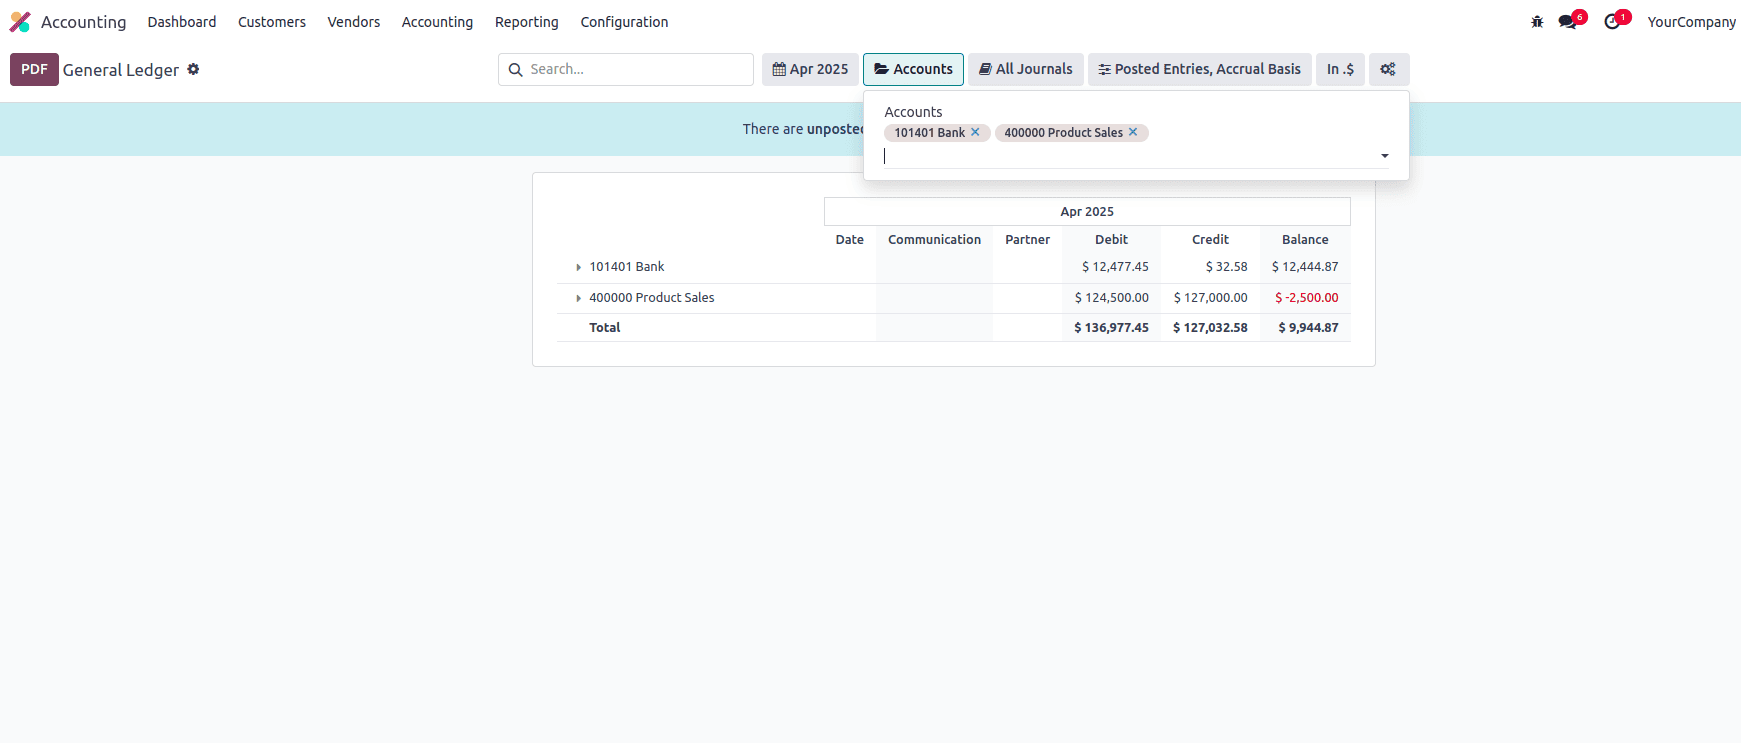
Once the Account Filter is enabled, you can select the corresponding accounts directly from the filter dropdown, and it filters the report correspondingly.
With these steps completed, you now have the ability to filter accounting reports by specific accounts, providing a more focused and personalized way to analyze financial data. This feature enhances the flexibility of Odoo's reporting system, making it easier to generate meaningful insights based on account-specific data.
To read more about An Overview of Odoo 17 Accounting Reports, refer to our blog An Overview of Odoo 17 Accounting Reports.